Loading ...
Loading ...
4 TOLL FREE: 1-800-798-7398 5www.sharkclean.com
MAXIMIZING THE LIFE OF YOUR
BATTERY
1 To enhance battery life, this vacuum
is equipped with an advanced feature
that will shut off the vacuum when
the battery is almost fully discharged.
If the vacuum shuts off while in use,
charge the unit until the complete
oval around the power button is
illuminated, indicating a full charge.
2 Charge the vacuum for 7 hours
before initial use. After initial use,
each recharge will take 4 to 7 hours.
A complete oval around the power
button will illuminate when the charge
is complete.
3 The precision charger monitors the
batteries so you don’t have to. A
complete charge can take as little as
4 hours, but may take up to 7 hours
because the charger monitors battery
properties to extend battery life.
Leaving the unit in the charger past
the complete charge time will NOT
harm the batteries.
4 If the vacuum has never been used
or has not been used for an extended
period of time, it will take 3 to 5
complete charge and run down cycles
to realize the full operational time of
the vacuum.
5 Do not store or charge in areas of high
temperature or humidity.
6 Use only the charge adapter supplied
with this unit, marked with “For
SV1106 Model Only”. If other chargers
are used, the battery can fail causing
damage to the battery, to the vacuum,
or to personal property.
3 This unit is equipped with a
precision charger that monitors
the batteries to ensure a full
charge for every use and to extend
the life of the batteries. Depending
on usage, the time for a full
charge is 4 to 7 hours.
4 One half of the blue LED light
around the power button will
illuminate while the unit is
charging. When the charge is
complete, the complete oval will
be illuminated. (fig. 4)
If the charging light does not
illuminate, ensure that the
charging adapter is plugged
in properly to the wall outlet
and to the back of the charging
base. Also ensure that the
unit is properly seated in the
charging base.
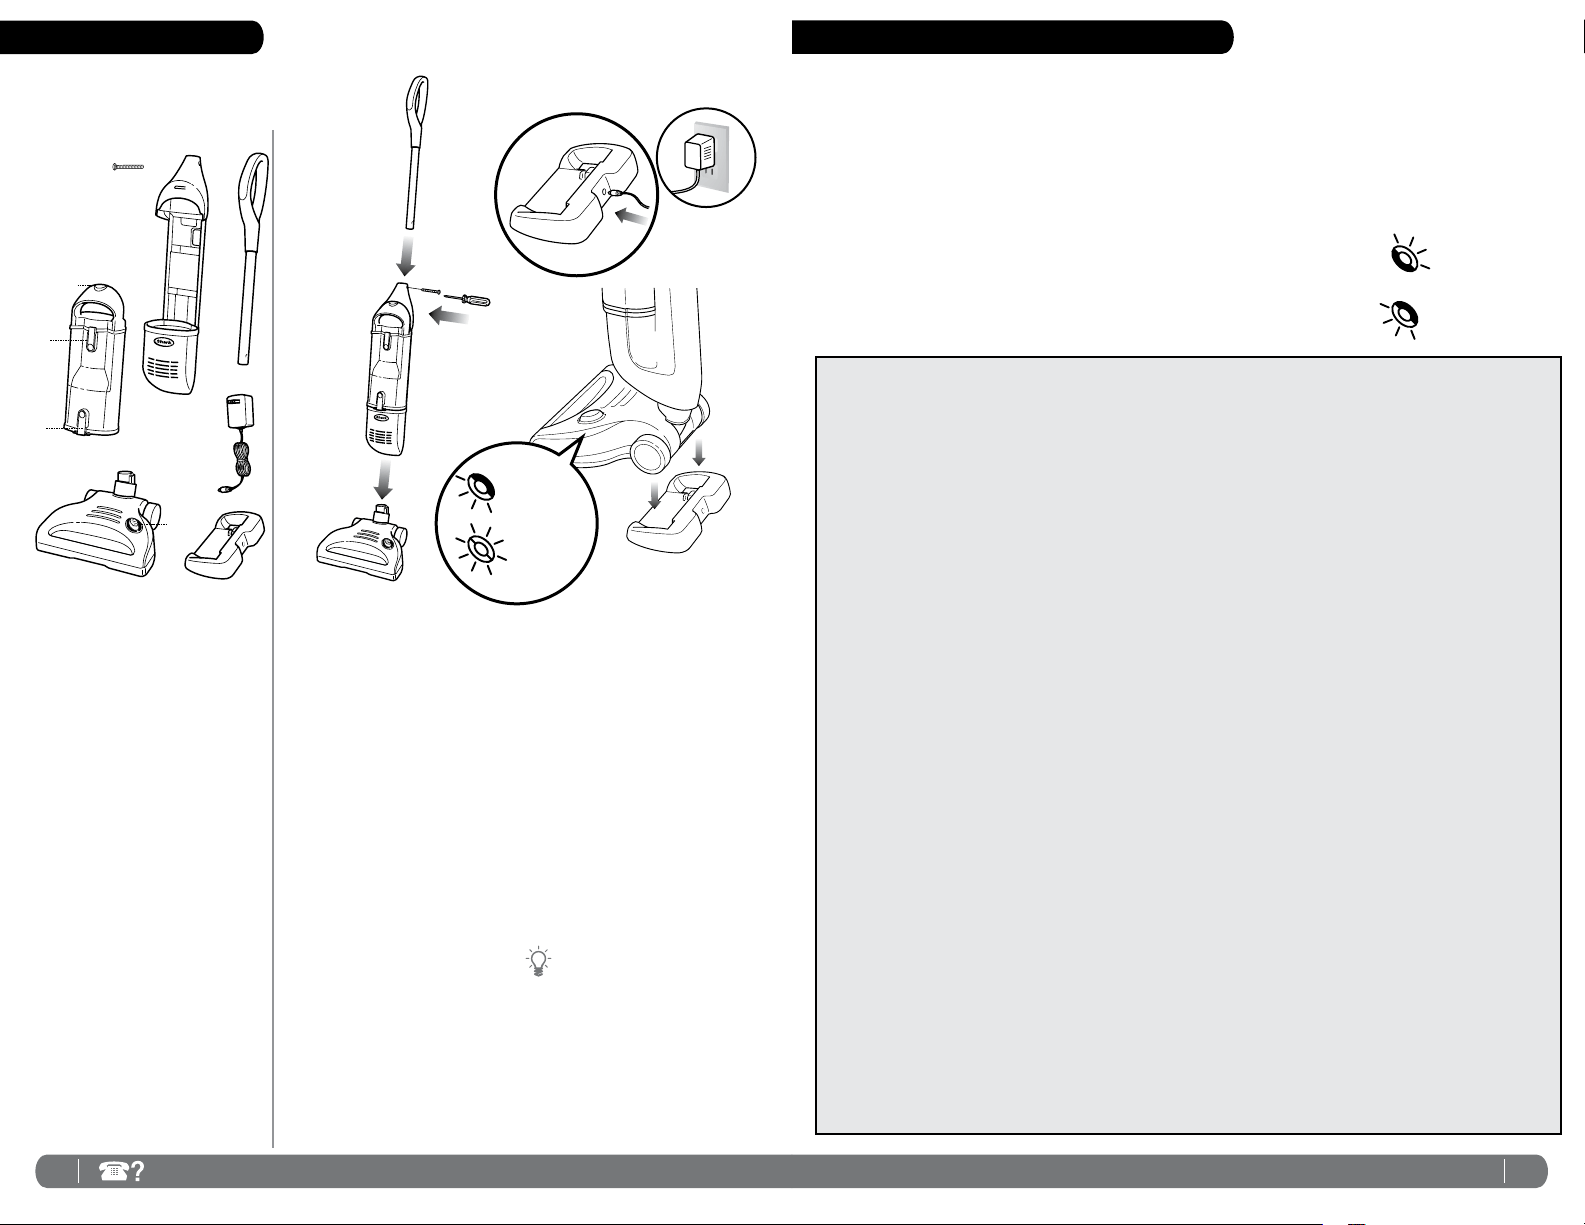
ASSEMBLY
1 Insert the vacuum body into the
motorized brush. (fig. 1a)
2 Insert the handle pole into the top
of the main body. (fig. 1b)
3 Use a screwdriver to secure the
handle assembly in place with the
bolt (taped to the handle during
shipping). (fig. 1c)
4 Ensure that the dust cup is
securely in place. (fig. 1d)
CHARGING
1 The charge adapter plug will fit
into the charging base only one
way. Insert the charging adapter
plug by aligning the arrow on the
plug with the arrow next to the
charging jack on the back of the
charging base. (fig. 2)
2 Place the vacuum on the charging
base to charge. Charge the unit
for 7 hours before using the
vacuum for the first time. (fig. 3)
VACUUM COMPONENTS
A Main Body
B Handle
C Screw
D Dust Cup
E Dust Cup Release
F Upper Dust Cup Door Release
G Lower Dust Cup Door Release
H Motorized Brush
I Power Button
J Charging Adapter
K Charging Base
TECHNICAL SPECIFICATIONS:
Volts: 14.4
ASSEMBLY
A
H
I
J
K
E
F
D
G
B
C
USING YOUR SHARK
®
CORDLESS VACUUM
USE YOUR CORDLESS VACUUM
TO CLEAN BARE FLOORS,
CARPETS AND RUGS.
1 Place your foot lightly on the top
of the motorized brush and tilt the
handle back to release the unit
from the locked upright position.
• Lightly press the power button
on the motorized floor brush
with your foot to turn the
vacuum on to a high speed
optimized for carpet cleaning.
On this setting, the vacuum
will run for approximately 12
minutes.
• Press the button again to switch
to a lower speed optimized for
bare floor cleaning. On this
setting the vacuum will run for
approximately 17 minutes. The
LED lights around the power
button will indicate your speed.
• Press the button again to turn
the unit off.
fig. 2
fig. 1
fig. 3
BATTERY RECONDITIONING
If you experience shorter run time over the
life of the vacuum, perform the following
battery reconditioning steps. These
steps can also be performed as monthly
maintenance for maximum battery life.
1 Charge the vacuum for a minimum of 7
hours.
2 Run the vacuum until it turns itself off.
3 Charge the vacuum for a minimum of 7
hours.
BATTERY REMOVAL, REPLACEMENT
AND DISPOSAL
The cordless vacuum is powered by Ni-Mh
batteries, which must be recycled or
disposed of properly in accordance
with state, federal and local laws. If
uncertain as to how to remove the battery
pack, we suggest that you take your
vacuum to a reputable small appliance
service technician to have this service
performed.
BATTERY REMOVAL
1 Ensure that the unit is Off.
2 Never open the battery compartment
except to replace or dispose of the
battery pack.
3 The battery door is on the bottom of
the floor nozzle. Turn the unit over and
push the sliding tab located next to the
battery door to the unlock position.
Slide and lift the battery door off of the
nozzle.
4 Remove the battery pack by pulling on
the battery strap.
5 Grasp the white connector terminals
and push down on the lever with your
thumb. Pull to disconnect.
BATTERY REPLACEMENT
1 Push the connector terminals together
until they click into place.
2 Replace the new battery pack into the
battery compartment, taking care to
tuck the wiring completely in so that
the wiring does not interfere with the
battery access door.
3 Place the battery door onto the bottom
of the nozzle, slide it back into place
and move the sliding tab next to the
door to the lock position.
CAUTION:
• Use only with battery pack supplied.
• Never use ordinary batteries for
replacement as these may leak and
damage your vacuum
• Do not attempt to remove the battery
pack from the unit to charge.
• Never throw the battery pack or the
appliance into a fire or incinerate it.
• Do not remove or damage the battery
casing.
• Do not place the batteries on metal
surfaces.
• Do not touch metal parts of the
batteries together as the batteries will
overheat.
Call customer service at 1 (800) 798-7398 or visit our web site at www.sharkclean.com to order a replacement battery pack.
a
b
c
d
fig. 4
IMPORTANT: The indicator light
around the power button will
flash if the brush roll stops
due to a jam. This feature is
designed to protect the Lifetime
Belt that powers the brushroll.
See “Restarting After a Jam” on
page 8.
Charging
Charge
Complete
BARE FLOOR
CARPET
Loading ...
Loading ...
Loading ...