User Manual
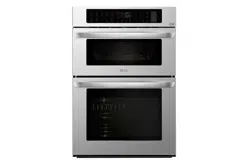
PRODUCT OVERVIEW
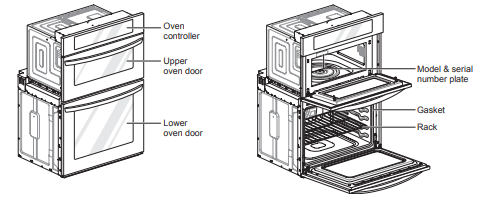
Parts
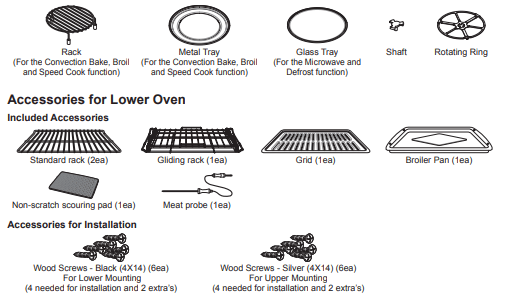
Accessories
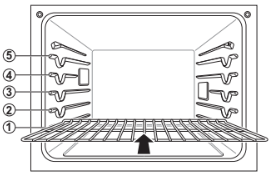
Accessories for Upper Oven
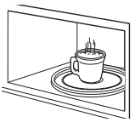
The turntable rotates in both directions to help food cook more evenly. Do not operate the microwave oven without the glass tray in place.
OPERATION
Control Panel Overview

UPPER OVEN
1 Upper Timer On/Off
Use to set or cancel the timer of the upper oven.
2 Upper Light
Use to turn the oven lights of the upper oven on and off.
3 Upper Clear/Off
Use to stop cooking, cancel settings of the upper oven.
4 Microwave
Use to select the Microwave function of the upper oven.
5 Conv. Bake
Use to select the Convection Bake function of the upper oven. 6 Broil Use to select the Broil function of the upper oven.
7 Power Level
Use to select a cooking power level.
8 Popcorn
Use to select the Popcorn function of the upper oven. 9 Defrost Use to select the Defrost function of the upper oven.
10 Speed Cook
Use to select the Speed Cook function of the upper oven.
11 Sensor Cook
Use to select the Sensor Cook function of the upper oven.
12 More Mode
Use to select the More Mode function of the upper oven.
13 +30 seconds
Use to add 30 seconds of cooking time each time you touch it.
LOWER OVEN
14 Lower Timer On/Off
Use to set or cancel the timer of the lower oven.
15 Lower Light
Use to turn the oven lights of the lower oven on and off.
16 Lower Clear/Off
Use to stop cooking, cancel settings of the lower oven. Press and hold button for three seconds to activate LOCKOUT.
17 Conv. Bake
Use to select the Convection Bake function of the lower oven.
18 Conv. Roast
Use to select the Convection Roast function of the lower oven.
19 Bake
Use to select the Bake function of the lower oven.
20 Broil
Use to select the Broil function of the lower oven.
21 Self Clean
Use to select the Self Clean function of the lower oven.
22 Steam Bake
Use to select the Steam Bake function of the lower oven.
23 Steam Roast
Use to select the Steam Roast function of the lower oven.
24 Probe
Use to select the Probe function of the lower oven.
25 More Mode
Use to select the More Mode function of the lower oven.
26 EasyClean®
Use to select the Easy Clean function of the lower oven.
COMMON
27 Clock
Use to set the time of day. Press and hold button for three seconds to select and adjust oven settings.
28 Steam Level
Use to select and adjust steam level.
29 Cook Time
Use to set the length of the cook time. (Bake, Conv. Bake/Roast only)
30 Start Time
Use to set delay time. (Bake, Conv. Bake/Roast, Self Clean only)
31 Number Pads
Use to enter a temperature and all times.
32 Remote Start
Use to select the Remote Start function. Press and hold button for three seconds to connect it to a Wi-Fi network.
33 Start
Use to START all functions in the oven. 34 Smart Diagnosis™ Use with the Smart Diagnosis feature.
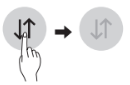
Flashing Time
If your oven displays a flashing clock, touch Clock and reset the time, or touch any key to stop the flashing.
Changing Oven Settings
Clock
The clock must be set to the correct time of day in order for the automatic oven timing functions to work properly.
1 Touch Clock. The display shows CLO in red.
2 Touch the numbers to enter the time. For example, to set the clock for 10:30, touch the numbers: 1, 0, 3 and 0.
3 Touch Start.
Timer On/Off
The Upper or Lower Timer On/Off serves as an extra timer in the kitchen that beeps when the set time has run out. It does not start or stop cooking. The Upper or Lower Timer On/Off feature can be used during any of the other oven control functions. The Upper and Lower Timer can be operated independently of each other.
Setting the Timer
For example, to set 5 minutes
1 Touch Upper Timer On/Off or Lower Timer On/ Off once. 0:00 appears and Timer flashes in the display.
2 Touch 5. 0:05 appears in the display.
3 Touch Timer On/Off to start the Timer. The remaining time countdown appears in the display.
NOTE If Upper Timer On/Off or Lower Timer On/Off is not touched, the timer returns to the time of day.
4 When the set time runs out, End shows in the display. The indicator tones sound every 15 seconds until Upper Timer On/Off or Lower Timer On/Off is touched.
Canceling the Timer
1 Touch Upper Timer On/Off or Lower Timer On/Off once. The display returns to the time of day
Settings
Press and hold Clock key for three seconds to select and adjust oven settings.
The Setting key allows you to:
- set the hour mode on the clock (12 or 24 hours)
- enable/disable convection auto conversion
- adjust the oven temperature
- select display language
- activate/deactivate the preheating alarm light
- set the beeper volume
- switch the temperature scale between Fahrenheit and Celsius
- disable/enable demo mode
Setting the Hour Mode
The control is set to use a 12-hour clock. To reset the clock to 24-hour mode, follow the steps below.
- Touch and hold Clock until CLO appears in the display.
- Touch 1 to select a 12-hour clock, or 2 to select a 24-hour clock.
- Touch Start to accept the change.
Setting Convection Auto Conversion (Only for Lower Oven)
When Conv. Bake and Conv. Roast are selected, Convection Auto Conversion automatically converts the standard recipe temperature entered to a convection temperature by subtracting 25 °F / 14 °C. This auto-converted temperature shows on the display. For example, select Conv. Bake, enter 350 °F, and 325 °F shows on the display after preheat.
Convection Auto Conversion is enabled by default. To change the setting, follow these instructions.
- Touch and hold Clock until CLO appears in the display. Then touch Clock repeatedly until Auto appears in the display.
- Touch 1 to enable or 2 to disable auto conversion.
- Touch Start to accept the change.
Adjusting the Oven Temperature (Only for Lower Oven)
Your new oven may cook differently from the one it replaced. Use your new oven for a few weeks to become more familiar with it before changing the temperature settings. If after familiarizing yourself with the new oven, you still think that it is too hot or too cold, you can adjust the oven temperature yourself.
NOTE
To begin, either raise or lower the thermostat 15 °F (8 °C). Try the oven with the new setting. If the oven still needs adjustment, raise or lower the thermostat again, using the first adjustment as a gauge. For example, if the adjustment was too much, raise or lower the thermostat 10 °F (5 °C). If the adjustment was not enough, raise or lower the thermostat 20 °F (12 °C). Proceed in this way until the oven is adjusted to your satisfaction.
- Touch and hold Clock until CLO appears in the display. Then touch Clock repeatedly until L_AJ appears in the display.
- Use the number keys to enter the number of degrees you want to adjust the oven temperature.
- Adjust the temperature either up or down by touching Clock repeatedly to toggle between plus (+) or minus (-).
- Touch Start to accept the change.
NOTE
- This adjustment does not affect the broiling or Self Clean temperatures. The adjustment is retained in memory after a power failure. The oven temperature can be increased (+) or decreased (-) as much as 35 °F or 19 °C.
- Once the temperature is increased or decreased, the display shows the adjusted temperature until it readjusts.
Selecting the Display Language
The oven control is set to display in English but can be changed to display in Spanish or French.
- Touch and hold Clock until CLO appears in the display. Then touch Clock repeatedly until Lng appears in the display.
- Touch 1 for English, 2 for Spansh, or 3 for French.
- Touch Start to accept the change.
Turning the Preheat Alarm Light On/Off (Only for Lower Oven)
When the oven reaches its set-temperature, the preheating alarm light flashes 5 times or until the oven door is opened.
You can activate or deactivate the preheating alarm light.
- Touch and hold Clock until CLO appears in the display. Then touch Clock repeatedly until PrE appears in the display.
- Touch 1 to turn on and 2 to turn off the alarm.
- Touch Start to accept the change.
Adjusting the Beeper Volume
- Touch and hold Clock until CLO appears in the display. Then touch Clock repeatedly until BEEP appears in the display.
- Touch 1 for Loud, 2 for Low, and 3 for Mute.
- Touch Start to accept the change.
Selecting Fahrenheit or Celsius
Set the oven temperature display to show either Fahrenheit (°F) or Celsius (°C) units. The oven defaults to Fahrenheit unless changed by the user.
- Touch and hold Clock until CLO appears in the display. Then touch Clock repeatedly until Unit appears in the display.
- Touch 1 for °F (Fahrenheit) or 2 for °C (Celsius).
- Touch Start to accept the change.
Demo Mode
Demo Mode for showroom use only. The oven will not heat up.
- Touch and hold Clock until CLO appears in the display. Then touch Clock repeatedly to select demo mode.
- Touch 1 to enable and 2 to disable the demo mode.
- Touch Start to accept the change.
NOTE
- When Demo Mode is on, the appliance will not heat up.
- The oven Demo Mode icon appears in the display if the Demo Mode is on.
Lockout
The Lockout feature automatically locks the lower oven door and prevents most oven controls on both ovens from being turned on. It does not disable the clock, timer or the interior oven light.
- Touch and hold Lower Clear/Off for three seconds.
- The lock melody sounds, OVEN LOCKOUT appears in the display and the lock blinks in the display.
- Once the oven door is locked, the lock indicator stops blinking and remains on.
- To deactivate the Lockout feature, touch and hold Lower Clear/Off for three seconds. The unlock melody sounds and the door and the controls unlock.
Start Time (Delayed Timed Cook)
The automatic timer of the Delayed Timed Cook function turns the oven on and off at the time you select. This feature can be used with the Bake, Conv. Bake and Conv. Roast modes.
Setting a Delayed Timed Cook
For example, to bake at 300 °F and delay the start of baking until 4:30, first set the clock for the correct time of day.
- Touch Bake. 350 °F appears in the display.
- Set the temperature: touch 3, 0 and 0.
- Touch Cook Time and set the baking time.
- Touch Start Time.
- Set the start time: touch 4, 3 and 0 for 4:30.
- Touch Start. A short beep sounds and Delay Timed and the start time appear in the display. The oven begins baking at the set start time.
NOTE
- To cancel the Delayed Timed Cook function, touch Clear/Off at any time.
- To change the cooking time, repeat step 3 and touch Start.
- If the oven clock is set as a 12-hour clock, you can delay the cook time for 12 hours. If the oven clock is set as a 24-hour clock, you can delay the cook time for 24 hours.
The oven will continue to cook for the set amount of time and then turn off automatically. When the cooking time has elapsed:
- End and the time of day show in the display.
- The cook end indicator tone sounds every 60 seconds until Clear/Off is touched
Cook Time (Timed Cook)
Set the oven to cook for a specific length of time using the Timed Cook feature. This feature can only be used with the Speed Cook, Bake, Conv.Bake and Conv.Roast modes.
Setting the Cook Time Function
For example, to bake at 300 °F for 30 minutes, first set the clock to the correct time of day.
- Touch Bake. 350 °F appears in the display.
- Set the temperature. Touch 3, 0 and 0.
- Touch Cook Time. Timed flashes in the display. Bake, 0:00 and 300 °F appear in the display.
- Set the baking time: touch 3 and 0 (for 30 minutes). The baking time can be set for any amount of time between 1 minute and 11 hours and 59 minutes.
- Touch Start.
The oven will continue to cook for the set amount of time and then turn off automatically. When the cooking time has elapsed:
- END OF CYCLE and the time of day show in the display.
- The cook end indicator tone sounds every 60 seconds until Clear/Off is touched.
Changing the Cook Time during Cooking
For example, to change the cook time from 30 minutes to 1 hour and 30 minutes, do the following.
- Touch Cook Time.
- Change the baking time: touch 1, 3, 0.
- Touch Start to accept the change
Using the Upper Oven
Upper Oven Light
1 Touch Upper Light to turn the upper oven light on or off.
Microwave Cookware Guide
Use
OVENPROOF GLASS (treated for high intensity heat): utility dishes, loaf dishes, pie plates, cake plates, liquid measuring cups, casseroles and bowls without metallic trim.
CHINA: bowls, cups, serving plates, and platters without metallic rims.
PLASTIC:
Plastic wrap (as a cover)- lay the plastic wrap loosely over the dish and press it to the sides.
Vent plastic wrap by turning back one edge slightly to allow excess steam to escape. The dish should be deep enough so that the plastic wrap will not touch the food. As the food heats it may melt the plastic wrap wherever the wrap touches the food.
Use plastic dishes, cups, semi-rigid freezer containers and plastic bags only for short cooking time. Use these with care because the plastic may soften from the heat of the food.
PAPER:
Paper towels, waxed paper, paper napkins, and paper plates with no metallic rim or design.
Check the manufacturer's label before using in the microwave oven.
Note:
Do not use recycled paper products in the microwave oven. They sometimes contain impurities that cause arcing and sparking.
Do Not Use
METAL CONTAINERS:
Metal shields the food from microwave energy and produces uneven cooking. Also avoid metal skewers, thermometers, or foil trays. Metal containers can cause arcing, which can damage the microwave oven.
METAL DECORATION:
Metal-rimmed or metal-banded dinnerware, casserole dishes, etc. The metal rim interferes with normal cooking and may damage the oven.
ALUMINUM FOIL:
Avoid large sheets of aluminum foil because they hinder cooking and may cause harmful arcing. Use small pieces of foil to shield poultry legs and wings. Keep ALL aluminum foil at least 1 inch from the side walls and door of the oven.
WOOD:
Wooden bowls and boards will dry out and may split or crack when you use them in the microwave oven. Baskets react in the same way.
TIGHTLY COVERED COOKWARE:
Be sure to leave openings for steam to escape from covered containers. Pierce plastic pouches of vegetables or other food items before cooking. Tightly closed pouches could explode.
BROWN PAPER:
Avoid using brown paper bags.
They absorb too much heat and could burn.
FLAWED OR CHIPPED COOKWARE:
Any container that is cracked, flawed, or chipped may break in the oven.
METAL TWIST TIES:
Remove metal twist ties from plastic or paper bags. They become hot and could cause a fire.
Microwave Cooking Tips
Keeping an Eye on Things
Always watch your food while it cooks. The light inside the upper oven turns on automatically when the oven is cooking so you can monitor the cooking process. Directions given in recipes to elevate, stir, and the like should be thought of as the minimum steps recommended. If the food seems to be cooking unevenly, simply make the necessary adjustments you think appropriate to correct the problem.
Factors Affecting Microwave Cooking Times
Many factors affect cooking times. The temperature of ingredients used in a recipe makes a big difference in cooking times. For example, a cake made with ice-cold butter, milk, and eggs will take considerably longer to bake than one made with ingredients that are at room temperature. Some recipes, particularly those for bread, cake, and custards, recommend that food be removed from the oven when they are slightly undercooked.
This is not a mistake. When allowed to stand, usually covered, these foods will continue to cook outside of the oven as the heat trapped within the outer portions of the food gradually travels inward. If the food is left in the oven until it is cooked all the way through, the outer portions will become overcooked or even burnt. Practice will improve your ability to estimate both cooking and standing times for various foods.
Density of Food
Light, porous food such as cakes and breads cook more quickly than heavy, dense foods such as roasts and casseroles. You must take care when microwaving porous food so that the outer edges do not become dry and brittle.
Height of Food
The upper portion of tall foods, particularly roasts, will cook more quickly than the lower portion.
Therefore, it is wise to turn tall food several times during cooking.
Moisture Content of Food
Because the heat generated from microwaves causes moisture to evaporate, relatively dry food such as roasts and some vegetables should either be sprinkled with water prior to cooking or covered to retain moisture.
Bone and Fat Content of Food
Bones conduct heat and fat cooks more quickly than meat. Care must be taken when cooking bony or fatty cuts of meat in order to prevent unevenly cooked or overcooked meat.
Quantity of Food
The number of microwaves in your oven remains constant regardless of how much food is being cooked. Therefore, the more food you place in the oven, the longer the required cooking time. Remember to decrease cooking times by at least one third when halving a recipe.
Shape of Food
Microwaves penetrate only about 3/4 of an inch (2 cm) into food. The interior portion of thick foods is cooked as the heat generated on the outside travels inward. Only the outer edge of food is cooked by microwave energy; the rest is cooked by conduction. The worst possible shape for a food that is to be microwaved is a thick square.
The corners will burn long before the center is even warm. Round thin foods and ring-shaped foods cook most successfully in the microwave.
Covering
A cover traps heat and steam which causes food to cook more quickly. Use a lid or microwave cling film with a corner folded back to prevent splitting.
Covering with Parchment Paper
Parchment paper (not waxed paper) is microwave safe. Because it makes a looser cover than a lid or clingfilm, greaseproof paper allows the food to dry out slightly.
Stirring
Stirring is one of the most important of all microwaving techniques. In conventional cooking, food is stirred for the purpose of blending. Microwaved food, however, is stirred in order to spread and redistribute heat. Always stir from the outside towards the centre as the outside of the food heats first.
Placing Thicker Portions Facing Outward
Place thicker cuts or portions of meat, poultry, and fish toward the outer edge of the baking dish so they absorb the most microwave energy and the food cooks more evenly.
Shielding
Strips of aluminium foil (which block microwaves) can be placed over the corners or edges of square and rectangular foods to prevent those portions from overcooking. Never use too much foil and make sure the foil is secured to the dish or it may cause arcing in the oven, especially if the foil passes too closely to the walls of the oven during rotation.
Elevating
Thick or dense foods can be elevated so that microwaves can be absorbed by the underside and center of the foods.
Piercing
Foods enclosed in a shell, skin or membrane are likely to burst in the oven unless they are pierced prior to cooking. Such foods include yolks and whites of eggs, clams, oysters, potatoes, and other whole vegetables and fruits.
Testing if Cooked
Microwaves cook food quickly, so test food for doneness frequently. Some foods are left in the microwave until completely cooked, but most foods, including meats and poultry, should be removed from the oven while still slightly undercooked and allowed to finish cooking during standing time. The internal temperature of foods will rise between 5 °F (3 °C) and 15 °F (8 °C) during standing time.
Microwave Power Levels
This upper oven is equipped with 10 power levels to give you maximum flexibility and control over cooking. See the table for suggested power levels for various foods.
Microwave Power Levels Chart
P-HI (100 %)
- Boiling water.
- Browning ground beef.
- Making candy.
- Cooking poultry pieces, fish, & vegetables.
- Cooking tender cuts of meat.
P-90
- Reheating rice, pasta, & vegetables.
P-80
- Reheating prepared foods quickly.
- Reheating sandwiches.
P-70
- Cooking egg, milk and cheese dishes.
- Melting chocolate.
P-60
- Cooking veal.
- Cooking whole fish.
- Cooking puddings and custard.
P-50
- Cooking ham, whole poultry and lamb.
- Cooking rib roast and sirloin tip.
P-40
- Thawing meat, poultry and seafood.
P-30
- Cooking less tender cuts of meat.
- Cooking pork chops and roasts.
P-20
- Taking chill out of fruit.
- Softening butter.
P-10
- Keeping casseroles and main dishes warm.
- Softening butter and cream cheese.
+30 seconds
Use this to quickly add 30 seconds to microwave cooking time.
1 Press the button when the oven is off to immediately start the microwave function for 30 seconds at High power.
2 Press Upper Clear/Off to pause the oven. Press it again to cancel cooking.
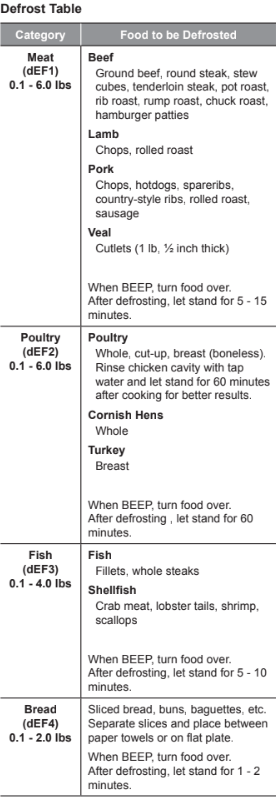
Defrost
The oven has 4 preset defrost cycles. The defrost feature provides the best defrosting method for frozen foods. The Defrost Table shows the suggested defrost cycle for various foods.
The Defrost function conveniently chimes partway through the defrost cycle to remind you to check, turn over, separate, or rearrange the food for best results.
1 Meat
2 Poultry
3 Fish
4 Bread
Setting the Defrost Function
Example: To defrost 1.2 pounds of meat.
1 Touch Defrost.
2 Touch 1 to select MEAT.
3 Set the weight : Touch 1, 2. (for 1.2 lbs)
4 Touch Start to start cooking.
5 When cooking is complete, touch Clear/Off.
Defrosting Tips
- When using Defrost, the weight to be entered is the net weight in pounds and tenths of pounds (the weight of the food minus the container).
- Before starting, remove the metal twist-ties which often come with frozen food bags, and replace them with strings or elastic bands.
- Open containers such as cartons before they are placed in the oven.
- Remove fish, shellfish, meat, and poultry from its original wrapping paper or plastic package. Otherwise, the wrap will hold steam and juice close to the foods, which can cause the outer surface of the foods to cook.
- If food is foil wrapped, remove foil and place the food in a suitable container.
- Slit the skins, if any, of frozen food such as sausage.
- Bend plastic pouches of food to ensure even defrosting.
- Place foods in a shallow container or in a microwave roasting dish to catch the drippings.
- Always underestimate defrosting time. Food should still be somewhat icy in the center when removed from the oven. If defrosted food is still icy in the center, return it to the upper oven for more defrosting.
- The length of defrosting time varies according to how solidly the food is frozen.
- Depending on the shape of the food, some areas may defrost more quickly than others.
- The shape of the package affects how quickly food will defrost. Shallow packages will defrost more quickly than a deep block.
- As food begins to defrost, separate the pieces to defrost them more easily.
- Turn over food during defrosting or standing time. Break apart and remove food as required.
- For best results, shape ground meat into the form of a doughnut before freezing. When defrosting, scrape off thawed meat when the beep sounds and continue defrosting.
- Use small pieces of aluminum foil to shield parts of food such as chicken wings, leg tips, fish tails, or areas that start to get warm. Make sure the foil does not touch the sides, top, or bottom of the oven. The foil can damage the oven lining.
- For better results, let food stand after defrosting.
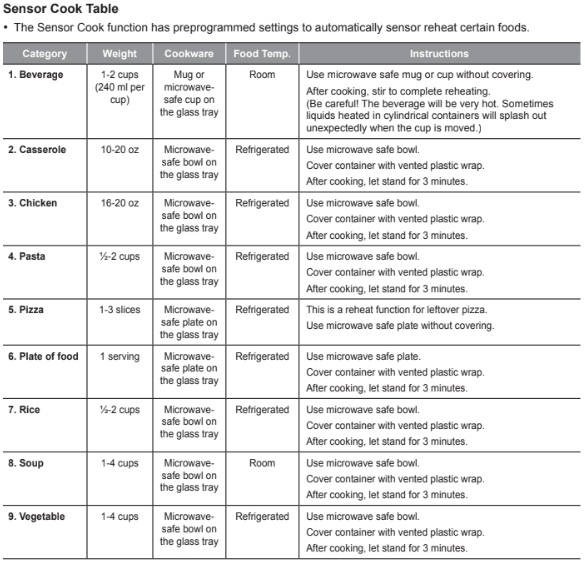
Sensor Operation
Sensor Cook reheats favorite foods without selecting cooking times and power levels.
The oven automatically determines required cooking time for each food item. When the internal sensor detects a certain amount of humidity coming from the food, it tells the oven how much longer to heat. The display shows the remaining heating time. For best results when sensor cooking, follow these recommendations.
- Food cooked with the sensor system should be at normal storage temperature.
- The glass tray and the outside of the container should be dry to assure best cooking results.
- Foods should always be covered loosely with microwavable plastic wrap, waxed paper, or a lid.
- Do not open the door or touch Clear/Off during the sensing time. When sensing time is over, the oven beeps and the remaining cooking time will appear in the display window. At this time you can open the door to stir, turn, or rearrange the food.
Appropriate containers and coverings help assure good sensor cooking results.
- Always use microwavable containers and cover them with lids or vented plastic wrap.
- Never use tight-sealing plastic covers. They can prevent steam from escaping and cause food to overcook.
- Match the amount to the size of the container. Fill containers at least half full for best results.
- Be sure the outside of the cooking container and the inside of the upper oven are dry before placing food in the oven. Beads of moisture turning into steam can mislead the sensor.
Using Sensor Cook
Use Sensor Cook to heat common microwave prepared foods without needing to program times and power levels. Sensor Cook has preset programs for 9 food categories. See the Sensor Cook table for more information.
Setting the Sensor Cook Function
Example: To sensor cook rice
1 Touch Sensor Cook.
2 Touch 7 to select RICE.
3 Touch Start.
- When the cook time is over a melody sounds and END OF CYCLE displays.
Convection Bake
During Convection Bake, a heating element is used to raise the temperature of the air inside the oven. Convection cooking temperature ranges from 100 °F to 450 °F.
It is best to preheat the oven when convection cooking.
NOTE
Reduce oven temperature by 25 °F from the temperature recommended on packaged foods.
The baking time may vary according to the food condition or individual preference.
Setting the Convection Bake Function
Example: 45 minutes at 375°F with preheating
- Touch Conv.Bake. The display flashes 350 °F.
- Set the oven temperature: touch 3, 7 and 5.
- Touch Start. The oven starts to preheat and display shows Conv.Bake and the oven temperature. (Do not enter the time.)
- When the melody sounds, Place the food in the oven.
- Set the cook time: touch 4, 5.
- Touch Start.
- When cooking is complete, touch Clear/Off.
Example: 30 minutes at 375°F without preheating
- Touch Conv. Bake. The display flashes 350 °F.
- Set the oven temperature: touch 3, 7 and 5.
- Touch Cook Time.
- Set the cook time: touch 3, 0.
- Touch Start.
- When cooking is complete, touch Clear/Off.
NOTE
- When the oven reaches the set preheat temperature, a melody will sound and the display scrolls the message PREHEAT END. The oven automatically holds that temperature for 30 minutes.
- The oven temperature drops very quickly when the door is opened; however, this should not prevent food from being fully cooked during normal cooking time.
Broil
This feature will allow you to brown and crisp food quickly. There is no need for preheating.
Setting the Broil Function
Example: Broiling for 1 minute 30 seconds
- Touch Broil.
- Set the cook time: touch 1, 3 and 0.
- Touch Start. The oven begins to heat.
- Touch Clear/Off to cancel at any time or when cooking is complete.
Speed Cook
This feature uses power from a halogen light, heaters, and microwaves simultaneously to allow quick cooking.
NOTE
Power levels only can be selected from 10 to 40 %. Each power level gives you heater power and microwave energy for a certain percentage of the time.
CAUTION
When using Speed Cook function, remember that the oven, door and dishes will be very hot.
Setting the Speed Convection Function
Use this mode for roast meat, roast chicken, roast vegetables, frozen pizza, cake, pies and breads.
Example: Cooking for 1 minute 30 seconds at 40 % power and 375 °F
- Touch Speed Cook.
- Touch 1 to select SPEED CONVECTION.
- Set the power level: touch 4.
- Set the oven temperature: touch 3, 7, 5 and Start.
- Set the cook time : touch 1, 3 and 0.
- Touch Start. The oven begins to heat.
- When cooking has finished or to cancel, touch Clear/Off.
Setting the Speed Broil Function
Use this mode for steaks, chicken fillets, fish or seafood.
Example: Cooking for 1 minute 30 seconds at 20 % power
- Touch Speed Cook.
- Touch 2 to select SPEED BROIL.
- Set the power level: touch 2.
- Set the cook time : touch 1, 3 and 0.
- Touch Start. The oven begins to heat.
- When cooking has finished or to cancel, touch Clear/Off.
Auto Cook
Use Auto Cook to heat common prepared foods without selecting cooking times and power levels. Auto Cook has preset programs for 28 food functions.
Setting the Auto Cook Function
Example: To auto cook 4 slices of bacon
- Touch More Mode.
- Touch 1 to select AUTO COOK.
- Select the food item: touch 1 for BACON.
- Touch Start to enter choice.
- Set the weight or amount: touch 1 to select 3-4 slices of bacon.
- Touch Start to begin cooking
Soften
The oven uses low power to soften foods such as butter, cream cheese, frosting, and ice cream.
See the following table.
Setting the Soften Function
Example, 1 pint of ice cream
- Touch More Mode.
- Touch 2 to select SOFTEN.
- Set the Menu: touch 4 to select ICE CREAM and touch Start.
- Set the amount: touch 1 to select 1 pint.
- Touch Start.
- When the cook time is over a melody sounds and END OF CYCLE displays
Melt
The oven uses low power to melt foods such as butter, caramel, cheese, chocolate, and marshmallows.
See the following table.
Setting the Melt Function
Example, 8 oz of chocolate.
- Touch More Mode.
- Touch 4 to select MELT.
- Set the Menu: touch 4 to select CHOCOLATE and touch Start.
- Set the amount: touch 2 to select 8 oz.
- Touch Start.
- When the cook time is over a melody sounds and END OF CYCLE displays
Warm
The WARM function maintains an oven temperature of less than 230°F. This function should not be used to reheat cold food. The Warm function keeps cooked food warm for serving up to 3 hours after cooking has finished. After 3 hours the WARM function shuts the oven OFF automatically.
Setting the Warm Function
- Touch More Mode.
- Touch 4 to select WARM.
- Select the temperature level: touch 1 for low, 2 for medium, or 3 for high.
- Touch Start.
- Select the type: touch 1 for moist, 2 for crisp.
- Touch Start to start warming.
- Touch Clear/Off at any time to cancel.
NOTE
- Low = 140°-160°F (60°-71°C)
Medium = 160°-195°F (71°-91°C)
High = 195°-230°F (91°-110°C)
- The Warm function is intended to keep food warm. Do not use it to cool food down.
- It is normal for the fan to operate during the Warm function.
Proof
This feature maintains a warm oven for rising yeast leavened products before baking.
Setting the Proof Function
- Touch More Mode.
- Touch 5 to select PROOF.
- Touch Start to start proofing.
- Touch Clear/Off at any time to cancel.
NOTE
- To avoid lowering the oven temperature and lengthening proofing time, do not open the oven door unnecessarily.
- Check bread products early to avoid over-proofing.
- Do not use the proofing mode for warming food or keeping food hot. The proofing oven temperature is not hot enough to hold foods at safe temperatures. Use the WARM feature to keep food warm.
- Proofing will not operate if the oven is too hot. Allow the oven to cool before proofing.
Popcorn
Setting the Popcorn Function
- Touch Popcorn.
- Touch Start.The Popcorn function starts.
- Touch Clear/Off to cancel Popcorn at any time
CAUTION
Never use a brown paper bag for popping corn.

When popping prepackaged popcorn, place the bag carefully in the oven so it does not touch the walls as it rotates. Fold the ends of the bag up and toward the center of the bag as shown.
Using the Lower Oven
Lower Oven Light
The interior oven light automatically turns on when the door is opened. Touch Lower Light to manually turn the lower oven light on. The lamp of the lower oven will turn off after 2 minutes and 30 seconds to save power.
NOTE The oven light cannot be turned on if the Self Clean function is active.
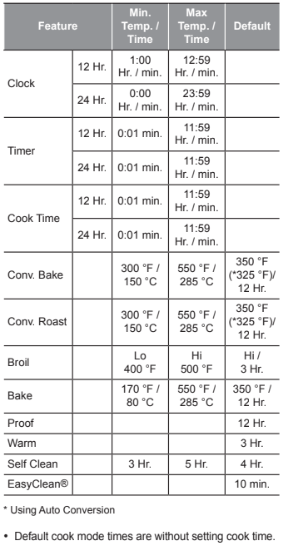
Minimum & Maximum Default Settings
All of the features listed have a minimum and a maximum time or temperature setting that may be entered into the control. An entry acceptance beep sounds each time a control key is touched. An entry error tone (two short tones) sounds if the entry of the temperature or time is below the minimum or above the maximum setting for the feature.
Using Oven Racks
The racks have a turned-up back edge that prevents them from being pulled out of the oven cavity.
Removing Racks
1 Pull the rack straight out until it stops.
2 Lift up the front of the rack and pull it out.
Replacing Racks
1 Place the end of the rack on the support.
2 Tilt the front end up and push the rack in.
Bake
Bake is used to prepare foods such as pastries, breads and casseroles. The oven can be programmed to bake at any temperature from 170 °F (80 °C) to 550 °F (285 °C). The default temperature is 350 °F (175 °C).
Setting the Bake Function
Example: To bake at 375 °F
1 Touch Bake.
2 Set the oven temperature: touch 3, 7 and 5.
3 Touch Start. The oven starts to preheat. As the oven preheats, the temperature is displayed and rises in 5-degree increments. Once the oven reaches the set temperature, a tone sounds and the oven light blinks on and off.
PREHEATING
Place the food in the oven after preheating. Preheating is necessary for better cooking results.
4 When cooking is complete, touch Clear/Off.
5 Remove food from the oven
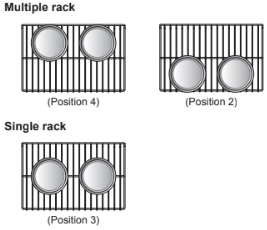
Multi-Rack Baking
- The oven has 5 rack positions.
Baking results will be better if baking pans are centered in the oven as much as possible. If baking with more than one pan, place the pans so each has at least 1" to 11/2" of air space around it. If cooking on multiple racks, place the oven racks in positions 2 and 4 (for two racks). Place the cookware as shown.
Oven Vent
- Areas near the vent may become hot during operation and may cause burns.
- Do not block the vent opening at the bottom of the oven.
- Avoid placing plastics near the vent as heat may distort or melt the plastic.
- It is normal for steam to be visible when cooking foods with high moisture
Convection Mode
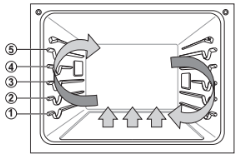
The convection system uses a fan to circulate the heat evenly within the oven. Improved heat distribution allows for even cooking and excellent results while cooking with single or multiple racks.
The lower oven uses convection auto conversion to automatically subtract 25°F/14°C from the temperature you enter. To disable convection auto conversion, see "Setting Convection Auto Conversion."
Setting the Convection Function
Example: To cook at 350°F (auto-converted)
1 Touch Conv. Bake or Conv. Roast. The display flashes 350 °F.
2 Set the oven temperature: touch 3, 7 and 5.
3 Touch Start. The display shows Conv. Bake or Conv. Roast and the oven temperature starting at 100 °F.
As the oven preheats, the display shows increasing temperatures in 5-degree increments. Once the oven reaches the set adjusted temperature, a tone sounds and the oven light flashes on and off. The display shows the auto converted oven temperature, 350 °F, and the fan icon.
4 When cooking has finished or to cancel, touch Clear/Off
Broil
Broiling uses an intense, radiant heat to cook food. Both the inner and outer broil elements heat during full broiling. Only the inner broil element heats during center broiling. The element(s) cycle on and off at intervals to maintain the oven temperature. The meat probe cannot be used with this mode.
NOTE
This oven is designed for closed-door broiling. Close the door to set the Broil function. If the door is open, the Broil function cannot be set and door appears on the display. Close the door and reset the Broil function. Opening the door turns off the broil burner during broiling. If the door is opened during broiling, the broil burner turns off after five seconds. The broiler turns back on automatically once the door is closed.
Setting the Oven to Broil
1 Place the food on the broiler pan grid.
2 Touch Broil.
3 Touch 1 for full broiling or 2 for center broiling.
4 Touch 1 for High, 2 for Medium or 3 for Low broil.
5 Touch Start. The oven begins to broil.
6 Broil on one side until food is browned ; turn and cook on the other side.
NOTE Always pull the rack out to the stop position before turning or removing food.
7 When broiling is finished, touch Lower Clear/ Off. Touch Clear/Off to cancel this function at any time.
Smoking
Due to the intense heat associated with broiling, it is normal to experience smoke during the cooking process. This smoke is a natural byproduct of searing and should not cause you to worry. If you are experiencing more smoke than you are comfortable with, use the following tips to reduce the amount of smoke in your oven.
1 Always use a broiler pan. Do not use saute pans or regular baking sheets for safety reasons.
2 The broiler pan should always be thoroughly cleaned and at room temperature at the beginning of cooking.
3 Keep the interior of your oven as clean as possible. Leftover debris from prior meals can burn or catch fire.
4 Avoid fatty marinades and sugary glazes. Both of these will increase the amount of smoke you experience. If you would like to use a glaze, apply it at the very end of cooking.
5 If you are experiencing significant smoke with any food item, consider:
- Lowering the broiler to the Lo setting.
- Lowering the rack position to cook the food further away from the broiler.
- Using the Hi broil setting to achieve the level of searing you desire, and then either switching to the Lo broil setting, or switching to the Bake function.
6 As a rule, fattier cuts of meat and fish will produce more smoke than leaner items.
7 Adhere to the recommended broil settings and cooking guidelines in the chart on the following page whenever possible.
Steam Function
The Steam mode heats food gradually, using the oven heating elements and moist steam heat. This is an ideal cooking method for delicate food items such as seafood, which can lose nutrients when boiled. The oven provides 2 methods of steam cooking: Steam Bake, and Steam Roast.
Using the Steam Feeder Tank
The steam feeder tank is located over the oven cavity.
1 Gently push the front of the steam feeder tank to slide it out
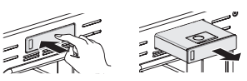
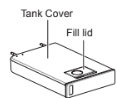
2 Remove the tank and place it on a flat surface.
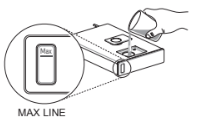
3 Remove the tank cover or flip open the fill lid at the front of the tank cover.
4 Fill the tank to the max line located at the front of the tank. Use softened, filtered water, if possible. Hard water may clog the steam generator more quickly with scale buildup.
5 Assemble the cover or snap closed the fill lid.
6 Carefully insert the tank into the steam feeder slot, making sure to keep the tank level while carrying it. If the tank is not kept level, water will drain out of the tubes in the back.
7 Slide the tank into the slot until it clicks into place.
Setting Steam Function
Example: To steam cook at 375 °F
- Touch Steam Bake or Steam Roast.
- Touch Steam Level repeatedly until desired steam level appears in the display: Low, Med, or High.
- Touch Start. The display shows 350 °F.
- Set the oven temperature: touch 3, 7 and 5. If desired, set the cook time and delayed start time.
- Touch Start. The display shows Steam Bake or Steam Roast and the oven temperature starting at 100 °F.
- Once cooking is finished, allow oven to cool completely, then wipe up any water left on oven interior.
Once Steam function is started, an indicator on the display shows the status of the steam function. Make sure the steam feeder tank is filled with water before starting the Steam Bake or Steam Roast function. If the water in the tank runs out during cooking, a chime sounds and Fill the water shows in the display. The oven continues to cook without steam.
Warm
The WARM function maintains an oven temperature of less than 230°F. This function should not be used to reheat cold food. The Warm function keeps cooked food warm for serving up to 3 hours after cooking has finished.
After 3 hours the WARM function shuts the oven OFF automatically.
Setting the Warm Function
- Touch More Mode.
- Touch 2 to select WARM.
- Select the temperature level: touch 1 for high, 2 for medium, or 3 for low.
- Touch Start to start warming.
- Touch Clear/Off at any time to cancel
Proof
This feature maintains a warm oven for rising yeast leavened products before baking.
Setting the Proof Function
- Use rack position 2 or 3 for proofing.
- Touch More Mode.
- Touch 3 to select PROOF.
- Enter the proofing time, if desired, and touch Start.
- Touch Clear/Off at any time to cancel.
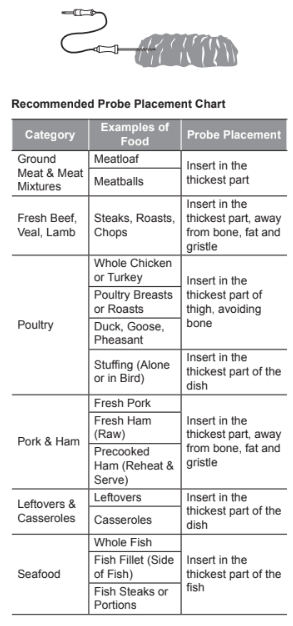
Probe
The probe accurately measures the internal temperature of meat, poultry and casseroles. It should not be used during broiling, self clean, warming or proofing. Always unplug and remove the probe from the oven when removing food. Before using, insert the probe into the center of the thickest part of the meat or into the inner thigh or breast of poultry, away from fat or bones. Place the food in the oven and connect the probe to the jack. Keep the probe as far away from heat sources as possible.
- The probe cannot be used in Broil, Self Clean, Easy Clean®, Warm or Proof modes.
- For thin cuts of meat, insert probe in thickest side of meat.
Using the Probe
- Insert the probe into the food.
- Connect the probe to the jack in the oven.
- Touch an appropriate cooking mode.
- Touch the numbers to set the oven temperature.
- Touch Start or Probe. PRESS START OR ENTER PROBE TEMP / 80F – 210F appears in the display.
- Touch numbers to set the probe temperature. The default probe temperature is 150 °F (65 °C), but can be changed to any temperature between 80 °F (27 °C) and 210 °F (100 °C)
- Touch Start. The display shows the changing probe temperature.
- When the set probe temperature is reached, the oven shuts off automatically.
- Touch Clear/Off at any time to stop cooking.
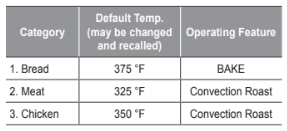
Favorite
The Favorite feature is used to record and recall favorite recipe settings. This feature can store and recall up to 3 different settings. The Favorite feature can be used with the Cook Time mode. It will not work with any other function including the Start Time (delayed cook) mode.
- Place the food in the oven.
- Touch More Mode.
- Touch 1 to select FAVORITE.
- Touch More Mode repeatedly until desired recipe appears in the display: Bread, Meat or Chicken.
- Touch the numbers to set the desired oven temperature. This temperature is stored and recalled when next used.
- Touch Start. The preheat indicator beeps 3 times when the oven reaches the set temperature.
Sabbath Mode
Sabbath mode is used on the Jewish Sabbath and Holidays.
While the oven is in Sabbath mode, the temperature cannot be changed and the timer, light, and alarm functions are disabled. If the oven light is on when the oven is put in Sabbath mode, it will remain on.Sabbath mode is only available when upper oven is not operating and lower oven is in Bake mode. All function buttons, except for the CLEAR/OFF is inactive.
Setting Sabbath Mode
- Disconnect the probe. The Probe function is not available in Sabbath mode.
- Touch Bake and set the desired temperature and cook time. Any cook time can be set from 1 minute to 73 hours 59 minutes.
- Touch Start.
- Touch and hold More Mode for three seconds. SB and □ appears i in the display when the Sabbath mode is activated.
- To stop Sabbath mode, touch and hold More Mode for three seconds. To cancel the Bake function, touch Clear/Off at any time.
Wi-Fi
Connect the appliance to a home Wi-Fi network to use Remote Start and other smart functions. See the Smart Functions section for more details.
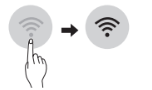
Setting Up Wi-Fi
1 Touch and hold Remote Start key for three seconds.
The Wi-Fi icon  appears at the bottom of the display.
Remote Start
If the appliance is registered on a home Wi-Fi network, the preheating function of the oven can be started or stopped using the LG SmartThinQ Application.
Preparing the Oven for a Remote Start
1 Touch Remote Start. REMOTE READY and Wi-Fi icon  show in the display. In this mode, the controls for both ovens are locked.
2 Follow the instructions in the LG SmartThinQ application for using the Remote Start function.
SMART FUNCTIONS
LG SmartThinQ Application
The LG SmartThinQ application allows you to communicate with the appliance using a smartphone.
Before Using LG SmartThinQ
- For appliances with the
 logo
logo
1 Use a smartphone to check the strength of the wireless router (Wi-Fi network) near the appliance.
- If the distance between the appliance and the wireless router is too far, the signal strength becomes weak. It may take a long time to register or installation may fail.
2 Turn off the Mobile data or Cellular Data on your smartphone.
- For iPhones, turn data off by going to Settings → Cellular → Cellular Data.
3 Connect your smartphone to the wireless router
LG SmartThinQ Application Features
- For appliances with the
 logo
logo
EasyClean®
Allows you to set EasyClean® alerts, read the instruction guide, and simulate and compare energy consumption when using EasyClean® versus selfclean cycles.
Smart Diagnosis™
This function provides useful information for diagnosing and solving issues with the appliance based on the pattern of use.
Settings
Allows you to set various options on the oven and in the Application.
Monitoring
This function shows the current status, remaining time, cook settings and end time on one screen.
Push Alerts
Turn on the Push Alerts to receive appliance status notifications.
The notifications are triggered even if the LG SmartThinQ application is off.
Timer
You can set the timer from the application.
Firmware Update
Keep the appliance updated.
Smart Diagnosis™ Function
Should you experience any problems with the appliance, it has the capability of transmitting data via your telephone to the LG Customer Information Center. NFC or Wi-Fi equipped models can also transmit data to a smartphone using the LG SmartThinQ application.
Smart Diagnosis™ through the Customer Information Center
- For appliances with the
 logo
logo
This method allows you to speak directly to our trained specialists. The specialist records the data transmitted from the appliance and uses it to analyze the issue, providing a fast and effective diagnosis.
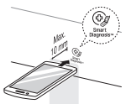
1 Call the LG Customer Information Center at 1-800-243-0000.
2 When instructed to do so by the call center agent, hold the mouthpiece of your phone over the Smart Diagnosis™ logo on the machine. Hold the phone no more than one inch from (but not touching) the machine.
NOTE Do not touch any other buttons or icons on the display screen.
3 Touch and hold the Start button for three seconds.
4 Keep the phone in place until the tone transmission has finished. This takes about 6 seconds and the display will count down the time.
5 Once the countdown is over and the tones have stopped, resume your conversation with the call center agent, who will then be able to assist you in using the information transmitted for analysis
LG SmartThinQ Smart Diagnosis™
- For appliances with the
 ogo
ogo
Use the Smart Diagnosis feature in the LG SmartThinQ application for help diagnosing issues with the appliance without the assistance of the LG Customer Information Center. Follow the instructions in the LG SmartThinQ application to perform a Smart Diagnosis using your smartphone.
1 Open the LG SmartThinQ application on the smart phone.
2 In the application, select the appliance from your list of connected appliances and then touch the dots at the upper right of the screen.
3 Select Smart Diagnosis, then touch the Start Smart Diagnosis button.
NOTE If the diagnosis fails several times, use the following instructions.
4 Select the Audible Diagnosis.
5 Follow the instructions on the smart phone.
6 Keep the phone in place until the tone transmission has finished. View the diagnosis on the phone.
MAINTENANCE
Caring for the Upper Oven
To make sure the microwave oven looks good and works well for a long time, maintain it properly. For proper care, follow these instructions carefully.
Cleaning the Interior
Wash often with warm, sudsy water and a sponge or soft cloth. Use only mild, nonabrasive soaps or a mild detergent. Keep the areas clean where the door and oven frame touch when closed.
Wipe well with a clean cloth. Over time, stains can occur on the surfaces as the result of food particles spattering during cooking. This is normal.
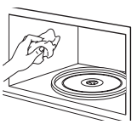
For stubborn soil, boil a cup of water in the oven for 2 to 3 minutes. Steam will soften the soil. To get rid of odors inside the oven, boil a cup of water with some lemon juice or vinegar in it.
Cleaning the Exterior
Use a soft cloth sprayed with glass cleaner.
Apply the glass cleaner to the soft cloth; do not spray directly on the oven.
NOTE
Abrasive cleansers, steel wool pads, gritty wash cloths, some paper towels, etc., can damage the control panel and the interior and exterior oven surfaces.
To clean the glass tray and rotating ring, wash in mild, sudsy water.
For heavily soiled areas use a mild cleanser and scouring sponge.
The glass tray and rotating ring are dishwasher safe.

Caring for the Lower Oven
EasyClean®
LG’s EasyClean® enamel technology provides two cleaning options for the inside of the lower oven. The EasyClean® feature takes advantage of LG’s new enamel to help lift soils without harsh chemicals, and it runs using ONLY WATER for just 10 minutes in low temperatures to help loosen LIGHT soils before hand cleaning.
While EasyClean® is quick and effective for small and LIGHT soils, the Self Clean feature can be used to remove HEAVY, built up soils. The intensity and high heat of the Self Clean cycle may result in smoke which will require the opening up of windows to provide ventilation. Compared to the more intense Self Clean process, your LG oven gives you the option of cleaning with LESS HEAT, LESS TIME, and virtually NO SMOKE OR FUMES.
When needed, the oven still provides the Self Clean option for longer, more thorough oven cleaning for heavier, built up soils.
Benefits of EasyClean®
- Helps loosen light soils before hand-cleaning
- EasyClean® only uses water; no chemical cleaners
- Makes for a better self-clean experience
- Delays the need for a self-clean cycle
- Minimizes smoke and odors
- Can allow shorter self-clean tim
Cleaning Tips
- Allow the oven to cool to room temperature before using the EasyClean® cycle. If your oven cavity is above 150 °F (65 °C), OVEN IS HOT will appear in the display, and the EasyClean® cycle will not be activated until the oven cavity cools down.
- A plastic spatula can be used as a scraper to scrape off any chunks or debris before and during oven cleaning.
- Using the rough side of a non-scratch scouring pad may help to take off burnt-on stains better than a soft sponge or towel.
- Certain non-scratch scrubbing sponges, such as those made of melamine foam, available at your local stores, can also help improve cleaning.
- The Oven must be level to ensure that the lower surface of the oven cavity is completely covered with water at the beginning of the EasyClean® cycle.
- For best results, use distilled or filtered water. Tap water may leave mineral deposits on the oven bottom.
- Soil baked on through several cooking cycles will be more difficult to remove with the EasyClean® cycle.
- Do not open the oven door during the EasyClean® cycle. Water will not get hot enough if the door is opened during the cycle.
- For hard to reach areas such as the back surface of the oven, it is better to use the Self Clean cycle.
Steam Feeder Tank
The steam feeder tank is used during the steam cooking functions. Use filtered, softened water if possible.
NOTE
- After using the steam function, the steam feeder tank should be drained. To avoid bacteria or odors, clean and dry the steam feeder tank after every use.
- Do not clean in a dishwasher.
Hard Water Scale
If hard water is used in the steam feeder tank, the steam generator may become clogged with hard water scale. In areas with hard water, run the Descaling function frequently or use softened water.
Cleaning Scale on Oven Bottom
To remove mineral deposits that remain on the oven bottom after using the steam mode, use a cloth or sponge soaked in vinegar or a weak citric acid solution. For more stubborn or extensive scaling, use the Descaling function.
Descaling
Use this function to remove the white deposits that form after the steam generator is used for a long period.
The Descaling function runs for 65 minutes. Water will come out of the steam generator while it is being cleaned.
For instructions on removing and filling the steam feeder tank, see "Using the Steam Feeder Tank."
Using Descaling
- Fill the steam feeder tank with a 20:1 mixture of water and citric acid. For example, use 4 tsp of citric acid in 41/4 cups water (20 g citric acid in 1000 ml water).
- Insert the steam feeder tank into the slot over the oven cavity and push it in until it clicks into place.
- Touch More Mode.
- Touch 4 to select DESCALING.
- After a few minutes of descaling, Insert the water tank will appear in the display. Following the instructions, drain the tank and fill it with clean water.
- Insert the tank and start the Rinsing function.
- Once the Rinsing function is complete, dry the inside of the oven with a soft cloth.
Drying
The Drying function removes residual water inside the steam generator. The function takes a little over 1 minute and runs automatically after any steam cooking cycle. The Drying function can also be started manually, if needed.
Using Drying
- Check whether there is water in the steam feeder tank. The remaining water in the tank must be drained.
- Touch More Mode.
- Touch 5 to select DRYING.
- Touch Start to begin Drying. The remaining time appears in the display.
Self Clean
The Self Clean cycle uses extremely hot temperatures to clean the oven cavity. While running the Self Clean cycle, you may notice smoking or an odor. This is normal; especially if the oven is heavily soiled.
During Self Clean, the kitchen should be well ventilated to minimize the odors from cleaning.
Setting Self Clean
The Self Clean function has cycle times of 3, 4, or 5 hours.
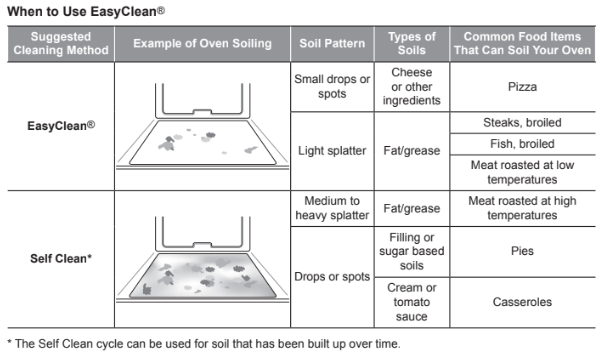
Self Clean Soil Guide
- Lightly Soiled Oven Cavity 3-Hour Self Clean
- Moderately Soiled Oven Cavity 4-Hour Self Clean
- Heavily Soiled Oven Cavity 5-Hour Self Clean
- Remove all racks and accessories from the oven.
- Touch Self Clean. The oven defaults to the recommended four-hour self clean for a moderately soiled oven. Touch twice for a five hour self clean or three times for a three-hour self clean.
- Touch Start.
- Once the self-clean cycle is set, the oven door locks automatically and the lock icon displays. You will not be able to open the oven door until the oven has cooled. The lock releases automatically when the oven has cooled.
CAUTION
Do not force the oven door open when the lock icon is displayed. The oven door remains locked until the oven temperature has cooled. Forcing the door open will damage the door.
Setting Self Clean with a Delayed Start
- Remove all racks and accessories from the oven.
- Touch Self Clean. The oven defaults to the recommended four-hour self clean for a moderately soiled oven. Touch twice for a five-hour self clean or three times for a three-hour self clean.
- Touch Start Time.
- Use the number keys to enter the time of day you would like the Self Clean to start.
- Touch Start.
During Self Clean
- The Self Clean cycle uses extremely hot temperatures to clean the oven cavity. While running the Self Clean cycle, you may notice smoking or an odor. This is normal, especially if the oven is heavily soiled.
- As the oven heats, you may hear sounds of metal parts expanding and contracting. This is normal and will not damage the oven.
- Do not force the oven door open when the lock is displayed. The oven door remains locked until the oven temperature has cooled. Forcing the door open will damage the door.
- Do not remove the steam feeder tank from the oven during the self-clean cycle. Doing so, could result in product damage.
After the Self Clean Cycle
- The oven door remains locked until the oven temperature has cooled.
- You may notice some white ash in the oven. Wipe it off with a damp cloth or a soap-filled pad after the oven cools. If the oven is not clean after one self�clean cycle, repeat the cycle.
- If oven racks were left in the oven and do not slide smoothly after a self-clean cycle, wipe racks and rack supports with a small amount of vegetable oil to make them glide more easily.
- Fine lines may appear in the porcelain because it went through heating and cooling. This is normal and will not affect performance
Changing the Oven Light
The oven light is a standard 50-watt appliance bulb. It turns on when the oven door is open. When the oven door is closed, touch Light to turn it on or off.
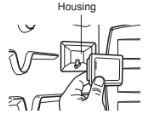
Replacing Lamp on Side Wall
1 Unplug oven or disconnect power.
2 Remove oven racks.
3 Slide a flat blade screwdriver between the housing and the glass light cover.
4 Support the glass light cover with two fingers to prevent the cover from falling to the bottom of the oven.
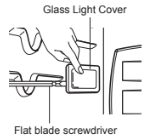
5 Gently twist the screwdriver blade to loosen the glass light cover
6 Remove bulb from socket.
7 Replace bulb, replace light cover by snapping back into place.
8 Plug in oven or reconnect power.
Cleaning the Exterior
Painted and Decorative Trim
For general cleaning, use a cloth with hot soapy water. For more difficult soils and built-up grease, apply a liquid detergent directly onto the soil. Leave it on for 30 to 60 minutes. Rinse with a damp cloth and dry. Do not use abrasive cleaners.
Stainless Steel Surfaces
To avoid scratches, do not use steel wool pads.
- Place a small amount of stainless steel appliance cleaner or polish on a damp cloth or paper towel.
- Clean a small area, rubbing with the grain of the stainless steel if applicable.
- Dry and buff with a clean, dry paper towel or soft cloth.
- Repeat as necessary
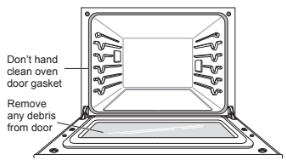
Oven Door
- Use soapy water to thoroughly clean the oven door. Rinse well. Do not immerse the door in water.
- You may use a glass cleaner on the outside glass of the oven door. Do not spray water or glass cleaner on the door vents.
- Do not use oven cleaners, cleaning powders, or harsh abrasive cleaning materials on the outside of the oven door.
- Do not clean the oven door gasket. The oven door gasket is made of a woven material that is essential for a good seal. Care should be taken not to rub, damage, or remove this gasket.
Broiler Pan and Grid
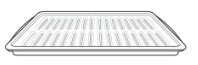
- Do not store a soiled broiler pan or grid anywhere in the oven.
- Do not clean the broiler pan or grid in a self cleaning mode.
- Remove the grid from the pan. Carefully pour out the grease from the pan into a proper container
- Wash and rinse the broiler pan and grid in hot water with a soap-filled or plastic scouring pad.
- If food has burned on, sprinkle the grid with cleaner while hot and cover with wet paper towels or a dishcloth. Soaking the pan will remove burned-on foods.
- Both the broiler pan and grid may be cleaned with a commercial oven cleaner or in the dishwasher.
Oven Racks
Remove the oven racks before operating the self clean cycle.
1 Food spilled into the tracks could cause the racks to become stuck. Clean racks with a mild, abrasive cleaner.
2 Rinse with clean water and dry
Removing and Replacing the Lift-Off ENGLISH Oven Doors
Removing the Door
1 Open the door fully.
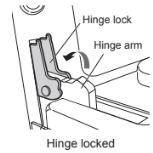
2 Pull the hinge locks down toward the door frame to the unlocked position.
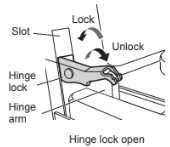
3 Firmly grasp both sides of the door at the top.
4 Close door to the door removal position, which is approximately 5 degrees.
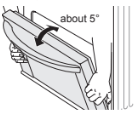
5 Lift door up and out until the hinge arm is clear of the slot.
Replacing the Door
1 Firmly grasp both sides of the door at the top.
2 With the door at the same angle as the removal position, seat the indentation of the hinge arm into the bottom edge of the hinge slot. The notch in the hinge arm must be fully seated into the bottom of the slot.
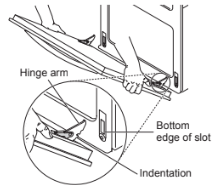
3 Open the door fully. If the door will not open fully, the indentation is not seated correctly in the bottom edge of the slot.
4 Push the hinge locks up against the front frame of the oven cavity to the locked position.
5 Close the oven door.
TROUBLESHOOTING
FAQs
Can I use a rack in my upper oven to reheat or cook on two levels at once?
Only use the rack that is supplied with your upper oven. Use of any other rack can result in poor cooking performance and/or arcing and may damage your oven.
Will the upper oven be damaged if it operates empty?
Yes. Never operate the oven empty or without the glass tray.
Does microwave energy pass through the viewing screen in the door?
No. The metal screen bounces the energy back to the oven cavity. The holes (or ports) allow only light to pass through. They do not let microwave energy pass through.
Why do I see light reflection around the outer case?
This light is from the upper oven light which is located between the oven cavity and the outer wall of the oven.
What are the various sounds I hear when the upper oven is operating?
The clicking sound is caused by a mechanical switch turning the microwave oven's magnetron ON and OFF.
The heavy hum and clunk is from the change in power the magnetron draws as it is turned ON and OFF by a mechanical switch. The change in blower speed is from the change in line voltage caused by the magnetron being turned ON and OFF.
Can my upper oven be damaged if food is cooked for too long?
Like any other cooking appliance, it is possible to overcook food to the point that the food creates smoke and even possibly fire, and damage to the inside of the oven. It is always best to be near the oven while you are cooking.
Why is a standing time recommended after microwave cooking time is over?
Standing time allows foods to continue cooking evenly for a few minutes after the actual microwave oven cooking cycle. The amount of standing time depends upon the density of the foods.
Why is additional time required for cooking food stored in the refrigerator?
As in conventional cooking, the initial temperature of food affects total cooking time. You need more time to cook food taken out of a refrigerator than for food at room temperature.
Can I use either metal or aluminum pans in my upper oven?
Usable metal includes aluminum foil for shielding (use small, flat pieces), and shallow foil trays (if tray is ¾ inch deep and filled with food to absorb microwave energy). Never allow metal to touch walls or door.
Sometimes the door of my upper oven appears wavy. Is this normal?
This appearance is normal and does not affect the operation of your oven.
The glass tray does not move.
The glass tray is not correctly in place. It should be correct-side up and sitting firmly on the center hub. The support is not operating correctly. Remove the glass tray and restart the oven. Cooking without the glass tray can give you poor results.
Why does the dish become hot when I microwave food in it? I thought that this should not happen.
As the food becomes hot it will conduct the heat to the dish. Use hot pads to remove food after cooking.
What does standing time mean?
Standing time means that food should be taken out of the oven and covered for additional time after cooking. This process allows the cooking to finish, saves energy, and frees the oven for other purposes.
Can I pop popcorn in my upper oven? How do I get the best results?
Yes. Pop packaged microwave popcorn following manufacturer’s guidelines or use the preprogrammed Popcorn key.
Do not use regular paper bags. Use the listening test by stopping the oven as soon as the popping slows to a pop every one or two seconds. Do not try to repop unpopped kernels. You can also use special microwave poppers. When using a popper, be sure to follow manufacturer’s directions. Do not pop popcorn in glass utensils.
Why does steam come out of the air exhaust vent?
Steam is normally produced during cooking. The upper oven has been designed to vent steam out of the top vent.
The Lower oven doesn’t cook like my old one. Is there something wrong with the temperature settings?
No, your oven has been factory tested and calibrated. For the first few uses, follow your recipe times and temperatures carefully. If you still think your new oven is too hot or too cold, you can adjust the oven temperature yourself to meet your specific cooking needs. Refer to the Oven Temperature Adjustment section in this manual for easy instructions on how to adjust your thermostat.
Is it normal to hear a clicking noise coming from the back of the lower oven when I am using it?
Your new oven is designed to maintain a tighter control over your oven’s temperature. You may hear your oven’s heating elements click on and off more frequently on your new oven. This is NORMAL.
Why is the time flashing?
This means that the product has just been plugged in, or that it has experienced a power interruption. To clear the flashing time, touch any button and reset the clock if needed.
During convection cooking the fan stops when I open the door. Is that normal?
Yes, this is normal. When the door is opened, the convection fan will stop until the door is closed.
Can I use aluminum foil to catch drippings in the lower oven cavity?
Never use aluminum foil to line the bottom or sides of the oven. The foil will melt and stick to the bottom surface of the oven and will not be removable. Use a sheet pan placed on a lower oven rack to catch drippings instead. (If foil has already melted onto the bottom of the oven, it will not interfere with the oven's performance.)
Can I use aluminum foil on the racks?
Do not cover racks with aluminum foil. Covering entire racks with foil restricts air flow, leading to poor cooking results. Use a sheet pan lined with foil under fruit pies or other acidic or sugary foods to prevent spillovers from damaging the oven finish.
Can I leave my racks in the oven when running a Self Clean cycle?
No. Although it will not damage the racks, it will discolor them and may make them hard to slide in and out during use. Remove all items from the oven before starting a Self Clean cycle.
What should I do if my racks are sticky and have become hard to slide in and out?
Over time, the racks may become hard to slide in and out. Apply a small amount of olive oil to the ends of the racks. This will work as a lubricant for easier gliding.
Why aren't the function buttons working?
Make sure that the oven is not in Lockout mode. The lock will show in the display if Lockout is activated. To deactivate Lockout, touch and hold Lower Clear/Off for three seconds. The unlock melody sounds and Loc appears in the display until the controls are unlocked.
My oven is still dirty after running the EasyClean® cycle. What else should I do?
The EasyClean® cycle only helps to loosen light soils in your oven to assist in hand-cleaning of your oven. It does not automatically remove all soils after the cycle. Some scrubbing of your oven is required after running the EasyClean® cycle.
I tried scrubbing my oven after running EasyClean®, but some soils still remain. What can I do?
The EasyClean® feature works best when the soils are fully soaked and submerged in water before running the cycle and during hand-cleaning. If soils are not sufficiently soaked in water, it can negatively affect the cleaning performance. Repeat the EasyClean® process using sufficient water. Sugar-based and certain greasy soils are especially hard to clean. If some stubborn soils remain, use the Self Clean feature to thoroughly clean your oven.
Soil on the oven walls is not coming off. How can I clean the oven walls?
Soils on the side and rear walls of your oven may be more difficult to fully soak with water. Try repeating the EasyClean® process with more than the ¼ cup (2 oz or 60 ml).
Will EasyClean® get all of the soils and stains out completely?
It depends on the soil type. Sugar-based and certain grease stains are especially hard to clean. Also, if stains are not sufficiently soaked in water, this can negatively affect cleaning performance. If stubborn or built-up stains remain, use the Self Clean feature. Refer to the Self Clean section of your owner's manual.
Are there any tricks to getting some of the stubborn soils out?
Scraping the soils with a plastic scraper before and during hand-cleaning is recommended. Fully saturating soils with water is also recommended. However, certain types of soils are harder to clean than others. For these stubborn soils, the Self Clean cycle is recommended. Consult the Self Clean section of your owner's manual for details.
Is it safe for my convection fan, broil burner or heater element to get wet during EasyClean®?
Yes. The convection fan, broiler burner or heater element may get a little wet during cleaning. However, direct spray onto the broil burner and heater elements is not necessary because these are self-cleaning during regular use.
I see smoke coming out of my oven's vents during EasyClean®. Is this normal?
This is normal. This is not smoke. It is actually water vapor (steam) from the water in the oven cavity. As the oven heats briefly during EasyClean®, the water in the cavity evaporates and escapes through the oven vents.
How often should I use EasyClean®?
EasyClean® can be performed as often as you wish. EasyClean® works best when your oven is LIGHTLY soiled from such things as LIGHT grease splatter and small drops of cheese. Please refer to the EasyClean® section in your owner's manual for more information.
What is required for EasyClean®?
A plastic scraper, a non-scratch scrubbing pad and a towel. You should not use abrasive scrubbers such as heavy-duty scouring pads or steel wool. Except for a towel, all of the materials you need are included in a special cleaning kit with your new oven.
Before Calling for Service
Before you call for service, review this list. It may save you time and expense. The list includes common occurrences that are not the result of defective workmanship or materials in this appliance.
Oven control beeps and displays any F code error
- Electronic control has detected a fault condition. Touch Clear/Off to clear the display and stop beeping. Reprogram oven. If fault recurs, record fault number. Touch Clear/Off and contact a Service agent.
- Code F-3 Touch key error
- Code F-19 Oven not heating (Lower oven)
Oven will not work
- Plug on range is not completely inserted in the electrical outlet.
- Make sure electrical plug is plugged into a live, properly grounded outlet.
- A fuse in your home may be blown or the circuit breaker tripped.
- Replace the fuse or reset the circuit breaker.
- Oven controls improperly set.
- See the Using the Oven section.
- Oven too hot.
- Allow the oven to cool to below locking temperature.
Arcing or Sparking (Upper Oven)
- Cookware is not microwave safe. When in doubt, test cookware before use.
- Do not operate oven while empty.
Unevenly Cooked Foods (Upper Oven)
- Test cookware to make sure it is microwave safe.
- Do not cook without the glass tray.
- Turn or stir food while cooking.
- Defrost food completely before cooking.
- Use correct cook time and power level.
Overcooked Foods (Upper Oven)
- Change cook time or power level.
Undercooked Foods (Upper Oven)
- Test that cookware is microwave safe.
- Defrost food completely before cooking.
- Change cook time or power level.
- Make sure ventilation ports are not blocked.
Improper Defrosting (Upper Oven)
- Test that cookware is microwave safe.
- Change defrost time or weight.
- Turn or stir food during defrost cycle.
If the display shows a time counting down but the oven is not cooking
- Check that door is firmly closed.
- Check that timer wasn't started instead of a cooking function.
Steam is exhausted through the oven vent
- Cooking foods with high moisture produces steam. This is normal.
Appliance does not operate
- Make sure cord is plugged correctly into outlet. Check circuit breakers.
- Service wiring is not complete. Contact your electrician for assistance.
- Power outage. Check house lights to be sure. Call your local electric company for service.
Oven light does not work
- Replace or tighten bulb. See Changing the Oven Light section in this Owner’s Manual.
Oven smokes excessively during broiling
- Control not set properly. Follow instructions under Setting Oven Controls.
- Meat too close to the element. Reposition the rack to provide proper clearance between the meat and the element. Preheat broil element for searing.
- Meat not properly prepared. Remove excess fat from meat. Cut remaining fatty edges to prevent curling.
- Insert on broiler pan wrong side up and grease not draining. Always place grid on the broiler pan with ribs up and slots down to allow grease to drip into pan.
- Grease has built up on oven surfaces. Regular cleaning is necessary when broiling frequently.
- Old grease or food spatters cause excessive smoking.
Food does not bake or roast properly
- Oven controls improperly set.
- See the Using the Oven section.
- Rack position is incorrect or the rack is not level.
- See the Using the Oven section.
- Incorrect cookware or cookware of improper size being used.
- See the Using the Oven section.
- Oven sensor needs to be adjusted.
- See Oven Temperature Adjustment in the Features section.
Food does not broil properly
- Oven controls improperly set.
- Make sure you touch Broil.
- Improper rack position being used.
- Cookware not suited for broiling.
- Use broiling pan and grid.
- Aluminum foil used on the broiling pan and grid has not been fitted properly and slit as recommended.
- See the Using the Oven section.
- In some areas the power voltage may be low.
- Preheat the broil element for 5-7 minutes.
- See the Broiling Guide.
Oven temperature too hot or too cold
- Oven sensor needs to be adjusted.
- See Oven Temperature Adjustment in the Features section.
Oven will not Self Clean
- The oven temperature is too high to set a Self Clean operation.
- Allow the oven to cool and reset the controls.
- Oven controls improperly set.
- See the Self Clean section.
- A Self Clean cycle cannot be started if the oven lockout feature is active.
- Make sure to slide the tank into the slot until it clicks into place.
”Crackling” or “popping” sound
- This is the sound of the metal heating and cooling during both the cooking and Self Clean functions.
Fan noise
- A convection fan may automatically turn on and off.
Convection Fan stops
- Convection fan stops during a convection bake cycle.
- This is normal and is done to allow for more even heating during the cycle. This is not a failure of the oven and should be considered normal operation.
Displayed Time is flashing
- This is normal. This means that the product has just been plugged in, or that it has experienced a power interruption. Touch the Clock key and reset the time, or touch any key to stop the flashing.
Excessive smoking during a Self Clean cycle
- Excessive soil.
- Touch the Clear/Off button. Open the windows to rid the room of smoke. Wait until the Self Clean mode is cancelled. Wipe up the excess soil and reset the clean.
Oven door does not open after a Self Clean cycle
- Oven is too hot.
- Allow the oven to cool below locking temperature.
- Allow about one hour for the oven to cool after the completion of a Self Clean cycle. The door can be opened when the lock is no longer displayed.
- The control and door may be locked.
The oven does not clean after a Self Clean cycle
- Oven controls not properly set.
- See the Self Clean section.
- Oven was heavily soiled.
- Clean up heavy spillovers before starting the clean cycle. Heavily soiled ovens may need to Self Clean again or for a longer period of time.
CLEAN and door flash in the display
- The Self Clean cycle has been selected, but the door is not closed.
LOCKED is on in the display when you want to cook
- The oven door is locked because the temperature inside the oven has not dropped below the locking temperature.
- Touch the Clear/Off button. Allow the oven to cool.
Burning or oily odor emitting from the vent
- This is normal in a new oven and will disappear in time.
- To speed the process, set a Self Clean cycle for a minimum of 3 hours. See the Self Clean section.
Oven racks are difficult to slide
- The shiny, silver-colored racks were cleaned in a Self Clean cycle.
- Apply a small amount of vegetable oil to a paper towel and wipe the edges of the oven racks with the paper towel
Moisture collects on oven window or steam comes from oven vent
- This is normal when cooking foods high in moisture.
- Excessive moisture was used when cleaning the window.
Oven will not Steam cook
- Make sure to slide the tank into the slot until it clicks into place.
- The drain in the steam feeder tank may be clogged with hard water scale. If this happens, the descaling function must be run before the steam function can be used.
Water pools in the bottom of the oven during or after steam cooking
- During steam cooking, the water in the steam feeder is transferred to the bottom of the oven. It is normal for water to fill the bottom of the oven during or after the Steam mode.
- If the water leaves mineral deposits on the oven bottom, remove the deposits with a cloth or sponge soaked in vinegar.
White residue appears on the oven bottom after steam cooking
- Using hard water in the steam feeder can result in hard water scale on the oven bottom.
- To remove mineral deposits that remain on the oven bottom, use a cloth or sponge soaked in vinegar or a weak citric acid solution.
Trouble connecting appliance and smartphone to Wi-Fi network
- The password for the Wi-Fi network was entered incorrectly.
- Delete your home Wi-Fi network and begin the registration process again.
- Mobile data for your smartphone is turned on.
- Turn off the Mobile data on your smartphone before registering the appliance.
- The wireless network name (SSID) is set incorrectly.
- The wireless network name (SSID) should be a combination of English letters and numbers. (Do not use special characters.)
- The router frequency is not 2.4 GHz.
- Only a 2.4 GHz router frequency is supported. Set the wireless router to 2.4 GHz and connect the appliance to the wireless router. To check the router frequency, check with your Internet service provider or the router manufacturer.
- The distance between the appliance and the router is too far.
- If the appliance is too far from the router, the signal may be weak and the connection may not be configured correctly. Move the router closer to the appliance or purchase and install a Wi-Fi repeater.