Operating manual Purifying fan
Getting started
Assembly
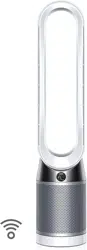
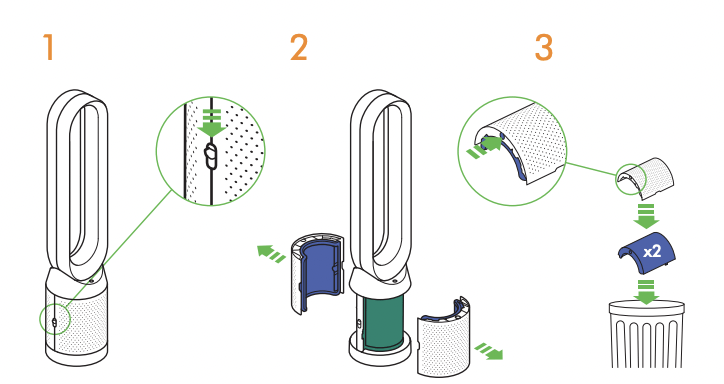
Use both hands to lift the appliance out of the box, taking care to hold by the base of the appliance only. Do not lift out by the amplifier loop
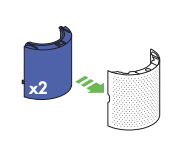
- Take the carbon filters out of the box and remove the protective packaging.
- Attach both carbon filters to the appliance.
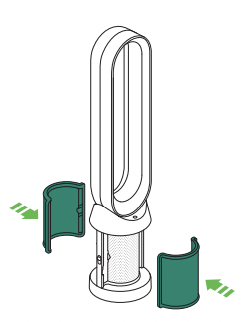
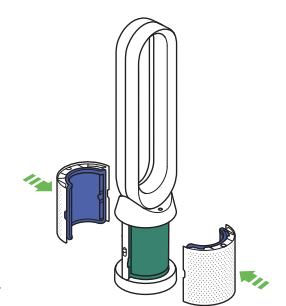
Remove the glass HEPA filters from their protective packaging and push into the shrouds until secure
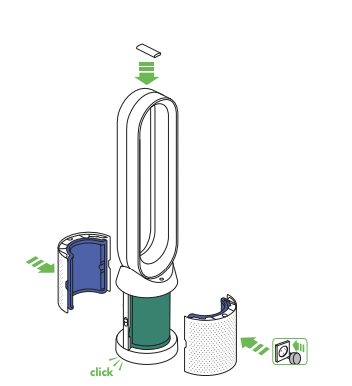
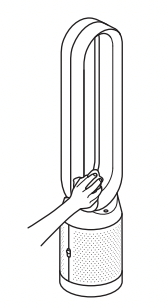
- Position the shrouds onto the base and push gently until they click securely into place.
- Place the remote control on the top of the appliance with the buttons facing down.
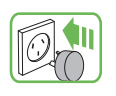
- Plug in and switch on.
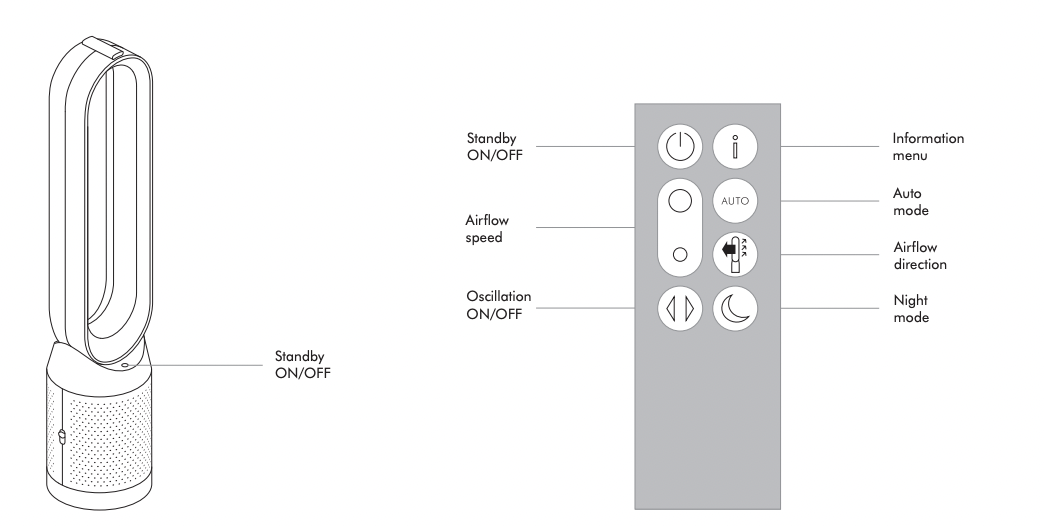
Controls
Additional functions
Standby ON/OFF
Press the Standby ON/OFF button on the appliance or remote control to stop the purifying fan. The appliance will continue to monitor the air quality if the continuous monitoring function has been enabled, otherwise it will go in to standby. To reactivate the appliance press the Standby ON/OFF button on the appliance or remote control.
Continuous monitoring
The continuous monitoring function will: • Collect extensive environmental information (see the Information menu" section).
- Allow historical air quality information to be displayed on the screen and in the Dyson Link app.
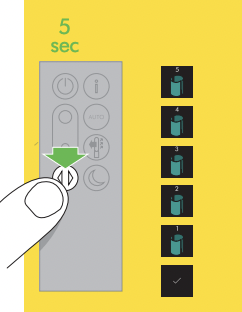
- To enable/disable continuous monitoring, press and hold the Auto mode button for 5 secs
Connecting to the Dyson Link app

The Dyson Link app allows you to control, schedule, monitor, and customise your settings for your appliance from your mobile device. Wi-Fi is enabled by default.
To disable or enable the Wi-Fi press and hold the ON/OFF button on the appliance for 5 Seconds.
Apple and the Apple logo are trademarks of Apple Inc., registered in the U.S. and other countries. App Store is a service mark of Apple Inc., registered in the U.S. and other countries.
Google Play and the Google Play logo are trademarks of Google Inc
App functionality may vary by location. Requires WiFi and a smart phone. Standard data and messaging rates may apply. The Bluetooth® word mark and logos are registered trade marks owned by the Bluetooth SIG, Inc. and any use of such marks by Dyson is under license.


Plug in your appliance to the mains electricity supply and turn on the power.
Check your mobile device is compatible with the app, switched on, connected to a Wi-Fi network and Bluetooth® wireless technology enabled.
If you do not already have the Dyson Link app you will need to download it from the App Store or Google Play.
Open the Dyson Link app and follow the instructions to create a new account if you do not already have one.
Follow the on-screen instructions to pair your appliance to the Dyson Link app.
You will now be able to use the Dyson Link app to create custom settings, monitor information from the appliance, control your appliance, schedule use and also keep up to date with system upgrades.
If you experience problems downloading the Dyson Link app or pairing your device; first check that you are connected to a Wi-Fi network and Bluetooth® wireless technology is enabled on your mobile device and try again.
If you continue to experience problems downloading the app or pairing your device, please contact the Dyson Helpline.
Information menu
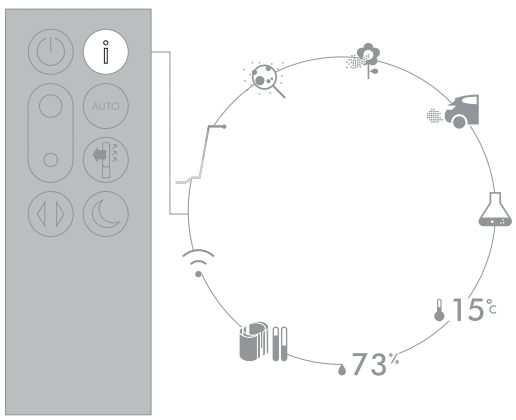
Scroll through the options to monitor the performance of your appliance.
The menu will also allow you to access information about the pollutants in the air and the temperature and humidity levels.
When a particular type of pollutant causes air quality to decrease, the symbol for that pollutant will show in the display

Indoor air quality - 12 seconds Monitor the current air quality with a graph showing the last 12 seconds of data.

Particulate matter (PM2.5) Microscopic particles up to 2.5 microns in size, suspended in the air we breathe. These include smoke, bacteria and allergens.

Particulate matter (PM10) Larger microscopic particles up to 10 microns in size, suspended in the air we breathe. These include dust, mould and pollen.
Nitrogen dioxide and other oxidising gases These potentially harmful gases are released into the air by combustion, for example the burning gas when cooking and in vehicle exhaust emissions.
Volatile organic compounds VOC’s are typically odours that may be potentially harmful. These can be found in cleaning products, paints and new furnishings.
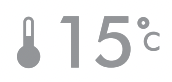
Indoor temperature Monitor the ambient temperature to help maintain a comfortable environment.
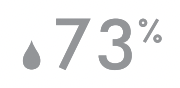
Indoor humidity The amount of water vapour in the air, shown as a percentage of the maximum possible humidity at the current temperature
Filters The remaining filter life is shown in the display and will indicate when either filter needs replacing.

Wi-Fi The current status of connection to the Wi-Fi network.
Auto mode
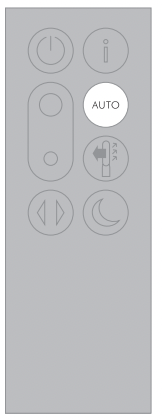
When Auto mode is selected the on-board sensors will intelligently adjust the settings of the appliance according to the quality of air.
The appliance will pause once the sensors detect that the target air quality level has been reached.
The sensors will continue to monitor the air quality, switching the appliance back on when air quality levels have dropped.
Airflow
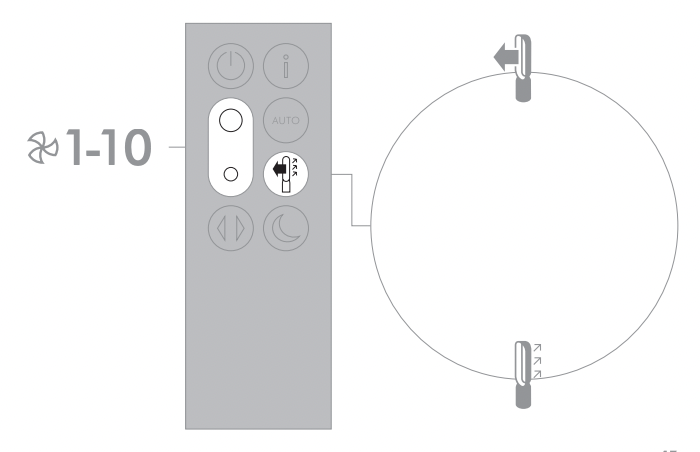
Air will be purified continuously, whether the air is set to flow from the front or the back.
For purification and cool airflow, select the airflow direction to the front.
For purification without cool airflow from the front, select the airflow direction to the back.
Press the Airflow speed button to increase and decrease the airflow speed.
Night mode
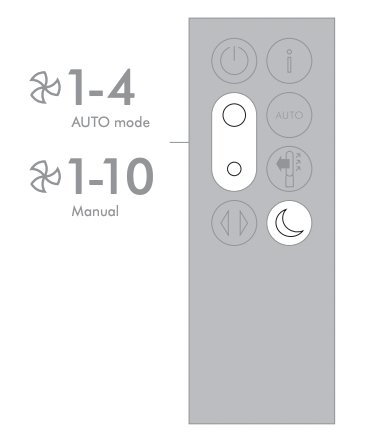
Night mode will dim the display and the appliance will run more quietly, making it ideal for use while sleeping.
If Auto mode has been set, Night mode will reduce airflow speeds to range from 1 to 4.
You can manually change the airflow from 1-10.
Press the Night mode button multiple times to scroll through the timer options.
Oscillation
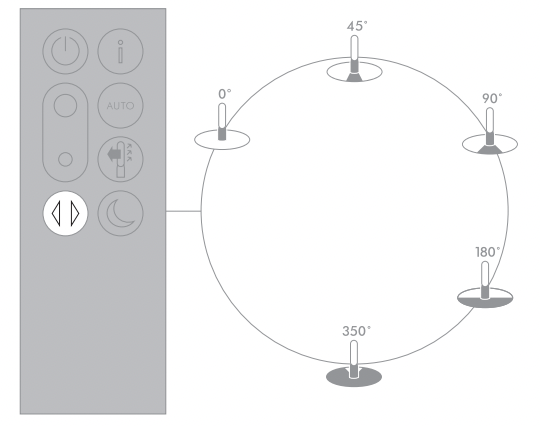
Press the Oscillation button to scroll through the options from 0° to 350°.
Customise your oscillation settings in the Dyson Link app.
Small details may vary slightly from those shown.
Maintenance
Changing the glass HEPA filters

Important: Always unplug the appliance before changing filters. The remaining filter life is shown in the display and will indicate when the non-washable glass HEPA filter needs replacing.
Dispose of used filter units in accordance with local regulations.
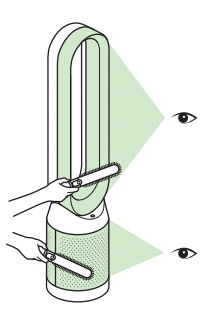
- Unplug the appliance from the mains electricity supply. Slide the buttons down on both sides of the shrouds.
- The shrouds will release with the glass HEPA filters attached.
- Empty the glass HEPA filters directly into the bin by pushing in both the purple tabs on the shrouds.
4. Push the new glass HEPA filters into the shrouds until secure.
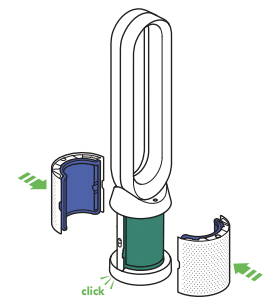
5. Push the shrouds until they click back into position in the base.
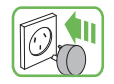
6. Plug the appliance in to the mains electricity supply and switch on.
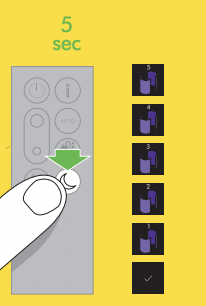
7. Important Press and hold the Night mode button on the remote control. The display on the appliance will countdown from five, finishing with the default screen. The glass HEPA filter level will be reset and the appliance is ready to use.
Changing the carbon filters
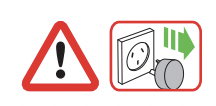
Important: Always unplug the appliance before changing filters. The remaining filter life is shown in the display and will indicate when the non-washable carbon filter needs replacing.

- Unplug the appliance from the mains electricity supply. Slide the buttons down on both sides of the shrouds.
- The shrouds will release with the glass HEPA filters attached.
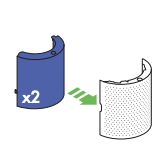
- To remove the carbon filters: pull the tabs on both sides of the filters. Dispose of the carbon filters in the bin.
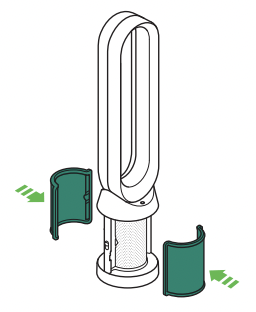
4. Push the new carbon filters onto the base until secure.
5. Push the shrouds until they click back into position in the base.
6. Plug the appliance in to the mains electricity supply and switch on.
7. Important : Press and hold the Oscillation button on the remote control. The display on the appliance will countdown from five, finishing with the default screen. The carbon filter level will be reset and the appliance is ready to use.
Cleaning
To ensure that your appliance works efficiently, it is important to clean and check for blockages regularly. Unplug your appliance from the mains electricity supply before cleaning.
Dust may accumulate on the surface of the machine. Wipe dust from the loop amplifier, filter unit and other parts with a dry or damp cloth.
Look for blockages in the air inlet holes on the filter and the small aperture inside the loop amplifier. Use a soft brush to remove dust and debris.
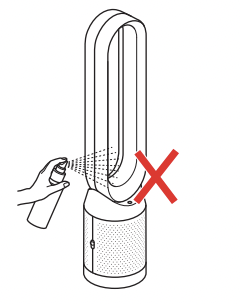
Do not use detergents or polishes to clean the appliance.
Troubleshooting

1. If the appliance has been used without a filter in place or the filters have not been changed when prompted, blockages may occur.
2. To remove a blockage:
- Remove the filter shrouds and look for blockages in the air inlet holes under the filters.
- Use a soft brush to remove dust and debris. If an error code is displayed, first try unplugging the appliance and plugging it in again. If an error code continues to be displayed, contact the Dyson Help
3. If an error code is displayed, first try unplugging the appliance and plugging it in again.
If an error code continues to be displayed, contact the Dyson Helpline.
CONTROL WITHOUT THE REMOTE
- The appliance can be controlled through your Dyson Link app.
DYSON LINK APP CONNECTIVITY
- You must have a live Internet connection in order for the Dyson Link app to work.
- The appliance can connect to either 2.4GHz or 5GHz networks which includes most modern routers. Check your router documentation for compatibility.
- The Dyson Link app requires an iOS device with at least iOS version 10* or an Android device with at least Android version 5.
- Your mobile device must have Bluetooth® wireless technology 4.0 support (Bluetooth® wireless technology Low Energy) in order to set up a connection with the appliance. Check your device specification for compatibility.
- Supported Wi-Fi protocols:
- IEE E802.11a
- IEEE802.11b (Not recommended)
- IEEE802.11g
- IEEE802.11n
REPLACEABLE PARTS
BATTERY REPLACEMENT
CAUTION
- Unscrew the battery compartment on the remote control. Loosen the base and pull to remove the battery.
- Do not install backwards or short circuit the batteries.
- Do not attempt to dismantle or charge the batteries. Keep away from fire.
- Follow battery manufacturers' instructions when installing new batteries battery type CR 2032).
- Always replace the screw in the remote control and refer to the battery hazard in the warning section.
NON-WASHABLE FILTER UNITS
- Your filter units are non-washable and non-recyclable.
- To replace your filter units follow the steps as shown.
- Failure to replace the filter units when prompted may result in changes to product performance and appearance.
- New filter units can be purchased at www.dyson.com.au/support (AU) or www.dyson.co.nz/support (NZ).
AUTO MODE
- A period of 6 days is required after the appliance is first used for the sensor to calibrate. During this period the appliance may be more sensitive to VOCs (such as odours) than normal.
DISPOSAL INFORMATION
Dyson products are made from high grade recyclable materials. Please dispose of this product responsibly and recycle where possible. When your Dyson appliance reaches the end of its life, we are responsible for its safe disposal. You can send your old Dyson appliance back to us (at our cost) and we will organise for it to be recycled.* *Please note that not all parts are recyclable. Recycling of parts is subject to the capabilities of 3rd party suppliers. Available in Australia only.
Simply:
1. Box up your old Dyson appliance.
2. Take the package to your local post office and send to the address below:
Dyson We Recycle Reply Paid 83215 Dyson Service Centre 8–10 Mangrove Lane Taren Point, NSW 2229
• Keep the used batteries away from children as these can still harm children if swallowed.
• Your filter units are non-washable and non-recyclable.
• Dispose of the exhausted filter units in accordance with local ordinances or regulations.
• The battery should be removed from the product before disposal.
DYSON CUSTOMER CARE
THANK YOU FOR CHOOSING TO BUY A DYSON APPLIANCE.
After registering your 2 year Dyson guarantee, your Dyson appliance will be covered for parts and labour for 2 years from the date of purchase, subject to the terms of the guarantee. If you have any questions about your Dyson appliance, call the Dyson Helpline with your serial number and details of where/when you bought the appliance. Most questions can be solved over the phone by one of our trained Dyson Helpline staff. Your serial number can be found on your rating plate which is on the base of the appliance.
• If your Dyson appliance needs a service, call the Dyson Customer Care Helpline so we can discuss the available options.
DYSON 2 YEAR GUARANTEE
TERMS AND CONDITIONS OF THE DYSON 2 YEAR GUARANTEE
WHAT IS COVERED
- The repair or replacement of your Dyson appliance (at Dyson’s discretion) if it is found to be defective due to faulty materials, workmanship or function within 2 years of purchase or delivery (if any part is no longer available or out of manufacture Dyson will replace it with a functional replacement part).
- This Dyson guarantee will only be valid if the appliance is used in the country in which it was sold.
WHAT IS NOT COVERED
- Replacement filter units. The appliance's filter units are not covered by the guarantee. Under your Dyson guarantee, Dyson shall not be liable for costs of repair or replacement of a product incurred as a result of:
- Damage caused by not carrying out the recommended appliance maintenance.
- Accidental damage, faults caused by negligent use or care, misuse, neglect, careless operation or handling of the Dyson appliance which is not in accordance with this Dyson Operating Manual.
- Use of the Dyson appliance for anything other than normal domestic purposes in the country of purchase.
- Use of parts not assembled or installed in accordance with the instructions of Dyson.
- Use of parts and accessories other than those produced or recommended by Dyson.
- Faulty installation (except where installed by Dyson).
- Repairs or alterations carried out by parties other than Dyson or its authorised agents.
- Blockages – Please refer to the 'Troubleshooting‘ section and illustrations in this Dyson Operating Manual for details of how to look for and clear blockages.
- Normal wear and tear (e.g. fuse etc.).
- Reduction in battery discharge time due to battery age or use (cordless machines only).
- Whether or not your Dyson guarantee applies, you may have statutory rights and remedies available to you as a consumer. If you are in any doubt as to what is covered by your Dyson guarantee, please call the Dyson Helpline.
OTHER TERMS RELATING TO THE DYSON GUARANTEE
- The Dyson guarantee becomes effective from the date of purchase.
- All work will be carried out by Dyson Appliances (Aust.) Pty Limited, Dyson New Zealand Limited (NZ) or their authorised agents.
- Any parts replaced by Dyson or its service agents will become the property of Dyson Appliances (Aust.) Pty Limited or Dyson New Zealand Limited (NZ).
- You must provide proof of (both the original and any subsequent) delivery/purchase before any work can be carried out on your Dyson appliance. Without this proof, any work carried out pursuant to the Dyson guarantee and any associated delivery charges both to and from us) will be at your cost, subject to your statutory rights and remedies as a consumer. Please keep your receipt or delivery note.
- Whether or not your Dyson guarantee applies, you may have statutory rights and remedies available to you as a consumer. If you are in any doubt as to what is covered by your Dyson guarantee, please call the Dyson Helpline.
AUSTRALIAN CONSUMER LAW
In addition to your rights under the Dyson guarantee, we also provide the following statement as required by the Australian Consumer Law: In Australia, your Dyson appliance comes with statutory guarantees that cannot be excluded under the Australian Consumer Law. You are entitled to a replacement or refund for a major failure and for compensation for any other reasonably foreseeable loss or damage. You are also entitled to have your Dyson appliance repaired or replaced if it fails to be of acceptable quality and the failure does not amount to a major failure.
ABOUT YOUR PRIVACY
PRIVACY AND PERSONAL DATA PROTECTION
You will need to provide us with basic contact information when you register your Dyson Product or the Dyson Link app;
WHEN REGISTERING YOUR DYSON APPLIANCE
• You will need to provide us with basic contact information to register your appliance and enable us to support your Dyson guarantee.
WHEN REGISTERING VIA THE DYSON LINK APP
- You will need to provide us with basic contact information to register the Dyson Link app; this enables us to securely link your product to your instance of the app. When you register, you will have the opportunity to choose whether you would like to receive communications from us. If you opt-in to communications from Dyson, we will send you details of special offers and news of our latest innovations. We never sell your information to third parties and only use information that you share with us as defined by our privacy policies which are available on our website privacy.dyson.com