
W11450808C
FREESTANDING GAS RANGE OWNER'S MANUAL
CUISINIÈRE À GAZ AUTOPORTANTE MANUEL DU
PROPRIÉTAIRE
Table of Contents/Table des matières
RANGE SAFETY..............................................................2
Range Safety................................................................2
RANGE MAINTENANCE AND CARE...................................6
General Cleaning...........................................................6
Self-Cleaning Cycle........................................................7
INSTALLATION INSTRUCTIONS ........................................7
REQUIREMENTS.............................................................7
Tools and Parts .............................................................7
Location Requirements ...................................................8
Electrical Requirements ..................................................9
Gas Supply Requirements ...............................................9
INSTALLATION ............................................................. 10
Unpack Range ............................................................ 10
Install Anti-Tip Bracket .................................................. 11
Make Gas Connection .................................................. 12
Verify Anti-Tip Bracket Is Installed and Engaged ................. 14
Level Range ............................................................... 15
Electronic Ignition System.............................................. 15
Warming Drawer or Premium Storage Drawer (on some
models) ..................................................................... 17
Storage Drawer (on some models) .................................. 18
Oven Door.................................................................. 18
Complete Installation .................................................... 18
GAS CONVERSIONS...................................................... 19
Propane Gas Conversion .............................................. 19
Natural Gas Conversion ................................................ 22
Moving the Range........................................................ 25
SÉCURITÉ DE LA CUISINIÈRE ........................................ 26
Sécurité de la cuisinière ................................................ 26
ENTRETIEN ET RÉPARATION DE LA CUISINIÈRE.............. 30
Nettoyage général........................................................ 30
Programme de nettoyage .............................................. 31
INSTRUCTIONS D’INSTALLATION ................................... 32
EXIGENCE ................................................................... 32
Outils et pièces............................................................ 32
Exigences d’emplacement ............................................. 32
Spécifications électriques .............................................. 33
Spécifications de l’alimentation en gaz ............................. 34
INSTALLATION ............................................................. 35
Déballage de la cuisinière.............................................. 35
Installation de la bride antibasculement ............................ 36
Raccordement au gaz................................................... 37
Vérifier que la bride antibasculement est bien installée et
engagée .................................................................... 38
Réglage de l’aplomb de la cuisinière ................................ 39
Système d’allumage électronique .................................... 40
Tiroir-réchaud ou tiroir de remisage de qualité supérieure
(sur certains modèles) .................................................. 42
Tiroir de remisage (sur certains modèles).......................... 42
Porte du four............................................................... 43
Achever l’installation..................................................... 43
CONVERSIONS POUR CHANGEMENT DE GAZ ................. 44
Conversion pour l’alimentation au propane ........................ 44
Conversion pour l’alimentation au gaz naturel .................... 48
Déplacement de la cuisinière.......................................... 51
IMPORTANT:
Installer:
Leave installation instructions with the homeowner.
Homeowner: Keep installation instructions for future reference.
IMPORTANT :
Installateur : Remettre les instructions d’installation au propriétaire
Propriétaire : Conserver les instructions d’installation pour référence ultérieure.
2
RANGE SAFETY
WARNING: If the information in these instructions is not followed exactly, a fire or
explosion may result causing property damage, personal injury or death.
− Do not store gasoline or other flammable vapors and liquids in the vicinity of this or any
other appliance.
− WHAT TO DO IF YOU SMELL GAS
• Do not try to light any appliance.
• Do not touch any electrical switch.
• Do not use any phone in your building.
• Immediately call your gas supplier from a neighbor’s phone. Follow the gas suppliers
instructions.
• If you cannot reach your gas supplier, call the fire department.
− Installation and service must be performed by a qualified installer, service agency or the
gas supplier.
WARNING:
Never Operate the Top Surface Cooking Section of this Appliance Unattended
• Failure to follow this warning statement could result in fire, explosion, or burn hazard that
could cause property damage, personal injury, or death.
• If a fire should occur, keep away from the appliance and immediately call your fire
department.
DO NOT ATTEMPT TO EXTINGUISH AN OIL/GREASE FIRE WITH WATER.
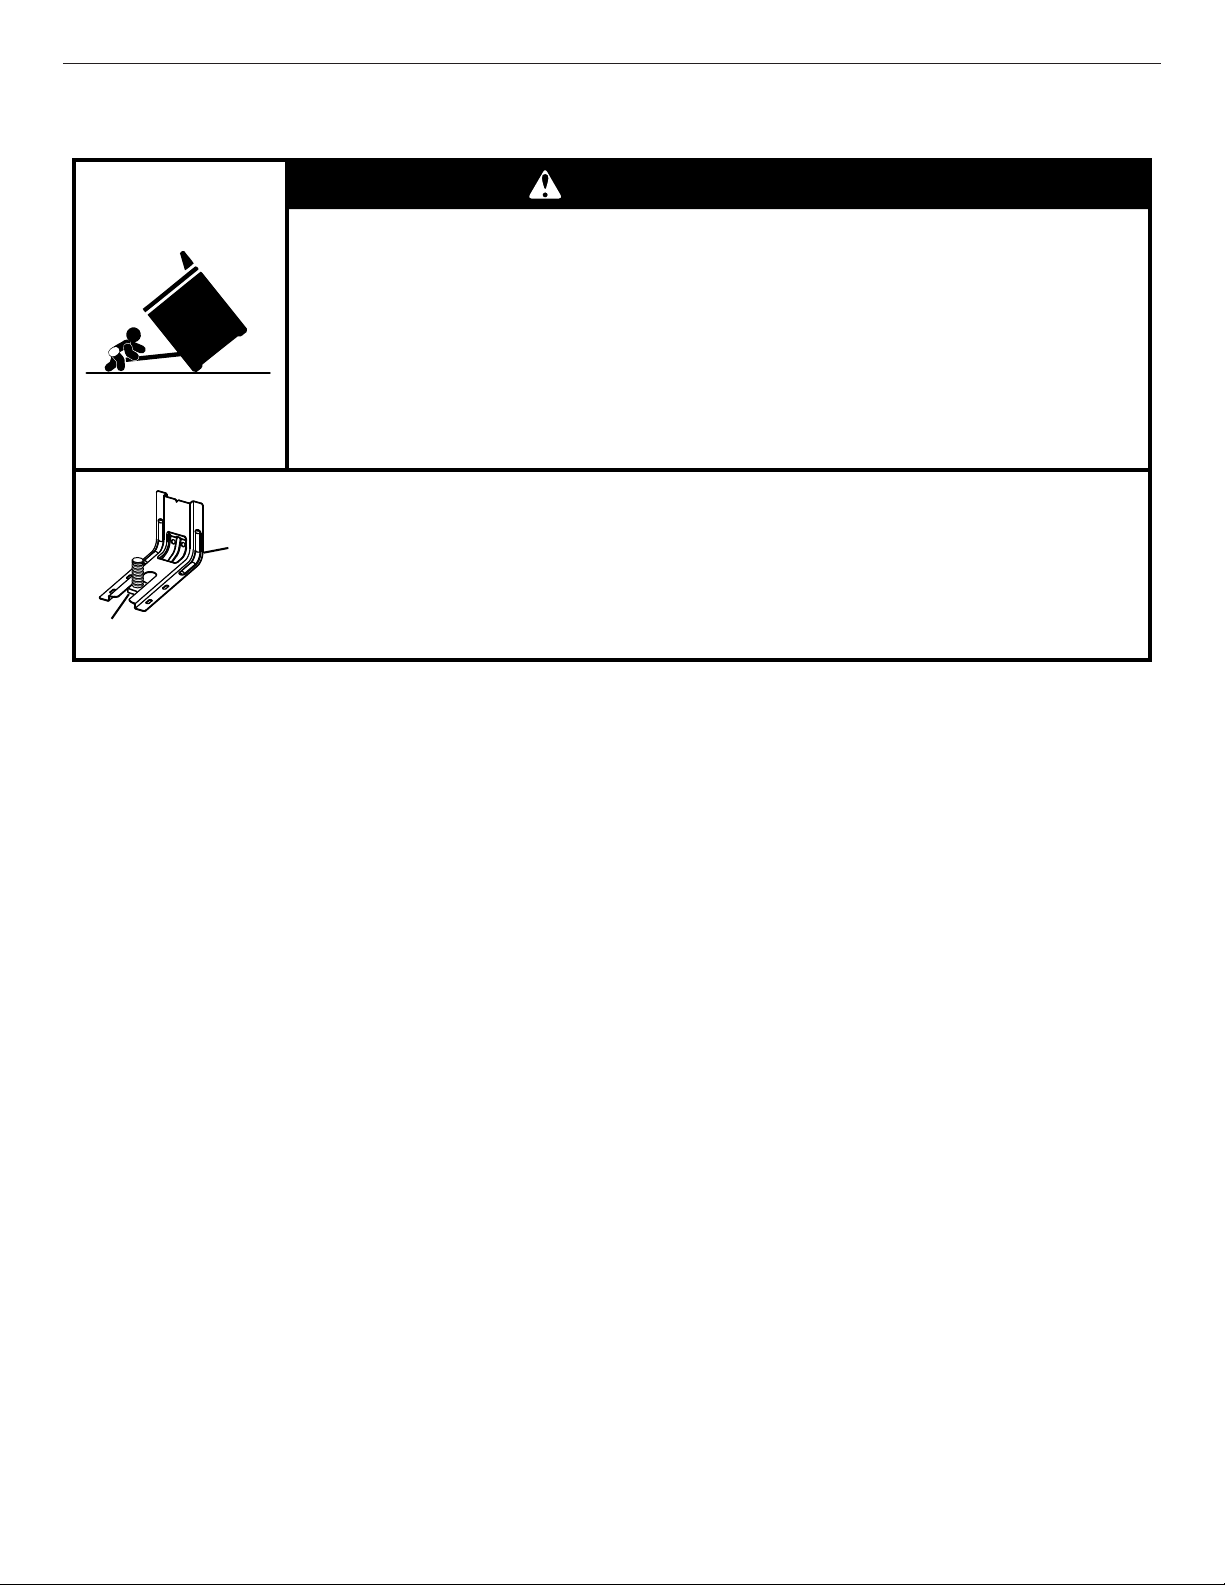
The range will not tip during normal use. However, the range can tip if you apply too much force or weight to the open door without the
anti-tip bracket fastened down properly.
WARNING
Tip Over Hazard
A child or adult can tip the range and be killed.
Install anti-tip bracket to floor or wall per installation instructions.
Slide range back so rear range foot is engaged in the slot of the anti-tip bracket.
Re-engage anti-tip bracket if range is moved.
Do not operate range without anti-tip bracket installed and engaged.
Failure to follow these instructions can result in death or serious burns to children and adults.
To verify the anti-tip bracket is properly installed and engaged:
• Slide range forward.
• Look for the anti-tip bracket securely attached to floor or wall.
• Slide range back so rear range foot is under the anti-tip bracket.
• See Installation Instructions for details.
3
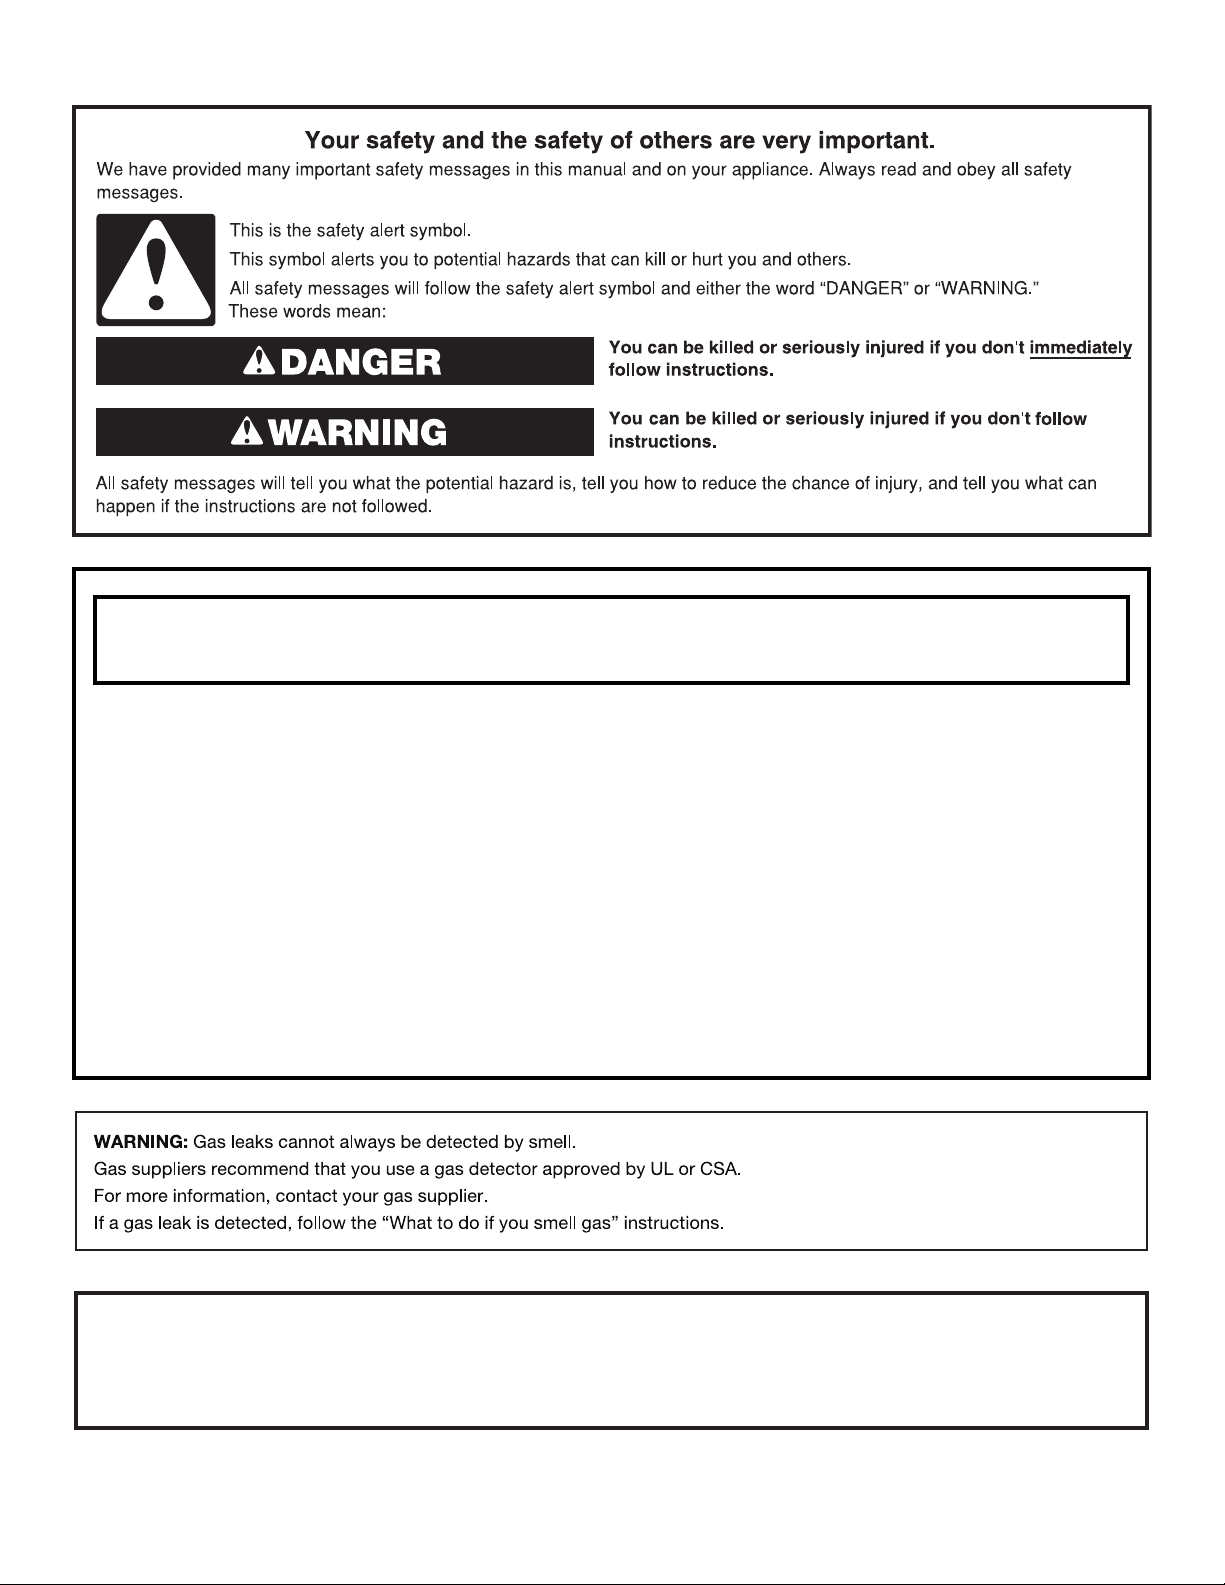
WARNING: Gas leaks cannot always be detected by smell.
Gas suppliers recommend that you use a gas detector approved by UL or CSA.
For more information, contact your gas supplier.
If a gas leak is detected, follow the “What to do if you smell gas” instructions.
Your safety and the safety of others are very important.
We have provided many important safety messages in this manual and on your appliance. Always read and obey all safety
messages.
This is the safety alert symbol.
This symbol alerts you to potential hazards that can kill or hurt you and others.
All safety messages will follow the safety alert symbol and either the word “DANGER” or “WARNING.” These
words mean:
DANGER
You can be killed or seriously injured if you don't
immediately follow instructions.
WARNING
You can be killed or seriously injured if you don’t follow
instructions.
All safety messages will tell you what the potential hazard is, tell you how to reduce the chance of injury, and tell you what can
happen if the instructions are not followed.
IMPORTANT: Do not install a ventilation system that blows air downward toward this gas cooking appliance. This type of ventilation
system may cause ignition and combustion problems with this gas cooking appliance resulting in personal injury or unintended
operation.
In the State of Massachusetts, the following installation instructions apply:
� Installation and repairs must be performed by a qualified or licensed contractor, plumber, or gas fitter qualified or licensed by the
State of Massachusetts.
� Acceptable Shut-off Devices: Gas Cocks and Ball Valves installed for use shall be listed.
� A flexible gas connector, when used, must not exceed 4 feet (121.9 cm).
4
IMPORTANT SAFETY INSTRUCTIONS
WARNING: To reduce the risk of fire, electric shock, or injury to persons when using the appliance, follow basic precautions,
including the following:
�
WARNING: TO REDUCE THE RISK OF TIPPING OF
THE RANGE, THE RANGE MUST BE SECURED BY
PROPERLY INSTALLED ANTI-TIP DEVICES. TO CHECK
IF THE DEVICES ARE INSTALLED PROPERLY, SLIDE
RANGE FORWARD, LOOK FOR ANTI-TIP BRACKET
SECURELY ATTACHED TO FLOOR OR WALL, AND
SLIDE RANGE BACK SO REAR RANGE FOOT IS
UNDER ANTI-TIP BRACKET.
WARNING
NEVER use this appliance as a space heater to heat or warm
the room. Doing so may result in carbon monoxide poisoning
and overheating of the oven.
WARNING
NEVER cover any slots, holes or passages in the oven
bottom or cover an entire rack with materials such as
aluminum foil. Doing so blocks air flow through the oven and
may cause carbon monoxide poisoning. Aluminum foil linings
may also trap heat, causing a fire hazard.
�
CAUTION: Do not store items of interest to children in
cabinets above an appliance or on the backguard of an
appliance - children climbing on the appliance to reach
items could be seriously injured.
� Do Not Leave Children Alone - Children should not be left
alone or unattended in area where appliance is in use.
They should never be allowed to sit or stand on any part of
the appliance.
� Wear Proper Apparel – Loose-fitting or hanging garments
should never be worn while using the appliance.
� User Servicing – Do not repair or replace any part of the
appliance unless specifically recommended in the manual.
All other servicing should be referred to a qualified
technician.
� Storage in or on Appliance – Flammable materials should
not be stored in an oven or near surface units.
� This appliance is not intended for storage.
� Do Not Use Water on Grease Fires – Smother fire or flame
or use dry chemical or foam-type extinguisher.
� Use Only Dry Potholders – Moist or damp potholders on hot
surfaces may result in burns from steam. Do not let
potholder touch hot surface units. Do not use a towel or
other bulky cloth.
� Never Leave Surface Units Unattended at High Heat
Settings – Boilover causes smoking and greasy spillovers
that may ignite.
� Glazed Cooking Utensils – Only certain types of glass,
glass/ceramic, ceramic, earthenware, or other glazed
utensils are suitable for range-top service without breaking
due to the sudden change in temperature.
� Utensil Handles Should Be Turned Inward and Not Extend
Over Adjacent Surface Units – To reduce the risk of burns,
ignition of flammable materials, and spillage due to
unintentional contact with the utensil, the handle of a utensil
should be positioned so that it is turned inward, and does
not extend over adjacent surface units.
� Disconnect power before servicing.
� This appliance is equipped with a three-prong grounding
plug for your protection against shock hazard and should
be plugged directly into a properly grounded receptacle. Do
not cut or remove the grounding prong from this plug.
� Proper Installation - The appliance, when installed, must be
electrically grounded in accordance with local codes, or in
the absence of local codes, with the National Electrical
Code, ANSI/NFPA 70 or the Canadian Electrical Code,
CSA C22.1-02. In Canada, the appliance must be
electrically grounded in accordance with Canadian
Electrical Code. Be sure your appliance is properly installed
and grounded by a qualified technician.
� Injuries may result from the misuse of appliance doors or
drawers such as stepping, leaning, or sitting on the doors or
drawers.
� Maintenance – Keep range area clear and free from
combustible materials, gasoline, and other flammable
vapors and liquids.
� Top burner flame size should be adjusted so it does not
extend beyond the edge of the cooking utensil. This
instruction is based on safety considerations.
� Do not use replacement parts that have not been
recommended by the manufacturer (e.g. parts made at
home using a 3D printer).
� Clean Cooktop With Caution – If a wet sponge or cloth is
used to wipe spills on a hot cooking area, be careful to
avoid steam burn. Some cleaners can produce noxious
fumes if applied to a hot surface.
� Use Care When Opening Door – Let hot air or steam
escape before removing or replacing food.
� Do Not Heat Unopened Food Containers – Build-up of
pressure may cause container to burst and result in injury.
� Keep Oven Vent Ducts Unobstructed.
� DO NOT TOUCH HEATING ELEMENTS OR INTERIOR
SURFACES OF OVEN – Heating elements may be hot
even though they are dark in color. Interior surfaces of an
oven become hot enough to cause burns. During and after
use, do not touch, or let clothing or other flammable
materials contact heating elements or interior surfaces of
oven until they have had sufficient time to cool. Other
surfaces of the appliance may become hot enough to cause
burns – among these surfaces are oven vent openings and
surfaces near these openings, oven doors, and windows of
oven doors.
SAVE THESE INSTRUCTIONS

5
IMPORTANT SAFETY INSTRUCTIONS
� Care must be taken to prevent aluminum foil and meat
probes from contacting heating elements.
For self-cleaning ranges –
� CAUTION: DO NOT LEAVE FOOD OR COOKING
UTENSILS, ETC., IN OVEN DURING THE PYROLYTIC
SELF-CLEANING MODE OF OPERATION.
� Do Not Clean Door Gasket – The door gasket is essential
for a good seal. Care should be taken not to rub, damage,
or move the gasket.
� Do Not Use Oven Cleaners – No commercial oven cleaner
or oven liner protective coating of any kind should be used
in or around any part of the oven.
� Clean Only Parts Listed in Manual.
� Before Self-Cleaning the Oven – Remove broiler pan and
other utensils. Wipe off all excessive spillage before
initiating the cleaning cycle.
For units with ventilating hood –
� Clean Ventilating Hoods Frequently – Grease should not be
allowed to accumulate on hood or filter.
� When flaming foods under the hood, turn the fan on.
For smart enabled ranges and ovens
� Remote operation – This appliance is configurable to allow
remote operation at any time. Do not store any flammable
materials or temperature sensitive items inside, on top or
near surface units of the appliance.
SAVE THESE INSTRUCTIONS
6
RANGE MAINTENANCE AND
CARE
General Cleaning
IMPORTANT: Before cleaning, make sure all controls are OFF
and the oven and cooktop are cool. Always follow label
instructions on cleaning products.
Soap, water, and a soft cloth or sponge are suggested first, unless
otherwise noted.
EXTERIOR PORCELAIN ENAMEL SURFACES (on some
models)
Food spills containing acids, such as vinegar and tomato, should
be cleaned as soon as the entire range is cool. These spills may
affect the finish.
Cleaning Method:
� Glass cleaner, mild liquid cleaner, or nonabrasive scrubbing
pad: Gently clean around the model/serial/rating plate because
scrubbing may remove numbers.
� Affresh
®
† Kitchen and Appliance Cleaner Part Number
W10355010 (not included):
See the Quick Start Guide for ordering information.
STAINLESS STEEL (On some models)
NOTE: To avoid damage to stainless steel surfaces, do not use
soap-filled scouring pads, abrasive cleaners, Cooktop Cleaner,
steel-wool pads, gritty washcloths, or abrasive paper towels.
Damage may occur to stainless steel surfaces, even with one-time
or limited use.
Cleaning Method:
� Rub in direction of grain to avoid damaging.
� Affresh
®
Stainless Steel Cleaner Part Number W10355016
(not included):
See the Quick Start Guide for ordering information.
METALLIC PAINT (On some models)
Do not use abrasive cleaners, cleaners with bleach, rust
removers, ammonia, or sodium hydroxide (lye) because paint
surface may stain.
PORCELAIN-COATED GRATES AND CAPS
Food spills containing acids, such as vinegar and tomato, should
be cleaned as soon as the cooktop, grates and caps are cool.
These spills may affect the finish.
To avoid chipping, do not bang grates, and caps against each
other or hard surfaces such as cast iron cookware.
Do not reassemble caps on burners while wet. Do not clean in the
Self-Cleaning cycle.
Cleaning Method:
� Nonabrasive plastic scrubbing pad and mildly abrasive
cleanser: Clean as soon as cooktop, grates, and caps are
cool.
� Dishwasher (grates only, not caps):
Use the most-aggressive cycle. Cooked-on soils should be
soaked or scrubbed before going into a dishwasher.
Although the burner grates are durable, they may lose their
shine and/or discolor when washed in a dishwasher.
� Gas Grate and Drip Pan Cleaner Part Number 31617 (not
included):
See the Quick Start Guide for ordering information.
SURFACE BURNERS
Food spills containing acids, such as vinegar and tomato, should
be cleaned as soon as the cooktop, grates, and caps are cool.
These spills may affect the finish.
To avoid chipping, do not bang grates and caps against each
other or hard surfaces such as cast iron cookware.
Do not reassemble caps on burners while wet.
Do not clean in the Self-Cleaning cycle.
Do not clean in dishwasher.
Cleaning Method:
� Nonabrasive plastic scrubbing pad and mildly abrasive
cleanser:
Clean as soon as cooktop, grates, burners, and caps are cool.
� Gas Grate and Drip Pan Cleaner (not included).
COOKTOP CONTROLS
To avoid damage to the cooktop controls, do not use steel wool,
abrasive cleansers, or oven cleaner.
To avoid damage, do not soak knobs. When replacing knobs,
make sure knobs are in the Off position.
On some models, do not remove seals under knobs.
Cleaning Method:
� Soap and water: Pull knobs straight away from control panel to
remove
CONTROL PANEL AND OVEN DOOR EXTERIOR
To avoid damage to the control panel, do not use abrasive
cleaners, steel-wool pads, gritty washcloths, or abrasive paper
towels.
Cleaning Method:
� Glass cleaner and soft cloth or sponge: Apply glass cleaner to
soft cloth or sponge, not directly on panel.
� affresh
®
Kitchen and Appliance Cleaner Part Number
W10355010 (not included):
See the Quick Start Guide for ordering information.
OVEN RACKS
Cleaning Method:
� Steel-wool pad.
� For racks that have discolored and are harder to slide, a light
coating of vegetable oil applied to the rack guides will help
them slide.
� Dishwasher (steam rack water reservoir only, not racks):
Although the water reservoir is durable, it may lose its shine
and/or discolor when washed in a dishwasher.
STORAGE/WARMING DRAWER (On some models)
Check that storage/warming drawer is cool and empty before
cleaning.
Cleaning Method:
� Mild detergent
OVEN CAVITY
Do not use oven cleaners.
Food spills should be cleaned when oven cools. At high
temperatures, foods react with porcelain. Staining, etching, pitting,
or faint white spots can result.
Cleaning Method:
� Self-Cleaning cycle: See the “Self-Cleaning Cycle” or “Clean
Cycle” section first.
†
®
Affresh is a registered trademark of Whirlpool, U.S.A.
7
Self-Cleaning Cycle
WARNING
Burn Hazard
Do not touch the oven during the Self-Cleaning cycle.
Keep children away from the oven during Self-Cleaning
cycle.
Failure to follow these instructions can result in burns.
IMPORTANT: The health of some birds is extremely sensitive to
the fumes given off during the Self-Cleaning cycle. Exposure to
the fumes may result in death to certain birds. Always move birds
to another closed and well-ventilated room.
Do not block the oven vent(s) during the Self-Cleaning cycle. Air
must be able to move freely. Depending on your model, see the
“Oven Vent” or “Oven Vents” section in the Quick Start Guide.
Do not clean, rub, damage, or move the oven door gasket.
Prepare Range
� Remove the broiler pan, grid, cookware and bakeware, all
cooking utensils, oven racks, and aluminum foil and, on some
models, the temperature probe from the oven.
� Use a damp cloth to clean inside door edge and the
1
1
/
2
"(3.8 cm) area around the inside oven cavity frame, being
certain not to move or bend the gasket.
� Remove plastic items from the cooktop because they may
melt.
� Remove all items from the storage drawer.
How the Cycle Works
IMPORTANT: The heating and cooling of porcelain on steel in the
oven may result in discoloring, loss of gloss, hairline cracks and
popping sounds.
Before Self-Cleaning, make sure the door is completely closed or
the door will not lock and the Self-Cleaning cycle will not begin.
Once the oven has completely cooled, remove ash with a damp
cloth. To avoid breaking the glass, do not apply a cool, damp cloth
to the inner door glass before it has completely cooled.
To stop the Self-Cleaning cycle at any time, press OFF/CANCEL
or the Cancel keypad. If the temperature is too high, the oven door
will remain locked and “cool” and “locked/
” will be displayed.
The cooling fan may continue to run.
The oven light will not function during the Self-Cleaning cycle.
On some models: Once the cleaning temperature has been
reached, the electronic control requires a 12 hour delay before
another Self-Cleaning cycle can be started.
Electronic Oven Control with Adjustable Clean
Time (On some models)
The Self-Cleaning cycle is time adjustable between 2 hours
30 minutes and 4 hours 30 minutes in 30-minute increments.
Suggested clean times are 2 hours 30 minutes for light soil and
4 hours 30 minutes for heavy soil.
To Self-Clean:
1. Press CLEAN.
2. Press the Temp/Time “up” or “down” arrow keypad to enter the
desired Self-Cleaning cycle time.
3. Press START.
The oven door will automatically lock. The Door Locked and
Clean indicator lights will be displayed. The time remaining will
also be displayed.
4. When the Self-Cleaning cycle is complete and the oven cools,
the Door Locked and Clean indicator lights will turn off.
5. When the oven is completely cooled, remove ash with a damp
cloth.
To exit the Self-Cleaning cycle before completed, press OFF/
CANCEL or the Cancel keypad. The door will unlock once the
oven cools.
INSTALLATION INSTRUCTIONS
REQUIREMENTS
Tools and Parts
Gather the required tools and parts before starting installation.
Read and follow the instructions provided with any tools listed
here.
Tools Needed
� Tape measure
� Flat-blade screwdriver
� Phillips screwdriver
� 1/8" flat-blade screwdriver
� Level
� Hand or electric drill
� Hammer
� Wrench or pliers
� Pipe wrench
� 15/16" combination wrench
� 1/4" drive ratchet
� 3/8" nut driver
� 1/8" drill bit (for wood floors)
� Marker or pencil
� Pipe-joint compound
resistant to Propane gas
� Noncorrosive leak-detection
solution
� 3/16" carbide-tipped
masonry drill bit
(for concrete/ceramic floors)
(For Slide-in/Front Control
Ranges)
For Propane/Natural Gas
Conversions
� 3/8" combination wrench
� 1/2" combination wrench
� 5/8" combination wrench
� 9/32" nut driver
� Quadrex
®
† or Phillips
screwdriver
� Masking tape
� 3/8" nut driver
(For Slide-in/Front Control
Ranges)
†Quadrex
®
is a registered trademark of NLW Holdings, Inc.
8
Parts Supplied
Check that all parts are included.
A. Anti-tip bracket
B. #12 x 1
5
/
8
" (4.1 cm) screws (2)
Anti-tip bracket must be securely mounted to floor or wall.
Thickness of flooring may require longer screws to anchor bracket
to floor.
Parts needed
Check local codes and consult gas supplier. Check existing gas
supply and electrical supply. See “Electrical Requirements” and
“Gas Supply Requirements” sections.
NOTE: Be sure to purchase only whirlpool factory-certified parts
and accessories for your appliance. Your installation may require
additional parts. To order, refer to the contact information
referenced in your Quick Start Guide.
Location Requirements
IMPORTANT: Observe all governing codes and ordinances. Do
not obstruct flow of combustion and ventilation air.
� It is the installer’s responsibility to comply with installation
clearances specified on the model/serial/rating plate. The
model/serial/rating plate is located behind the oven door on the
top right/left-hand side of the oven frame.
� The range should be located for convenient use in the kitchen.
� Recessed installations must provide complete enclosure of the
sides and rear of the range.
� All openings in the wall or floor where range is to be installed
must be sealed.
� Cabinet opening dimensions that are shown must be used.
Given dimensions are minimum clearances.
� The anti-tip bracket must be installed. To install the anti-tip
bracket shipped with the range, see “Install Anti-Tip Bracket”
section.
� Grounded electrical supply is required. See “Electrical
Requirements” section.
� Proper gas supply connection must be available. See “Gas
Supply Requirements” section.
� Contact a qualified floor covering installer to check that the
floor covering can withstand at least 200°F (93°C).
� Use an insulated pad or 1/4" (6.4 mm) plywood under range if
installing range over carpeting.
IMPORTANT: To avoid damage to your cabinets, check with your
builder or cabinet supplier to make sure that the materials used
will not discolor, delaminate or sustain other damage. This oven
has been designed in accordance with the requirements of UL
and CSA International and complies with the maximum allowable
wood cabinet temperatures of 194°F (90°C).
Mobile Home - Additional Installation
Requirements
The installation of this range must conform to the Manufactured
Home Construction and Safety Standard, Title 24 CFR, Part 3280
(formerly the Federal Standard for Mobile Home Construction and
Safety, Title 24, HUD Part 280). When such standard is not
applicable, use the Standard for Manufactured Home Installations,
ANSI A225.1/NFPA 501A or with local codes. In Canada, the
installation of this range must conform with the current standards
CAN/CSA-Z240.1 - latest edition, or with local codes.
Mobile Home Installations Require:
� When this range is installed in a mobile home, it must be
secured according to the instructions in this document.
Cabinet Dimensions
Cabinet opening dimensions shown are for 25" (64.0 cm)
countertop depth, 24" (61.0 cm) base cabinet depth and
36" (91.4 cm) countertop height.
IMPORTANT: If installing a range hood or microwave hood
combination above the cooking surface, follow the range hood or
microwave hood combination installation instructions for
dimensional clearances above the cooktop surface.
A. 18" (45.7 cm) upper side cabinet to countertop
B. 13" (33 cm) max. upper cabinet depth
C. 30" (76.2 cm) min. opening width
D. For minimum clearance to top of cooktop, see NOTE*.
E. 30" (76.2 cm) min. opening width
F. The shaded areas are recommended for installation of rigid gas pipe.
G. 4
¹
/
2
" (11.4 cm)
H. 8" (20.3 cm)
I. 17" (43.2 cm)
J. 2" (5.1 cm)
K. 4
¹
/
2
" (11.4 cm)
L. 3" (7.6 cm) min. clearance from both sides of range to side wall or
other combustible material.
M. Grounded outlet
N. Cabinet door or hinges should not extend into the cutout.
NOTE: 24" (61.0 cm) minimum when bottom of wood or metal
cabinet is shielded by not less than 1/4" (6.35 mm) flame retardant
millboard covered with not less than No. 28 MSG sheet steel,
0.015" (0.4 mm) stainless steel, 0.024" (0.6 mm) aluminum or
0.020" (0.5 mm) copper. 30" (76.2 cm) minimum clearance
between the top of the cooking platform and the bottom of an
uncovered wood or metal cabinet.
9
Electrical Requirements
WARNING
Electrical Shock Hazard
Plug into a grounded 3 prong outlet.
Do not remove ground prong.
Do not use an adapter.
Do not use an extension cord.
Failure to follow these instructions can result in death,
fire, or electrical shock.
IMPORTANT: The range must be electrically grounded in
accordance with local codes and ordinances, or in the absence of
local codes, with the National Electrical Code, ANSI/NFPA 70 or
Canadian Electrical Code, CSA C22.1.
This range is equipped with an electronic ignition system that will
not operate if plugged into an outlet that is not properly polarized.
If codes permit and a separate ground wire is used, it is
recommended that a qualified electrical installer determine that
the ground path is adequate.
A copy of the above code standards can be obtained from:
National Fire Protection Association
1 Batterymarch Park
Quincy, MA 02169-7471
CSA International
8501 East Pleasant Valley Road
Cleveland, OH 44131-5575
� A 120 V, 60 Hz, AC only, 15 A fused, ground and polarized
electrical circuit is required. A time-delay fuse or circuit breaker
is also recommended. It is recommended that a separate
circuit serving only this range be provided.
� Electronic ignition systems operate within wide voltage limits,
but proper grounding and polarity are necessary. Check that
the outlet provides 120 V power and is correctly grounded.
� This gas range is not required to be plugged into a GFCI
(Ground-Fault Circuit Interrupter) outlet. It is recommended
that you not plug an electric spark ignition gas range or any
other major appliance into a GFCI wall outlet as it may cause
the GFCI to trip during normal cycling.
� Performance of this range will not be affected if operated on a
GFCI-protected circuit. However, occasional nuisance tripping
of the GFCI breaker is possible due to the normal operating
nature of electronic gas ranges.
� The tech sheet and wiring diagram are located on the back of
the range in a plastic bag.
NOTE: The metal chassis of the range must be grounded in order
for the control panel to work. If the metal chassis of the range is
not grounded, no keypads will operate. Check with a qualified
electrician if you are in doubt as to whether the metal chassis of
the range is grounded.
Gas Supply Requirements
WARNING
Explosion Hazard
Use a new CSA International approved gas supply line.
Install a shut-off valve.
Securely tighten all gas connections.
If connected to propane, have a qualified person make
sure gas pressure does not exceed 14" (36 cm) water
column.
Examples of a qualified person include: licensed heating
personnel, authorized gas company personnel, and
authorized service personnel.
Failure to do so can result in death, explosion, or fire.
Observe all governing codes and ordinances.
IMPORTANT: This installation must conform with all local codes
and ordinances. In the absence of local codes, installation must
conform with the National Fuel Gas Code ANSI Z223.1/NFPA 54
or, in Canada, the Natural Gas and Propane Installation Code,
CSA B149.1 - latest edition.
IMPORTANT: Leak testing of the range must be conducted
according to the manufacturer’s instructions. Refer to the
“Complete Connection” in the “Make gas connection” section for
the leak testing instructions.
Type of Gas
Natural Gas:
� This range is factory set for use with Natural gas. See “Gas
Conversions” section. The model/serial rating plate located on
the oven frame behind of the oven door has information on the
types of gas that can be used. If the types of gas listed do not
include the type of gas available, check with the local gas
supplier.
Propane Gas Conversion:
Conversion must be done by a qualified service technician.
No attempt shall be made to convert the appliance from the gas
specified on the model/serial rating plate for use with a different
gas without consulting the serving gas supplier. See “Gas
Conversions” section.
Gas Supply Line
� Provide a gas supply line of 3/4" (1.9 cm) rigid pipe to the
range location. A smaller size pipe on longer runs may result in
insufficient gas supply. With Propane gas, piping or tubing size
can be 1/2" (1.3 cm) minimum. Usually, Propane gas suppliers
determine the size and materials used in the system.
� NOTE: Pipe-joint compounds that resist the action of Propane
gas must be used. Do not use TEFLON
®
† tape.
†TEFLON
®
is a registered trademark of Chemours.
10
Flexible Metal Appliance Connector:
� If local codes permit, a new CSA design-certified,
4 to 5 ft (122 to 152.4 cm) long, 1/2" (13 mm) or 3/4" (19 mm)
I.D., flexible metal appliance connector may be used for
connecting range to the gas supply line.
� A 1/2" (13 mm) male pipe thread is needed for connection to
the female pipe threads of the inlet to the appliance pressure
regulator.
� Do not kink or damage the flexible metal tubing when moving
the range.
Rigid pipe connection:
The rigid pipe connection requires a combination of pipe fittings to
obtain an in-line connection to the range. The rigid pipe must be
level with the range connection. All strains must be removed from
the supply and fuel lines so range will be level and in line.
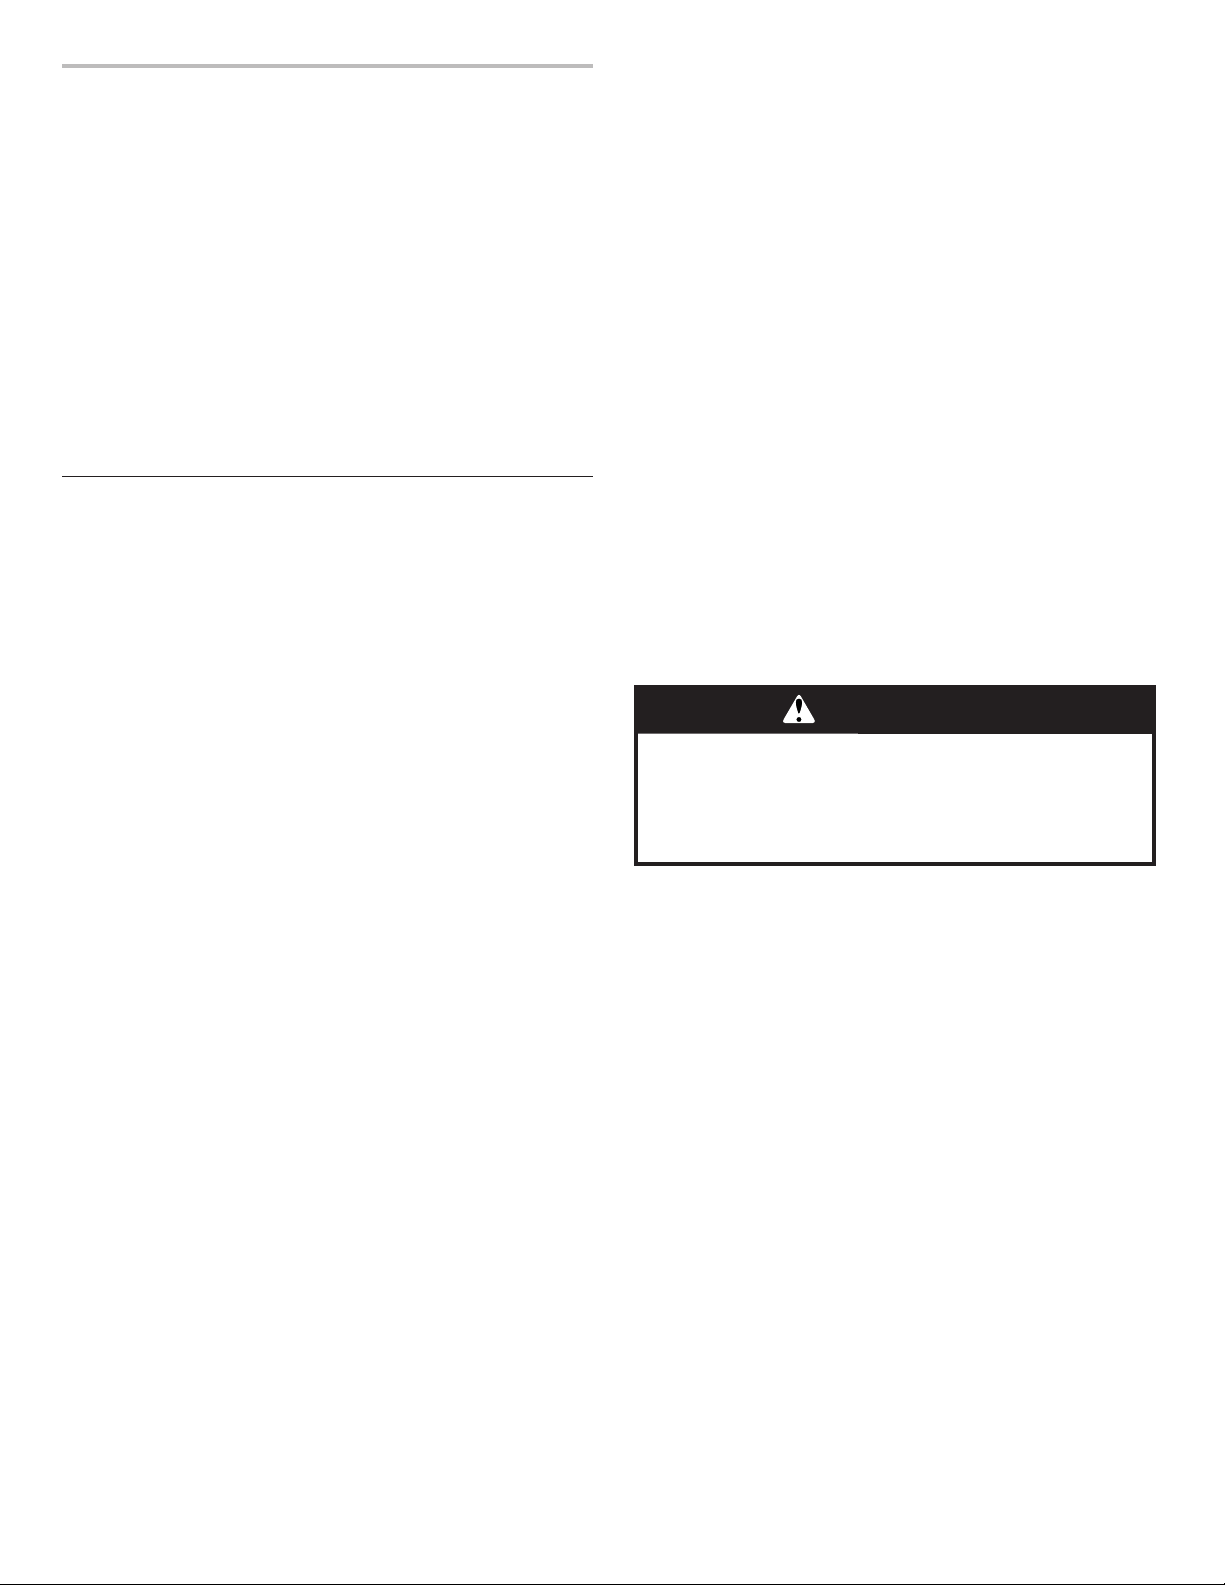
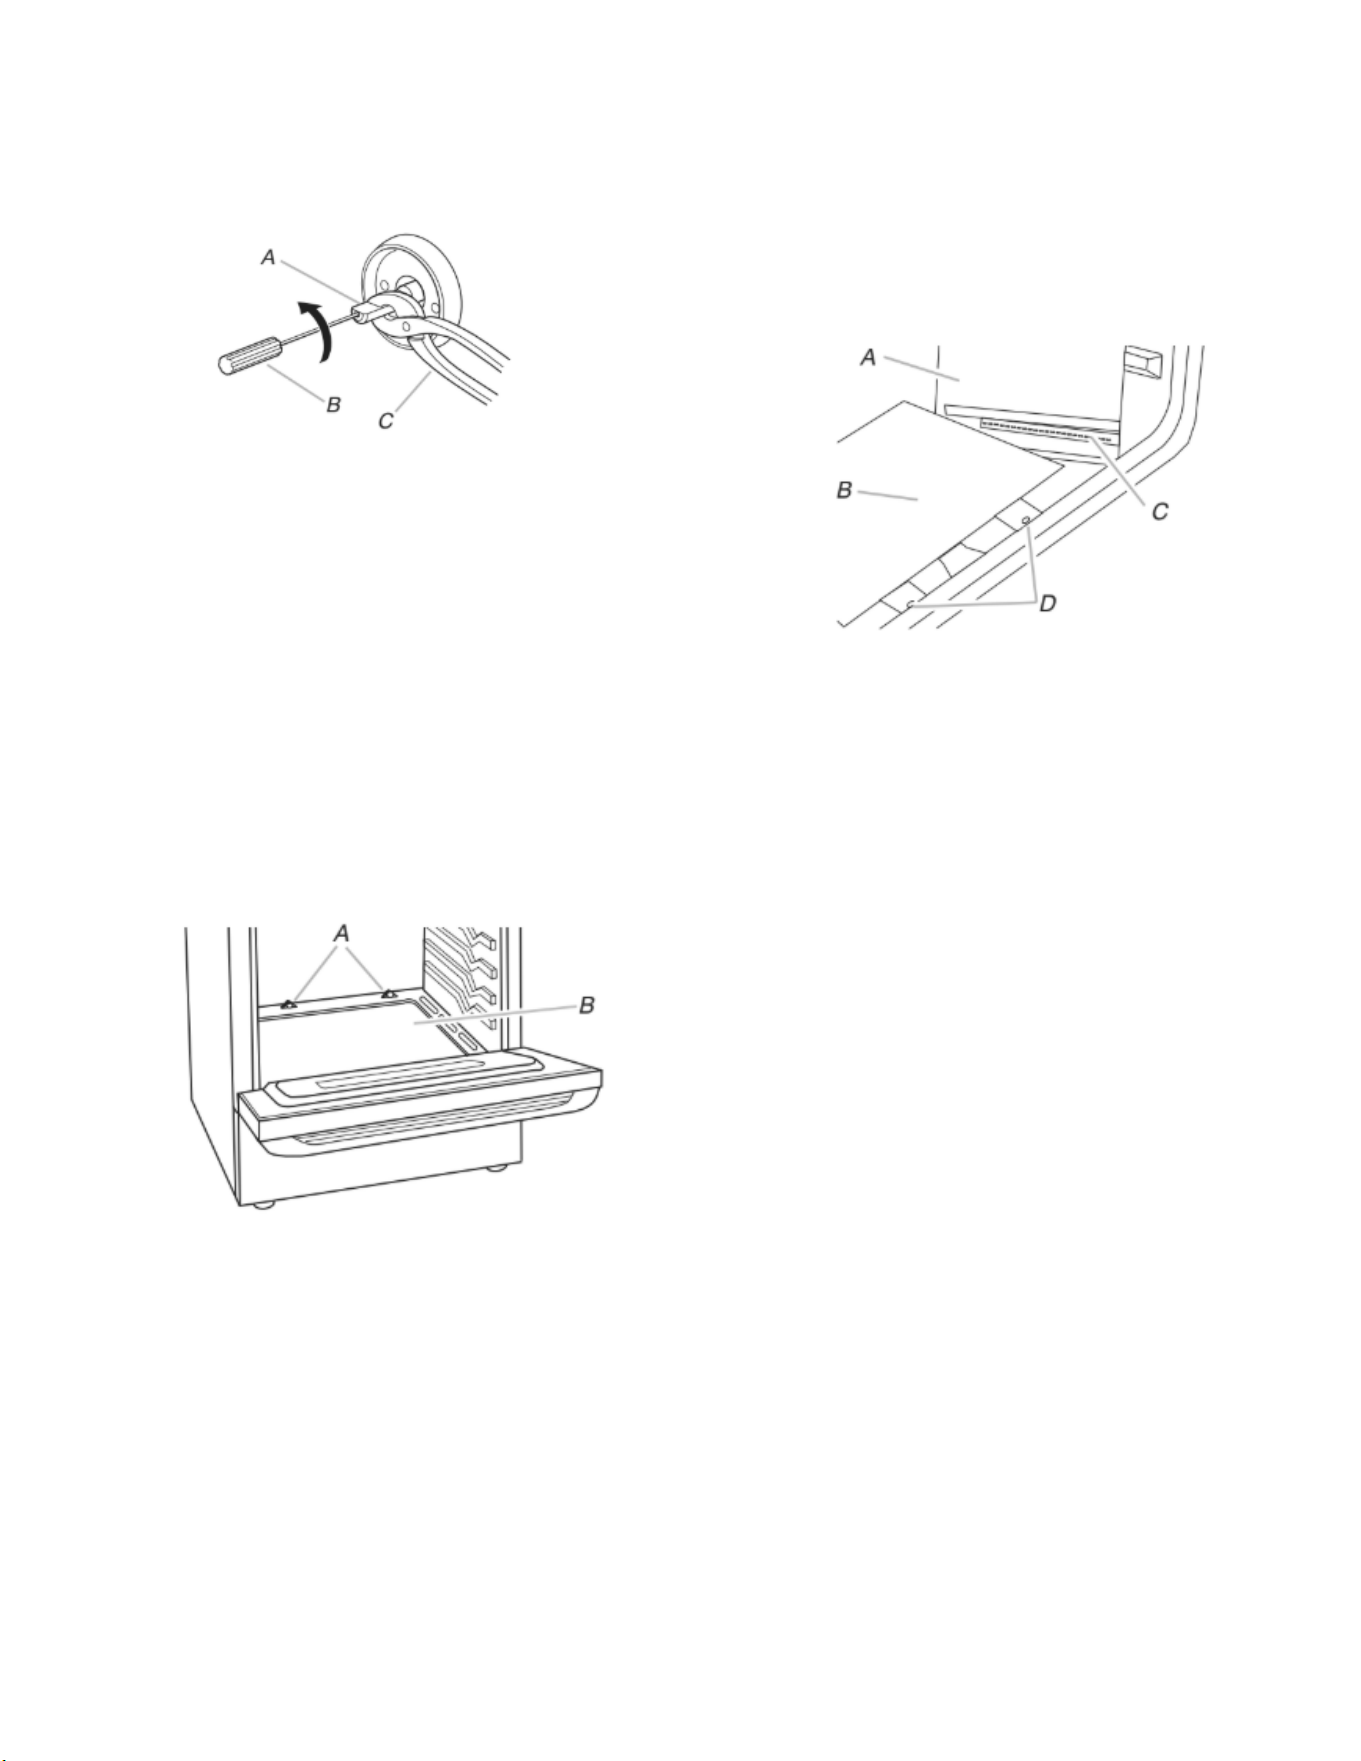
� Must include a shut-off valve:
Install a manual gas line shut-off valve in an easily accessible
location. Do not block access to shut-off valve. The valve is for
turning on or shutting off gas to the cooktop.
A. Gas supply line
B. Shut-off valve “open” position
C. To range
Gas Pressure Regulator
The gas pressure regulator supplied with this range must be used.
The inlet pressure to the regulator should be as follows for proper
operation:
Natural Gas:
Minimum pressure: 5" (12.7 cm) WCP
Maximum pressure: 14" (35.5 cm) WCP
Propane Gas:
Minimum pressure: 11" (27.9 cm) WCP
Maximum pressure: 14" (35.5 cm) WCP
Contact local gas supplier if you are not sure about the inlet
pressure.
Burner Input Requirements
Input ratings shown on the model/serial/rating plate are for
elevations up to 2,000 ft (609.6 m).
For elevations above 2,000 ft (609.6 m), ratings are reduced at a
rate of 4% for each 1,000 ft (304.8 m) above sea level (not
applicable for Canada).
Gas Supply Pressure Testing
Gas supply pressure for testing regulator must be at least
1" (2.5 cm) water column pressure above the manifold pressure
shown on the model/serial rating plate.
Line pressure testing above 1/2 psi (3.5 kPa) gauge
14" (35.5 cm) WCP
The range and its individual shutoff valve must be disconnected
from the gas supply piping system during any pressure testing of
that system at test pressures in excess of 1/2 psi (3.5 kPa).
Line pressure testing at 1/2 psi (3.5 kPa) gauge 14" (35.5 cm)
WCP or lower
The range must be isolated from the gas supply piping system by
closing its individual manual shutoff valve during any pressure
testing of the gas supply piping system at test pressures equal to
or less than 1/2 psi (3.5 kPa).
INSTALLATION
Unpack Range
WARNING
Excessive Weight Hazard
Use two or more people to move and install or uninstall
appliance.
Failure to do so can result in back or other injury.
1. Remove shipping materials, tape and film from range.
2. Remove oven racks and parts package from inside oven.
3. Do not remove the shipping base at this time.
A. Shipping base
11
4. On Ranges Equipped with a Storage Drawer:
Remove the storage drawer. See the “Storage Drawer”
section. Use a 1/4" (6.4 mm) drive ratchet to lower the rear
leveling legs one-half turn. Use a wrench or pliers to lower
front leveling legs one-half turn.
A. 1/4" (6.4 mm)
drive ratchet
B. Rear leveling
leg
C. Wrench or pliers
D. Front leveling leg
On Ranges Equipped with a Warming Drawer or Premium
Storage Drawer:
On ranges equipped with a warming drawer or premium
storage drawer, the rear legs cannot be accessed by removing
the warming drawer or premium storage drawer. It will be
necessary to adjust the rear legs from outside the range. Use
wrench or pliers to lower the front and rear leveling legs one-
half turn.
A. Rear leveling leg
B. Wrench or pliers
C. Front leveling leg
Install Anti-Tip Bracket
WARNING
Tip Over Hazard
A child or adult can tip the range and be killed.
Install anti-tip bracket to floor or wall per installation
instructions.
Slide range back so rear range foot is engaged in the
slot of the anti-tip bracket.
Re-engage anti-tip bracket if range is moved.
Do not operate range without anti-tip bracket installed
and engaged.
Failure to follow these instructions can result in death or
serious burns to children and adults.
1. Remove the anti-tip bracket from where it is taped inside the
storage drawer, warming drawer, or premium storage drawer
2. Determine which mounting method to use: floor or wall. If you
have a stone or masonry floor, you can use the wall mounting
method. If you are installing the range in a mobile home, you
must secure the range to the floor.
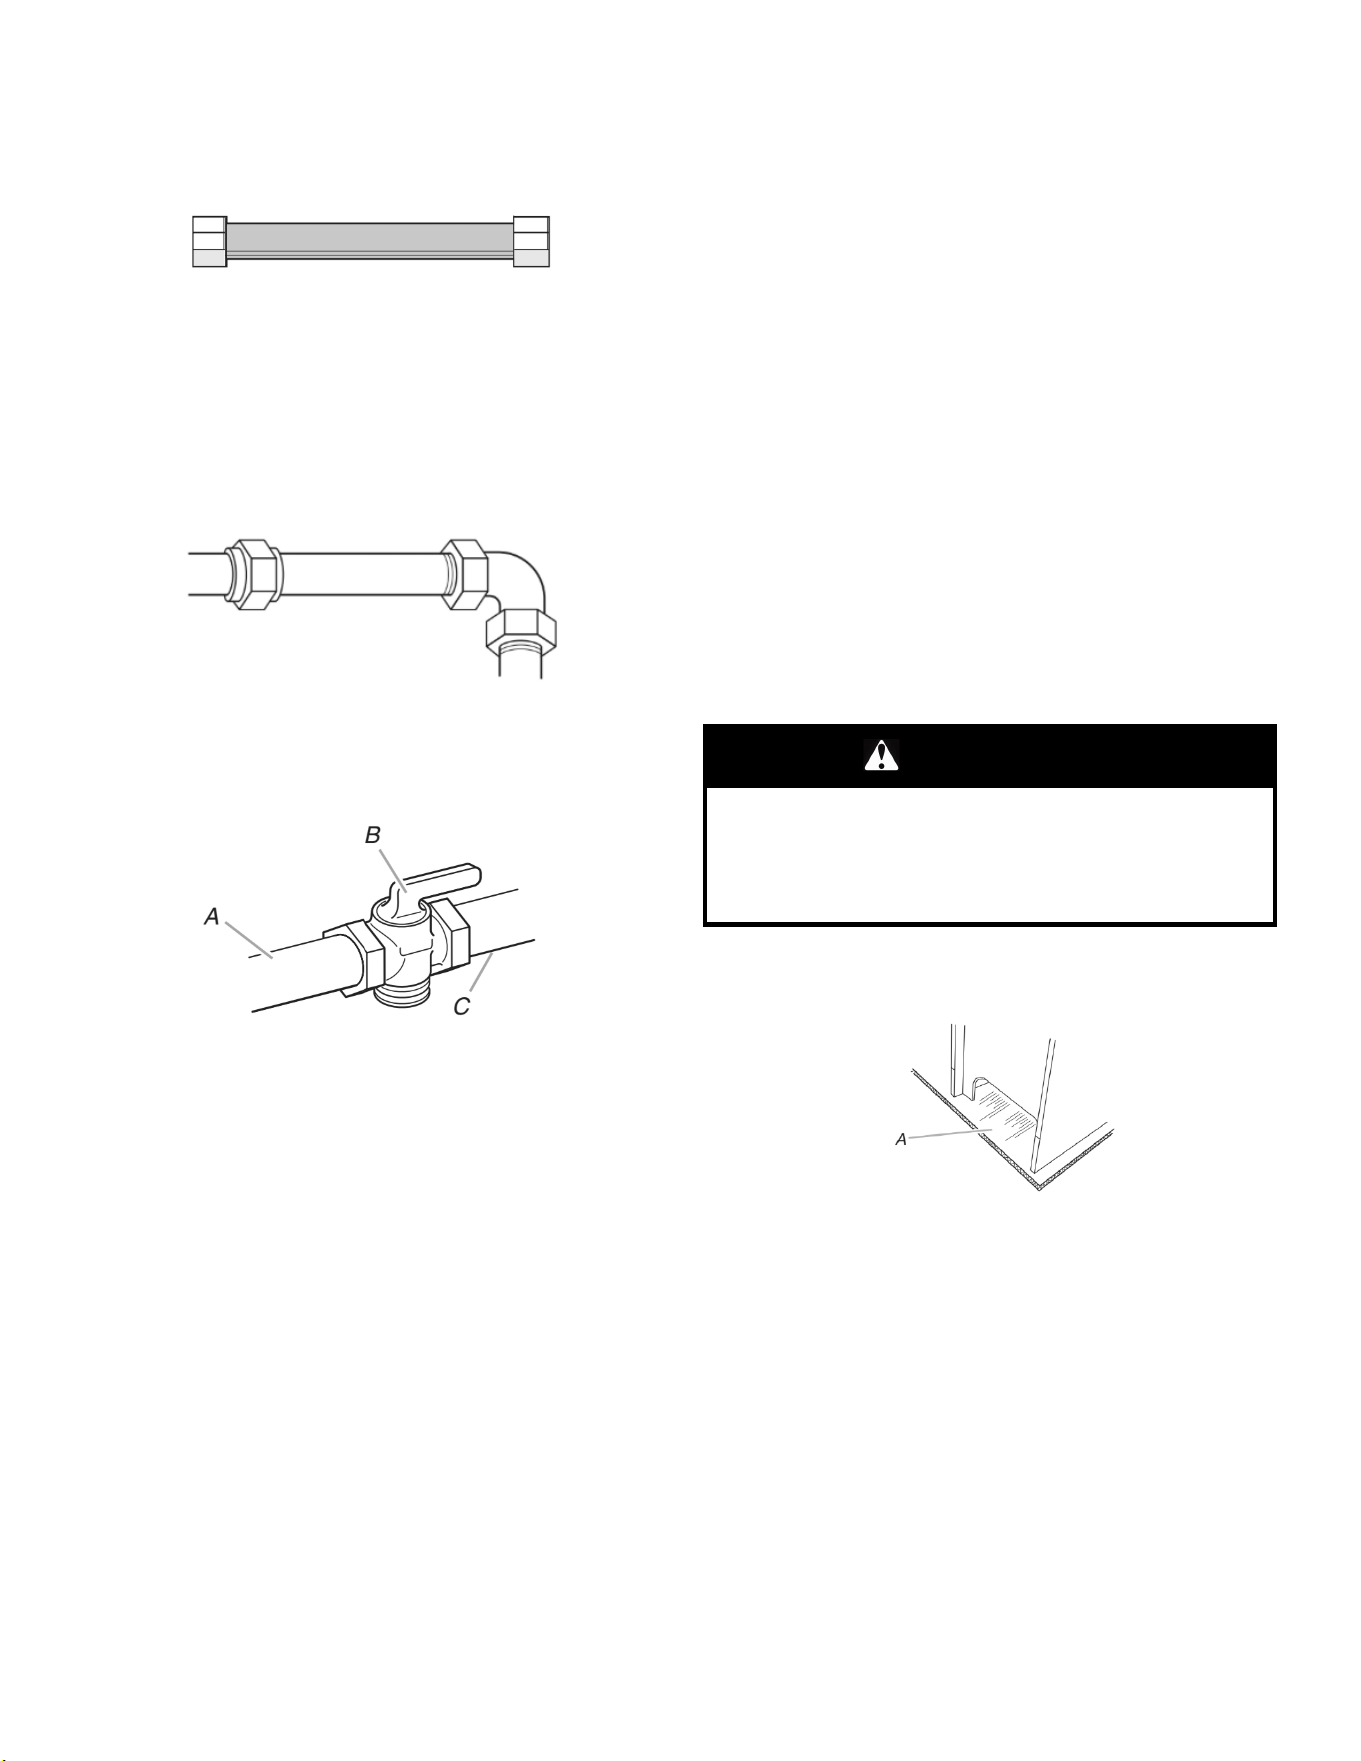
3. Determine and mark centerline of the cutout space. The
mounting can be installed on either the left side or right side of
the cutout. Position mounting bracket against the wall in the
cutout so that the V-notch of the bracket is 12
9
⁄
16
" (31.9 cm)
from centerline as shown.
A. 12
9
⁄
16
" (31.9 cm)
B. Bracket V-notch

12
4. Drill two 1/8" (3 mm) holes that correspond to the bracket
holes of the determined mounting method. See the following
illustrations.
Floor Mounting
Rear position Front position Diagonal
(2 options)
Wall Mounting
5. Using the Phillips screwdriver, mount anti-tip bracket to the
wall or floor with the two #12 x 1
5
/
8
" (4.1 cm) screws provided,
mount anti-tip bracket to the wall or floor.
6. Move range close enough to opening to allow for final gas and
electrical connections. Remove shipping base, cardboard or
hardboard from under range.
7. Move range into its final location, making sure rear leveling leg
slides into anti-tip bracket.
8. Move range forward onto shipping base, cardboard or
hardboard to continue installing the range using the following
installation instructions.
Make Gas Connection
WARNING
Explosion Hazard
Use a new CSA International approved gas supply line.
Install a shut-off valve.
Securely tighten all gas connections.
If connected to propane, have a qualified person make
sure gas pressure does not exceed 14" (36 cm) water
column.
Examples of a qualified person include: licensed heating
personnel, authorized gas company personnel, and
authorized service personnel.
Failure to do so can result in death, explosion, or fire.
Typical rigid pipe connection
A combination of pipe fittings must be used to connect the range
to the existing gas line. Your connections may be different,
according to the supply line type, size and location.
1. Apply pipe-joint compound made for use with Propane gas to
all pipe thread connections.
2. Using a pipe wrench to tighten, connect the gas supply to the
range.
A. Gas pressure regulator
B. 90° elbow (must have 1/3"
[1.2 cm] male pipe thread)
C. Nipple
D. Union
E. Black iron pipe
F. Manual gas shutoff valve
G. 1/2" (1.3 cm) or 3/4" (1.9 cm)
gas pipe
H. Nipple
I. Union
J. 90° elbow

13
Typical flexible connection
1. Apply pipe-joint compound made for use with propane gas to
the smaller thread ends of the flexible connector adapters
(see B and G in the following illustration).
2. Attach one adapter to the gas pressure regulator and the other
adapter to the gas shut-off valve. Tighten both adapters.
3. Use a 15/16" (23.8 mm) combination wrench and channel lock
pliers to attach the flexible connector to the adapters. Check
that connector is not kinked.
A. Gas pressure regulator
B. Use pipe-joint compound.
C. Adapter (must have 1/3"
[12.7 mm] male pipe thread)
D. Flexible connector
E. Manual gas shutoff valve
F. 1/2" (12.7 mm) or 3/4"
(19.1 mm) gas pipe
G. Use pipe-joint compound.
H. Adapter
Complete Connection
1. Check that the gas pressure regulator shutoff valve is in the
“on” position.
A. Gas pressure regulator shut-off valve shown in
the “on” position
2. Open the manual shutoff valve in the gas supply line. The
valve is open when the handle is parallel to the gas pipe.
A. Closed valve
B. Open valve
3. Test all connections by brushing on an approved noncorrosive
leak-detection solution. If bubbles appear, a leak is indicated.
Correct any leak found.
4. Remove cooktop burner caps and bases from package
containing parts. Place the burner bases as indicated by the
following illustration for your model:
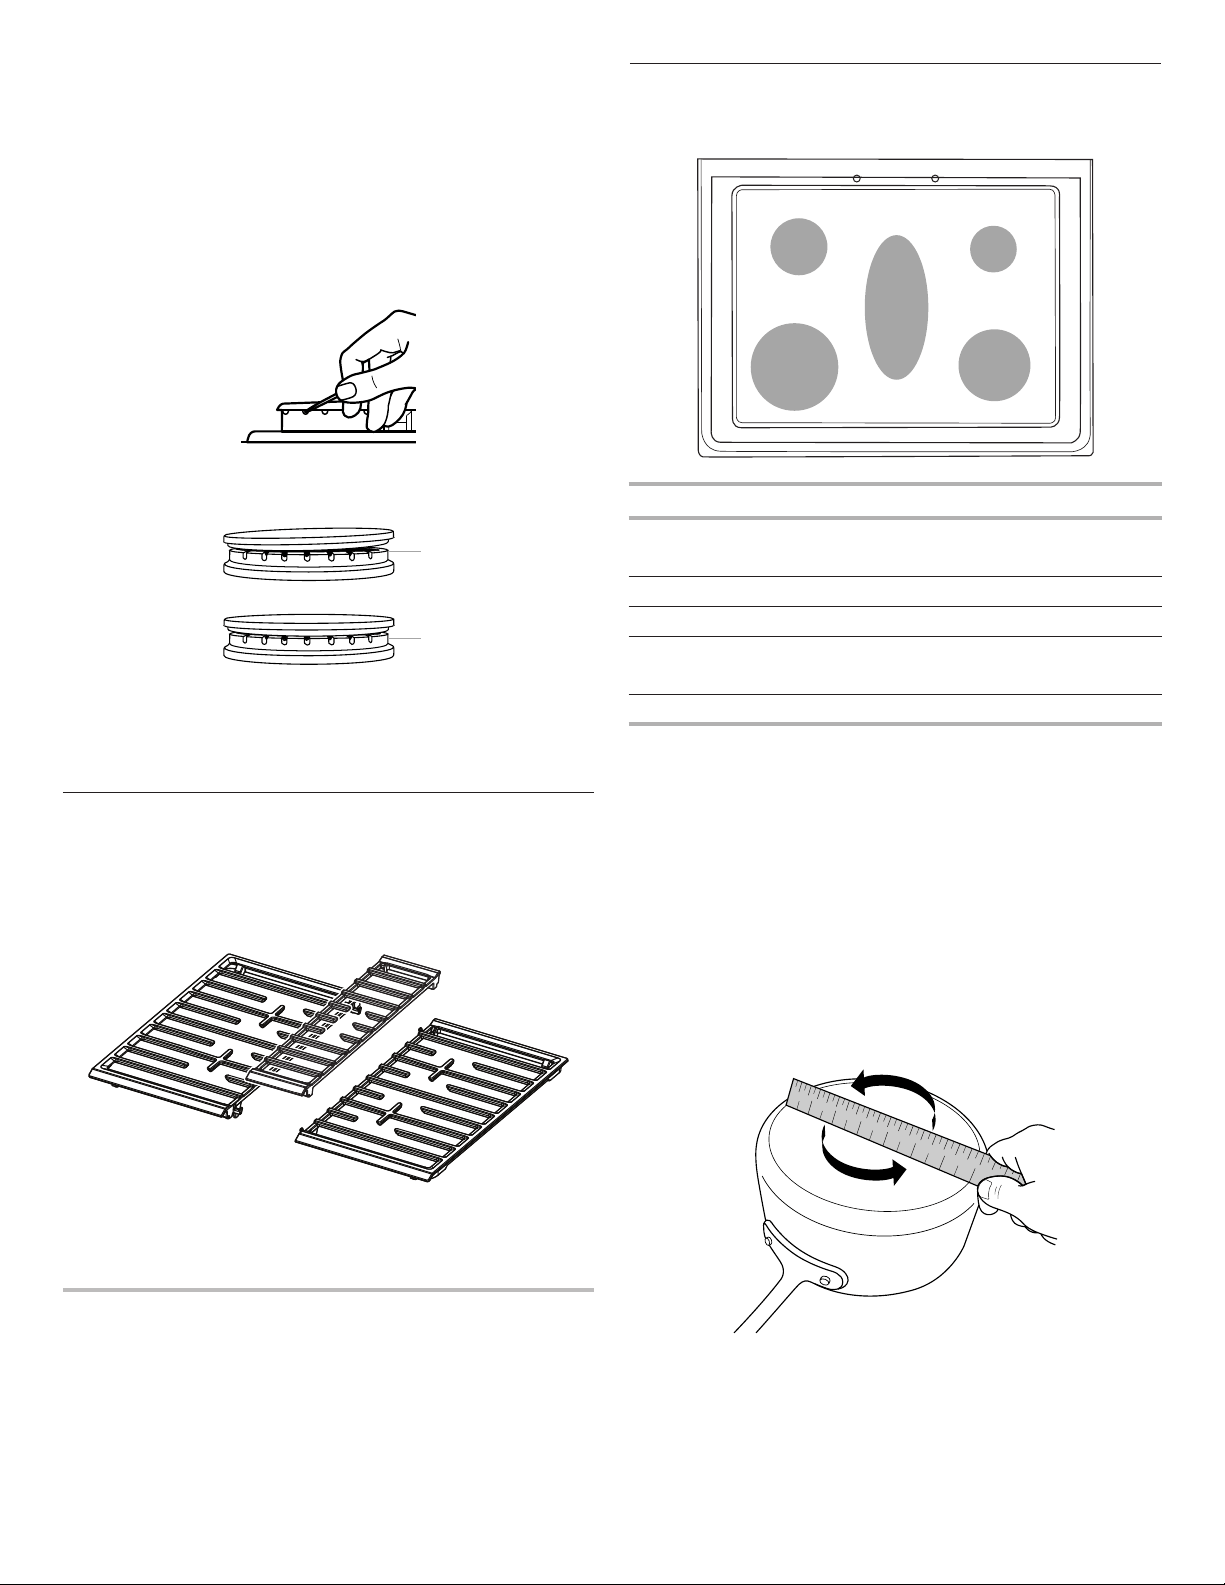
For model AGR6603SF :
A. Medium (Semi Rapid)
B. Large (Ultra Rapid)
D. Small (Auxiliary)
E. Large (Ultra Rapid)
For models MGR6600F and WFG550S0H:
A. Medium (Semi Rapid)
B. Large (Ultra Rapid)
C. Oval
D. Small (Auxiliary)
E. Large (Ultra Rapid)
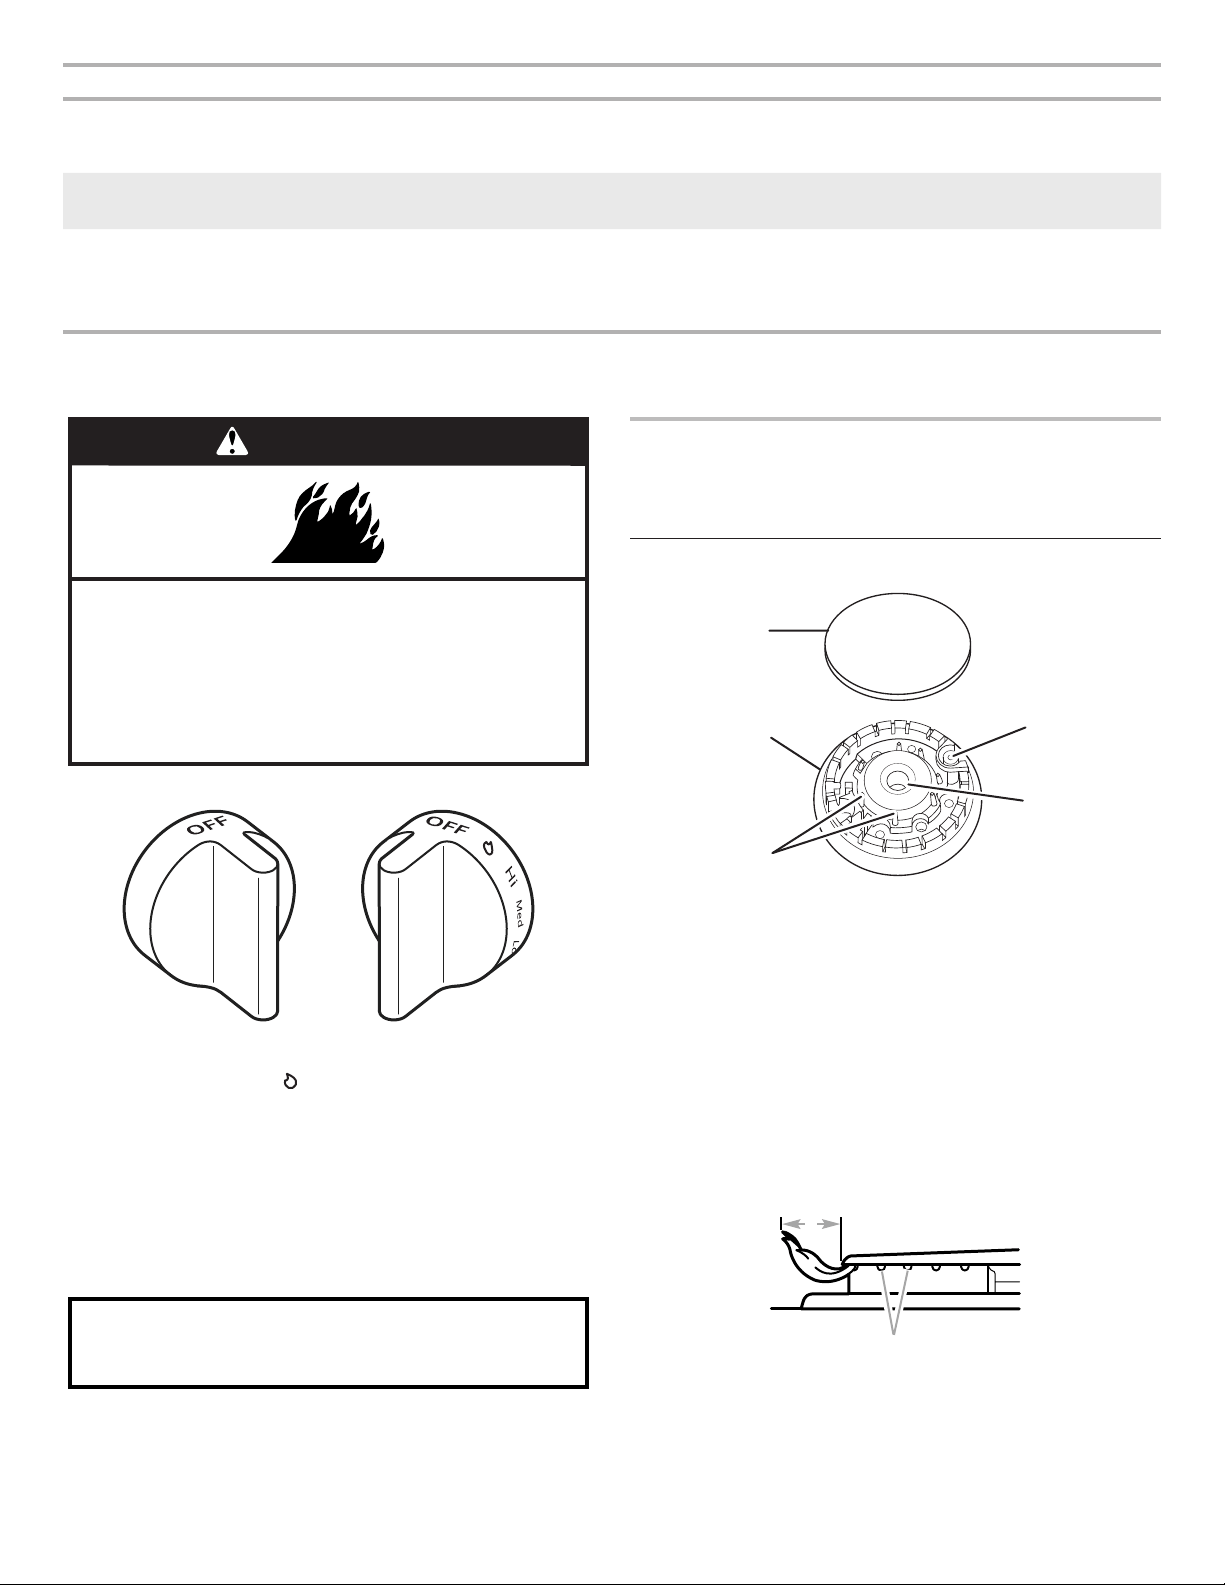
5. Burner caps should be level when properly positioned. If
burner caps are not properly positioned, surface burners will
not light. Place burner grates over burners and caps.
A. Burner base
B. Burner cap
C. Burner grate
14
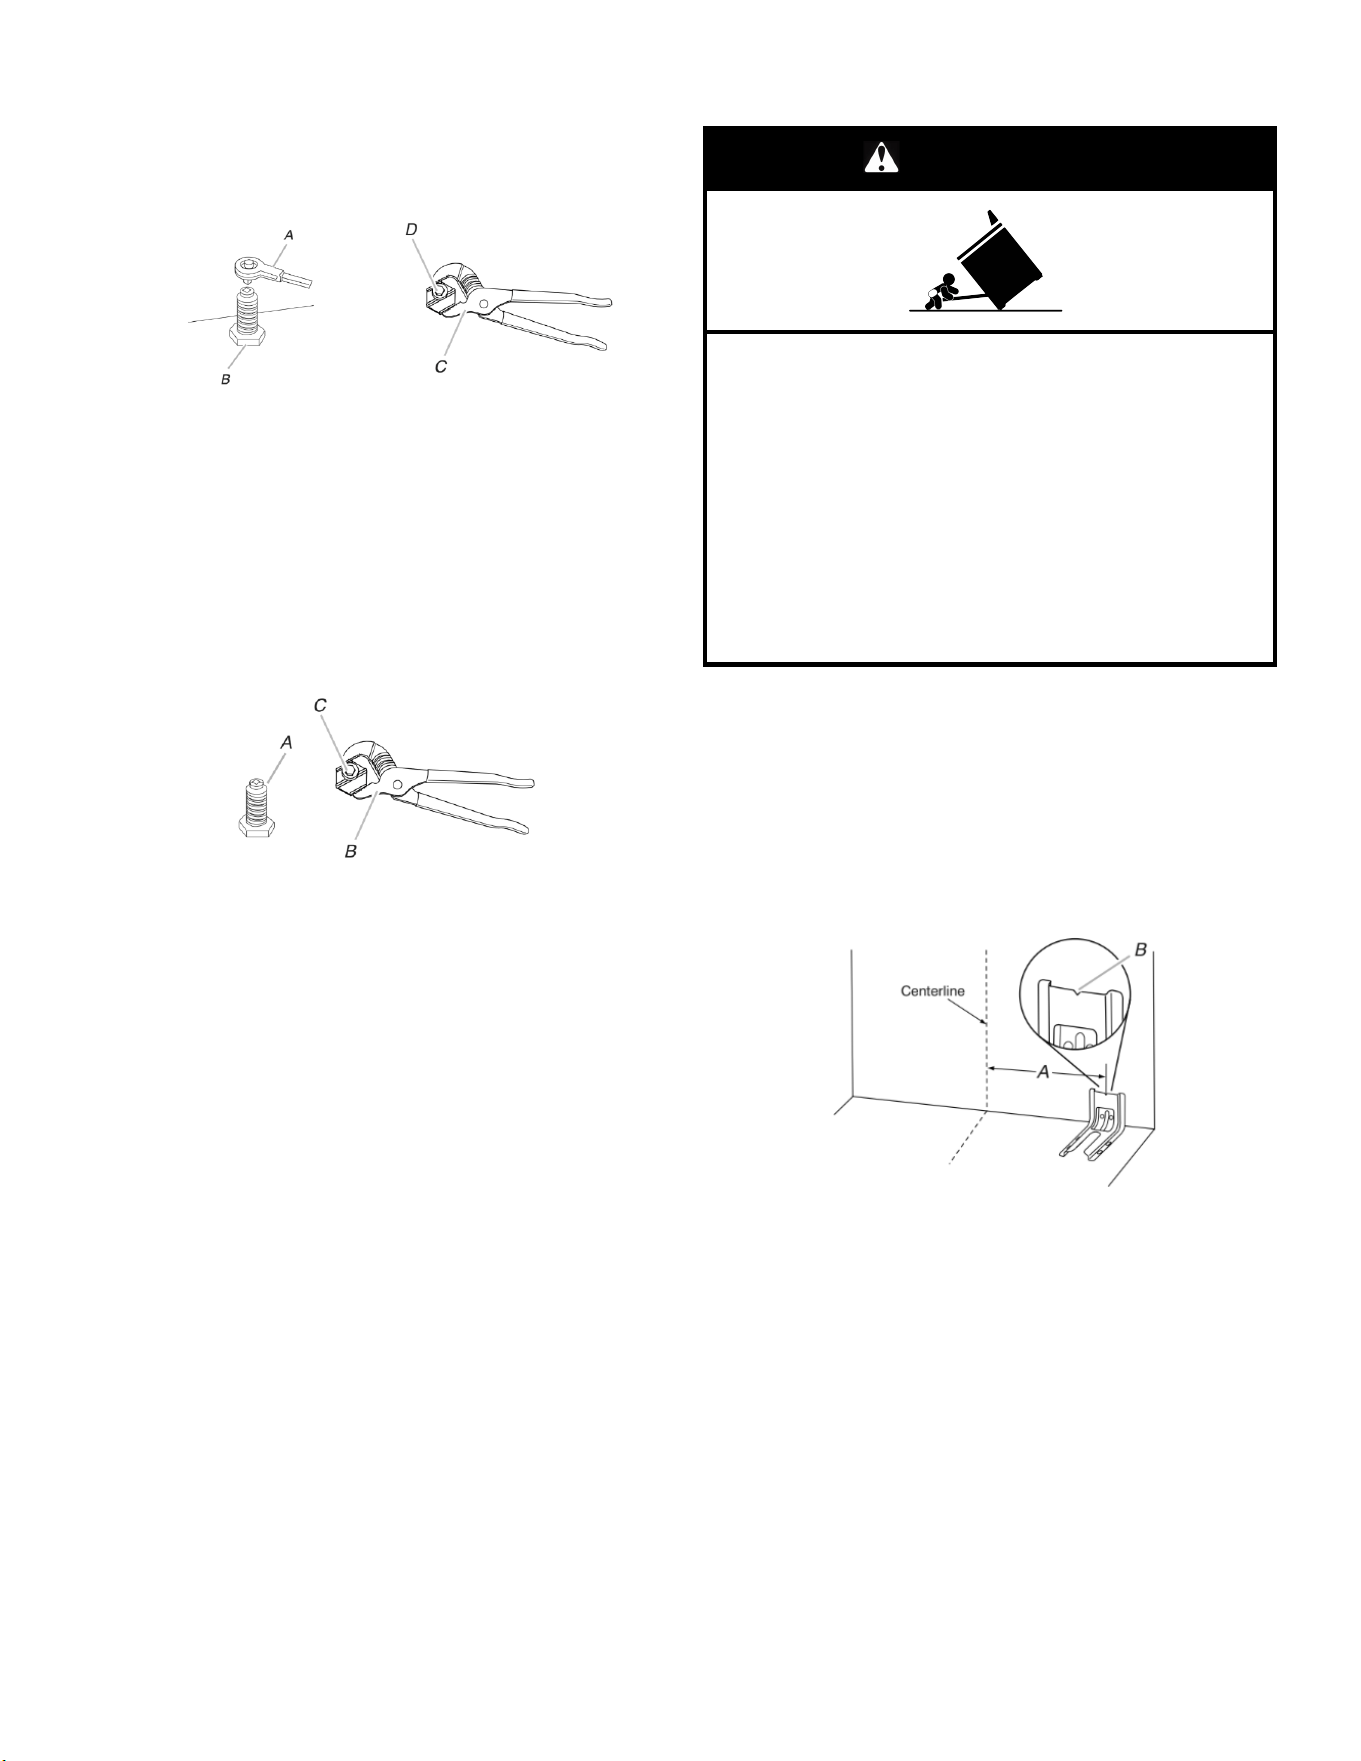
6. Place the burner caps on the appropriate burner bases.
IMPORTANT: The bottom of the small and medium caps are
different. Do not put the wrong size burner cap on the burner
base. Each round burner cap is marked with an AUX, SR, UR,
or ST to match with a letter on the burner base.
Small cap
(Auxiliary)
Medium cap (Semi
Rapid)
Large cap (Ultra
Rapid)
WARNING
Electrical Shock Hazard
Plug into a grounded 3 prong outlet.
Do not remove ground prong.
Do not use an adapter.
Do not use an extension cord.
Failure to follow these instructions can result in death,
fire, or electrical shock.
7. Plug into a grounded 3-prong outlet.
8. Slide range into final location, making sure the rear leveling
leg slides into the slot of the anti-tip bracket.
Verify Anti-Tip Bracket Is Installed
and Engaged
On Ranges Equipped with a Storage Drawer:
1. Remove the storage drawer. See the “Storage Drawer”
section.
2. Use a flashlight to look underneath the bottom of the range.
3. Visually check that the rear range foot is inserted into the slot
of the anti-tip bracket.
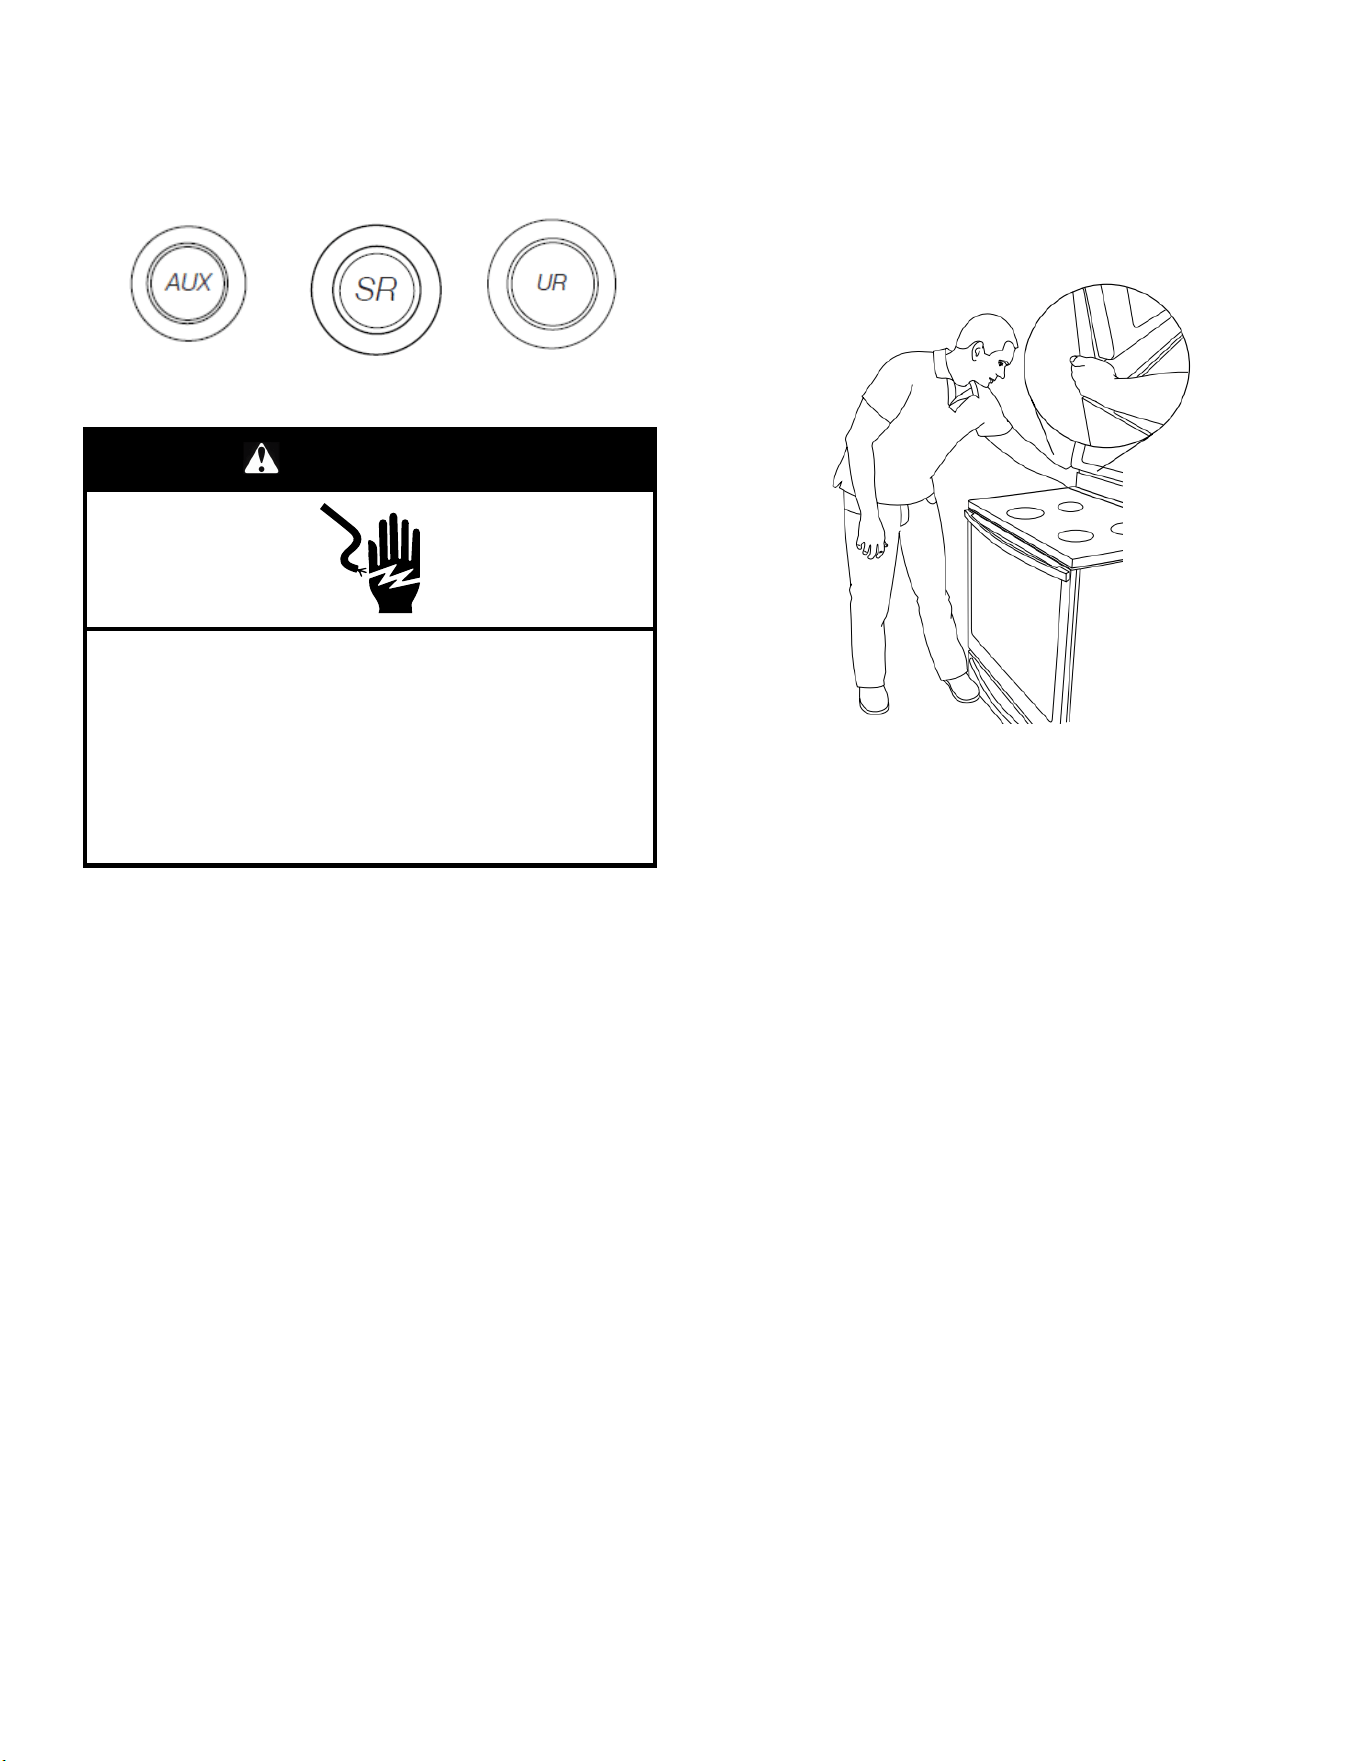
On Ranges Equipped with a Warming Drawer or
Premium Storage Drawer:
1. Place the outside of your foot against the bottom front of the
warming drawer or premium storage drawer, and grasp the
lower right or left side of the control panel as shown.
NOTE: If your countertop is mounted with a backsplash, it
may be necessary to grasp the range higher than is shown in
the illustration.
2. Slowly attempt to tilt the range forward.
If you encounter immediate resistance, the range foot is
engaged in the anti-tip bracket.
3. If the rear of the range lifts more than 1/2” (1.3 cm) off the floor
without resistance, stop tilting the range and lower it gently
back to the floor. The range foot is not engaged in the anti-tip
bracket.
IMPORTANT: If there is a snapping or popping sound when
lifting the range, the range may not be fully engaged in the
bracket. Check to see if there are obstructions keeping the
range from sliding to the wall or keeping the range foot from
sliding into the bracket. Verify that the bracket is held securely
in place by the mounting screws.
4. Slide the range forward, and verify that the anti-tip bracket is
securely attached to the floor or wall.
5. Slide range back so the rear range foot is inserted into the slot
of the anti-tip bracket.
IMPORTANT: If the back of the range is more than 2” (5.1 cm)
from the mounting wall, the rear range foot may not engage the
bracket. Slide the range forward and determine if there is an
obstruction between the range and the mounting wall. Changes to
the gas supply must be performed by a qualified service
technician. If you need assistance or service, refer to the Quick
Start Guide for contact information.
6. Repeat steps 1 and 2 to ensure that the range foot is engaged
in the anti-tip bracket.
If the rear of the range lifts more than 1/2” (1.3 cm) off the floor
without resistance, the anti-tip bracket may not be installed
correctly. Do not operate the range without anti-tip bracket
installed and engaged. If you need assistance or service, refer
to the Quick Start Guide for contact information.

15
Level Range
Determine if you have AquaLift
®
Technology or Steam Clean by
referring to the “Range Maintenance and Care” section.
For Ranges with AquaLift
®®
Technology or Steam Clean:
1. Place level on the oven bottom as indicated in one of the two
figures below depending on the size of the level. Check with
the level side to side and front to back.
2. If range is not level, pull range forward until rear leveling leg is
removed from the anti-tip bracket.
3. Follow the directions in Style 1 or Style 2, depending on the
style of drawer supplied with the range.
For Ranges without AquaLift
®®
Technology or Steam Clean:
1. Place a standard flat rack in oven.
2. Place level on the rack and check levelness of the range, first
side to side; then front to back.
3. If range is not level, pull range forward until rear leveling leg is
removed from the anti-tip bracket.
4. Follow the directions in Style 1 or Style 2, depending on the
style of drawer supplied with the range.
Style 1: Ranges Equipped with a Storage Drawer:
Use a 1/4" (6.4 mm) drive ratchet, wrench or pliers to adjust
leveling legs up or down until the range is level. Push range back
into position. Check that rear leveling leg is engaged in the anti-tip
bracket.
Style 2: Ranges Equipped with a Warming Drawer or
Premium Storage Drawer:
Use a wrench or pliers to adjust leveling legs up or down until the
range is level. Push range back into position. Check that rear
leveling leg is engaged in the anti-tip bracket.
NOTE: Range must be level for satisfactory baking performance
and best cleaning results using AquaLift
®
Technology and Steam
Clean functions.
Electronic Ignition System
Initial Lighting and Gas Flame Adjustments
Cooktop and oven burners use electronic igniters in place of
standing pilots. When the cooktop control knob is turned to the
“LITE” position, the system creates a spark to light the burner.
This sparking continues, as long as the control knob is turned to
“LITE.”
When the oven control is turned to the desired setting, sparking
occurs and ignites the gas.
Check Operation of Cooktop Burners
Standard Surface Burners
Push in and turn each control knob to the “LITE” position.
The flame should light within 4 seconds. The first time a burner is
lit, it may take longer than 4 seconds to light because of air in the
gas line.
If Burners Do Not Light Properly:
� Turn cooktop control knob to the “OFF” position.
� Check that the range is plugged in. Check that the circuit
breaker has not tripped or the household fuse has not blown.
� Check that the gas shutoff valves are set to the “open”
position.
� Check that burner caps are properly positioned on burner
bases.
Repeat start-up. If a burner does not light at this point, turn the
control knobs to the “OFF” position and contact your dealer or
authorized service company for assistance.
Power Failure
In case of prolonged power failure, the surface burners can be lit
manually. Hold a lit match near a burner, and turn knob
counterclockwise to LITE. After the burner lights, turn knob to
desired setting.
Adjust Flame Height
Adjust the height of top burner flames. The cooktop “low” burner
flame should be a steady blue flame approximately 1/4" (6.4 mm)
high.
A. Low flame
B. High flame
16
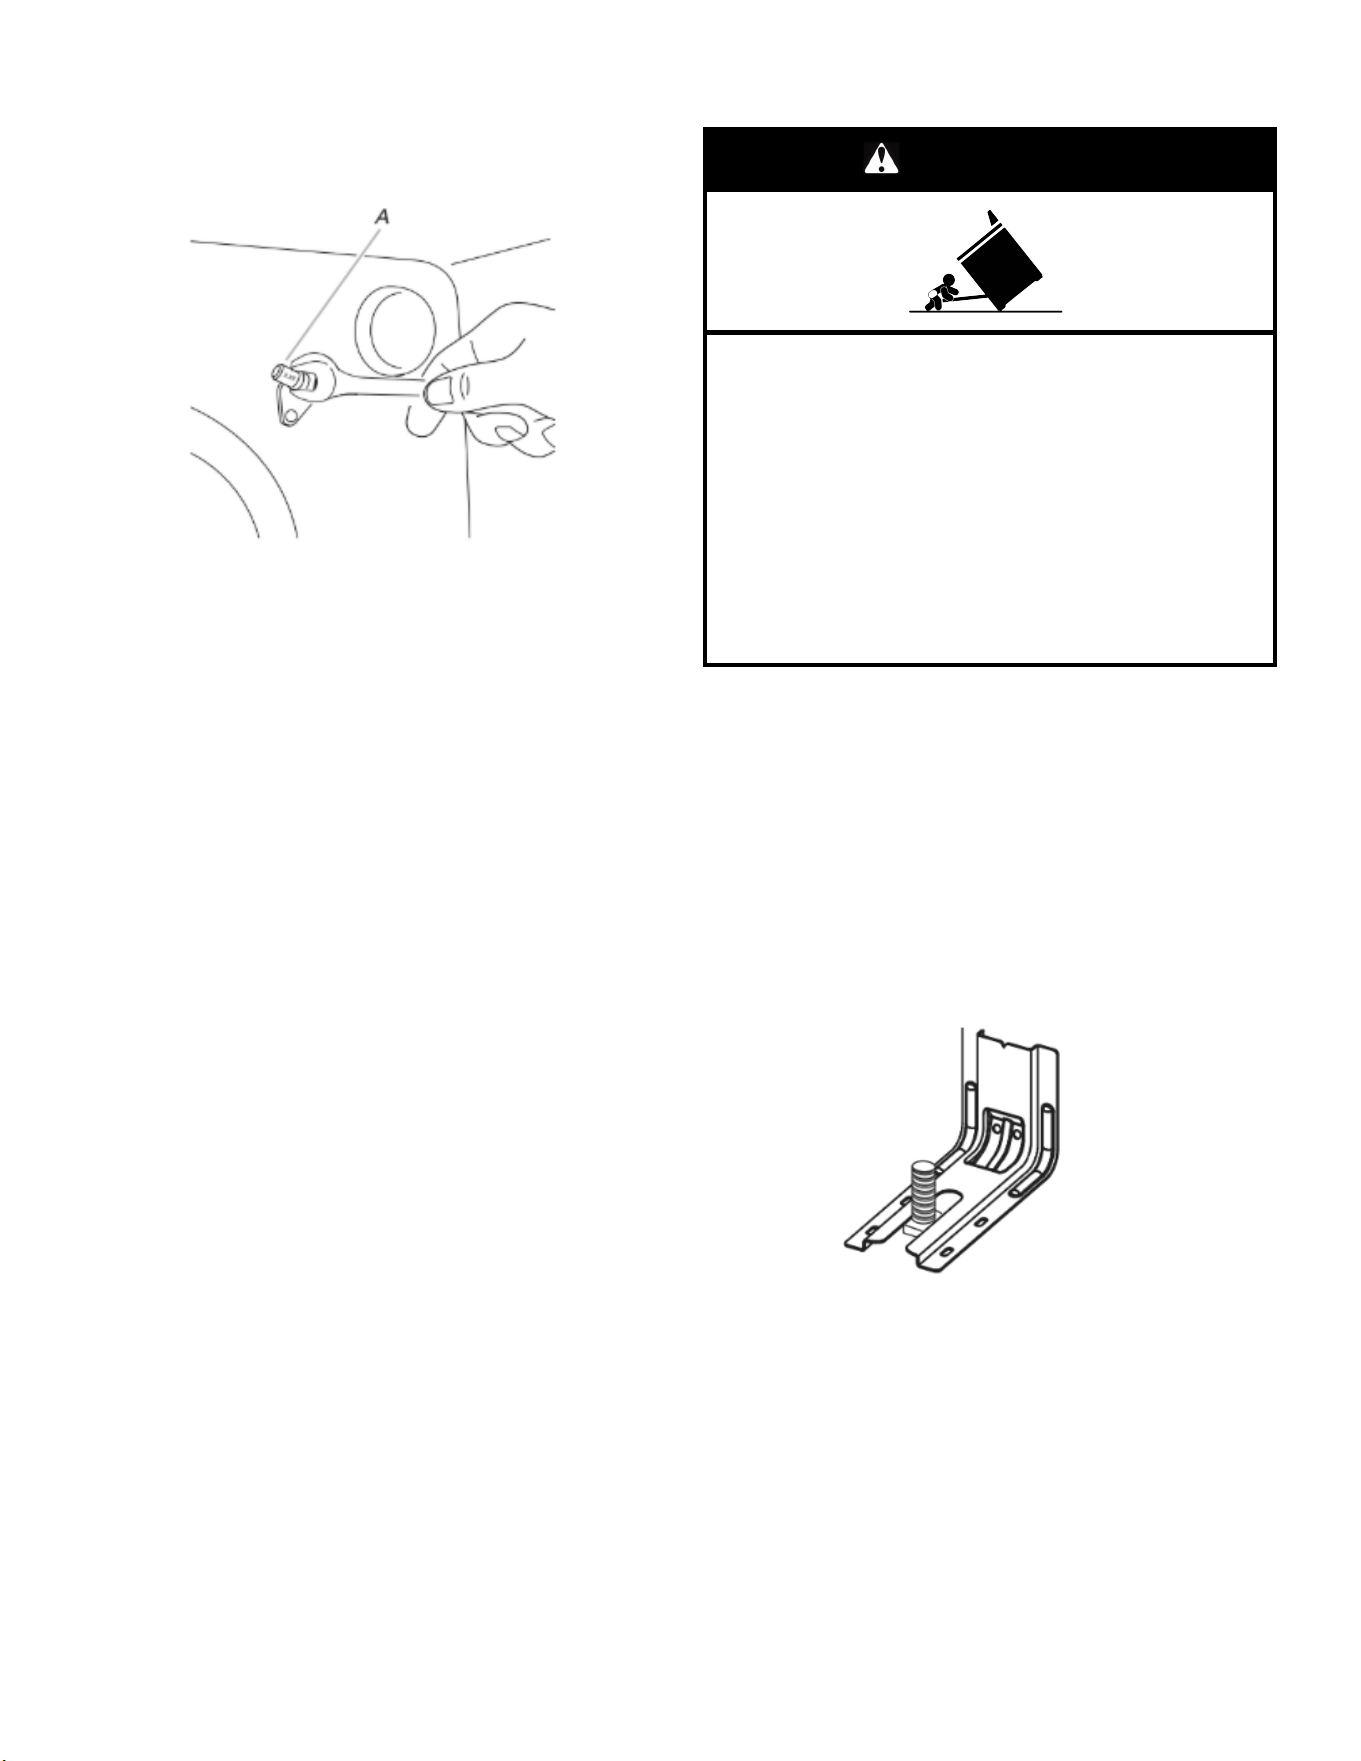
To adjust standard burner:
The flame can be adjusted using the adjustment screw in the
center of the valve stem. The valve stem is located directly
underneath the control knob.
If the “low” flame needs to be adjusted:
A. Control knob stem
B. Screwdriver
C. Pliers
1. Light 1 burner and turn to lowest setting.
2. Remove the control knob.
Hold the knob stem with a pair of pliers. Use a small flat blade
screwdriver to turn the screw located in the center of the
control knob stem until the flame is the proper size.
3. Replace the control knob.
4. Test the flame by turning the control from “LO” to “HI,”
checking the flame at each setting.
5. Repeat the previous steps for each burner.
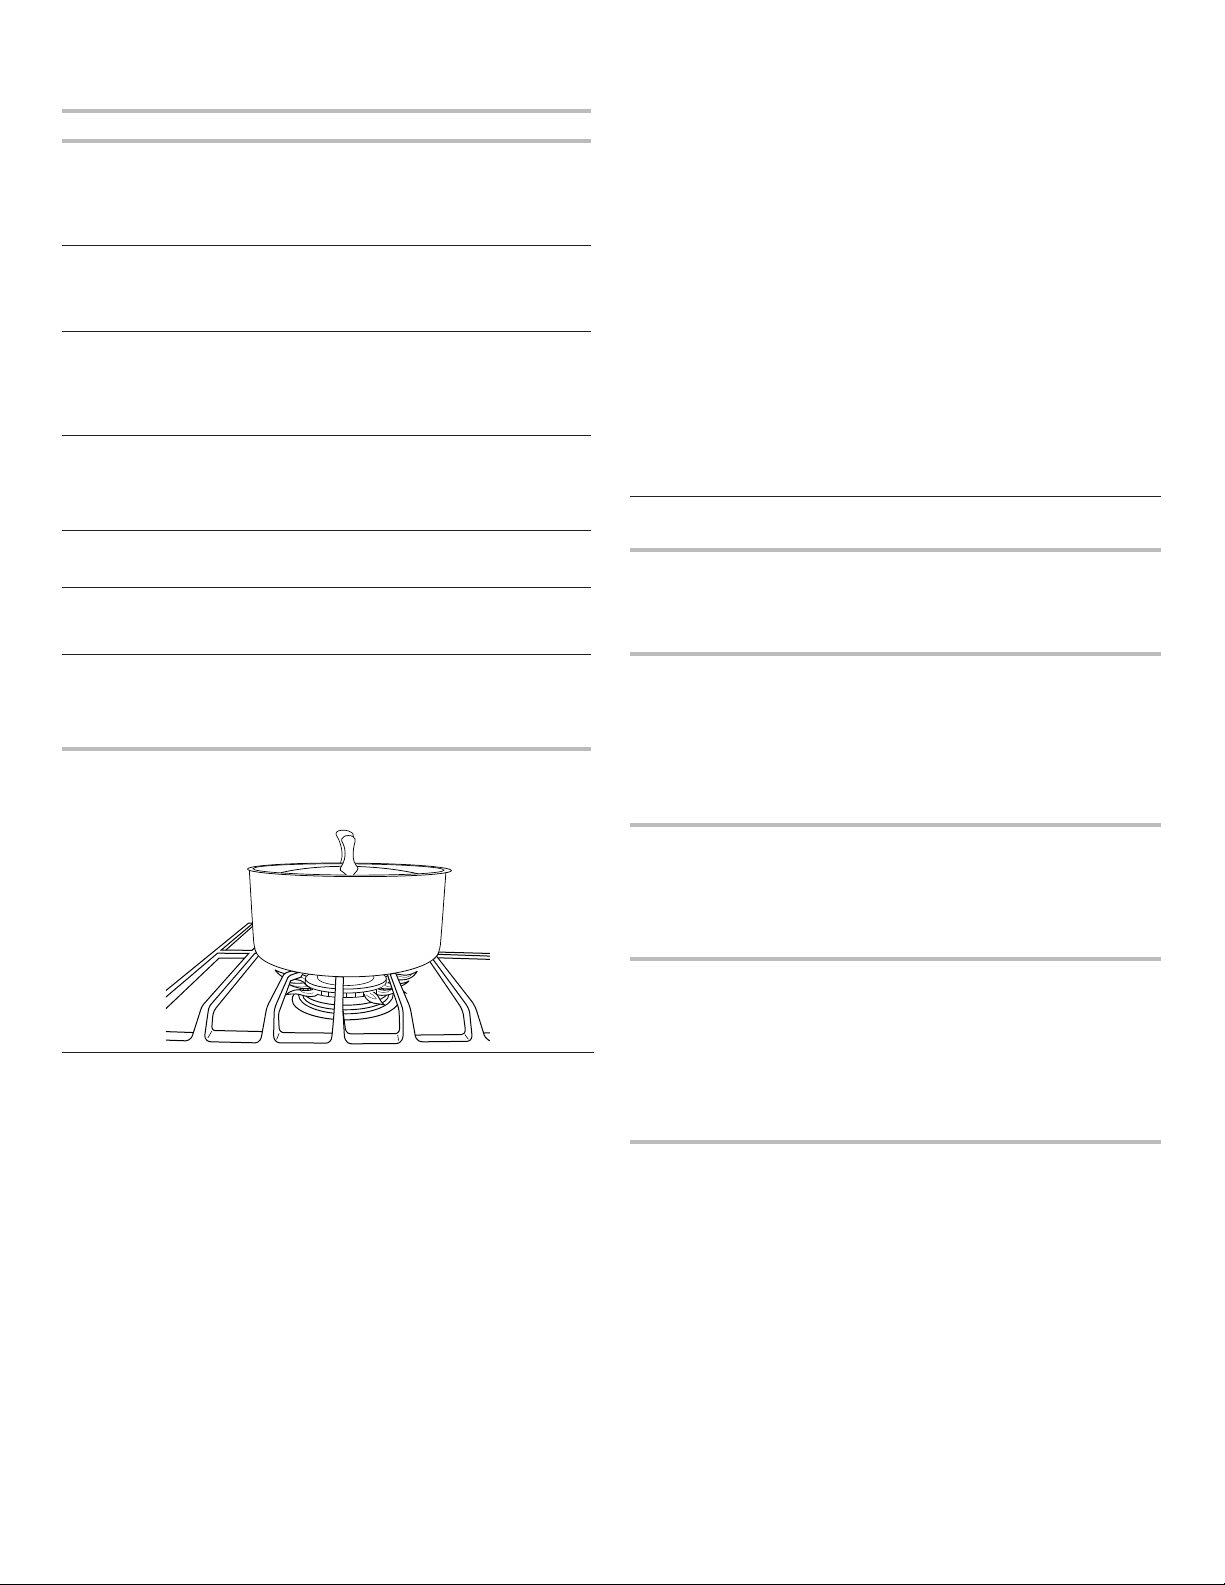
Check Operation of Oven Bake Burner
1. Remove the oven rack.
2. To remove the oven bottom: Remove 2 screws at the rear of
the oven bottom. Lift the rear of the oven bottom up and back
until the front of the panel is away from the front frame.
Remove from oven and place on a covered surface.
A. Screws
B. Oven bottom
3. You can check the burner flame by removing the flame
spreader or by using a mirror.
Remove flame spreader:
Remove 2 screws from the front tabs of the flame spreader.
Lift front of the flame spreader and pull forward to remove tabs
from rear of oven.
Using a mirror:
Insert a mirror to one side of the burner. Look into the mirror to
check flame.
A. Mirror
B. Flame spreader
C. Flame reflection
D. 2 screws
4. Push the BAKE pad.
5. Press the START pad.
The oven bake burner should light within 8 seconds. Under certain
conditions, it may take the burner up to 50 to 60 seconds to light.
Electronic igniters are used to light the bake and broil burners.
Refer to the Quick Start Guide and online Control Guide for proper
operation of the oven controls.
Adjust Oven Bake Burner Flame (If needed)
1. On models with a warming drawer, remove access cover plate
(1 screw) located at the back of the warming drawer
compartment.
2. Check the oven bake burner for proper flame.
This flame should have a 1/2" (1.3 cm) long inner cone of
bluish-green, with an outer mantle of dark blue, and should be
clean and soft in character. No yellow tips, blowing or lifting of
flame should occur.
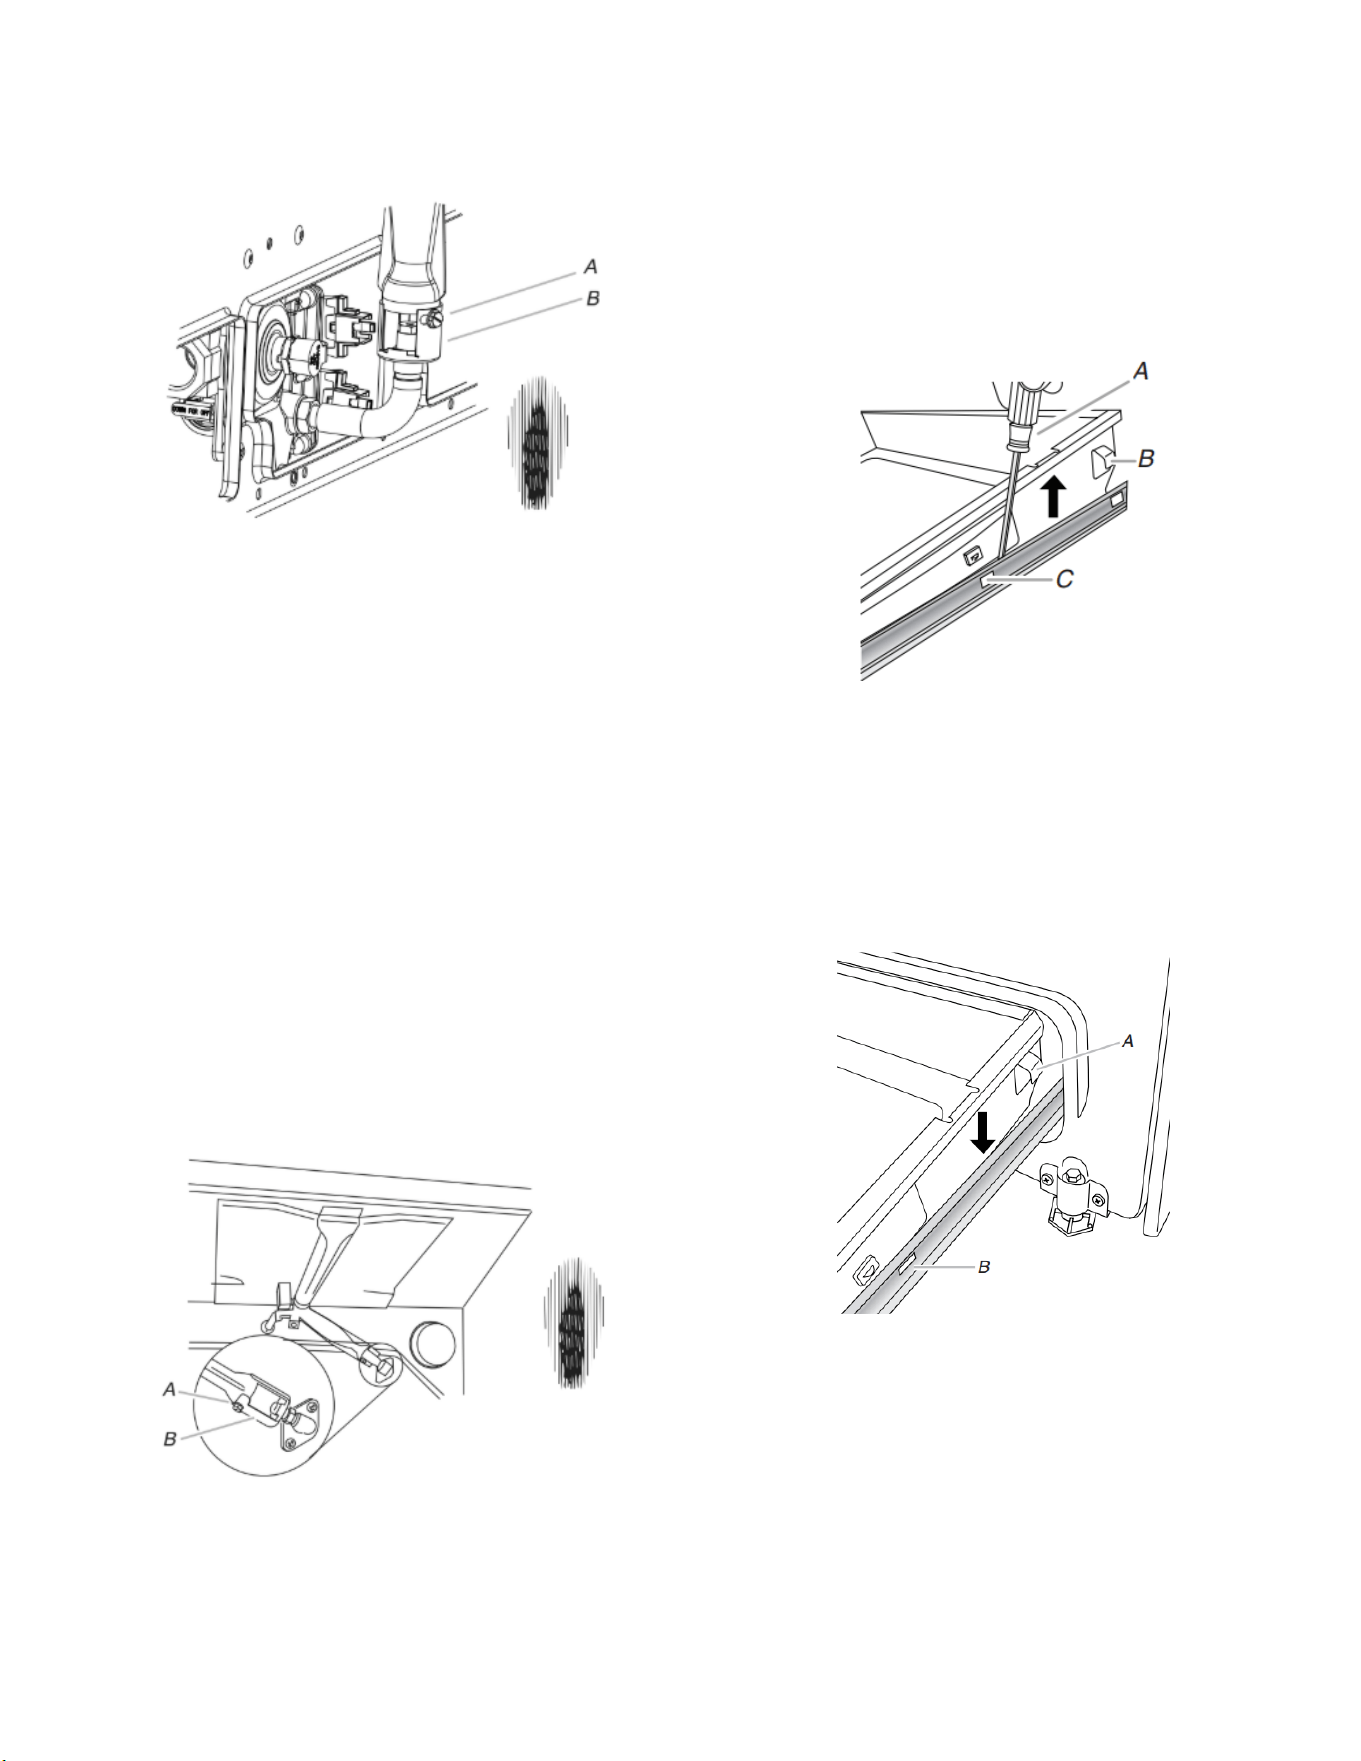
17
3. If the oven bake flame needs to be adjusted, locate the air
shutter near the center rear of the range. Loosen the locking
screw and rotate the air shutter until the proper flame appears.
Tighten locking screw.
A. Locking screw
B. Air shutter
4. Push CANCEL/OFF when finished.
5. Reinstall flame spreader and oven bake burner cover.
Check Operation of Oven Broil Burner
1. Close the oven door.
2. Press the BROIL pad.
3. Press the START pad.
The oven burner should light within 8 seconds. Under certain
conditions, it may take the burner up to 50 to 60 seconds to light.
Refer to the Quick Start Guide and online Control Guide for proper
operation of the oven controls.
Adjust Oven Broil Burner Flame (If needed)
Look through oven window to check broil burner for proper flame.
This flame should have a 1/2" (1.3 cm) long inner cone of bluish-
green, with an outer mantle of dark blue, and should be clean and
soft in character. No yellow tips, blowing or lifting of flame should
be present.
If flame needs to be adjusted:
1. Loosen the lock screw on the air shutter located at the rear of
the broil burner.
2. Adjust the air shutter as needed.
3. Tighten lock screw.
A. Lock screw
B. Air shutter
4. Press CANCEL/OFF when finished.
Warming Drawer or Premium
Storage Drawer (On some models)
Remove all items from inside the baking drawer, warming drawer
or premium storage drawer, and then allow the range to cool
completely before attempting to remove the drawer.
To Remove:
1. Open the drawer to its fully open position.
2. Using a flat-blade screwdriver, gently loosen the drawer from
the glide alignment notch, and then lift up the drawer
alignment tab from the glide.
A. Flat-blade screwdriver
B. Drawer alignment tab
C. Drawer glide notch
3. Repeat Step 2 on the other side. The drawer is no longer
attached to the drawer glides. Using both hands, pick up the
drawer to complete the removal.
To Replace:
1. Align the forward drawer notches with the notches in the
drawer glides on both sides. Place the rear alignment tabs into
the drawer glides on both sides.
A. Drawer alignment tab
B. Drawer glide notch
2. Push the warming drawer or premium storage drawer in all the
way.
3. Gently open and close the warming drawer or premium
storage drawer to ensure it is seated properly on the glides on
both sides.
18
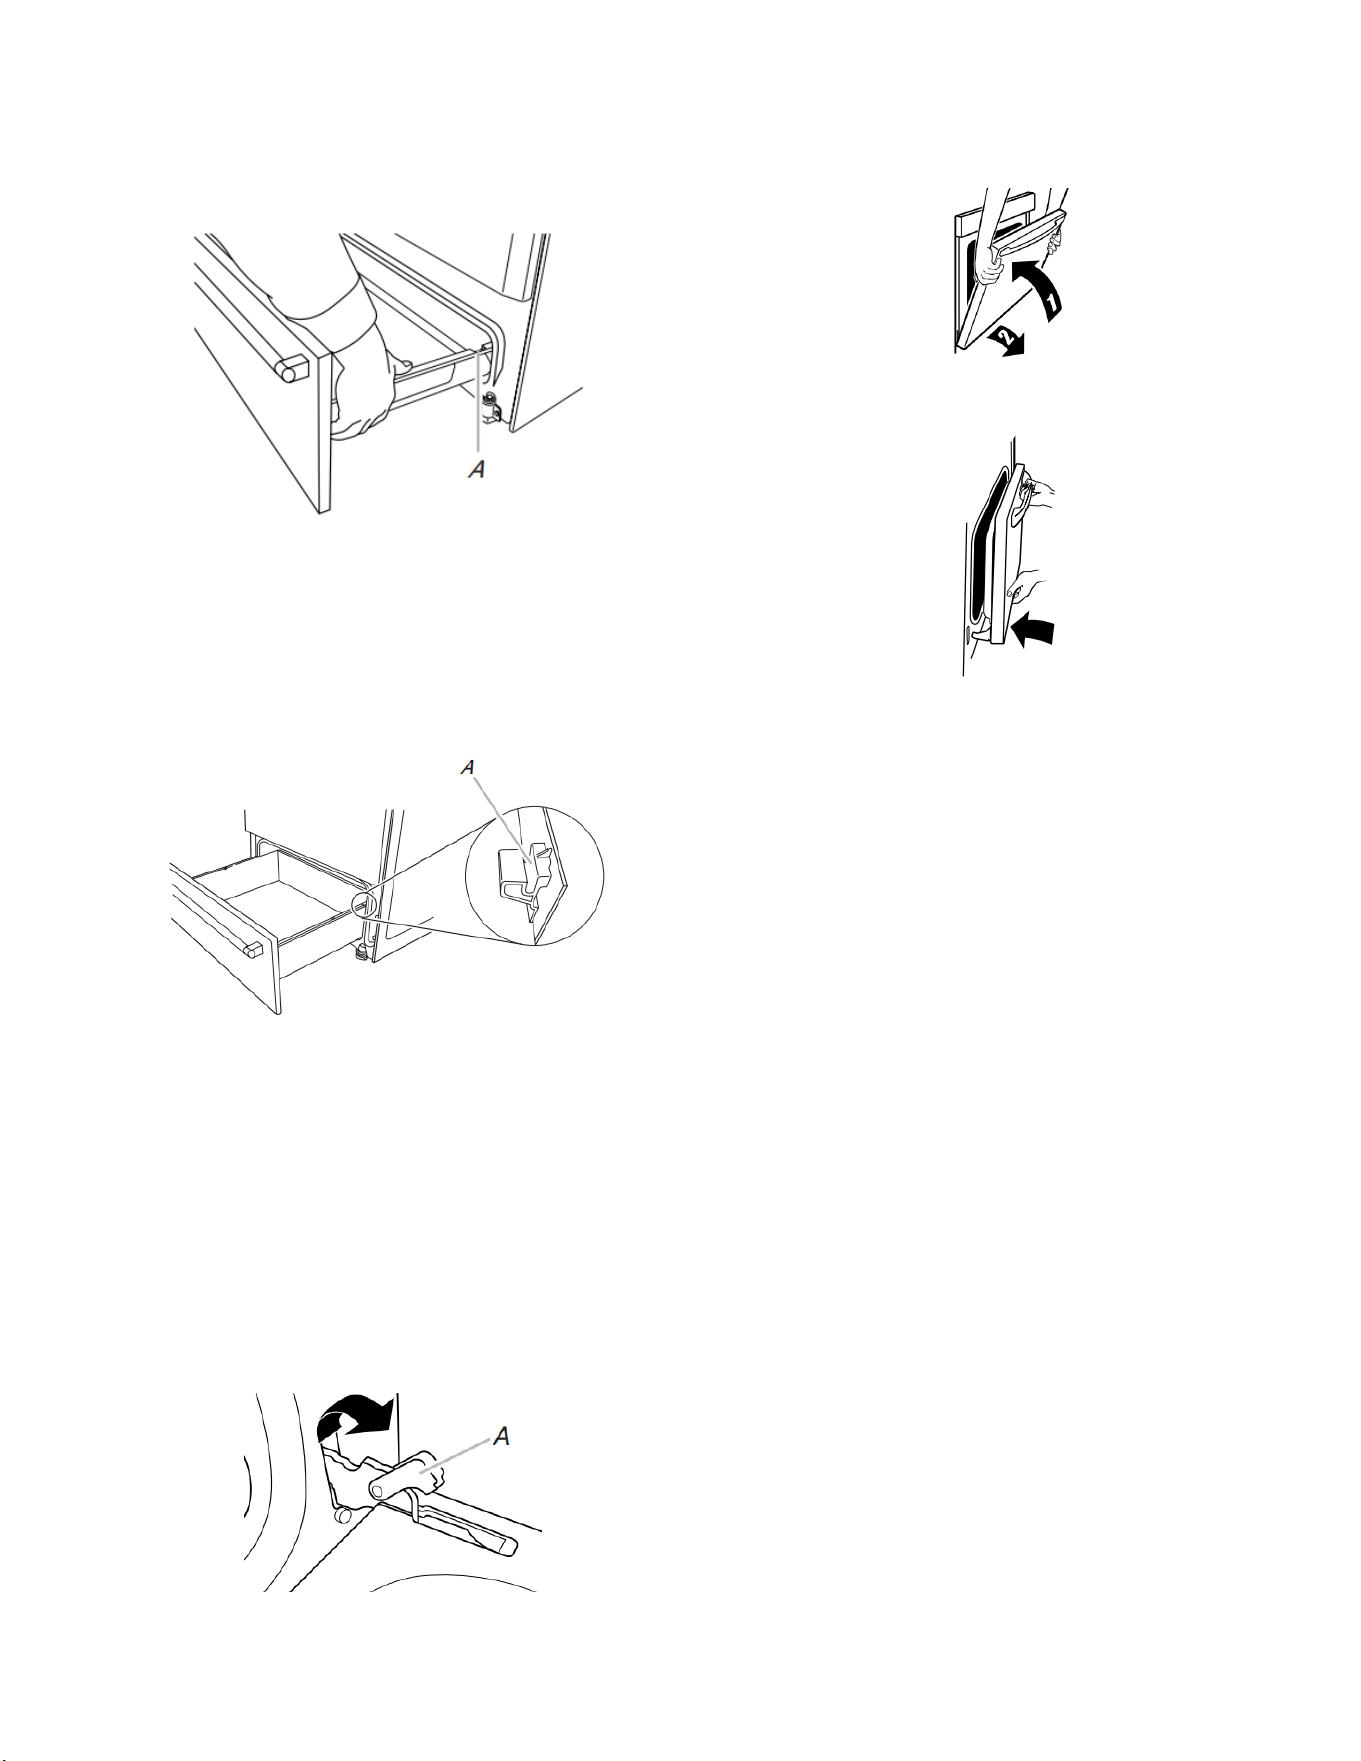
Storage Drawer (On some models)
The storage drawer can be removed. Before removing, make sure
drawer is cool and empty.
To Remove:
1. Pull the storage drawer straight back to the drawer stop.
A. Drawer stop notch
2. Lift up the front of the drawer and pull the drawer out.
To Replace:
1. Lift up the front of the drawer and place the rear of the drawer
inside the range so that the drawer stop notch is behind the
drawer glide.
2. Lower the drawer so that the edge of the slide rail drops into
the slot in the drawer glide.
3. Slowly push the drawer into the range.
A. Engage drawer glide
NOTE: When properly installed, the rear slides on the bottom of
the drawer will engage the base rails and the drawer will not tip
when items are placed in the drawer.
Oven Door
For normal range use, it is not suggested to remove the oven
door. However, if removal is necessary, make sure the oven is
OFF and cool. Then, follow these instructions. The oven door is
heavy.
To Remove:
1. Open oven door all the way.
2. Pinch the hinge latch between two fingers and pull forward.
Repeat on other side of oven door.
A. Hinge Latch
3. Close the oven door as far as it will shut.
4. Lift the oven door while holding both sides.
Continue to push the oven door closed and pull it away from
the oven door frame.
To Replace:
1. Insert both hanger arms into the door.
2. Open the oven door.
You should hear a click as the door is set into place.
3. Move the hinge levers back to the locked position. Check that
the door is free to open and close. If it is not, repeat the
removal and installation procedures.
Complete Installation
1. Check that all parts are now installed. If there is an extra part,
go back through the steps to see which step was skipped.
2. Check that you have all of your tools.
3. Dispose of/recycle all packaging materials.
4. Check that the range is level. See the “Level Range” section.
5. Use a mild solution of liquid household cleaner and warm
water to remove waxy residue caused by shipping material.
Dry thoroughly with a soft cloth. For more information, read
the “Range Maintenance and Care” section.
6. Read the Quick Start Guide and online Control Guide.
7. Turn on surface burners and oven. See the Quick Start Guide
and online Control Guide for specific instruction on range
operation.
If Range Does Not Operate, Check the Following:
� Household fuse is intact and tight; or circuit breaker has not
tripped.
� Range is plugged into a grounded 3-prong outlet.
� Gas pressure regulator shutoff valve is in the “on” position.
� Electrical supply is connected.
� See the online “Troubleshooting” section.
8. When the range has been on for 5 minutes, check for heat. If
the range is cold, turn off the range and check that the gas
supply line shut-off valve is open.
� If the gas supply line shut-off valve is closed, open it, and
then repeat the 5 minute test as outlined above.
� If the gas supply line shutoff valve is open, press the
CANCEL button on the oven control panel and contact a
qualified technician.
If You Need Assistance or Service:
Please reference the Quick Start Guide for contact information.

19
GAS CONVERSIONS
Gas conversions from Natural gas to propane gas or from
propane gas to Natural gas must be done by a qualified installer.
WARNING
Explosion Hazard
Use a new CSA International approved gas supply line.
Install a shut-off valve.
Securely tighten all gas connections.
If connected to propane, have a qualified person make
sure gas pressure does not exceed 14" (36 cm) water
column.
Examples of a qualified person include: licensed heating
personnel, authorized gas company personnel, and
authorized service personnel.
Failure to do so can result in death, explosion, or fire.
WARNING:
This conversion kit shall be installed by a qualified
service agency in accordance with the manufacturer’s
instructions and all applicable codes and requirements of
the authority having jurisdiction. If the information in
these instructions is not followed exactly, a fire, an
explosion or production of carbon monoxide may result
causing property damage, personal injury or loss of life.
The qualified service agency is responsible for the proper
installation of this kit. The installation is not proper and
complete until the operation of the converted appliance is
checked as specified in the manufacturer’s instructions
supplied with the kit.
Propane Gas Conversion
WARNING
Tip Over Hazard
A child or adult can tip the range and be killed.
Install anti-tip bracket to floor or wall per installation
instructions.
Slide range back so rear range foot is engaged in the
slot of the anti-tip bracket.
Re-engage anti-tip bracket if range is moved.
Do not operate range without anti-tip bracket installed
and engaged.
Failure to follow these instructions can result in death or
serious burns to children and adults.
1. Turn manual shutoff valve to the closed position.
A. To range
B. Manual shut-off valve closed position
C. Gas supply line
2. Unplug range or disconnect power.
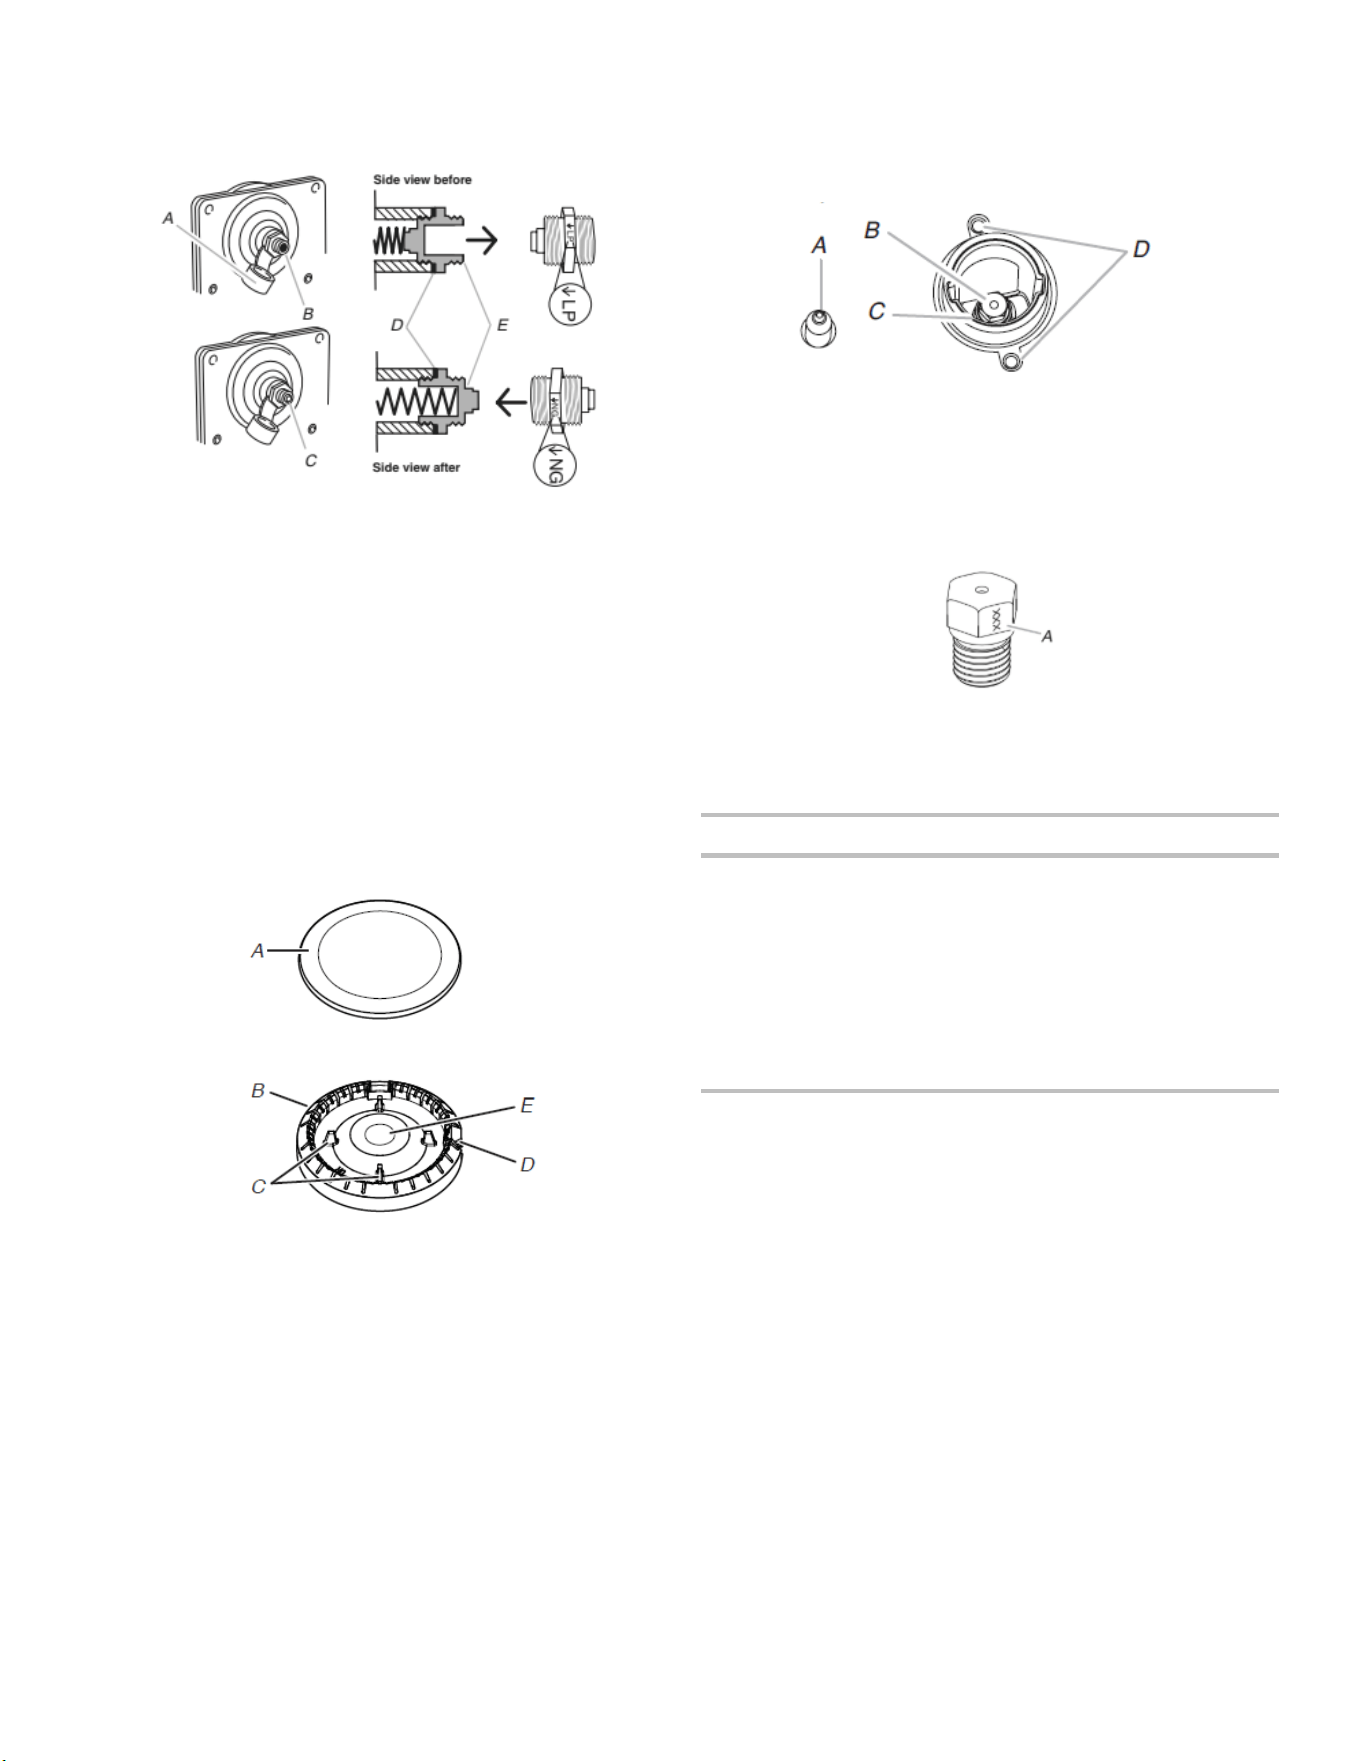
To Convert Gas Pressure Regulator (Natural gas
to Propane)
1. Remove the premium storage drawer, warming drawer or
baking drawer. See the “Remove/Replace Drawer”, “Storage
Drawer” or “Warming Drawer or Premium Storage Drawer”
section.
2. Locate gas pressure regulator at rear of the drawer
compartment.
NOTE: On models with a warming drawer or baking drawer,
an access cover must be removed to access the gas pressure
regulator.
A. Gas pressure regulator
IMPORTANT: Do not remove the gas pressure regulator.
3. Remove plastic cover from gas pressure regulator cap.
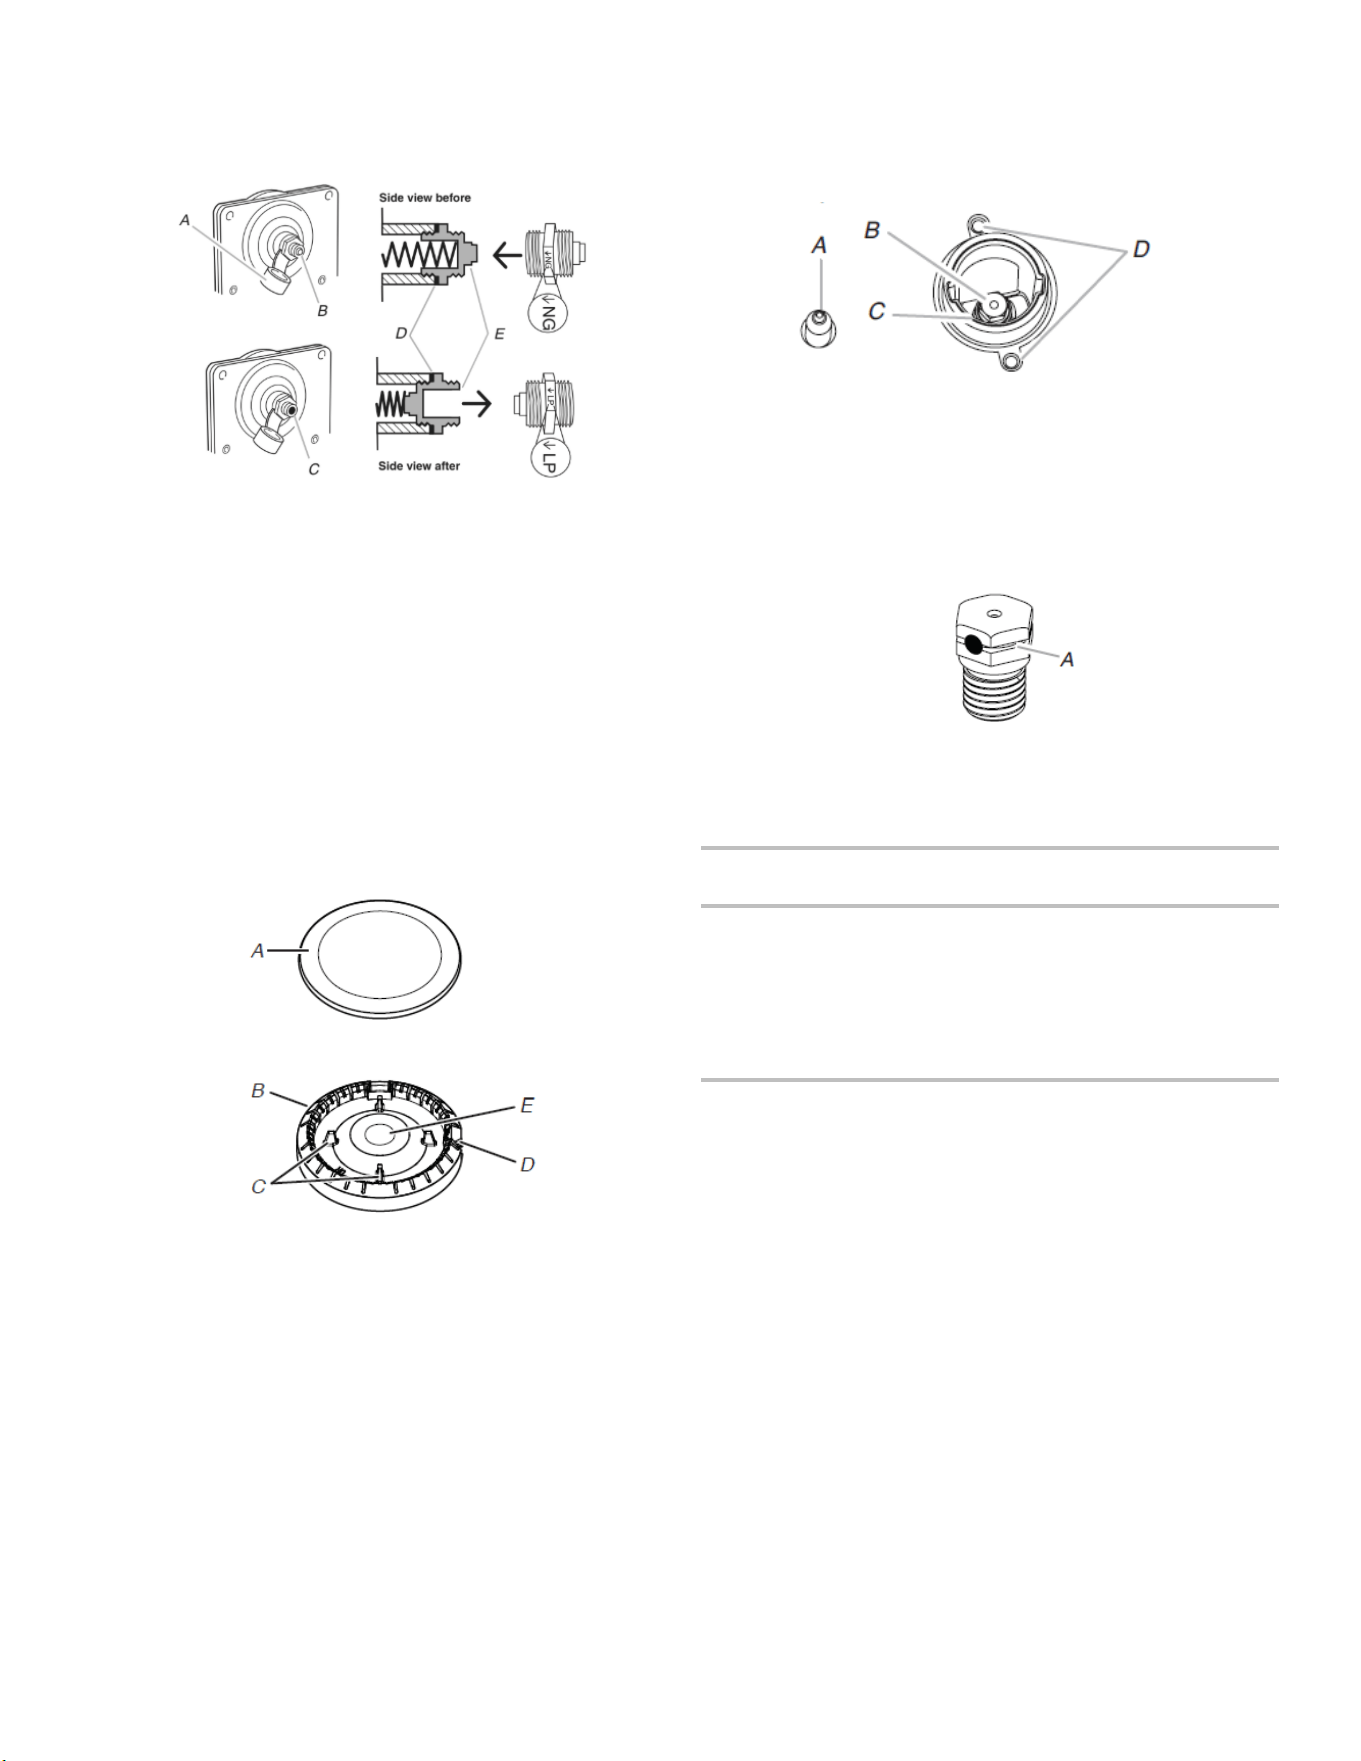
20
4. Turn gas pressure regulator cap counterclockwise with a 5/8"
(1.6 cm) combination wrench to remove.
NOTE: Do not remove the spring beneath the cap.
A. Plastic cover
B. Gas pressure regulator cap with solid end
facing out
C. Gas pressure regulator cap with hollow end
facing out
D. Washer
E. Gas pressure regulator cap
5. Turn over the gas pressure regulator cap and reinstall on
regulator so that the hollow end faces out and the marking
“↓LP” is facing the direction shown in the above drawing.
6. Replace plastic cover over gas pressure regulator cap.
To Convert Surface Burners (Natural Gas to
Propane Gas)
1. Remove burner cap.
2. Remove the burner base.
A. Burner cap
B. Burner base
C. Alignment pins
D. Igniter electrode
E. Gas tube opening
3. Apply masking tape to the end of a 9/32" (7 mm) nut driver to
help hold the gas orifice spud in the nut driver while changing
it. Press nut driver down onto the gas orifice spud and remove
by turning it counterclockwise and lifting out. Set gas orifice
spud aside.
A. Igniter electrode
B. Orifice spud
C. Orifice spud holder
D. Screws
4. Remove the orifice spuds shipped in the literature package in
the oven. Gas orifice spuds are stamped with a number and
have a groove in the hex area. Replace the Natural gas orifice
spud with the correct propane gas orifice spud.
A. Propane groove
Refer to the following chart for correct Propane gas orifice
spud placement.
Propane Gas Orifice Spud Chart for Surface Burner
Placement Burner Rating
/ Type
Size (mm) ID Number
LF 14,200 BTU 1.08 108AM
LR 8,000 BTU 0.84 084AM
RF 14,200 BTU 1.08 108AM
RR 5,000 BTU 0.64 064AM
CTR 8,000 BTU 0.84 084AM
NOTE: Refer to the model/serial/rating plate located on the oven
frame behind the top left side of the oven door for proper sizing of
spuds for each burner location.
5. Place Natural gas orifice spuds in the orifice spud bag.
IMPORTANT: Keep the Natural gas orifice spuds in case of
reinstallation with Natural gas.
6. Replace the burner base.
7. Replace burner cap.
8. Repeat steps 1-7 for the remaining burners.
21
To Convert Oven Bake Burner (Natural Gas to
Propane Gas)
1. Remove the oven racks.
2. Remove 2 screws at the rear of the oven bottom.
3. Lift the rear of the oven bottom up and back until the front of
the panel is away from the front frame. Remove from oven
and set it aside on a covered surface.
A. Screws
B. Oven bottom
4. Remove 2 screws from the front tabs of the flame spreader.
Lift the front of the flame spreader and pull forward to remove
tabs from rear of oven and set it aside on a covered surface.
A. Screws
B. Flame spreader
5. Remove 2 screws from the bake burner.
6. Slide the front of the bake burner to the side to remove tab
from front of oven. Lift the back of the bake burner off the oven
orifice, and set the bake burner aside.
A. Screws
B. Bake burner
7. Use a 3/8" (1 cm) nut driver or combination wrench and turn
the Natural gas bake burner orifice spud counterclockwise to
remove. The spud will be stamped with a “49.”
8. Replace the “49” spud with a “57” spud. Install the Propane
gas bake burner orifice spud, turning it clockwise until snug.
IMPORTANT: Do not overtighten.
A. Orifice spud
9. Position the back of the bake burner over the oven orifice, and
slide the tab on front of the bake burner into the front of the
oven.
10. Reattach the bake burner with 2 screws.
11. Insert the tabs on the rear of the flame spreader into the rear
of the oven.
12. Reattach the front tabs of the flame spreader to the oven with
2 screws.
13. Position the front of the oven bottom panel toward the front
frame and lower the rear of the oven bottom panel into the
oven.
14. Reattach the oven bottom panel with 2 screws.
To Convert Oven Broil Burner (Natural Gas to
Propane Gas)
1. Remove the screw from the broil burner
2. Remove the flame spreader.
3. Remove the broil burner from the broil burner orifice hood.
NOTE: The broil burner will hang in the back of the oven while
changing the orifice hood.
A. Broil burner
B. Screws
C. Orifice hood
4. Use a 3/8" (1 cm) combination wrench and turn the Natural
gas broil burner orifice hood counterclockwise to remove. The
hood will be stamped with a “53.”

22
5. Replace the “53” hood with a “090” hood. Install the Propane
gas broiler burner orifice hood, turning it clockwise until snug.
IMPORTANT: Do not overtighten.
6. Place the broil burner on the broil burner orifice hood and
insert the broil burner ceramic igniter in the hole in the rear of
the oven.
A. Orifice hood
7. Position the broil burner against the top of the oven and attach
it with 2 screws.
8. Replace storage drawer, warming drawer or premium storage
drawer. See the “Storage Drawer” or “Warming Drawer or
Premium Storage Drawer” section.
9. Replace the oven door if it has been removed. See the “Oven
Door” section.
10. Replace the oven racks
Complete Installation (Natural Gas to Propane
Gas)
1. Refer to the “Make Gas Connection” section for properly
connecting the range to the gas supply.
2. Refer to the “Electronic Ignition System” section for proper
burner ignition, operation and burner flame adjustments.
IMPORTANT: You may have to adjust the “LO” setting for
each cooktop burner.
Checking for proper cooktop, bake and broil burner flame is
very important. The small inner cone should have a very
distinct blue flame 1/4" (0.64 cm) to 1/2" (1.3 cm) long. The
outer cone is not as distinct as the inner cone. Propane gas
flames have a slightly yellow tip.
3. Refer to “Complete Installation” in the “Installation
Instructions” section of this manual to complete this
procedure.
NOTE: Make sure to save the orifices that have just been
replaced in the conversion.
Natural Gas Conversion
WARNING
Tip Over Hazard
A child or adult can tip the range and be killed.
Install anti-tip bracket to floor or wall per installation
instructions.
Slide range back so rear range foot is engaged in the
slot of the anti-tip bracket.
Re-engage anti-tip bracket if range is moved.
Do not operate range without anti-tip bracket installed
and engaged.
Failure to follow these instructions can result in death or
serious burns to children and adults.
1. Turn manual shutoff valve to the closed position.
A. To range
B. Manual shut-off valve closed position
C. Gas supply line
2. Unplug range or disconnect power.
To Convert Gas Pressure Regulator (Propane Gas
to Natural Gas)
1. Remove the premium storage drawer, warming drawer or
baking drawer or premium storage drawer. See the Remove /
Replace Drawer, Storage Drawer or Warming Drawer or
Premium Storage Drawer section.
2. Locate gas pressure regulator at rear of the drawer
compartment.
NOTE: On models with a warming drawer or baking drawer,
an access cover must be removed to access the gas pressure
regulator.
A. Gas pressure regulator
IMPORTANT: Do not remove the gas pressure regulator.
3. Remove plastic cover from gas pressure regulator cap.
23
4. Turn gas pressure regulator cap counterclockwise with a 5/8"
(1.6 cm) combination wrench to remove.
NOTE: Do not remove the spring beneath the cap.
A. Plastic cover
B. Gas pressure regulator cap with hollow end
facing out
C. Gas pressure regulator cap with solid end
facing out
D. Washer
E. Gas pressure regulator cap
5. Turn over the gas pressure regulator cap and reinstall on
regulator so that the solid end faces out and the marking
“↓NG” is facing the direction shown in the above drawing.
6. Replace plastic cover over gas pressure regulator cap.
To Convert Surface Burners (Propane Gas to
Natural Gas)
1. Remove burner cap.
2. Remove the burner base.
A. Burner cap
B. Burner base
C. Alignment pins
D. Igniter electrode
E. Gas tube opening
3. Apply masking tape to the end of a 9/32" (7 mm) nut driver to
help hold the gas orifice spud in the nut driver while changing
it. Press nut driver down onto the gas orifice spud and remove
by turning it counterclockwise and lifting out. Set gas orifice
spud aside.
A. Igniter electrode
B. Orifice spud
C. Orifice spud holder
D. Screws
4. Gas orifice spuds are stamped with a number on the side.
Replace the propane gas orifice spud with the correct Natural
gas orifice spud.
A. Stamped number
Refer to the following chart for the correct Natural gas orifice spud
placement.
Natural Gas Orifice Spud Chart
Burner Rating Size (mm) ID Number
18,000 BTU 2.00 200AM
17,000 BTU 1.96 196AM
15,000 BTU 1.80 180AM
9,500 BTU 1.40 140AM
8,000 BTU 1.30 130AM
5,000 BTU 1.00 100AM
NOTE: Refer to the model/serial/rating plate located on the oven
frame behind the top right-hand side of the oven door for proper
sizing of spuds for each burner location.
5. Place propane gas orifice spuds in the orifice spud bag.
IMPORTANT: Keep the propane gas orifice spuds in case of
reinstallation with propane gas.
6. Replace the burner base using both screws.
7. Replace burner cap.
8. Repeat steps 1 through 7 for the remaining burners.

24
To Convert Oven Bake Burner (Propane Gas to
Natural Gas)
1. Remove the oven racks.
2. Remove 2 screws at the rear of the oven bottom.
3. Lift the rear of the oven bottom up and back until the front of
the panel is away from the front frame. Remove from oven
and set it aside on a covered surface.
A. Screws
B. Oven bottom
4. Remove 2 screws from the front tabs of the flame spreader.
Lift front of the flame spreader and pull forward to remove tabs
from rear of oven and set it aside on a covered surface.
A. Screws
B. Flame spreader
5. Remove 2 screws from the bake burner.
6. Slide the front of the bake burner to the side to remove tab
from front of oven. Lift the back of the bake burner off the oven
orifice, and set the bake burner aside.
A. Screws
B. Bake burner
7. Use a 3/8" (1 cm) nut driver or combination wrench and turn
the Propane gas bake burner orifice spud counterclockwise to
remove. The spud will be stamped with a “57.”
8. Replace the “57” spud with a “49” spud. Install the Natural gas
bake burner orifice spud, turning it clockwise until snug.
IMPORTANT: Do not overtighten.
A. Orifice spud
9. Position the back of the bake burner over the oven orifice, and
slide the tab on front of the bake burner into the front of the
oven
10. Reattach the bake burner with 2 screws.
11. Insert the tabs on the rear of the flame spreader into the rear
of the oven.
12. Reattach the front tabs of the flame spreader to the oven with
2 screws.
13. Position the front of the oven bottom panel toward the front
frame and lower the rear of the oven bottom panel into the
oven.
14. Reattach the oven bottom panel with 2 screws.
To Convert Oven Broil Burner (Propane Gas to
Natural Gas)
1. Remove the screw from the broil burner
2. Remove the broil burner from the broil burner orifice hood.
NOTE: The broil burner will hang in the back of the oven while
changing the orifice hood.
A. Broil burner
B. Screws
C. Orifice hood
3. Using a 3/8" (9.5 mm) combination wrench, turn the Propane
gas broil burner orifice hood counterclockwise to remove. The
hood will be stamped with a “090.”
25
4. Replace the “090” hood with a “53” hood. Install the Natural
gas broiler burner orifice hood, turning it clockwise until snug.
IMPORTANT: Do not overtighten.
A. Orifice hood
5. Place the broil burner on the broil burner orifice hood and
insert the broil burner ceramic igniter in the hole in the rear of
the oven.
6. Position the broil burner against the top of the oven and attach
it with 2 screws.
7. Replace storage drawer or warming drawer. See the “Storage
Drawer” or “Warming Drawer or Premium Storage Drawer”
section.
8. Replace the oven door. See the “Oven Door” section.
9. Replace the oven racks.
Complete Installation (Propane Gas to Natural
Gas)
1. Refer to the “Make Gas Connection” section for properly
connecting the range to the gas supply.
2. Refer to the “Electronic Ignition System” section for proper
burner ignition, operation and burner flame adjustments.
IMPORTANT: You may have to adjust the “LO” setting for
each cooktop burner.
Checking for proper cooktop, bake and broil burner flame is
very important. Natural gas flames do not have yellow tips.
3. Refer to “Complete Installation” in the “Installation
Instructions” section of this manual to complete this
procedure.
NOTE: Make sure to save the orifices that have just been
replaced in the conversion.
Moving the Range
WARNING
Tip Over Hazard
A child or adult can tip the range and be killed.
Install anti-tip bracket to floor or wall per installation
instructions.
Slide range back so rear range foot is engaged in the
slot of the anti-tip bracket.
Re-engage anti-tip bracket if range is moved.
Do not operate range without anti-tip bracket installed
and engaged.
Failure to follow these instructions can result in death or
serious burns to children and adults.
When moving range, slide range onto cardboard or hardboard to
avoid damaging the floor covering.
If removing the range is necessary for cleaning or maintenance:
For power supply cord-connected ranges:
1. Slide range forward.
2. Turn manual shutoff valve to the closed position.
3. Unplug the power supply cord.
4. Disconnect the gas supply tubing.
5. Complete cleaning or maintenance.
6. Reconnect the gas supply tubing.
7. Open the manual shutoff valve in the gas supply line.
8. Plug in power supply cord.
9. Slide range back so rear range foot is under anti-tip bracket.
10. Refer to the “Verify Anti-Tip Bracket Is Installed and Engaged”
section to verify engagement.
11. Check that range is level.
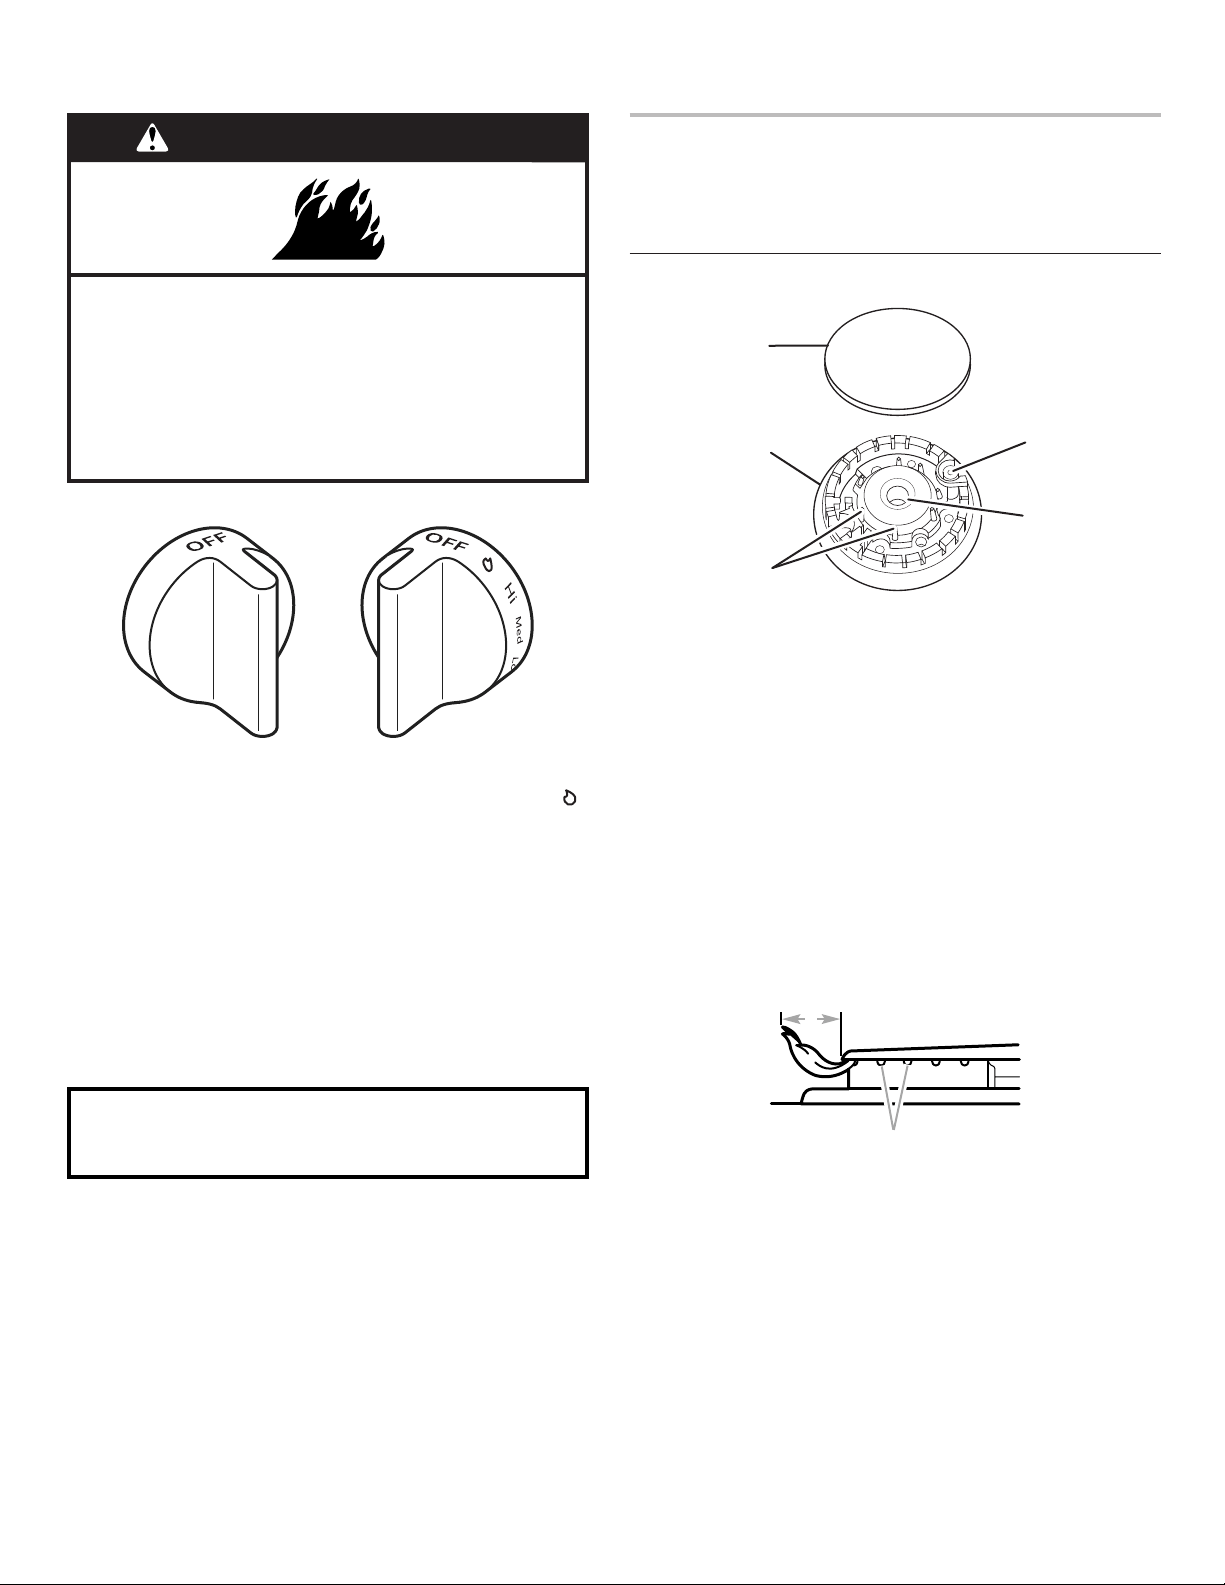
26
SÉCURITÉ DE LA CUISINIÈRE
AVERTISSEMENT : Si les renseignements dans ces instructions ne sont pas
exactement observés, un incendie ou une explosion peut survenir, causant des
dommages au produit, des blessures ou un décès.
− Ne pas entreposer ni utiliser de l’essence ou d’autres vapeurs ou liquides inflammables à
proximité de cet appareil ou de tout autre appareil électroménager.
− QUE FAIRE DANS LE CAS D’UNE ODEUR DE GAZ :
•
Ne pas tenter d’allumer un appareil.
• Ne pas toucher à un commutateur électrique.
• Ne pas utiliser le téléphone se trouvant sur les lieux.
• Appeler immédiatement le fournisseur de gaz à partir du téléphone d'un voisin. Suivre ses instructions.
• À défaut de joindre votre fournisseur de gaz, appeler les pompiers.
− L’installation et l’entretien doivent être effectués par un installateur qualifié, une agence
de service ou le fournisseur de gaz.
AVERTISSEMENT :
Ne jamais faire fonctionner la surface de cuisson de la partie supérieure de cet appareil sans
surveillance.
• Ne pas respecter cet énoncé de mise en garde peut provoquer un risque d’incendie,
d’explosion ou de brûlure pouvant causer des dommages à la propriété, des blessures ou
un décès.
• Si un incendie se produit, rester à distance de l’appareil et appeler immédiatement les
pompiers.
NE JAMAIS ESSAYER D’ÉTEINDRE UN FEU D’HUILE/DE GRAISSE AVEC DE L’EAU.
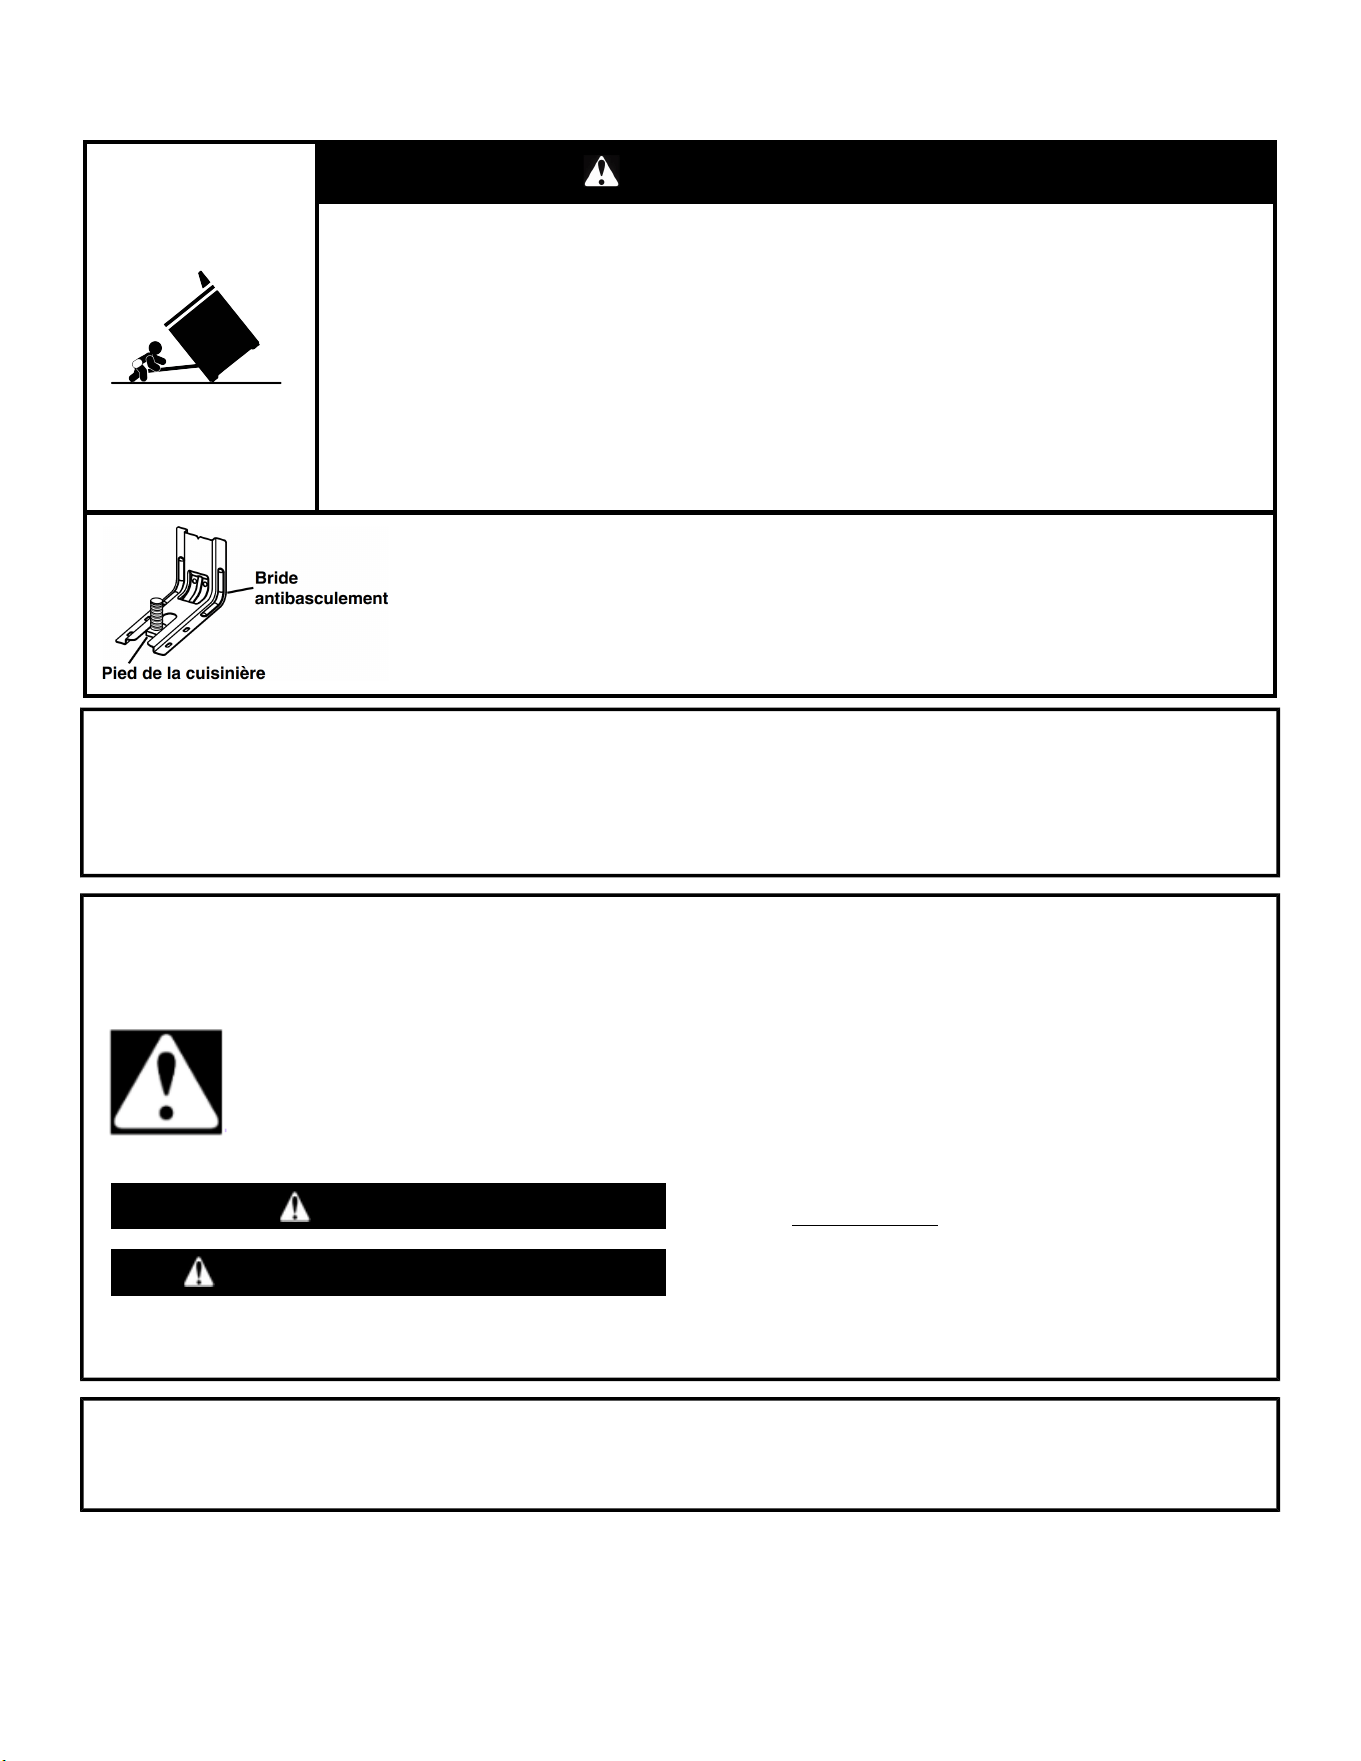
27
La cuisinière ne basculera pas pendant une utilisation normale. Cependant, la cuisinière peut basculer, si vous appliquez trop de force ou
de poids à la porte de la cuisinière, sans avoir adéquatement fixé le pied antibasculement.
AVERTISSEMENT
Risque de basculement
Une personne, enfant ou adulte, peut faire basculer la cuisinière et subir des blessures mortelles
Fixer la bride antibasculement au plancher ou au mur, conformément aux instructions
d’installation.
Faire glisser de nouveau la cuisinière de façon à ce que son pied arrière se trouve dans la fente de
la bride antibasculement.
Joindre de nouveau la bride antibasculement si la cuisinière est déplacée.
Ne pas faire fonctionner la cuisinière si la bride antibasculement n’est pas installée et engagée.
Le non-respect de ces instructions peut causer un décès ou des brûlures graves aux enfants et
aux adultes.
Pour vérifier que la bride antibasculement est bien installée et engagée :
• Faire glisser la cuisinière vers l’avant.
• Vérifier que la bride antibasculement est bien fixée au plancher ou au mur.
• Faire glisser de nouveau la cuisinière de façon à ce que le pied arrière de la cuisinière
se trouve sous la bride antibasculement.
• Voir les directives d’installation pour obtenir de plus amples renseignements.
AVERTISSEMENT: L’odorat ne permet pas toujours la détection d’une fuite de gaz.
Les distributeurs de gaz recommandent l’emploi d’un détecteur de gaz (homologation UL ou CSA).
Pour d’autre information, contacter le fournisseur de gaz local.
En cas de détection d’une fuite de gaz, exécuter les instructions "Que faire dans le cas d’une odeur de gaz".
Votre sécurité et celle des autres est très importante
Nous donnons de nombreux messages de sécurité importants dans ce manuel et sur votre appareil ménager. Assurez-vous de
toujours lire tous les messages de sécurité et de vous y conformer .
Voici le symbole d’alerte de sécurité.
Ce symbole d’alerte de sécurité vous signale les dangers potentiels de décès et de blessures graves à vous et à
d’autres.
Tous les messages de sécurité suivront le symbole d’alerte de sécurité et le mot "DANGER" ou
"AVERTISSEMENT". Ces mots signifient :
DANGER
Risque possible de décès ou de blessure grave si vous ne
suivez pas immédiatement les instructions.
AVERTISSEMENT
Risque possible de décès ou de blessure grave si vous ne
suivez pas les instructions.
Tous les messages de sécurité vous diront quel est le danger potentiel et vous disent comment réduire le risque de blessure et ce
qui peut se produire en cas de non-respect des instructions.
IMPORTANT : Ne pas installer un système de ventilation avec évacuation de l'air vers le bas, qui évacuerait l'air vers cet appareil de
cuisson à gaz. Ce type de système de ventilation peut causer des problèmes d'allumage et de combustion avec cet appareil de
cuisson à gaz et entraîner des blessures corporelles ou le fonctionnement non désiré de cet appareil.

28
Dans l’État du Massachusetts, les instructions d’installation suivantes sont applicables :
� Les travaux d’installation et réparation doivent être exécutés par un plombier ou tuyauteur qualifié ou licencié, ou par le personnel
qualifié d’une entreprise licenciée par l’État du Massachusetts.
� Remplacer par des dispositifs de fermeture acceptables : Les robinets de gaz et robinets à bille installés pour l'utilisation
devraient être indiqués.
� Si un conduit de raccordement flexible est utilisé, sa longueur ne doit pas dépasser 4 pi (121,9 cm).
IMPORTANTES INSTRUCTIONS DE SÉCURITÉ
AVERTISSEMENT: Afin de réduire le risque d’incendie, de décharge électrique ou de blessures lors de l’utilisation de l’appareil,
il convient d’observer certaines précautions fondamentales, notamment :
�
AVERTISSEMENT: POUR MINIMISER LE RISQUE DE
BASCULEMENT DE LA CUISINIÈRE, ELLE DOIT ÊTRE
BIEN IMMOBILISÉE PAR DES DISPOSITIFS
ANTIBASCULEMENT CORRECTEMENT INSTALLÉS.
POUR VÉRIFIER SI LES DISPOSITIFS SONT
CORRECTEMENT INSTALLÉS, GLISSER LA
CUISINIÈRE VERS L’AVANT ET VÉRIFIER SI LA BRIDE
ANTIBASCULEMENT EST BIEN FIXÉE AU PLANCHER
OU AU MUR, ET GLISSER LA CUISINIÈRE VERS
L’ARRIÈRE POUR QUE LE PIED ARRIÈRE DE LA
CUISINIÈRE SOIT SOUS LA BRIDE
ANTIBASCULEMENT.
AVERTISSEMENT
NE JAMAIS utiliser cet appareil comme dispositif de
chauffage de la pièce. Le non-respect de cette instruction
peut entraîner une intoxication au monoxyde de carbone et
une surchauffe du four.
AVERTISSEMENT
NE JAMAIS couvrir les fentes, trous ou passages d'air au
fond du four ou couvrir entièrement une grille avec des
matériaux tels que du papier d'aluminium. Le non-respect de
cette instruction empêche la circulation de l'air dans le four et
peut entraîner une intoxication au monoxyde de carbone. Les
feuilles de papier d'aluminium peuvent également retenir la
chaleur et créer un risque d'incendie.
�
MISE EN GARDE : Ne pas ranger d’articles pouvant
intéresser les enfants dans les armoires situées au-dessus
d’une appareil ou sur dosseret de la appareil – les enfants
grimpant sur la appareil pour atteindre des articles peuvent
gravement se blesser.
� Ne pas laisser les enfants seuls – Les enfants ne doivent
pas être laissés seuls ou sans surveillance dans la zone où
la appareil est utilisé. Ils ne doivent jamais être autorisés à
s’asseoir ou à se tenir debout sur une partie quelconque de
la appareil.
� Porter des vêtements adaptés – Les vêtements pendants
ou non ajustés ne doivent jamais être portés lorsqu’on
utilise la cuisinière.
� Entretien par l’utilisateur – Ne pas réparer ou remplacer
une quelconque pièce de la appareil sans recommandation
spécifique du manuel. Toutes les autres tâches d’entretien
doivent être effectuées par un technicien qualifié.
� Entreposage dans ou sur la appareil – Les matières
inflammables ne doivent pas être entreposées dans un four
ou près de la surface de la table.
� Cet appareil n’est pas conçu pour servir d’espace de
rangement.
� Ne pas utiliser d’eau sur les feux de friture – Étouffer le feu
ou la flamme ou utiliser un extincteur avec agent chimique
sec ou mousseux.
� Utiliser uniquement des mitaines sèches – Les mitaines
humides ou trempées sur les surfaces chaudes peuvent
provoquer des brûlures dues à la vapeur. Ne pas laisser les
mitaines toucher des unités de surface et chauds. Ne pas
utiliser un chiffon ou tout autre tissu encombrant.
� Ne jamais laisser les surfaces de cuisson sans surveillance
à des réglages de chaleur élevée – Les ébullitions
provoquent de la fumée et des éclaboussures graisseuses
qui peuvent s’enflammer.
� Ustensiles de cuisson émaillés – seuls certains types
d’ustensiles en verre, vitrocéramique, céramique, terre
cuite ou autre émaillage peuvent être utilisés sur la surface
de la cuisinière sans briser en raison du changement de
température soudain.
� Les poignées des ustensiles doivent être tournées vers
l’intérieur et ne doivent pas dépasser au-dessus des unités
de surface de cuisson – Pour éviter le risque de brûlures,
d’inflammation des matières inflammables et
d’éclaboussures dues à un contact non intentionnel avec
l’ustensile, la poignée d’un ustensile doit toujours être
positionnée vers l’intérieur et ne doit pas dépasser au-
dessus des surfaces de cuisson adjacentes.
� Déconnecter la source de courant électrique avant
l’entretien.
� Cet appareil est pourvu d’ une fiche à trois broches don't
une mise à la terre assurant une protection contre les
chocs électriques. La prise dans laaquelle elle est
branchée doit être correctement mise à la terre. Ne pas
couper ni enlever la broche de mise à la terre de la fiche.
� Bonne installation – l’appareil, lorsqu’il est installé, doit être
relié à la terre conformément aux codes locaux, ou en
l’absence de codes locaux, au National Electrical Code,
ANSI/NFPA 70 ou au Code canadien de l’électricité CSA
C22.1-02. Au Canada, l’appareil doit être relié à la terre en
respectant le Code canadien de l’électricité. S’assurer que
l’appareil est bien installé et que la mise à la terre est
réalisée par un technicien qualifié.
� Des blessures peuvent résulter d’un mauvais usage des
portes ou tiroirs de l’appareil – par exemple, marcher,
s’appuyer ou s’asseoir sur les portes ou tiroirs.
CONSERVEZ CES INSTRUCTIONS

29
IMPORTANTES INSTRUCTIONS DE SÉCURITÉ
� Entretien – Maintenir la zone de la cuisinière à l’abri des
matériaux combustibles, essence ou autres vapeurs ou
liquides inflammables.
� La taille de la flamme du brûleur supérieur doit être ajustée
de façon à ne pas dépasser du bord de l’ustensile de
cuisson. Cette instruction est basée sur des considérations
de sécurité.
� Ne pas utiliser de pièces de remplacement qui n’ont pas
été recommandées par le fabricant (c.-à-d., des pièces
fabriquées à la maison à l’aide d’une imprimante 3D).
� Nettoyer la table de cuisson avec précaution – Si une
éponge ou un linge humide est utilisé pour nettoyer les
éclaboussures sur une zone de cuisson chaude, faire
attention aux brûlures dues à la vapeur. Certains nettoyants
peuvent produire des fumées toxiques si appliqués sur une
surface chaude.
� Ouvrir la porte lentement – Laisser la chaleur ou la vapeur
s’échapper avant de retirer ou de remettre en place un plat.
� Ne pas faire chauffer un contenant qui n’a pas été ouvert –
L’accumulation de pression pourrait faire éclater le
contenant et causer des blessures.
� Garder dégagés les conduits de ventilation du four.
� NE PAS TOUCHER LES ÉLÉMENTS CHAUFFANTS OU
LES SURFACES INTÉRIEURES DU FOUR – Les
éléments chauffants peuvent être chauds même s’ils sont
de couleur foncée.Les surfaces intérieures du four peuvent
être suffisamment chaudes pour provoquer des brûlures.
Pendant et après l’utilisation, ne pas toucher ou laisser des
vêtements ou d’autres matériaux inflammables en contact
avec les éléments chauffants ou les surfaces intérieures
tant qu’ils n’ont pas suffisamment refroidi. Les autres
surfaces de l’appareil peuvent devenir suffisamment
chaudes pour causer des brûlures – les ouvertures de
ventilation et les surfaces autour de ces ouvertures, les
portes du four et les hublots de portes font partie de ces
surfaces.
� Il faut faire attention de ne pas laisser le papier aluminium
et la sonde de cuisson entrer en contact avec les éléments
chauffants.
Pour les cuisinières autonettoyantes –
� AVERTISSEMENT : NE PAS LAISSER D’ALIMENTS,
D’USTENSILES DE CUISSON, ETC. DANS LE FOUR
PENDANT L’UTILISATION DU MODE DE NETTOYAGE
PYROLYTIC.
� Ne pas nettoyer le joint de la porte – Le joint de la porte est
essentiel pour une bonne étanchéité. Faire attention à ne
pas frotter, endommager ou déplacer le joint.
� Ne pas utiliser de nettoyants à four – Aucun nettoyant
commercial ou revêtement de protection pour four
d’aucune sorte ne devrait être utilisé dans le four ou près
de ses parties.
� Ne nettoyer que les pièces indiquées dans le manuel.
� Avant de mettre en marche l’autonettoyage – Enlever la
lèchefrite et les autres ustensiles. Essuyer tout excès de
renversement avant de commencer un programme de
nettoyage.
Pour les appareils avec hotte de ventilation –
� Nettoyer régulièrement les hottes de ventilation – Ne pas
laisser la graisse s’accumuler dans la hotte ou le filtre.
� Lorsque des aliments sont flambés sous la hotte, mettre le
ventilateur en marche.
Pour les cuisinières et fours intelligents :
� Utilisation à distance – cet appareil peut être configuré pour
permettre l’utilisation à distance en tout temps. Ne pas
ranger de matériaux inflammables ou sensibles à la
température sur le dessus ou près de la surface de
l’appareil.
CONSERVEZ CES INSTRUCTIONS
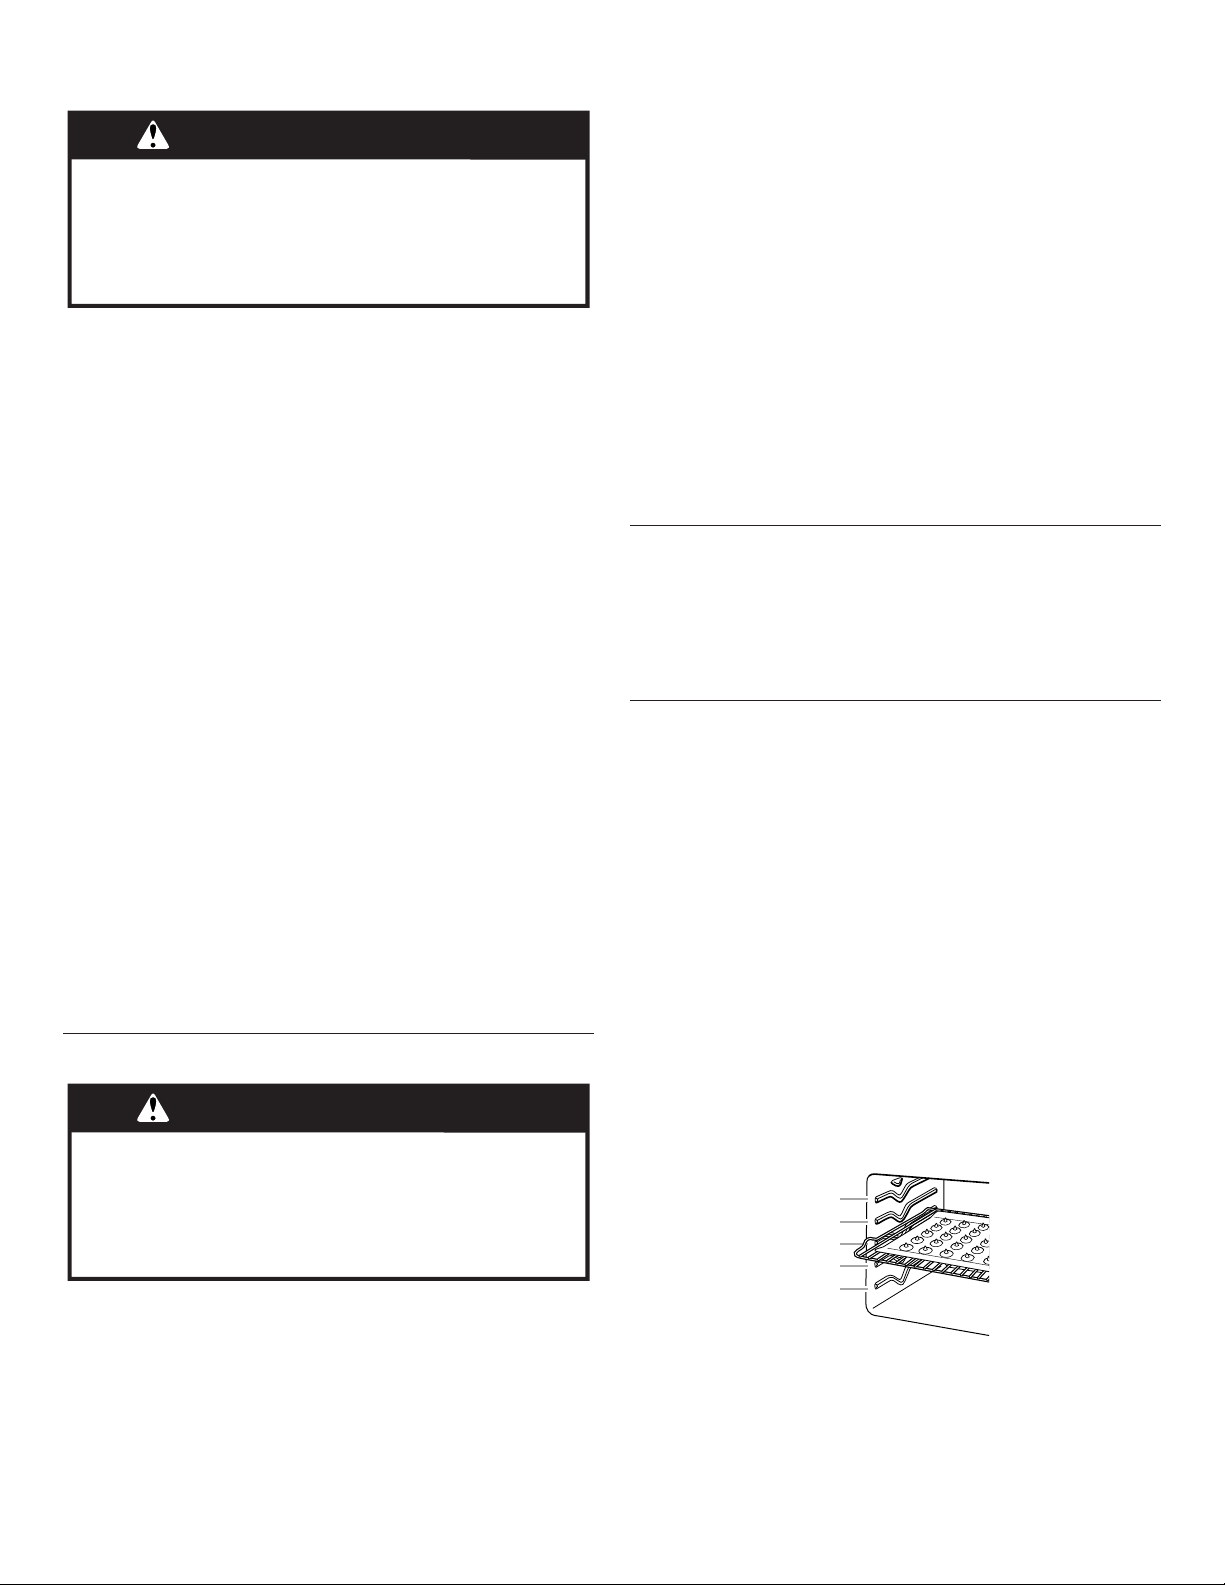
30
ENTRETIEN ET RÉPARATION DE
LA CUISINIÈRE
Nettoyage général
IMPORTANT : Avant le nettoyage, s’assurer que toutes les
commandes sont éteintes et que le four et la table de cuisson sont
froids. Toujours suivre les instructions figurant sur les étiquettes
des produits de nettoyage.
Du savon, de l’eau et un chiffon doux ou une éponge sont
recommandés, à moins d’indications contraires.
SURFACES EN ÉMAIL VITRIFIÉ UNIQUEMENT (Sur certains
modèles)
Les éclaboussures alimentaires acides, telles que vinaigre et
tomate, doivent être nettoyées dès que la cuisinière a refroidi. Ces
salissures peuvent endommager le fini.
Méthode de nettoyage :
� Nettoyant à vitre, nettoyant doux liquide ou tampon à récurer
non abrasif : Nettoyer doucement autour de la plaque
signalétique car le frottement pourrait en effacer les chiffres.
� Nettoyant pour cuisine et appareils ménagers Affresh
®
†
référence W10355010 (non fourni) :
Consulter le Guide de démarrage rapide pour les informations
de commande.
ACIER INOXYDABLE (Sur certains modèles)
REMARQUE : Afin d’éviter d’endommager les surfaces en acier
inoxydable, ne pas utiliser de tampons à récurer savonneux, de
nettoyants abrasifs, de crème à polir pour table de cuisson, de
tampons en laine d’acier, de chiffons de lavage rêches ou
d’essuie-tout abrasifs. Ils peuvent endommager les surfaces en
acier inoxydable, même après usage unique ou limité.
Méthode de nettoyage :
� Frotter dans la direction du grain pour éviter les dommages.
� Nettoyant pour acier inoxydable affresh
®
référence
W10355016 (non fourni) :
Consulter le Guide de démarrage rapide pour les informations
de commande.
PEINTURE MÉTALLIQUE (Sur certains modèles)
Ne pas utiliser de nettoyants abrasifs, de nettoyants avec agent
de blanchiment, de produits antirouille, d’ammoniaque ou
d’hydroxyde de sodium (soude), car la surface peinte pourrait se
tacher.
GRILLES ET CHAPEAUX ÉMAILLÉS
Les renversements d’aliments contenant des produits acides, tels
que vinaigre et tomates, doivent être nettoyés dès que la table de
cuisson, les grilles et les chapeaux ont refroidi. Ces salissures
peuvent endommager le fini.
Pour éviter l’écaillement, ne pas entrechoquer les grilles et les
chapeaux ni les frapper contre des surfaces dures telles que les
ustensiles en fonte.
Ne pas réinstaller les chapeaux sur les brûleurs lorsqu’ils sont
mouillés. Ne pas nettoyer pendant le programme d’autonettoyage
Méthode de nettoyage :
� Ustensile de récurage en plastique non abrasif et nettoyant
légèrement abrasif : Nettoyer dès que la table de cuisson, les
grilles et les chapeaux ont refroidi.
� Lave-vaisselle (les grilles seulement et non les chapeaux) :
Utiliser le programme le plus intensif. Les saletés cuites
doivent être trempées ou frottées avant d’être placées au lave-
vaisselle.
Bien que les grilles de brûleurs soient durables, elles perdront
progressivement de leur lustre et (ou) se décoloreront
lorsqu’on les lave au lave-vaisselle.
� Nettoyant pour grille et plateau d’égouttement pour installation
à gaz – Pièce n° 31617A (non fournie) :
Consulter le Guide de démarrage rapide pour les informations
de commande.
BRÛLEURS DE SURFACE
Les renversements d’aliments contenant des produits acides, tels
que vinaigre et tomates, doivent être nettoyés dès que la table de
cuisson, les grilles et les chapeaux ont refroidi. Ces salissures
peuvent endommager le fini.
Pour éviter l’écaillement, ne pas entrechoquer les grilles et les
chapeaux ni les frapper contre des surfaces dures telles que les
ustensiles en fonte.
Ne pas réinstaller les chapeaux sur les brûleurs lorsqu’ils sont
mouillés.
Ne pas utiliser le programme d’autonettoyage pour les nettoyer.
Ne pas nettoyer au lave-vaisselle.
Méthode de nettoyage :
� Ustensile de récurage en plastique non abrasif et nettoyant
légèrement abrasif :
Nettoyer dès que la table de cuisson, les grilles, les brûleurs et
les chapeaux ont refroidi.
� Nettoyant pour plateau d’égouttement et grille de cuisinière à
gaz (non fourni).
COMMANDES DE LA TABLE DE CUISSON
Afin d’éviter d’endommager les commandes de la table de
cuisson, ne pas utiliser de laine d’acier, de nettoyants abrasifs ou
de nettoyant pour four.
Afin d’éviter toute détérioration, ne pas laisser tremper les
boutons de commande. Lors de la réinstallation des boutons,
s’assurer que chaque bouton est à la position Off (arrêt).
Sur certains modèles, ne pas enlever les joints sous les boutons.
Méthode de nettoyage:
� Savon et eau : Tirer les boutons en ligne droite hors du tableau
de commande pour les enlever.
TABLEAU DE COMMANDE ET EXTÉRIEUR DE LA PORTE DU
FOUR
Afin d’éviter d’endommager le tableau de commande, ne pas
utiliser de nettoyants abrasifs, de tampons en laine d’acier, de
chiffons de lavage rêches ou d’essuie-tout abrasifs.
Méthode de nettoyage :
� Nettoyant à vitre et chiffon doux ou éponge : Appliquer le
nettoyant à vitre sur un chiffon doux ou une éponge, et non
directement sur le tableau.
� Nettoyant pour cuisine et appareils ménagers affresh
®
référence W10355010 (non fourni) :
Consulter le Guide de démarrage rapide pour les informations
de commande.
†Affresh
®
est une marque déposée de Whirlpool, É.-U.
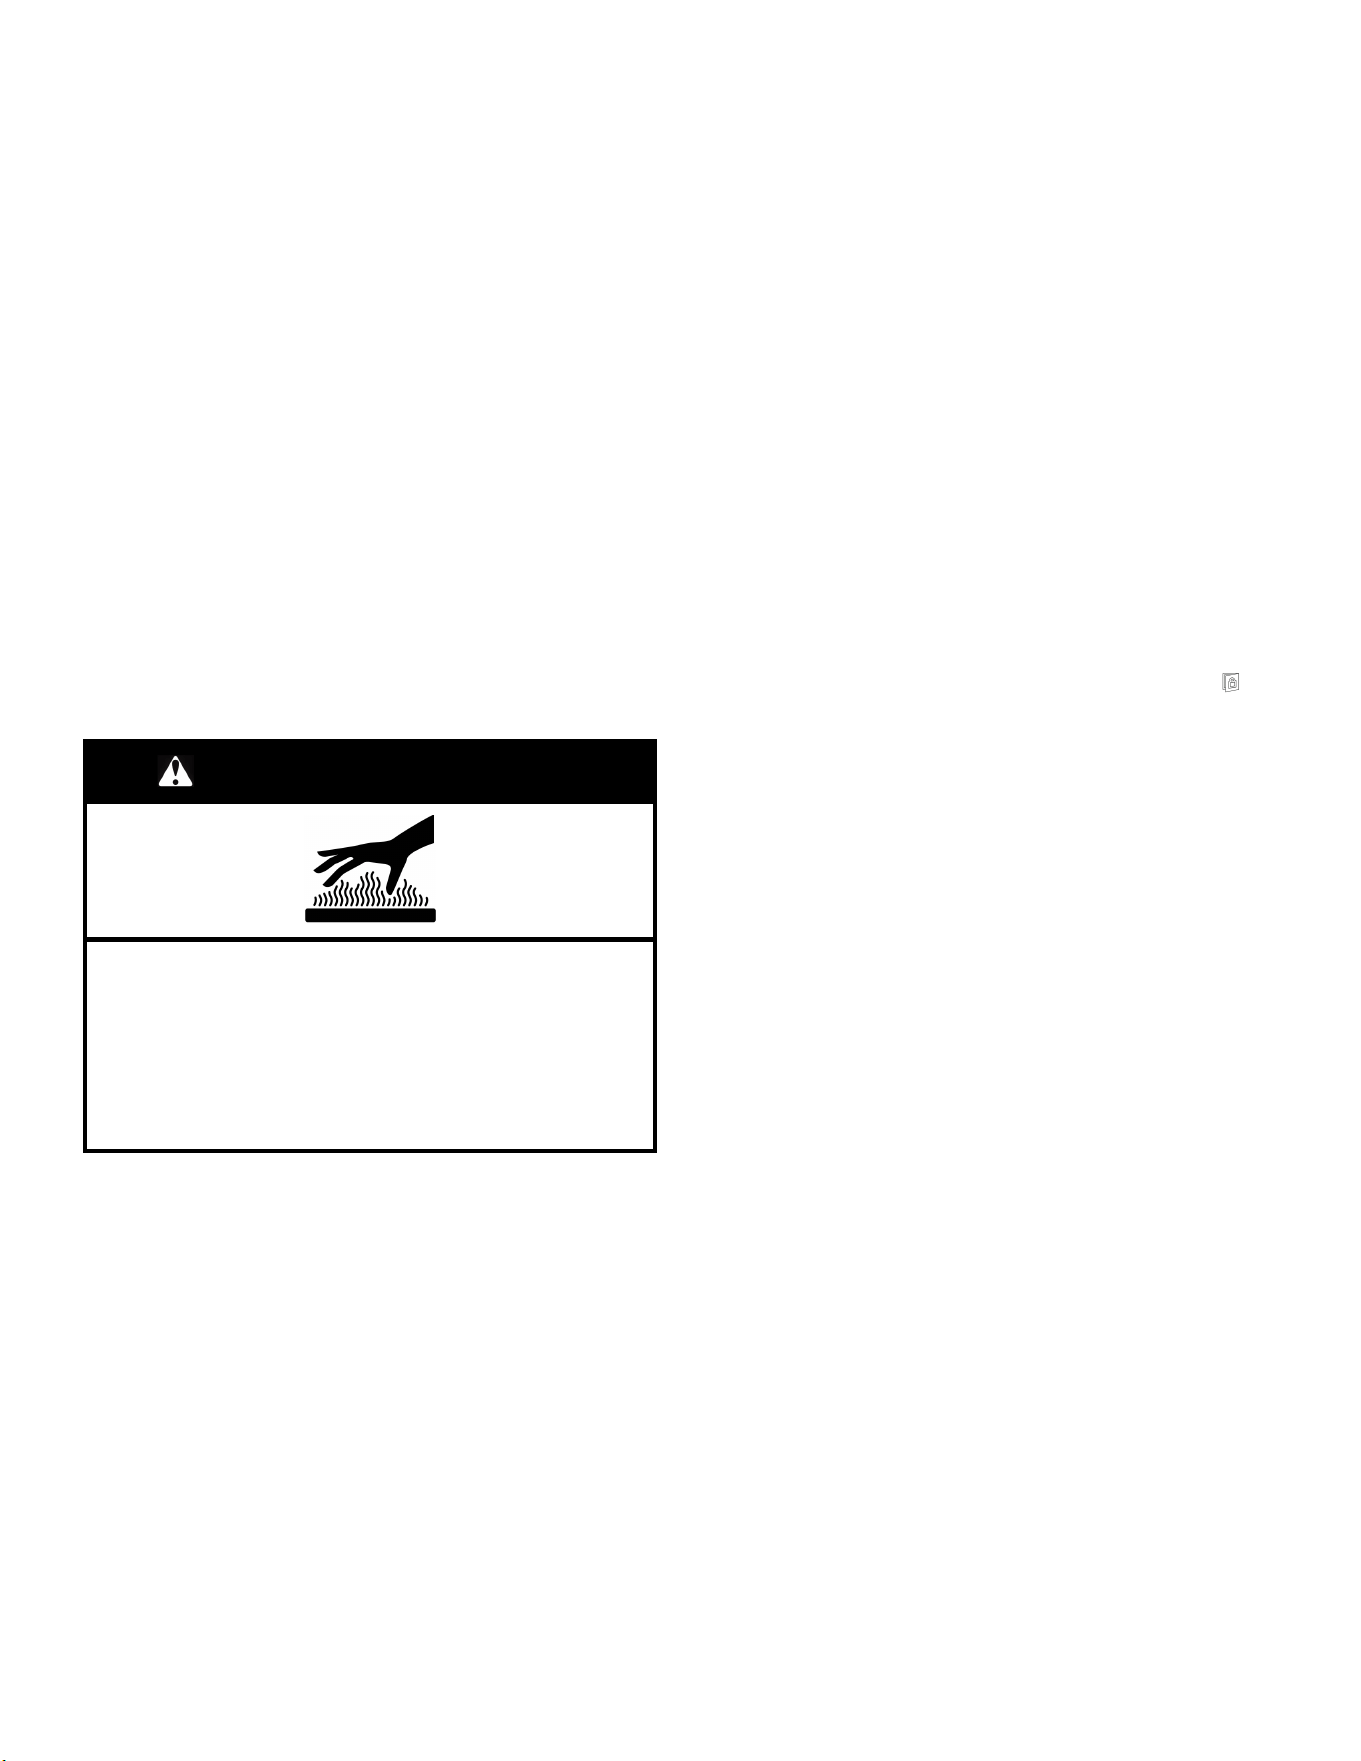
31
GRILLES DU FOUR
Méthode de nettoyage :
� Tampon en laine d’acier
� Pour les grilles ternies qui glissent difficilement, enduire
légèrement les glissières d’huile végétale; cela facilitera leur
glissement.
� Lave-vaisselle (réservoir à eau de la grille d’étuvage
uniquement, pas les grilles) : Bien que le réservoir à eau soit
résistant, il peut perdre de son lustre et/ou décolorer s’il est
lavé au lave-vaisselle.
TIROIR DE REMISAGE (sur certains modèles)
S’assurer que le tiroir est froid et vide avant le nettoyage.
Méthode de nettoyage :
� Détergent doux
CAVITÉ DU FOUR
Ne pas utiliser de nettoyants à four.
Les éclaboussures alimentaires doivent être nettoyées lorsque le
four a refroidi. À haute température, les aliments réagissent avec
l’émail et peuvent provoquer la formation de taches, une attaque
acide, des piqûres ou des décolorations blanchâtres.
Méthode de nettoyage :
� Programme d’autonettoyage: Voir d’abord la section
“Programme d’autonettoyage” ou “Programme de nettoyage”.
Programme de nettoyage
AVERTISSEMENT
Risque de brûlures
Ne pas toucher le four au cours du programme
d'autonettoyage.
Garder les enfants loin du four au cours du programme
d'autonettoyage.
Le non-respect de ces instructions peut causer des
brûlures.
IMPORTANT : La santé de certains oiseaux est très sensible aux
émanations qui surviennent durant le programme de nettoyage.
L’exposition aux émanations peut entraîner la mort de certains
oiseaux. Toujours déplacer les oiseaux dans une autre pièce
fermée et bien aérée.
Ne pas obstruer l’évent du four durant le programme de
nettoyage. L’air doit pouvoir circuler librement. Selon votre
modèle, voir la section “Évent du four” ou évents de four dans le
Guide de démarrage rapide.
Ne pas nettoyer, frotter, endommager ou déplacer le joint
d’étanchéité de la porte du four.
Préparation de la hotte
� Sortir du four la lèchefrite, la grille, les ustensiles de cuisson au
four et de rôtissage, les grilles du four, le papier d’aluminium et
sur certains modèles, la sonde thermométrique.
� Utiliser un chiffon humide pour nettoyer l’intérieur de la porte et
une zone de 1
1
/
2
po (3,8 cm) sur le pourtour du cadre de la
cavité du four, en prenant soin de ne pas déplacer ni plier le
joint d’étanchéité.
� Enlever les articles de plastique de la table de cuisson car ils
peuvent fondre.
� Enlever tous les articles du tiroir de remisage.
Comment fonctionne le programme
IMPORTANT : Le chauffage et le refroidissement de la porcelaine
sur l’acier dans le four peuvent causer une décoloration, une perte
de lustre, des fissures minuscules et des craquements.
Avant le nettoyage, s’assurer que la porte est complètement
fermée sinon elle ne se verrouillera pas et le programme
d’autonettoyage ne commencera pas.
Lorsque le four a complètement refroidi, retirer la cendre avec un
chiffon humide. Afin d’éviter de briser le verre, ne pas appliquer de
chiffon humide et froid sur la partie interne du hublot de la porte
avant qu’il n’ait complètement refroidi.
Pour arrêter le programme de nettoyage à tout moment, appuyer
sur la touche annulation. Si la température est trop élevée, la
porte du four reste verrouillée et “cool” (froid) et “verrouillée/
”
s’affichent. Le ventilateur de refroidissement peut continuer à
fonctionner.
La lampe du four ne fonctionne pas durant le programme de
nettoyage.
sur certains modèles: Une fois la température de nettoyage
atteinte, la commande électronique nécessite un délai de
12 heures avant qu’un autre programme d’autonettoyage puisse
être lancé.
Commande électronique de four avec temps de
nettoyage ajustable (sur certains modèles)
La durée du programme Clean (nettoyage) est réglable entre 2 h
30 et 4 h 30 par tranches de 30 minutes. Les durées de nettoyage
suggérées sont de 2 h 30 pour des saletés légères et de 4 h 30
pour des saletés abondantes.
Pour utiliser l’autonettoyage :
1. Appuyer sur CLEAN (nettoyage).
2. Appuyer sur la touche à flèche “vers le haut” ou “vers le bas”
de Temp/Time (température/durée) pour entrer la durée du
programme d’autonettoyage désirée.
3. Appuyer sur la touche mise en marche.
La porte du four se verrouille automatiquement. Les témoins
lumineux Door Locked (porte verrouillée) et Clean (nettoyage)
s’allument. La durée résiduelle est également affichée.
4. Lorsque le programme de nettoyage est terminé et que le four
est froid, les témoins lumineux Door Locked (porte verrouillée)
et Clean (nettoyage) s’éteignent.
5. Lorsque le four a complètement refroidi, retirer la cendre avec
un chiffon humide.
Pour quitter le programme Clean (nettoyage) avant la fin,
appuyer sur la touche OFF/CANCEL ou annulation. La porte
se déverrouille dès que le four est froid.
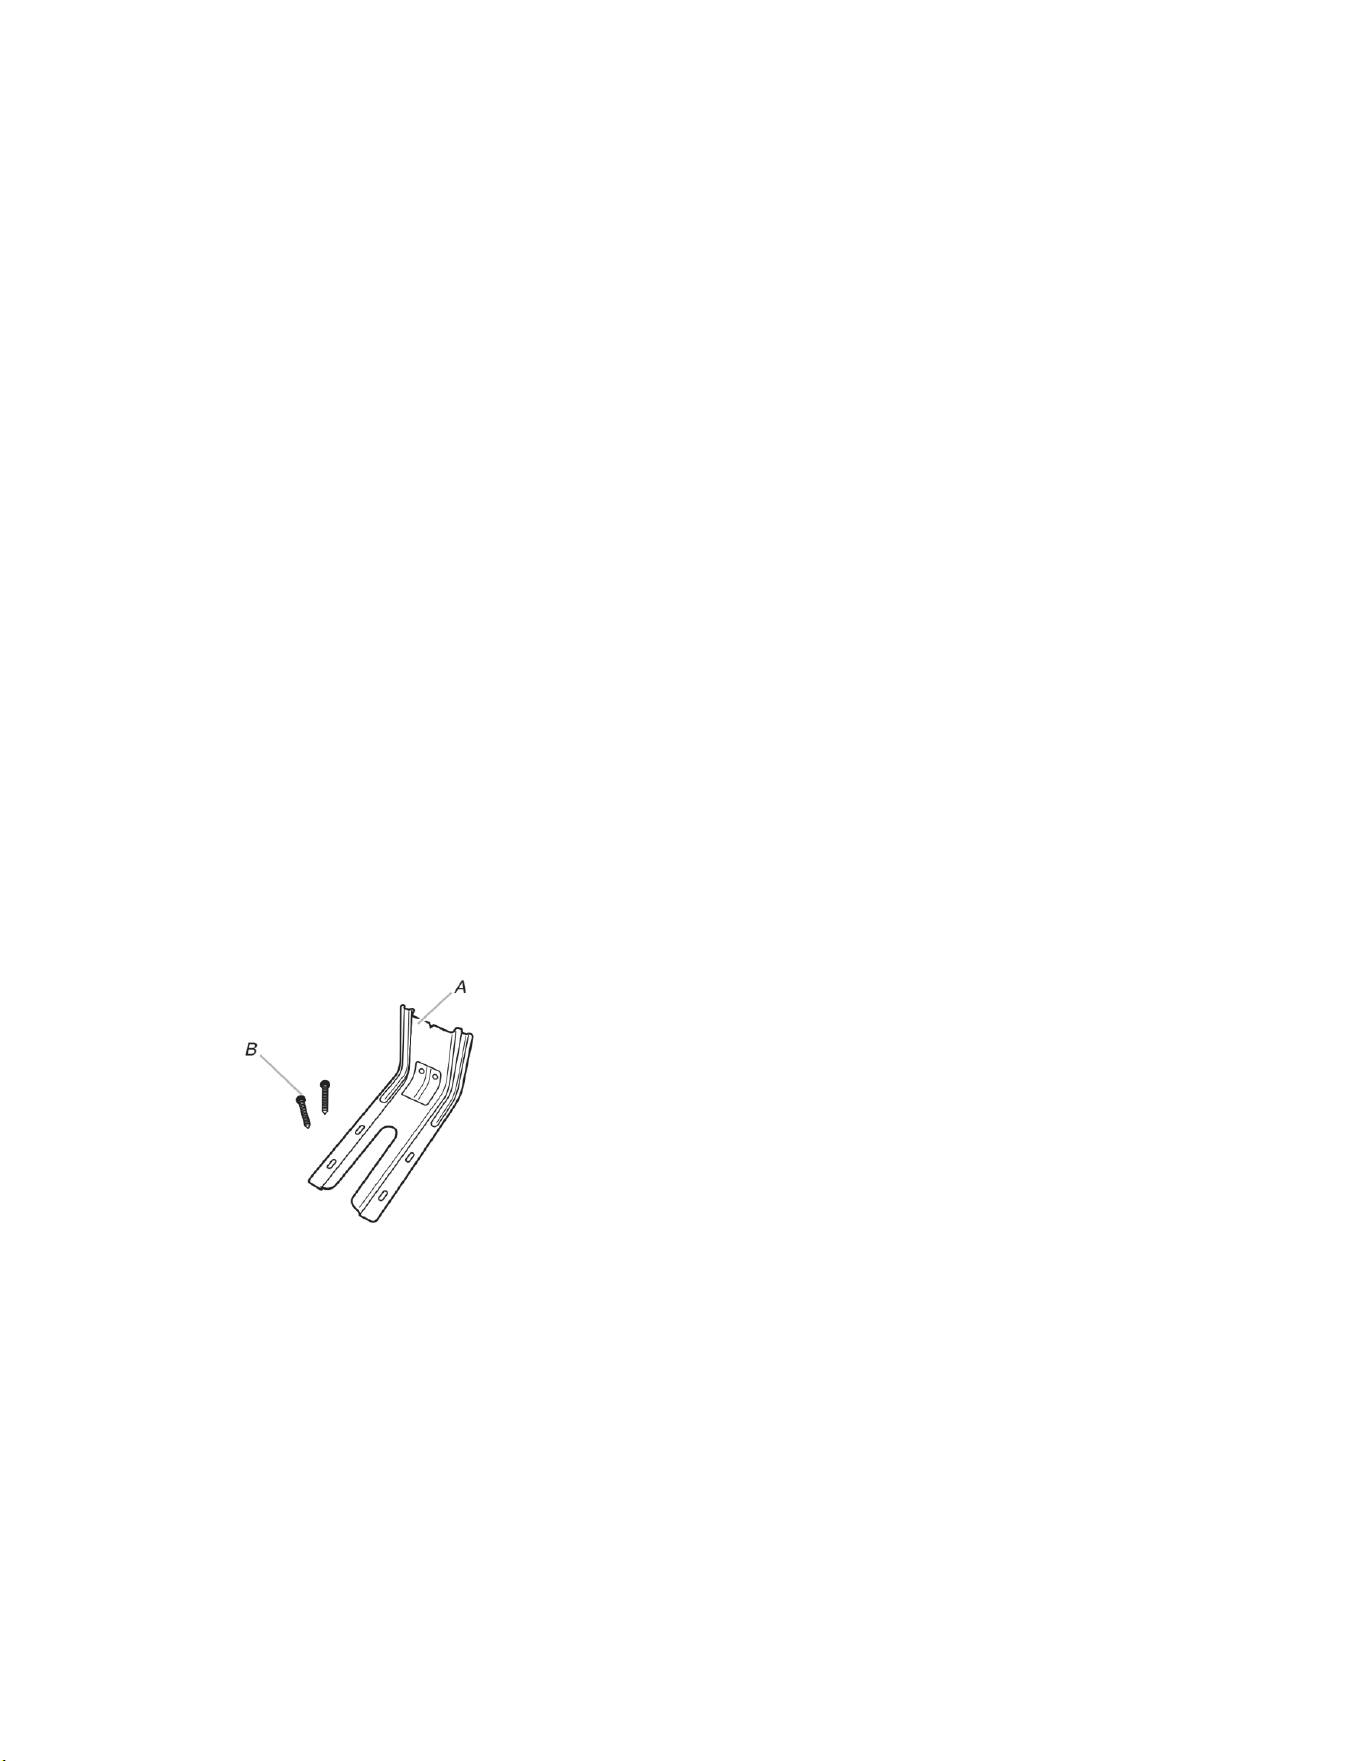
32
INSTRUCTIONS D’INSTALLATION
EXIGENCE
Outils et pièces
Avant d’entreprendre l’installation, rassembler tous les outils et le
matériel nécessaires. Lire et suivre les instructions fournies avec
les outils indiqués ici.
Outils nécessaires
� Ruban à mesurer
� Tournevis à lame plate
� Tournevis Phillips
� Tournevis à lame plate de
1/8 po (3 mm)
� Niveau
� Perceuse manuelle ou
électrique
� Marteau
� Clé ou pince
� Clé à tuyauterie
� Clé mixte de 15/16 po
� Clé à cliquet de 1/4 po
� Tourne-écrou de 3/8 po
� Foret de 1/8 po (pour
plancher de bois)
� Crayon ou marqueur
� Composé d’étanchéité des
raccords filetés résistant au
propane
� Solution non corrosive de
détection des fuites
� Foret à maçonnerie à pointe
carburée de 3/16 po
(4,8 mm)
(pour planchers en béton/
céramique)
(Pour les cuisinières avec
commandes encastrées/à
l’avant)
Pour la conversion pour
l’alimentation au gaz
propane/ gaz naturel
� Clé mixte de 3/8 po
� Clé mixte de 1/2 po
� Clé mixte de 5/8 po
� Tourne-écrou 9/32 po
� Tournevis Quadrex
®
†
ou
Phillips
� Ruban adhésif de
masquage
� Tourne-écrou 3/8 po
(Pour les cuisinières avec
commandes encastrées/à
l’avant)
Pièces fournies
Vérifier la présence de toutes les pièces.
A. Bride antibasculement
B. #12 x 1
5
/
8
po (4,1 cm) Vis (2)
La bride antibasculement doit être bien fixée au plancher ou au
mur. L’épaisseur du plancher peut nécessiter des vis plus longues
pour l’ancrage de la bride au plancher.
Pièces nécessaires
Consulter les codes locaux en vigueur et le fournisseur de gaz.
Déterminer les caractéristiques des sources disponibles
d’électricité et gaz. Voir “Spécifications électriques” et
“Spécifications de l’alimentation en gaz”.
REMARQUE : S’assurer d’acheter uniquement des pièces et des
accessoires Whirlpool certifiés par le fabricant de l’appareil. Il se
peut que l’installation nécessite des pièces supplémentaires. Pour
commander, consulter les coordonnées indiquées dans le guide
de démarrage rapide.
Exigences d’emplacement
IMPORTANT : Observer les dispositions de tous les codes et
règlements en vigueur. Ne pas obstruer le flux de combustion et
de ventilation.
� C’est à l’installateur qu’incombe la responsabilité de respecter
les distances de séparation spécifiées sur la plaque
signalétique. La plaque signalétique se trouve derrière la porte
du four, dans le coin supérieur droit /gauche du châssis.
� La cuisinière doit être installée à un endroit pratique dans la
cuisine.
� Dans le cas d’une cuisinière encastrée, l’enceinte doit
recouvrir complètement les côtés et l’arrière de la cuisinière.
� Toutes les ouvertures dans le mur ou le plancher de
l’emplacement d’installation de la cuisinière doivent être
scellées.
� Respecter les dimensions indiquées pour les ouvertures à
découper dans les placards. Ces dimensions constituent les
valeurs minimales des dégagements.
� La bride antibasculement de plancher doit être installée. Pour
l’installation de la bride antibasculement fournie avec la
cuisinière, voir la section “Installation de la bride
antibasculement”.
� Une source d’électricité avec liaison à la terre est nécessaire.
Voir la section “Spécifications électriques”.
� Un raccordement adéquat à l’alimentation en gaz doit être
disponible. Voir la section “Spécifications de l’alimentation en
gaz”.
� Contacter un installateur de revêtement de sol qualifié, qui
pourra déterminer si le revêtement de sol peut résister à une
température d’au moins 200 °F (93 °C).
� Dans le cas de l’installation de la cuisinière sur une moquette,
placer sous la cuisinière un tapis isolant ou une plaque de
contreplaqué de 1/4 po (0,64 cm).
IMPORTANT : Afin d’éviter d’endommager les placards, consulter
le constructeur de la maison ou le fabricant des placards pour
déterminer si les matériaux utilisés peuvent subir un changement
de couleur, une déstratification ou d’autres dommages. Ce four a
été conçu conformément aux exigences des normes UL et CSA
International et respecte les températures maximales permises de
194 °F (90 °C) pour les placards en bois.
Résidence mobile – Spécifications additionnelles
à respecter lors de l’installation
L’installation de cette cuisinière doit être conforme aux
dispositions de la norme Manufactured Home Construction and
Safety Standard, Title 24 CFR, Part 3280 (anciennement Federal
Standard for Mobile Home Construction and Safety, Title 24, HUD
Part 280). Lorsque cette norme n’est pas applicable, l’installation
doit satisfaire aux critères de la norme Standard for Manufactured
Home Installations, ANSI A225.1/NFPA 501A ou aux dispositions
des codes locaux.. Au Canada, l’installation de cette cuisinière
doit satisfaire aux stipulations de la version la plus récente de la
norme CAN/ CSA-Z240.1 ou des codes locaux en vigueur.
Autres critères à respecter pour une installation en résidence
mobile :
� Dans le cas de l’installation de cette cuisinière dans une
résidence mobile, la cuisinière doit être fixée conformément
aux instructions présentées dans ce document.
†QUADREX
®
est une marque déposée de NLW Holdings, Inc.
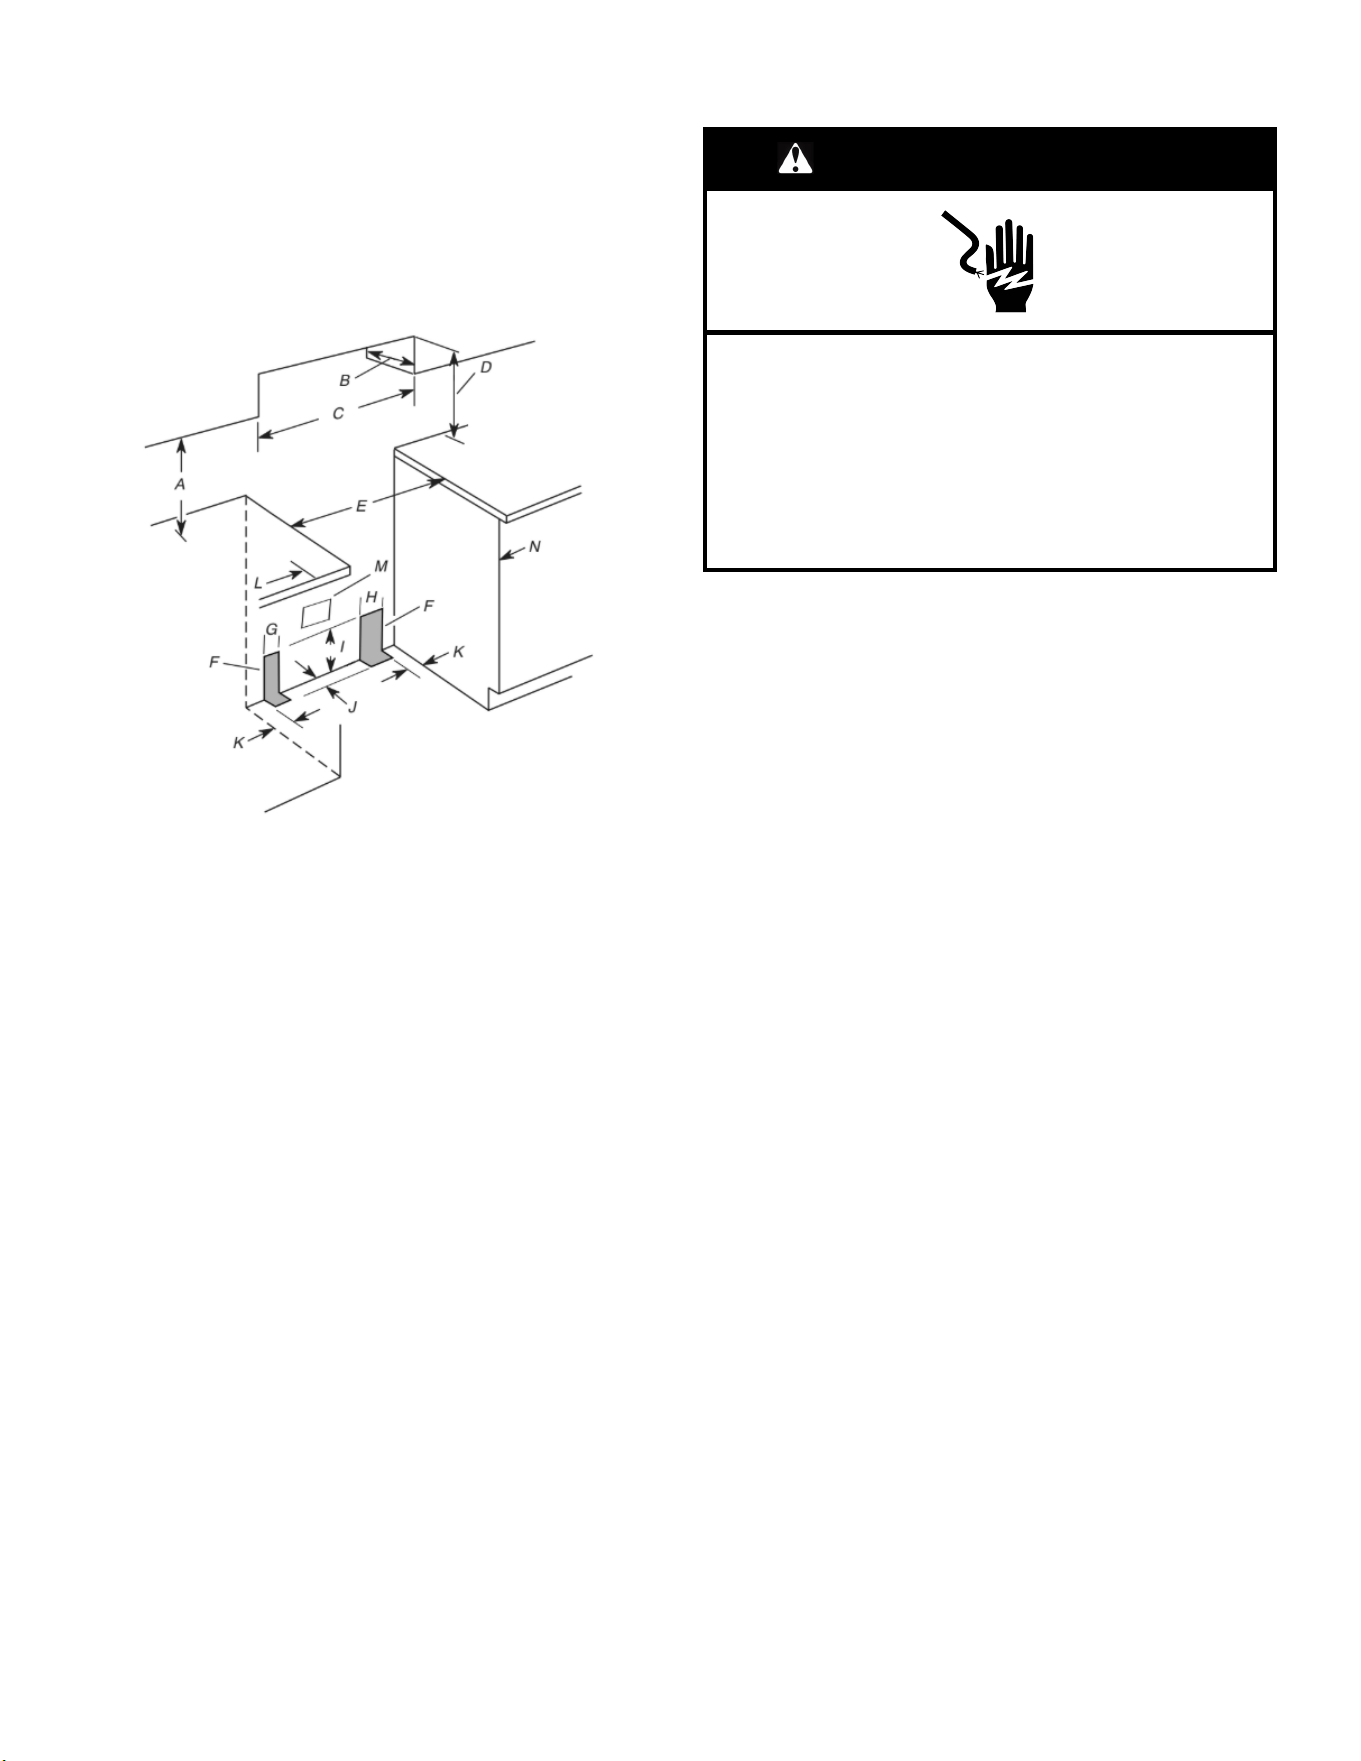
33
Dimensions du placard
Les dimensions de l’espace d’installation entre les placards sont
valides pour l’installation entre des placards de 25 po (64,0 cm) de
profondeur avec plan de travail de 24 po (61,0 cm) de profondeur
et 36 po (91,4 cm) de hauteur.
IMPORTANT : Si une hotte ou un ensemble hotte/four à micro-
ondes est installé au-dessus de la surface de cuisson, suivre les
instructions d’installation fournies avec la hotte ou l’ensemble
hotte/four à micro-ondes concernant les dimensions de
dégagement à respecter au-dessus de la surface de cuisson.
A. 18 po (45,7 cm) entre le placard latéral supérieur et le plan de travail
B. Profondeur maximale des placards supérieurs : 13 po (33 cm)
C. Largeur de l’ouverture 30 po (76,2 cm) minimum
D. Pour le dégagement minimum par rapport au dessus de la table de
cuisson, voir la REMARQUE*.
E. Largeur minimale de l’ouverture : 30 po (76.2 cm)
F. Il est recommandé d’effectuer l’installation de la canalisation de gaz
rigide dans les zones grisées.
G. 4
¹
⁄
2
po (11,4 cm)
H. 8 po (20,3 cm)
I. 17 po (43,2 cm)
J. 2 po (5,1 cm)
K. 4
¹
⁄
2
po (11,4 cm)
L. Dégagement minimal de 3 po (7,6) entre les deux côtés de la
cuisinière et la paroi latérale ou d’autres matériaux combustibles.
M. Prise reliée à la terre
N. Ni la porte, ni les charnières du placard ne doivent dépasser à
l’intérieur de l’ouverture.
REMARQUE : Distance de séparation de 24 po (61,0 cm) ou plus
lorsque le fond d’un placard de bois ou de métal est protégé par
une planche ignifugée d’au moins 1/4 po (6,4 mm) recouverte
d’une feuille métallique d’épaisseur égale ou supérieure à : acier
calibre 28 MSG, acier inoxydable 0,015 po (0,4 mm), aluminium
0,024 po (0,6 mm) ou cuivre 0,020 po (0,5 mm). Distance de
séparation minimale de 30 po (76,2 cm) entre le dessus de la
table de cuisson et le fond d’un placard de bois ou de métal non
protégé.
Spécifications électriques
AVERTISSEMENT
Risque de choc électrique
Brancher sur une prise à 3 alvéoles reliée à la terre.
Ne pas enlever la broche de liaison à la terre.
Ne pas utiliser un adaptateur.
Ne pas utiliser un câble de rallonge.
Le non-respect de ces instructions peut causer un
décès, un incendie ou un choc électrique.
IMPORTANT : La cuisinière doit être électriquement reliée à la
terre conformément aux prescriptions des codes et règlements
locaux; en l’absence de code local, respecter les prescriptions du
code national en vigueur : National Electrical Code, ANSI/NFPA
70, ou Code canadien de l’électricité, CSA C22.1.
Cette cuisinière est dotée d’un système d’allumage électronique
qui ne fonctionnera pas en cas de branchement dans une prise
qui n’est pas correctement polarisée.
Si un conducteur distinct de liaison à la terre est utilisé (lorsque le
code en vigueur le permet), on recommande qu’un électricien
qualifié vérifie la qualité de la liaison à la terre.
On peut obtenir un exemplaire des normes du code national en
vigueur à l’adresse suivante :
National Fire Protection Association
1 Batterymarch Park
Quincy, MA 02169-7471
CSA International
8501 East Pleasant Valley Road
Cleveland, OH 44131-5575
� L’appareil doit être alimenté uniquement par un circuit
électrique de 120 VCA seulement, de 60 Hz, 15 A protégé par
fusibles. On recommande également l’emploi de fusibles
temporisés ou disjoncteurs. On recommande que la cuisinière
soit alimentée par un circuit indépendant.
� Les dispositifs d’allumage électronique peuvent fonctionner
correctement dans une plage de tension d’alimentation
étendue, mais il est nécessaire de respecter la polarité
stipulée et d’établir une liaison à la terre adéquate. Vérifier que
la prise de courant fournit une tension de 120 V et qu’elle est
correctement reliée à la terre.
� Il n’est pas nécessaire de brancher cette cuisinière à gaz à
une prise équipée d’un disjoncteur différentiel. Il est
recommandé de ne pas brancher une cuisinière à gaz ou tout
autre gros appareil électroménager à allumage électrique par
étincelle dans une prise murale à disjoncteur différentiel, car
ce dernier peut se déclencher lors de l’utilisation normale de
l’allumeur.
� La performance de cette cuisinière ne change pas si elle est
branchée à un circuit protégé par disjoncteur différentiel.
Toutefois, le déclenchement intempestif du disjoncteur
différentiel en utilisation normale peut se produire du fait de la
nature des cuisinières à gaz à allumage électronique.

34
� Le schéma de câblage est situé à l’arrière de la cuisinière,
dans un sachet plastique transparent.
REMARQUE : Le châssis métallique de la cuisinière doit être relié
à la terre pour que le tableau de commande puisse fonctionner
correctement. Si le châssis métallique de la cuisinière n’est pas
relié à la terre, aucune touche du tableau de commande ne peut
fonctionner. En cas de doute quant à la qualité de la liaison à la
terre du châssis en métal de la cuisinière, consulter un électricien
qualifié.
Spécifications de l’alimentation en
gaz
AVERTISSEMENT
Risque d’explosion
Utiliser une canalisation neuve d’arrivée de gaz pour
utilisation à l’extérieur approuvée par la CSA
International.
Installer un robinet d'arrêt.
Bien serrer chaque organe de connexion de la
canalisation de gaz.
En cas de connexion au gaz propane, demander à une
personne qualifiée de s’assurer que la pression de gaz
ne dépasse pas 36 cm (14 po) de la colonne d’eau.
Par personne qualifiée, on comprend : le personnel
autorisé de chauffage, le personnel autorisé d’une
compagnie de gaz, et le personnel d’entretien autorisé.
Le non-respect de ces instructions peut causer un
décès, une explosion ou un incendie.
Observer toutes les prescriptions des codes et règlements en
vigueur.
IMPORTANT : L’installation doit satisfaire aux critères de tous les
codes et règlements locaux. En l’absence de code local,
l’installation doit satisfaire aux prescriptions de la plus récente
édition du : National Fuel Gas Code ANSI Z223.1 (American
National Standard), o, en Canadá, el Código de instalación de gas
natural y propano, CSA B149.1. plus récente édition.
IMPORTANT : Les tests de fuite de la cuisinière doivent être
effectués selon les instructions du fabricant. Voir la section «
Achever l’installation » des « Raccordement au gaz » pour les
instructions du tests de fuite.
Type de gaz
Gaz naturel :
� Cette cuisinière a été configurée à l’usine pour l’alimentation
au gaz naturel. Voir la section “Conversions pour changement
de gaz”. La plaque signalétique située sur le châssis du four,
derrière le côté supérieur droit de la porte du four indique les
types de gaz utilisables. Si le type de gaz disponible n’est pas
mentionné, consulter le fournisseur de gaz local.
Conversion pour l’alimentation au propane :
L’opération de conversion doit être exécutée par un technicien
qualifié.
Consulter le fournisseur de gaz avant toute conversion de
l’appareil pour l’utilisation d’un type de gaz qui n’est pas
mentionné sur la plaque signalétique. Voir la section “Conversions
pour changement de gaz”.
Canalisation d’alimentation en gaz
� Installer une canalisation d’alimentation en gaz rigide de
3/4 po (1,9 cm) jusqu’à l’emplacement d’installation de la
cuisinière. L’emploi d’une canalisation de plus petit diamètre
ou plus longue peut susciter une déficience du débit
d’alimentation. Pour l’alimentation au propane, le diamètre des
canalisations doit être de 1/2 po (1,3 cm) ou plus.
Généralement, le fournisseur de gaz propane détermine les
matériaux à utiliser et la dimension appropriée.
� REMARQUE : On doit utiliser un composé d’étanchéité pour
tuyauteries résistant à l’action du gaz propane. Ne pas utiliser
de ruban TEFLON
®
†
.
Raccord métallique flexible pour appareil ménager :
� Si les codes locaux le permettent, pour raccorder la cuisinière
à la canalisation de gaz, on peut utiliser un raccord métallique
flexible pour appareil ménager neuf (homologation CSA) de
4 à 5 pi (122 à 152,4 cm) de longueur, de diamètre interne de
1/2 po ou 3/4 po (1,3 ou 1,9 cm).
� Un raccord avec filetage mâle de 1/2 po (1,3 cm) est
nécessaire pour la connexion sur le raccord à filetage femelle
à l’entrée du détendeur de l’appareil.
� Veiller à ne pas déformer ou endommager le tube métallique
flexible lors d’un déplacement de la cuisinière.
Raccordement par une canalisation rigide :
On doit utiliser une combinaison de raccords pour réaliser un
raccordement rigide entre la cuisinière et la canalisation de gaz.
La canalisation rigide doit se trouver au même niveau que le
raccord de connexion de la cuisinière. On doit veiller à ne
soumettre les sections de canalisation d’alimentation et de
combustible à aucun effort de traction ou flexion, pour que la
cuisinière soit d’aplomb et correctement alignée.
� Robinet d’arrêt nécessaire :
Installer un robinet d’arrêt manuelle à un emplacement facile
d’accès. Ne pas bloquer l’accès au robinet d’arrêt. Le robinet
permet d’alimenter et de couper l’alimentation en gaz à la
cuisinière.
A. Canalisation d’alimentation en gaz
B. Robinet d’arrêt en position d’ouverture
C. Vers la cuisinière
†
®
TEFLON est une marque déposée de Chemours.
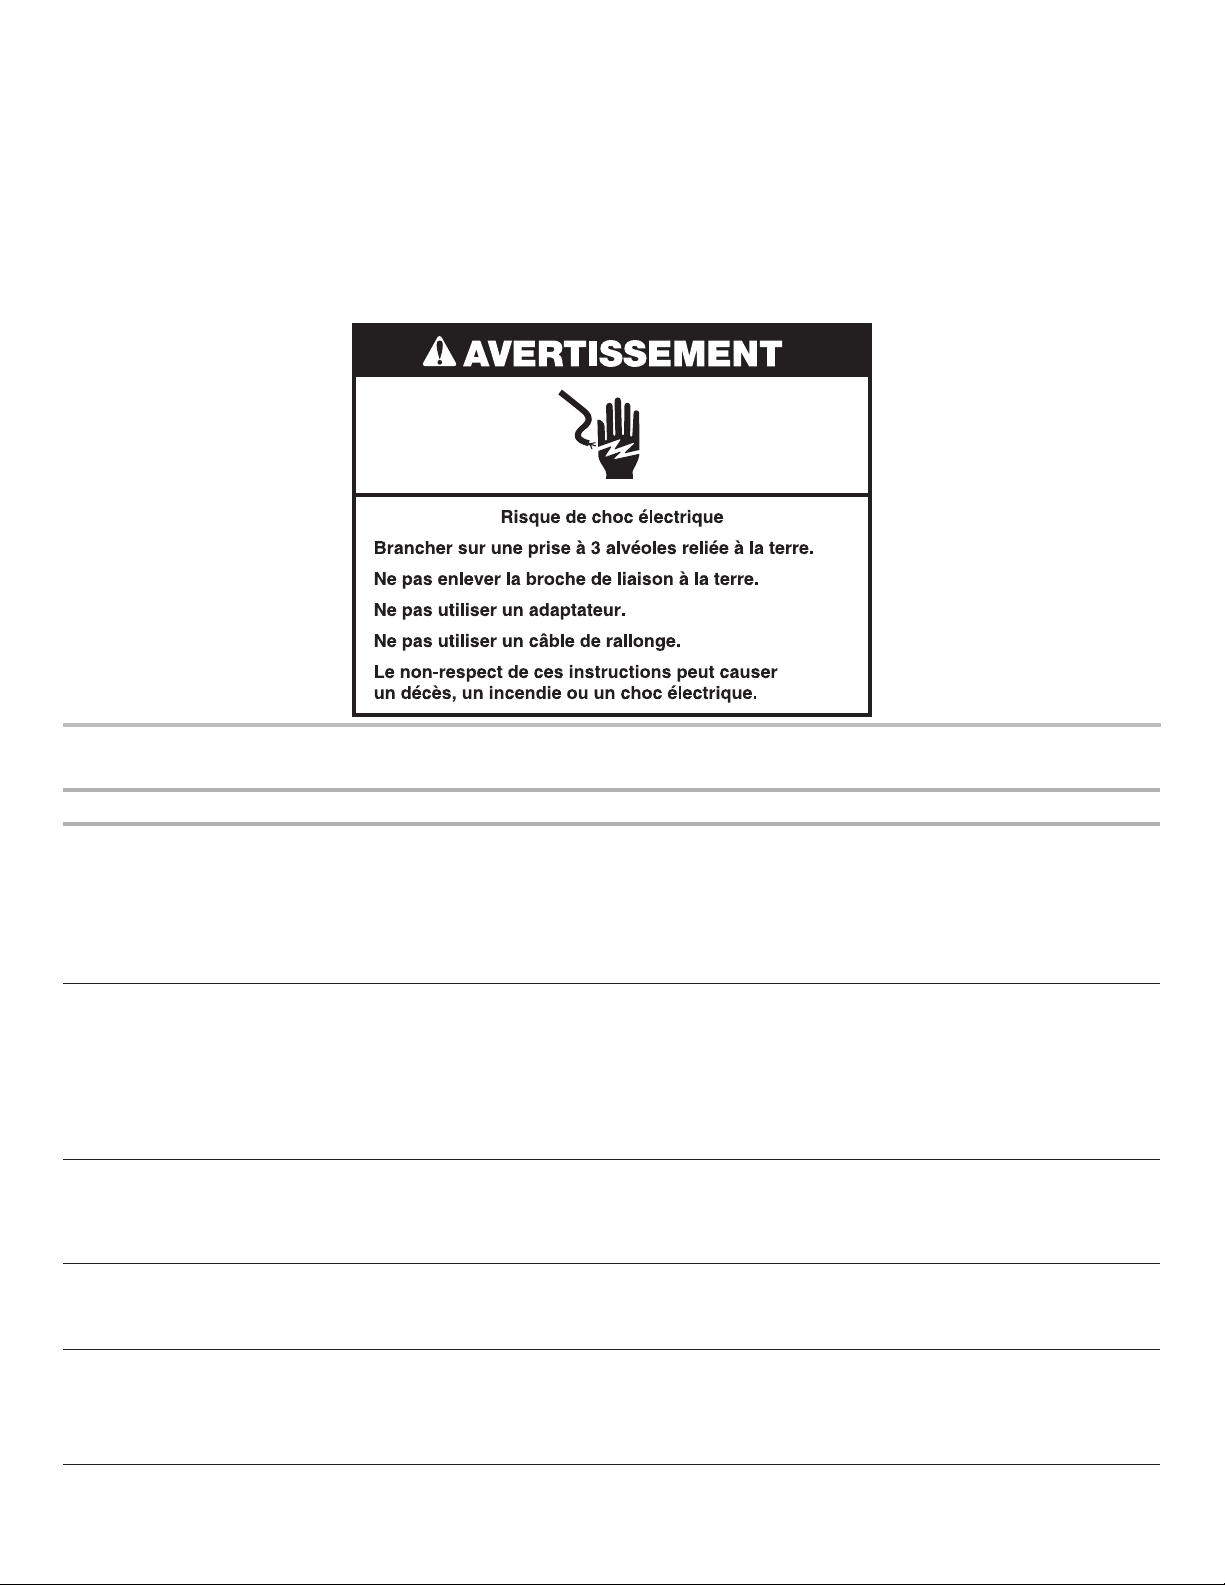
35
Détendeur
Le détendeur fourni avec cette cuisinière doit être utilisé. Pour un
fonctionnement correct, la pression d’alimentation du détendeur
doit être comme suit :
Gaz naturel :
Pression minimum : 5 po (12,7 cm) (colonne d’eau)
Pression maximum : 14 po (35,5 cm) (colonne d’eau)
Gaz propane :
Pression minimum : 11 po (27,9 cm) (colonne d’eau)
Pression maximum : 14 po (35,5 cm) (colonne d’eau)
En cas d’incertitude quant à la pression d’alimentation à établir,
contacter le fournisseur de gaz local.
Débit thermique des brûleurs
Les débits thermiques indiqués sur la plaque signalétique
correspondent à une altitude d’utilisation inférieure ou égale à
2000 pi (609,6 m).
Lorsque l’appareil est utilisé à une altitude supérieure à 2000 pi
(609,6 m), on doit réduire le débit thermique indiqué de 4% pour
chaque tranche de 1000 pi (304,8 m) au-dessus du niveau de la
mer (pas applicable au Canada).
Tests de pressurisation de la canalisation de gaz
On doit tester le détendeur sous une pression supérieure d’au
moins 1 po (colonne d’eau) à la pression de la tubulure de
distribution indiquée sur la plaque signalétique.
Pressurisation à une pression supérieure à 1/2 lb/po
2
(3,5 Kpa) (14 po [35,5 cm] - colonne d’eau)
Lors de tout test de pressurisation de ce système à une pression
supérieure à 1/2 lb/po
2
(3,5 kPa), on doit déconnecter la cuisinière
et son robinet d’arrêt individuel de la canalisation de gaz.
Pressurisation à une pression égale ou inférieure à 1/2 lb/po
2
(3,5 Kpa) (14 po [35,5 cm] de colonne d’eau ou moins)
Lors de tout test de pressurisation de la canalisation de gaz à une
pression égale ou inférieure à 1/2 lb/po
2
(3,5 kPa), on doit isoler la
cuisinière de la canalisation de gaz par fermeture de son robinet
d’arrêt manuel individuel.
INSTALLATION
Déballage de la cuisinière
AVERTISSEMENT
Risque du poids excessif
Utiliser deux personnes ou plus pour déplacer et installer
ou désinstaller l’appareil.
Le non-respect de cette instruction peut causer une
blessure au dos ou d'autre blessure.
1. Ôter les matériaux d’emballage, le ruban adhésif et le film
protecteur de la cuisinière.
2. Retirer les grilles de four et le sachet de pièces de l’intérieur
du four.
3. Ne pas enlever la base d’expédition pour l’instant.
A. Base d’expédition
4. Sur les cuisinières équipées d’un tiroir de remisage :
Retirer le tiroir de remisage. Voir la section “Tiroir de
remisage”. Déployer les pieds de nivellement arrière d’un
demi-tour; utiliser une clé à cliquet de 1/4 po (6,35 cm).
Déployer les pieds de nivellement avant d’un demi-tour;
utiliser une clé ou une pince.
A. Clé à cliquet de
1/4 po (6,35 cm)
B. Pied de
nivellement arrière
C. Clé ou pince
D. Pied de nivellement avant
Sur les cuisinières équipées d’un tiroir-réchaud ou tiroir
de remisage de qualité supérieure :
Sur les cuisinières équipées d’un tiroir-réchaud ou d’un tiroir
de remisage de qualité supérieure, on ne peut pas accéder
aux pieds arrière en retirant le tiroir-réchaud ou tiroir de
remisage de qualité supérieure. Les pieds arrière doivent être
réglés depuis l’extérieur de la cuisinière. Déployer les pieds
de nivellement avant et arrière d’un demi-tour; utiliser une clé
ou une pince.
A. Pied de nivellement arrière
B. Clé ou pince
C. Pied de nivellement avant

36
Installation de la bride
antibasculement
AVERTISSEMENT
Risque de basculement
Un enfant ou une personne adulte peut faire basculer la
cuisinière, ce qui peut causer un décès.
Fixer la bride antibasculement au plancher ou au mur,
conformément aux instructions d'installation.
Faire glisser de nouveau la cuisinière de façon à ce que
le pied arrière de la cuisinière se trouve dans la fente de
la bride antibasculement.
Réengager la bride antibasculement si la cuisinière a été
déplacée.
Ne pas faire fonctionner la cuisinière si la bride
antibasculement n'est pas installée et engagée.
Le non-respect de ces instructions peut causer un
décès ou des brûlures graves aux enfants et aux
adultes.
1. Ôter la bride antibasculement fixée par du ruban adhésif à
l’intérieur du tiroir de remisage ou du tiroir-réchaud ou tiroir de
remisage de qualité supérieure.
2. Déterminer la méthode de montage à utiliser : au plancher ou
au mur. Pour un plancher en pierre ou en briquetage, on peut
utiliser la méthode de montage au mur. En cas d’installation
de la cuisinière dans une résidence mobile, il est impératif de
fixer la cuisinière au sol.
3. Déterminer et marquer l’axe central de l’espace à découper.
La bride de montage peut être installée du côté gauche ou
droit de la découpe. Positionner la bride de montage contre le
mur dans l’ouverture à découper de façon à ce que l’encoche
en V de la bride se trouve à 12
9
⁄
16
po (3,9 cm) de l’axe
central, tel qu’illustré.
A. 12
9
⁄
16
po (31,9 cm)
B. Encoche en V de la bride
4. Percer deux trous de 1/8 po (3 mm) qui correspondent aux
trous de la bride selon la méthode de montage déterminée.
Voir les illustrations suivantes.
Montage au plancher
Positionnement par
l’arrière
Positionnement par
l’avant
En diagonale
(2 options)
Montage mural
5. À l’aide du tournevis cruciforme, monter la bride
antibasculement sur le mur ou sur le plancher avec les deux
vis n° #12 x 1
5
/
8
po (4,1 cm) fournies.
6. Rapprocher suffisamment la cuisinière de l’ouverture pour
permettre le raccordement électrique et le raccordement final
au gaz. Retirer la base d’expédition, le carton ou le panneau
de fibres dur de sous la cuisinière.
7. Placer la cuisinière dans son emplacement final en s’assurant
que le pied de nivellement arrière glisse dans la bride
antibasculement.
8. Déplacer la cuisinière vers l’avant sur la base de sa boîte
d’expédition, sur une planche en carton ou en matériau de
fibres dur pour poursuivre l’installation de la cuisinière à l’aide
des instructions d’installation suivantes.

37
Raccordement au gaz
AVERTISSEMENT
Risque d’explosion
Utiliser une canalisation neuve d’arrivée de gaz pour
utilisation à l’extérieur approuvée par la CSA
International.
Installer un robinet d'arrêt.
Bien serrer chaque organe de connexion de la
canalisation de gaz.
En cas de connexion au gaz propane, demander à une
personne qualifiée de s’assurer que la pression de gaz
ne dépasse pas 36 cm (14 po) de la colonne d’eau.
Par personne qualifiée, on comprend : le personnel
autorisé de chauffage, le personnel autorisé d’une
compagnie de gaz, et le personnel d’entretien autorisé.
Le non-respect de ces instructions peut causer un
décès, une explosion ou un incendie.
Raccordement typique à une canalisation rigide
On doit utiliser une combinaison de raccords pour raccorder la
cuisinière à la canalisation de gaz existante. La configuration de
connexion sera variable, selon les caractéristiques de la
canalisation d’alimentation (type, taille et position).
1. Sur chaque connexion filetée, appliquer un composé
d’étanchéité résistant au propane.
2. Utiliser une clé pour serrer tous les raccords entre la cuisinière
et la canalisation de gaz.
A. Détendeur
B. Coude à 90° (avec filetage
mâle de 1/2" (1,3 cm))
C. Raccord droit
D. Raccord
E. Tuyau de fer noir
F. Robinet d’arrêt manuel
G. Tuyau de gaz 1/2" (1,3 cm)
ou 3/4" (1,9 cm)
H. Raccord droit
I. Raccord
J. Coude à 90°
Raccordement typique par raccord flexible
1. Appliquer un composé d’étanchéité de filetage résistant au
propane sur l’extrémité filetée la plus petite des adaptateurs
de raccord flexible (voir B et G dans l’illustration ci-dessous).
2. Fixer un raccord d’adaptation sur le détendeur et l’autre
raccord d’adaptation sur le robinet d’arrêt de la canalisation de
gaz. Serrer les deux raccords d’adaptation en s’assurant de
ne pas déplacer ou tourner le détendeur.
3. À l’aide d’une clé mixte de 15/16" (2,4 cm) et d’une clé à
molette, visser le raccord flexible sur les raccords
d’adaptation.
A. Détendeur
B. Appliquer un composé
d’étanchéité
C. Raccord d’adaptation (avec
filetage mâle de 1/2" (1,3
cm))
D. Raccord flexible
E. Robinet d’arrêt manuel
F. Tuyau de gaz de 1/2"
(1,3 cm) ou 3/4" (1,9 cm)
G. Appliquer un composé
d’étanchéité
H. Raccord d’adaptation
Compléter le raccordement
1. Vérifier que le robinet d’arrêt du détendeur est à la position
“on” (ouvert).
A. Robinet d’arrêt du détendeur montré à la
position “on” (ouvert)
2. Ouvrir le robinet d’arrêt manuel sur la canalisation de gaz. Le
robinet est ouvert lorsque la manette est parallèle au tuyau.
A. Robinet d’arrêt fermé
B. Robinet d’arrêt ouvert
3. Effectuer une recherche des fuites : appliquer au pinceau sur
les connexions une solution approuvée non corrosive de
détection des fuites; la formation de bulles identifiera une
fuite. Éliminer toute fuite constatée.
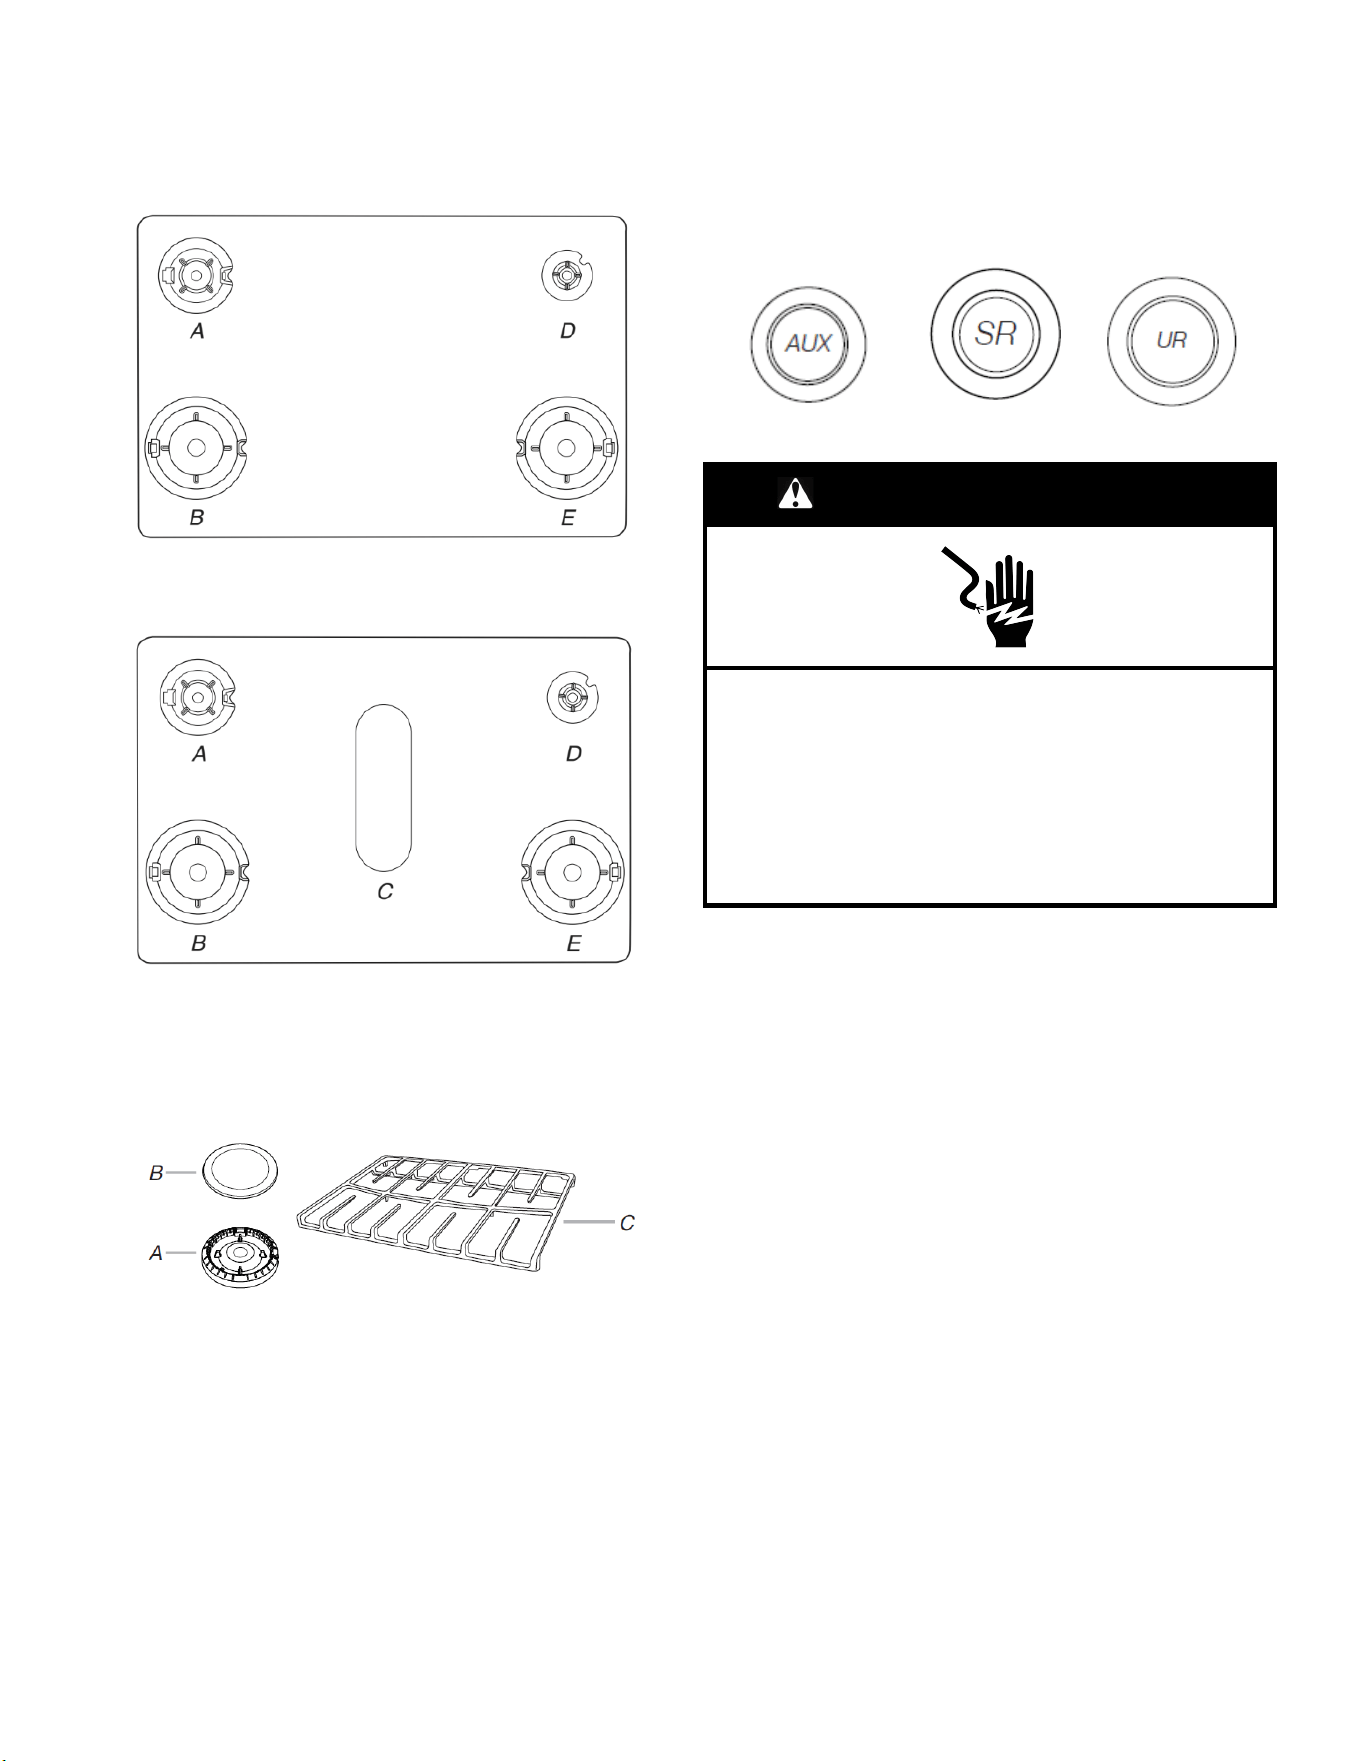
38
4. Ôter les chapeaux et les bases de brûleur de la table de
cuisson du sachet de pièces. Placer les bases de brûleur
comme indiqué dans l’illustration suivante correspondant à
votre modèle :
Pour les modèles AGR6603SF :
A. Moyen
B. Grand
D. Petit
E. Grand
Pour les modèles MGR6600F et WFG550S0H:
A. Moyen
B. Grand
C. Ovale
D. Petit
E. Grand
5. Un chapeau de brûleur correctement placé doit être
horizontal. Si les chapeaux de brûleur ne sont pas
correctement installés, les brûleurs de surface ne s’allumeront
pas. Placer les grilles de brûleur sur les brûleurs et chapeaux.
A. Base du brûleur
B. Chapeau de brûleur
C. Grille du brûleur
6. Placer les chapeaux de brûleur sur les bases de brûleurs
appropriées.
IMPORTANT : Les dessous des chapeaux petit et moyen sont
différents. Ne pas placer un chapeau de la taille incorrecte sur
la base du brûleur. Chaque chapeau de brûleur rond porte la
marque AUX, SR, UR pour correspondre avec la marque sur
la base du brûleur.
Petit chapeau
(Auxiliaire
Chapeau moyen
(Semi-rapide)
Grand chapeau (Ultra
rapide)
AVERTISSEMENT
Risque de choc électrique
Brancher sur une prise à 3 alvéoles reliée à la terre.
Ne pas enlever la broche de liaison à la terre.
Ne pas utiliser un adaptateur.
Ne pas utiliser un câble de rallonge.
Le non-respect de ces instructions peut causer un
décès, un incendie ou un choc électrique.
7. Brancher l’appareil sur une prise à 3 alvéoles reliée à la terre.
8. Déplacer la cuisinière vers son emplacement définitif en
s’assurant que le pied de nivellement arrière glisse dans les
fentes de la bride antibasculement.
Vérifier que la bride antibasculement
est bien installée et engagée
Sur les modèles avec tiroir de remisage :
1. Retirer le tiroir de remisage. Voir la section “Tiroir de
remisage”.
2. Au moyen d’une torche électrique, inspecter le dessous de la
cuisinière.
3. Inspecter la cuisinière pour vérifier que le pied arrière de la
cuisinière se trouve dans la fente de la bride antibasculement.

39
Sur les modèles avec tiroir-réchaud ou tiroir de
remisage de qualité supérieure :
1. Placer l’extérieur du pied contre la partie inférieure avant du
tiroir-réchaud ou tiroir de remisage de qualité supérieure et
saisir le côté inférieur droit ou gauche du tableau de
commande tel qu’indiqué.
REMARQUE : Si le plan de travail comporte un dosseret, il
faudra peut-être saisir la cuisinière plus haut que ce
qu’indique l’illustration.
2. Tenter d’incliner la cuisinière vers l’avant avec précaution.
Si vous rencontrez une résistance immédiate, cela signifie
que le pied de la cuisinière est engagé dans la bride
antibasculement.
3. Si l’arrière de la cuisinière se soulève de plus de 1/2" (1,3 cm)
du plancher sans opposer de résistance, cesser d’incliner la
cuisinière et la reposer doucement sur le plancher. Le pied de
la cuisinière n’est pas engagé dans la bride antibasculement.
IMPORTANT : Si l’on entend un claquement ou un bruit
d’éclatement lorsqu’on soulève la cuisinière, cela signifie
peutêtre que la cuisinière n’est pas bien engagée dans la
bride. Vérifier qu’aucune obstruction n’empêche la cuisinière
de glisser vers le mur ou le pied de la cuisinière de glisser
dans la bride. Vérifier que la bride est fermement maintenue
en place par les vis de montage.
4. Glisser la cuisinière vers l’avant et vérifier que la bride
antibasculement est bien fixée au plancher ou au mur.
5. Faire glisser de nouveau la cuisinière de façon à ce que le
pied arrière de la cuisinière se trouve dans la fente de la bride
antibasculement.
IMPORTANT : Si l’arrière de la cuisinière se trouve à plus de 2"
(5,1 cm) du mur de montage, cela signifie que le pied arrière de la
cuisinière n’est pas engagé dans la bride. Glisser la cuisinière
vers l’avant et déterminer si un objet fait obstruction entre la
cuisinière et la paroi de montage. Les modifications apportées à
l’alimentation en gaz doivent être effectuées par un dépanneur
qualifié. Si vous avez besoin d’aide ou d’un entretien, consulter le
Guide de démarrage rapide pour obtenir les coordonnées.
6. Répéter les étapes 1 et 2 pour s’assurer que le pied de la
cuisinière est bien engagé dans la bride antibasculement.
Si l’arrière de la cuisinière se soulève de plus de 1/2" (1,3 cm)
du plancher sans opposer de résistance, cela peut signifier
que la bride antibasculement n’est pas correctement installée.
Ne pas faire fonctionner la cuisinière si la bride
antibasculement n’est pas installée et engagée. Si vous avez
besoin d’aide ou d’un entretien, consulter le Guide de
démarrage rapide pour obtenir les coordonnées.
Réglage de l’aplomb de la cuisinière
Déterminer si vous possédez la technologie AquaLift
®
† ou Steam
Clean (nettoyage à la vapeur) en consultant la section “Entretien
de la cuisinière”
Pour les cuisinières équipées de la technologie AquaLift
®®
ou
Steam Clean
1. En fonction de la taille du niveau, placer le niveau sur le bas
du four tel qu’indiqué dans l’une des deux figures ci-dessous.
Contrôler l’aplomb transversal et dans le sens avant/arrière.
2. Si la cuisinière n’est pas d’aplomb, la tirer vers l’avant jusqu’à
ce que le pied de nivellement arrière se dégage de la bride
antibasculement.
3. Suivre les instructions fournies pour le type 1 ou 2, en fonction
du type de tiroir fourni avec la cuisinière.
Pour les cuisinières dépourvues de la technologie AquaLift
®®
ou Steam Clean
1. Placer une grille standard dans le four.
2. Placer un niveau sur la grille et contrôler l’aplomb de la
cuisinière, d’abord transversalement, puis dans le sens avant/
arrière.
3. Si la cuisinière n’est pas d’aplomb, la tirer vers l’avant jusqu’à
ce que le pied de nivellement arrière se dégage de la bride
antibasculement.
4. Suivre les instructions fournies pour le type 1 ou 2, en fonction
du type de tiroir fourni avec la cuisinière.
Style 1 : Sur les cuisinières équipées d’un tiroir de remisage :
Utiliser une clé à cliquet de 1/4" (0,63 cm), une clé ou une pince
pour régler les pieds de nivellement vers le haut ou vers le bas
jusqu’à ce que la cuisinière soit d’aplomb. Repousser la cuisinière
pour la remettre en place. Vérifier que le pied de nivellement
arrière est engagé dans la bride antibasculement.
Style 2 : Sur les cuisinières équipées d’un tiroir-réchaud ou
tiroir de remisage de qualité supérieure :
Utiliser une clé ou une pince pour régler les pieds de nivellement
vers le haut ou vers le bas jusqu’à ce que la cuisinière soit
d’aplomb. Repousser la cuisinière pour la remettre en place.
Vérifier que le pied de nivellement arrière est engagé dans la
bride antibasculement.
REMARQUE : La cuisinière doit être d’aplomb pour que les
résultats de cuisson au four soient satisfaisants et les résultats de
nettoyage idéaux avec les fonctions de technologie AquaLift
®
et
Steam Clean .
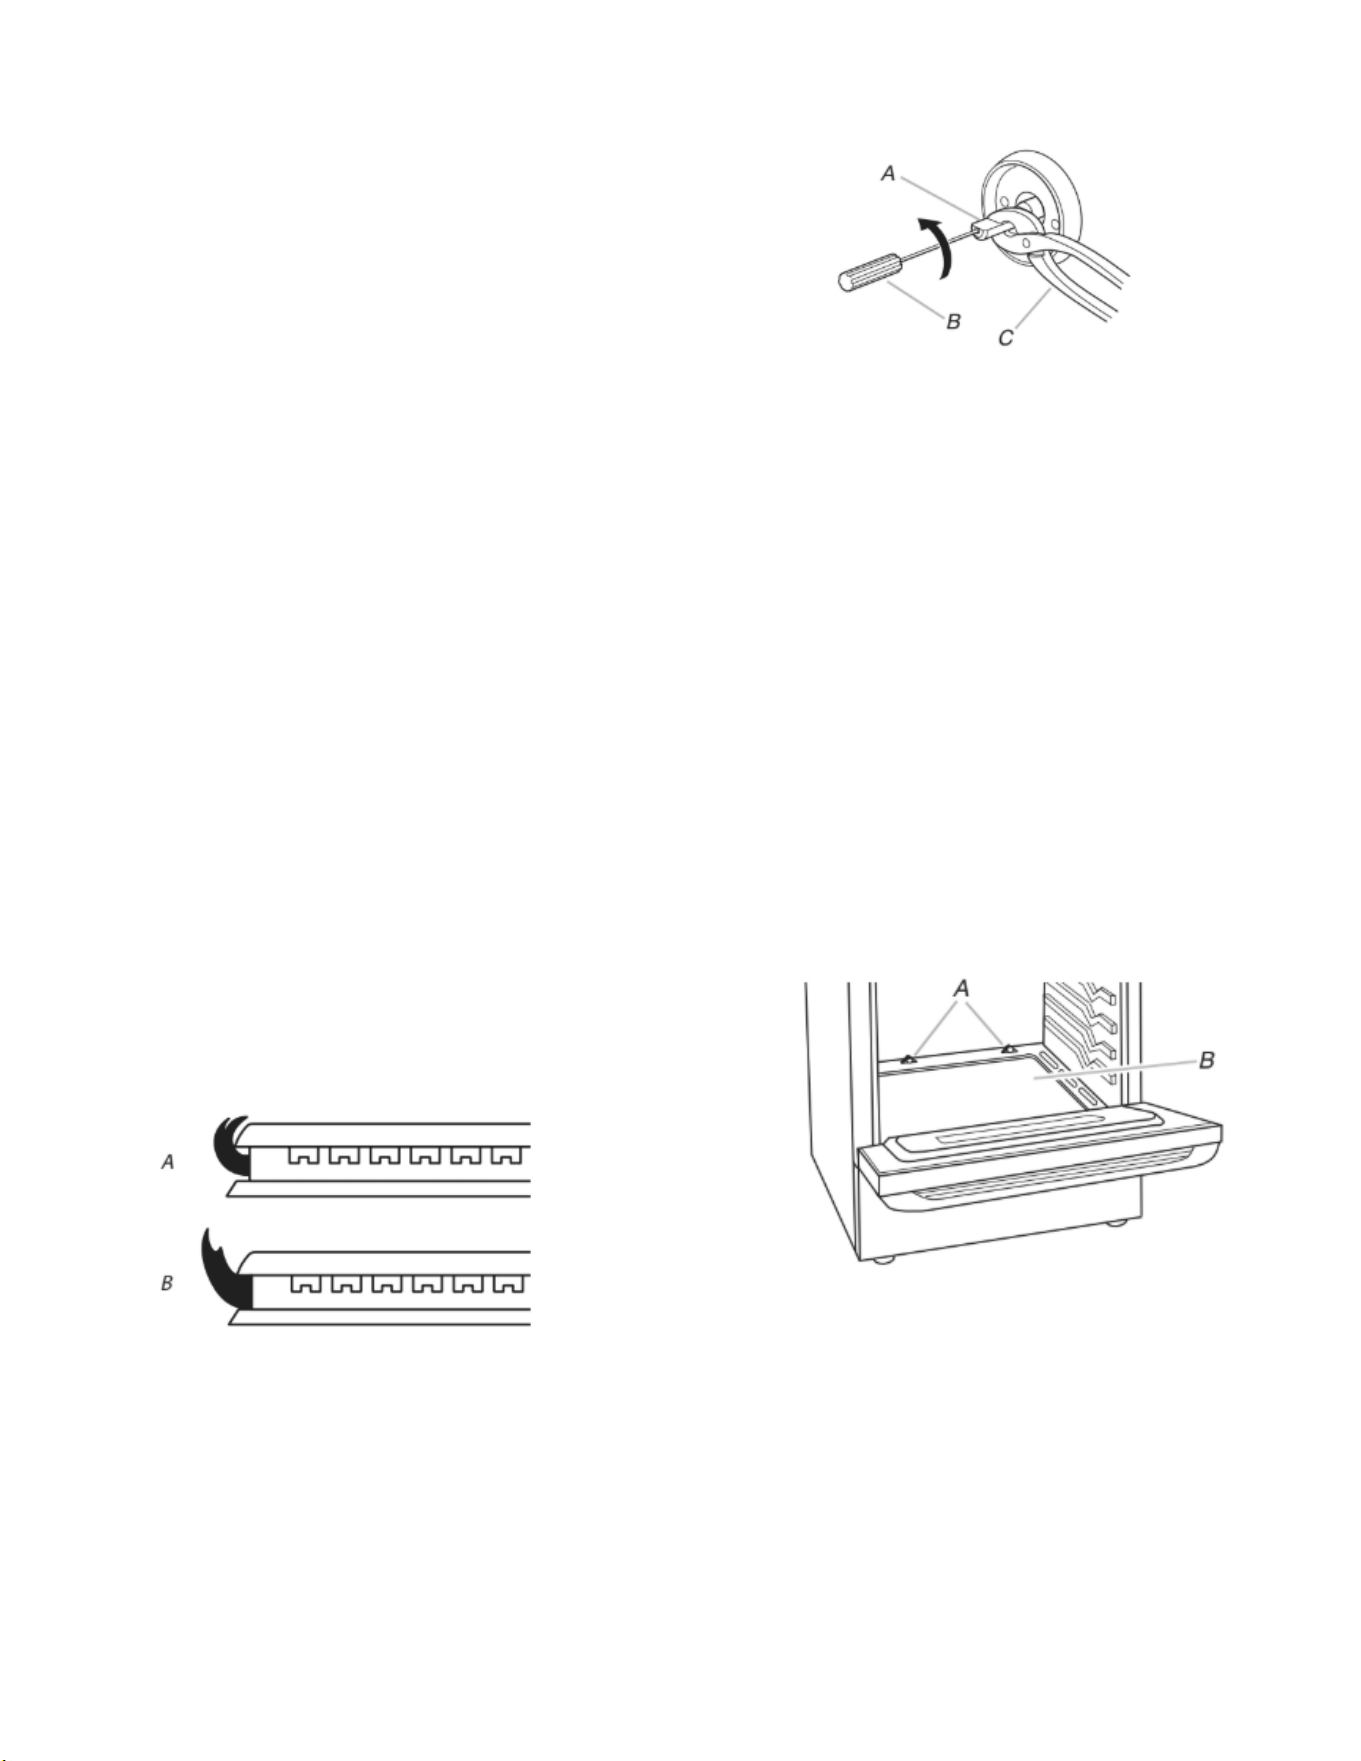
40
Système d’allumage électronique
Allumage initial et réglages des flammes de gaz
Un système d’allumage électronique est utilisé à la place des
flammes de veille usuelles pour l’allumage des brûleurs (table de
cuisson et four). Lorsqu’on place le bouton de commande d’un
brûleur de la table de cuisson à la position “LITE” (allumage), le
système génère des étincelles pour l’allumage du brûleur. La
génération d’étincelles se poursuit aussi longtemps que le bouton
de commande est laissé à la position “LITE”.
Lorsqu’on place le bouton de commande du brûleur du four à la
position désirée, les étincelles générées provoquent
l’inflammation du gaz. No sparking occurs. The glow bar remains
on while the burner operates.
Contrôle du fonctionnement des brûleurs de la
table de cuisson
Brûleurs standard de la table de cuisson
Enfoncer et tourner chaque bouton de commande du brûleur à la
position “LITE”.
Les flammes doivent s’allumer sur le brûleur en moins de 4
secondes. Lors de l’allumage initial, le délai d’allumage peut être
supérieur à 4 secondes du fait de la présence d’air dans la
canalisation de gaz.
Si les brûleurs ne s’allument pas correctement :
� Tourner le bouton de commande de la table de cuisson à la
position d’arrêt.
� Vérifier que la cuisinière est branchée. Vérifier qu’aucun
fusible n’est grillé et que le disjoncteur ne s’est déclenché.
Vérifier que chaque robinet d’arrêt de gaz est ouvert.
� Vérifier que chaque robinet d’arrêt est ouvert.
� Vérifier que les chapeaux de brûleur sont correctement placés
sur les bases des brûleur
Répéter le processus de mise en marche. Si à ce stade, l’un des
brûleurs ne s’allume toujours pas, tourner les boutons de
commande à la position d’arrêt et contacter le revendeur ou un
dépanneur agréé.
Réglage de la taille des flammes
Régler la taille des flammes sur les brûleurs supérieurs de la table
de cuisson. Pour le réglage au débit thermique minimum, on doit
observer des flammes stables bleues d’une hauteur de 1/4"
(6,4 mm) environ.
A. Débit thermique minimum
B. Débit thermique maximum
Réglage des brûleurs standard :
La vis de réglage au centre de la tige de commande du robinet
permet de régler la taille des flammes. La tige de commande est
située directement au-dessous du bouton de commande..
S’il est nécessaire de régler la taille des flammes pour le
débit thermique minimum :
A. Tige du bouton de commande
B. Tournevis
C. Pince
1. Allumer un brûleur et tourner pour obtenir le réglage le plus
faible.
2. Ôter le bouton de commande.
Immobiliser la tige de commande du bouton avec une pince.
Utiliser un petit tournevis à lame plate pour faire tourner la vis
située au centre de la tige de commande; ajuster les flammes
à la taille désirée.
3. Réinstaller le bouton de commande.
4. Tester les flammes en tournant le bouton de commande de la
position “LO” (basse) à la position “HI” (élevée), observer les
flammes pour chaque réglage et s’assurer qu’elles sont
stables.
5. Répéter cette procédure pour chacun des brûleurs.
Contrôle du fonctionnement du brûleur de
cuisson au four
1. Ôter la grille du four.
2. Pour retirer la partie inférieure du four : Ôter 2 vis à l’arrière de
la partie inférieure du four. Soulever l’arrière de la partie
inférieure du four vers le haut et l’arrière jusqu’à ce que l’avant
du panneau se trouve hors du cadre avant. Le retirer du four
et placer la plaque de couverture sur une surface protégée.
A. Vis
B. Partie inférieure du four
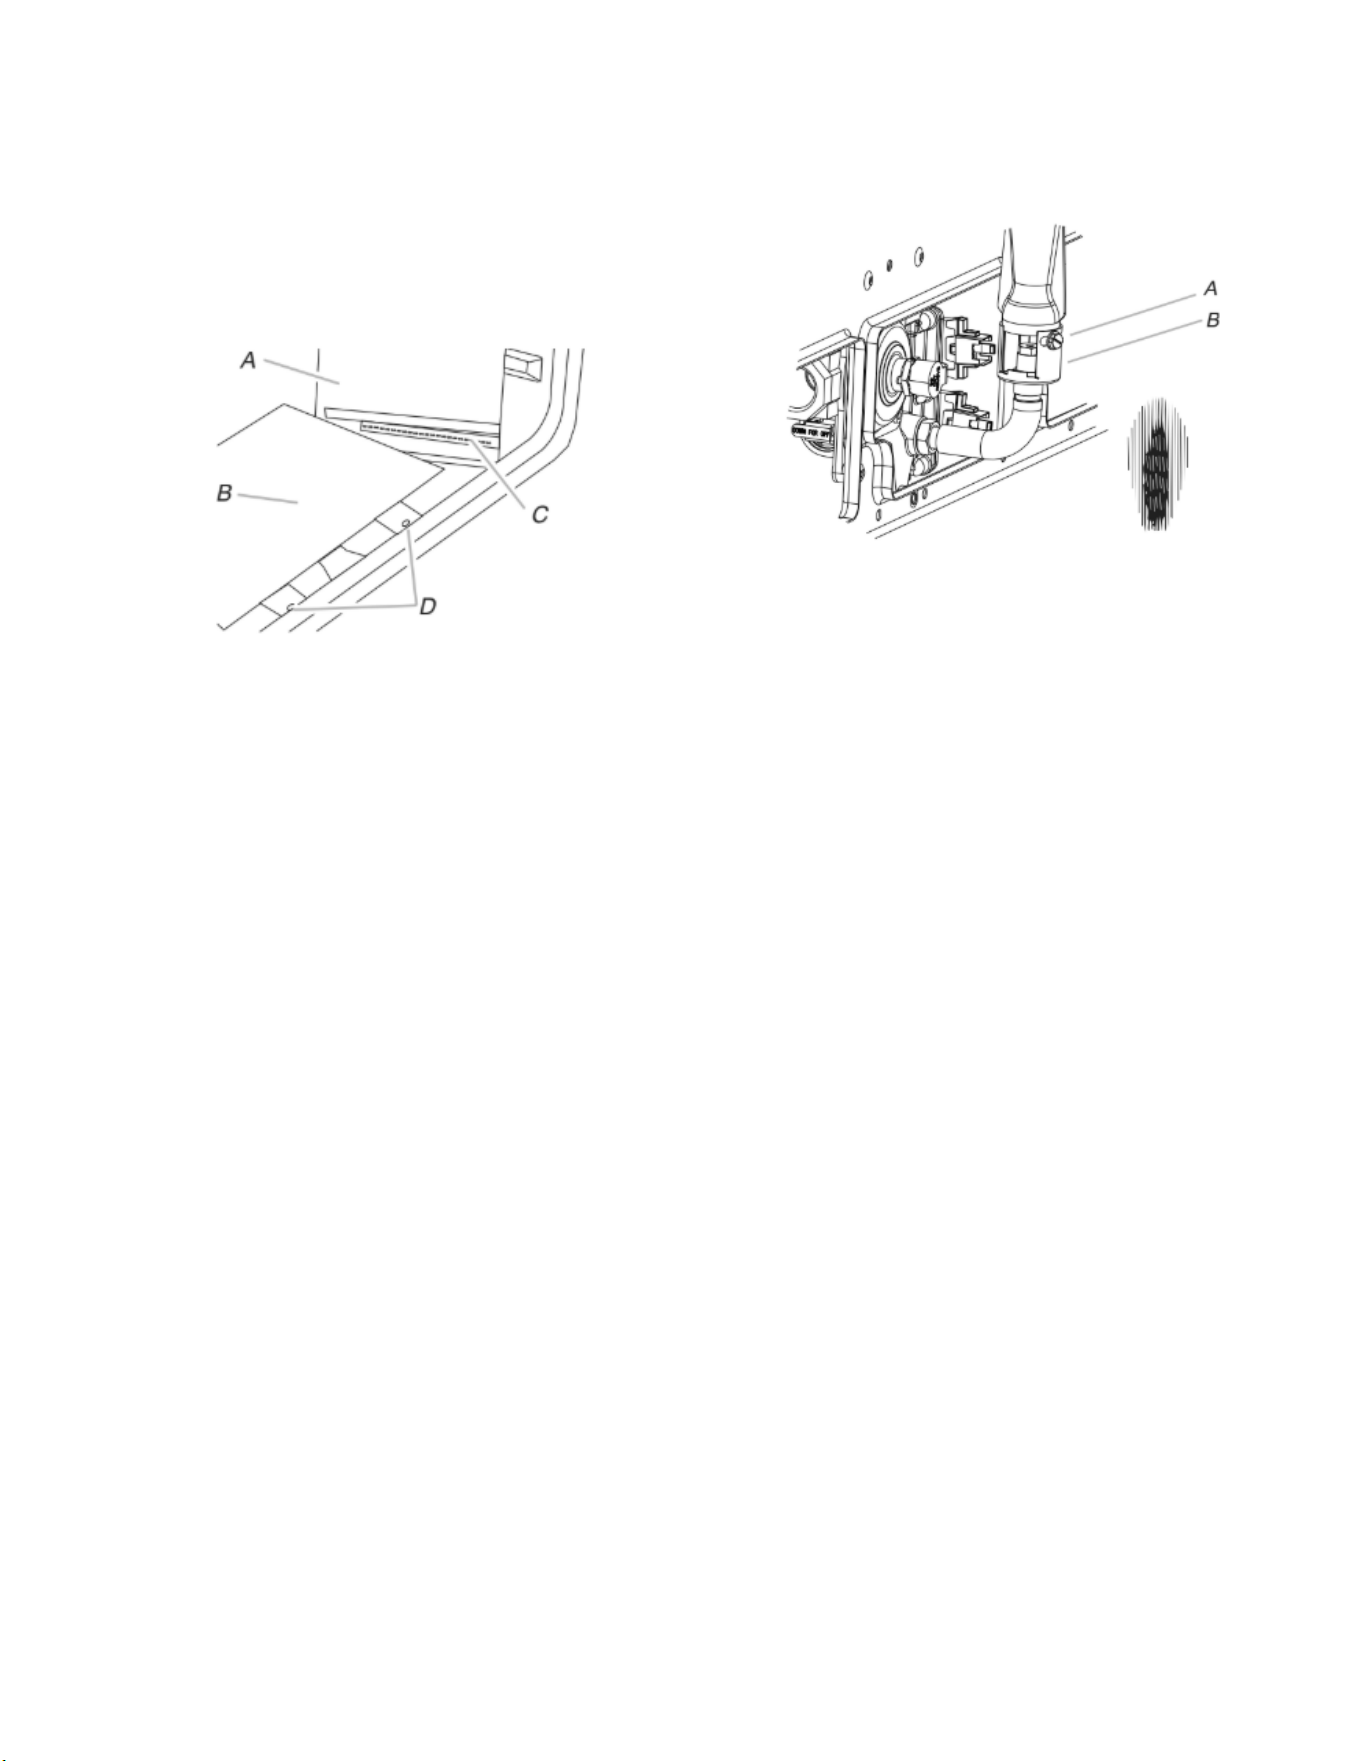
41
3. Pour vérifier la flamme du brûleur, ôter le répartiteur de
flammes ou utiliser un miroir.
Pour ôter le répartiteur de flammes :
Ôter 2 vis des volets avant du répartiteur de flammes.
Soulever l’avant du répartiteur de flammes et tirer vers l’avant
pour retirer les volets de l’arrière du four.
Utilisation d’un miroir :
Insérer un miroir sur un côté du brûleur. Regarder dans le
miroir pour vérifier la flamme.
A. Miroir
B. Répartiteur de flammes
C. Réfléchissement de la flamme
D. 2 vis
4. Appuyer sur la touche BAKE (cuisson au four).
5. Appuyer sur la touche START (mise en marche).
Le brûleur du four devrait s’allumer en moins de 8 secondes;
dans certaines conditions, l’allumage peut ne survenir qu’après
50 à 60 secondes.
Un dispositif d’allumage électronique est utilisé pour l’allumage
des brûleurs du four et du gril.
Consulter le Guide de démarrage rapide et le Guide de
commande en ligne pour connaître le bon fonctionnement des
commandes du four.
Panne de courant
En cas de panne de courant prolongée, les brûleurs de surface
peuvent être allumés manuellement. Tenir une allumette allumée
près d’un brûleur et tourner le bouton dans le sens antihoraire à
LITE (allumage). Une fois le brûleur allumé, tourner le bouton au
réglage souhaité.
Réglage de la taille des flammes sur le brûleur de
cuisson au four (le cas échéant)
1. Sur les modèles avec tiroir-réchaud, retirer la plaque de
fermeture de l’ouverture d’accès (1 vis) située à l’arrière du
compartiment du tiroir-réchaud.
2. Observer les flammes sur le brûleur de cuisson au four pour
déterminer si un réglage est nécessaire.
Il doit y avoir sur le brûleur des flammes comportant un cône
interne bleu-vert de 1/2" (1,3 cm) et une zone externe bleu
foncé; la forme des flammes doit être nette et douce. On ne
doit pas observer de pointes jaunes, ni d’effet de soufflage ou
de séparation entre les flammes et le brûleur.
3. S’il est nécessaire de régler la taille des flammes, identifier la
virole de réglage de l’admission d’air près du centre/à l’arrière
de la cuisinière. Desserrer la vis de blocage et faire tourner la
virole pour établir des flammes de configuration correcte.
Resserrer la vis de blocage de la virole.
A. Vis de blocage
B. Virole de réglage de l’admission d’air
4. Appuyer sur la touche CANCEL/OFF (annulation/arrêt) une
fois terminé.
5. Réinstaller le répartiteur de flammes et la plaque de
couverture du brûleur de four.
Contrôle du fonctionnement du brûleur du gril
1. Fermer la porte du four.
2. Appuyer sur la touche BROIL (gril).
3. Appuyer sur la touche START (mise en marche).
Le brûleur du four devrait s’allumer en moins de 8 secondes; dans
certaines conditions, l’allumage peut ne survenir qu’après 50 à 60
secondes.
Consulter le Guide de démarrage rapide et le Guide de
commande en ligne pour connaître le bon fonctionnement des
commandes du four.
Réglage de la taille des flammes sur le brûleur du
gril (le cas échéant)
Examiner les flammes sur le brûleur du gril à travers le hublot du
four. Il doit y avoir sur le brûleur des flammes comportant un cône
interne bleu-vert de 1/2" (1,3 cm) et une zone externe bleu foncé;
la forme des flammes doit être nette et douce. On ne doit pas
observer de pointes jaunes, ni d’effet de soufflage ou de
séparation entre les flammes et le brûleur.
S’il est nécessaire de régler la taille des flammes :
1. Desserrer la vis de blocage de la virole de réglage de
l’admission d’air, à l’arrière du brûleur du gril.
2. Régler l’admission d’air selon le besoin.
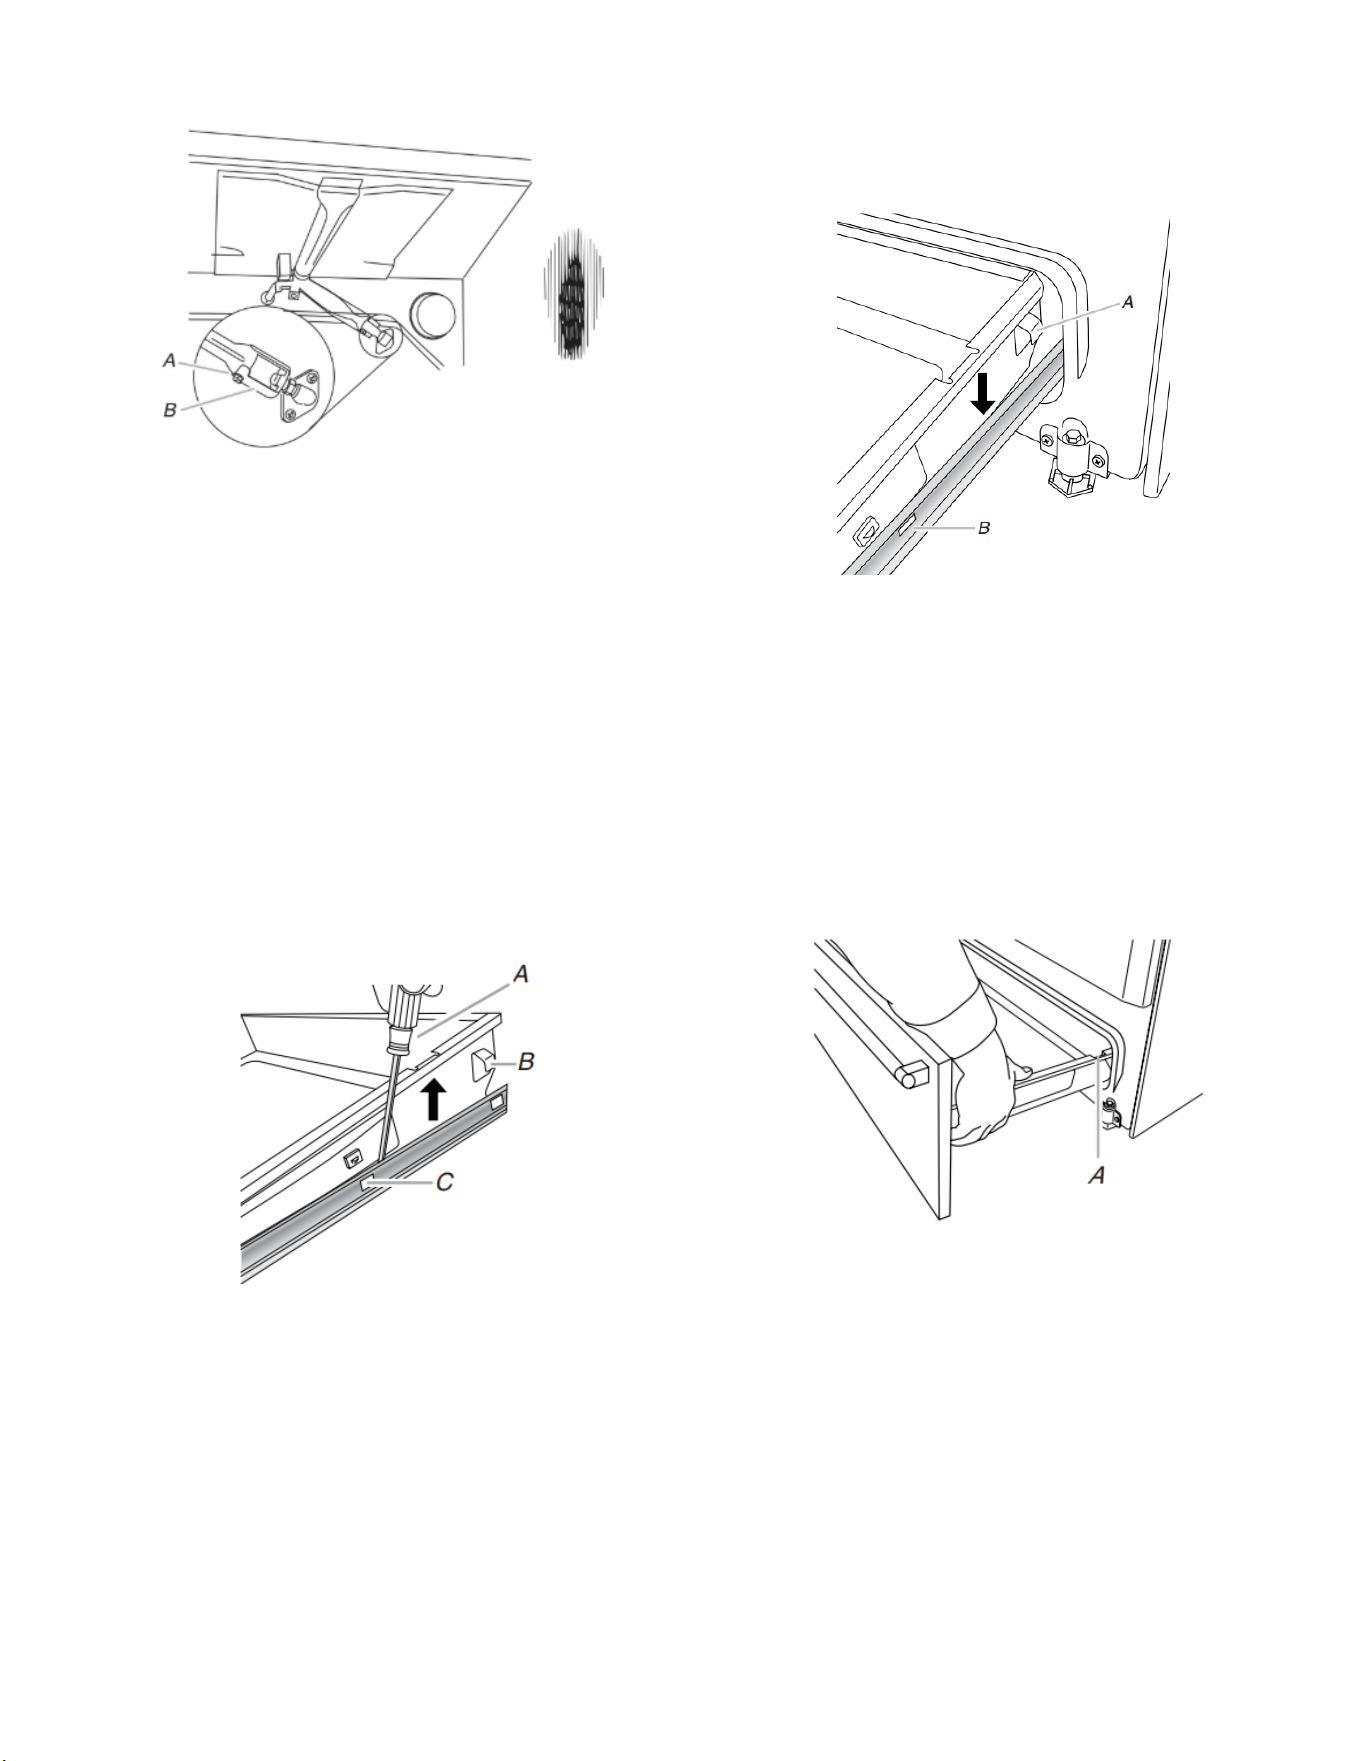
42
3. Resserrer la vis de blocage.
A. Vis de blocage
B. Virole de réglage de l’admission d’air
4. Appuyer sur la touche CANCEL/OFF (annulation/arrêt) une
fois terminé.
Tiroir-réchaud ou tiroir de remisage
de qualité supérieure (Sur certains
modèles)
Enlever tous les articles de l’intérieur du tiroir de cuisson au four,
tiroir-réchaud ou tiroir de remisage de qualité supérieure et laisser
la cuisinière refroidir complètement avant d’essayer d’enlever le
tiroir.
Dépose :
1. Ouvrir complètement le tiroir.
2. À l’aide d’un tournevis à lame plate, desserrer doucement le
tiroir pour le dégager de l’encoche d’alignement de glissière et
soulever l’onglet d’alignement du tiroir pour le dégager de la
glissière.
A. Tournevis à lame plate
B. Onglet d’alignement du tiroir
C. Encoche de glissière du tiroir
3. Répéter l’étape 2 pour l’autre côté. Le tiroir n'est plus fixé aux
glissières de tiroir. Avec les deux mains, saisir le tiroir pour le
retirer complètement.
Réinstallation :
1. Aligner les encoches de l’avant du tiroir avec les encoches
des glissières latérales à l’intérieur du tiroir (de chaque côté).
Placer les onglets d’alignement arrière dans les glissières de
tiroir (de chaque côté).
A. Onglet d’alignement du tiroir
B. Encoche de glissière du tiroir
2. Pousser le tiroir complètement.
3. Ouvrir et fermer délicatement le tiroir pour s’assurer qu’il est
bien engagé dans les glissières (de chaque côté).
Tiroir de remisage (Sur certains
modèles)
Le tiroir de remisage peut être enlevé. Avant de l’enlever,
s’assurer que le tiroir est froid et vide.
Dépose :
1. Tirer le tiroir de remisage en ligne droite vers l’arrière jusqu’à
la butée du tiroir.
A. Encoche de la butée du tiroir
2. Soulever l’avant du tiroir et retirer ce dernier.
Réinstallation :
1. Soulever l’avant du tiroir et placer l’arrière du tiroir dans la
cuisinière de façon à ce que l’encoche de butée du tiroir se
trouve derrière la glissière du tiroir.
2. Abaisser le tiroir de façon à ce que le bord de la glissière
s’insère dans l’encoche de la glissière de tiroir.

43
3. Enfoncer lentement le tiroir dans la cuisinière.
A. Engager la glissière du tiroir.
REMARQUE : Lorsque le tiroir est correctement installé, les
glissières de la base s’engagent dans les glissières arrière du
fond du tiroir et le tiroir lui-même ne s’incline pas lorsqu’on place
des objets à l’intérieur.
Porte du four
Il n’est pas recommandé d’enlever la porte du four pour une
utilisation normale. Toutefois, si la dépose est nécessaire,
s’assurer que le four est éteint et froid. Puis, suivre ces
instructions. La porte du four est lourde.
Dépose :
1. Ouvrir la porte du four complètement.
2. Pincer le loquet de charnière entre les deux doigts et tirer vers
l’avant. Répéter ces opérations pour l’autre côté de la porte du
four.
A. Loquet de charnière
3. Fermer la porte du four aussi loin qu’elle peut aller.
4. Soulever la porte du four en la retenant de chaque côté.
Continuer de maintenir la porte du four fermée et la dégager
du châssis de la porte du four.
Réinstallation :
1. Insérer les deux bras de suspension dans la porte.
2. Ouvrir la porte du four.
Vous devriez entendre un déclic lors de la mise en place de la
porte.
3. Remettre les leviers des charnières à la position verrouillée.
Effectuer quelques manoeuvres d’ouverture/fermeture de la
porte du four pour vérifier le bon fonctionnement. En cas
d’impossibilité d’ouverture ou de fermeture parfaite de la
porte, répéter le processus de dépose et d’installation de la
porte.
Achever l’installation
1. Vérifier que toutes les pièces sont maintenant installées. S’il
reste une pièce inutilisée, passer en revue les différentes
étapes pour découvrir laquelle aurait été oubliée.
2. Vérifier la présence de tous les outils.
3. Jeter ou recycler tous les matériaux d’emballage.
4. Contrôler l’aplomb de la cuisinière. Voir “Réglage de l’aplomb
de la cuisinière”.
5. Utiliser une solution d’eau tiède et de nettoyant ménager
liquide doux pour éliminer tout résidu de cire laissé par les
matériaux de protection de l’emballage. Sécher parfaitement
avec un linge doux. Pour obtenir plus d’informations, consulter
la section « Entretien et réparation de la cuisinière »
6. Lire le Guide de démarrage rapide et le Guide de commande
en ligne.
7. Mettre en marche les brûleurs de surface et le four. Consulter
le Guide de démarrage rapide et le Guide de commande pour
obtenir des instructions précises sur le fonctionnement de la
cuisinière.
Si la cuisinière ne fonctionne pas, contrôler ce qui suit :
� Le fusible du domicile est intact et bien serré, ou le disjoncteur
ne s’est pas déclenché.
� La cuisinière est branchée directement sur une prise de
courant à 3 alvéoles, reliée à la terre.
� Le robinet d’arrêt du détenteur est à la position “marche”.
� Le raccordement de l’alimentation électrique a été effectué.
� Consulter la section « Dépannage » en ligne.
8. Après 5 minutes de fonctionnement de la cuisinière, évaluer le
niveau de chaleur. Si la cuisinière est froide, arrêter la
cuisinière et déterminer si le robinet d’arrêt d’alimentation en
gaz est ouvert.
� Si le robinet d’arrêt de l’alimentation en gaz est fermé,
l’ouvrir, puis répéter le test de 5 minutes décrit ci-dessus.
� Si le robinet d’arrêt de l’alimentation en gaz est ouvert,
appuyer sur le bouton CANCEL (annulation) sur le tableau
de commande du four et contacter un technicien qualifié.
Si vous avez besoin d’assistance ou de service :
Consulter le Guide de démarrage rapide pour obtenir les
coordonnées.
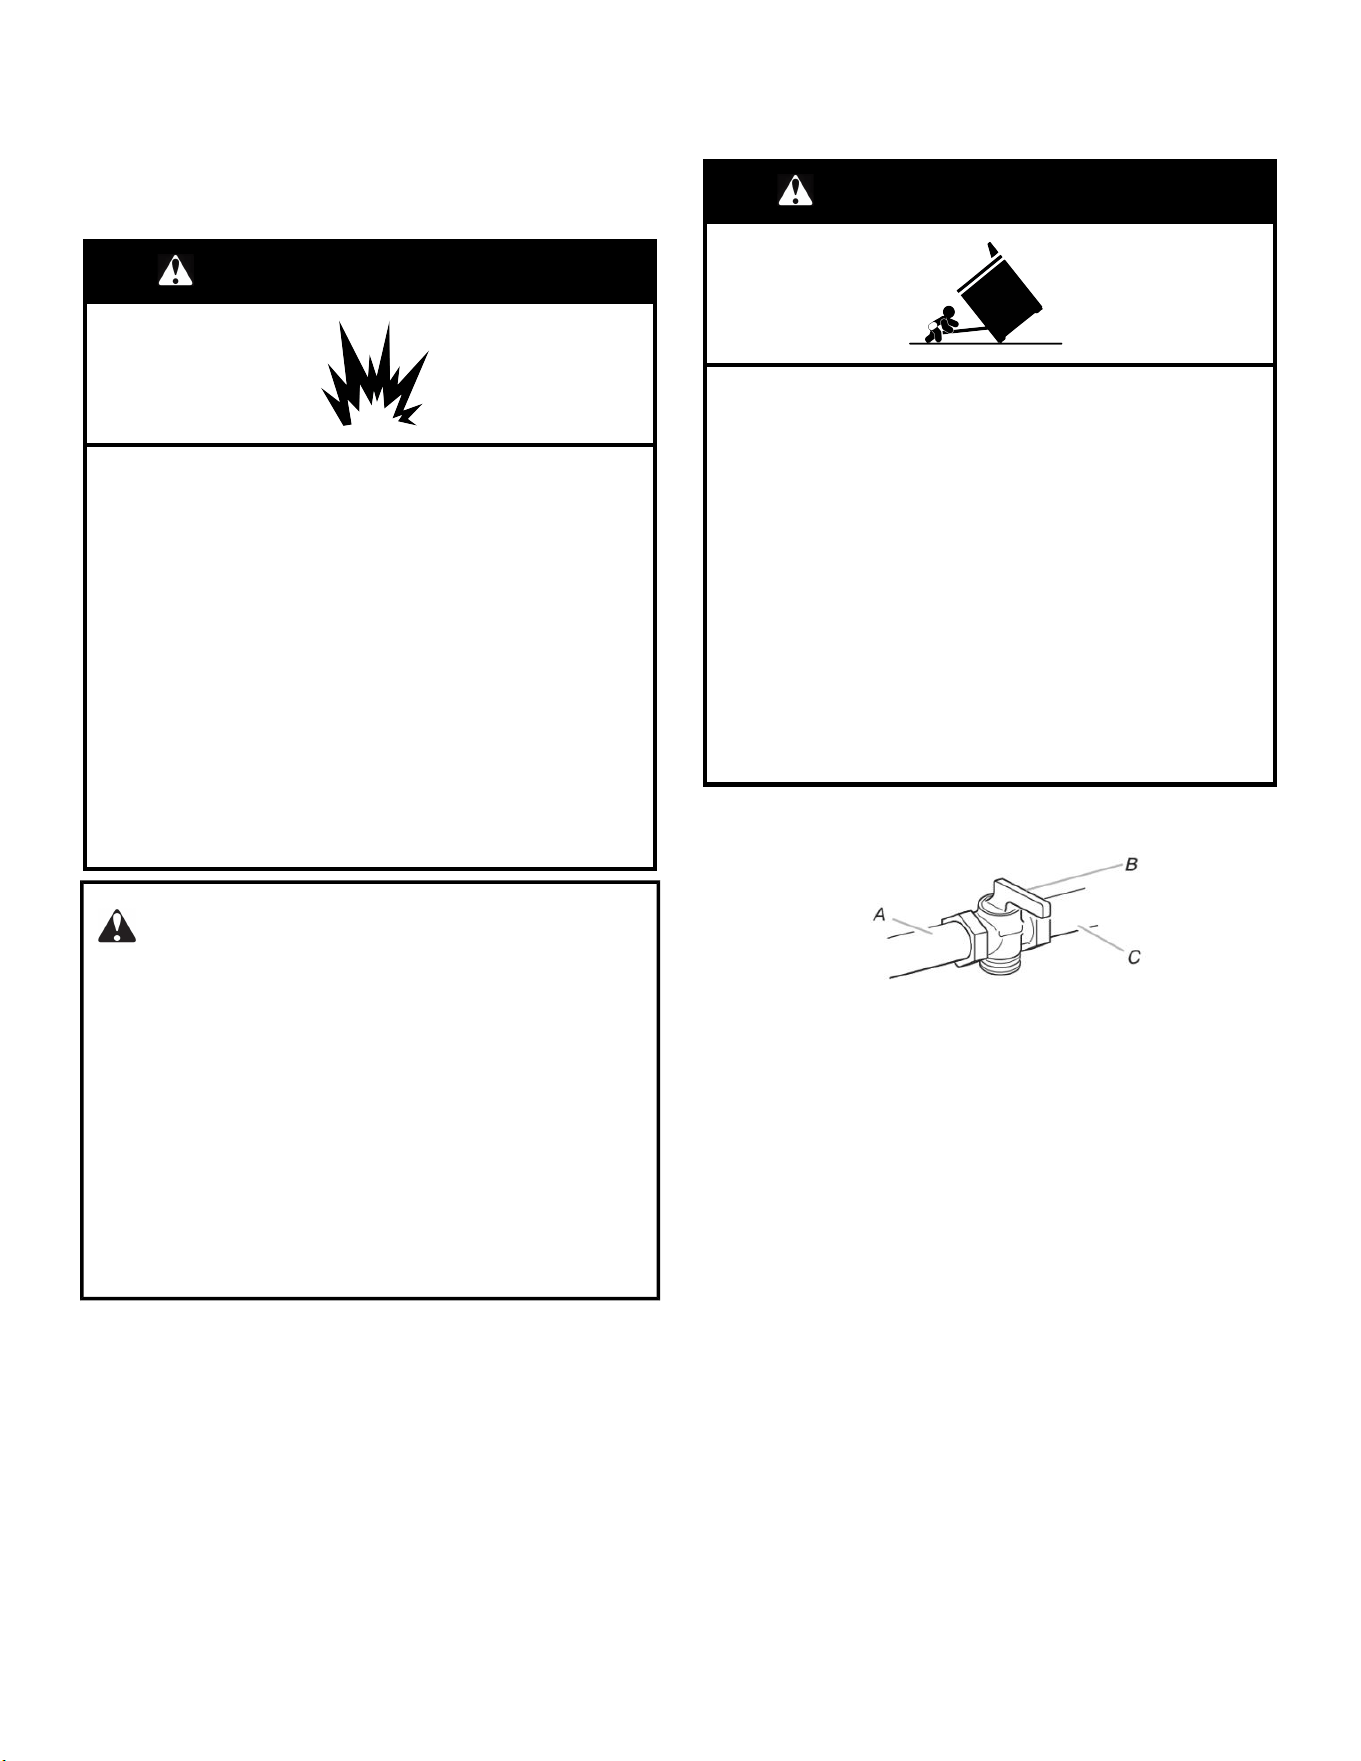
44
CONVERSIONS POUR
CHANGEMENT DE GAZ
Les conversions pour changement du gaz naturel au propane ou
du propane au gaz naturel doivent être effectuées par un
installateur qualifié.
AVERTISSEMENT
Risque d’explosion
Utiliser une canalisation neuve d’arrivée de gaz pour
utilisation à l’extérieur approuvée par la CSA
International.
Installer un robinet d'arrêt.
Bien serrer chaque organe de connexion de la
canalisation de gaz.
En cas de connexion au gaz propane, demander à une
personne qualifiée de s’assurer que la pression de gaz
ne dépasse pas 36 cm (14 po) de la colonne d’eau.
Par personne qualifiée, on comprend : le personnel
autorisé de chauffage, le personnel autorisé d’une
compagnie de gaz, et le personnel d’entretien autorisé.
Le non-respect de ces instructions peut causer un
décès, une explosion ou un incendie.
AVERTISSEMENT:
Cet ensemble de conversion doit être installé par un
organisme de service qualifié, conformément aux
directives du fabricant ainsi qu’à tous les codes
applicables et à toutes les exigences des autorités
compétentes. Si les directives ne sont pas suivies à la
lettre, un incendie, une explosion ou une émission de
monoxyde de carbone pourrait se produire et entraîner
des dommages matériels et des blessures graves ou
mortelles. L’organisme de service qualifié est
responsable de l’installation appropriée de cet ensemble
de conversion. L’installation n’est pas considérée
adéquate et complète tant que le fonctionnement de
l’appareil converti n’a pas été vérifié, conformément aux
directives du fabricant fournies avec l’ensemble de
conversion.
Conversion pour l’alimentation au
propane
AVERTISSEMENT
Risque de basculement
Un enfant ou une personne adulte peut faire basculer la
cuisinière, ce qui peut causer un décès.
Fixer la bride antibasculement au plancher ou au mur,
conformément aux instructions d'installation.
Faire glisser de nouveau la cuisinière de façon à ce que
le pied arrière de la cuisinière se trouve dans la fente de
la bride antibasculement.
Réengager la bride antibasculement si la cuisinière a été
déplacée.
Ne pas faire fonctionner la cuisinière si la bride
antibasculement n'est pas installée et engagée.
Le non-respect de ces instructions peut causer un
décès ou des brûlures graves aux enfants et aux
adultes.
1. Tourner le robinet d’arrêt manuel pour le placer à la position
de fermeture.
A. Vers la cuisinière
B. Robinet d’arrêt manuel à la position “fermée”.
C. Canalisation d’alimentation en gaz
2. Débrancher la cuisinière ou déconnecter la source de courant
électrique.
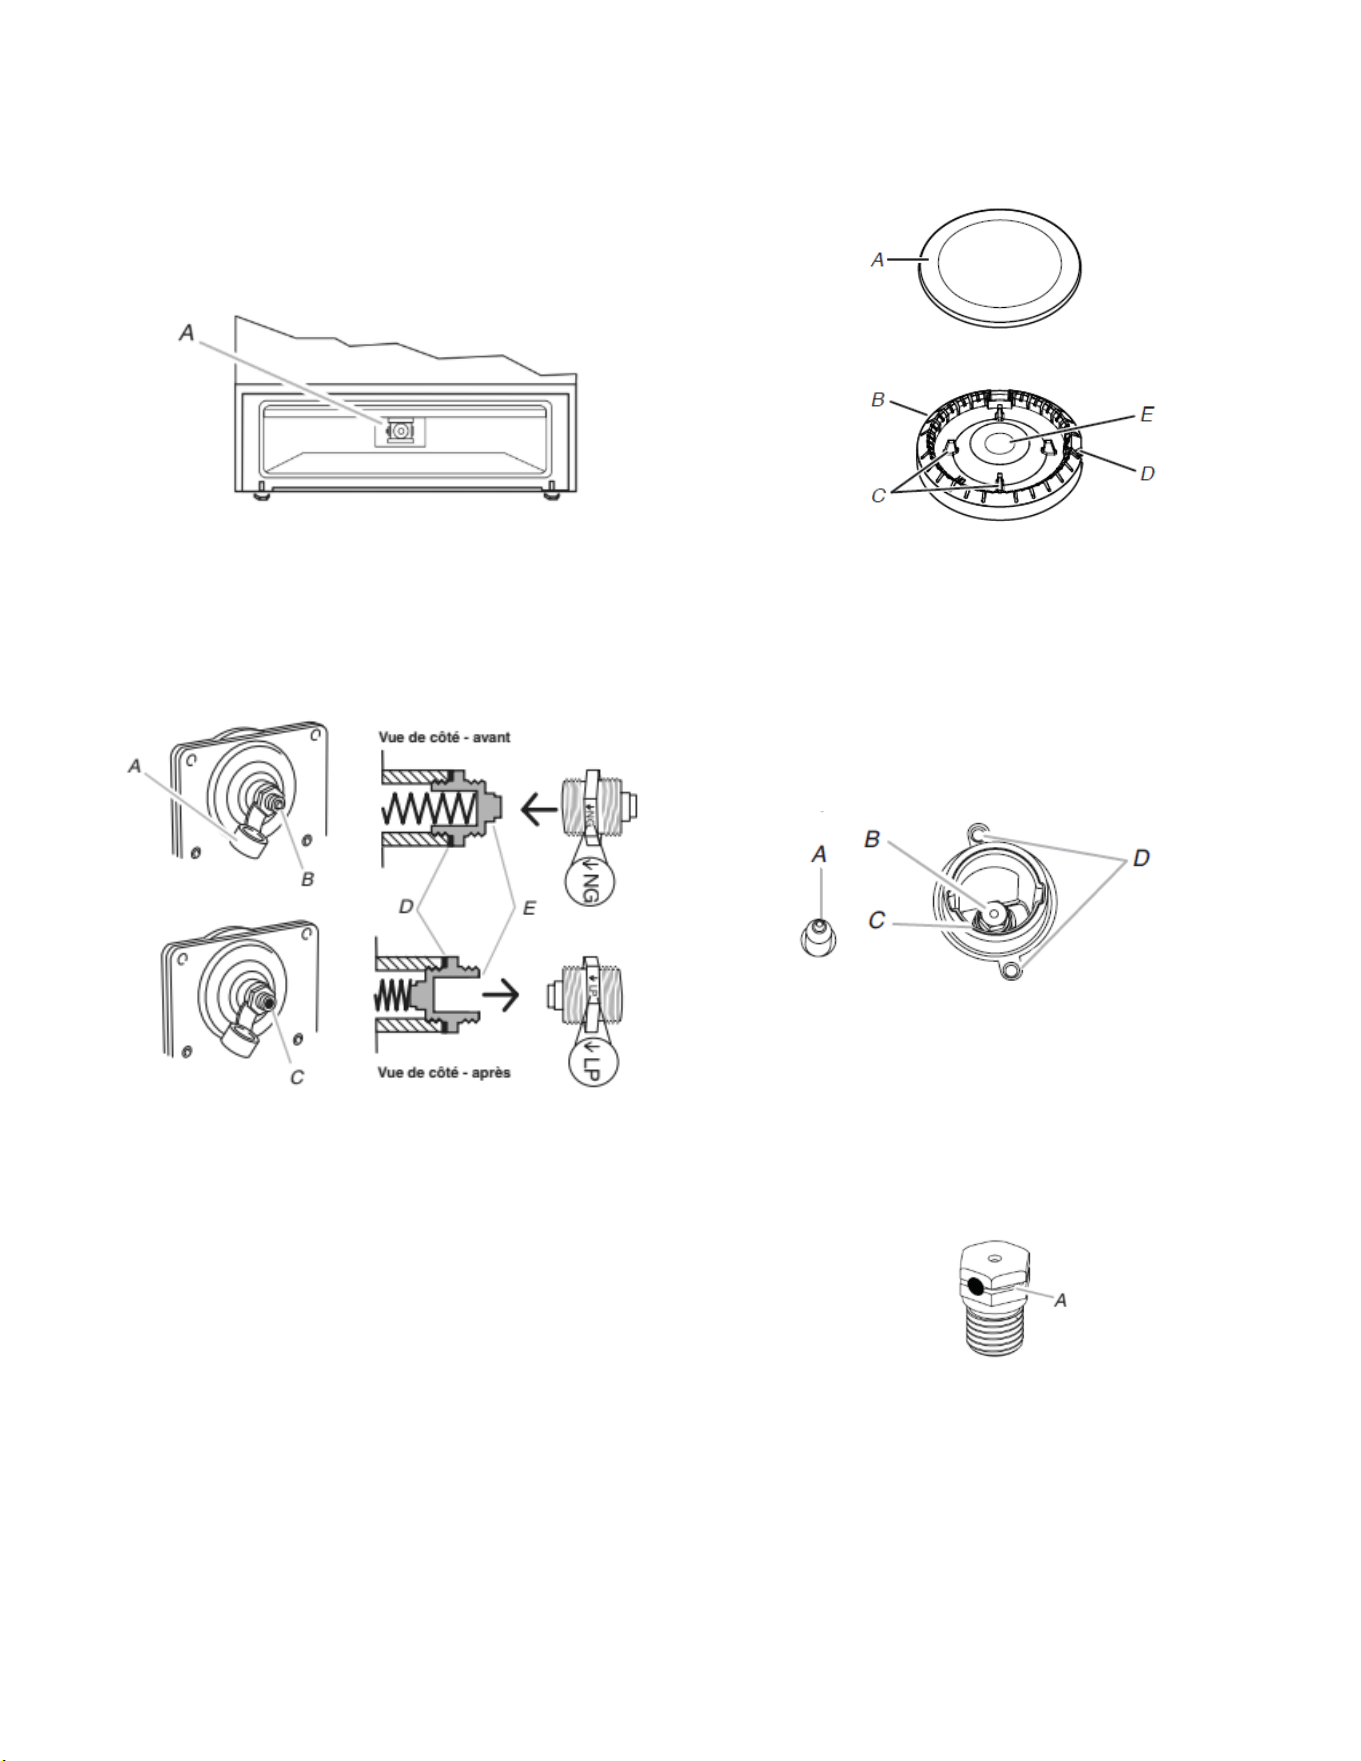
45
Conversion du détendeur de gaz (du gaz naturel
au gaz propane)
1. Retirer le tiroir de remisage de qualité supérieure, le
tiroirréchaud, ou le tiroir de cuisson. Voir la section “Dépose et
repose du tiroir”,“Tiroir de remisage” ou “Tiroir-réchaud ou
tiroir de remisage de qualité supérieure”.
2. Identifier le détendeur à l’arrière du compartiment du tiroir.
REMARQUE : Pour les modèles avec tiroir-réchaud ou tiroir
de cuisson, on doit enlever le couvercle d’accès au détendeur.
A. Détendeur
IMPORTANT : Ne pas enlever le détendeur.
3. Ôter le capuchon en plastique du capuchon du détendeur.
4. Avec une clé mixte de 5/8" (1,6 cm), tourner le capuchon du
détendeur dans le sens antihoraire pour l’enlever.
REMARQUE : Ne pas enlever le ressort situé sous le
capuchon.
A. Capuchon en plastique
B. Capuchon du détendeur; extrémité borgne vers
l’extérieur
C. Capuchon du détendeur; extrémité creuse
ouverte vers l’extérieur
D. Rondelle
E. Capuchon du détendeur
5. Retourner le capuchon du détendeur et le réinstaller sur le
détendeur de façon à ce que l’extrémité creuse soit orientée
vers l’extérieur et que l’indication “ ↓LP” soit orientée de la
manière indiquée à l’illustration ci-dessus.
6. Réinstaller le capuchon en plastique par-dessus le capuchon
du détendeur.
Conversion des brûleurs de surface (du gaz
naturel au gaz propane)
1. Ôter le chapeau de brûleur.
2. Ôter la base du brûleur.
A. Chapeau de brûleur
B. Base du brûleur
C. Tiges d’alignement
D. Électrode d’allumage
E. Ouverture du tube d’arrivée de gaz
3. Appliquer du ruban adhésif de masquage à l’extrémité d’un
tourne-écrou de 9/32 po (7 mm) pour retenir le gicleur du
brûleur dans le tourne-écrou durant l’extraction. Placer le
tourne-écrou sur l’injecteur; tourner dans le sens antihoraire et
soulever pour enlever l’injecteur. Conserver à part l’injecteur
du brûleur.
A. Électrode d’allumage
B. Gicleur
C. Support d’injecteur
D. Vis
4. Retirer les injecteurs fournis dans le sachet de documentation
situé dans le four. Chaque injecteur est marqué d’un code
d’identification gravé et comporte une rainure dans la zone
hexagonale. Remplacer l’injecteur à orifice pour gaz naturel
par le bon injecteur pour gaz propane.
A. Rainure pour gaz propane
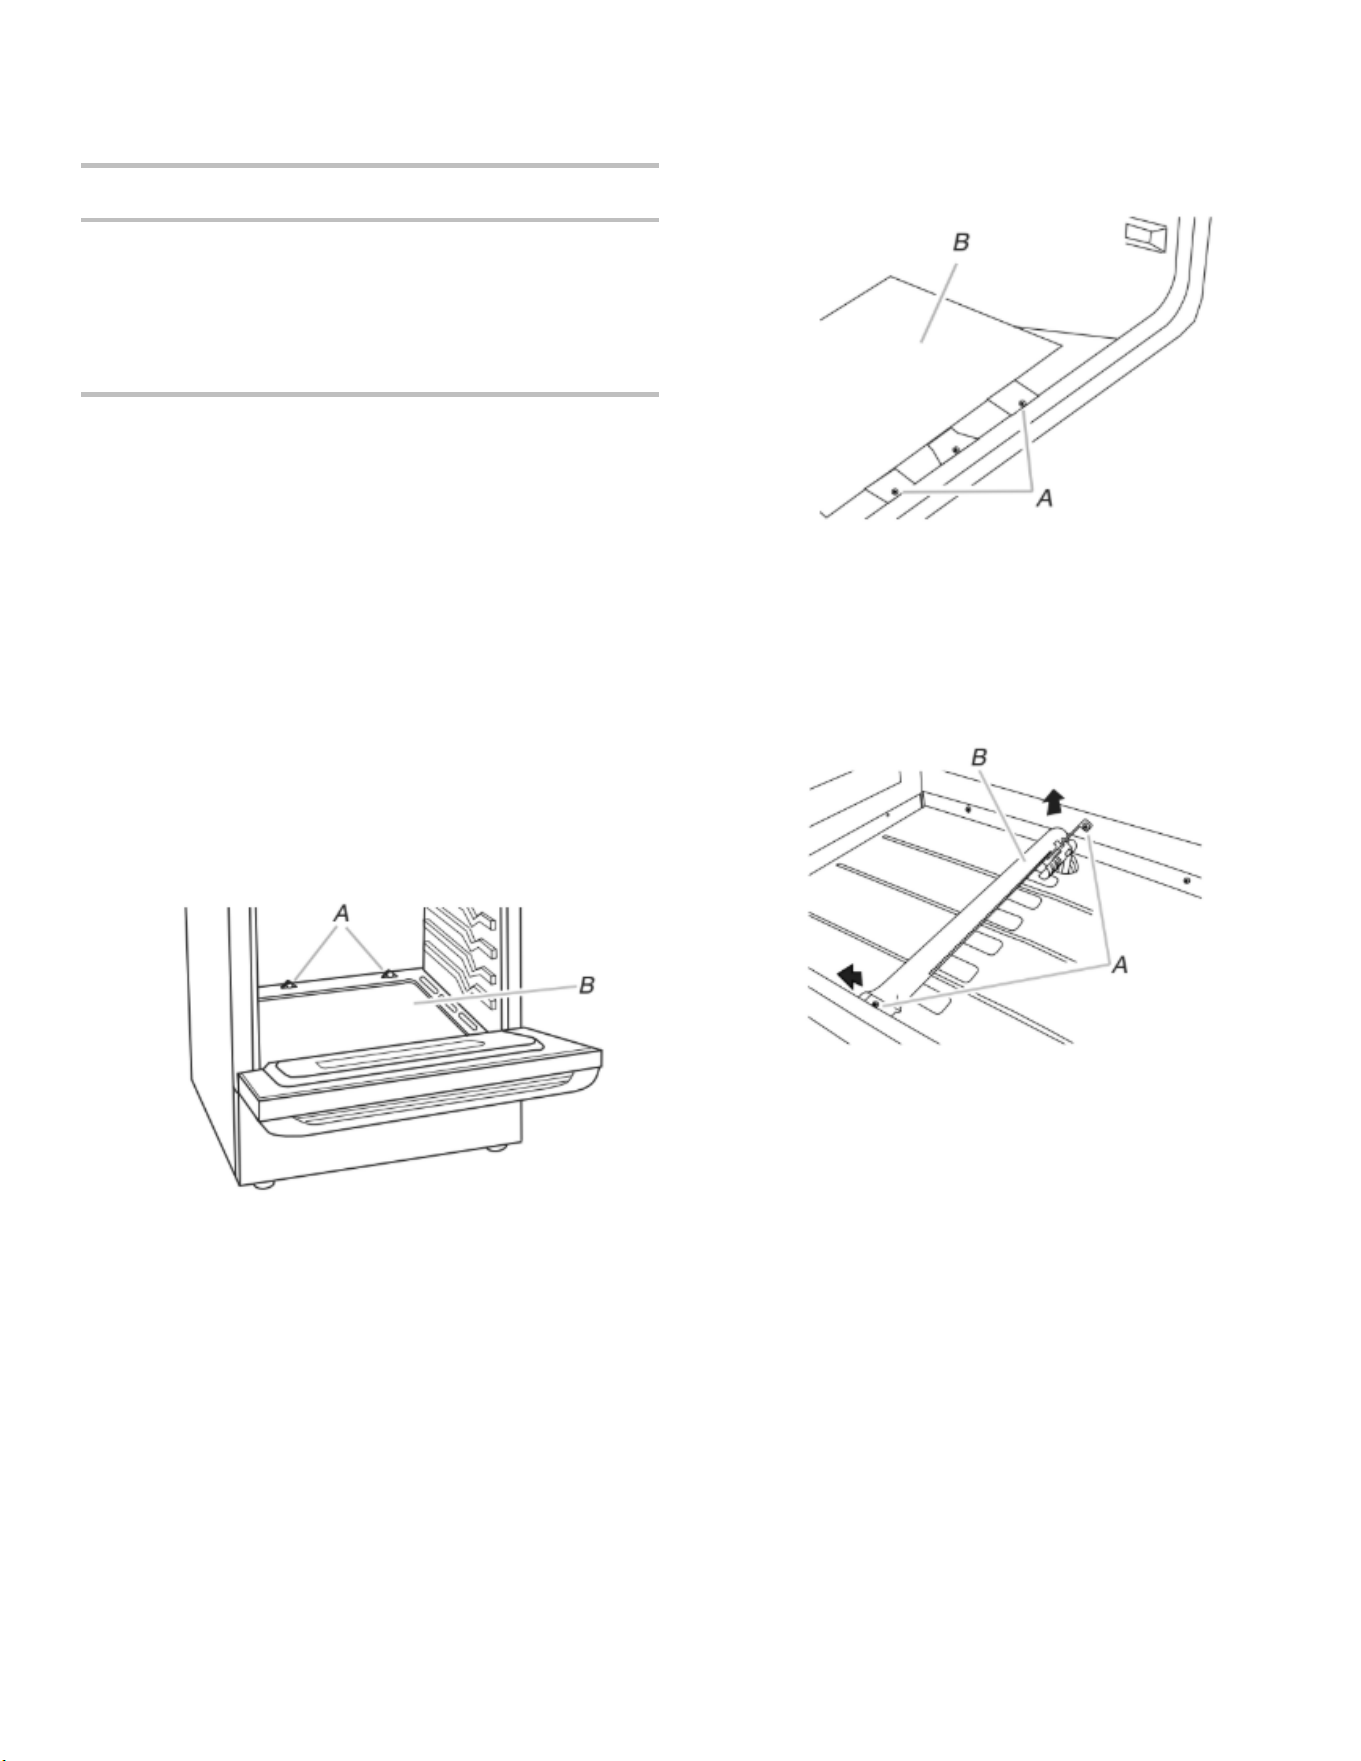
46
Consulter le tableau suivant pour connaître le bon positionnement
de l’injecteur à orifice pour gaz propane.
Injecteurs pour propane – brûleurs de surface
Emplacement Capacité/type
de brûleur
Taille (mm) Identifiant
GAV 14,200 BTU 1.08 108AM
GAR 8,000 BTU 0.84 084AM
DAV 14,200 BTU 1.08 108AM
DAR 5,000 BTU 0.64 064AM
CD 8,000 BTU 0.84 084AM
REMARQUE : Voir la plaque signalétique située sur le châssis du
four, derrière le côté supérieur droit de la porte du four pour
connaître la taille d’injecteur à orifice à utiliser pour chaque
brûleur (selon sa position).
5. Placer l’injecteur à orifice pour gaz naturel sur le porte-
injecteur à orifice de carton.
IMPORTANT : Conserver les injecteurs pour gaz naturel au
cas où la cuisinière devrait être reconvertie au gaz naturel.
6. Réinstaller la base du brûleur – utiliser les deux vis.
7. Réinstaller le chapeau de brûleur.
8. Répéter les étapes 1 à 7 pour les autres brûleurs.
Conversion du brûleur de cuisson au four (du gaz
naturel au gaz propane)
1. Retirer les grilles du four.
2. Ôter 2 vis à l’arrière de la partie inférieure du four.
3. Soulever l’arrière de la partie inférieure du four vers le haut et
l’arrière jusqu’à ce que l’avant du panneau se trouve hors du
cadre avant. Le retirer du four et le mettre de côté sur une
surface couverte.
A. Vis
B. Fond du four
4. Ôter 2 vis des volets avant du répartiteur de flammes.
Soulever l’avant du répartiteur de flammes et le tirer vers
l’avant pour retirer les onglets de l’arrière du four. Les mettre
de côté sur une surface couverte.
A. Vis
B. Répartiteur de flammes
5. Ôter 2 vis du brûleur de cuisson au four..
6. Faire glisser l’avant du brûleur de cuisson au four sur le côté
pour retirer l’onglet de l’avant du four. Retirer l’arrière du
brûleur de cuisson au four de l’orifice du four, et mettre le
brûleur de cuisson au four de côté sur une surface couverte.
A. Vis
B. Brûleur de cuisson au four
7. Utiliser un tourne-écrou de 3/8" (9,5 mm) ou une clé mixte et
tourner l’injecteur à orifice du brûleur pour gaz naturel dans le
sens antihoraire pour l’enlever. L’injecteur à orifice portera la
mention “49”.
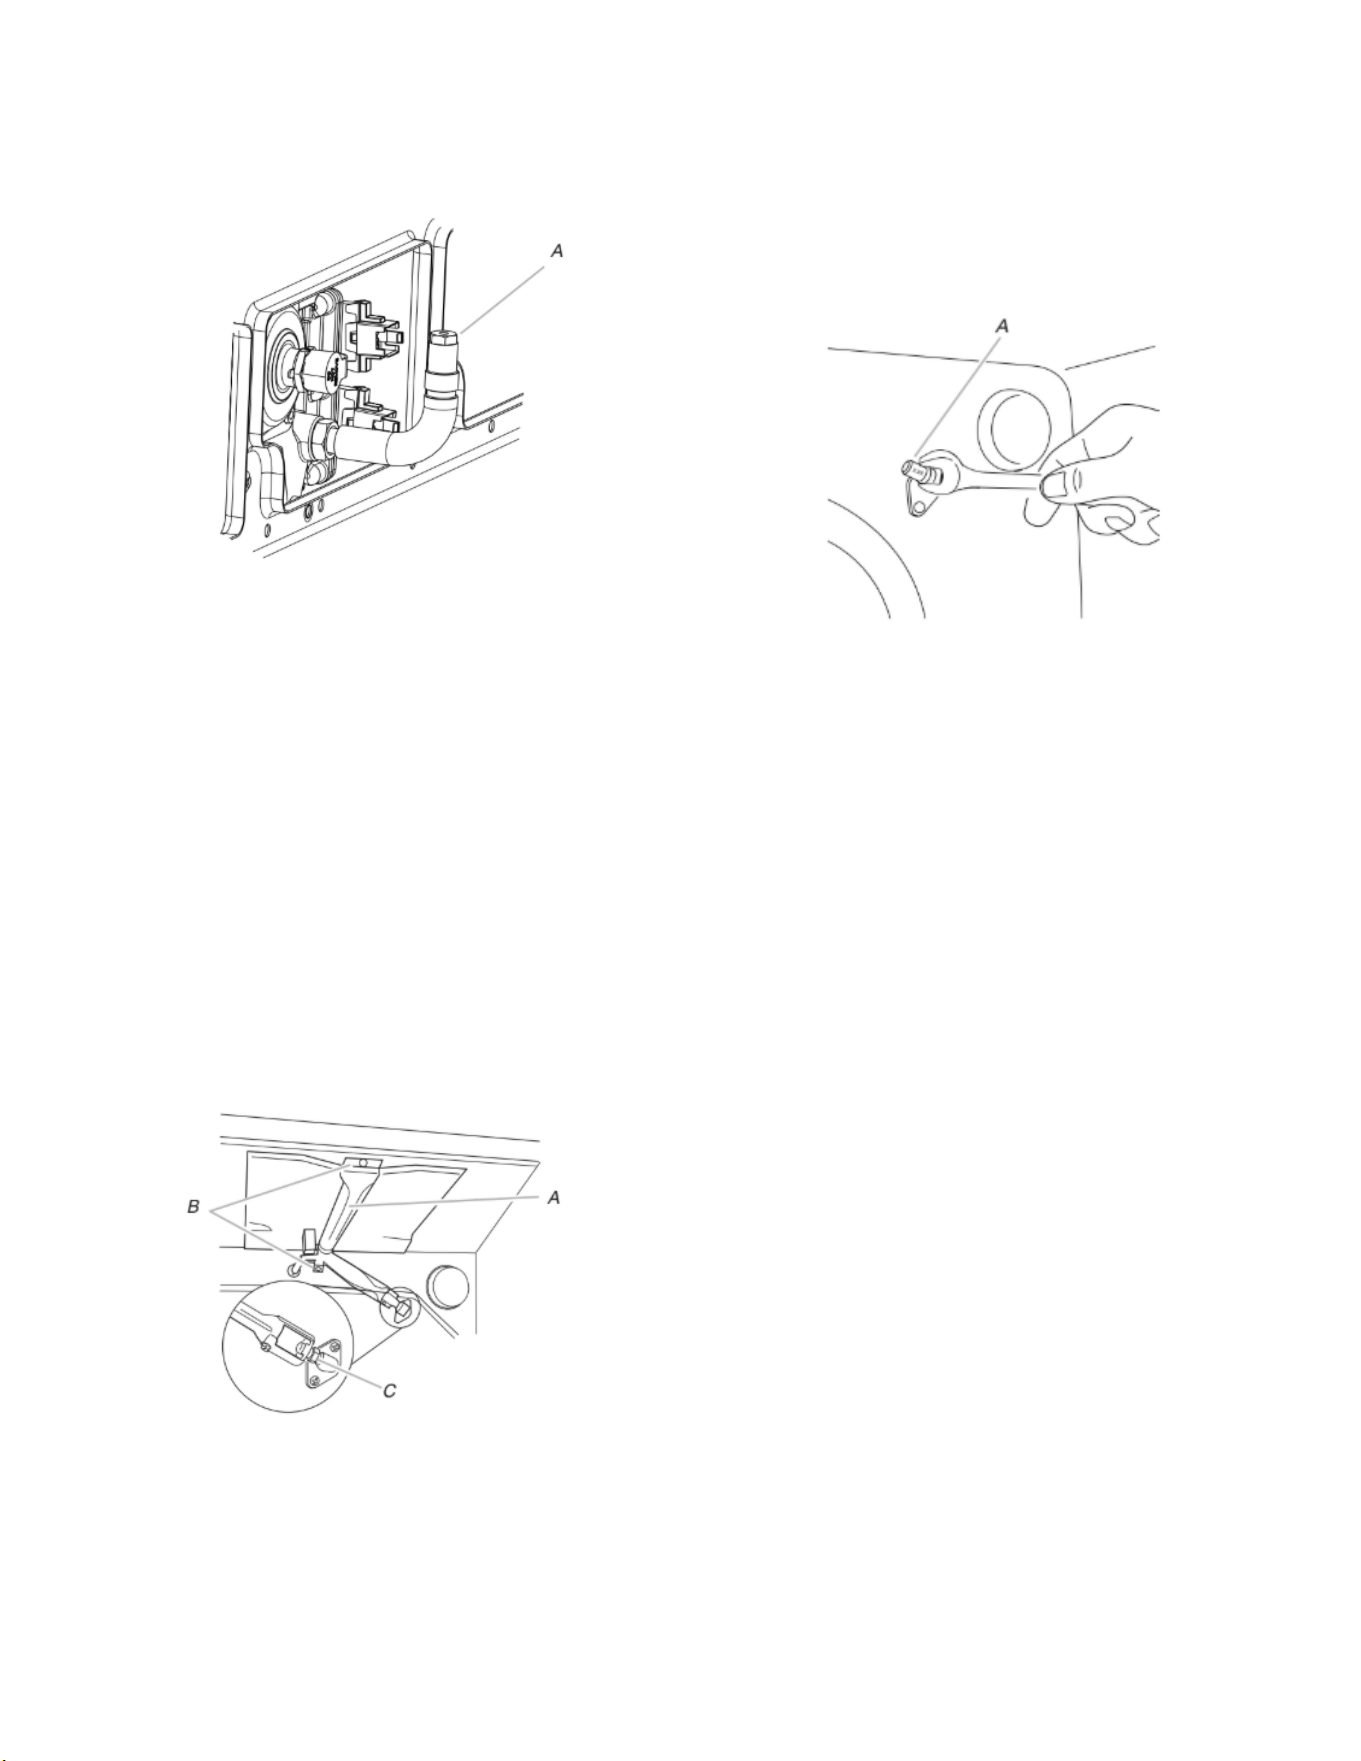
47
8. Remplacer l’injecteur à orifice “49” par un injecteur à orifice
“57”. Installer l’injecteur à orifice pour gaz propane du brûleur
de cuisson au four en le tournant dans le sens horaire jusqu’à
ce qu’il soit serré.
IMPORTANT : Ne pas serrer excessivement.
A. Injecteur à orifice
9. Positionner l’arrière du brûleur de cuisson au four sur l’orifice
du four et insérer l’onglet situé à l’avant du brûleur de cuisson
au four dans l’avant du four.
10. Réinstaller le brûleur de cuisson au four avec 2 vis.
11. Insérer les onglets à l’arrière du répartiteur de flammes dans
l’arrière du four.
12. Réinstaller les onglets avant du répartiteur de flammes au four
avec 2 vis.
13. Positionner l’avant du panneau inférieur du four vers le
châssis avant et abaisser l’arrière du panneau du fond du four
pour l’insérer dans le four.
14. Réinstaller le panneau du fond du four avec 2 vis.
Conversion du brûleur de cuisson au gril (du gaz
naturel au gaz propane)
1. Ôter 1 vis du brûleur de cuisson au gril.
2. Ôter le répartiteur de flammes.
3. Retirer le brûleur de cuisson au gril de l’injecteur femelle du
brûleur de cuisson au gril.
REMARQUE : Le brûleur de cuisson au gril pend à l’arrière du
four pendant que l’on change l’injecteur femelle.
A. Brûleur de cuisson au gril
B. Vis
C. Injecteur femelle
4. Utiliser une clé mixte de 3/8" (9,5 mm) pour tourner l’injecteur
femelle du brûleur de cuisson au gril pour gaz naturel dans le
sens antihoraire pour l’enlever. L’injecteur femelle portera la
mention “53”.
5. Remplacer l’injecteur femelle “53” par un injecteur femelle
“090”. Installer l’injecteur femelle du brûleur du gril pour gaz
naturel en le tournant dans le sens horaire jusqu’à ce qu’il soit
serré.
IMPORTANT : Ne pas serrer excessivement.
6. Placer le brûleur de cuisson au gril sur l'injecteur femelle du
brûleur de cuisson au gril et insérer l'allumeur en céramique
du brûleur de cuisson au gril dans le trou situé à l'arrière du
four.
A. Injecteur femelle
7. Positionner le brûleur de cuisson au gril contre la partie
supérieure du four et le fixer avec 2 vis.
8. Réinstaller le tiroir de remisage, le tiroir-réchaud ou le tiroir de
remisage de qualité supérieure. Voir la section “Tiroir de
remisage” ou “Tiroir-réchaud ou tiroir de remisage de qualité
supérieure”.
9. Réinstaller la porte du four. Voir la section “Porte du four”.
10. Réinstaller les grilles du four.
Achever l’installation (du gaz naturel au gaz
propane)
1. Pour le raccordement correct de la cuisinière à l'alimentation
en gaz, se reporter à la section “Raccordement au gaz”.
2. Pour l'allumage et l'utilisation corrects du brûleur ainsi que le
réglage des flammes sur le brûleur, voir la section “Système
d'allumage électronique”.
IMPORTANT : Il peut être nécessaire de modifier le réglage
des flammes à la position du débit thermique minimum “LO”
pour chaque brûleur de la table de cuisson.
Il est très important de vérifier l’établissement de flammes
correctes sur les brûleurs de la table de cuisson, ainsi que sur
les brûleurs de cuisson au four et au gril. Le petit cône interne
doit comporter une flamme bleue très distincte de 1/4" (0,64
cm) à 1/2" (1,3 cm) de longueur. Le cône externe n’est pas
aussi distinct que le cône interne. Les flammes d’un brûleur
alimenté au propane comportent une pointe légèrement
jaune.
3. Voir le paragraphe “Achever l'installation” de la section
“Instructions d'installation” du présent manuel pour achever
cette procédure.
REMARQUE : S'assurer de bien conserver les injecteurs à
orifice qui ont été remplacés au cours de la conversion.
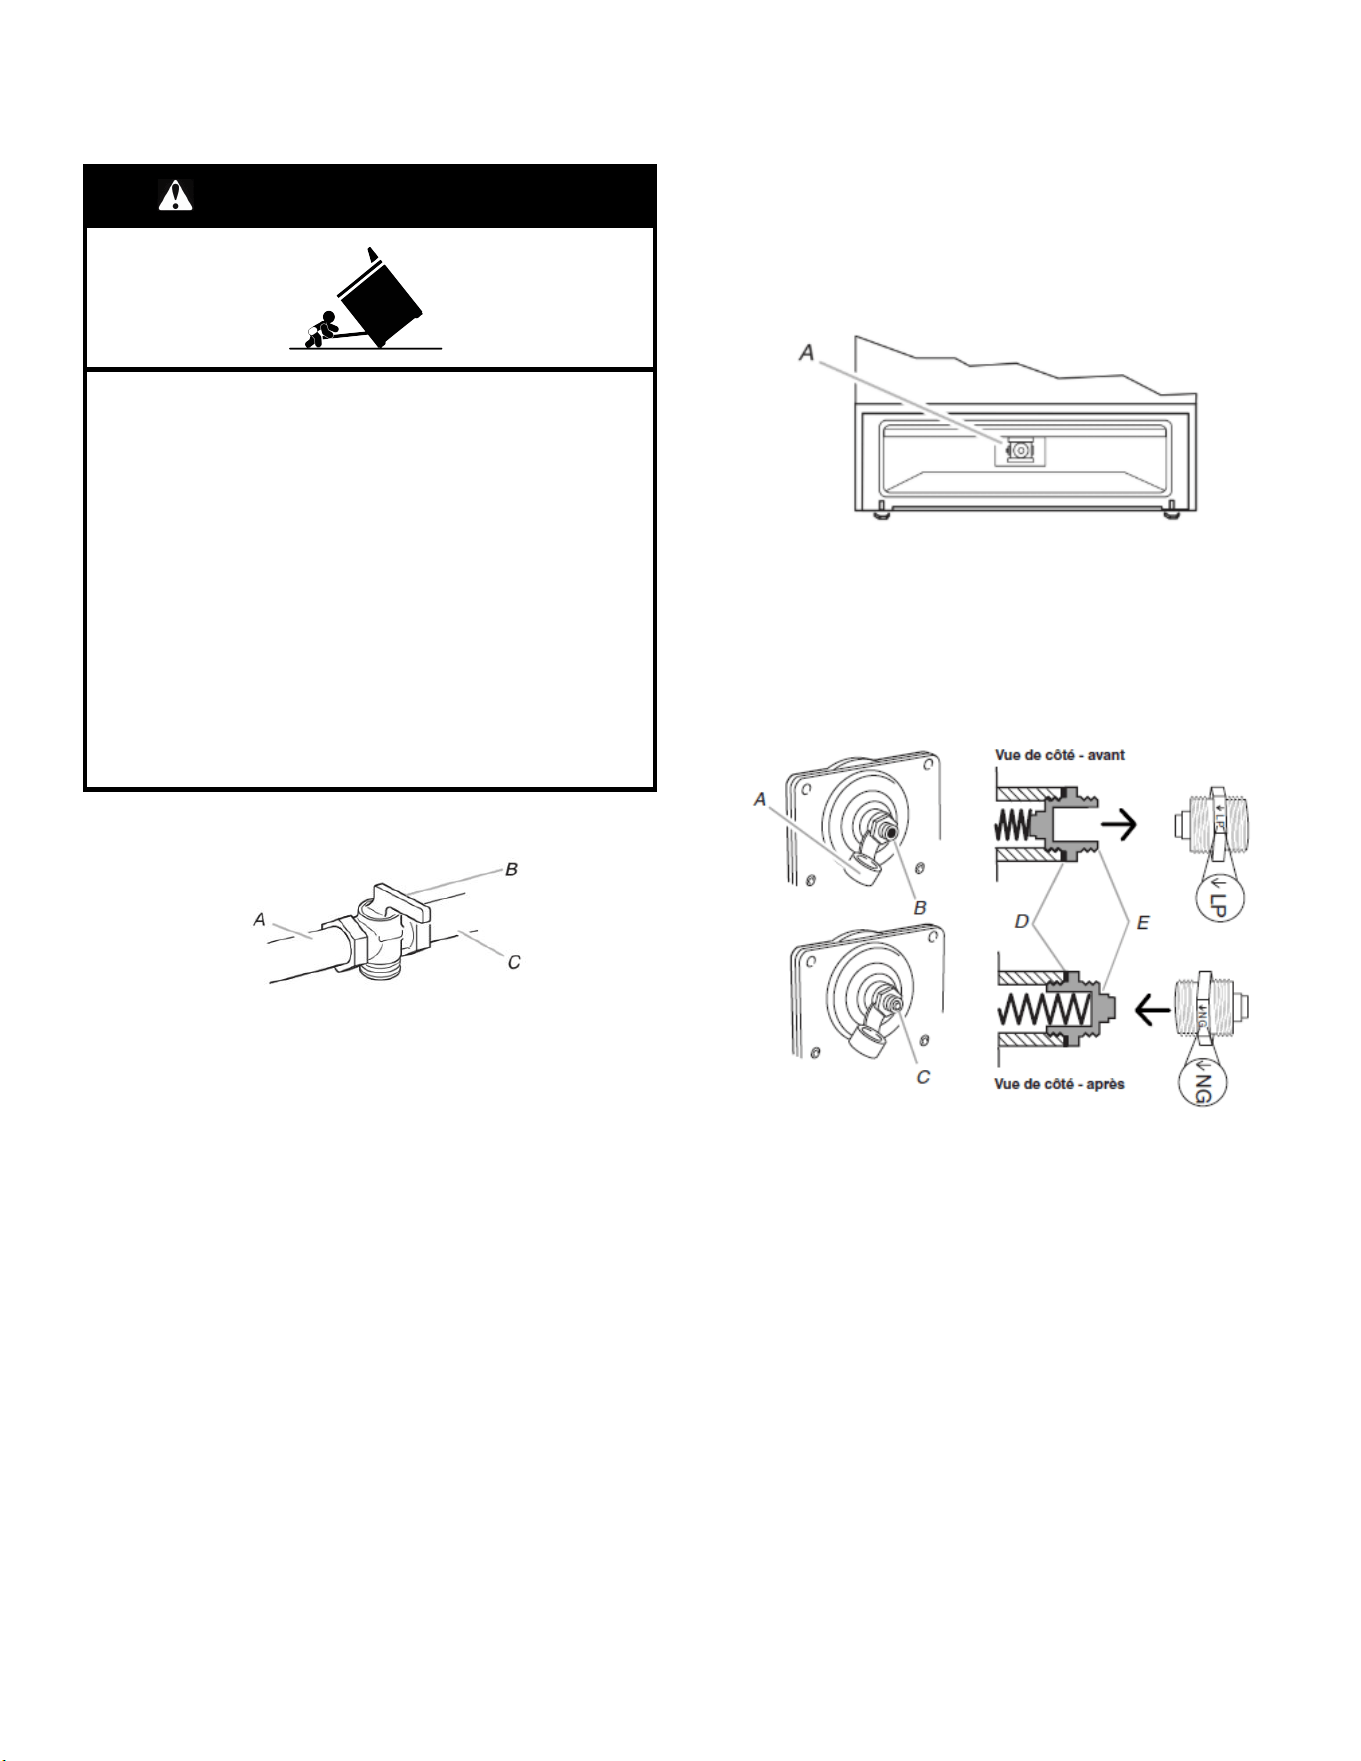
48
Conversion pour l’alimentation au
gaz naturel
AVERTISSEMENT
Risque de basculement
Un enfant ou une personne adulte peut faire basculer la
cuisinière, ce qui peut causer un décès.
Fixer la bride antibasculement au plancher ou au mur,
conformément aux instructions d'installation.
Faire glisser de nouveau la cuisinière de façon à ce que
le pied arrière de la cuisinière se trouve dans la fente de
la bride antibasculement.
Réengager la bride antibasculement si la cuisinière a été
déplacée.
Ne pas faire fonctionner la cuisinière si la bride
antibasculement n'est pas installée et engagée.
Le non-respect de ces instructions peut causer un
décès ou des brûlures graves aux enfants et aux
adultes.
1. Tourner le robinet d’arrêt manuel pour le placer à la position
de fermeture.
A. Vers la cuisinière
B. Robinet d’arrêt manuel à la position “fermée”.
C. Canalisation d’alimentation en gaz
2. Débrancher la cuisinière ou déconnecter la source de courant
électrique..
Conversion du détendeur de gaz (du gaz propane
au gaz naturel)
1. Retirer le tiroir de remisage de qualité supérieure, le
tiroirréchaud, ou le tiroir de cuisson. Voir la section “Dépose et
repose du tiroir”, “Tiroir de remisage” ou “Tiroir-réchaud ou
tiroir de remisage de qualité supérieure”.
2. Identifier le détendeur à l’arrière du tiroir de remisage ou du
tiroir-réchaud.
REMARQUE : Pour les modèles avec tiroir-réchaud, on doit
enlever le couvercle d’accès au détendeur.
A. Détendeur
IMPORTANT : Ne pas enlever le détendeur.
3. Ôter le couvercle de plastique du capuchon du détendeur.
4. Avec une clé mixte de 5/8 po (1,6 cm), tourner le chapeau du
détendeur dans le sens antihoraire pour l’enlever.
REMARQUE : Ne pas enlever le ressort situé sous le
capuchon.
A. Capuchon en plastique
B. Capuchon du détendeur; extrémité creuse
ouverte vers l’extérieur
C. Capuchon du détendeur; extrémité borgne vers
l’extérieur
D. Rondelle
E. Capuchon du détendeur
5. Retourner le chapeau du détendeur et le réinstaller sur le
détendeur de façon à ce que l’extrémité borgne soit orientée
vers l’extérieur et que l’indication “↓NG” soit orientée de la
manière indiquée à l’illustration ci-dessus.
6. Réinstaller le couvercle de plastique par-dessus le capuchon
du détendeur.
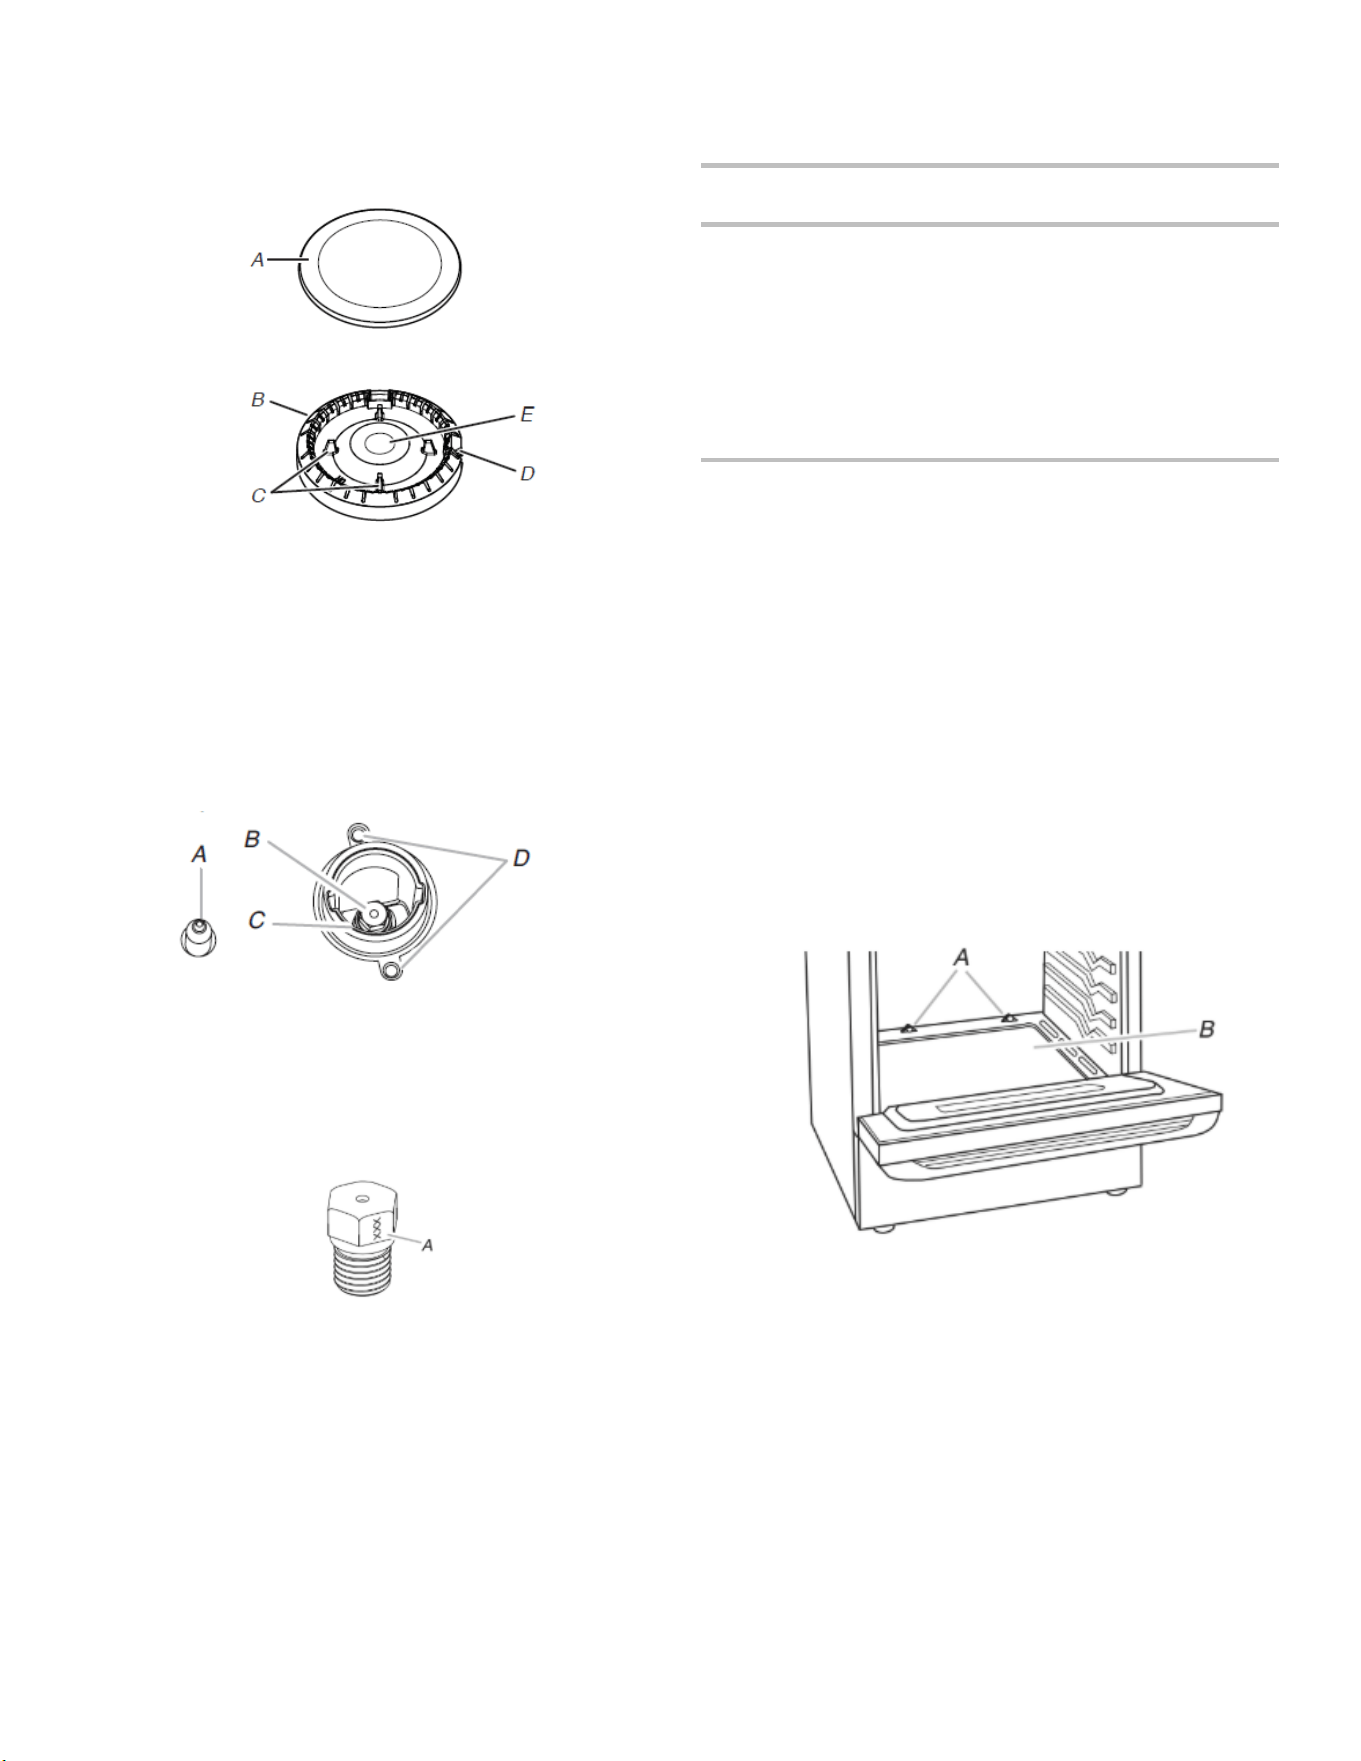
49
Conversion des brûleurs de surface (du gaz
propane au gaz naturel)
1. Ôter le chapeau de brûleur.
2. Enlever la base du brûleur.
A. Chapeau de brûleur
B. Base du brûleur
C. Tiges d’alignement
D. Électrode d’allumage
E. Ouverture du tube d’arrivée de gaz
3. Appliquer du ruban adhésif de masquage à l’extrémité d’un
tourne-écrou de 9/32 po (7 mm) pour retenir le gicleur du
brûleur dans le tourne-écrou durant l’extraction. Placer le
tourne-écrou sur le gicleur; tourner dans le sens antihoraire et
soulever pour enlever le gicleur. Conserver à part le gicleur du
brûleur.
A. Électrode d’allumage
B. Gicleur
C. Support d’injecteur
D. Vis
4. Chaque injecteur est marqué d’un code d’identification gravé
sur le côté. Remplacer l’injecteur à orifice pour gaz propane
par le bon injecteur pour gaz naturel.
A. Chiffre gravé
Le tableau qui suit permet de sélectionner l’injecteur pour gaz
naturel correct pour chaque brûleur.
Tableau de sélection des injecteurs pour gaz naturel
Capacité des
brûleurs
Taille (mm) Identifiant
18,000 BTU 2,00 200AM
17,000 BTU 1,96 196AM
15,000 BTU 1,80 180AM
9,500 BTU 1,40 140AM
8,000 BTU 1,30 130AM
5,000 BTU 1,00 100AM
REMARQUE : Voir la plaque signalétique située sur le cadre du
four, derrière le coin supérieur droit de la porte du four pour
connaître la taille d’injecteur à utiliser pour chaque brûleur (selon
sa position).
5. Placer l’injecteur pour gaz propane dans le sachet à injecteur.
IMPORTANT : Conserver les injecteurs pour gaz propane au
cas où la cuisinière devrait être reconvertie au gaz propane.
6. Réinstaller la base du brûleur à l’aide des deux vis.
7. Réinstaller le chapeau de brûleur.
8. Répéter les étapes 1à 7 pour les autres brûleurs.
Conversion du brûleur de cuisson au four (du gaz
propane au gaz naturel)
1. Retirer les grilles du four.
2. Ôter 2 vis à l’arrière de la partie inférieure du four.
3. Soulever l’arrière de la partie inférieure du four vers le haut et
l’arrière jusqu’à ce que l’avant du panneau se trouve hors du
cadre avant. Le retirer du four et le mettre de côté sur une
surface couverte.
A. Vis
B. Fond du four
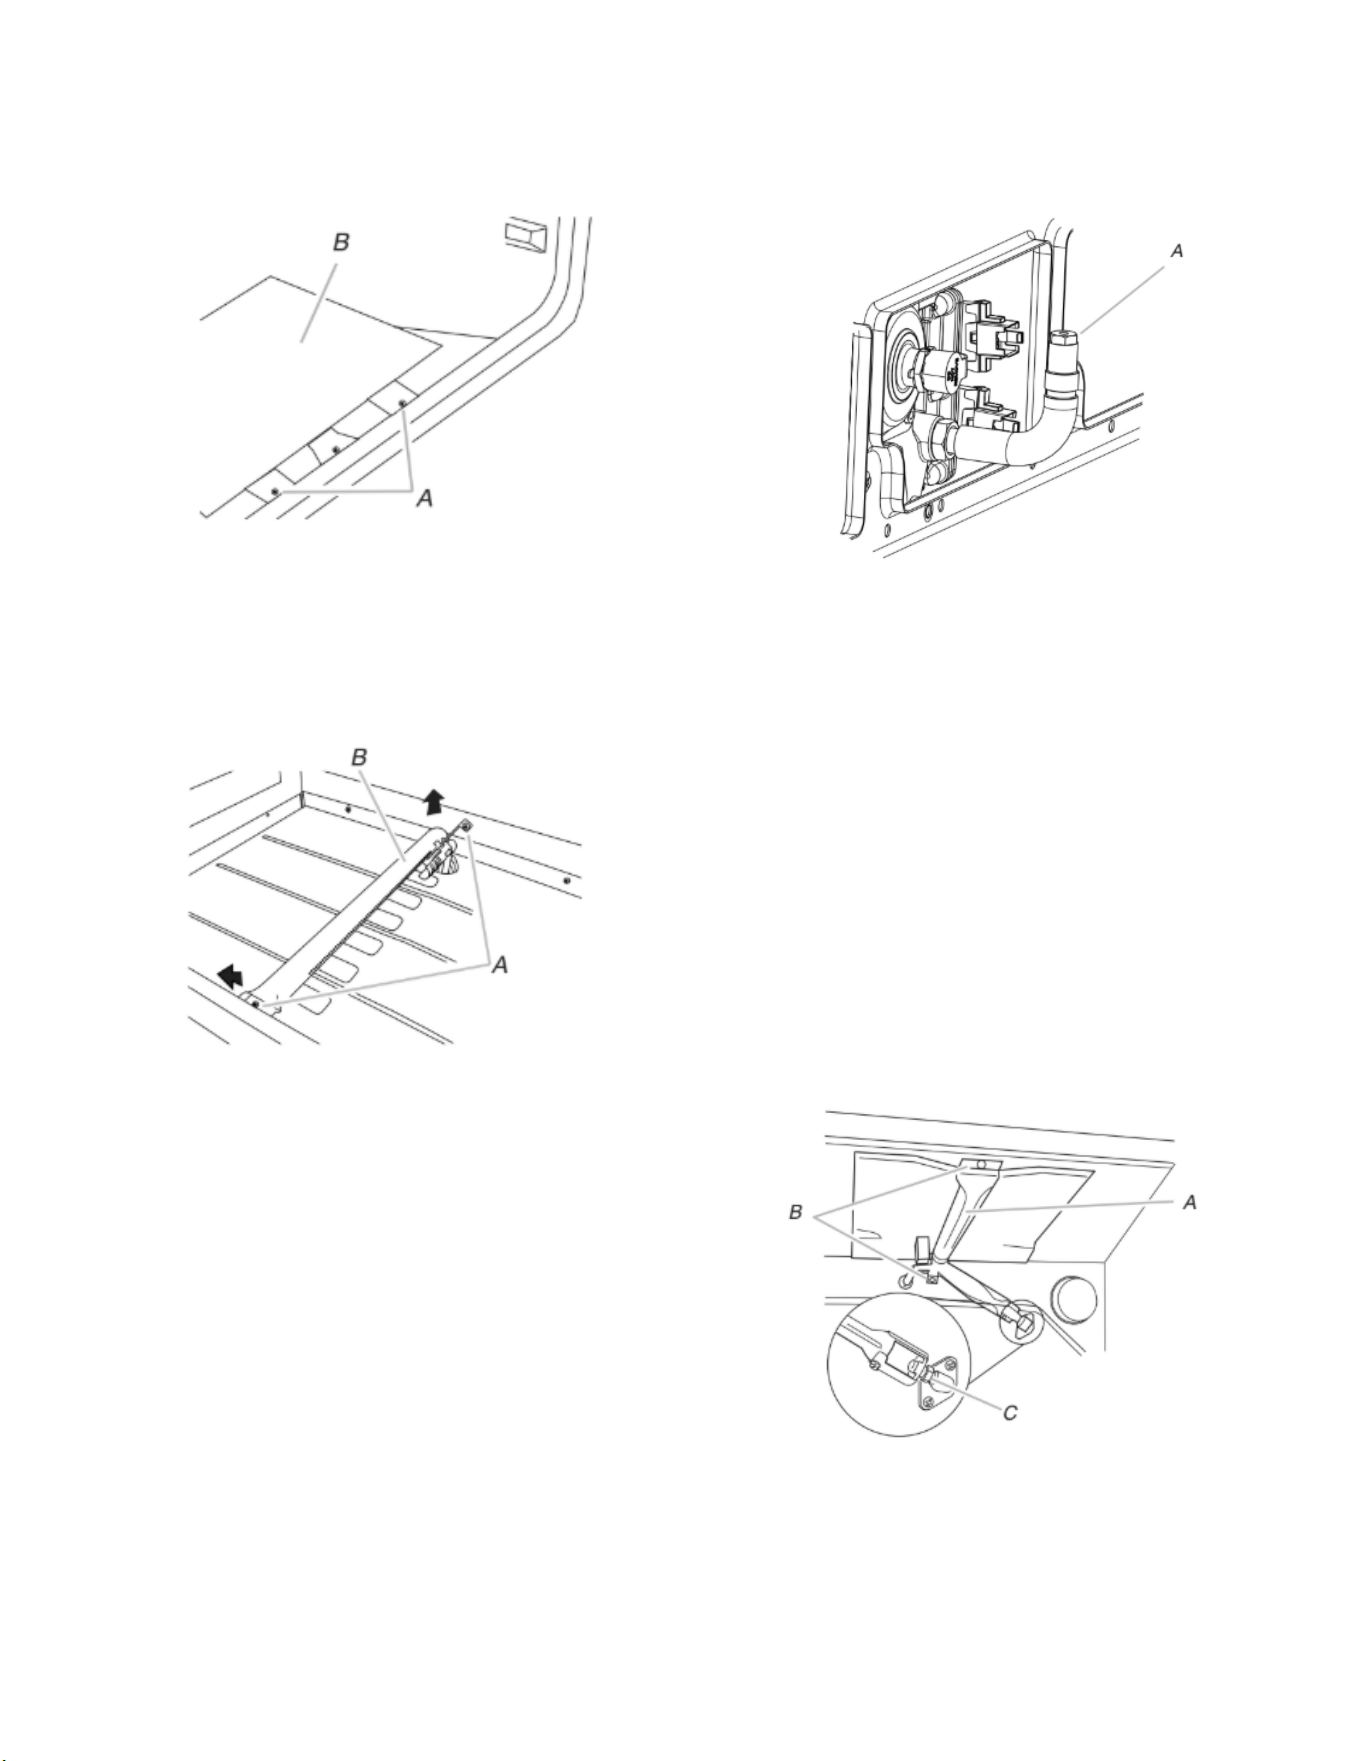
50
4. Ôter 2 vis des volets avant du répartiteur de flammes.
Soulever l’avant du répartiteur de flammes et le tirer vers
l’avant pour retirer les onglets de l’arrière du four. Les mettre
de côté sur une surface couverte.
A. Vis
B. Répartiteur de flammes
5. Ôter 2 vis du brûleur de cuisson au four.
6. Faire glisser l’avant du brûleur de cuisson au four sur le côté
pour retirer l’onglet de l’avant du four. Retirer l’arrière du
brûleur de cuisson au four de l’orifice du four, et mettre le
brûleur de cuisson au four de côté.
A. Vis
B. Brûleur de cuisson au four
7. Utiliser un tourne-écrou de 3/8" (9,5 mm) ou une clé mixte et
tourner l’injecteur à orifice du brûleur de cuisson au four pour
gaz propane dans le sens antihoraire pour l’enlever.
L’injecteur à orifice portera la mention “57”.
8. Remplacer l’injecteur à orifice “57” par un injecteur à orifice
“49”. Installer l’injecteur à orifice pour gaz naturel du brûleur
de cuisson au four en le tournant dans le sens horaire jusqu’à
ce qu’il soit serré.
IMPORTANT : Ne pas serrer excessivement.
A. Injecteur à orifice
9. Positionner l’arrière du brûleur de cuisson au four sur l’orifice
du four et insérer l’onglet situé à l’avant du brûleur de cuisson
au four dans l’avant du four.
10. Réinstaller le brûleur de cuisson au four avec 2 vis.
11. Insérer les onglets à l’arrière du répartiteur de flammes dans
l’arrière du four.
12. Réinstaller les onglets avant du répartiteur de flammes au four
avec 2 vis.
13. Positionner l’avant du panneau inférieur du four vers le
châssis avant et abaisser l’arrière du panneau du fond du four
pour l’insérer dans le four.
14. Réinstaller le panneau du fond du four avec 2 vis.
Conversion du brûleur de gril (du gaz propane au
gaz naturel)
1. Ôter la vis du brûleur de cuisson au gril.
2. Retirer le brûleur de cuisson au gril de l’injecteur femelle du
brûleur de cuisson au gril.
REMARQUE : Le brûleur de cuisson au gril pend à l’arrière du
four pendant que l’on change l’injecteur femelle..
A. Brûleur de cuisson au gril
B. Vis
C. Injecteur femelle
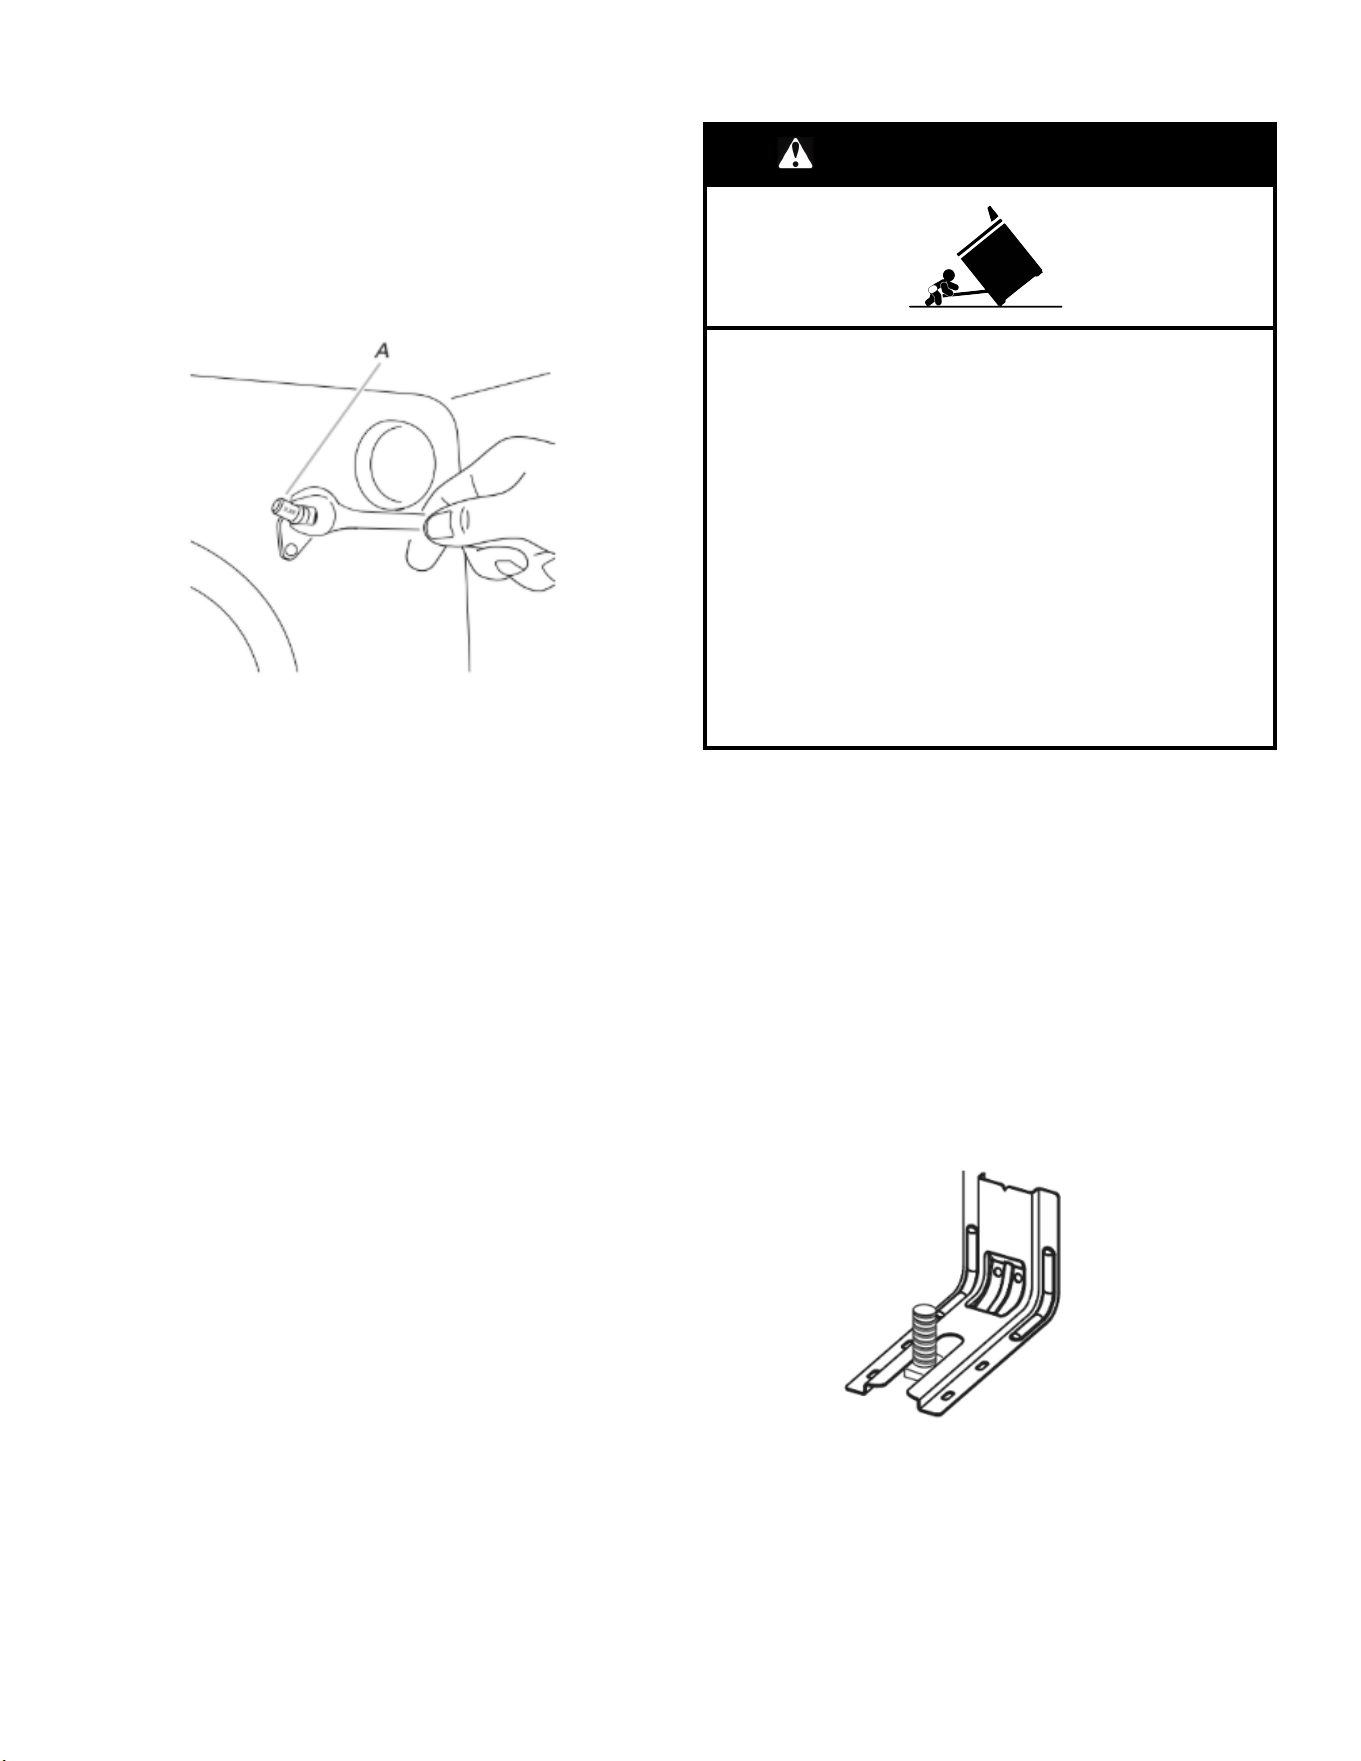
3. Utiliser une clé mixte de 3/8" (9,5 mm) pour tourner l’injecteur
femelle du brûleur de cuisson au gril pour gaz propane dans le
sens antihoraire pour l’enlever. L’injecteur portera la mention
“090”.
4. Remplacer l’injecteur femelle “090” par un injecteur femelle
“53”. Installer l’injecteur femelle du brûleur du gril pour gaz
naturel en le tournant dans le sens horaire jusqu’à ce qu’il soit
serré.
IMPORTANT : Ne pas serrer excessivement.
A. Injecteur femelle
5. Placer le brûleur de cuisson au gril sur l’injecteur femelle du
brûleur de cuisson au gril et insérer l’allumeur en céramique
du brûleur de cuisson au gril dans le trou situé à l’arrière du
four.
6. Positionner le brûleur de cuisson au gril contre la partie
supérieure du four et le fixer avec 2 vis.
7. Réinstaller le tiroir de remisage, le tiroir-réchaud ou le tiroir de
remisage de qualité supérieure. Voir la section “Tiroir de
remisage” ou “Tiroir-réchaud ou tiroir de remisage de qualité
supérieure”.
8. Réinstaller la porte du four. Voir la section “Porte du four”.
9. Réinstaller les grilles du four.
Achever l’installation (du gaz propane au naturel)
1. Pour le raccordement correct de la cuisinière à l’alimentation
en gaz, se reporter à la section “Raccordement au gaz”.
2. Pour l’allumage et l’utilisation corrects du brûleur ainsi que le
réglage des flammes sur le brûleur, voir la section “Système
d’allumage électronique”.
IMPORTANT : Il peut être nécessaire de modifier le réglage
des flammes à la position du débit thermique minimum “LO”
pour chaque brûleur de la table de cuisson.
Il est très important de vérifier l’établissement de flammes
correctes sur la table de cuisson. Le petit cône interne doit
comporter une flamme bleue très distincte de 1/4" à 1/2"
(0,64 à 1,3 cm) de longueur. Le cône externe n’est pas aussi
distinct que le cône interne. Les flammes d’un brûleur
alimenté au propane comportent une pointe légèrement
3. Voir le paragraphe “Achever l’installation” de la section
“Instructions d’installation” du présent manuel pour achever
cette procédure.
REMARQUE : S’assurer de bien conserver les injecteurs à
orifice qui ont été remplacés au cours de la conversion.
Déplacement de la cuisinière
AVERTISSEMENT
Risque de basculement
Un enfant ou une personne adulte peut faire basculer la
cuisinière, ce qui peut causer un décès.
Fixer la bride antibasculement au plancher ou au mur,
conformément aux instructions d'installation.
Faire glisser de nouveau la cuisinière de façon à ce que
le pied arrière de la cuisinière se trouve dans la fente de
la bride antibasculement.
Réengager la bride antibasculement si la cuisinière a été
déplacée.
Ne pas faire fonctionner la cuisinière si la bride
antibasculement n'est pas installée et engagée.
Le non-respect de ces instructions peut causer un
décès ou des brûlures graves aux enfants et aux
adultes.
Lorsqu’on déplace la cuisinière, la faire glisser sur une planche de
carton ou un panneau de fibres dur pour éviter d’endommager le
revêtement du sol.
Si le déplacement de la cuisinière est nécessaire pour le
nettoyage ou l’entretien :
Cuisinières alimentées par cordon d’alimentation :
1. Faire glisser la cuisinière vers l’avant.
2. Fermer le robinet d’arrêt manuel.
3. Débrancher le cordon d’alimentation électrique.
4. Débrancher le conduit d’alimentation en gaz.
5. Effectuer le nettoyage ou l’entretien.
6. Rebrancher le conduit d’alimentation en gaz.
7. Ouvrir le robinet d’arrêt manuel sur la canalisation de gaz.
8. Brancher le cordon d’alimentation électrique.
9. Faire glisser la cuisinière vers l’arrière de sorte que le pied
arrière de la cuisinière soit sous la bride antibasculement.
10. Voir la section “Vérifier que la bride antibasculement est bien
installée et engagée” pour vérifier que la bride est bien
engagée.
11. Vérifier que la cuisinière est d’aplomb.
51

52
REMARQUES

53
REMARQUES

REMARQUES
54

REMARQUES
55

W11450808C
©2022 All rights reserved. Used under license in Canada.
Tous droits réservés. Utilisé sous licence au Canada.
03/22