Both the refrigerator and freezer sections defrost automatically. However, clean both sections about once a month to avoid odor buildup. Wipe up spills immediately.
IMPORTANT:
Because air circulates between all sections, any odors formed in one section will transfer to the other. You must thoroughly clean all sections to eliminate odors. To avoid odor transfer and drying out of food, wrap or cover foods tightly.
Do not use abrasive or harsh cleaners such as window sprays, scouring cleansers, flammable fluids, muriatic acid, cleaning waxes, concentrated detergents, bleaches or cleansers containing petroleum products on doors and cabinet, plastic parts, interior and door liners or gaskets. Do not use paper towels, scouring pads, or other harsh cleaning tools.
For stainless steel models, stainless steel is corrosion resistant and not corrosion-proof. To help avoid corrosion of your stainless steel, keep your surfaces clean by using the following cleaning instructions.
Cleaning the Touch Screen Display on the Dispenser Panel (on some models):
1. Make sure the refrigerator is unplugged or the power is disconnected before wiping the screen to avoid unintentionally changing the settings.
2. Mix a solution of mild detergent in warm water. Dampen a soft, lint-free cloth with the solution and gently wipe the screen. NOTE: Do not spray or wipe liquids directly onto the screen or over-saturate the cloth.
3. Plug in refrigerator or reconnect power.
Cleaning the Interior:
IMPORTANT: Refrigerator shelves with under-shelf, LED lighting are not dishwasher safe.
1. Unplug refrigerator or disconnect power.
2. Hand wash, rinse, and dry removable parts and interior surfaces thoroughly. Use a clean sponge or soft cloth and a mild detergent in warm water.
3. Plug in refrigerator or reconnect power.
Cleaning the Exterior:
IMPORTANT: Damage to smooth finish due to improper use of cleaning products or using non-recommended cleaning products is not covered under the warranty. Sharp or blunt instruments will mar the finish.
1. Unplug refrigerator or disconnect power.
2. Using a clean sponge or soft cloth and a mild detergent in warm water, wash, rinse, and thoroughly dry stainless steel and painted metal exteriors.
To keep your stainless steel refrigerator looking like new and to remove minor scuffs or marks, it is suggested that you use the manufacturer’s approved stainless steel cleaner and polish. This cleaner is for stainless steel parts only. Refer to the Quick Start Guide for ordering information.
NOTE: When cleaning stainless steel, always wipe in the direction of the grain to avoid cross-grain scratching.
Do not allow the stainless steel cleaner and polish to come into contact with any plastic parts such as the trim pieces, dispenser covers, or door gaskets. If unintentional contact does occur, clean plastic part with a sponge and mild detergent in warm water. Dry thoroughly with a soft cloth.
3. Plug in refrigerator or reconnect power.
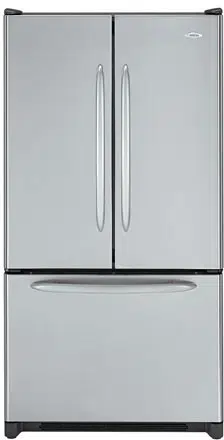
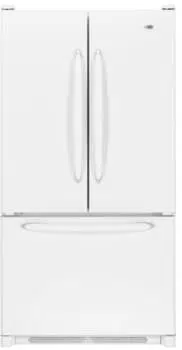
Style 1: Smooth Door/Painted Metal
DO USE
DO NOT USE
Soft, clean cloth
Abrasive cloths
Paper towels or newsprint
Steel-wool pads
Warm, soapy water with a mild detergent
Abrasive powders or liquids
Window sprays
Ammonia
Acidic or vinegar-based cleaners
Oven cleaners
Flammable fluids
NOTE: Paper towels scratch and may dull the clear coat of the painted door. To avoid possible damage, use only soft, clean cloths to polish and wipe the door.
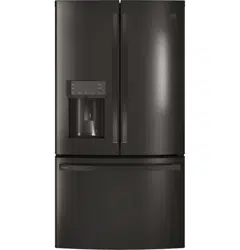
Style 2: Stainless Steel
DO USE
DO NOT USE
Soft, clean cloth
Abrasive cloths
Paper towels or newsprint
Steel-wool pads
Warm, soapy water with a mild detergent
Abrasive powders or liquids
Ammonia
Citrus-based cleaners
Acidic or vinegar-based cleaners
Oven cleaners
For heavy soil, use only a manufacturer’s approved stainless steel cleaner and polish
Abrasive powders or liquids
Ammonia
Citrus-based cleaners
Acidic or vinegar-based cleaners
Oven cleaners
Abrasive cloths
Paper towels or newsprint
Steel-wool pads
NOTES
If unintentional contact does occur, clean plastic part with a sponge and mild detergent in warm water. Dry thoroughly with a soft cloth.
Avoid exposing stainless steel appliances to caustic or corrosive elements such as high-salt, high-moisture, or highhumidity environments. Damage due to exposure to these elements is not covered under the warranty.
Just because a cleaner is a liquid does not mean it is nonabrasive. Many liquid cleansers formulated to be gentle on tile and smooth surfaces still damage stainless steel.
When cleaning stainless steel, always wipe in the direction of the grain to avoid cross-grain scratching.
Citric acid permanently discolors stainless steel. To avoid damaging the finish of your stainless steel refrigerator:
Do not allow these substances to remain on the finish:
Mustard
Tomato juice
Marinara sauce
Citrus-based sauces
Citrus-based products
Condenser Cleaning
There is no need for routine condenser cleaning in normal home operating environments. If the environment is particularly greasy or dusty or there is significant pet traffic in the home, the condenser should be cleaned every 6 months to ensure maximum efficiency.
Unplug refrigerator or disconnect power.
Remove the base grille.
Use a vacuum cleaner with a soft brush to clean the grille, the open areas behind the grille, and the front surface area of the condenser.
Replace the base grille when finished.
Plug in refrigerator or reconnect power.
NOTE: If you are unable to clean the condenser, please call for service.
Changing the LED Module
IMPORTANT: The lights in both the refrigerator and freezer compartments use LED technology that do not need to be replaced. If the lights do not illuminate when the door or drawer is opened, call for assistance or service. Refer to the Quick Start Guide for contact information.
If an LED module(s) do not illuminate when the refrigerator and/or freezer door is opened, call for assistance or service.
Refrigerator Shelves
Important information to know about glass shelves and covers:
Do not clean glass shelves or covers with warm water when they are cold. Shelves and covers may break if exposed to sudden temperature changes or impact, such as bumping. Tempered glass is designed to shatter into many small, pebble-size pieces. This is normal. Glass shelves and covers are heavy. Use both hands when removing them to avoid dropping.
The shelves in your refrigerator are adjustable to match your individual storage needs.
Storing similar food items together in your refrigerator and adjusting the shelves to fit different heights of items will make finding the exact item you want easier. It will also reduce the amount of time the refrigerator door is open, and save energy.
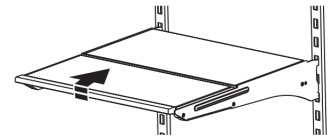
Glass Shelves
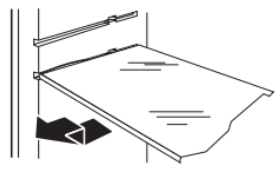
To remove a shelf:
1. Remove items from the shelf.
2. Slide the shelf straight out to the stop.
3. Depending on your model, lift the back or front of the shelf past the stop. Pull the shelf out the rest of the way.
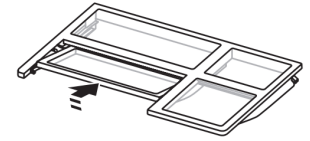
To replace a shelf:
1. Slide the back of the shelf into the track in the wall of the cabinet.
2. Guide the front of the shelf into the shelf track. Be sure to slide the shelf in all the way.
Shelves with Shelf Frames
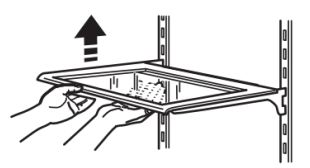
To remove and replace a shelf/shelf frame:
1. Remove the shelf/frame by tilting it up at the front and lifting it out of the shelf supports.
2. Replace the shelf/frame by guiding the rear shelf hooks into the shelf supports. Tilt the front of the shelf up until rear shelf hooks drop into the shelf supports.
3. Lower the front of the shelf and make sure that the shelf is in position.
Shelves with Under-Shelf Lighting (on some models)
By moving LED lighting to a new spot under the shelves, this leading-edge technology improves interior refrigerator lighting and aids in locating storage items.
For models with the shelf frames, the hooks on the rear of the shelf must be fully engaged in the shelf supports to maintain proper electrical flow.
No more than two shelves with under-shelf lighting may be used in the refrigerator at one time.
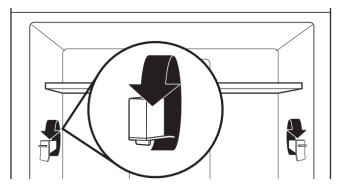
Shelves with Shelf Mounts
Shelf height can be adjusted by changing the adjustable shelf mounts between their vertical and horizontal positions.
Carefully lift the shelf off the shelf mounts and turn the flipper to the desired orientation.
Repeat for remaining shelf mounts.
Apply pressure to the top of the shelf to ensure the shelf is properly seated on the shelf mounts.
To remove and replace shelves:
1. Make sure adjustable shelf mounts are in the lower position before removing shelves. Also doors will need to be open at a 90˚ angle. If open wider, it will make it harder to remove the shelves.
2. Remove the middle shelf or top shelf by lifting it up and out of the shelf supports. Then pull the shelf forward and tilt down to a vertical position. Turn the shelf at an angle and pull out of the refrigerator. Infinity slide glass shelves should be pushed back in. When tilted up, make sure glass does not slide to front. NOTE: Remove middle shelf first before removing top shelf.
3. Remove the bottom shelf by lifting it up and out of the shelf supports. Then pull the shelf forward and tilt up to a vertical position. Turn the shelf at an angle and pull out of the refrigerator.
4. Replace the middle and top shelves by putting the shelf in the refrigerator at an angle with the shelf front down. Lift the front of the shelf up and slide in until rear shelf drops into the shelf supports. Lower the front of the shelf and make sure that the shelf is in position.
5. Replace the bottom shelf by putting the shelf in the refrigerator at an angle with the shelf up. Lift the front of the shelf down and slide in until rear shelf drops into the shelf supports. Lower the front of the shelf and make sure that the shelf is in position.
Tuck/Slide Away Shelf (on some models)
Some shelves will tuck/slide away to create room for taller objects.
To retract and extend the front section of the shelf:
1. To retract the front-section of the shelf, slightly lift up on the front edge and push the adjustable portion of the shelf back toward the rear of the refrigerator.
2. Extend the front of the shelf by pulling the retracted portion of the shelf outward until it is fully extended.
Foldaway Shelf (on some models)
To retract the fold away shelf:
Retract the fold away section of the shelf by holding the front of the shelf with one hand and lifting up on the center front of the shelf. Then push back and down on the shelf until it slides beneath the back section of the shelf.
To replace the fold away shelf:
Replace the fold away section of the shelf by holding the front of the shelf with one hand and pulling the center of the shelf until the fold away section is returned to its full shelf position.
MicroEdge® Glo Shelves (on some models)
The hooks on the rear of the shelf must be fully engaged in the shelf supports to maintain proper electrical flow.
No more than two shelves with under-shelf lighting may be used in the refrigerator at one time.
Opening and Closing Doors
There are two refrigerator compartment doors. The doors can be opened and closed either separately or together. On some models, there is a, automatic closing mechanism so the door(s) will not unintentionally be left open. If a door is open at a 40° or smaller angle, the door will automatically, softly close.
IMPORTANT: If the doors do not automatically close at a 40° or smaller angle, see “Bottom Door Hinge.”
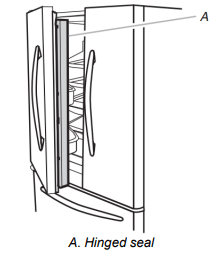
There is a vertically-hinged seal on the left refrigerator door.
When the left-hand door is opened, the hinged seal automatically folds inward so that it is out of the way.
When both doors are closed, the hinged seal automatically forms a seal between the two doors.
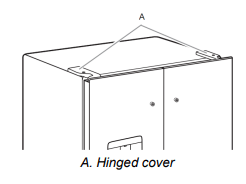
The refrigerator compartment door switch is located in the top left and right hinge cover.
The door switch uses magnet to sense door opening/closing.
Ensure there are no magnet or electronic devices (Speaker, CoolVox®, etc) within 3 inches of the hinge cap.
NOTE: The light and internal user interface (UI) will not turn on if the door opening is not detected.
Vacation and Moving Care
Vacation
If You Choose to Leave the Refrigerator On While You’re Away:
1. Use up any perishables and freeze other items.
2. If your refrigerator has an automatic ice maker, and is connected to the household water supply, turn off the water supply to the refrigerator. Property damage can occur if the water supply is not turned off.
3. If you have an automatic ice maker, turn off the ice maker. NOTE: Depending on your model, raise the wire shutoff arm to Off (up) position or press the switch to Off.
4. Empty the ice bin.
Models with Vacation Mode Feature
Turn on Vacation mode. See the “Quick Start Guide” for details.
NOTE: Activating Vacation mode does not turn off the ice maker.
If You Choose to Turn Off the Refrigerator Before You Leave:
1. Remove all food from the refrigerator.
2. If your refrigerator has an automatic ice maker:
Turn off the water supply to the ice maker at least one day ahead of time.
When the last load of ice drops, raise the wire shutoff arm to the Off (up) position or press the switch to Off, depending on your model.
3. Empty the ice bin.
4. Turn off the Temperature control(s). See the “Quick Start Guide.”
5. Clean refrigerator, wipe it, and dry well.
6. Tape rubber or wood blocks to the tops of both doors to prop them open far enough for air to get in. This stops odor and mold from building up.
Moving
When you are moving your refrigerator to a new home, follow these steps to prepare it for the move.
1. If your refrigerator has an automatic ice maker:
Turn off the water supply to the ice maker at least one day ahead of time.
Disconnect the water line from the back of the refrigerator.
When the last load of ice drops, raise the wire shutoff arm to the Off (up) position or press the switch to Off, depending on your model.
2. Remove all food from the refrigerator and pack all frozen food in dry ice.
3. Empty the ice bin.
4. Turn off the Temperature control(s). See the “Quick Start Guide.”
5. Unplug refrigerator.
6. Clean, wipe, and dry thoroughly.
7. Take out all removable parts, wrap them well, and tape them together so they don’t shift and rattle during the move.
8. Depending on the model, raise the front of the refrigerator so it rolls more easily or raise the leveling screws so they don’t scrape the floor. See “Adjust the Door(s)” or “Door Closing and Door Alignment.”
9. Tape the doors closed and tape the power cord to the back of the refrigerator.
When you get to your new home, put everything back and refer to the “Installation Instructions” section for preparation instructions. Also, if your refrigerator has an automatic ice maker, remember to reconnect the water supply to the refrigerator.
REFRIGERATOR FEATURES
Crisper Humidity Control (on some models)
You can control the amount of humidity in the moisture-sealed crisper. Depending on your model, adjust the control to any setting between Fruit and Vegetables or Low and High.
Fruit/Low (open):
Move control to allow moist air out of the crisper for best storage of fruits and vegetables with skins.
Fruit: Wash, let dry and store in refrigerator in plastic bag or crisper. Do not wash or hull berries until they are ready to use.
Sort and keep berries in original container in crisper, or store in a loosely closed paper bag on a refrigerator shelf.
Vegetables with skins: Place in plastic bags or plastic container and store in crisper.
Vegetables/High (closed):q
Move control to keep moist air in the crisper for best storage of fresh, leafy vegetables.
Leafy vegetables: Wash in cold water, drain and trim or tear off bruised and discolored areas. Place in plastic bag or plastic container and store in crisper.
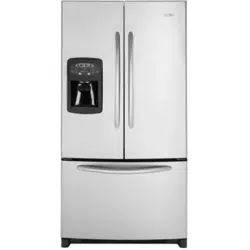
Water and Ice Dispensers (on some models)
For additional information on how to use your water and ice dispensers, see the online “Dispensing Guide.”
IMPORTANT:
After connecting the refrigerator to a water source or replacing the water filter, flush the water system. Use a sturdy container to depress and hold the water dispenser pad for 5 seconds, then release it for 5 seconds. Repeat until water begins to flow. Once water begins to flow, continue depressing and releasing the dispenser pad (5 seconds on, 5 seconds off) until a total of 4 gallon (15 L) has been dispensed. This will flush air from the filter and water dispensing system, and prepare the water filter for use. Additional flushing may be required in some households. As air is cleared from the system, water may spurt out of the dispenser.
Allow 24 hours for the refrigerator to cool down and chill water. Dispense enough water every week to maintain a fresh supply.
Allow 24 hours to produce the first batch of ice. Discard the first three batches of ice produced.
The dispenser will dispense either water or ice.
The dispensing system will not operate when the refrigerator door is open.
On some models, the display screen on the dispenser control panel will turn off automatically and enter “sleep” mode when the control buttons and dispenser levers have not been used for 2 minutes or more. While in “sleep” mode, the first press of a control button will only reactivate the display screen without changing any settings. After reactivation, changes to any settings can then be made. If no changes are made within 2 minutes, the display will re-enter “sleep” mode.
Flush the Water System
Air in the water dispensing system can cause the water dispenser to drip. After connecting the refrigerator to a water source or replacing the water filter, flush the water system.
Flushing the water dispensing system forces air from the water line and filter and prepares the water filter for use. Additional flushing may be required in some households.
NOTE: As air is cleared from the system, water may spurt out of the dispenser.
Using a sturdy container, depress and hold the water dispenser paddle for 5 seconds.
Release the dispenser paddle for 5 seconds. Repeat steps 1 and 2 until water begins to flow.
Once water begins to flow, continue depressing and releasing the dispenser pad (5 seconds on, 5 seconds off) until a total of 3 gallon (12 L) has been dispensed.
The Water Dispenser
IMPORTANT:
Dispense at least 1 qt. (1 L) of water every week to maintain a fresh supply.
If the flow of water from the dispenser decreases, it could be caused by low water pressure.
With the water filter removed, dispense 1 cup (237 mL) of water. If 1 cup of water is dispensed in 8 seconds or less, the water pressure to the refrigerator meets the minimum requirement.
If it takes longer than 8 seconds to dispense 1 cup (237 mL) of water, the water pressure to the refrigerator is lower than recommended. See “Water Supply Requirements” and online “Troubleshooting” for more information.
Cleaning the Ice Dispenser Chute
Humidity causes ice to naturally clump together. Ice particles can build up until the ice dispenser chute becomes blocked.
If ice is not dispensed regularly, it may be necessary to empty the ice storage bin and clean the ice delivery chute, the ice storage bin and the area beneath the storage bin every 2 weeks.
If necessary, remove the ice clogging the storage bin and delivery chute, using a plastic utensil.
Clean the ice delivery chute and the bottom of the ice storage bin using a warm, damp cloth and dry thoroughly.
Ice Maker and Storage Bin
IMPORTANT:
To avoid low ice production and poor quality ice, flush the water system before turning on the ice maker. See “Water and Ice Dispenser” for details.
Following installation, allow 24 hours to produce the first batch of ice. Allow 2 to 3 days to fill the ice storage bin.
For models with a water filter, after connecting the refrigerator to a water source or replacing the water filter, fill and discard three full containers of ice to prepare the water filter for use.
The quality of your ice will be only as good as the quality of the water supplied to your ice maker. Avoid connecting the ice maker to a softened water supply. Water softener chemicals (such as salt) can damage parts of the ice maker and lead to poor quality ice. If a softened water supply cannot be avoided, make sure the water softener is operating properly and is well maintained.
If the ice in the storage bin clumps together, break up ice using a plastic utensil and discard ice. Do not use anything sharp to break up the ice. This can cause damage to the ice bin and the dispenser mechanism.
Do not store anything on top of the ice maker or in the ice storage bin.
Ice Production Rate
Allow 24 hours to produce the first batch of ice. Discard the first three batches of ice produced.
Allow 3 days to completely fill the ice storage bin. The ice maker should produce approximately 3 lbs (1.4 kg) (8 to 12 batches) of ice in a 24-hour period.
To increase ice production, lower the freezer and refrigerator temperature, or see “Control Panel Descriptions” in the Quick Start Guide for details. Wait 24 hours between adjustments.
Ice Maker in the Freezer
Turn the Ice Maker On/Off:
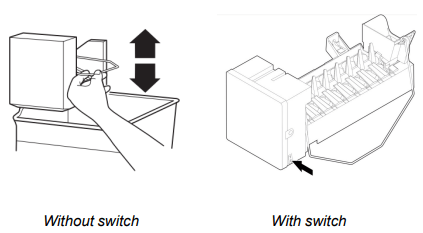
Turn the Ice Maker On/Off for Icemaker without a switch:
To turn on the ice maker, simply lower the wire shutoff arm.
To manually turn the ice maker off, lift the wire shutoff arm to the off (arm up) position and listen for the click.
Your ice maker has an automatic shutoff. As ice is made, the ice cubes will fill the ice storage bin and the ice cubes will raise the wire shutoff arm to the off (arm up) position. Do not force the wire shutoff arm up or down.
For icemakers with a switch:
For icemakers with a switch, use the switch to turn ON or Off the icemaker.
NOTE: Turn off the ice maker before removing the ice storage bin to serve ice or to clean the bin. This will keep the ice cubes from dropping out of the ice maker and into the freezer compartment. After replacing the ice storage bin, turn on the ice maker.
Wash the ice storage bin with mild soap and warm water.
Slide the ice storage bin under the ice maker and push it toward the back as far as it will go.
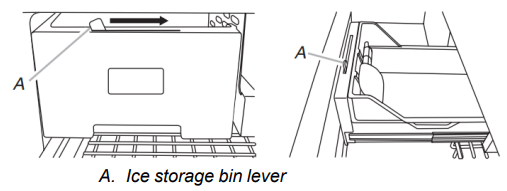
Auto Ice Storage Bin (on some models):
Your ice storage bin has a lever which allows the storage bin to slide out with the drawer when it is pulled open or to stay in place.
Move the lever to the right to attach the ice storage bin to the freezer drawer.
Move the lever to the left to release the ice storage bin from the freezer drawer.
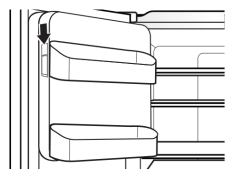
Ice Maker in the Refrigerator (on some models)
Style 1—Left-Hand Refrigerator Door
The ice maker is located on the left-hand side of the refrigerator door. Ice cubes are ejected into the ice storage bin, located on the left-hand refrigerator door.
Turn the Ice Maker On/Off:
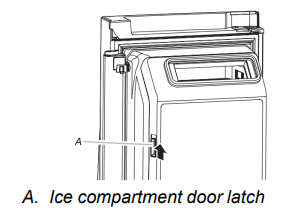
1. Push up on the latch on the left-hand side of the ice compartment to open the door.
2. Turn on the ice maker by moving the switch to the (left) on position.
To manually turn off the ice maker, move the control to the off (right) position.
Your ice maker has an automatic shutoff. The sensor will automatically stop ice production if the storage bin is full, if the door is open or the storage bin is removed. The control will remain in the on (left) position.
3. Close the ice compartment door.
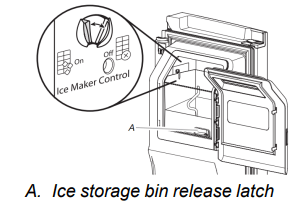
Remove and Replace the Ice Storage Bin:
Remove the ice storage bin by inserting your fingers into the hole at the base of the bin and squeezing the latch to release the bin from the compartment. Lift the storage bin up and pull it straight out.
Replace the storage bin inside the ice compartment and push down to make sure it is firmly in place.
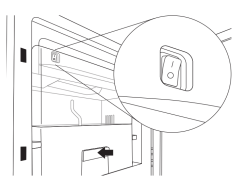
Style 2—Upper Left-Hand Side of the Refrigerator Compartment
The ice maker and storage bin are located in the upper left-hand side of the refrigerator compartment.
Some models have an on/off switch located on the ice maker. To turn on the ice maker, press the switch to the On position. To manually turn off the ice maker, press the switch to the Off position.
To manually turn off the ice maker, see the Quick Start Guide for more information.
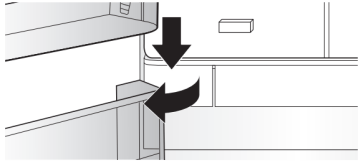
Remove and Replace the Ice Storage Bin:
1. Hold the base of the storage bin and press the release button on the lower right.
2. Pull out the storage bin until resistance is felt. Lift up the front of the ice bin and remove.
3. Press the switch to Off (on some models).
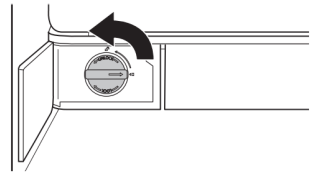
IMPORTANT: To remove the ice storage bin, it may be necessary to turn the auger driver, behind the ice bin, counterclockwise to properly align the ice bin with the auger driver. The ice storage bin must be locked in place for proper ice dispensing.
Press the switch to On (on some models).
Slide the ice bin into the guide rails located on either side of the enclosure.
Push the ice bin in until resistance is felt. Raise the front slightly and push the ice bin in until an audible “click” is heard.
Style 3—Left-Hand Door Behind the Refrigerator Bins
The ice maker is located on the left door behind the bins. Ice cubes are ejected into the ice storage bin located on the left-hand refrigerator door.
Turn the Ice Maker On/Off:
1. Push up on the latch on the left-hand side of the ice compartment to open the door.
2. Turn on the ice maker by moving the switch to the On (I) position.
3. Close the ice compartment door.
Remove and Replace the Ice Storage Bin:
Remove the ice storage bin by inserting your fingers into the hole at the base of the bin and squeezing the latch to release the bin from the compartment. Lift the storage bin up and pull it straight out.
Replace the storage bin inside the ice compartment and push down to make sure it is firmly in place.
Water Filtration System
Do not use with water that is microbiologically unsafe or of unknown quality without adequate disinfection before or after the system. Systems certified for cyst reduction may be used on disinfected waters that may contain filterable cysts.
IMPORTANT: The disposable water filter should be replaced at least every 6 months. If the water flow to the water dispenser or ice maker decreases noticeably before 6 months have passed, replace the water filter more often.
Install the Water Filter
To order a replacement filter, contact us at www.whirlpool.com/ Parts & Accessories. See the “Quick Start Guide” for details.
NOTE: If the filter is not installed correctly, water may dispense at a lower flow rate and there will be slower ice production. Improper filter installation may also cause the water filter housing to leak.
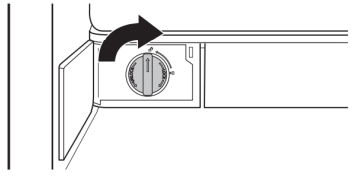
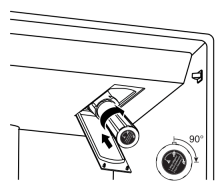
Style 1 — Bottom Left of Refrigerator Compartment
1. Push the water filter door to open, located bottom left of refrigerator compartment.
2. Twist the water filter and turn 90° counterclockwise to unlock.
3. Pull the filter out of the housing.
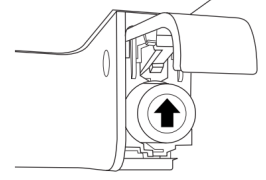
4. Remove the water filter cap from the water filter.
5. Install the water filter cap onto the new filter. Be sure to align the arrows so the grooves in the filter align with ribs in the filter cap.
6. Insert the filter into the housing.
7. Twist the water filter and turn 90° clockwise until it locks into place and the arrows are aligned.
8. Push the water filter door closed.
Style 2— Right-Hand Side of Refrigerator Ceiling
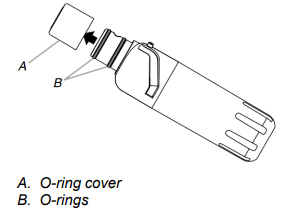
1. Locate the accessory packet in the refrigerator and remove the water filter.
2. Take the water filter out of its packaging and remove the cover from the O-rings. Be sure the O-rings are still in place after the cover is removed.
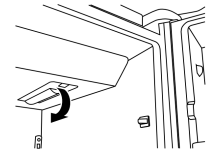
3. The water filter compartment is located in the right-hand side of the refrigerator ceiling. Push up on the compartment door to release the catch, then lower the door.
4. Align the arrow on the water filter label with the cutout notch in the filter housing and insert the filter into the housing.
5. Turn the filter clockwise 90 degrees (1/4 turn), until it locks into the housing.
NOTE: If the filter is not correctly locked into the housing, the water dispenser will not operate. Water will not flow from the dispenser.
6. While the compartment door is still open, lift the filter up into the compartment. Then, close the filter compartment door completely.
7. Flush the water system. See “Water and Ice Dispensers” for details.
IMPORTANT: If you do not flush the water system, you may experience dripping and/or decreased flow from the water dispenser.
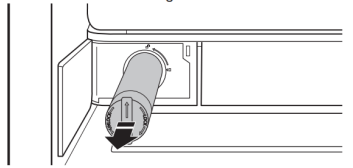
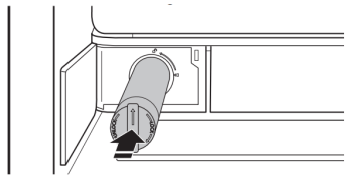
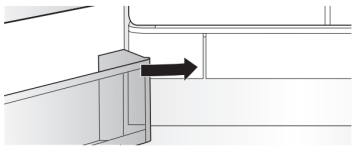
Style 3— Top-right Corner of Refrigerator Ceiling
Locate the water filter in the top-right corner of the refrigerator compartment.
Lift open the filter cover door. The filter will be released and then eject as the door is opened.
When the door is completely open, pull the filter straight out. NOTE: There may be some water in the filter. Some spilling may occur. Use a towel to wipe up any spills.
Take the new filter out of its packaging and remove the covers from the O-rings. Be sure the O-rings are still in place after the covers are removed.
With the arrow pointing up, align the new filter with the filter housing and slide it into place. The filter cover door will automatically begin to close as the new filter is inserted.
Close the filter cover door completely in order to snap the filter into place. You may need to press hard.
Flush the water system. See “Water and Ice Dispensers” for details.
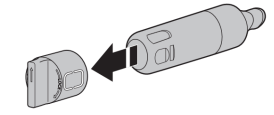
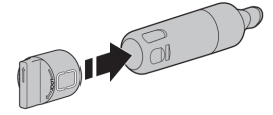
Replacing the Water Filter
To purchase a replacement water filter, use model number EDR4RXD1, UKF8001AXX-200 or UKF8001AXX-750, contact your dealer, or call 1-800-422-9991 in the U.S.A. or 1-800-807-6777 in Canada.
IMPORTANT: Air trapped in the water system may cause water and filter to eject. Always dispense water for at least 2 minutes before removing the filter or blue bypass cap.
If applicable, press upward on the water filter cover to access the filter.
Turn filter counterclockwise, and pull straight out to remove. NOTE: There may be some water in the filter. Some spilling may occur. Use a towel to wipe up any spills.
Remove sealing label from replacement filter and insert the filter end into the filter head.
Turn the filter clockwise until it stops. Snap the filter cover closed.
Flush the water system. See “Water and Ice Dispensers” for details.
NOTE: The dispenser feature may be used without a water filter installed. Your water will not be filtered. If this option is chosen, replace the filter with the blue bypass cap.
Reset Water Filter Status
After replacing the water filter, press and hold Reset Filter or Filter Reset (depending on your model) for 3 seconds. The Order and Replace indicator lights will blink and then go off when the system is reset. On some models the indicator light will change to blue when the system is reset. See the “Quick Start Guide” for more information.
On models with Options and Measured Fill buttons located on the control panel:
After changing the water filter, reset the status light. Press the Options button to enter Options mode, then press Lock to initiate the reset, then press Measured Fill to confirm that you want to reset the status light. When the system is reset, the “Order” and “Replace” icons will disappear from the display screen.
On models with Water Filter button located on the control panel:
After changing the water filter, reset the status. Press and hold the Water Filter button for 3 seconds. When the system is reset, the water filter icon will return to Blue and the words “Replace Filter” will disappear from the display
OPERATING INSTRUCTIONS
IMPORTANT: Before operating this appliance, make sure it has been properly installed according to the appliance’s Owner’s Manual.
The control center is located on the front of the ice and water dispenser.
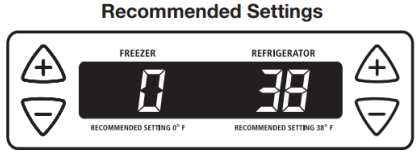
TEMPERATURE CONTROLS
For your convenience, your temperature controls are preset at the factory. When you first install your refrigerator, make sure the controls are still set to the recommended set points as shown.
IMPORTANT:
The recommended settings should be correct for normal household refrigerator use. The controls are set correctly when milk or juice is as cold as you like and when ice cream is firm.
When the power is on, the temperature display shows the set point temperature of the compartment.
Wait 24 hours for your refrigerator to cool completely before adding food. If you add food before the refrigerator has cooled completely, your food may spoil.
NOTE: Adjusting the refrigerator and freezer controls to a colder than recommended setting will not cool the compartments any faster.
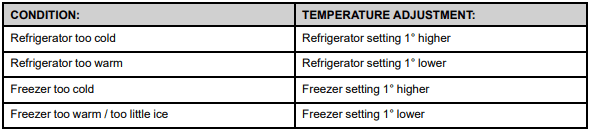
If the temperature is too warm or too cold in the refrigerator or freezer, first check the air vents to be sure they are not blocked before adjusting the controls.
Adjust Set Points
The first touch of the (+) or (-) touch pad displays the current temperature set point.
Press the (+) or (-) touch pads until the desired temperature set point is displayed.
NOTE: Except when first turning on the refrigerator, do not adjust either temperature control more than one setting at a time. Wait 24 hours between adjustments for the temperature to stabilize.
Adjusting the Controls
The refrigerator control adjusts the refrigerator compartment temperature. The freezer control adjusts the freezer compartment temperature.
If you need to adjust the temperature in either the refrigerator or freezer compartment, use the settings listed in the chart below as a guide.
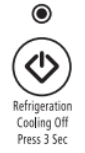
COOLING ON/OFF
Cooling On/Off turns off cooling for both compartments. It does not disconnect power to the refrigerator.
Press and hold Cooling On/Off for 3 seconds. The LED will light up to indicate that cooling is Off. Press the button again to turn on the cooling. The LED will turn off.
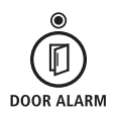
DOOR ALARM
The Door Alarm feature sounds a chime every few seconds when the refrigerator door has been left open for 5 continuous minutes. The chime will sound until the door is closed or Door Alarm is turned off.
Press the Door Alarm touch pad to turn this feature on or off. The indicator light will be lit when the Door Alarm feature is on.
FAST COOL
The Fast Cool feature assists during times of high refrigerator use, full grocery loads or temporarily warm room temperatures.
Press the Fast Cool touch pad to set the freezer and refrigerator to the lowest temperature settings. Press the Fast Cool touch pad again to return to the normal refrigerator set point.
NOTE: The Fast Cool feature will automatically shut off in approximately 2 hours. When Fast Cool is on, the temperature cannot be adjusted.
HUMIDITY CONTROL
The Humidity Control feature turns on a heater to help reduce moisture on the door hinge seal.
Use in humid environments or when you notice moisture on the door hinge seal. The refrigerator uses more energy when Humidity Control is on.
Press Humidity Control to turn on the door heater. Press Humidity Control again to turn off the heater. The LED will be illuminated when Humidity Control is on.
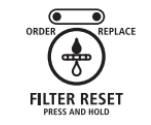
FILTER RESET
The filter reset control allows you to restart the water filter status tracking feature each time you replace the water filter. See “Water Filtration System” in the Owner’s Manual.
After replacing the water filter, press and hold Filter Reset for 3 seconds, until the Order or Replace light turns off.
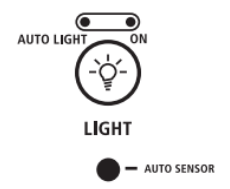
DISPENSER LIGHT
NOTE:
The dispenser lights are LEDs that cannot be changed. If it appears that your dispenser lights are not working, see online “Troubleshooting” for more information.
When you use the dispenser, the lever will automatically turn the light on. If you want the light to be on continuously, you may choose either On or Auto.
Auto: The dispenser light will illuminate at half-power when the light sensor detects the light levels in the room are low. To turn the dispenser light on, press the Light button. The Auto indicator light will illuminate.
On: For continuous light, press the Light button a second time. The On indicator light will illuminate.
Off: To turn the dispenser light off, press the Light button a third time.
DISPENSER LOCK
The dispenser can be turned off for easy cleaning or to avoid unintentional dispensing by small children and pets.
NOTE: The dispenser lock does not shut off power to the product, to the ice maker, or to the dispenser light. It just deactivates all keypad functions.
To Lock and Unlock Dispenser:
Press and hold the Lock/Unlock touch pad for 3 seconds to lock the dispenser. The indicator light will illuminate when Lock is on.
Press and hold the Lock/Unlock touch pad again for 3 seconds to unlock dispenser. The indicator light will turn off.
USER PREFERENCES
The control center allows you to set user preferences, if desired.
Temperature Display (F_C)
This preference allows you to change the temperature display.
F - Temperature in degrees Fahrenheit
C - Temperature in degrees Celsius
Auto Light Level Selection (LL)
This preference allows you to adjust the dispenser light level from dimmest to brightest (settings 1 through 9).
NOTE: The Auto Light feature on the control center must be selected to activate this preference.
Alarm (AL)
This preference allows you to turn off the sound of all alarms.
On – You will hear the alarm sound.
Off – You will not hear the alarm sound.
Sabbath Mode (SAB)
On - All control center lights, interior lights and alarm tones will be disabled.
Off - All control center lights, interior lights and alarm tones will be enabled.
NOTE: Press and hold the Door Alarm touch pad for 3 seconds to restore all lights.
To Access the User Preferences Menu:
Press and hold the Door Alarm touch pad for 3 seconds. The preference name will appear in the freezer display and the preference status (F or C) or (On or Off) will appear in the refrigerator display.
Use the freezer (+) or (-) touch pads to scroll through the preference names. When the desired preference name is displayed, press the refrigerator (+) or (-) touch pads to change the preference status.
Set your preferences by pressing and holding the Door Alarm touch pad for 3 seconds, or by closing the refrigerator compartment door.
TO DISPENSE ICE AND WATER
Select water or cubed ice by pressing the corresponding button on the dispenser control panel. A light above the button indicates your selection.
Press a sturdy container against the dispenser lever. IMPORTANT: You do not need to apply a lot of pressure to the lever in order to activate the dispenser. Pressing hard will not make the water or ice dispense faster or in greater quantities.