IMPORTANT: Before installing your dishwasher, please use this instruction sheet as a supplement to the Installation Instructions.
Custom Panel Models Only
Gather these additional tools and parts before starting attach-
ment of the custom panel. Read and follow the instructions
provided in this instruction sheet.
Additional Tools Needed:
Power Drill
Phillips-head screwdriver or magnetic bit
Parts Supplied with Custom Panel Models:
1 ST3.5X45 X4
NOTE: The screws supplied are used for only a 0.59" (1.5 cm)
thick wooden panel. If the wooden panel is less than
0.59" (1.5 cm) thick, customer must purchase screws locally.
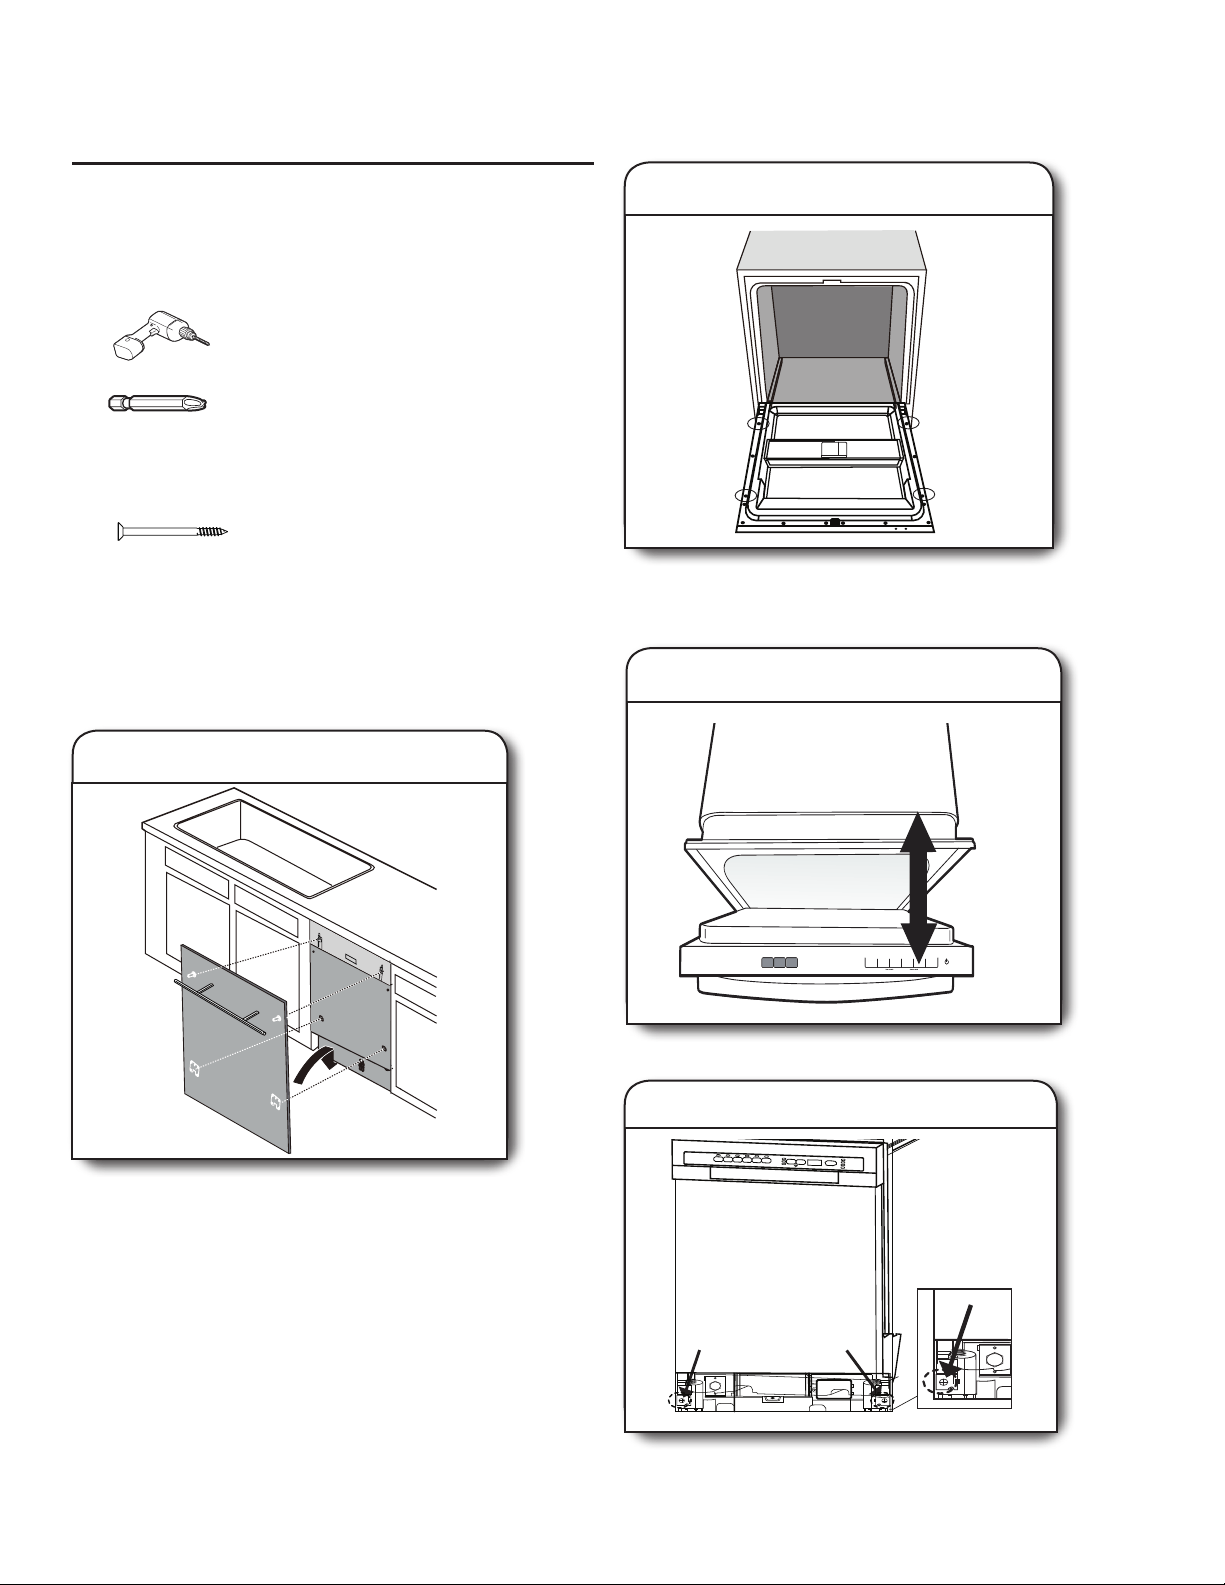
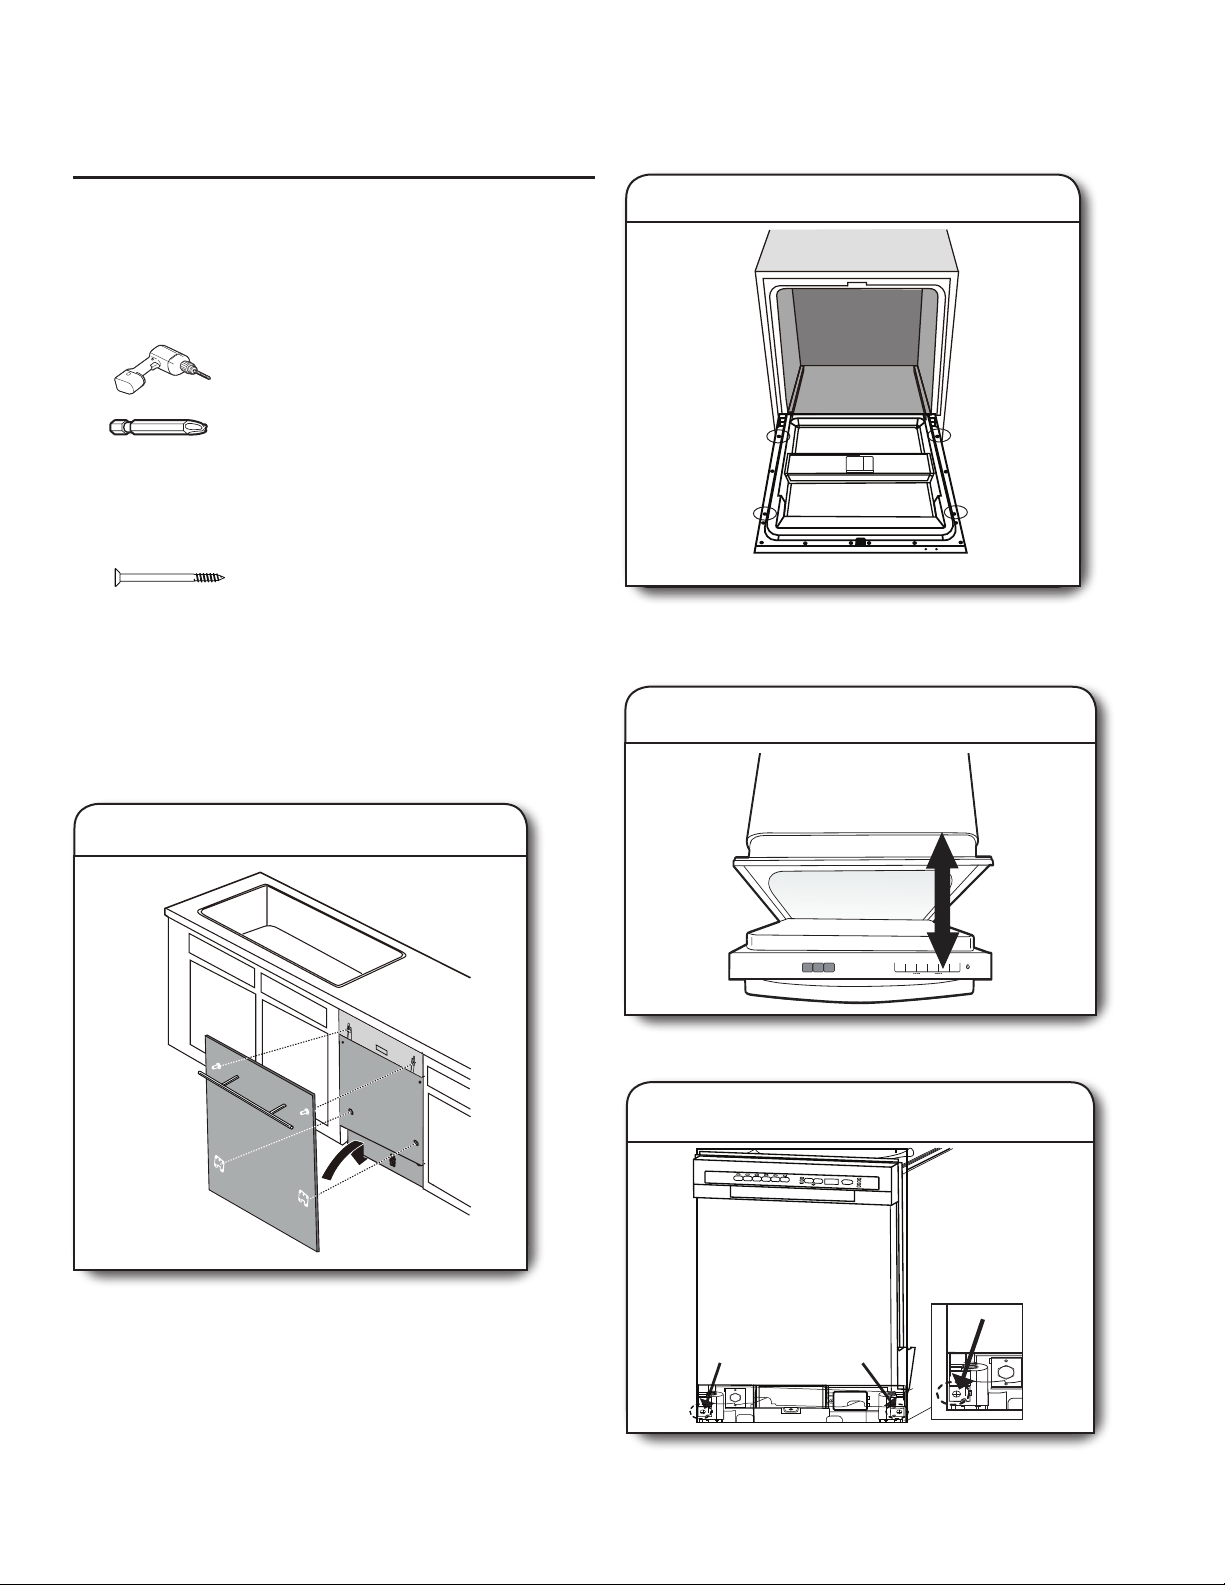
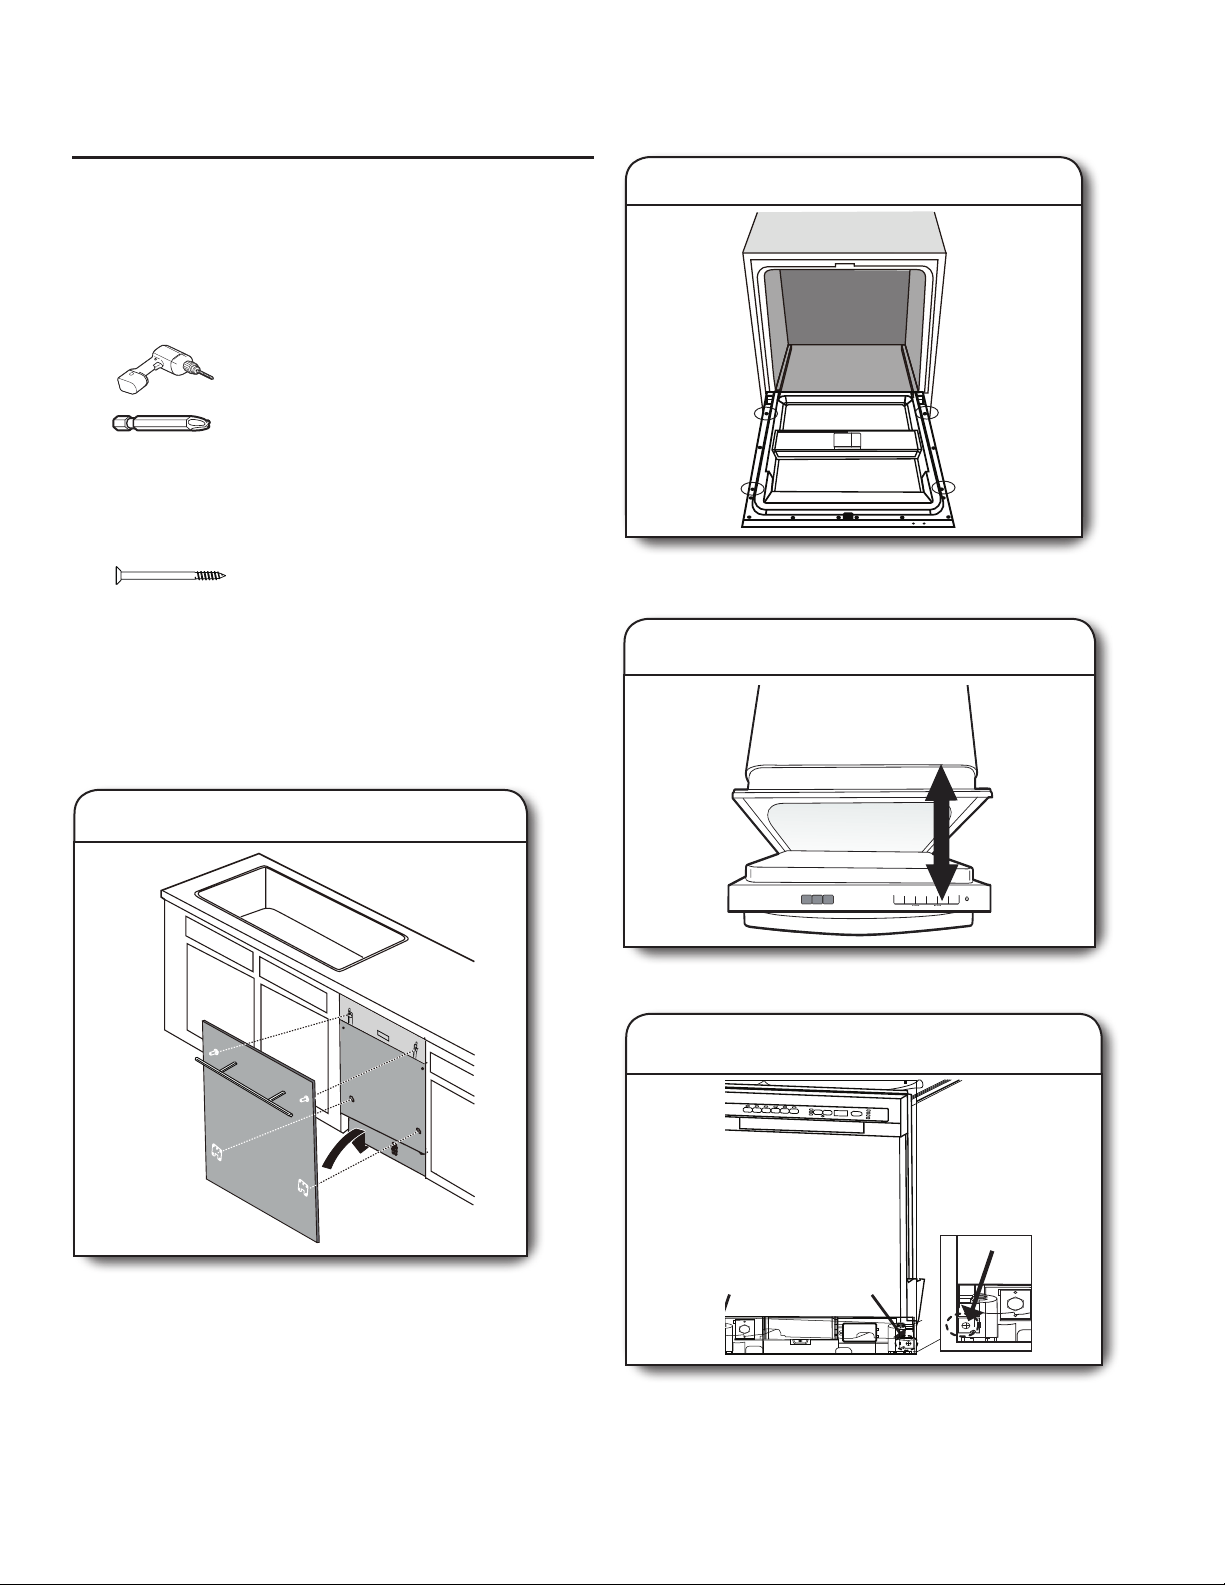
Slide panel onto door
Align the studs on the custom panel to the keyhole slots on the
door assembly. Ensure that the studs and brackets are engaged
in the keyhole slots. Slide panel down until the top surface of the
panel is ush with the top of the door.
Secure the door panel
Secure the door panel by inserting the four anchor screws
provided into the inner door frame holes. See screw hole
locations in the above illustration.
1.
2.
Check the spring tension
Open and close the door to check the spring tension of the door.
Adjust spring tension (if needed)
If needed, adjust the spring tension by using a Phillips-head
screwdriver. Turn screws clockwise to increase tension or
counterclockwise to decrease door tension.
Door spring adjustment
screws
3.
4.
W11246222A
INSTALLATION INSTRUCTIONS
FOR CUSTOM 18" AND 24" WOOD DOOR PANEL
2
IMPORTANTE: Antes de instalar la lavavajillas, use esta Hoja de instrucciones como complemento de las Instrucciones
de instalación.
Solo para modelos con panel a
la medida
Reúna estas herramientas y piezas adicionales antes de comen-
zar a instalar el panel a la medida. Lea y siga las instrucciones
provistas en esta hoja de instrucciones.
Herramientas adicionales necesarias:
Taladro eléctrico
Destornillador Phillips o broca magnética
Piezas suministradas con los modelos con panel
a la medida:
1 ST3.5X45 X4
NOTA: Los tornillos provistos se utilizan únicamente para un
panel de madera de 0,59" (1,5 cm) de espesor. Si el panel de
madera tiene menos de 0,59" (1,5 cm) de espesor, el cliente debe
comprar los tornillos en su localidad.
Alinee los taquetes en el panel a la medida con las ranuras
en forma de bocallave ubicadas en el conjunto de la puerta.
Asegúrese de que los taquetes y soportes estén enganchados en
las ranuras en forma de bocallave. Deslice el panel hacia abajo
hasta que la supercie superior del panel de madera esté al ras
con la parte superior de la puerta.
Para asegurar el panel de la puerta, inserte los cuatro tornillos de
anclaje que se suministran en los oricios del interior del marco
de la puerta. Vea la ubicación de los oricios de los tornillos en
la ilustración anterior.
1.
Deslice el panel sobre la puerta
2.
Asegure el panel de la puerta
3.
Verique la tensión de los resortes
Tornillos para regular los
resortes de la puerta
4.
Abra y cierre la puerta para vericar la tensión de los resortes de
la puerta.
Regule la tensión de los resortes
(si es necesario)
Si es necesario, ajuste la tensión de los resortes con un
destornillador Phillips. Gire los tornillos en sentido horario para
aumentar la tensión o en el sentido contrario para disminuirla.
INSTRUCCIONES DE INSTALACIÓN PARA
PANEL DE PUERTA DE MADERA DE 18" Y 24"
IMPORTANT : Avant d’installer le lave-vaisselle, utiliser cette che d’instruction en complément des instructions d’installation.
Modèles à panneau personnalisé
uniquement
Rassembler ces outils et pièces supplémentaires avant
d’entreprendre l’installation du panneau personnalisé. Lire et
observer les instructions d’installation fournies dans cette che
d’instruction.
Outillage supplémentaire nécessaire :
Perceuse électrique
Tournevis ou embout de tournevis
magnétique à tête cruciforme
Pièces fournies avec les modèles à panneau
personnalisé :
1 ST3.5X45 X4
REMARQUE : Les vis fournies conviennent à un panneau en bois
d’une épaisseur de 0,59" (1,5 cm) uniquement. Si l’épaisseur du
panneau de bois est inférieure à 0,59" (1,5 cm), l’utilisateur doit
acheter les vis dans un magasin local.
Aligner les goujons du panneau personnalisé avec les encoches
en trou de serrure de la porte. Vérier que les goujons et les
supports sont bien engagés dans les encoches en trou de
serrure. Glisser le panneau vers le bas jusqu’à ce que sa surface
soit en afeurement avec le sommet de la porte.
Fixer le panneau de porte en insérant les quatre vis de xation
fournies dans les trous du cadre de la porte interne. Voir les trous
d’emplacement de vis sur l’illustration ci-dessus.
1.
Glisser le panneau sur la porte
2.
Fixer le panneau de porte
3.
Verique la tensión de los resortes
Ouvrir et fermer la porte pour vérier la tension du ressort de la
porte.
Vis de réglage des
ressorts de porte
4.
Regule la tensión de los resortes
(si es necesario)
Si nécessaire, régler la tension du ressort à l’aide d’un tournevis à
tête cruciforme. Tourner les vis dans le sens horaire pour
augmenter la tension ou dans le sens antihoraire pour diminuer la
tension de la porte.
©2018 All rights reserved.
Todos los derechos reservados.
Tous droits réservés.
04/18
W11246222A
INSTRUCTIONS D’INSTALLATION POUR PANNEAU
DE PORTE PERSONNALISÉ EN BOIS 18" ET 24"