Owner's Guide Refrigeration
REFRIGERATOR FEATURES
Your model may have some or all of these features.
Important information to know about glass shelves and covers: Do not clean glass shelves or covers with warm water when they are cold. Shelves and covers may break if exposed to sudden temperature changes or impact, such as bumping. Tempered glass is designed to shatter into many small, pebble-size pieces. This is normal. Glass shelves and covers are heavy. Use both hands when removing them to avoid dropping.
Refrigerator Shelves
The shelves in your refrigerator are adjustable to match your individual storage needs.
Storing similar food items together in your refrigerator and adjusting the shelves to fit different heights of items will make finding the exact item you want easier. It will also reduce the amount of time the refrigerator door is open, and save energy.
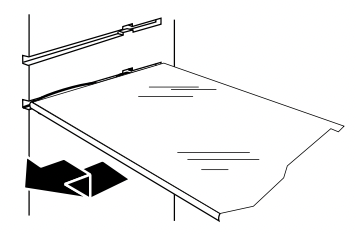
To remove and replace a shelf:
- Remove items from the shelf.
- Slide the shelf straight out to the stop.
- Depending on your model, lift back or front of the shelf past the stop. Slide shelf out the rest of the way.
- Replace the shelf by sliding the back of the shelf into the track in the wall of the cabinet.
- Guide the front of the shelf into the shelf track. Be sure to slide the shelf in all the way.
Deli Drawer
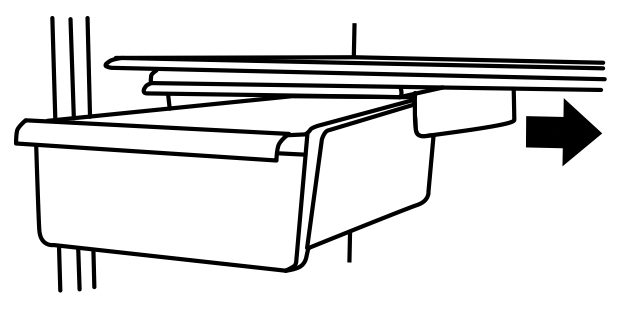
To remove and replace the deli drawer:
- Slide deli drawer out to the stop.
- Lift front of deli drawer with one hand while supporting bottom of drawer with other hand. Slide drawer out the rest of the way.
- Replace the drawer by sliding it back in fully past the drawer stop. NOTE: The deli drawer moves sideways on the shelf to allow for flexible positioning.
Meat Storage Guide
Store most meat in original wrapping as long as it is airtight and moisture-proof. Rewrap if necessary. See the following chart for storage times. When storing meat longer than the times given, freeze the meat.
Fresh fish or shellfish.........................use same day as purchased
Chicken, ground beef, variety meats (liver) ......................1-2 days
Cold cuts, steaks/roasts ..................................................3-5 days
Cured meats...................................................................7-10 days
Leftovers - Cover leftovers with plastic wrap, aluminum foil, or plastic containers with tight lids.
Crisper
Crisper Drawers
To remove and replace the crisper drawer:
- Slide the crisper drawer straight out to the stop. Lift the front and slide the drawer out the rest of the way.
- Replace the drawer by sliding the drawer in fully past the stop.
Crisper Cover
To remove and replace the crisper cover:
- Remove the crisper(s).
- Pull the glass straight out.
- Replace the glass by pushing it straight in.

Crisper Humidity Control
You can control the amount of humidity in the moisture-sealed crisper. Adjust the control to any setting between LOW and HIGH.
LOW (open) lets moist air out of the crisper for best storage of fruits and vegetables with skins.
- Fruit: Wash, let dry and store in refrigerator in plastic bag or crisper. Do not wash or hull berries until they are ready to use. Sort and keep berries in original container in crisper, or store in a loosely closed paper bag on a refrigerator shelf.
- Vegetables with skins: Place in plastic bag or plastic container and store in crisper.
HIGH (closed) keeps moist air in the crisper for best storage of fresh, leafy vegetables.
- Leafy vegetables: Wash in cold water, drain and trim or tear off bruised and discolored areas. Place in plastic bag or plastic container and store in crisper.
FREEZER FEATURES
Your model may have some or all of these features.
Important information to know about glass shelves and covers: Do not clean glass shelves or covers with warm water when they are cold. Shelves and covers may break if exposed to sudden temperature changes or impact, such as bumping.
Tempered glass is designed to shatter into many small, pebble-size pieces. This is normal. Glass shelves and covers
are heavy. Use both hands when removing them to avoid dropping.
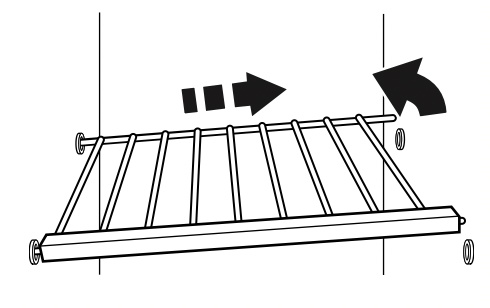
Wire Freezer Shelf (on some models)
To remove and replace a wire shelf:
- Remove the shelf by lifting the entire shelf slightly and moving it all the way to the left-hand side. Tilt the right-hand side up and out of the shelf supports.
- Replace the shelf by inserting the left-hand end all the way into the shelf supports. Then, lower the right-hand end of the shelf and insert it into the shelf supports.
NOTE: The shelf should lower slightly and lock into place. If the shelf does not appear stable, make sure both ends of the shelf are inserted into the shelf supports.
Glass Freezer Shelf (on some models)
To remove and replace a glass shelf:
- Lift the front of the shelf to raise the shelf tabs up and out of the opening in each shelf track. Slide the shelf out the rest of the way.
- Replace the shelf by tilting the back end downward to align the back shelf tab under the track on each side of the freezer. Gently push the shelf into the freezer until the two center shelf tabs are positioned within the opening in each track. Lower the shelf to rest on the shelf tracks.
Frozen Food Storage Guide
Storage times will vary according to the quality and type of food, the type of packaging or wrap used (should be airtight and moisture-proof), and the storage temperature. Seal the package or container securely to avoid taste and odor transfer throughout the product. Ice crystals inside a sealed package are normal. This simply means that moisture in the food and air inside the package have condensed, creating ice crystals.
Put no more unfrozen food into the freezer than will freeze within 24 hours (no more than 2 to 3 lbs of food per cubic foot [907 to 1,350 g per L] of freezer space). Leave enough space in the freezer for air to circulate around packages. The freezer door must close tightly.
NOTE: For more information on preparing food for freezing, check a freezer guide or reliable cookbook.
DOOR FEATURES
Your model may have some or all of these features.
Door Rails
The door rails may be removed for easier cleaning.
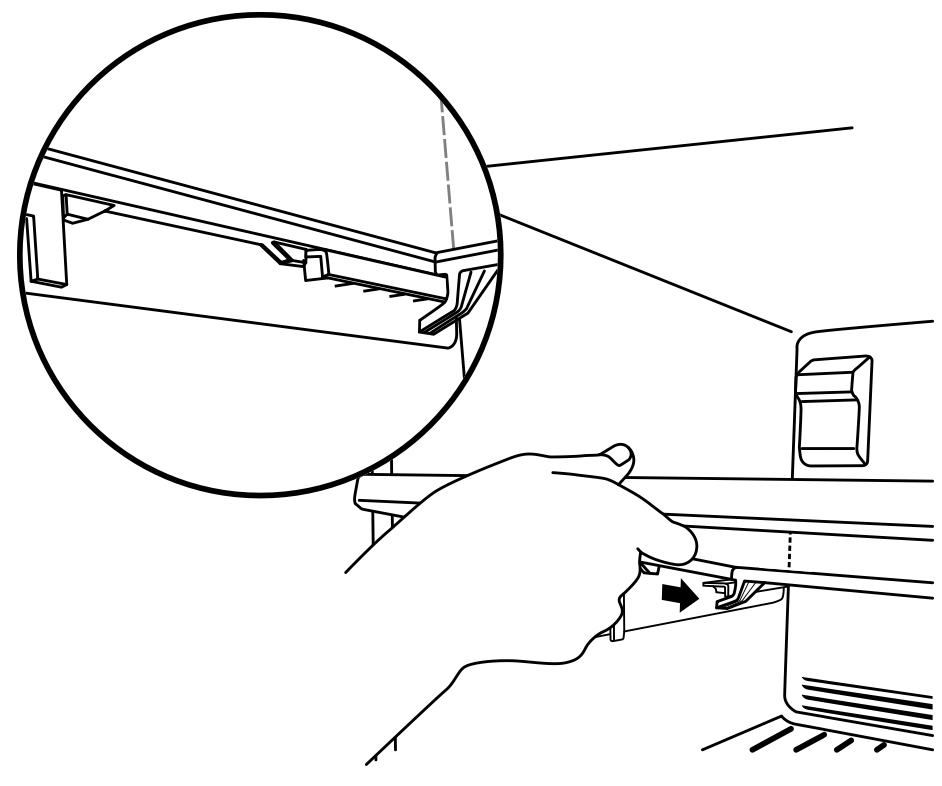
Snap-on Door Rails (on some models)
To remove and replace the rails:
- Depending on your model, remove the rails by pushing in slightly on the front of the bracket while pulling out on the inside tab. Repeat these steps for the other end.
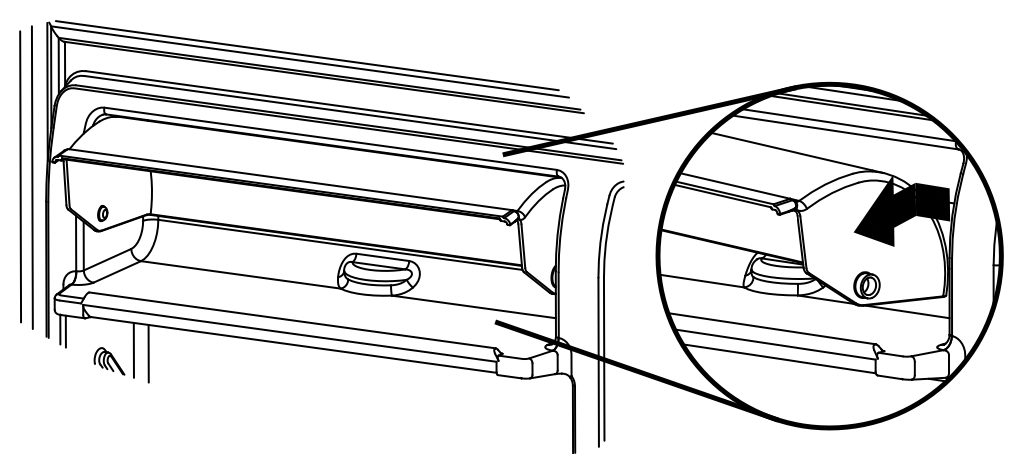
- Replace the rails by aligning the ends of the brackets with the buttons on the sides of the door liner. Firmly snap bracket and assembly onto the tabs above the shelf, as shown.
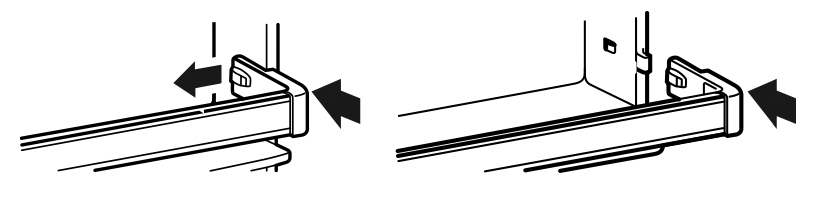
Drop-in Door Rails (on some models)
To remove and replace the rails:
- Remove the rails by pulling straight up on each end of the rail.
- Replace the rails by sliding the shelf rail into the slots on the door and pushing the rail straight down until it stops.
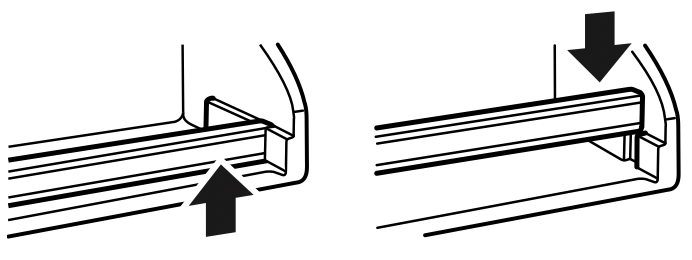
Door Bins (on some models)
To remove and replace the bins:
- Remove the bin by lifting it and pulling it straight out.
- Replace the bin by sliding it in above the desired support and pushing it down until it stops.

Utility Compartment
The utility compartment may be removed for easier cleaning.
To remove and replace the utility compartment:
- Remove the utility compartment by squeezing against one side while raising the utility compartment up and pulling it straight out.
- Replace the utility compartment by positioning one side in the lock and sliding in the opposite side until it stops.
Troubleshooting
Operational notes
- The Ice Maker water valve contains a flow washer that acts like a pressure regulator to control the water flow. For the Ice Maker to work properly, the water pressure in your home must be between 20 and 120 pounds per-square-inch (psi). If you encounter problems with your Ice Maker’s ability to produce ice, call your water utility company and have the water pressure checked.
- The Ice Maker’s water valve is equipped with two strainers: a plastic basket type and a wire-mesh screen. Both of these can be cleaned by turning off the water and disassembling the water valve (your service center should be able to provide this service). If local water conditions require periodic cleaning, or if you use a well as a water source, you should consider installing a second water strainer in the water line. You can obtain a water strainer from your local appliance dealer.
Troubleshooting chart
|
PROBLEM
|
CAUSE
|
|
One or more of the following sounds is heard:
- Buzzing
- Trickling water
- Thud (clatter of ice)
|
The water valve is operating.
Water is entering the Ice Maker fill cup.
Ice is being dumped into the ice bin.
|
|
Ice tastes stale.
|
The ice is old. Make a new batch.
|
|
Water in Ice Maker overflows.
|
Refrigerator or Ice Maker is not level. If the Ice Maker still overflows after leveling, turn off the Ice Maker’s water supply at the shut-off valve, and raise the Ice Maker’s bail arm to the “off” position (see page 21); then contact your local service center.
|
|
Not enough ice.
|
It will take 48 hours to fill the ice bucket. The ice maker will make ice every 2 to 3 hours. For more ice, adjust the freezer control for a colder setting.
|
|
Ice making has stopped.
|
Be sure that the bail arm is lowered into the ice bucket (see page 21).
Make sure that the water shut-off valve is on.
The water shut-off valve or the water valve screen is clogged (contact your local service center).
|