INSTALLATION
1. Save carton for off-season storage (if needed).
2. If hanging the unit, place it approximately 3–6 feet above floor or ground for optimal catch-rate and easy access for cleaning.
Unit can also be placed on the floor or ground.
3. Plug cord into an outdoor outlet or UL listed extension cord as described in “IMPORTANT SAFETY INSTRUCTIONS”.
4. Turn power switch to “ON” position. The switch is located under the upper housing near the light bulbs.
5. For best catch results leave unit on at all times, except when cleaning or servicing.
6. Catch rate activity will be higher at night. For best catch results, place unit away from other competing light sources.
7. It is recommended to place the unit at least 10 to 20 feet away from where people will be sitting.
8. This unit is all-weather resistant – designed for outdoor use including rainy conditions.
CLEANING
Clean the trap at least once a week to prolong life of the unit, insure fire prevention, and provide for more efficient operation.
1. Be sure to clean the unit once per week.
2. For weekly cleaning, remove the retaining cage by twisting clockwise and clean any build up from the inside of the trap with
a brush.
3. When replacing the retaining cage, DO NOT press or push against the screen windows.
REPLACING BULBS
Light bulbs life expectancy is approximately 3,000 hours (or about 4 months), and should be replaced alter that time has passed
in order to maintain optimal UV effectiveness. Even though the bulb’s light may be visible to you, it’s ability to attract insects
diminishes over time.
1. Turn power switch to “OFF” position, UNPLUG UNIT, and allow bulbs to cool before replacing.
2. Remove plastic cover that fits over the bulbs before removing the old bulbs (a screwdriver is required for this step).
3. Carefully turn bulb counterclockwise and then pull bulb straight out. Note: if you are unable to get the bulb cover off, unscrew
the 3 screws above the metal posts that are supporting the upper housing. Next pull the top part of the unit up, separating it
from the rest of the unit. Proceed to change the bulbs and replace the bulb cover. Place the upper housing back on the posts
and make sure that the housing is placed all the way down on the post. Replace the screws and your unit should be ready.
4. Locate and insert new bulbs into sockets, carefully turn clockwise, and make sure the prongs of the bulb are seated properly.
Replacement bulbs (6-watt fluorescent bulbs – part no. 32050) can be found at your local retailer or can be ordered directly from
by calling 1-877-403-TRAP (8727) or visiting www.dynatrap.com
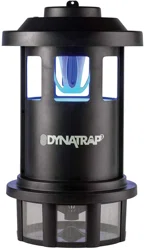
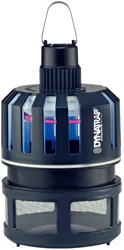
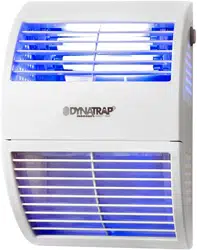
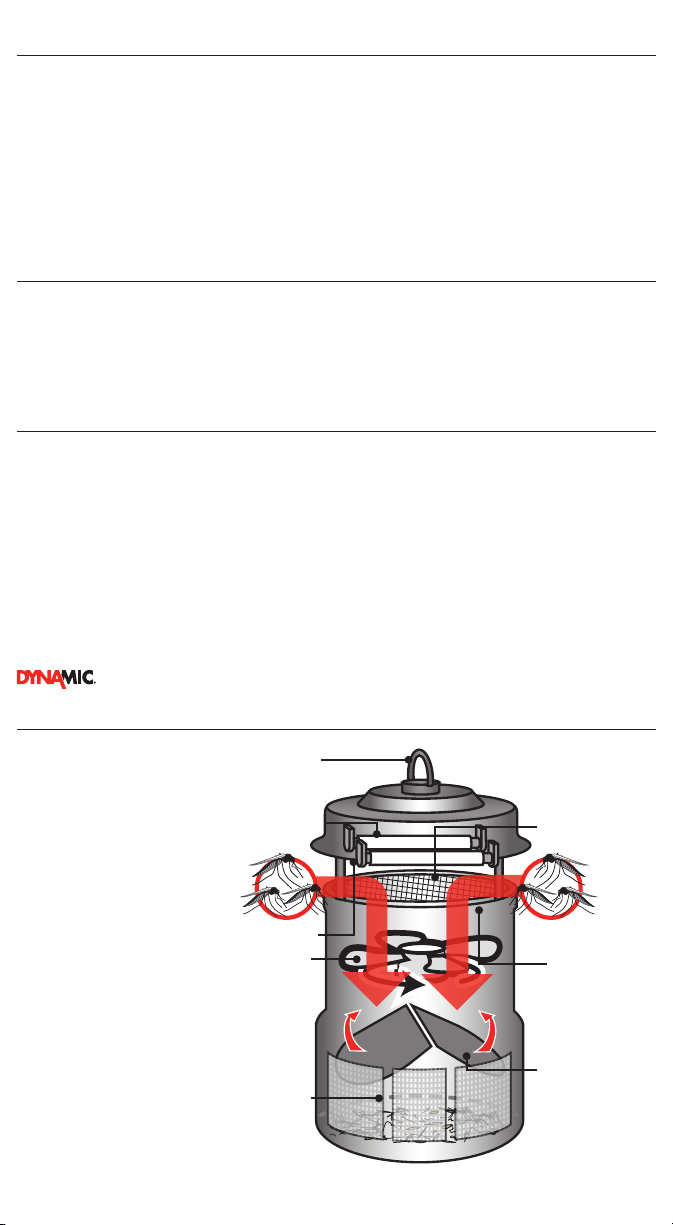
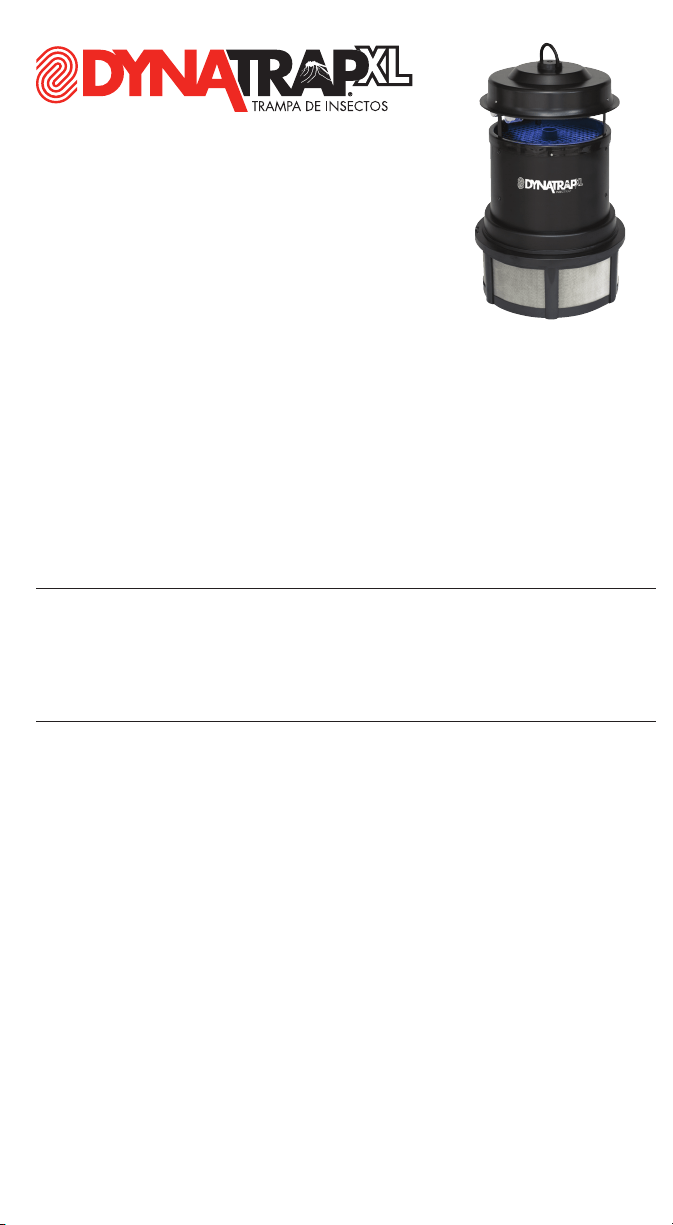
HOW THE DYNATRAP
®
XL INSECT TRAP WORKS
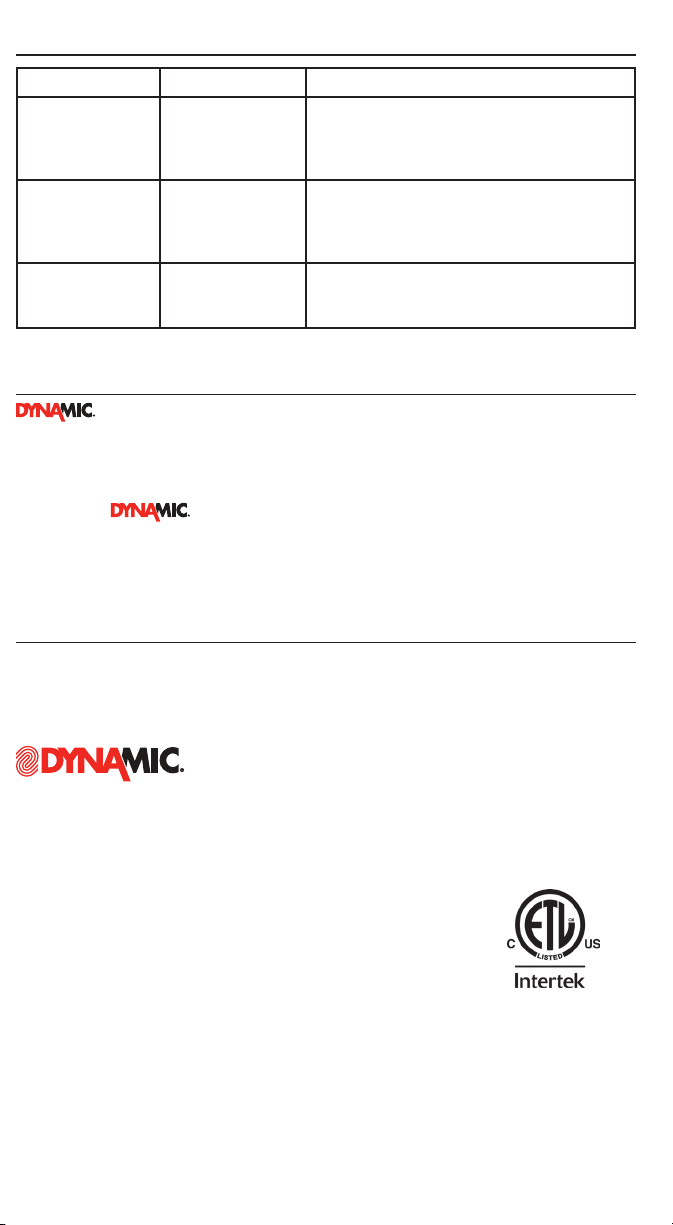
Problem: Possible cause: Correction:
Bulbs do not illuminate
and fan does not spin.
1. No electrical power 1. Check plug and receptacle and fuse or circuit breaker.
2. Check to make sure power is switched to the “ON”
position.
Bulb illuminates, but fan
does not spin.
1. Shorted fan 1. UNPLUG UNIT: Examine fan to see that it is free from
foreign material, dirt or build-up of dead insects. Clean unit as
in “CLEANING” section.
Fan spins, but bulb does
not illuminate
1. Bulb not seated
properly
2. Burnt out bulb
1. Check all sockets for proper bulb seating and alignment.
2. Replace bulb if needed following instructions under
“Replacing Bulbs”.
LIMITED WARRANTY
warranties to the original purchaser that this product is free from defective materials and
workmanship. This warranty is limited to remedy any defective part for a period of one year from date of
original date of purchase. Retain your original receipt as proof of purchase. This warranty does not apply
to the light bulb, nor to, in our judgment, misuse or abuse. If this unit has been altered, no warranty is in
force. This warranty does not apply if this unit is purchased outside the United States, Canada and Mexico.
In no case shall be liable for any accidental, punitive, consequential, or any other damages
of any kind for breach of this or any other warranty, expressed or implied, whatsoever. Some states do
not allow limitation on how long an implied warranty lasts, so the above limitation or exclusion may not
apply to you. This warranty gives you specific legal rights, and you may also have other rights that vary
from state to state.
PARTS & ACCESSORIES AVAILABLE
PART DESCRIPTION
32050 6-Watt Replacement Fluorescent Bulbs (2 pieces)
32065 Damper Flaps
Dynamic Solutions Worldwide, LLC
12247 W. Fairview Ave. Milwaukee, WI 53226
Phone: 414-431-2819
Toll free: 1-877-403-TRAP (8727)
Toll free fax: 877-403-3293
Email: [email protected]
Visit us online at www.dynatrap.com
© Dynamic Solutions Worldwide, LLC
SAVE THESE INSTRUCTIONS
IMPORTANT SAFETY INSTRUCTIONS
WARNING, When using electric appliances, basic precautions should always be followed, including the following:
– To disconnect, turn all controls to the off (“O”) position, then remove plug from outlet.
– Unplug from outlet when not in use and before servicing or cleaning.
– To reduce the risk of electrical shock, do not put appliance in water or other liquid.
– This appliance is provided with double insulation. Use only identical replacement parts.
See instructions for Servicing of Double-Insulated Appliances.
– Connect only to a circuit that is protected by a ground-fault circuit-interrupter (GFCI).
INSTRUCTIONS FOR DOUBLE-INSULATED, CORD-CONNECTED APPLIANCES:
In a double-insulated appliance, two systems of insulation are provided instead of grounding. No grounding means is provided
on a double-insulated appliance, nor should a means for grounding be added to the appliance. Servicing of a double-insulated
appliance requires extreme care and knowledge of the system, and should be done only by qualified service personnel.
Replacement parts for a double-insulated appliance must be identical to those parts in the appliance.
IMPORTANT SAFETY INSTRUCTIONS
Please read these instructions before using the DYNATRAP
®
Insect Trap and keep for future reference.
1. Always turn unit off and disconnect plug before servicing, cleaning, or changing bulb.
2. Do not position the unit near heat, gas, oil or other flammable materials.
3. Place product out of reach from children.
4. Never operate this product if it has a damaged cord or plug, if it is not working properly, if it has been dropped or
damaged, or if it has been dropped into water.
5. This product is equipped with 2-conductor cord and 2-prong polarized plug as a safety feature. This plug will fit in a
polarized outlet only one way. If the plug does not fully fit in the outlet, then reverse the plug. If it still does not fit,
then contact a qualified electrician. To reduce the risk of electrical shock, only plug into a properly installed outlet.
Do not attempt to defeat this safety feature.
6. Do not insert fingers or any foreign objects into the unit while it is connected to an electrical outlet.
7. Collected insects within the unit may contribute to fire, so clean insects from the unit frequently.
8. Do not clean this product with water spray. Do not place where it can fall into water, or near flammable materials.
9. Do not touch fan while in motion.
10. Do not abuse cord—never carry or hang unit by cord or yank it to disconnect from receptacle. Keep cord away from heat,
oil, or sharp edges.
11. Extension cords used with this product must be marked with suffix letters “W-A” and with a tag stating “Suitable for Use
with Outdoor Appliances”.
12. Use only extension cords that have plug and receptacles that match the product plug. Replace or repair damaged cords.
OWNER’S MANUAL
FLYING INSECT TRAP
MODEL: DT2000XL
Thank you for purchasing the
DYNATRAP
®
XL flying insect trap!
TROUBLESHOOTING
TIO
2
COATED SURFACE
Flying insects are attracted to the unit by
the UV light and the CO
2
that is generated
by the photo-catalysis between the UV
lamps and the TiO
2
coating. The fan
pulls the insects into the retaining cage,
trapping them until they dehydrate and
die. The screened base can be removed,
so you can periodically empty the contents
into the trash. The screen allows you to
see what’s trapped in the compartment,
alerting you when the retaining cage
needs to be emptied.
HOOK FOR
HANGING
(OPTIONAL)
AUTOMATIC DAMPER
CLOSES WHEN TURNED
OFF PREVENTING
LIVE MOSQUITOS FROM
ESCAPING.
PROTECTIVE SCREEN
2 UV LAMPS
ON/OFF SWITCH
POWERFUL
YET QUIET FAN
RETAINING CAGE
INSTALLATION
1. Save carton for off-season storage (if needed).
2. If hanging the unit, place it approximately 3–6 feet above floor or ground for optimal catch-rate and easy access for cleaning.
Unit can also be placed on the floor or ground.
3. Plug cord into an outdoor outlet or UL listed extension cord as described in “IMPORTANT SAFETY INSTRUCTIONS”.
4. Turn power switch to “ON” position. The switch is located under the upper housing near the light bulbs.
5. For best catch results leave unit on at all times, except when cleaning or servicing.
6. Catch rate activity will be higher at night. For best catch results, place unit away from other competing light sources.
7. It is recommended to place the unit at least 10 to 20 feet away from where people will be sitting.
8. This unit is all-weather resistant – designed for outdoor use including rainy conditions.
CLEANING
Clean the trap at least once a week to prolong life of the unit, insure fire prevention, and provide for more efficient operation.
1. Be sure to clean the unit once per week.
2. For weekly cleaning, remove the retaining cage by twisting clockwise and clean any build up from the inside of the trap with
a brush.
3. When replacing the retaining cage, DO NOT press or push against the screen windows.
REPLACING BULBS
Light bulbs life expectancy is approximately 3,000 hours (or about 4 months), and should be replaced alter that time has passed
in order to maintain optimal UV effectiveness. Even though the bulb’s light may be visible to you, it’s ability to attract insects
diminishes over time.
1. Turn power switch to “OFF” position, UNPLUG UNIT, and allow bulbs to cool before replacing.
2. Remove plastic cover that fits over the bulbs before removing the old bulbs (a screwdriver is required for this step).
3. Carefully turn bulb counterclockwise and then pull bulb straight out. Note: if you are unable to get the bulb cover off, unscrew
the 3 screws above the metal posts that are supporting the upper housing. Next pull the top part of the unit up, separating it
from the rest of the unit. Proceed to change the bulbs and replace the bulb cover. Place the upper housing back on the posts
and make sure that the housing is placed all the way down on the post. Replace the screws and your unit should be ready.
4. Locate and insert new bulbs into sockets, carefully turn clockwise, and make sure the prongs of the bulb are seated properly.
Replacement bulbs (6-watt fluorescent bulbs – part no. 32050) can be found at your local retailer or can be ordered directly from
by calling 1-877-403-TRAP (8727) or visiting www.dynatrap.com
HOW THE DYNATRAP
®
XL INSECT TRAP WORKS
Problem: Possible cause: Correction:
Bulbs do not illuminate
and fan does not spin.
1. No electrical power 1. Check plug and receptacle and fuse or circuit breaker.
2. Check to make sure power is switched to the “ON”
position.
Bulb illuminates, but fan
does not spin.
1. Shorted fan 1. UNPLUG UNIT: Examine fan to see that it is free from
foreign material, dirt or build-up of dead insects. Clean unit as
in “CLEANING” section.
Fan spins, but bulb does
not illuminate
1. Bulb not seated
properly
2. Burnt out bulb
1. Check all sockets for proper bulb seating and alignment.
2. Replace bulb if needed following instructions under
“Replacing Bulbs”.
LIMITED WARRANTY
warranties to the original purchaser that this product is free from defective materials and
workmanship. This warranty is limited to remedy any defective part for a period of one year from date of
original date of purchase. Retain your original receipt as proof of purchase. This warranty does not apply
to the light bulb, nor to, in our judgment, misuse or abuse. If this unit has been altered, no warranty is in
force. This warranty does not apply if this unit is purchased outside the United States, Canada and Mexico.
In no case shall be liable for any accidental, punitive, consequential, or any other damages
of any kind for breach of this or any other warranty, expressed or implied, whatsoever. Some states do
not allow limitation on how long an implied warranty lasts, so the above limitation or exclusion may not
apply to you. This warranty gives you specific legal rights, and you may also have other rights that vary
from state to state.
PARTS & ACCESSORIES AVAILABLE
PART DESCRIPTION
32050 6-Watt Replacement Fluorescent Bulbs (2 pieces)
32065 Damper Flaps
Dynamic Solutions Worldwide, LLC
12247 W. Fairview Ave. Milwaukee, WI 53226
Phone: 414-431-2819
Toll free: 1-877-403-TRAP (8727)
Toll free fax: 877-403-3293
Email: [email protected]
Visit us online at www.dynatrap.com
© Dynamic Solutions Worldwide, LLC
SAVE THESE INSTRUCTIONS
IMPORTANT SAFETY INSTRUCTIONS
WARNING, When using electric appliances, basic precautions should always be followed, including the following:
– To disconnect, turn all controls to the off (“O”) position, then remove plug from outlet.
– Unplug from outlet when not in use and before servicing or cleaning.
– To reduce the risk of electrical shock, do not put appliance in water or other liquid.
– This appliance is provided with double insulation. Use only identical replacement parts.
See instructions for Servicing of Double-Insulated Appliances.
– Connect only to a circuit that is protected by a ground-fault circuit-interrupter (GFCI).
INSTRUCTIONS FOR DOUBLE-INSULATED, CORD-CONNECTED APPLIANCES:
In a double-insulated appliance, two systems of insulation are provided instead of grounding. No grounding means is provided
on a double-insulated appliance, nor should a means for grounding be added to the appliance. Servicing of a double-insulated
appliance requires extreme care and knowledge of the system, and should be done only by qualified service personnel.
Replacement parts for a double-insulated appliance must be identical to those parts in the appliance.
IMPORTANT SAFETY INSTRUCTIONS
Please read these instructions before using the DYNATRAP
®
Insect Trap and keep for future reference.
1. Always turn unit off and disconnect plug before servicing, cleaning, or changing bulb.
2. Do not position the unit near heat, gas, oil or other flammable materials.
3. Place product out of reach from children.
4. Never operate this product if it has a damaged cord or plug, if it is not working properly, if it has been dropped or
damaged, or if it has been dropped into water.
5. This product is equipped with 2-conductor cord and 2-prong polarized plug as a safety feature. This plug will fit in a
polarized outlet only one way. If the plug does not fully fit in the outlet, then reverse the plug. If it still does not fit,
then contact a qualified electrician. To reduce the risk of electrical shock, only plug into a properly installed outlet.
Do not attempt to defeat this safety feature.
6. Do not insert fingers or any foreign objects into the unit while it is connected to an electrical outlet.
7. Collected insects within the unit may contribute to fire, so clean insects from the unit frequently.
8. Do not clean this product with water spray. Do not place where it can fall into water, or near flammable materials.
9. Do not touch fan while in motion.
10. Do not abuse cord—never carry or hang unit by cord or yank it to disconnect from receptacle. Keep cord away from heat,
oil, or sharp edges.
11. Extension cords used with this product must be marked with suffix letters “W-A” and with a tag stating “Suitable for Use
with Outdoor Appliances”.
12. Use only extension cords that have plug and receptacles that match the product plug. Replace or repair damaged cords.
OWNER’S MANUAL
FLYING INSECT TRAP
MODEL: DT2000XL
Thank you for purchasing the
DYNATRAP
®
XL flying insect trap!
TROUBLESHOOTING
TIO
2
COATED SURFACE
Flying insects are attracted to the unit by
the UV light and the CO
2
that is generated
by the photo-catalysis between the UV
lamps and the TiO
2
coating. The fan
pulls the insects into the retaining cage,
trapping them until they dehydrate and
die. The screened base can be removed,
so you can periodically empty the contents
into the trash. The screen allows you to
see what’s trapped in the compartment,
alerting you when the retaining cage
needs to be emptied.
HOOK FOR
HANGING
(OPTIONAL)
AUTOMATIC DAMPER
CLOSES WHEN TURNED
OFF PREVENTING
LIVE MOSQUITOS FROM
ESCAPING.
PROTECTIVE SCREEN
2 UV LAMPS
ON/OFF SWITCH
POWERFUL
YET QUIET FAN
RETAINING CAGE
INSTALACION E INSTRUCCIONES DE OPERACION
1. Guarde la caja para el almacenamiento fuera de temporada (si es necesario).
2. Si cuelga la unidad, colóquela aproximadamente de 3 a 6 pies arriba del suelo para maximizar la captura de insectos vola-
dores, además, esto facilitara el acceso para su limpieza. La unidad también puede colocarse sobre el piso o suelo.
3. Enchufe el cordón en un tomacorriente al aire libre con un cable de extensión que sea aprobado por UL como se describe en
“Instrucciones Importantes de Seguridad”.
4. Coloque el interruptor de encendido a la “posición ON”. El interruptor se encuentra debajo de la cubierta superior y cerca de
los focos de luz.
5. Para mejores resultados de captura, deje prendida la unidad todo el tiempo, excepto cuando se le dé limpieza o se le dé
servicio.
6. La actividad de captura de insectos será mucho mayor por la noche. Para mejores resultados de captura, coloque la unidad
alejada de otras fuentes de luz que compitan con la luz de la unidad, como son lámparas o spots de luz, etc.
7. Se recomienda colocar la unidad por lo menos a10 a 20 metros de distancia de donde la gente se encuentra.
8. Esta unidad puede ser usada en de todos tipos de climas – diseñado para el uso al aire libre incluyendo condiciones lluviosas.
LIMPIEZA
Limpieza frecuente prolongara la vida útil de la unidad, garantizara la prevención de incendios, y la unidad funcionara en forma
más eficiente.
1. Limpie la unidad una vez por semana.
2. Para la limpieza semanal, quite la cámara de recolección girando hacia la derecha y limpie la acumulación en el interior de
la trampa con un cepillo.
3. Al reemplazar la cámara de recolección, asegúrese de no presionar o empujar las mallas de acero de la cámara de recolección.
REEMPLAZO DEL FOCO
La duración de los focos es de aproximadamente 3.000 horas (o unos 4 meses) y deben ser reemplazados con el fin de mantener
la eficacia óptima de la luz Ultra Violeta (UV). Aunque la luz de los focos pueden ser visibles para usted, la capacidad de atraer
insectos disminuye con el tiempo.
1. Coloque el interruptor en “OFF” posición, desconecte la unidad y permita que se enfríe antes de reemplazar las bombillas.
2. Quite la tapa de plástico que se coloca sobre los bulbos antes de quitar los focos viejos (un destornillador se requiere para este
paso).
3. Cuidadosamente gire los focos hacia la izquierda y luego jálelos directamente hacia afuera de los sockets.
4. Inserte los focos nuevos en los sockets, y cuidadosamente gire hacia la derecha, asegúrandose que los las terminales del foco
son colocados correctamente.
Los focos de repuesto (6 vatios fluorescentes – parte Nº 32050) se puede encontrar en su distribuidor local o pueden solicitarse
directamente a por teléfono llamando al 1-877-403-TRAP (8727)
GARANTIA LIMITADA
garantiza al comprador original que este producto esta libre de defectos de materiales y mano de obra.
Esta garantía esta limitada a remediar cualquier parte defectuosa durante un periodo de un año a partir de la fecha de
compra original. Retenga su recibo original como prueba de compra. Esta garantía no es aplicable ni al foco, ni al maltrato
o uso inapropiado, a nuestro juicio. Si esta unidad es alterada, se anula la garantía. Esta no es aplicable a esta unidad si
fue comprada fuera de los Estados Unidos, excluyendo Canadá y México.
no será responsable en ningún
caso de daños incidentales, punitivos, derivados o daños de ningún otro tipo por incumplimiento de esta o de cualquier otra
garantía, ya sea expresa o implícita. Algunos estados no permiten limitación con respecto a la duración de una garantía
implícita y, por lo tanto, la limitación o exclusión anterior podría no serle aplicable. Esta garantía le otorga derechos
legales específicos y usted puede tener además otros derechos que variarán de un estado a otro.
PARTES & ACCESORIOS DISPONIBLES
PARTE DESCRIPCCION
32050 6-Watt Replacement Fluorescent Bulbs (2 pieces)
32065 Damper Flaps
Dynamic Solutions Worldwide, LLC
12247 W. Fairview Ave. Milwaukee, WI 53226
Teléfono: 414-431-2819
Llamada Gratis: 1-877-403-TRAP (8727)
Fax Gratis: 877-403-3293
Email: [email protected]
Visítenos en nuestra página web www.dynatrap.com
© Dynamic Solutions Worldwide, LLC
GUARDE ESTAS INSTRUCCIONES
Los insectos voladores son atraídos a la unidad por
medio de la luz y el CO
2
(dióxido de carbono) que es
generado por la foto-catálisis que sucede entre la capa
de TiO
2
(dióxido de titanio) y los focos ultravioletas;
luego el ventilador los succiona hacia una cámara de
recolección donde quedan atrapados hasta que se
deshidratan y mueren. La cámara de recolección puede
ser removida, de esta forma se pueden periódicamente
vaciar los contenidos en la basura. Las rejillas en la
cámara de recolección permiten ver lo que ha sido
atrapado, alertando de esta manera la siguiente vez
que se necesita vaciar.
CUIDADO, Cuando use aparatos eléctricos, se deben de seguir precauciones básicas, incluyendo lo siguiente:
– Para desconectar, apague todos los controles en la posición (“0”), luego, remueva la clavija del enchufe eléctrico.
– Desconecte del enchufe cuando no este en uso y antes de darle servicio.
– Para reducir el riesgo de choque eléctrico, no ponga el aparato en agua o cualquier otro líquido.
– Este aparato esta proveído con aislado doble. Use solo con partes de repuesto idénticas.
Vea instrucciones para Servicio de Aparatos de Doble Aislado.
– Conecte solamente a un tomacorriente protegido con un interruptor de circuito de falla a tierra (GFCI).
INSTRUCCIONES PARA APARATOS DE DOBLE AISLADO, APARATO CONECTADO CON CABLE:
En un aparato con aislado doble, dos sistemas de aislado son proveídos en lugar de tierra. No manera de hacer tierra es proveído en un aparato
de doble aislado, ni tampoco significa que la tierra del aparato debe de ser añadida. El servicio de mantenimiento eléctrico de un aparato con
doble aislado requiere de extremo cuidado y conocimiento del sistema, y debe únicamente de ser dado por personal calificado. Las partes de
repuesto de aparatos con doble aislado deben de ser idénticas
a los de las partes originales del aparato.
INSTRUCCIONES IMPORTANTES DE SEGURIDAD
Sírvase leer estas instrucciones antes de usar el trampa electrónico de insectos DYNATRAP
®
y guárdelas como
referencia futura.
1. Siempre desenchufe la unidad antes de darle servicio, limpiarla, cambiar el foco, cuando no este en uso, etc.
2. No coloque este producto cerca de fuentes de calor, gas, aceite u otros materiales inflamables.
3. Manténgase alejado del alcance de los niños.
4. Nunca opere este producto si su cable de corriente ha sido dañado, si no esta trabajando correctamente, si ha caído o dañado, o si ha sido
tirado en agua.
5. Esta producto esta equipado con un cable de 2 conductores y un enchufe de clavijas para calzar en el tipo de tomacorrientes adecuado.
Para reducir el riesgo de choque eléctrico, solo enchúfelo en un receptáculo instalado correctamente.
6. No meta los dedos ni objetos extraños en la unidad mientras esta conectada a un receptáculo eléctrico.
7. Los insectos recolectados dentro de la unidad podrían contribuir a un incendio; por lo tanto, limpie los insectos muertos de la unidad con
frecuencia.
8. No limpie este producto rociándolo con agua. No lo coloque donde pueda caerse al agua, ni cerca de materiales
inflamables.
9. No toque el ventilador cuando este en movimiento.
10. No maltrate el cable-nunca transporte la unidad por el cable ni tire del mismo para desenchufarla. Mantenga el cordón lejos del calor, el
aceite, o de bordes afilados.
11. Los cables de extensión utilizados con este producto deben estar marcados con las letras “W-A” y con una etiqueta que diga “Adecuado
para utilizarse con artefactos en áreas exteriores”.
12. Solo use cables de extensión que tengan un enchufe y receptáculos compatibles con el enchufe del producto. Reemplace o repare los
cables dañados.
13. ESTE APARATO NO SE DESTINA PARA UTILIZARSE POR PERSONAS (INCLUYENDO NIÑOS) CUYAS CAPACIDADES FÍSICAS, SENSORIALES O MEN-
TALES SEAN DIFERENTES O ESTÉN REDUCIDAS, O CAREZCAN DE EXPERIENCIA O CONOCIMIENTO, A MENOS QUE DICHAS PERSONAS RECIBAN
UNA SUPERVISIÓN O CAPACITACIÓN PARA EL FUNCIONAMIENTO DEL APARATO POR UNA PERSONA RESPONSABLE DE SU SEGURIDAD.
14. LOS NIÑOS DEBEN SUPERVISARSE PARA ASEGURAR QUE ELLOS NO EMPLEEN LOS APARATOS COMO JUGUETE.
MANUAL DEL PROPIETARIO
TRAMPA DE INSECTOS
VOLADORES
MODELO: DT2000XL
¡Gracias por comprar el DYNATRAP
®
XL
trampa de insectos voladores!
INSTRUCCIONES IMPORTANTES
DE SEGURIDAD
Problema: Posible Causa: Corrección:
Los focos no alumbran y
el ventilador no gira.
1. No hay corriente
eléctrica.
1. Revise la conexión, el contacto, o el breaker eléctrico.
2. Asegúrese de que el switch de prendido esta en la posición
“on”.
Los focos prenden, pero el
ventilador no gira.
1. El ventilador esta en
corto.
1. DESCONECTE LA UNIDAD: Examine el ventilador para ver si
esta libre de suciedad o insectos muertos. Limpie de acuerdo a
la sección de “Limpieza”.
El ventilador gira, pero los
focos no prenden.
1. Los focos no están
firmemente colocados.
2. Los focos están
fundidos.
1. Revise que los focos estén firmemente colocados en la base
del foco.
2. Cambie los focos si es necesario, de acuerdo a las instrucciones
bajo “Reemplazo del foco”.
IDENTIFICACION Y RESOLUCION DE PROBLEMAS
COMO FUNCIONA LA TRAMPA DE
INSECTOS DYNATRAP
®
SUPERFICIE CON CAPA
DE TIO
2
GANCHO PARA
COLGAR
(OPCIONAL)
COMPUERTA AUTOMÁTICA
SE CIERRA CUANDO SE
APAGA, PREVINIENDO
INSECTOS AUN VIVOS
QUE SE ESCAPEN
REJILLA PROTECTORA
2 FOCOS
ULTRAVIOLETA
SWITCH PARA
PRENDER O
APAGAR
PODEROSO Y
SILENCIOSO
VENTILADOR
CAMARA DE
RECOLECCION