Use / Install
MANUAL
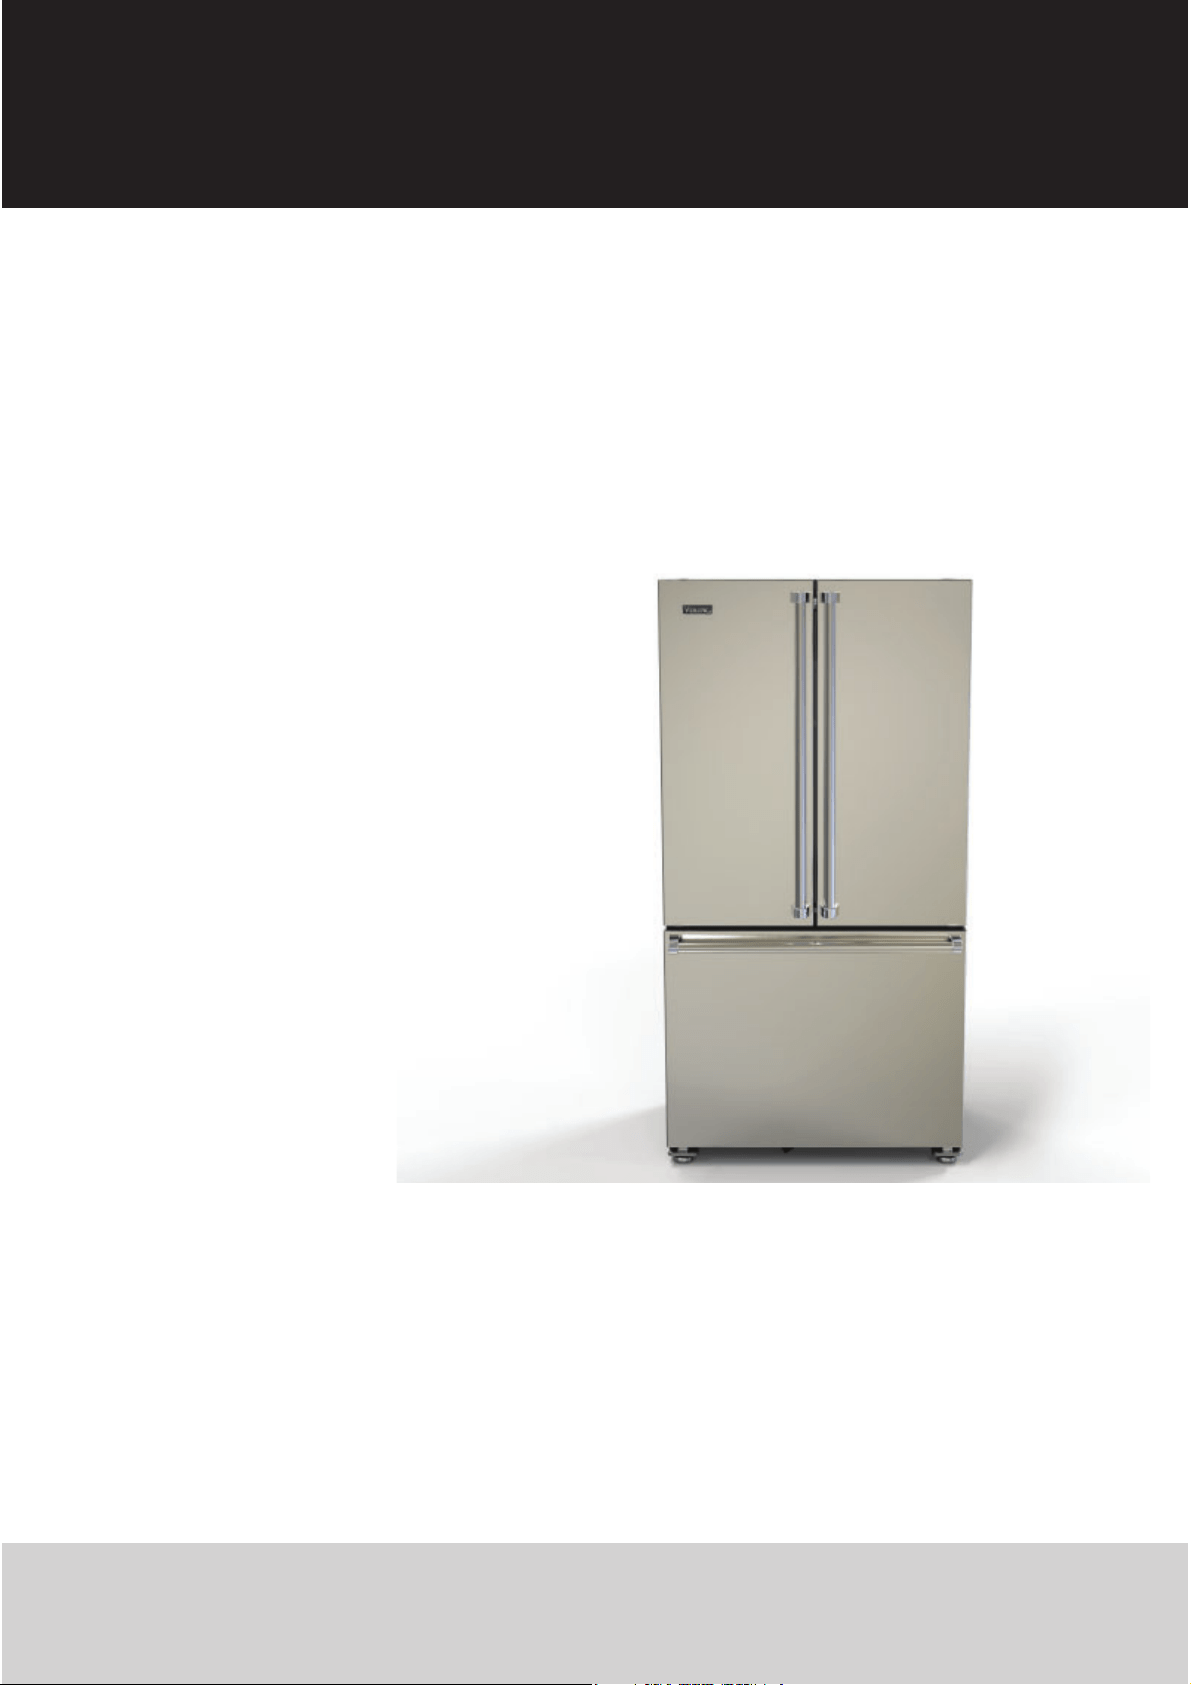
3 SERIES
RVFFR336
French Door Bottom Freezer/Refrgerator
Please read ths manual before usng the product!
Dear Customer,
We'd like you to make the best use of our product, which has been manufactured in modern facilities with care and meticulous
quality controls.
Thus, we advise you to read the entire user manual before you use the product. In case the product changes hands, do not forget to
hand the guide to its new owner along with the product.
Ths gude wll help you use the product quckly and safely.
• Please read the user gude carefully before nstallng and operatng the product.
• Always observe the applcable safety nstructons.
• Keep the user gude wthn easy reach for future use.
• Please read any other documents provded wth the product.
Keep in mind that this user guide may apply to several product models. The guide clearly indicates any variations of different models.
Important nformaton and useful tps.
Rsk of lfe and property
Rsk of electrc shock
The product’s packagng s made of recycleable materals,
n accordance wth the Natonal Envronment Legslaton
2 EN
Refrigerator / User Manual
1 Important instructions for safety
and environment 3
General safety. . . . . . . . . . . . . . . . . . . . . . . . . . . . . . . . . . . . .3
HCA warning. . . . . . . . . . . . . . . . . . . . . . . . . . . . . . . . . . . . . .4
For products with a water dispenser. . . . . . . . . . . . . . . . . .4
Intended use . . . . . . . . . . . . . . . . . . . . . . . . . . . . . . . . . . . . . .4
Children Safety . . . . . . . . . . . . . . . . . . . . . . . . . . . . . . . . . . . .4
Package information . . . . . . . . . . . . . . . . . . . . . . . . . . . . . . .4
2 Your Refrigerator 5
3 Installation 6
Appropriate installation location . . . . . . . . . . . . . . . . . . . . .6
Built-in installation . . . . . . . . . . . . . . . . . . . . . . . . . . . . . . . .6
Electrical connection . . . . . . . . . . . . . . . . . . . . . . . . . . . . . . .7
Adjusting the feet. . . . . . . . . . . . . . . . . . . . . . . . . . . . . . . . . .7
LED Lighting . . . . . . . . . . . . . . . . . . . . . . . . . . . . . . . . . . . . . .7
Door open alarm. . . . . . . . . . . . . . . . . . . . . . . . . . . . . . . . . . .7
Before Installation. . . . . . . . . . . . . . . . . . . . . . . . . . . . . . . . . .8
Connecting the water line to the refrigerator. . . . . . . . . . .8
Connecting the water line to the water supply . . . . . . . . .8
Water filter . . . . . . . . . . . . . . . . . . . . . . . . . . . . . . . . . . . . . . .9
Before using the water/ice dispenser . . . . . . . . . . . . . . . .10
Transportation of the appliance . . . . . . . . . . . . . . . . . . . . .10
Product Dimensions. . . . . . . . . . . . . . . . . . . . . . . . . . . . . . .11
4 Preparation 13
5 Operating the product 14
Indicator panel . . . . . . . . . . . . . . . . . . . . . . . . . . . . . . . . . . .14
Dual cooling system. . . . . . . . . . . . . . . . . . . . . . . . . . . . . . .17
Freezing fresh food. . . . . . . . . . . . . . . . . . . . . . . . . . . . . . . .17
Recommendations for preserving frozen food. . . . . . . . .17
Freezer information . . . . . . . . . . . . . . . . . . . . . . . . . . . . . . .17
Removing door shelves. . . . . . . . . . . . . . . . . . . . . . . . . . . .17
Glass shelves . . . . . . . . . . . . . . . . . . . . . . . . . . . . . . . . . . . . .18
Cold Zone Drawer. . . . . . . . . . . . . . . . . . . . . . . . . . . . . . . . .18
Humidity Zone Drawer . . . . . . . . . . . . . . . . . . . . . . . . . . . .18
Humidity controlled crisper. . . . . . . . . . . . . . . . . . . . . . . . .18
Ice bin. . . . . . . . . . . . . . . . . . . . . . . . . . . . . . . . . . . . . . . . . . .18
Dairy bin . . . . . . . . . . . . . . . . . . . . . . . . . . . . . . . . . . . . . . . .18
Egg holder . . . . . . . . . . . . . . . . . . . . . . . . . . . . . . . . . . . . . . .19
Ion Guard. . . . . . . . . . . . . . . . . . . . . . . . . . . . . . . . . . . . . . . .19
Odor filter. . . . . . . . . . . . . . . . . . . . . . . . . . . . . . . . . . . . . . . .19
Using internal water dispenser. . . . . . . . . . . . . . . . . . . . . .19
Dispensing water . . . . . . . . . . . . . . . . . . . . . . . . . . . . . . . . .19
Using water dispenser. . . . . . . . . . . . . . . . . . . . . . . . . . . . .19
Refrigerator Shelf Weight Limitations . . . . . . . . . . . . . . . .20
6 Maintenance and cleaning 21
Avoiding bad odors . . . . . . . . . . . . . . . . . . . . . . . . . . . . . . .21
Protecting the plastic surfaces . . . . . . . . . . . . . . . . . . . . . .21
7 Troubleshooting 22
8 Service Information 24
Warranty 25
3 EN
Refrigerator / User Manual
1 Important instructions for safety and environment
Ths secton contans safety nstructons that wll help protect from rsk
of personal njury or property damage.
Falure to follow these nstructons shall vod
any warranty.
Intended use
– WARNING: Keep ventlaton openngs, n the applance enclosure or n
the bult-n structure, clear of obstructon.
– WARNING: Do not use mechancal devces or other means to
accelerate the defrostng process, other than those recommended by
the manufacturer.
– WARNING: Do not damage the refrgerant crcut.
NOTE :Ths warnng s only applcable to applances wth
refrgeratng crcuts whch are accessble to the user.
– WARNING: Do not use electrcal applances nsde the food storage
compartments of the applance, unless they are of the type
recommended by the manufacturer.
Ths applance s ntended to be used n household and smlar
applcatons such as
– staff ktchen areas n shops, offces and other workng envronments;
– farm houses and by clents n hotels, motels and other resdental type
envronments;
– bed and breakfast type envronments;
– caterng and smlar non-retal applcatons.
–
Not to be used n commercal settngs.
General safety
• Ths product can be used by chldren at and above 8 years old and
by persons whose physcal, sensory or mental capabltes were not
fully developed or who lack experence and knowledge provded
that they are supervsed or traned on the safe usage of the product
and the rsks t brngs out. Chldren must not play wth the product.
Cleanng and mantenance works should not be performed by
chldren unless they are supervsed by someone.
• Unplug the product if a failure occurs while it is in use.
• If the product has a failure, it should not be operated unless it is
repaired by the Authorized Service Agent. There is the risk of electric
shock!
• Connect the product to a grounded outlet protected by a fuse
complying with the values in the rating plate. Have the grounding
installation made by a qualified electrician. Our company shall not
be liable for any damages that will arise when the product is used
without grounding in accordance with the local regulations.
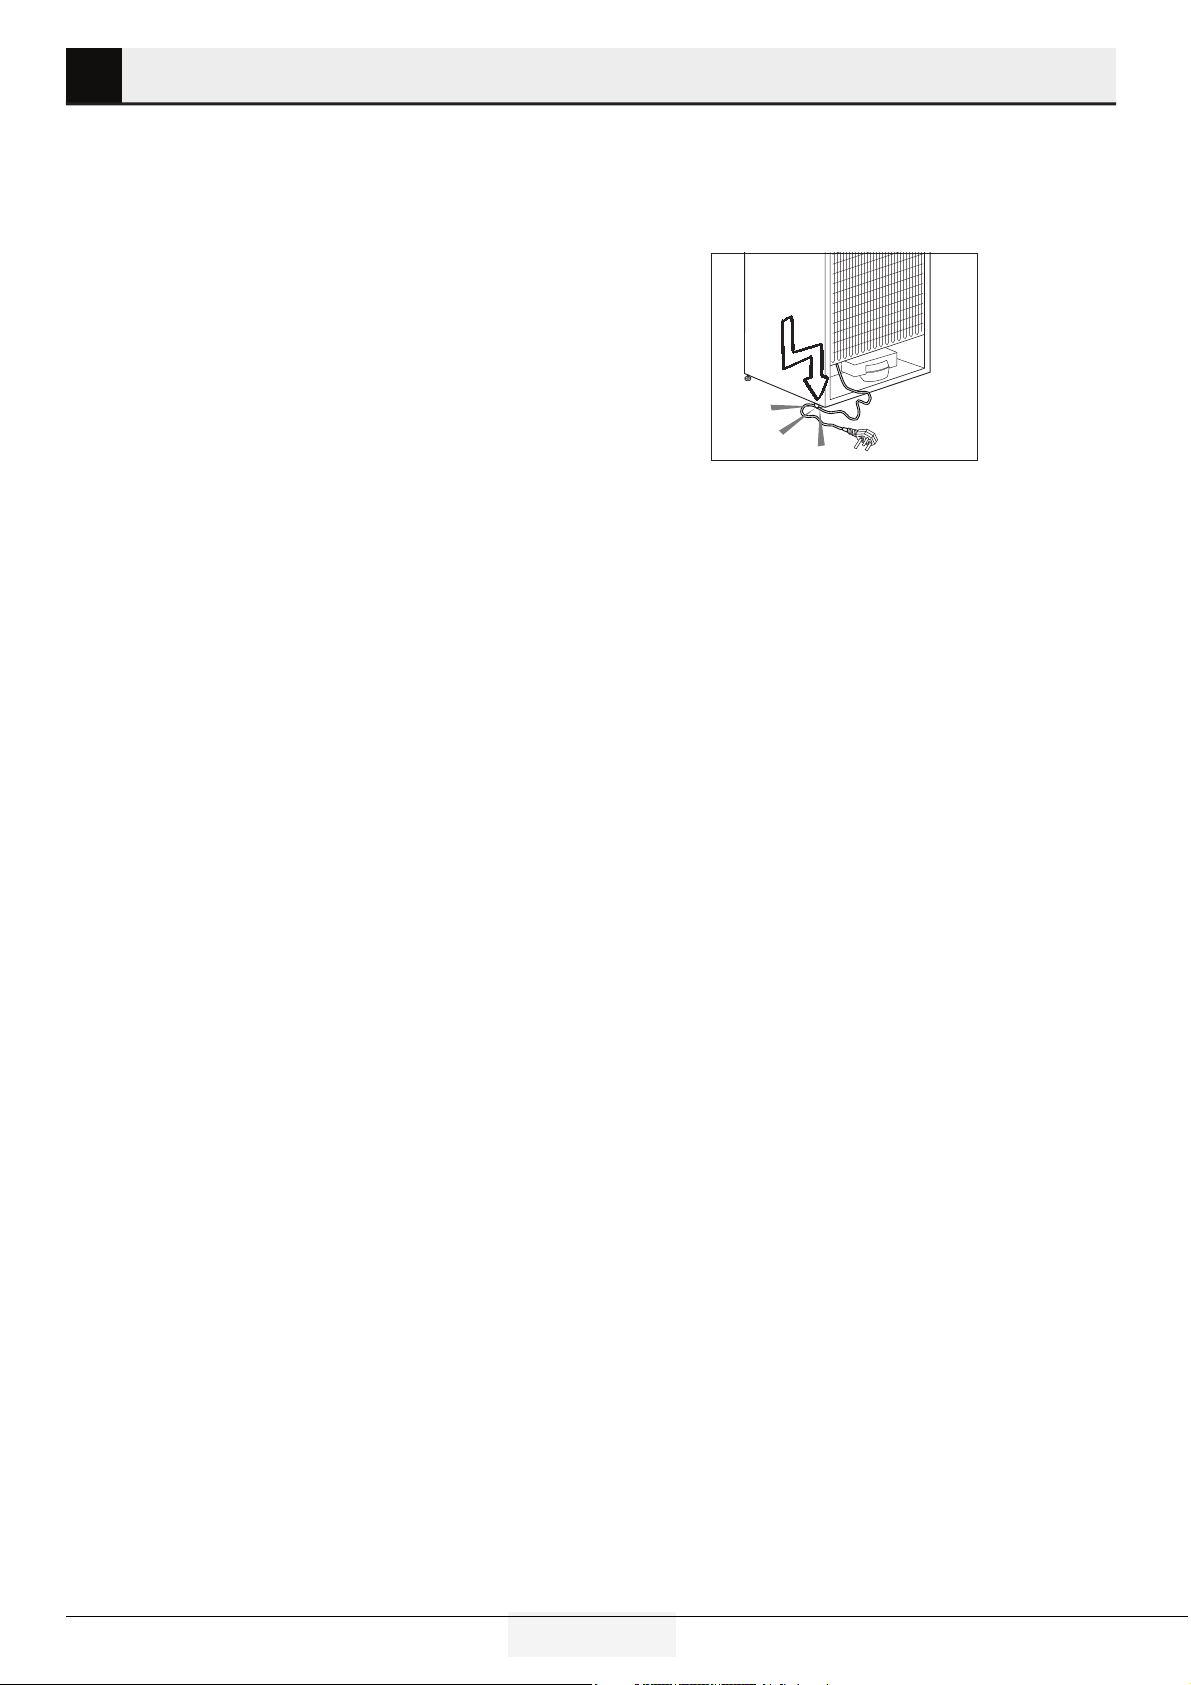
• Do not tuck the power cord under the product or to the rear of the
product. Do not put heavy tems on the power cord. The power cord
should not be bent, crushed, and come nto contact wth any heat
source.
• Never wash the product by spreading or pouring water onto it! There
is the risk of electric shock!
• Never touch the plug with wet hands! Never unplug by pulling on the
cable, always pull out by grabbing the plug.
• Do not plug the refrigerator if the wall outlet is loose.
• Never connect your refrigerator to electricity-saving systems. Such
systems are harmful for the product.
• Unplug the product during installation, maintenance, cleaning and
repairing procedures.
• Always have the installation and repairing procedures carried out by
the Authorized Service Agent. The
Manufacturer shall
not be held liable for damages that
may arise from procedures carried
out by unauthorized persons.
• Do not put bottled and canned liquid beverages in the freezer
compartment. They may burst!
• Never use steam and steam assisted cleaning materials to clean
or defrost the refrigerator. Steam will cause short circuit or electric
shock since it would get into contact with the electrical parts in the
refrigerator!
• Never use the parts on your refrigerator such as the door and drawer
as a means of support or step. This will cause the product to tip over or
parts of it get damaged.
• Do not damage the cooling circuit, where the refrigerant is circulating,
with drilling or cutting tools. The refrigerant that might blow out
when the gas channels of the evaporator, pipe extensions or surface
coatings are punctured may cause skin irritations and eye injuries.
• Do not cover or block the ventilation holes on the refrigerator with any
material.
• Do not use gaseous sprays near the product since there is the risk of
fire or explosion!
• Flammable items or products that contain flammable gases (e.g.
spray) as well as the explosive materials should never be kept in the
appliance.
• Do not place containers filled with liquid on top of the product.
Spilling water on an electrical component may cause electric shocks
or risk of fire.
• Do not store products (vaccines, heat-sensitive medicines, scientific
materials and etc.) that require a precise temperature control in the
refrigerator.
4 EN
Refrigerator / User Manual
Important instructions for safety and environment
• If you will not operate the product for a long period of time, unplug
and unload the food in it.
• If the product is equipped with blue light, do not look at the blue
light with optical tools.
• In products with mechanical control (thermostat), wait for mini-
mum 5 minutes to plug in the product again after unplugging it.
• Do not overload the product. It may fall when the door is opened,
and cause injury or damage. Similar problems may occur in case of
putting things on top of the product.
• Pay attention not to have your hand or any part of your body get
caught by the moving parts inside the product.
HCA warning
• Your product’s coolng system contans R600a:
This gas is flammable. Therefore, pay attention to not damaging the
cooling system and piping during usage and transportation. In the
event of damage, keep your product away from potential fire sources
that can cause the product catch a fire and ventilate the room in
which the unit is placed.
WARNING: Never dispose the product in fire.
Water dispenser
• Pressure for cold water nlet shall be maxmum 90 ps (620kPa). If
your water pressure exceeds 80 ps (550 Pa), use a pressure lmtng
valve n your man system. If you do not know how to check your
water pressure, ask for the help of a professonal plumber.
• If there s rsk of water hammer effect n your nstallaton, always use
a water hammer preventon equpment n your nstallaton. Consult
Professonal plumbers f you are not sure that there s no water
hammer effect n your nstallaton.
• Do not nstall on the hot water nlet. Take precautons aganst of the
rsk of freezng of the hoses. Water temperature operatng nterval
shall be 33°F (0.6°C) mnmum and 100°F (38°C) maxmum.
• Use only potable water.
Intended use
• This product has been designed for domestic use. The warranty
excludes use of the product n all commercal locatons
• Product must be used only for storing food.
• Viking Range, LLC is not responsible for property damage due to
improper installation or water connection.
Children’s safety
• Children must be supervised to prevent them from tampering
with the product.
DANGER: Rsk of chld entrapment. Before you
throw away your old refrgerator or freezer:
• Take off the doors.
• Leave the shelves n place so that chldren may
not easly clmb nsde.
Package information
• Packaging materials of the product are manufactured from
recyclable materials in accordance with our National Environment
Regulations. Do not dispose of the packaging materials together
with the domestic or other wastes. Take them to the packaging
material collection points designated by the local authorities.
•
Contact qualfed personnel for dsposal.
•Contact qualified personnel for servicing.
5 EN
Refrigerator / User Manual
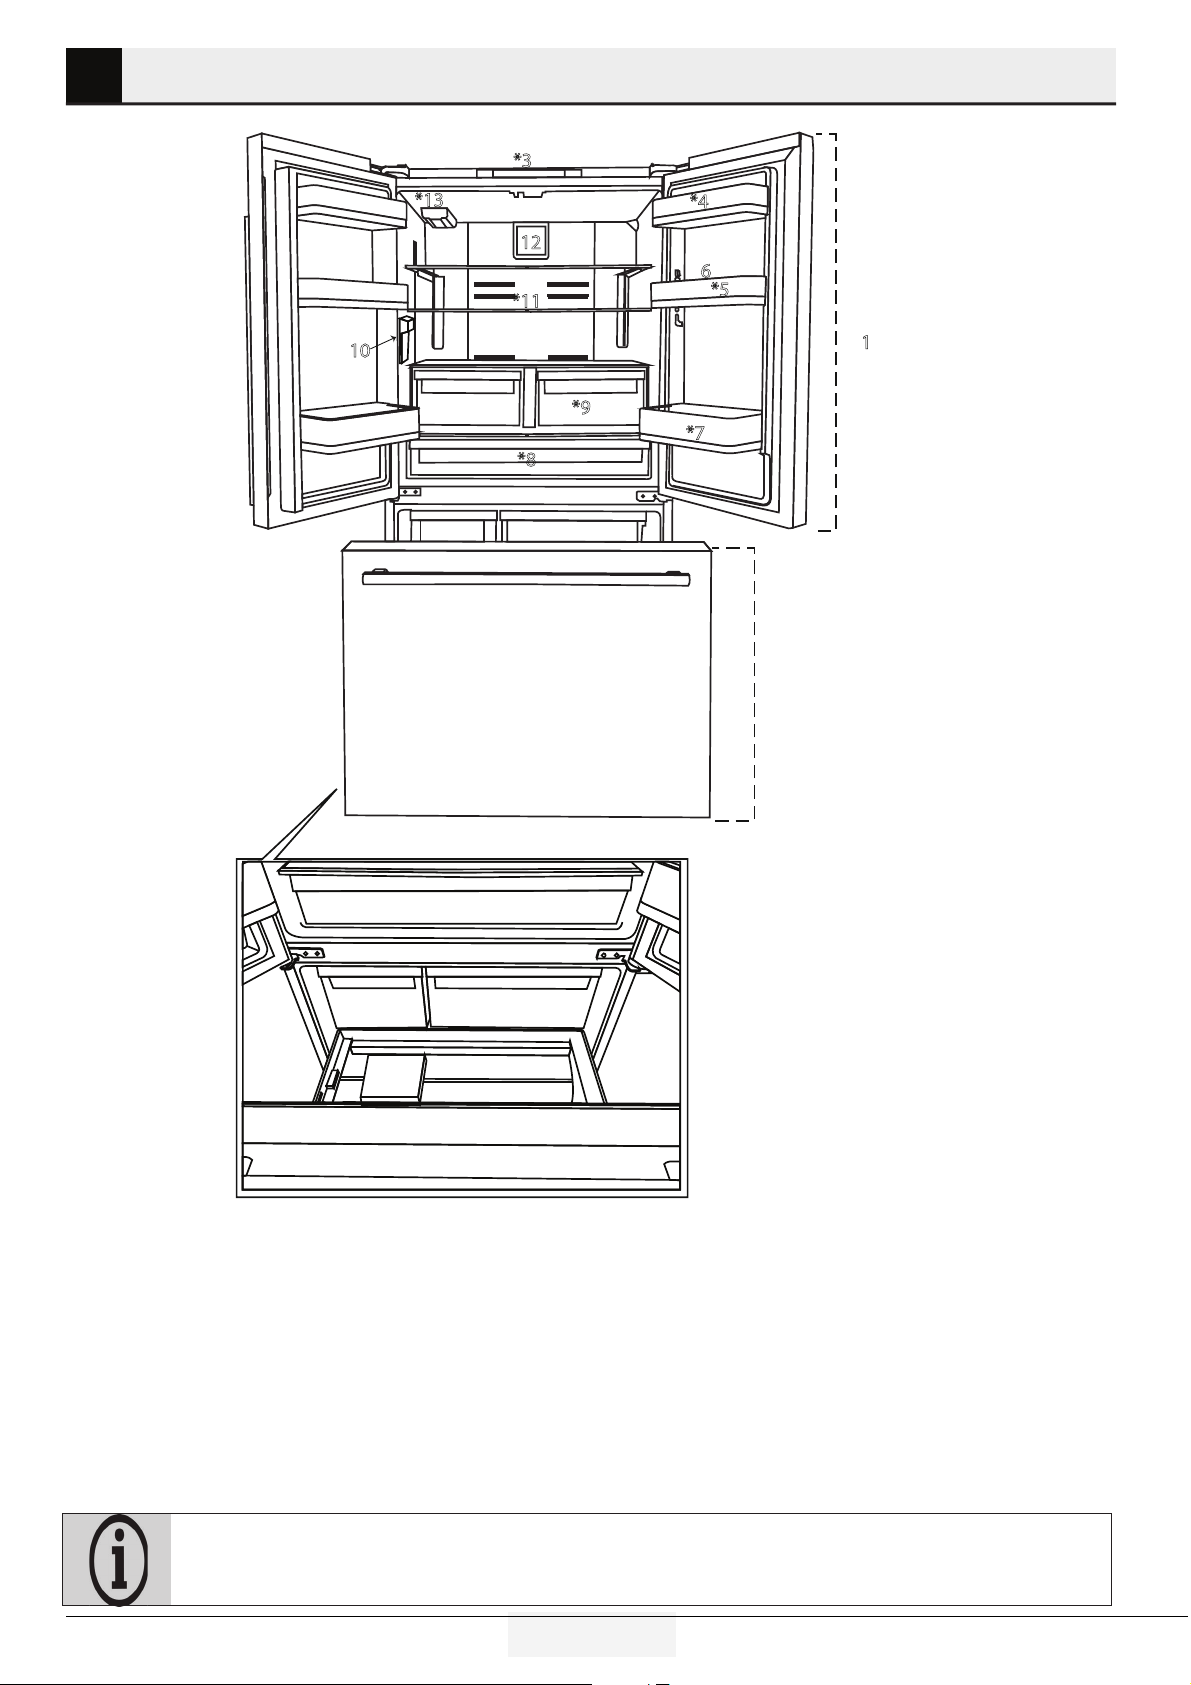
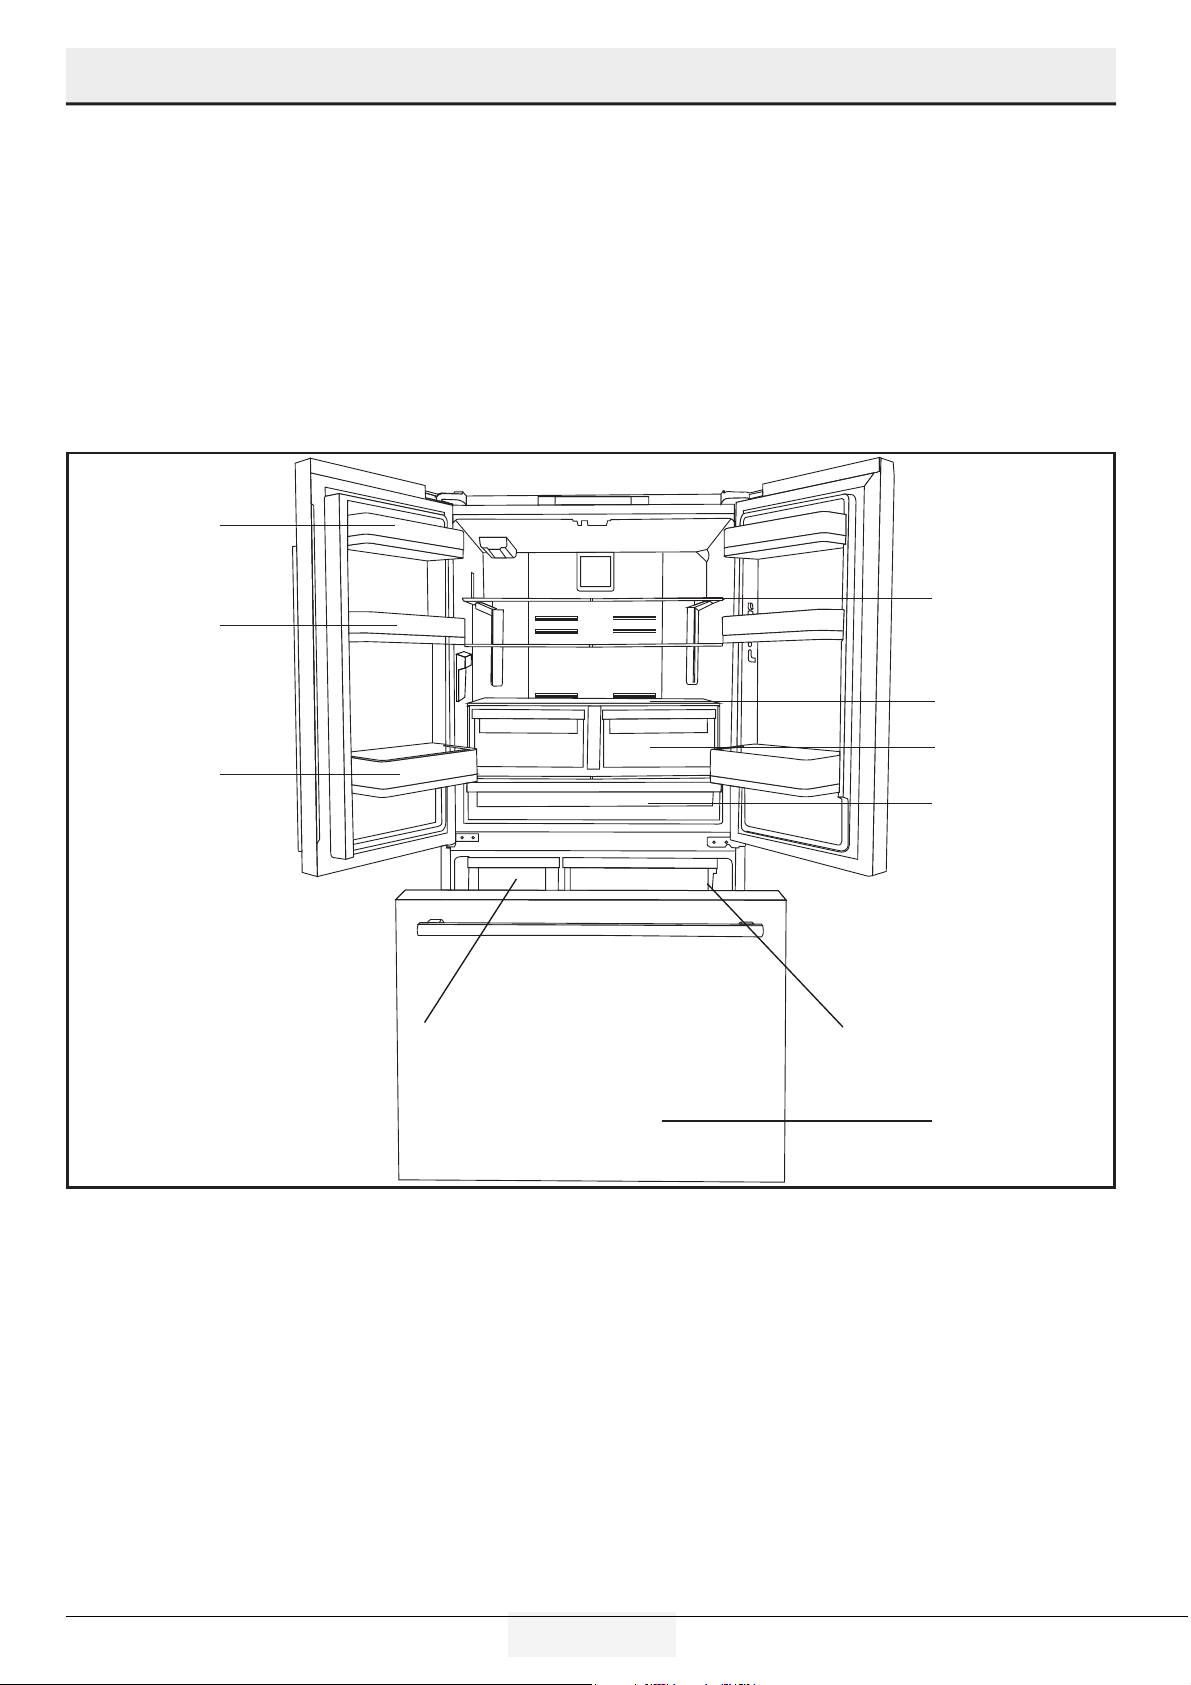
2 Your Refrigerator
1- Refrigerator Compartment
2- Freezer Compartment
3- Display/indicator Panel
4- Dairy Bin
5- Refrigerator Door Bins
6- Egg Tray
7- Tall Items Door Bin
8- Cold Zone Drawer
9- Humidity Zone Drawers
10- İnner Water Dispenser
11- Adjustable Glass Shelf
12- Fan Cover
13- Water Filter
14- Ice Bin
15- Frozen Food Storage Bın (Upper)
16- Frozen Food Storage Bın (Lower)
17- Drawer Divider
2
*3
1
*7
*5
*8
*9
10
12
*13
*11
6
*4
14 15
16
*17
Figures in this user manual are schematic and may not match the product exactly. If the subject parts are not included in the
product you have purchased, then those parts are valid for other models.
6 EN
Refrigerator / User Manual
3 Installation
To reduce the risk of fire, electrical shock, or injury to persons,
installation work and electrical wiring must be done by a qualifi
ed technician in accordance with all applicable codes and
standards, including fire-rated construction.
It is the customer’s responsibility to:
• Contact a qualified electrical installer.
• Assure that the electrical installation is adequate and
in conformance with the National Electrical Code,
ANSI/NFPA 70-latest edition or Canadian Electrical
Code C22.1-1998 and C22.2 No. 0-M91 (or latest
edition), and all local codes and ordinances.
Product must not be plugged in during installation.
Otherwise, there is the risk of death or serious injury!
WARNING: Installation and electrical
connections of the product must be carried out by
the Authorised Service Agent. Manufacturer shall
not be held liable for damages that may arise from
procedures carried out by unauthorized persons.
WARNING: Prior to installation, visually check
if the product has any defects on it. If so, do not have
it installed. Damaged products cause risks for your
safety.
Make sure that the power cable is not pinched or
crushed while pushing the product into its place after
installation or cleaning procedures.
Appropriate installation location
WARNING: If the door of the room where the
product will be placed is too small for the product
to pass, then the product's doors must be removed
and the product must be turned sideways to pass it
through.
• Install the product at least 12” (30 cm) away from heat
sources such as gas cooktops, ovens, and stoves and at least
2” (5 cm) away from electrical ovens. Product must not be
subjected to direct sun light and kept in humid places after
installation.
• Do not place the product on rugs or carpets.
• Place the product on an even floor surface to prevent
wobbling.
• Do not install the product in places where the temperature
falls below 10ºC /50°F.
If two refrigerators are to be installed side by side,
there should be at least 1-1/2
” (4 cm) distance
between them.
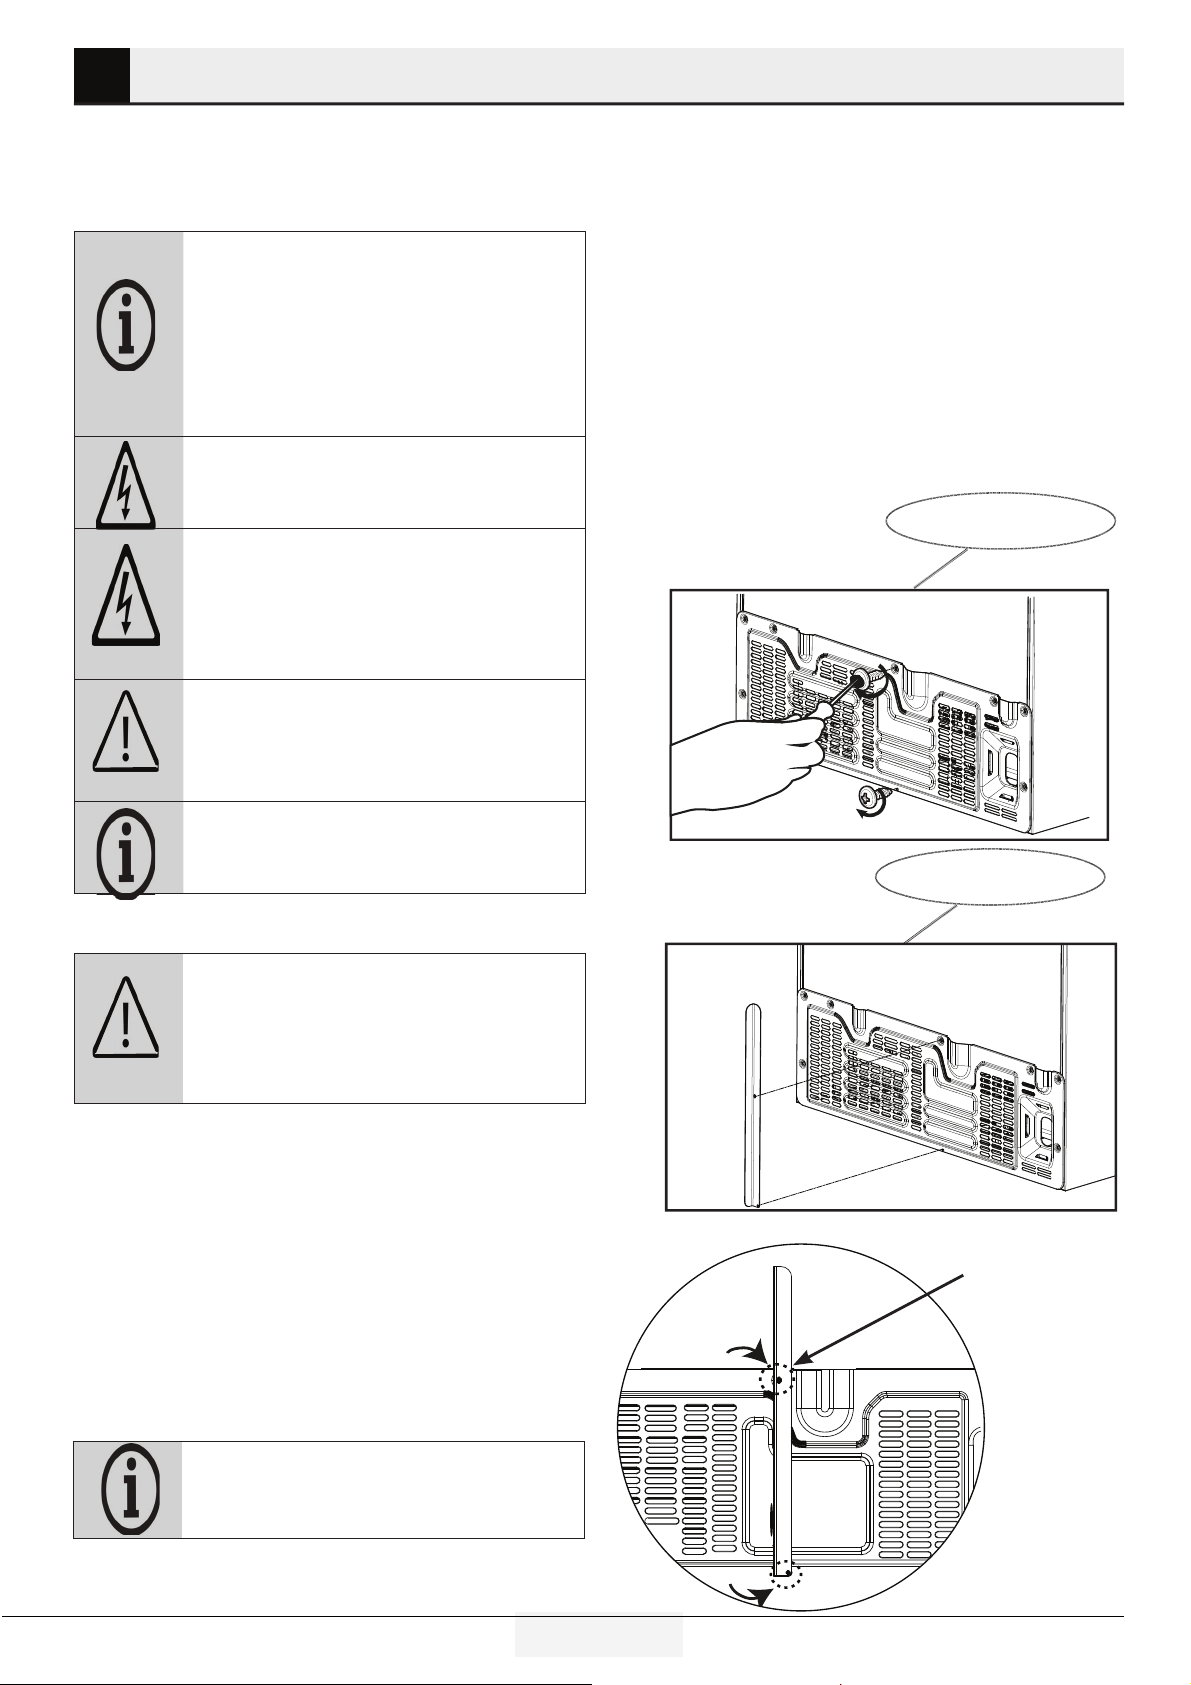
Bult-In Installaton
If the product will be placed in a cutout, make sure suffcent room
s provded around the applance to ensure free ar crculaton.
To
ensure proper ventlaton:
-Allow for a 5/8” (1.6 cm) space on each sde and 2” (5.1 cm) at the top.
-Allow 1-3/8” (3.5 cm) of space behnd the refrgerator.
Proper Circulation
unscrew before the nstallaton
Install the vertcal metal bracket and screw.
The longer screw must
be used on the top.
For effcent functonng n the cutout, the metal bracket and ar
buffer bumpers must be added to product.
7 EN
Refrigerator / User Manual
Installation
Electrical connection
• Electrical connection must comply with national and local
regulations.
• Power cable plug must be within easy reach after installation.
• The specified voltage must be equal to your mains voltage.
• Do not make connections via extension cables or multi-plugs.
WARNING: Damaged power cable must be
replaced by the Authorized Service Agents.
WARNING: If the product has a failure, it should
not be operated unless it is repaired by the Authorized
Service Agent! There is the risk of electric shock!
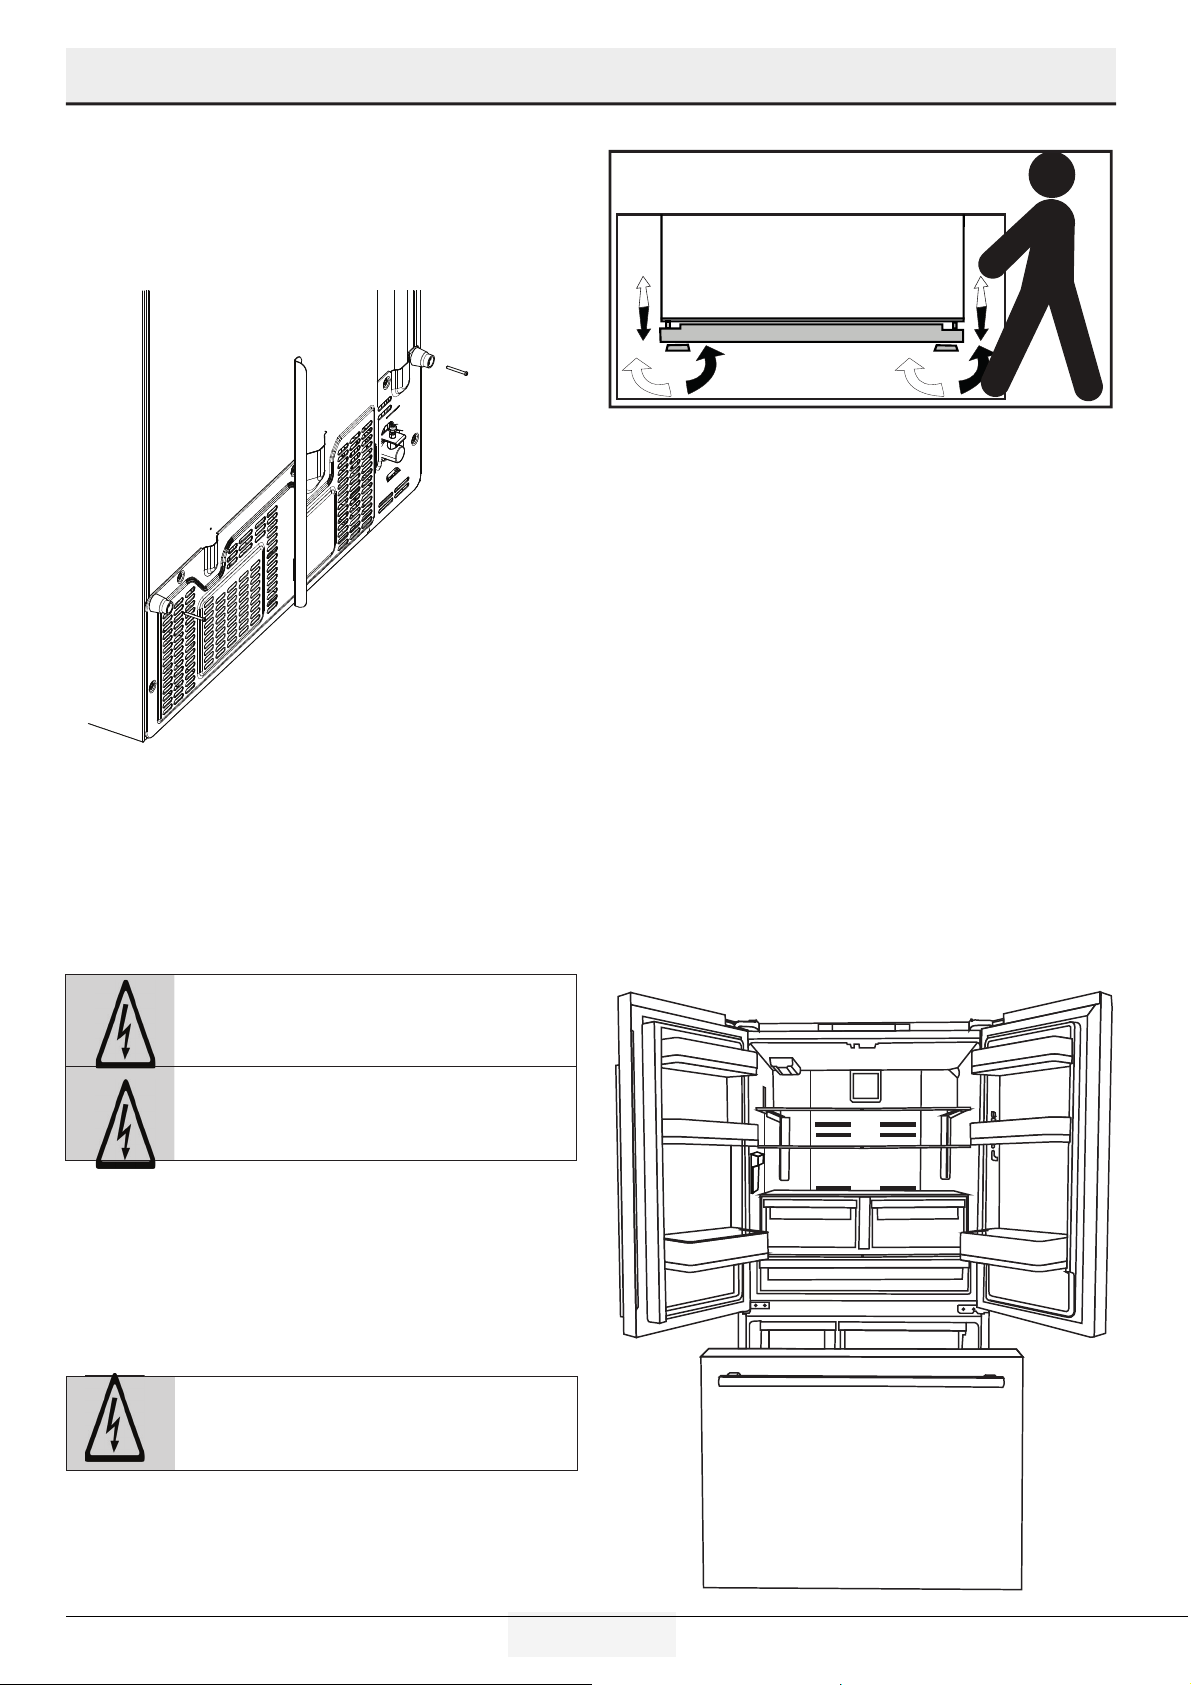
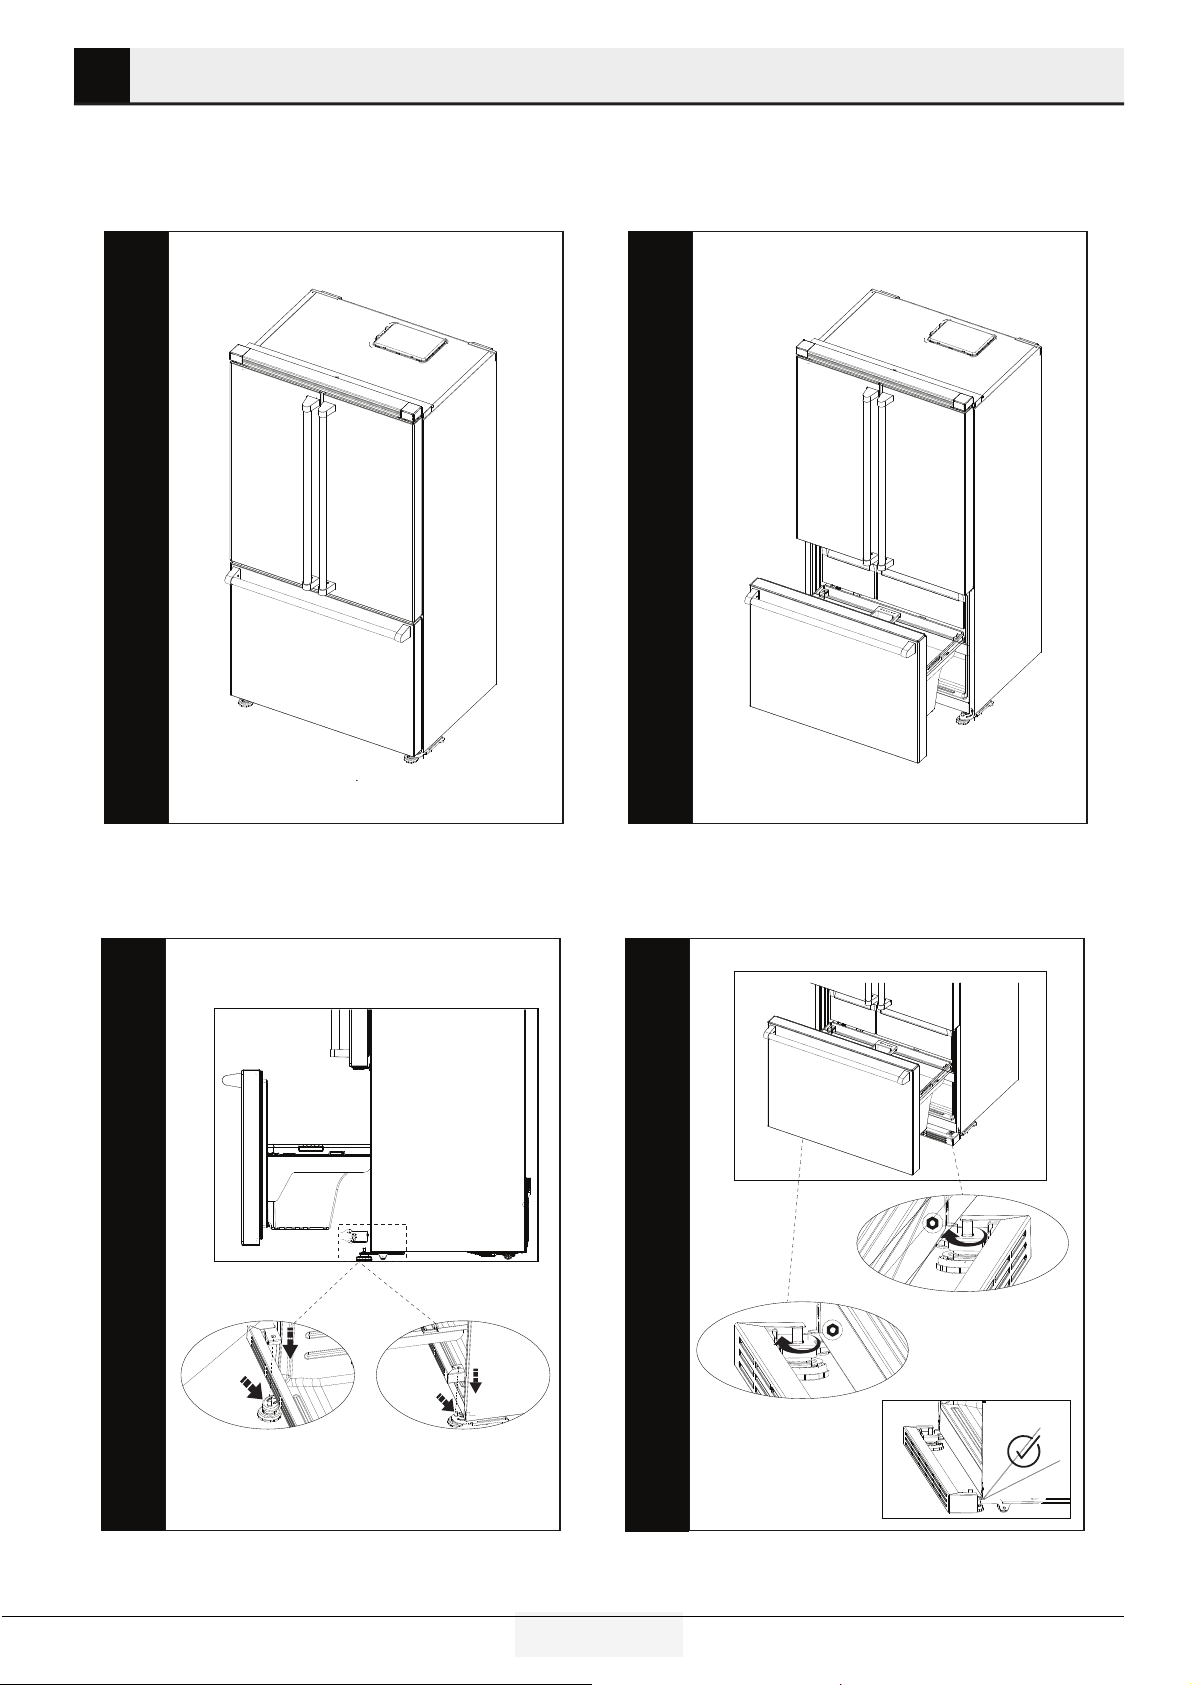
Adjusting the feet
If the product stands unbalanced after installation adjust the
feet. Use another person to safely tilt the product during this
process.
WARNING: First unplug the product. Product
must not be plugged in when adjusting the feet. There
is the risk of electric shock!
Turn the front feet to balance the product. The corner where the
foot exists is lowered when you turn in the direction of arrow
and raised when you turn it in the opposite direction.
LED Lighting
Do not attempt to repair yourself. Call an Authorized Service
Agent if the LED lights do not go on or are out of order.
The lghts used n ths applance are not sutable for household
room llumnaton. The ntended purpose of ths lght s to assst
when loadng food n the refrgerator/freezer n a safe and
comfortable way.
Door Alarm
An audio warning signal will sound when the door of your
product is left open for 1 minute. This warning will be muted
when the door is closed or any of the display buttons (if any)
are pressed.
Remove the two screws at the top of the grlle. Add the ar buffer
bumpers usng the screws that were removed.
8 EN
Refrigerator / User Manual
Installation
Before Installation
Make sure that you have everything necessary to ensure proper
installation before proceeding, including:
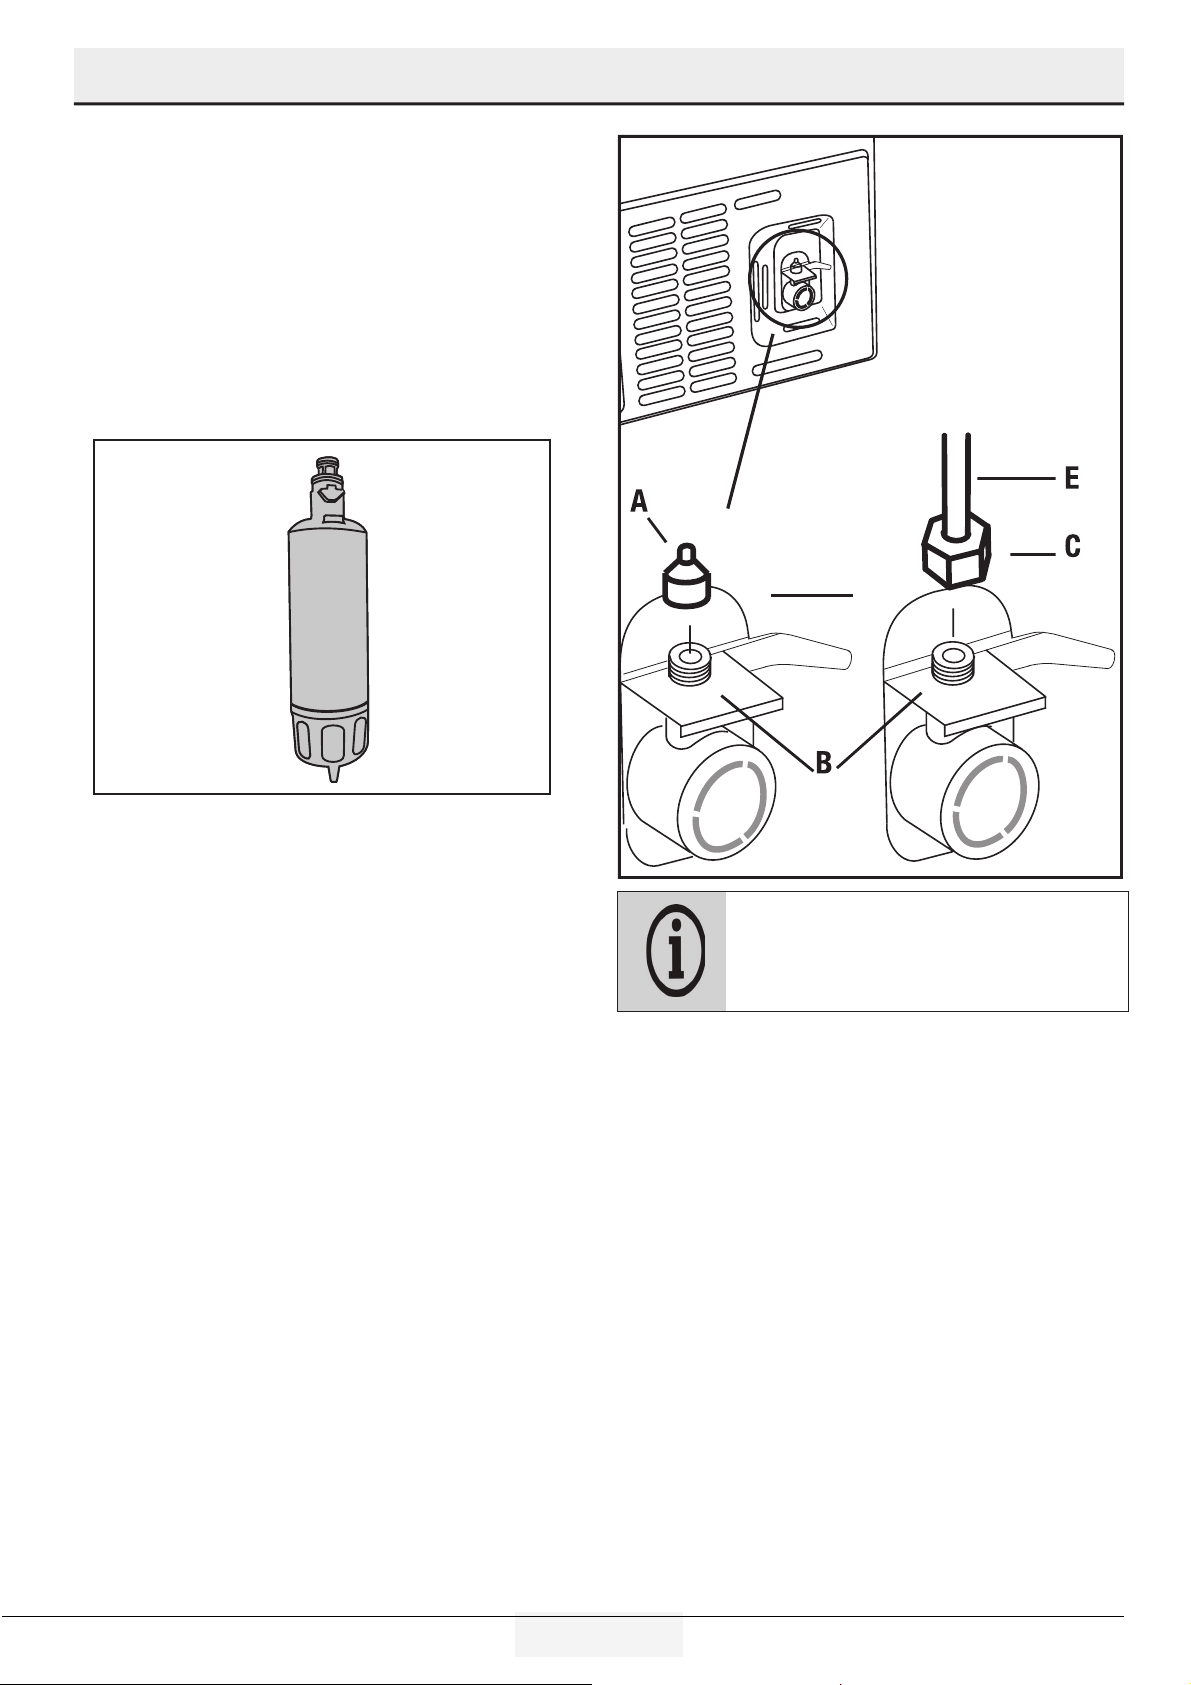
Your product comes with an internal water filter for use inside
the refrigerator. Part number of the filter is RWFRVFFR and
you can use this part number when ordering replacement
filters.
Normally, you are not required to tighten the union
with a tool. However, you can use a pliers or pliers
to tighten the union if there is a leak. DO NOT
overtighten
Connectng the water line
to the water supply
Connect the water line to a water supply valve. If a valve is not
present or you are not sure, consult a qualified plumber.
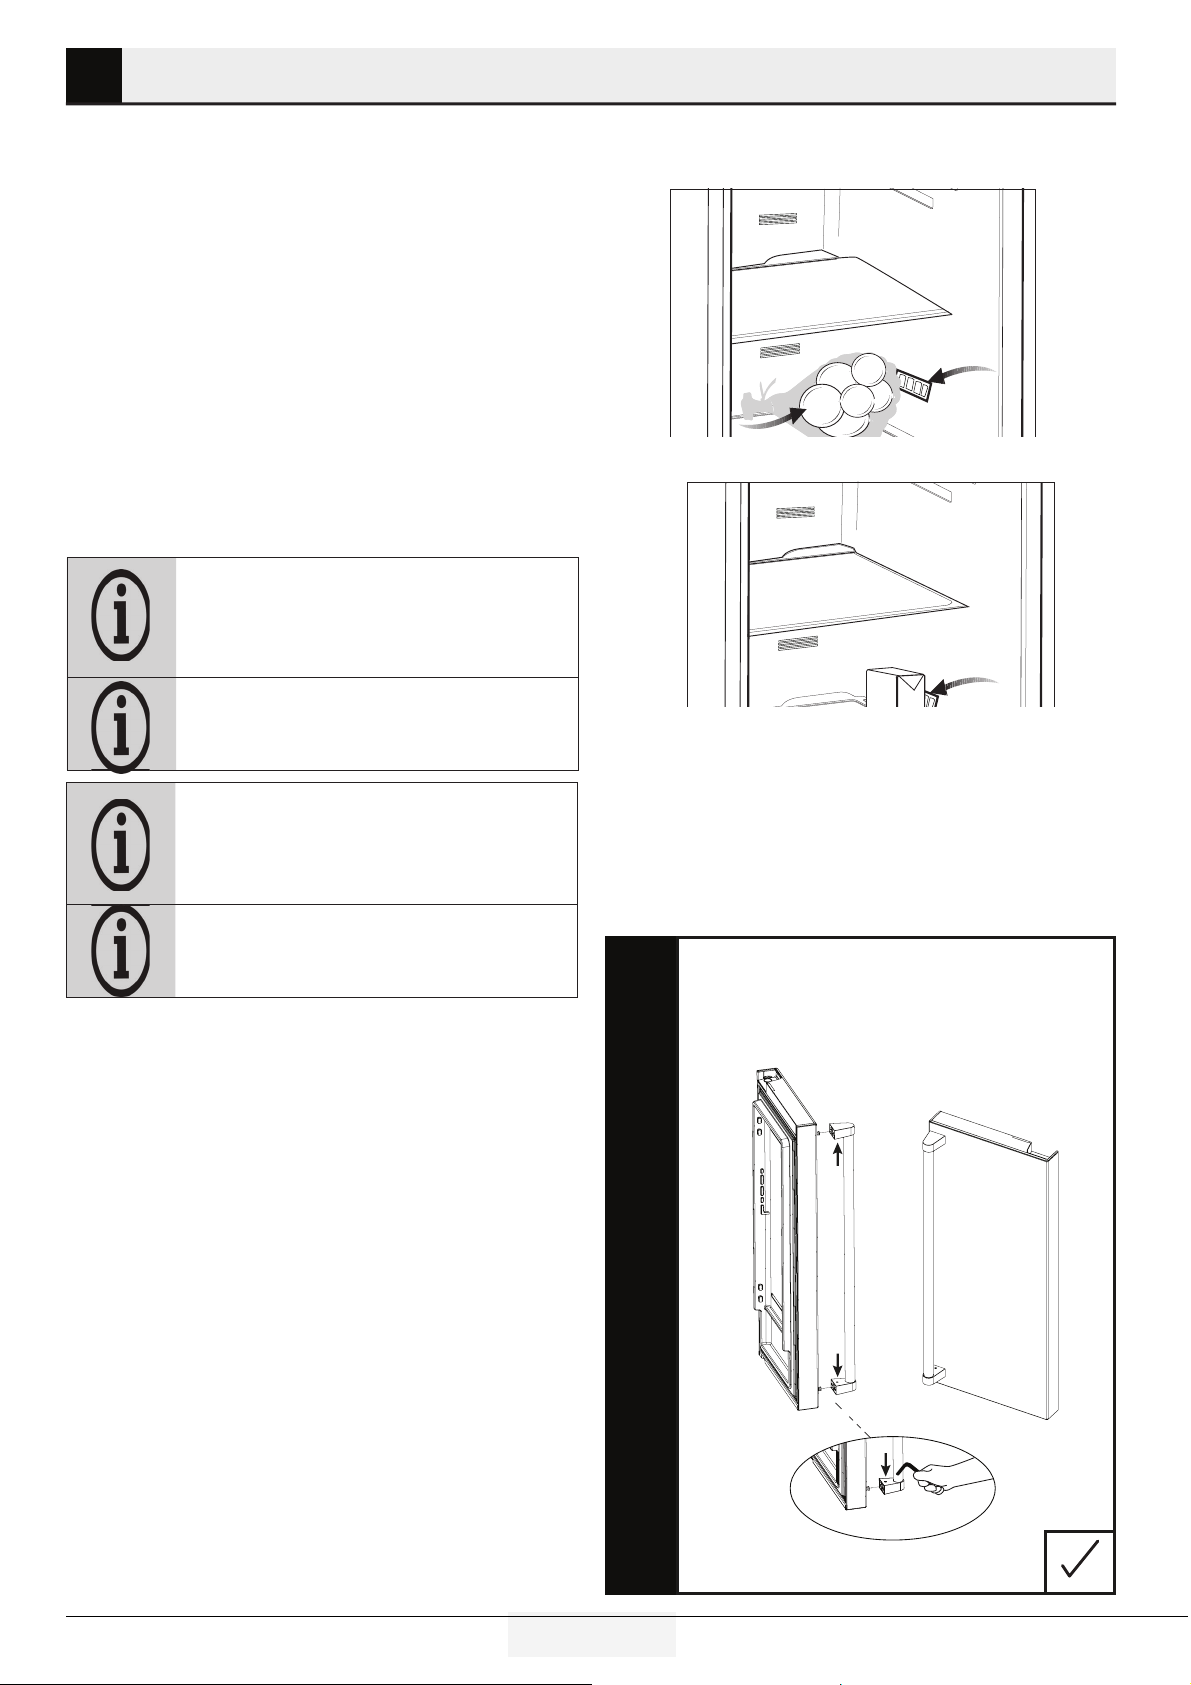
Connecting the water line
to the refrigerator
1. Remove the valve channel cover (A) from the water nlet valve.
2. Slp the unon (C) water nlet valve (B).
3. Push the water hose downwards frmly to slp t onto the water
nlet valve (B).
4. Tghten the unon (C) by hand to secure t onto the water nlet
valve.
9 EN
Refrigerator / User Manual
Installation
Water flter
Your refrigerator is equipped with an internal filter. To install the
water filter, follow the instructions below referring to the figures
supplied:
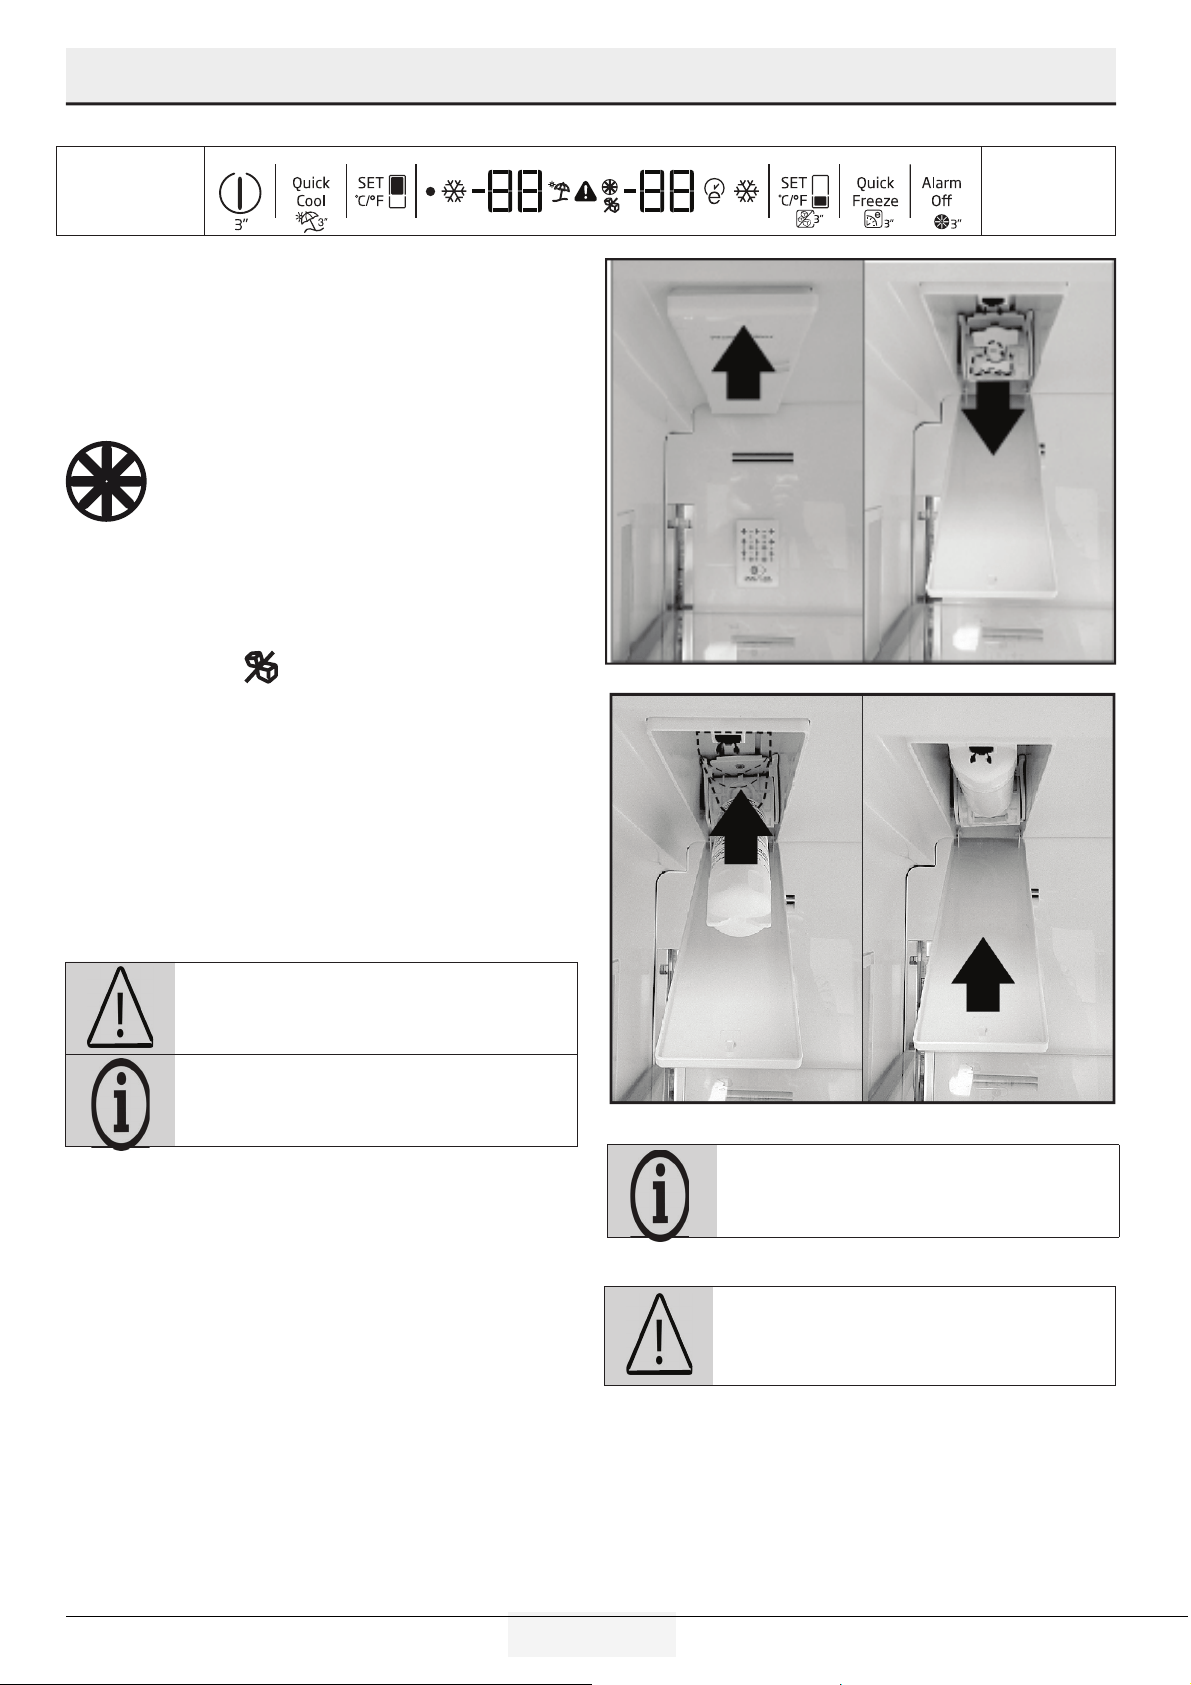
Installing the water filter
Filter replacement consists of 2 parts - physically changing the
filter and making adjustments on the display.
1. Press “Ice Off”
button (located under the SET
button) before removing the by pass cover.
2. Slide the water filter cover forward.
3. Remove the water filter bypass plug by turning it downwards and
pulling out.
4. Seat the water filter cover into the mechanism and push forwards
to lock it in place.
5. Press
“Ice Off”
button on the display again to exit this mode.
WARNING: Ensure that the Ice Off mode is
enabled before removing the by-pass cover.
It is normal that a few drops of water drip after the
cover has been removed.
WARNING: Water filter cleans some foreign
particles in the water. It does not purify water from
microorganisms.
Filter end of life warning.
Water filter must be replaced every 6 months. Make
sure that the "Ice Off" mode is enabled before
removing the filter.
10 EN
Refrigerator / User Manual
Installation
Before using the water/
ice dispenser
• Water system of the refrigerator must be connected To the cold
water line.
It must not be connected to hot water line.
• No water may be obtained in the initial start-up of the refrigerator.
Because there is air in the system. To discharge air from the system,
press dispenser for 1-2 minutes until water comes from the
dispenser. Water flow may be irregular at the beginning. After the
air in the system is discharged, water flow will return to normal
place container under dispenser nozzle.
• The first 10 glasses of water should not be consumed.
• During initial use, you will have to wait approximately 12 hours to
cool the water.
• It will take around 1-2 days for the system to produce required
amount of ice.
• If the water dispenser is not used for a long period of time, first 1-2
glasses of water can be hot.
• If a power outage or a temporary failure occurs while the
refrigerator is operating, ice can melt down a little bit and then
get frozen again. In such a case, ice cubes can stick to each other.
If the outage or failure prolongs, ice can melt down causing water
leakage. If you experience such a problem, empty and clean the ice
container.
• Ice cubes can stick to each other if they are left in the container for
a long time.
• The water system installation of the refrigerator must be performed
by the Authorized Service Agent.
• If the product is to be connected to the water mains, make sure that
you use potable water.
• Water system of the product is designed to operate only with water.
Do not use beverage such as soft drinks and/or juices in the water
system.
• It is recommended that the water is disconnected if you will not be
using the refrigerator for a long period of time due to vacation or
similar reasons.
• Do not attempt to dismantle the ice container group assembly
parts.
• Do not attempt to clean the ice container assembly without
removing it from the refrigerator.
• When taking water from the water dispenser, remove the glass
from the opening 1 second after releasing the trigger. Thus, water in
the system will not drip into the drip tray.
Transportation of the product
1. Unplug the product before transporting it.
2. Remove water connections.
3. Secure the shelves, accessories, and drawers. in the
refrigerator by adhesive tape before repackaging it.
Packaging must be tied with thick tapes or strong
ropes and the rules of transportation printed on the
package must be followed.
Original packaging and foam materials should be kept
for future transportations.
WARNING: Packaging materials are dangerous
for the children. Keep packaging materials in a safe
place away from reach of the children.
11 EN
Refrigerator / User Manual
Installation
5
8
(67.9 cm)
(90.8 cm)
69 1/2”
(176.5 cm)
with 3/8”
rollers
(60.0 cm)
(73.7 cm)
(90.5 cm)
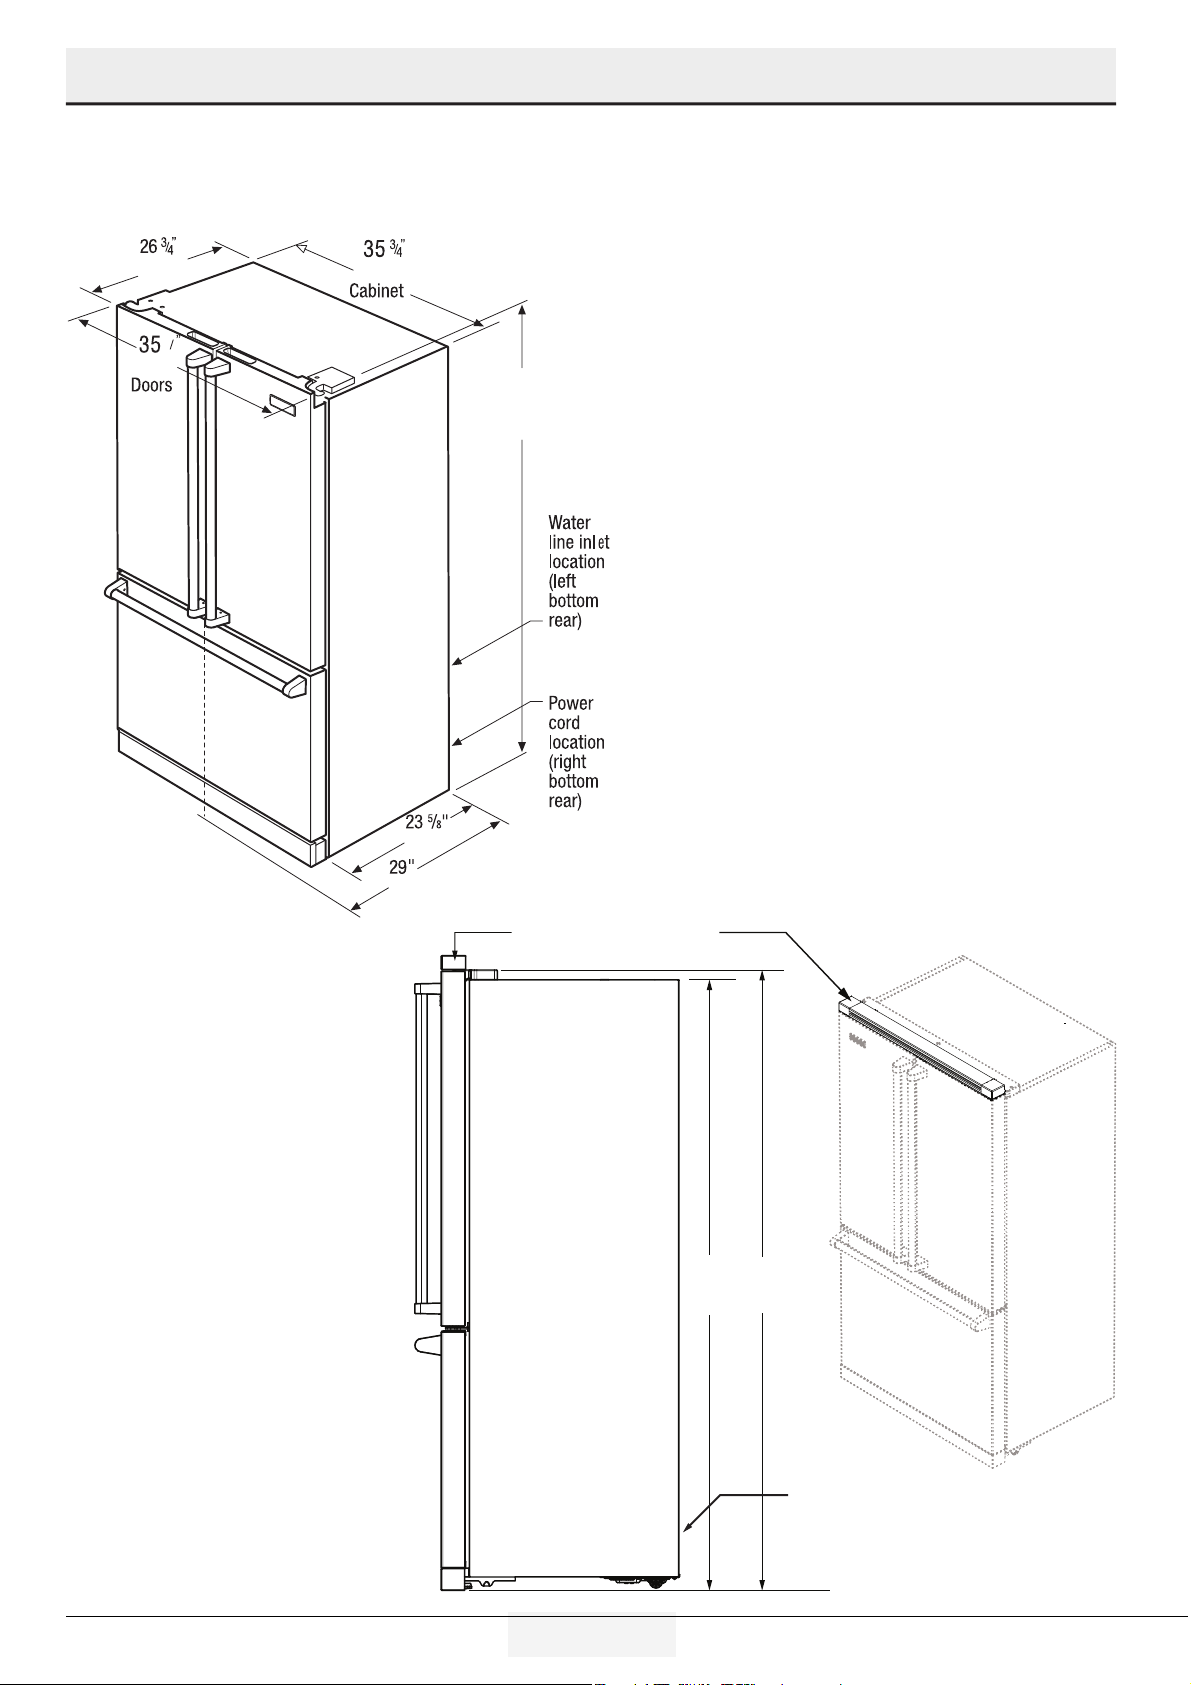
Side View
Grille Accessory
add 2” to top dimension of 69 /”
Grille Accessory
add 2” to top dimension of 69 /”
68 /”68 /”
with /” rollerswith /” rollers
69 /”69 /”
with /” rollerswith /” rollers
Water Line Inlet (Right)
Power Cord Location (Left)
Water Line Inlet (Right)
Power Cord Location (Left)
Product Dmensons
Wthout Grlle
Wth Grlle
12 EN
Refrigerator / User Manual
Installation
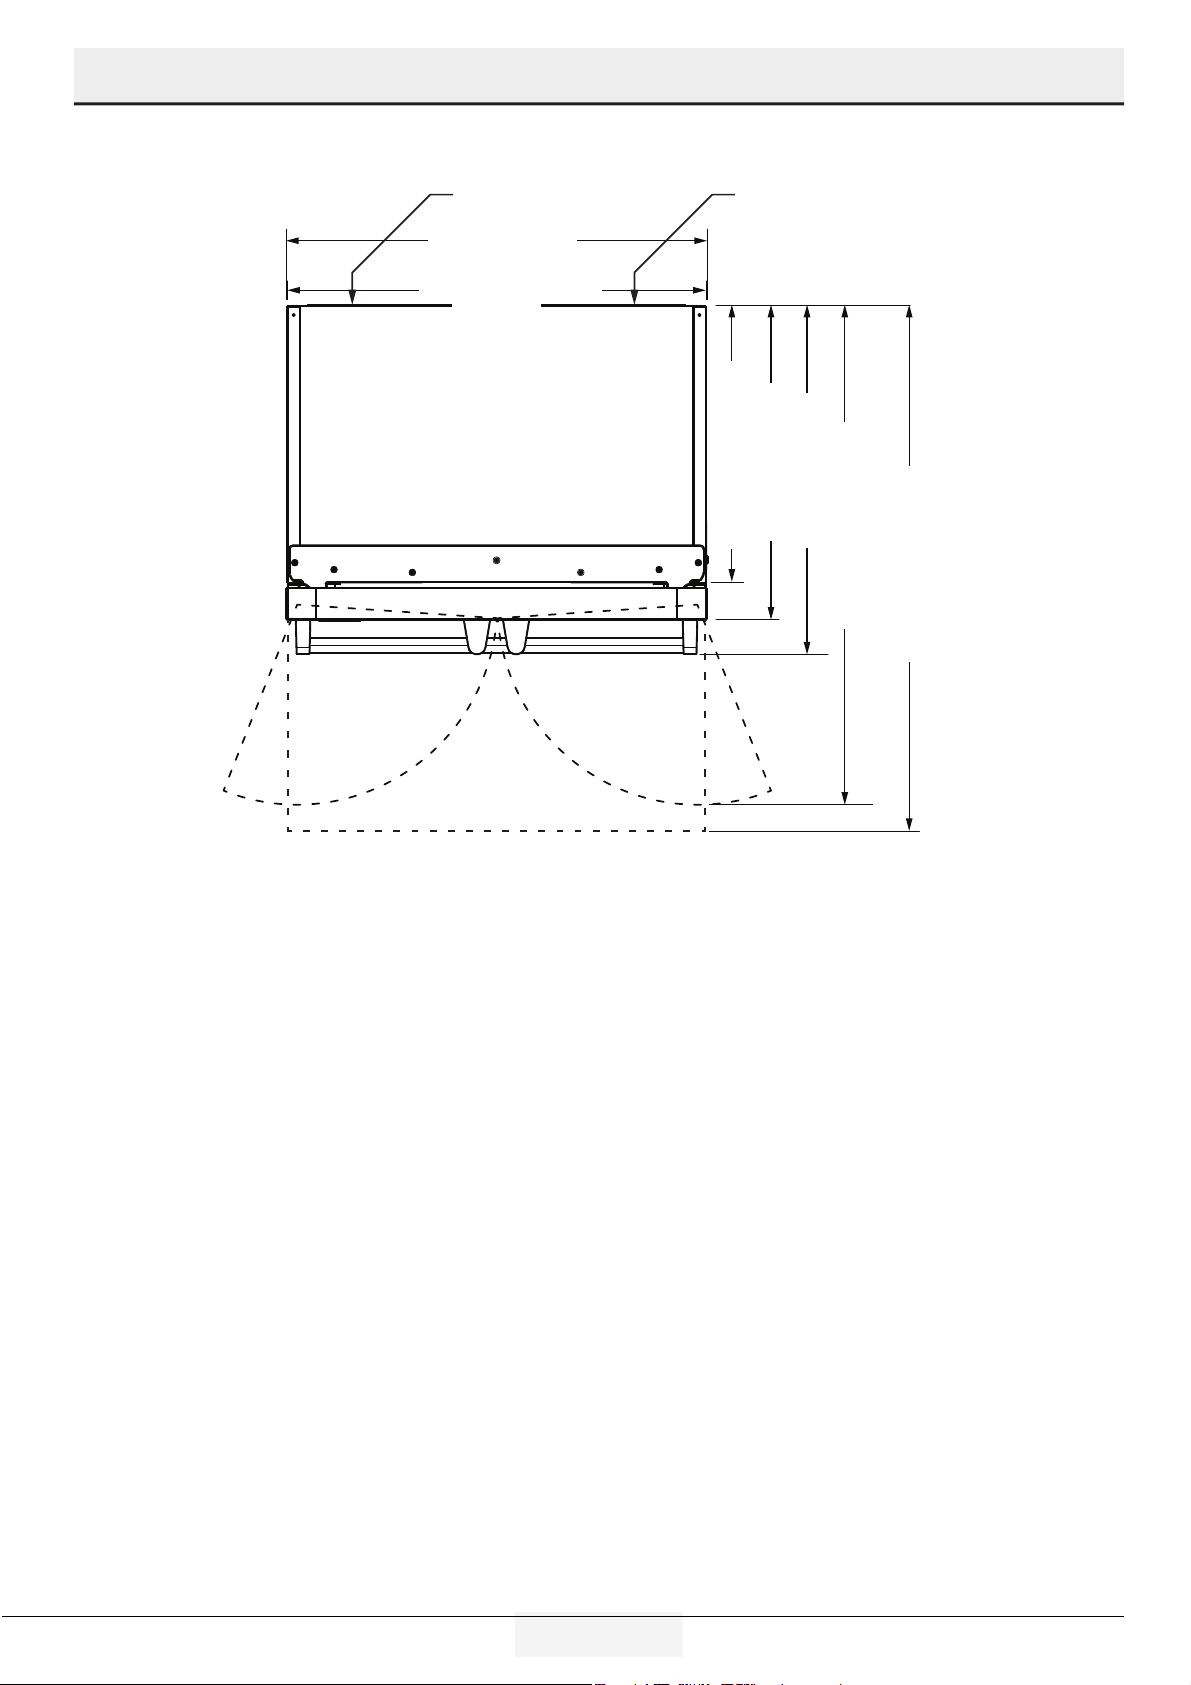
Door Swng
36” (91.4 cm)36” (91.4 cm)
DoorsDoors
27” (68.6 cm)27” (68.6 cm)
23 /” (60.0 cm)23 /” (60.0 cm)
30” (68.6 cm) 30” (68.6 cm)
46 /” (118.1 cm)46 /” (118.1 cm)
(with drawer fully extended including handle) (with drawer fully extended including handle)
42 /” (108.1 cm) 42 /” (108.1 cm)
(with doors 90º deg open) (with doors 90º deg open)
35 /” (90.4 cm)35 /” (90.4 cm)
Fridge BoxFridge Box
Water line inlet
at bottom
Water line inlet
at bottom
Power cord
location at bottom
Power cord
location at bottom
TOP
13 EN
Refrigerator / User Manual
4 Preparation
• To allow the refrgerator compartment keep ts deal storage
temperature, sensor must not be hndered by food.
Before usng the product, check that all preparatons are made n
accordance wth the nstructons n sectons "Important nstructons
for safety and envronment" and "Installaton".
• Clean the interior of the refrigerator as recommended in the
“Maintenance and cleaning (Page 25)” section. Check that inside of
it is dry before operating it.
• Plug the refrigerator into the grounded wall outlet. When the door is
opened the interior illumination will turn on.
• Run the refrigerator without putting any food for 6 hours and do not
open its door unless absolutely required.
• Do not allow the food to touch the temperature sensor in refrigerator
compartment.
You will hear a noise when the compressor starts up.
The liquids and gases sealed within the refrigeration
system may also give rise to noise, even if the
compressor is not running and this is quite normal.
Front edges of the refrigerator may feel warm. This is
normal. These areas are designed to be warm to avoid
condensation.
The ambient temperature of the room where you
install the refrigerator should at least be
10ºC /50°F.
Operating your refrigerator under cooler conditions
than this is not recommended.
Inside of your refrigerator must be cleaned thoroughly.
Installing Door Handle
1. Place the handle over the pn jonts that are on the door panel.
2. Usng the suppled 3 mm allen key, tghten the screw to a tghtness
where the handle does not move from the pn jonts.
3. Tghten both sdes evenly and do not overtghten.
14 EN
Refrigerator / User Manual
4 Preparation
Optional Toe Kick
Place the toe kck over the freezer hnge from rear.
Open the Freezer door
Tghten the nut on the adjustable feet by hand or usng a M10 tool.
15 EN
Refrigerator / User Manual
5 Operating the product
*optional: Figures in this user manual are schematic and may not match the product exactly. If the subject parts are not
included in the product you have purchased, then those parts are valid for other models.
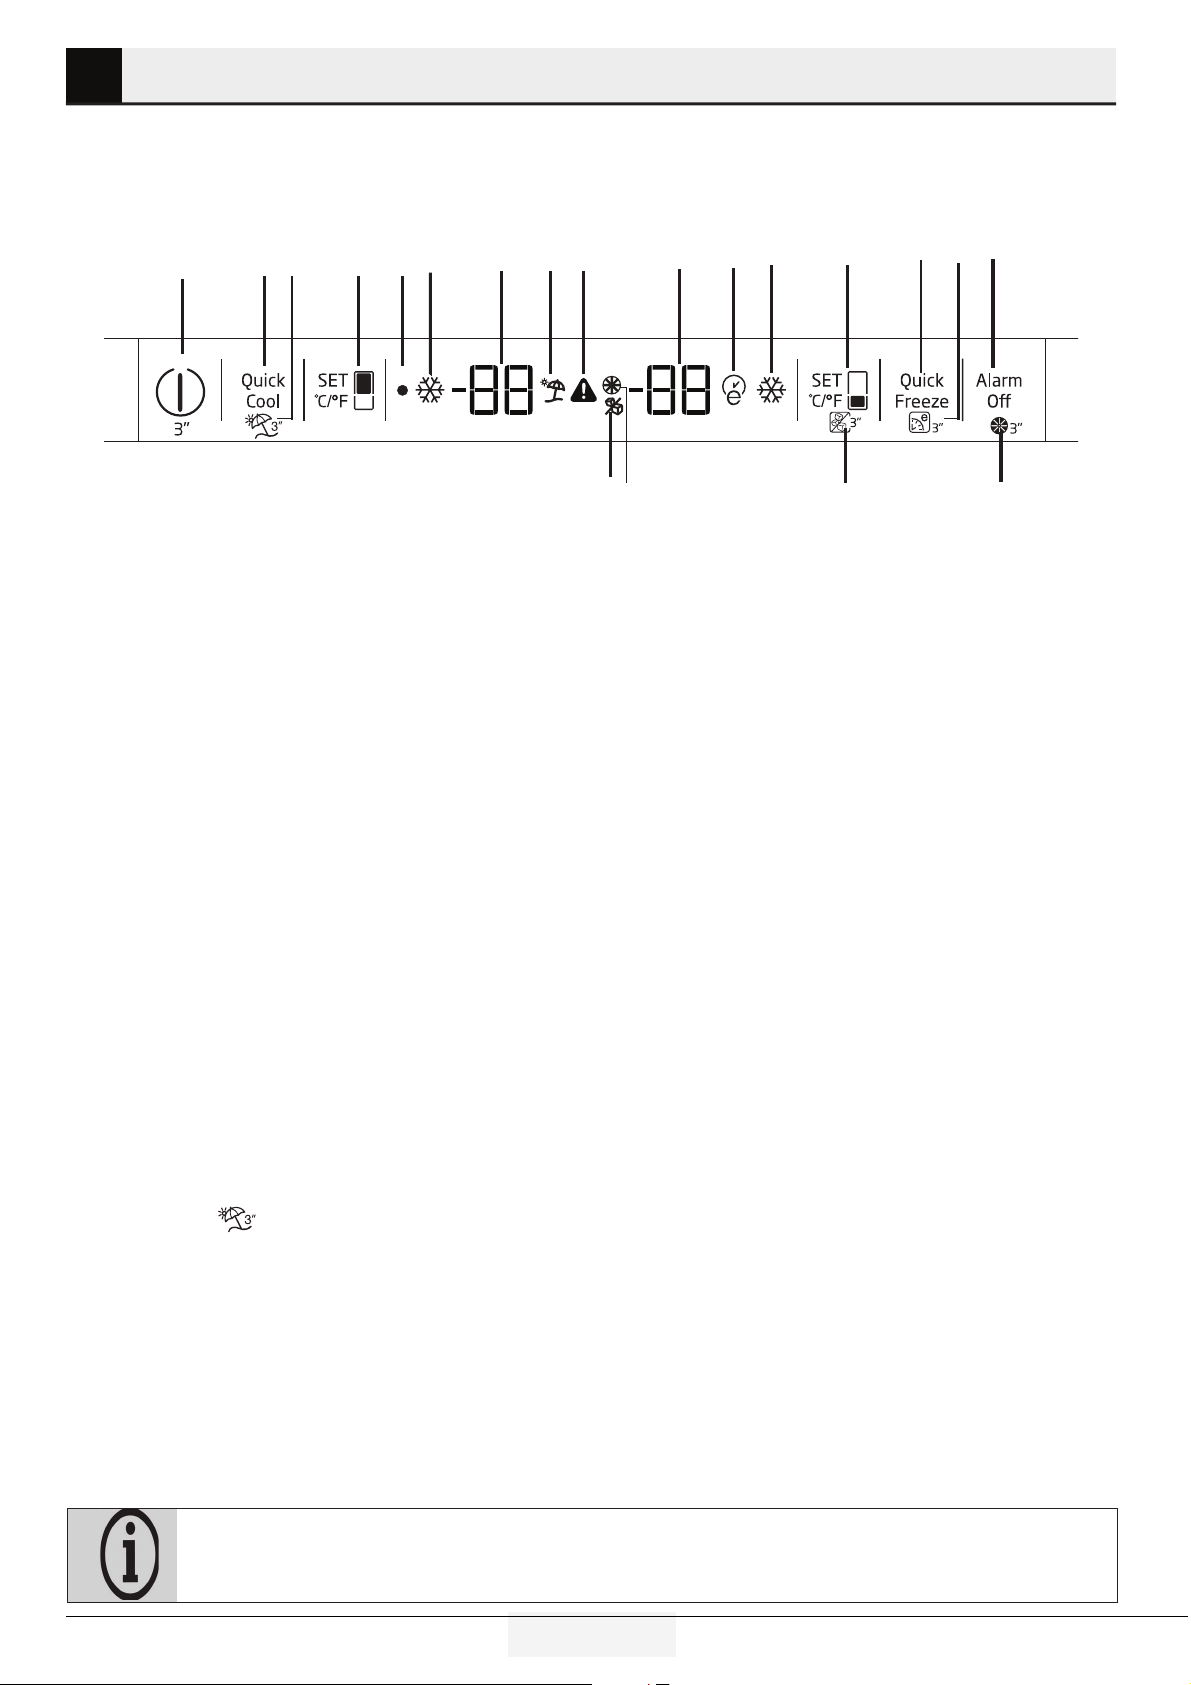
Indicator panel
Touch-control indicator panel allows you to set the temperature and control the other functions of the refrigerator. Just press the
relevant buttons for function settings.
1
23
4
5
67
8
9
10
11 12
13
14 15
16
*17
*18
*19
*20
1-On/Off functon
Press the On/Off button for 3 seconds to turn off or turn on the
refrgerator.
2-Quck Cool Functon
When you press Quck Cool button, the temperature of the
compartment wll be colder than the selected values.
Ths functon can be used for food placed n the cool compart-
ment and requred to be cooled down rapdly.
If you want to cool large amounts of fresh food, t s recom-
mended to actve ths feature before puttng the food nto the
refrgerator. Quck Cool ndcator wll reman lt when the Quck
Cool functon s enabled. To cancel ths functon press Quck Cool
button agan. Quck Cool ndcator wll turn off and return to ts
normal settngs.
If you do not cancel t, Quck Cool wll cancel tself automatcally
after 1 hours or when the refrgerator compartment reaches
to the coolng system target temperature. Ths functon s not
recalled when power restores after a power falure.
3-Vacaton Functon
Press the Quck Cool\Vacaton button for 3 seconds to actvate
Vacaton functon.”
” con comes on when the functon s
actve. Functon s deactvated by pressng the same button for
3 seconds agan or by pressng Refrgerator set button.
When vacaton mode s actvated, set values for the freshfood
compartment wll not appear n the dsplay.The temperature
wll be replaced by two dashes. ”...”
When vacaton mode s actvated, temperature of fresh food
s warmer than 50 °F (10 °C) so please do not keep foods n
refrgerator compartment. Temperature of freezer s not affected.
4-Refrgerator Set Functon
Ths button allows you to adjust the refrgerator compartment
temperature settng. Press ths button to set the temperature of
the refrgerator compartment to 46-39 °F (8,-2 °C).
5-Off Indcator
Off Indcator llumnated when the refrgerator s off .
6-Quck Cool Indcator
Ths con s llumnated when the Quck Cool functon s actve.
7-Refrgerature Compartment
Temperature Settng Indcator
Indcates the temperature set for the refrgerator compartment.
8-Vacaton Indcator
Ths con s llumnated when the Vacaton functon s actve.
9-Hgh Temperature Warnng Indcator
The Hgh Temp Error con s dsplayed when the Freezer
temperature s too warm after the ntal 72 hours of operaton.
If the Freezer temperature reaches 28°F (-2.2°C) or hgher, and
doesn’t drop below 16°F (-9°C) wthn 12 hours, the Hgh Temp
Error con wll be llumnated, an alarm wll sound and the set
temperature and hghest temperature reached n the Freezer
wll alternate n the dsplay. If you press the “Alarm Of” key, the
alarm wll be slenced, but the con and flashng temperature
wll contnue untl the Freezer gets below 16°F (-9°C). If the
Freezer does not cool below 16°F (-9°C) n the next 3.5 hours,
16 EN
Refrigerator / User Manual
Operating the product
the audble alarm wll return. The audble alarm can be slenced
agan wth the “Alarm Off” key. If the error contnues to return,
the doors should be checked for proper closure and sealng.
A common cause of ths error s a power falure n the crcut
to whch the refrgerator s connected. If the con contnues to
return, an authorzed servce agent should be called to nspect
the unt.
10-Freezer Compartment
Temperature Settng Indcator Indcates the temperature set for
the Freezer Compartment.
11-Eco-Extra Indcator
Eco-Extra Indcator s llumnated when the Eco Extra functon
s actve.
12-Quck Freeze Indcator
Ths ndcator s llumnated when the Quck Freezer functon s
actve.
13-Freezer Set Functon
Ths functon allows you to make the freezer compartment
temperature settng. Press ths button to set the temperature of
the freezer compartment to -8 to 5°F ( -22 to -15°C).
14-Quck Freeze Functon
The Quck Freeze ndcator wll be llumnated when ths feature
s on. Press the Quck Freeze button to turn ths opton on.When
Quck Freeze s actvated t wll drop the Freezer temperature to
ts lowest settng for 24 hours, after whch tme t wll automat-
cally cancel and return to the set temperature.
15-Eco-Extra (Specal Economc Usage)
Functon
Press the Quck Freeze\Eco Extra button for 3 seconds to actvate
the Eco Extra Functon. Refrgerator wll start operatng n the
most economc mode at least 6 hours later and the economc
usage ndcator wll turn on when the functon s actve. Press
the Quck Freeze button for 3 seconds agan to deactvate the Eco
Extra Functon.
16-Alarm Off
When the refrgerator door s opened for 1 mnute or when there
s a sensor falure, an alarm wll sound. Alarm can be turned off
by pressng “Alarm Off” button. If you close the door and then
open agan “Door open alarm” wll be actvated agan after 1
mnute later .
17-Flter reset button
The filter is reset when the alarm off button is pressed for 3
seconds. Filter reset icon goes off.
18-Ice machne off button
Ice machine is activated and deactivated when freezer set button
is pressed for 3 seconds. A no ice icon will be displayed when
the ice maker is off.
19. Flter reset con
This icon turns on when the filter needs to be reset.
20-Ice machne off con
The ice machine off icon will illuminate when the ice machine
is deactivated. This icon will not be illuminated when the ice
machine is active.
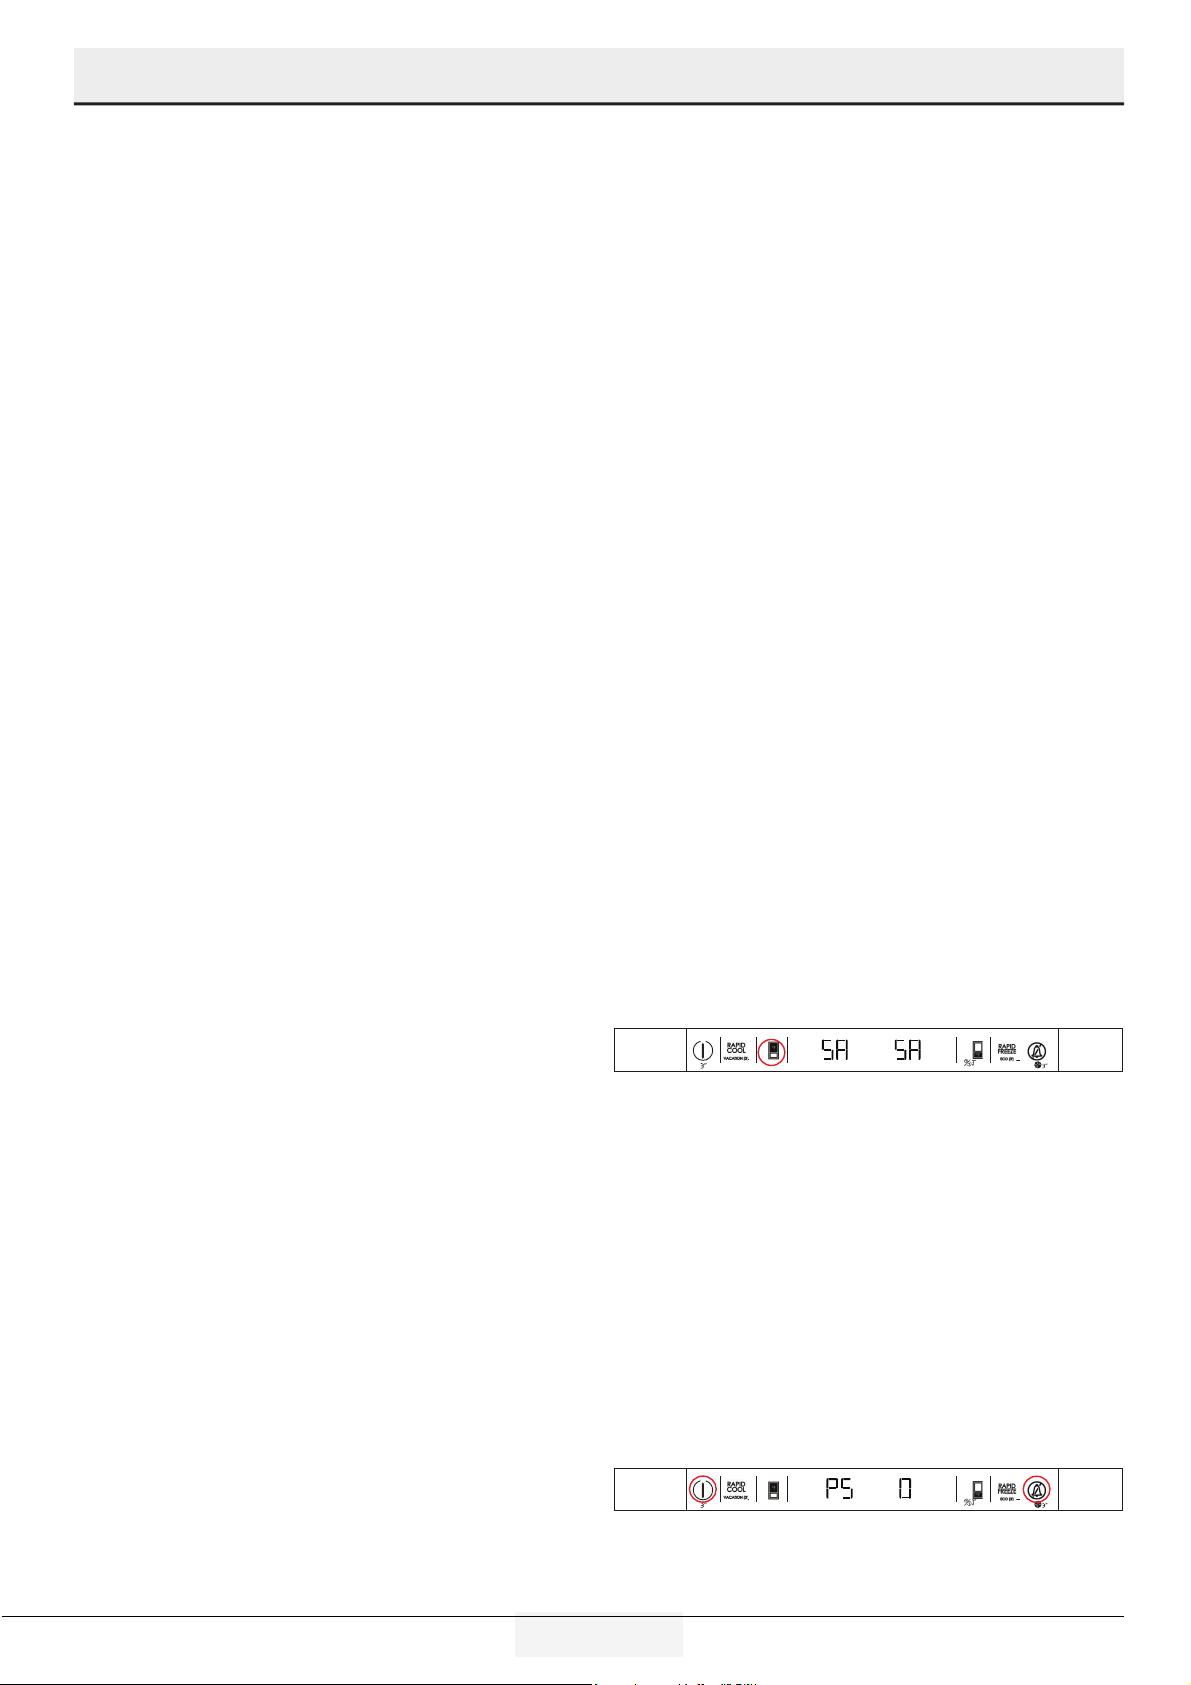
Sabbath Mode:
Press the Refrigerator Set Function Button for 3 seconds to
activate or deactivate the Sabbath Mode. When Sabbath Mode
is activated, the display, alarm, door opening or light buttons
will not function: The cooling algorithm is set according to the
sabbath fashion. If the user does not deactivate the Sabbath
mode, the refrigerator will automatically cancel it in 72 hours.
Showroom Mode:
Showroom Mode s an opton prmarly used n dealer’s showrooms. It
allows the product to be turned on wthout the operaton of the fans
and coolng system. To actvate ths mode, Press and hold Power &
Alarm Off button untl PS O appears. Change the O to an 8 by pressng
the Freezer Set Functon button. Then press Refrgerator Set Functon
button to actvate. To deactvate, press and hold the Power & Alarm
Off button agan.
Power Refrigertor
Set Function
Freezer
Set Function
Power Refrigertor
Set Function
Freezer
Set Function
Alarm O
17 EN
Refrigerator / User Manual
Operating the product
Freezer
Compartment
Setting
Refrigerator
Compartment
Setting
Explanations
-15°C / 5°F 4°C / 39°F This is the normally recommended setting.
-20°C / -4°F 3°C / 37°F
These settings are recommended when the ambient temperature exceeds
30°C/86°F.
Quick Freeze 4°C / 39°F
Use when you wish to freeze your food in a short time. Your refrigerator will return
to its previous mode when the process is over.
-24°C / -12°F 2°C / 35°F
Use these settings if you think that your refrigerator compartment is not cold
enough because of the hot ambient conditions or frequent opening and closing
of the door.
-15°C /5°F or colder Quick Refrigerator
Use this function when you place large quantities into the refrigerator
compartment or when you need to cool your food quickly. It is recommended that
you activate Quick Refrigerator function 4-8 hours before placing the food in the
compartment.
18 EN
Refrigerator / User Manual
Operating the product
Dual cooling system
Your refrigerator is equipped with two separate cooling systems
to cool the refrigerator compartment and freezer compartment.
Thus, air and odor in the refrigerator compartment and frozen
food compartment do not get mixed. Thanks to these two
separate cooling systems, cooling speed is much faster then
other refrigerators. Also additional power saving is provided
since the defrosting is performed individually.
Freezing fresh food
• Wrap the food or place them in a covered container before
putting them in the refrigerator.
• Hot food and beverages must cool down to the room
temperature before putting them in the refrigerator.
• The food that you want to freeze must be fresh and in good
quality.
• Divide the food into portions according to your family’s daily
or meal based consumption needs.
• Pack the food in an airtight manner to prevent them from
drying even if they are going to be stored for a short time.
Use packaging materials that are tear-proof and resistant
to cold, humidity, oils and acids and airtight. All packaging
must be completely sealed.
• Frozen food must be used immediately after they are thawed
and they should never be re-frozen.
• Do not freeze excessively large quantities of food at one time.
The quality of the food is best preserved when it is frozen
right through to the core as quickly as possible.
• Placing warm food into the freezer compartment causes
the cooling system to operate continuously until the food is
frozen solid.
Recommendations for
preserving frozen food
• Frozen food that you have purchased should be stored in
accordance with the frozen food manufacturer's instructions
for a ( 4 star) frozen food storage compartment.
Note:To ensure the quality achieved by the frozen food
manufacturer and food retailler is maintained, follow the steps
listed below:
1. Put packets in the freezer as quickly as possible after
purchase.
2. Make sure that contents of the package are labelled and
dated.
3. Check whether the "Use By" and "Best Before" dates on the
packaging are exceed or not.
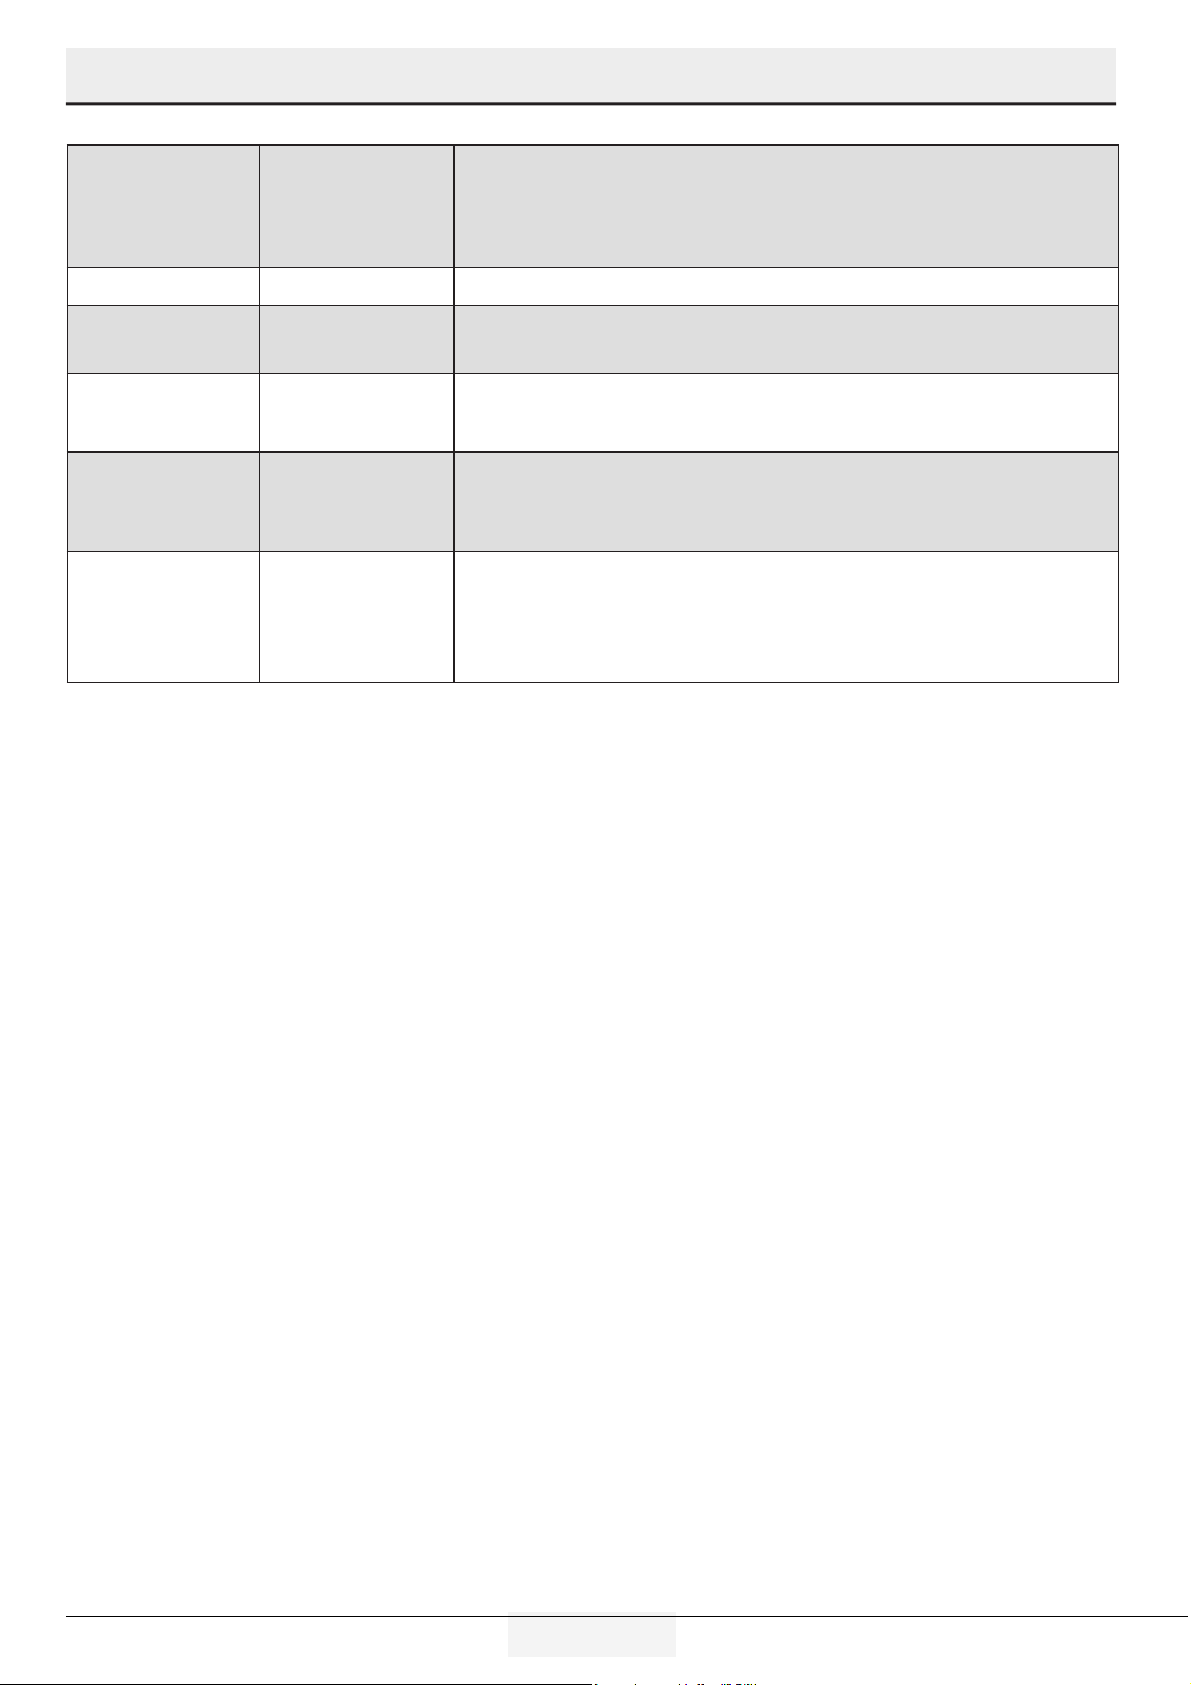
Placing the food
Freezer
compartment
shelves
Various frozen food such as meat, fish, ice
cream, vegetables and etc.
Refr igerator
compartment
shelves
Food in pans, covered plates and closed
containers
Refrigerator
compartment
door shelves
Small and packaged food or beverage
(such as milk, fruit juice, beer and etc.)
Forever fresh Vegetables and fruits
Cold Zone
Delicatessen products (cheese, butter,
salami and etc.)
Freezer information
You can keep the freshness of food for many months (at -15°C /
5°F or lower temperatures in the freezer).
Divide the food into portions according to your family’s
daily or meal based consumption needs.
Pack the food in an airtight manner to prevent them
from drying even if they are going to be stored for a
short time.
• Materials necessary for packaging:
• Cold resistant adhesive tape
• Self adhesive label
• Rubber bands
• Pen
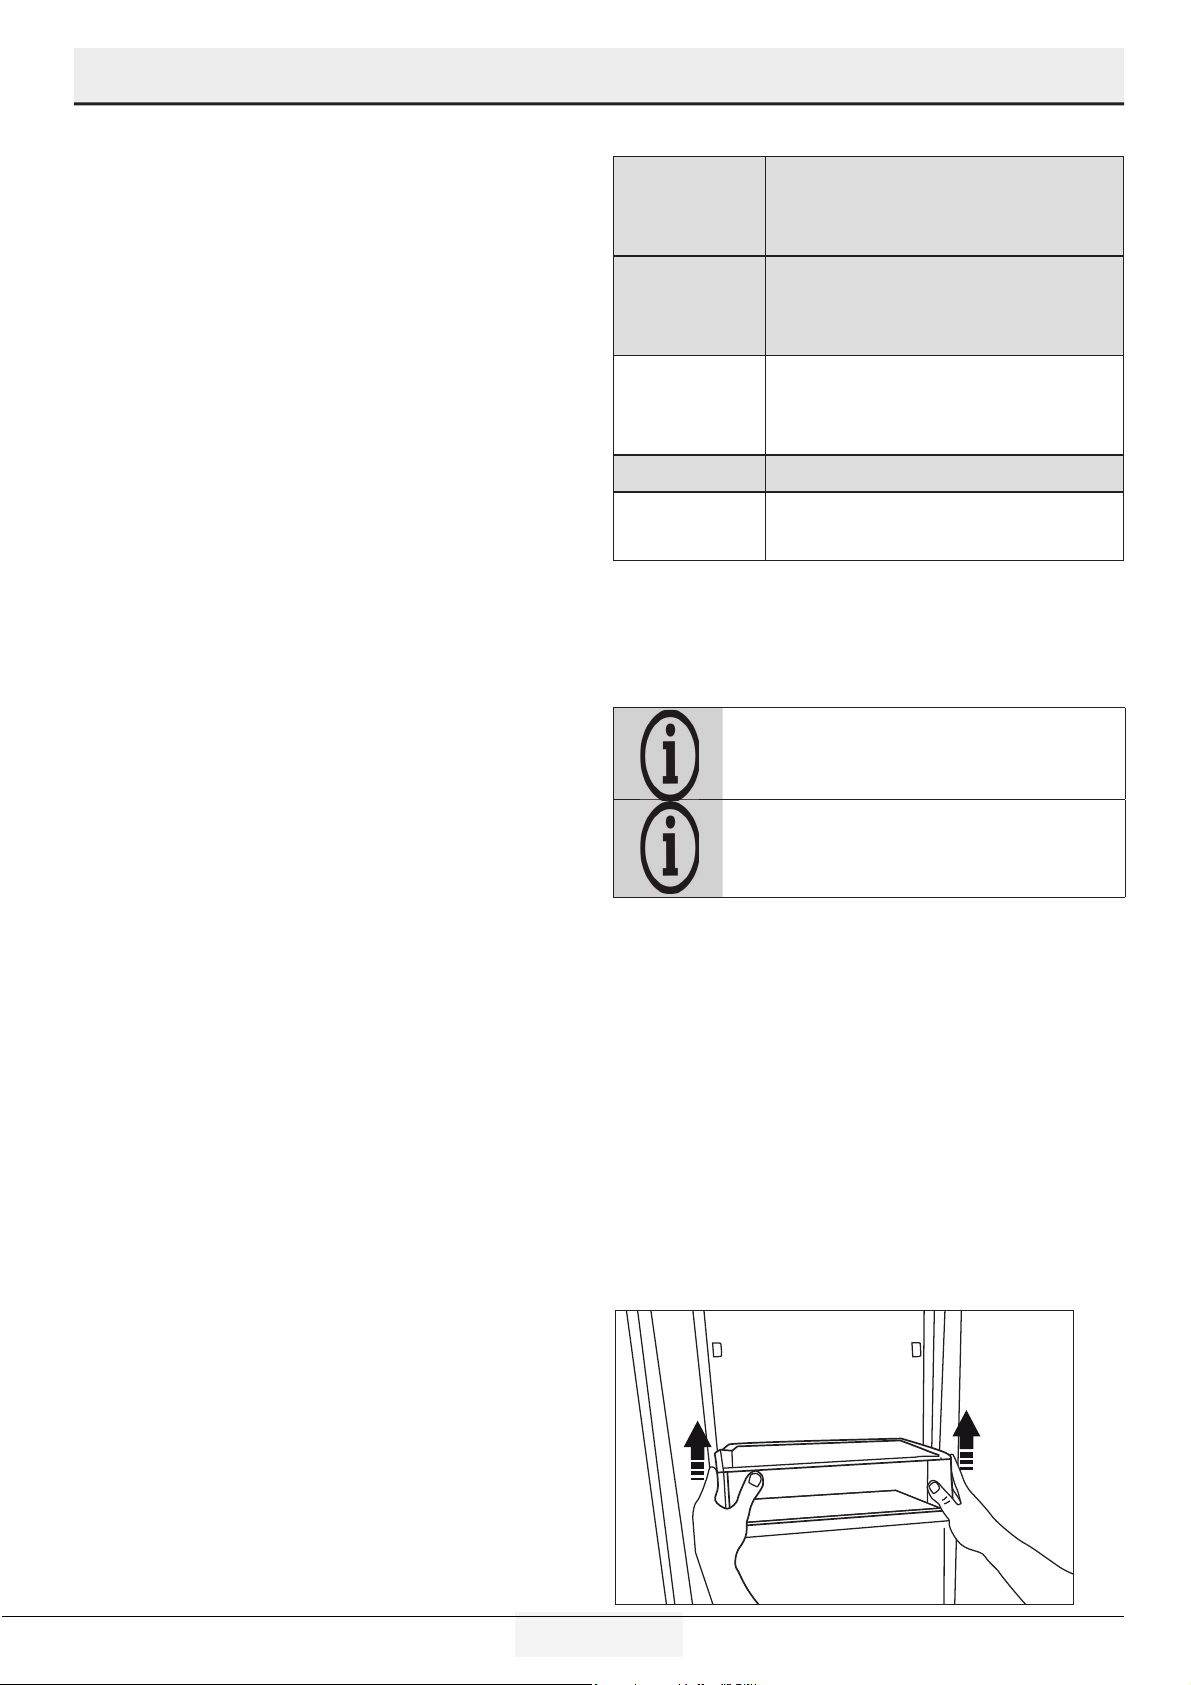
Removing door shelves
You can remove the door shelves to clean them. Do not remove
the door shelf when there is food on it. Remove all food first
To remove the upper door bins, push down on the gray tabs to
disengage the bin and remove. The bottom door bin can be
removed by pushing the desired shelf up.
19 EN
Refrigerator / User Manual
Operating the product
Glass shelves
You can remove the glass shelves to clean them. Be careful
when removing the shelves since they are heavy.
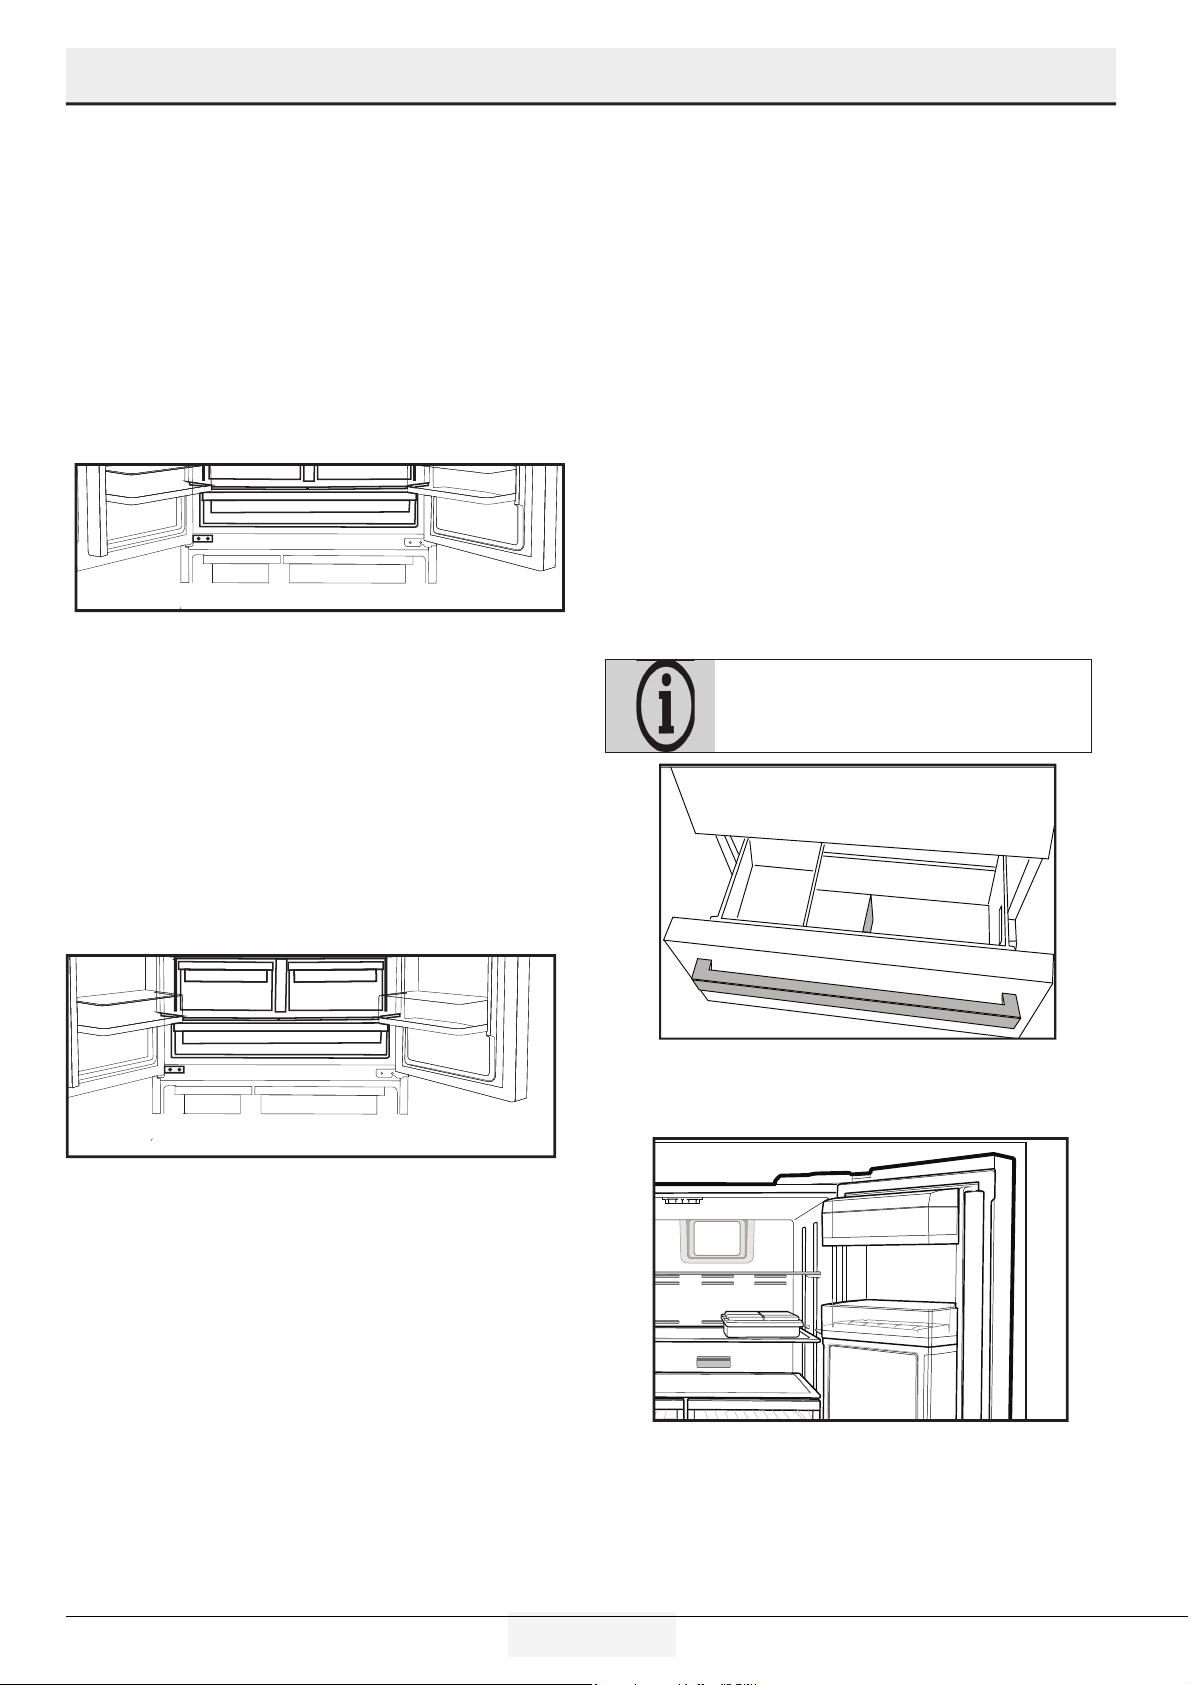
Cold Zone Drawer
The Cold Zone drawer allows you to prepare the food for
freezing. You can also use this drawer to store your food at a
temperature a few degrees below the refrigerator compartment.
You can increase the inner volume of your refrigerator by
removing any of the chiller compartments:
1. Pull the compartment towards yourself until it stops.
2. Lift the compartment about 1 cm up and pull towards
yourself to remove it from its seating.
Humidity Zone Drawer
The Humidity Zone drawer is designed specially to keep the
vegetables fresh without loosing their humidity. For this
purpose, cool air circulation is intensified around the drawers in
general. Remove the door shelves that stand against the drawers
before removing.
Humidity levels of the vegetables and fruit are controlled using
the Humidity Zone drawers, and food stays fresher longer.
We recommend you store the leafy vegetables such as lettuce,
spinach and the vegetables which are sensitive to humidity loss,
in a horizontal manner as much as possible inside the crisper,
not on their roots in a vertical position.
While the vegetables are being placed, specific gravity of the
vegetables should be taken into consideration. Heavy and hard
vegetables should be put at the bottom of the crisper and the
lightweight and soft vegetables should be placed over.
Never leave the vegetables inside the drawers in their bags. If
the vegetables are left inside their bags, this will cause them to
decompose in a short period of time. In case contacting with
other vegetables is not preferred for hygiene concerns, use a
perforated paper and other similar packaging materials instead
of a bag.
Do not store pears, apricots, peaches, apples or other fruits/
vegetables that generate high levels of ethylene gas in the same
drawer as other fruits/vegetables. The ethylene gas which is
emitted by these fruits may cause the other fruits to ripen faster
and decompose in a shorter time.
Ice bn
The ce bn s used to collect ce produced by the ce maker. Do
not put water n t to make ce as t may break. The ce bn s not
used for storng foods.
The ce machne may drop ce when the ce
contaner s opened.
Dairy Bin
Store food such as butter, cheese and margarine in this section.
20 EN
Refrigerator / User Manual
Operating the product
Egg holder
You can install the egg holder to the desired door or body shelf.
Never keep the egg holder in the freezer compartment.
Odor flter
Odor filter in the air duct of the refrigerator compartment
prevents build-up of unpleasant odors in the refrigerator.
Using internal water dispenser
After connectng the refrgerator to a water source or replacng
the water flter, flush the water system. Use a sturdy contaner
to depress and hold the water dspenser lever for 5 seconds,
then release t for 5 seconds. Repeat untl water begns to flow.
Once water begns to flow, contnue depressng and releasng
the dspenser paddle (5 seconds on, 5 seconds off) untl a total
of 5-6 gallons.
(about 20 liter) has been dspensed. Ths wll flush
ar from the flter and water dspensng system, and prepare the
water flter for use. Addtonal flushng may be requred n some
households. As ar s cleared from the system, water may spurt
out of the dspenser.
Allow 12 hours for the refrgerator to cool down and chll water.
Dspense enough water every week to mantan a fresh supply.
After 5 mnutes of contnuous dspensng, the
dspenser wll stop dspensng water to avod
floodng. To contnue dspensng, press the
dspenser paddle agan.
Dspensng water
Hold a contaner under the dspenser spout whle pressng the
dspenser pad. elease the dspenser pad to stop dspensng.
It is normal for the first few glasses of water taken
from the dispenser to be warm.
If the water dispenser is not used for a long period of
time, dispose of first few glasses of water to obtain
fresh water.
During initial use, you will have to wait approximately 12 hours for
the water to cool down.
Take out the glass a little while after you pull the trigger.
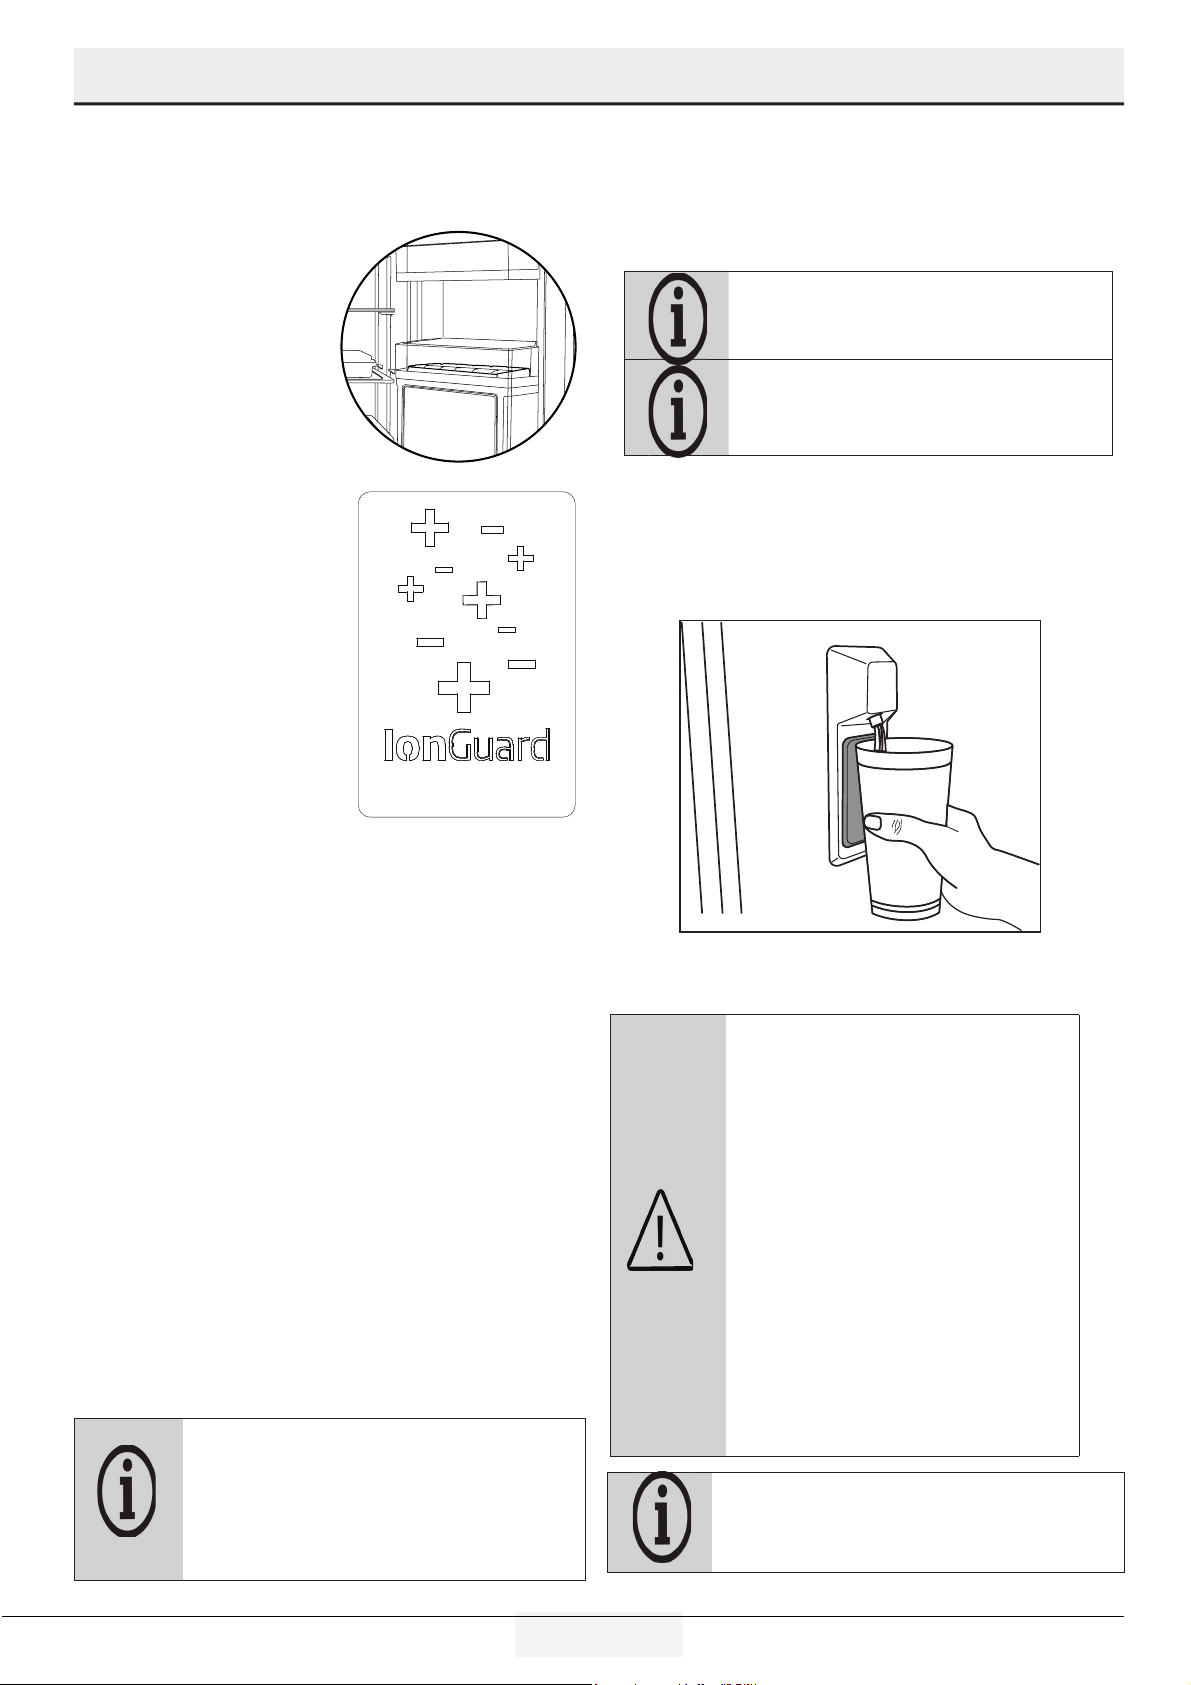
Ion Guard
Air is ionized by means of the
ionizer system in the refrigerator
compartment air duct. Thanks to
this system, air-borne bacteria
and odorizing molecules are
removed from the air.
Using water dispenser
Before using your refrigerator first time and after
replacing your water filter, water dispenser may
drip drops of water. To prevent water dripping or
leaking from dispenser, please bleed the air from
the system by dispensing 5-6 gallons (about 20
liter) of water through the water dispenser before
the first use and every time after you change
the water filter. This will remove any air trapped
in the system and stop the water dispenser
from leaking. Checking coupler position and
the straightness of water line at the back of the
unit will be required if there’s an obstruction in
water flow.
If your water dispenser is leaking just a few drops of water after
you have dispensed some water, this is normal.
21 EN
Refrigerator / User Manual
Operating the product
Refrigerator Shelf Weight Limitations
Refrgerator compartment cantlever shelves, those that only have rear supports, are tested for max 25kg (55pounds) per each part.
Forever fresh drawers wll hold up to 15kg (33pounds) per each one. Cold Zone drawer wll hold up to 20kg (44pounds). These are
dynamc loads for Forever fresh drawers and Cold Zone drawer.
Ice bn holds up to 22pounds (10kg), for usage wthout ce. Upper freezer bn wll hold up to 24kg (53 pounds) and drawer holds up to
30kg (66pounds). These are dynamc loads for ce bn, upper freezer bn and drawer.
25 kg=(55.11 pound)
15 kg=(33.06 pound)
6 kg=(13.22 pound)
4 kg=(8.80 pound)
10 kg=(22.04 pound)
Up to 5 kg/11 pound day ice production
22 kg=(48,50 pound)
30 kg=(66.13 pound)
20 kg=(44.01 pound)
48 kg=(105.82 pound)
4 kg=(8.80 pound)
22 EN
Refrigerator / User Manual
6. Mantenance and cleanng
Servce lfe of the product extends and frequently faced
problems decrease f cleaned at regular ntervals.
WARNING: Unplug the product before
cleaning it.
• Never use gasolne, benzene or smlar substances for cleanng
purposes.
• Never use any sharp and abrasve tools, soap, household
cleaners, detergent and wax polsh for cleanng.
• Dssolve one teaspoon of bakng soda n half lter of water. Soak a
cloth wth the soluton and wrng t thoroughly. Wpe the nteror
of the refrgerator wth ths cloth and dry thoroughly.
• Make sure that no water enters the lamp housng and other
electrcal tems.
• If you wll not use the refrgerator for a long perod of tme,
unplug t, remove all food nsde, clean t and leave the door ajar.
• Check regularly that the door gaskets are clean. If not, clean
them.
• To remove door and body shelves, remove all of ts contents.
• Remove the door shelves by pullng them up. After cleanng,
slde them from top to bottom to nstall.
• Never use cleanng agents or water that contan chlorne to clean
the outer surfaces and chromum coated parts of the product.
Chlorne causes corroson on such metal surfaces
Avodng bad odors
Materials that may cause odor are not used in the production of
our refrigerators. However, due to inappropriate food preserving
conditions and not cleaning the inner surface of the refrigerator
as required can bring forth the problem of odor . Pay attention to
following to avoid this problem:
• Keepng the refrgerator clean s mportant. Food resduals,
stans, etc. can cause odor . Therefore, clean the refrgerator
wth bakng soda dssolved n water every 15 days. Never use
detergents or soap.
• Keep the food n closed contaners. Mcroorgansms spreadng
out from uncovered contaners can cause unpleasant odors.
• Never keep the food that s past ts expraton date or has spoled
n the refrgerator.
Protectng the plastc surfaces
Do not put lqud ols or ol-cooked meals n your refrgerator n
unsealed contaners as they damage the plastc surfaces of the
refrgerator. If ol s splled or smeared onto the plastc surfaces,
clean and rnse the relevant part of the surface at once wth
warm water.

23 EN
Refrigerator / User Manual
7. Troubleshootng
Check ths lst before contactng a servcer. Dong so wll save you tme and money. Ths lst ncludes frequent complants that are not
related to faulty workmanshp or materals. Certan features mentoned heren may not apply to your product.
The refrgerator s not workng.
• The power plug s not fully seated. >>> Plug t n outlet completely nto the socket.
• The breaker connected to the outlet powerng the product or the man breaker s blown. >>> Check the breakers.
Condensaton on the sde wall of the refrgerator compartment
• The door s opened too frequently >>> Take care not to open the product’s door too frequently.
• The envronment s too humd. >>> Do not nstall the product n humd envronments.
• Foods contanng lquds are kept n unsealed holders. >>> Keep the foods contanng lquds n sealed holders.
• The product’s door s left open. >>> Do not keep the product’s door open for long perods.
• The thermostat s set to too low temperature. >>> Set the thermostat to approprate temperature.
Compressor s not workng.
I• In case of sudden power falure or pullng the power plug off and puttng back on, the gas pressure n the product’s coolng system s
not balanced, whch trggers the compressor thermc safeguard. The product wll restart after approxmately 6 mnutes. If the product
does not restart after ths perod, contact a servcer.
• Defrostng s actve. >>> Ths s normal for a fully-automatc defrostng product. The defrostng s carred out perodcally.
• The product s not plugged n. >>> Make sure the power cord s plugged n.
• The temperature settng s ncorrect. >>> Select the approprate temperature settng.
• The power s out. >>> The product wll contnue to operate normally once the power s restored.
The refrgerator’s operatng nose s ncreasng whle n use.
• The product’s operatng performance may vary dependng on the ambent temperature varatons. Ths s normal and not a malfuncton.
The refrgerator runs too often or for too long.
• The new product may be larger than the prevous one. Larger products wll run for longer perods.
• The room temperature may be hgh. >>> The product wll normally run for long perods n hgher room temperature.
• The product may have been recently plugged n or a new food tem s placed nsde. >>> The product wll take longer to reach the set
temperature when recently plugged n or a new food tem s placed nsde. Ths s normal.
• Large quanttes of hot food may have been recently placed nto the product. >>> Do not place hot food nto the product.
• The doors were opened frequently or kept open for long perods. >>> The warm ar movng nsde wll cause the product to run
longer. Do not open the doors too frequently.
• The freezer or refrgerator door may be ajar. >>> Check that the doors are fully closed.
• The product may be set to temperature too low. >>> Set the temperature to a hgher degree and wat for the product to reach the
adjusted temperature.
• The refrgerator or freezer door gasket may be drty, worn out, broken or not properly settled. >>> Clean or replace the gasket.
Damaged / torn door gasket wll cause the product to run for longer perods to preserve the current temperature.
The freezer temperature s very low, but the refrgerator temperature s adequate.
• The freezer compartment temperature s set to a very low degree. >>> Set the freezer compartment temperature to a hgher degree
and check agan.
The refrgerator temperature s very low, but the freezer temperature s adequate.
• The refrgerator compartment temperature s set to a very low degree. >>> Set the freezer compartment temperature to a hgher
degree and check agan.
The food tems kept n refrgerator compartment drawers are frozen.
• The refrgerator compartment temperature s set to a very low degree. >>> Set the freezer compartment temperature to a hgher
degree and check agan.

24 EN
Refrigerator / User Manual
Troubleshooting
The temperature n the refrgerator or the freezer s too hgh.
• The refrgerator compartment temperature s set to a very hgh degree. >>> Temperature settng of the refrgerator compartment
has an effect on the temperature n the freezer compartment. Wat untl the temperature of relevant parts reach the suffcent level by
changng the temperature of refrgerator or freezer compartments.
• The doors were opened frequently or kept open for long perods. >>> Do not open the doors too frequently.
• The door may be ajar. >>> Fully close the door.
• The product may have been recently plugged n or a new food tem s placed nsde. >>> Ths s normal. The product wll take longer
to reach the set temperature when recently plugged n or a new food tem s placed nsde.
• Large quanttes of hot food may have been recently placed nto the product. >>> Do not place hot food nto the product.
Shakng or nose.
• The ground s not level or durable. >>> If the product s shakng when moved slowly, adjust the stands to balance the product. Also
make sure the ground s suffcently durable to bear the product.
• Any tems placed on the product may cause nose. >>> Remove any tems placed on the product.
The product s makng nose of lqud flowng, sprayng etc.
• The product’s operatng prncples nvolve lqud and gas flows. >>> Ths s normal and not a malfuncton.
There s sound of wnd blowng comng from the product.
• The product uses a fan for the coolng process. Ths s normal and not a malfuncton.
There s condensaton on the product’s nternal walls.
• Hot or humd weather wll ncrease cng and condensaton. Ths s normal and not a malfuncton.
• The doors were opened frequently or kept open for long perods. >>> Do not open the doors too frequently; f open, close the door.
• The door may be ajar. >>> Fully close the door.
There s condensaton on the product’s exteror or between the doors.
• The ambent weather may be humd, ths s qute normal n humd weather. >>> The condensaton wll dsspate when the humdty
s reduced.
The nteror smells bad.
• The product s not cleaned regularly. >>> Clean the refrgerator wth bakng soda dssolved n water every 15 days.
• Certan holders and packagng materals may cause odour. >>> Use holders and packagng materals wthout free of odor.
• The foods were placed n unsealed holders. >>> Keep the foods n sealed holders. Mcro-organsms may spread out of unsealed food
tems and cause an unpleasant smell or odor. Remove any expred or spolt foods from the product.
The door s not closng.
• Food packages may be blockng the door. >>> Relocate any tems blockng the doors.
• The product s not standng n full uprght poston on the ground. >>> Adjust the stands to balance the product.
• The ground s not level or durable. >>> Make sure the ground s level and suffcently durable to bear the product.
TheHumdty Zone drawer s jammed.
• The food tems may be n contact wth the upper secton of the drawer. >>> Reorganze the food tems n the drawer.
If The Surface Of The Product Is Hot.
• Hgh temperatures may be observed between the two doors, on the sde panels and at the rear grll whle the product s operatng. Ths
s normal and does not requre servce mantenance! Be careful when touchng these areas.

25 EN
Refrigerator / User Manual
Troubleshooting
8. Servce Informaton
If service is required, call your dealer or authorized service agency. The name of the authorized service agency can be obtained from
the dealer or distributor in your area.
Have the following information readily available:
• Model number
• Serial number
• Date purchased
• Name of dealer from whom purchased
Clearly describe the problem that you are having. If you are unable to obtain the name of an authorized service agency, or if you
continue to have service problems, contact Viking Range at (888) 845-4641 or write to:
VIKING RANGE, LLC
PREFERRED SERVICE
111 Front Street
Greenwood, Mississippi 38930 USA
Record the information indicated below. You will need it if service is ever required. The serial number and model numbers for your
refrigerator are located on the upper wall, behind the lighting:
Model No. ___________________________________________ Serial No. __________________
Date of Purchase ________________________________________ Date Installed _______________
Dealer’s Name _________________________________________
Address _____________________________________________
_______________________________________________
If service requires installation of parts, use only authorized parts to insure protection under the warranty.
Keep this manual for future reference.
WARNING:
If the problem perssts after followng the nstructons n ths secton, contact your vendor or an Authorzed Servce. Do not try to
repar the product.
WARNING:
• Ths product can expose you to chemcals ncludng Nckel (Metallc) whch s known to the State of Calforna to cause cancer.
• For more nformaton go to www.P65Warnngs.ca.gov
• Note : Nckel s a component n all stanless steel and some other metal components.

26 EN
Refrigerator / User Manual
FREESTANDING FRENCH DOOR REFRIGERATOR/FREEZER WARRANTY
TWO YEAR FULL WARRANTY
Freestandng french door refrgerator/freezers and all of ther component parts, except as detaled below*†, are warranted to be free from defectve materals
or workmanshp
n normal resdental use for a perod of two (2) years from the date of orgnal retal purchase or closng date for new constructon, whchever perod s longer. Vkng Range,
LLC, warrantor, agrees to repar or replace, at ts opton, any part whch fals or s found to be defectve durng the warranty perod.
*FULL NINETY (90) DAY COSMETIC WARRANTY: Product s warranted to be free from cosmetc defects n materals or workmanshp (such as scratches
on stanless steel, pant/porcelan blemshes, etc.) for a perod of nnety (90) days from the date of orgnal retal purchase or closng date for new constructon,
whchever perod s longer. Any defects must be reported to the sellng dealer wthn nnety (90) days from date of orgnal retal purchase. Vkng Range, LLC uses
hgh qualty processes and materals avalable to produce all color fnshes. However, slght color varaton may be notced because of the nherent dfferences n
panted parts and porcelan parts as well as dfferences n ktchen lghtng, product locatons, and other factors. Therefore, ths warranty does not apply to color
varaton attrbutable to such factors.
†FULL NINETY (90) DAY WARRANTY IN “RESIDENTIAL PLUS” APPLICATIONS: Ths full warranty apples to applcatons where use of the product extends
beyond normal resdental use, but the warranty perod for products used n such applcatons s nnety (90) days. Examples of applcatons covered by ths warranty
are bed and breakfasts, fre statons, prvate clubs, churches, etc. Under ths “Resdental Plus” warranty, the product, ts components and accessores are warranted to
be free from defectve materal or workmanshp for a perod of nnety (90) days from the date of orgnal retal purchase. Ths warranty excludes use of the product n
all commercal locatons such as restaurants, food servce locatons and nsttutonal food servce locatons.
SIX YEAR FULL WARRANTY ON SEALED REFRIGERATI
ON PARTS AS LISTED
Any sealed refrgeraton system component, as lsted below, s warranted to be free from defectve materals or workmanshp n normal household use durng the third through the
sxth year from the date of orgnal retal purchase. Vkng Range, LLC, warrantor, agrees to repar or replace, at ts opton, any part whch fals or s found to be defectve durng the
warranty perod.
Sealed Refrgeraton System Components: Compressor, Evaporator, Condenser, Connectng Tubng, Dryer/Straner
TWELVE YEAR LIMITED WARRANTY ON SEALED REFRIGERATION PARTS AS LISTED
Any sealed refrgeraton system component, as lsted above, whch fals due to defectve materals or workmanshp n normal household use durng the seventh through the twelfth
year from the date of orgnal retal purchase wll be repared or replaced, free of charge for the part tself, wth the owner payng all other costs, ncludng labor.
Warranty Terms
WARRANTY TERMS
Ths warranty extends to the orgnal retal purchaser of the product warranted hereunder and to each transferee owner of the product durng the term of the orgnal purchaser’s
warranty. The warranty s transferable by the orgnal retal purchaser va home sale only. If a transferee owner s unable to provde proof of purchase from the orgnal purchaser and
the product has not been prevously regstered, the producton date of the product, located n the seral number on the product, wll serve as the effectve warranty start date.
The actvaton date of the warranty begns from the date of orgnal retal purchase. In the case of new product purchase va buldng development sales, actvaton begns from the
earler date of ether certfcate of occupancy or 24 months from date of manufacture. Note date of manufacture s dentfed by seral tag on product.
Ths warranty does not cover unts purchased as b-stock, lqudaton, salvage, seconds, refurbshed, as-s, used products.
Ths warranty shall apply to products purchased n the Unted States and Canada. Products must be purchased n the country where servce s requested. Warranty servce must be
performed by a Vkng Range LLC authorzed servce agency or representatve. Warranty shall not apply to damage resultng from abuse, accdent, natural dsaster, loss of electrcal
power to the product for any reason, alteraton, mproper nstallaton, mproper operaton, or repar servce of the product by anyone other than a Vkng Range LLC authorzed servce
agency or representatve. Ths warranty does not apply to commercal usage. Warrantor s not responsble for consequental or ncdental damage whether arsng out of breach of
warranty, breach of contract or otherwse. Some jursdctons do not allow the excluson or lmtaton of ncdental or consequental damages, so the above lmtatons do not apply
to you.
Owner shall be responsble for proper nstallaton, provdng normal care and mantenance, provdng proof of purchase upon request, and makng the product reasonably accessble
for servce. If the product or one of ts component parts contans a defect or malfuncton durng the warranty perod, after a reasonable number of attempts by the warrantor to
remedy the defects or malfunctons, the owner s enttled to ether a refund or replacement, at the warrantor’s dscreton of the product or ts component part or parts. Warrantor’s
lablty on any clam of any knd, wth respect to the goods or servces covered hereunder, shall n no case exceed the prce of the goods or servce or part thereof whch gves rse to
the clam.
WARRANTY SERVİCE
Under the terms of ths warranty, servce must be performed by a Vkng Range LLC authorzed servce agent or representatve. Servce wll be provded durng normal busness hours
Labor performed at overtme or premum rates shall not be covered by the warranty. To obtan warranty servce contact Vkng Range LLC Customer Care at 1-888-845-4641. Please
have model number, seral number, and date of orgnal purchase avalable when callng. IMPORTANT: retan proof of orgnal purchase to establsh warranty perod.
The return of the owner regstraton card s not a condton of warranty coverage. You should, however, return the owner regstraton card so Vkng Range LLC can contact you should
any queston of safety arse whch could affect you.
Any mpled warrantes of merchantablty and ftness applcable to the above descrbed burner assembles, nfrared rotssere burners, grll grates, and stanless steel parts are
lmted n duraton to the perod of coverage of the applcable express wrtten lmted warrantes set forth above. Some jursdctons do not allow lmtatons on how long an mpled
warranty lasts, so the above lmtatons may not apply to you. Ths warranty gves you specfc legal rghts, and you may also have other rghts whch may vary from jursdcton to
jursdcton.
Speci cations subject to change without notice.

27 EN
Refrigerator / User Manual

Operating the product
Vkng Range, LLC
111Front Street
Greenwood, Msssspp 38930
(662)455-1200
For more product nformaton call 1-888-845-4641
or vst our webste at vkngrange.com
077784-000 EN (081521)