
AXISCameraStationS1148Recorder
UserManual

AXISCameraStationS1148Recorder
TableofContents
Aboutyourdevice...........................................3
..............................................................3
Getstarted................................................4
..............................................................4
Installyourdevice..........................................5
..............................................................5
Congureyourdevice........................................13
First-timeconguration..........................................13
CongureAXISCameraStation....................................13
Licenseasystemonline..........................................17
Licenseasystemofine..........................................17
ManageWindows®useraccounts..............................19
Createauseraccount............................................19
Createanadministratoraccount...................................19
Createalocalusergroup.........................................19
Deleteauseraccount............................................19
Changeauseraccount'spassword..................................20
Createapasswordresetdiskforauseraccount.......................20
ManageAXISCameraStationuseraccounts.....................
21
Congureuserpermissions........................................21
Addusersorgroups..............................................21
Userorgroupprivileges..........................................22
Manageyourdevice.........................................24
UpdateWindows®...............................................24
CongureWindowsupdatesettings................................24
ChangetheRAID................................................25
Addaharddrive................................................
26
Troubleshooting............................................29
CheckthecurrentBIOSversion....................................
29
UpgradetheBIOS...............................................29
Rundiagnostics.................................................29
Performasystemrecovery........................................
30
Createatechnicalsupportreport...................................30
EnableIDRAC...................................................
31
Troubleshootthepowersupplyunit.................................31
Troubleshootmemoryerrors.......................................
32
TroubleshootAXISCameraStation..................................
32
Productoverview...........................................33
Frontandrearsides..............................................
33
Specications..................................................34
Needmorehelp?............................................38
Usefullinks....................................................
38
Contactsupport.................................................38
2

AXISCameraStationS1148Recorder
Aboutyourdevice
Aboutyourdevice
AXISCameraStationS11Recorderseriesconsistofout-of-the-boxreadyrackserversandworkstationsvalidatedforreliable
high-denitionsurveillanceupto4K.Forquickandeasyinstallation,therecorderseriesispreconguredandpreloadedwithAXIS
CameraStationvideomanagementsoftwareincludinglicensesplusallnecessarysystemsoftware.Thesystemcongurationcan
easilybeimportedfromAXISSiteDesigner,andAXISCameraStationletsyoutakefulladvantageofAxiswiderangeofvideo
surveillancedevices.Withredundantenterprise-gradeharddisks,operatingsystemstoredonsolid-statedrive(SSD),therecorder
seriesprovideshigh-performanceandreliabilityforyoursystem.
Towatchthisvideo,gotothewebversionofthisdocument.
www.axis.com/products/online-manual/46316#t10126794
3

AXISCameraStationS1148Recorder
Getstarted
Getstarted
ThestandardworkowtocongureanAXISCameraStationrecorderis:
1.Installyourdevice
2.CongureWindows®.Werecommendto:
-UpdateWindows®tothelatestversion.SeeUpdateWindows®onpage24
-Createastandarduseraccount.SeeCreateauseraccountonpage19
3.First-timecongurationonpage13
4.UpdateAXISCameraStationtothelatestversion.
-Ifyoursystemisonline:opentheAXISRecorderToolboxappandclickUpdateAXISCameraStation.
-Ifyoursystemisofine:gotoaxis.comanddownloadthelatestversion.
5.CongureAXISCameraStation
6.RegisteryouAXISCameraStationlicenses.
-Licenseasystemonlineonpage17
-Licenseasystemofineonpage17
7.ConnectyoursystemtotheAXISCameraStationmobileviewingapp.SeeCongureAXISSecureRemoteAccess
Towatchthisvideo,gotothewebversionofthisdocument.
www.axis.com/products/online-manual/46316#t10133431
4

AXISCameraStationS1148Recorder
Installyourdevice
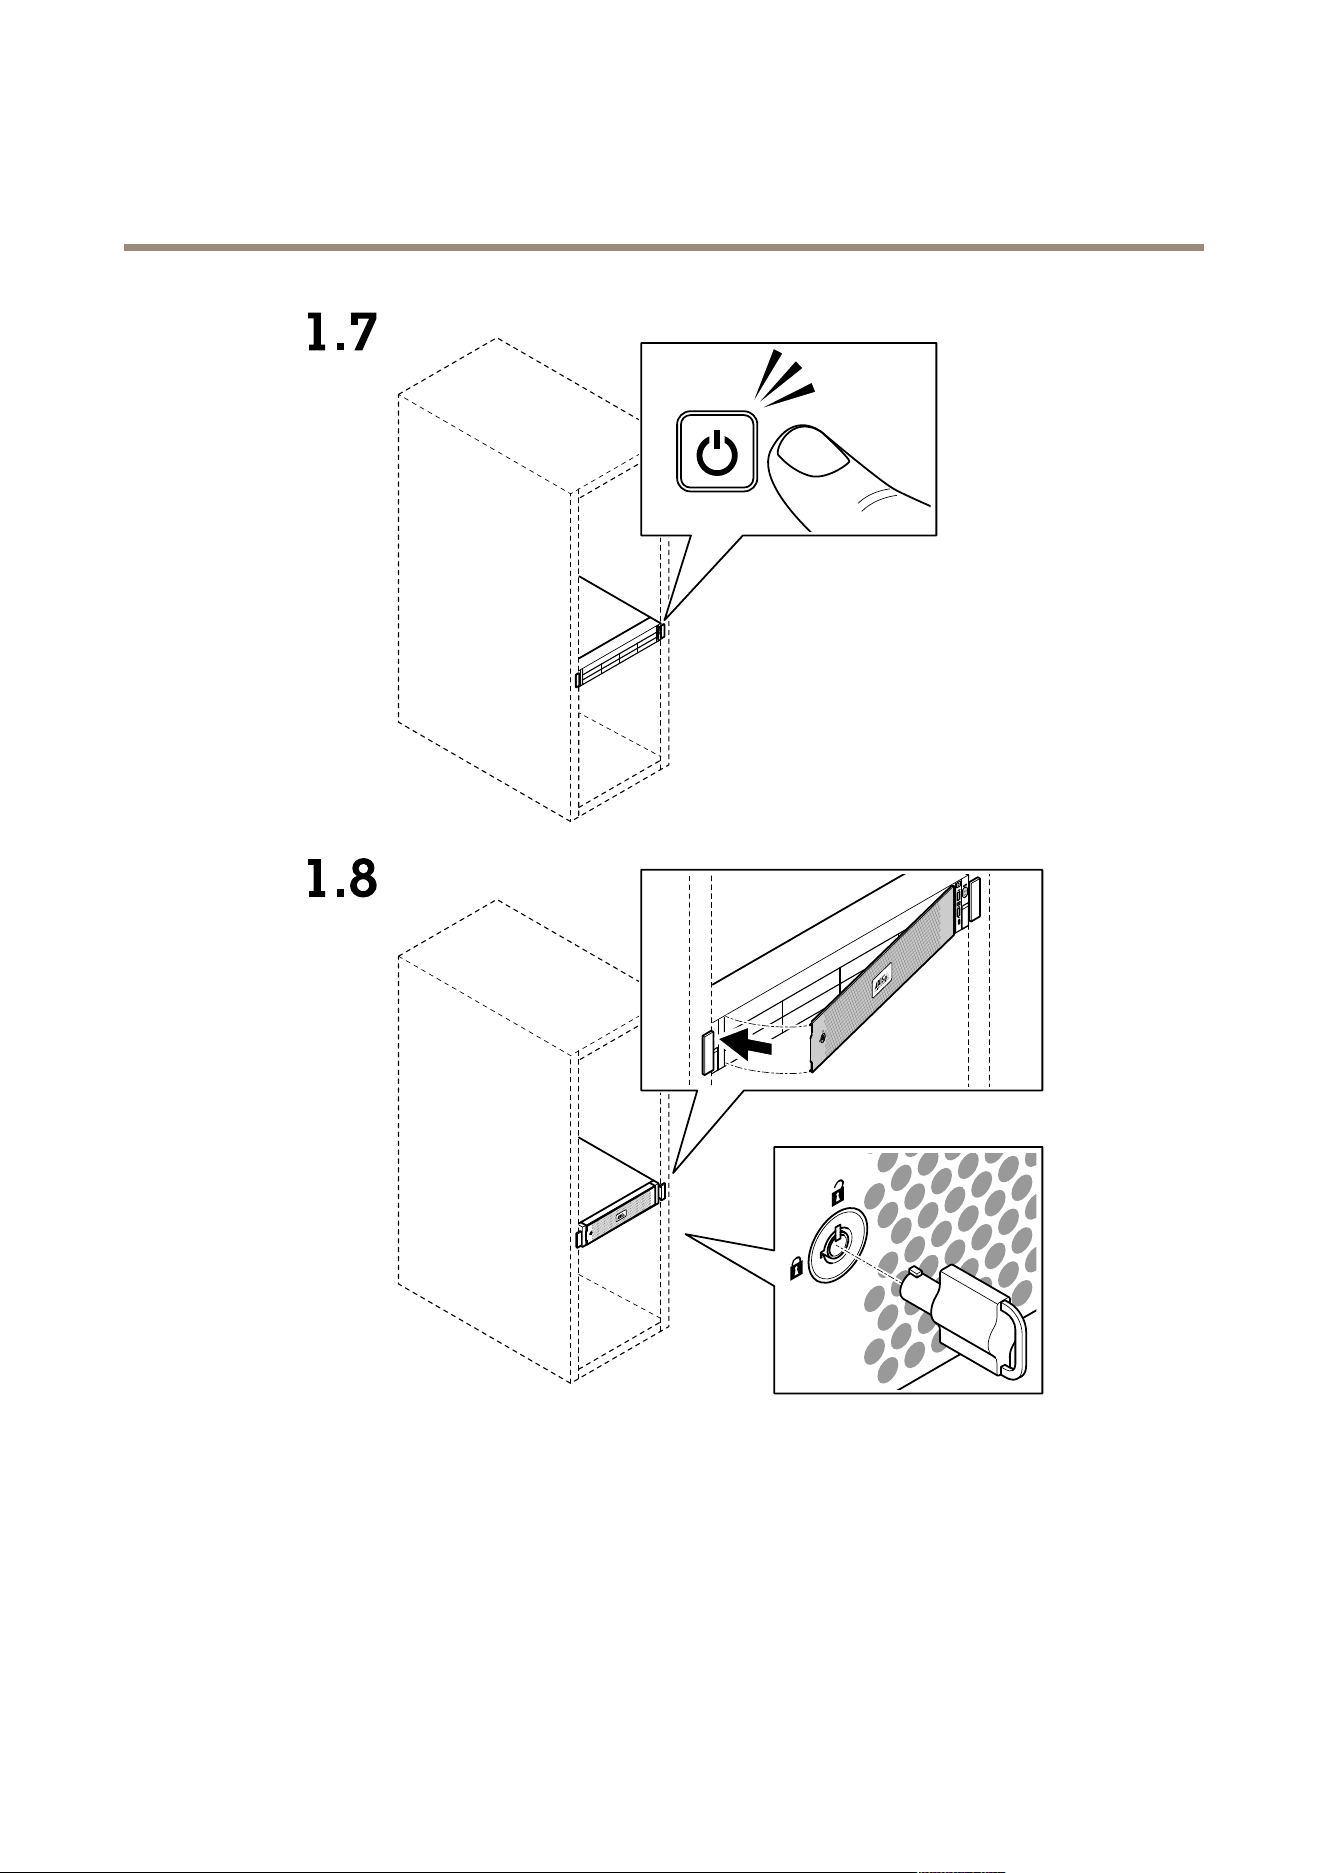
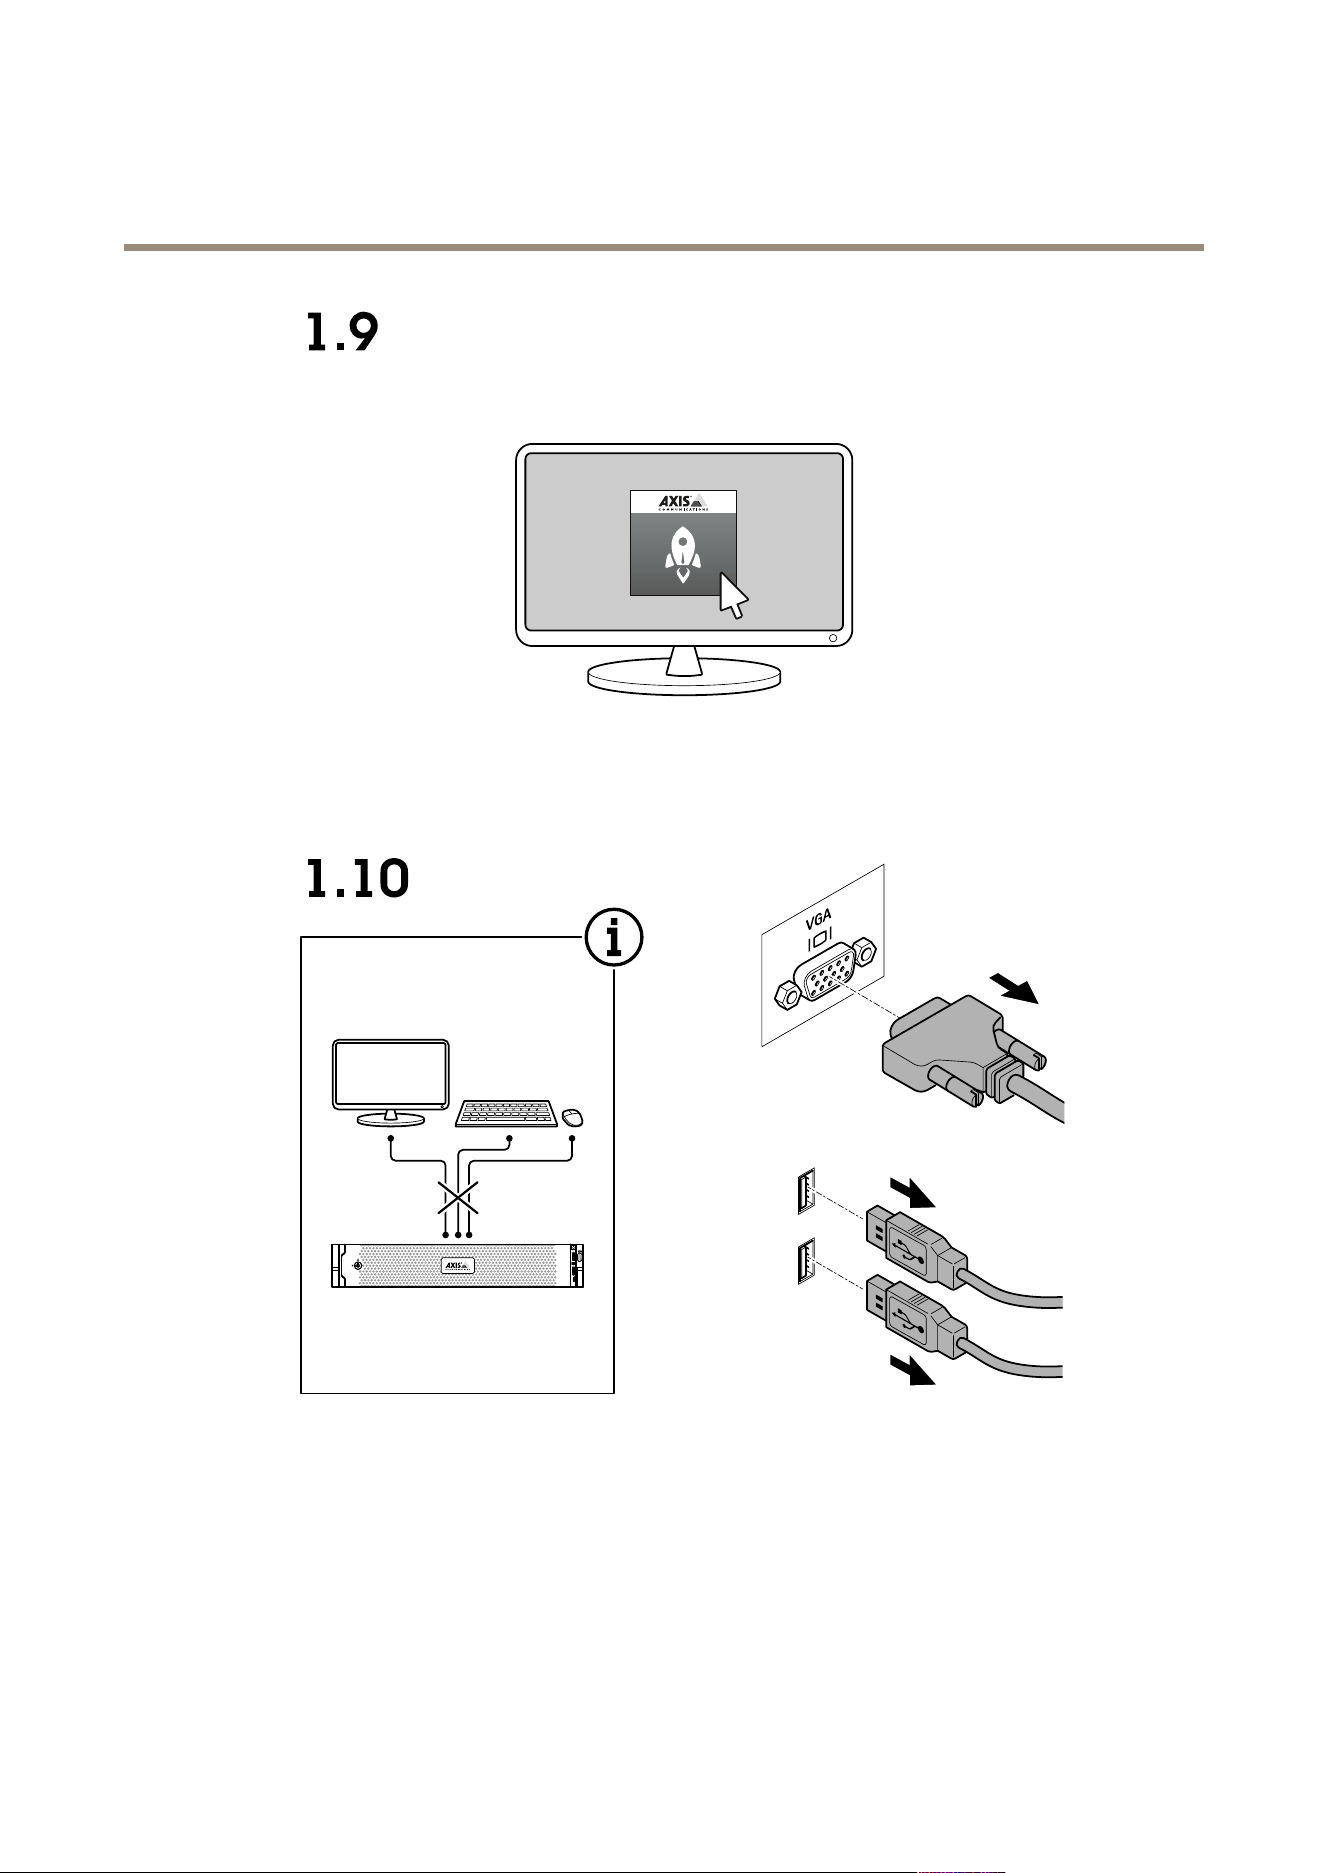
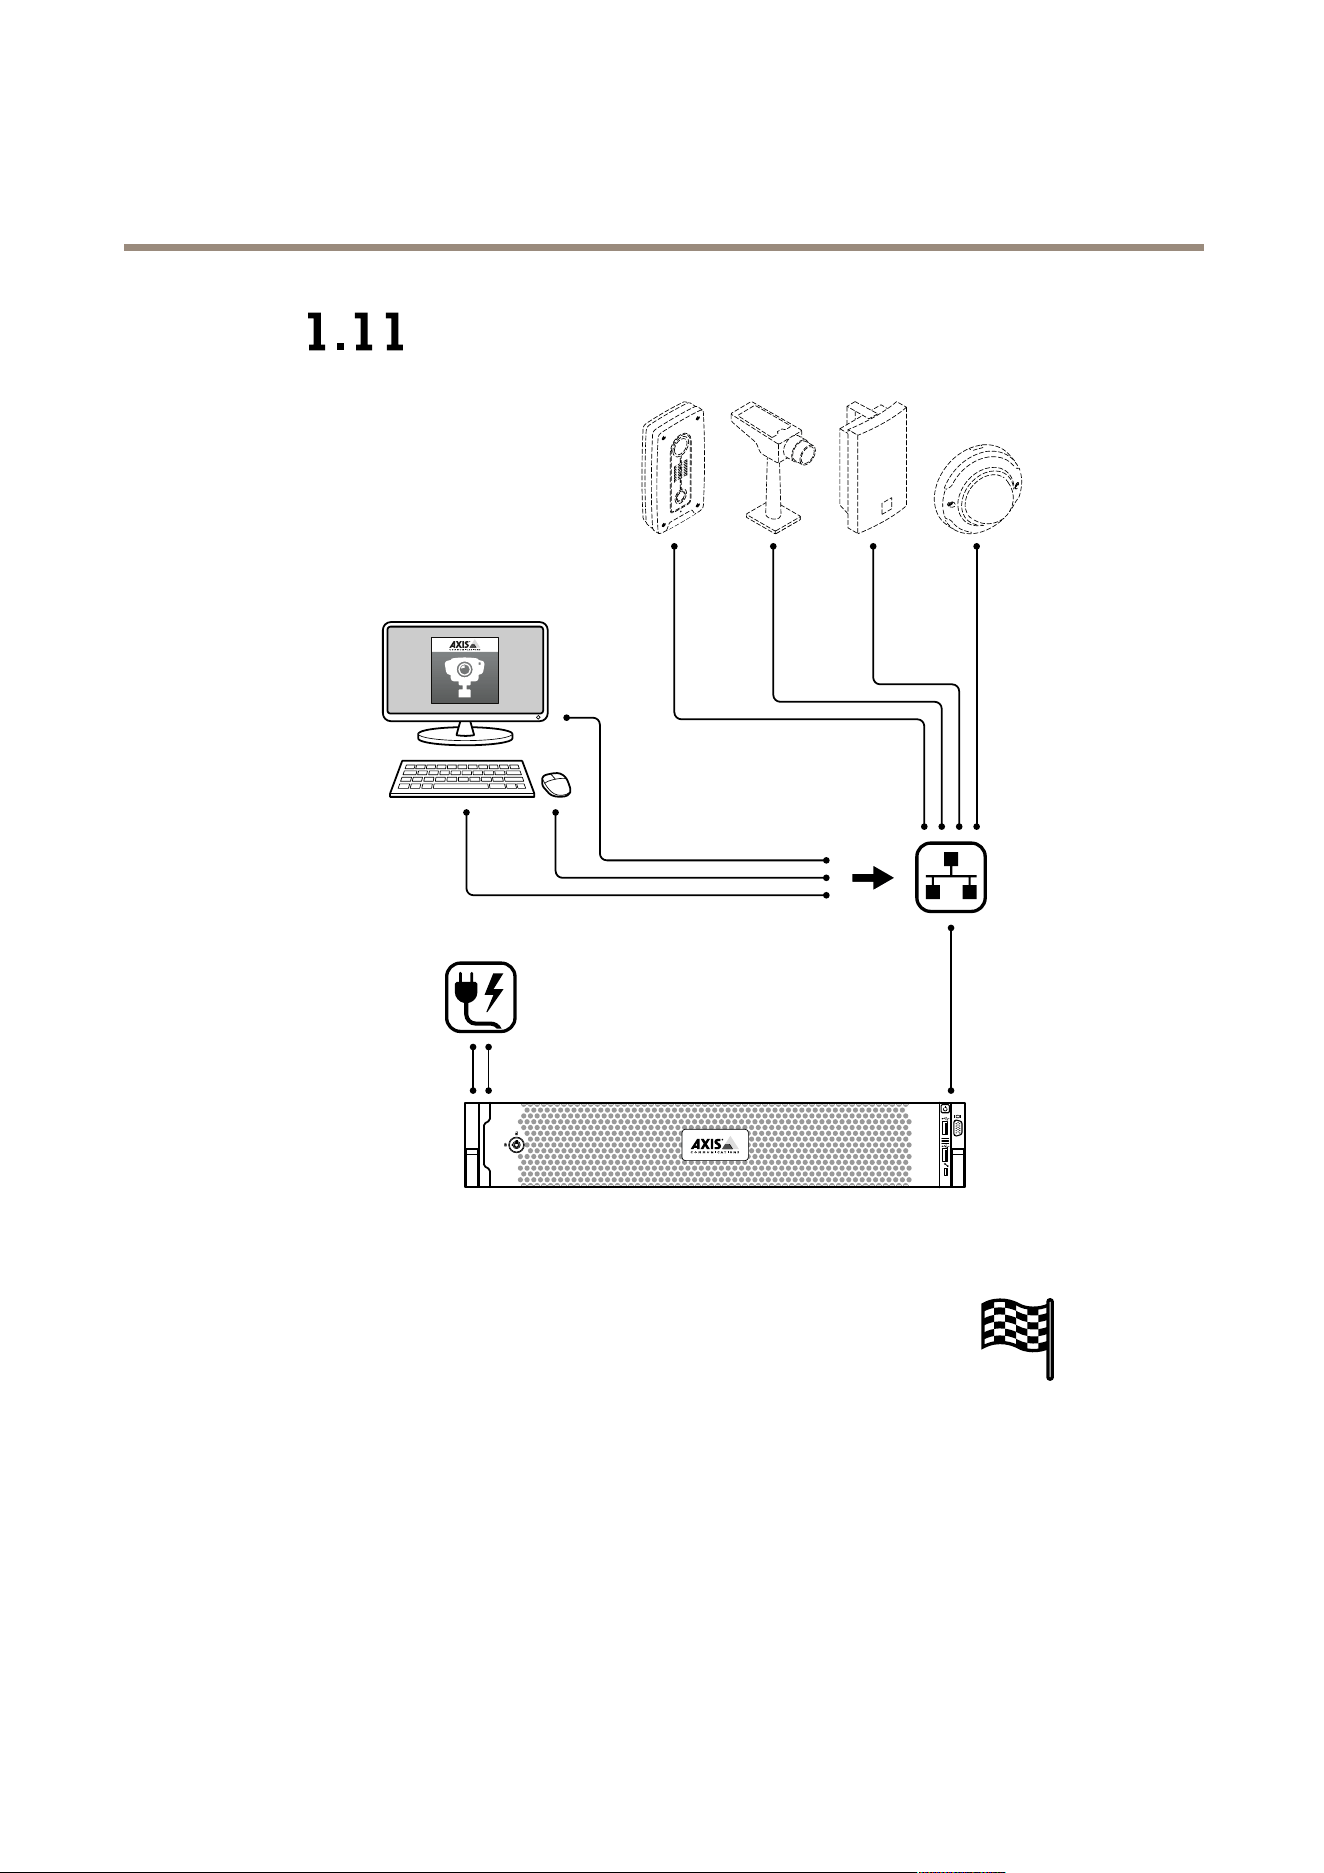
Installyourdevice
5

AXISCameraStationS1148Recorder
Installyourdevice
6

AXISCameraStationS1148Recorder
Installyourdevice
7

AXISCameraStationS1148Recorder
Installyourdevice
8

AXISCameraStationS1148Recorder
Installyourdevice
9
AXISCameraStationS1148Recorder
Installyourdevice
10
AXISCameraStationS1148Recorder
Installyourdevice
11
AXISCameraStationS1148Recorder
Installyourdevice
12

AXISCameraStationS1148Recorder
Configureyourdevice
Configureyourdevice
First-timeconguration
AfteryouhaveconguredWindows®,AXISRecorderToolboxisopenedautomaticallyandyouareguidedthroughtherst-time
congurationwizard.Inthiswizard,youcancongureseveralbasicandnecessarysettingsbeforeyoumanageyourdevicein
AXISRecorderToolbox.
1.ChangethecomputernameifyouwantandclickNext.
2.UnderDateandtime,congurethefollowingsettingsandclickNext.
-Selectatimezone.
-TosetupanNTPserver,selectNTPserverandentertheNTPserveraddress.
-Tosetmanually,selectManualandselectadateandtime.
3.UnderNetworksettings,congurethefollowingsettingsandclickNext.
-UseautomaticIPsettings(DHCP)andUseautomaticDNSsettingsareturnedonbydefault.
-IfyourdeviceisconnectedtoanetworkwithaDHCPserver,theassignedIPaddress,subnetmask,gateway,and
preferredDNSareautomaticallydisplayed.
-IfyourdeviceisnotconnectedtoanetworkorthereisnoDHCPserveravailable,entertheIPaddress,subnet
mask,gateway,andpreferredDNSmanuallydependingonthenetworkrequirements.
4.ClickFinish.Ifyouhavechangedthecomputername,AXISRecorderToolboxwillpromptyoutorestartthedevice.
CongureAXISCameraStation
ThisGetstartedtutorialwillwalkyouthroughthebasicstepstomakeyoursystemupandrunning.
Beforeyoustart,youmayneedto:
•Congureyournetworkdependingonyourinstallation.SeeNetworkconguration.
•Congureyourserverportsifneeded.SeeServerportconguration.
•Considersecurityissues.SeeSecurityconsiderations.
Afternecessarycongurations,youcanstarttoworkwithAXISCameraStation:
1.StartAXISCameraStation
2.Adddevices
3.Congurerecordingmethodonpage14
4.Liveviewcamerasonpage14
5.Playbackrecordingsonpage14
6.Addbookmarksonpage15
7.Exportrecordingsonpage15
8.PlayandverifyrecordingsinAXISFilePlayeronpage15
13

AXISCameraStationS1148Recorder
Configureyourdevice
StartAXISCameraStation
AXISCameraStationServiceControlautomaticallystartsaftertheinstallationiscomplete.
Double-clicktheAXISCameraStationClienticontostarttheAXISCameraStationclient.Whenstartingtheclientforthersttime,
itautomaticallyattemptstologintotheAXISCameraStationserverinstalledonthesamecomputerastheclient.
YoucanconnecttomultipleAXISCameraStationserversindifferentways.
Adddevices
ThersttimeyoustartyourAXISCameraStation,youarenavigatedtotheAdddevicespage.AXISCameraStationautomatically
searchesthenetworkforconnecteddevicesanddisplaysalistofdevicesfound.
1.Selectthecamerastoaddfromthelist.
Ifyourcameraisnotlisted,clickManualsearch.
2.ClickAdd.
3.SelectQuickcongurationorSiteDesignerconguration.ClickNext.
4.UsethedefaultsettingsandensuretherecordingmethodissettoNone.ClickInstall.
Congurerecordingmethod
1.GotoConguration>Recordingandevents>Recordingmethod.
2.Ifyouwanttoenablemotiondetectionrecording:
2.1Selectacamera.
2.2TurnonMotiondetection.
2.3ClickApply.
3.Ifyouwanttoenablecontinuousrecording:
3.1Selectacamera.
3.2TurnonContinuous.
3.3ClickApply.
Liveviewcameras
1.ClicktheLiveviewtabtonavigatetothecameraliveview.
2.Clickacameratonavigatetotheliveviewofthatcamera.
Abluedotafterthecameranameshowsthatcontinuousrecordingisinprogress.Areddotafterthecameranameshows
thatmotiondetectionrecordingisinprogress.
3.Click
tonavigatefromLiveviewtoRecordings.
Aredlineinthetimelineshowsthatmotiondetectionrecordinghasbeentakenforthatperiod.Abluelineinthe
timelineshowsthatcontinuousrecordingisinprogress.
Playbackrecordings
1.GototheRecordingtab.
2.Inthetimelineofthecamera,usethemousewheeltozoominandoutanddragthetimelinetomakethemarker
pointingatyourdesiredposition.
14

AXISCameraStationS1148Recorder
Configureyourdevice
3.Tostartplayingtherecordingfromthedesiredposition,click.
Addbookmarks
1.GototheRecordingtab.
2.Inthetimelineofthecamera,usethemousewheeltozoominandoutanddragthetimelinetomakethemarker
pointingatyourdesiredposition.
3.Click
.
4.Enterthebookmarknameanddescription.Usekeywordsinthedescriptiontomakethebookmarkeasytondand
recognized.
5.SelectPreventrecordingdeletiontolocktherecording.Alockedrecordingcan'tbedeletedunlessactivelyunlocked.
6.ClickOK.Abookmarkiconisdisplayedatyourdesiredpositioninthetimeline.
Exportrecordings
1.GototheRecordingtab.
2.Inthetimelineofthecamera,usethemousewheeltozoominandout.
3.Click
todisplaytheselectionmarkers.
4.Dragthemarkerstoincludetherecordingsthatyouwanttoexport.
5.Click
toopentheExporttab.
6.IntheExporttab,youcandothefollowingifdesired.
-Click
toaddanotefortherecording.
-ClickBrowsetoselectthelocationtoexporttherecordings.
-SelectIncludeAxisFilePlayer,Includenotes,andAdddigitalsignature.
7.ClickExport.
8.SelectUsepasswordandenteryourpasswordforthedigitalsignature.ClickOK.
PlayandverifyrecordingsinAXISFilePlayer
1.Gotothefolderthatyouhavespeciedfortheexportedrecordings.
15

AXISCameraStationS1148Recorder
Configureyourdevice
Inthisexample,theexportedlesincludetherecordingsinthe.asfformat,thenotesinthe.txtformat,andAXISFilePlayer.
2.Double-clickAXISFilePlayer.Theexportedrecordingswillbeautomaticallyplayed.
3.Click
toshowthenotesaddedtotherecordings.
4.Toverifythedigitalsignature:
4.1GotoTools>Verifydigitalsignature.
4.2SelectValidatewithpasswordandenteryourpassword.
4.3ClickVerify.Thevericationresultpageisdisplayed.
Networkconguration
WhenAXISCameraStationClient,AXISCameraStationServer,andtheconnectednetworkdevicesareinstalledondifferent
networks,youmightneedtocongureproxyorrewallsettingsbeforeusingAXISCameraStation.
Clientproxysettings
Whentheclientandtheserverareseparatedbyaproxyserver,conguretheclientproxysettings.
1.Double-clicktheAXISCameraStationClienticon.
2.ClickChangeclientproxysettings.
3.Changetheclientproxysettings.
4.ClickOK.
Serverproxysettings
Whennetworkdevicesandtheserverareseparatedbyaproxyserver,conguretheserverproxysettings.
1.Double-clicktheAXISServiceControliconinWindowsnoticationarea.
2.SelectModifysettings.
3.IntheProxysettingssection,usethedefaultSystemaccountinternetoptionorselectUsemanualproxysettings.
4.ClickSave.
NATandFirewall
WhentheclientandtheserverareseparatedbyaNAT,rewallorsimilar,conguretheNATorrewalltoensurethattheHTTPport,
TCPport,andstreamingportspeciedinAXISCameraStationServiceControlareallowedtopassthroughtherewalland/orNAT.
ForinstructionshowtoconguretheNATorrewall,contactthenetworkadministrator.
Serverportconguration
Theports55752(HTTP),55754(TCP),55756(mobilecommunication),and55757(mobilestreaming)areusedonAXISCamera
StationServerforcommunicationbetweentheserverandtheclient.Ifrequired,theportscanbechangedfromAXISCamera
StationServiceControl.
Securityconsiderations
Topreventunauthorizedaccesstocamerasandrecordings,keepthefollowinginmind:
•Usestrongpasswordsforallnetworkdevices(cameras,videoencodersandauxiliarydevices).
16

AXISCameraStationS1148Recorder
Configureyourdevice
•InstallAXISCameraStationServer,cameras,videoencoders,andauxiliarydevicesonasecurenetworkseparatedfrom
theofcenetwork.AXISCameraStationClientcanbeinstalledonacomputeronanothernetwork,forexample
anetworkwithInternetaccess.
•Ensureallusershavestrongpasswords.UsingWindowsActiveDirectoryahighlevelofsecuritycanbeimplemented.
Licenseasystemonline
BoththeAXISCameraStationclientandtheservermustbeconnectedtotheinternet.
1.IntheAXISCameraStationclient,
1.1GotoConguration>Licenses>Management.
1.2Managelicensesonlineisturnedonbydefault.
1.3ClickGotoAXISLicensePortal.
2.IntheAXISLicensePortalwww.axis.com/licenses,
2.1SigninwithyourMyAxisaccount.
2.2UnderAddlicensekey,enteryourlicensekeyandclickAdd.
3.IntheAXISCameraStationclient,checkthatyourlicensekeysareshowninConguration>Licenses>Keys.
Towatchthisvideo,gotothewebversionofthisdocument.
www.axis.com/products/online-manual/46316#t10129696
AXISCameraStationonlinelicenseregistration
Licenseasystemofine
1.IntheAXISCameraStationclient,exportthesystemle.
1.1GotoConguration>Licenses>Management.
1.2IfAXISCameraStationisonline,turnoffManagelicensesonlineandclickExportsystemle.
1.3IfAXISCameraStationisofine,clickExportsystemle.
1.4SaveyoursystemleonaUSBashdrive.
2.IntheAXISLicensePortalwww.axis.com/licenses,
2.1SigninwithyourMyAxisaccount.
2.2ClickUploadsystemletouploadthesystemleyouexported.
2.3UnderAddlicensekey,enteryourlicensekeyandclickAdd.
2.4UnderLicensekeys,clickDownloadlicenseleandsavetheletoaUSBashdrive.
17

AXISCameraStationS1148Recorder
Configureyourdevice
3.IntheAXISCameraStationclient,importthelicensele.
3.1GotoConguration>Licenses>Management.
3.2ClickImportlicenseleandselectthelicenseleonyourUSBashdrive.
3.3CheckthatyourlicensekeysareshowninConguration>Licenses>Keys.
Towatchthisvideo,gotothewebversionofthisdocument.
www.axis.com/products/online-manual/46316#t10129682
AXISCameraStationofinelicenseregistration
18

AXISCameraStationS1148Recorder
ManageWindows®useraccounts
ManageWindows®useraccounts
Createauseraccount
Tohelpkeepyourpersonaldataandinformationmoresecure,werecommendthatyouaddapasswordforeachlocalaccount.
Important
Onceyoucreateapasswordforalocalaccount,don'tforgetit.There’snowaytorecoveralostpasswordforlocalaccounts.
1.GotoSettings>Accounts>Otherpeople>AddsomeoneelsetothisPC.
2.ClickIdon’thavethisperson’ssign-ininformation.
3.ClickAddauserwithoutaMicrosoftaccount.
4.Enterausername,passwordandpasswordhint.
5.ClickNextandfollowtheinstructions.
Createanadministratoraccount
1.GotoSettings>Accounts>Otherpeople.
2.GototheaccountyouwanttochangeandclickChangeaccounttype.
3.GotoAccounttypeandselectAdministrator.
4.ClickOK.
5.Restartyourdeviceandsigninwiththenewadministratoraccount.
Createalocalusergroup
1.GotoComputerManagement.
2.GotoLocalUsersandGroups>Group.
3.Right-clickGroupandselectNewGroup.
4.Enteragroupnameandadescription.
5.Addgroupmembers:
5.1ClickAdd.
5.2ClickAdvanced.
5.3Findtheuseraccount(s)youwanttoaddtothegroupandclickOK.
5.4ClickOKagain.
6.ClickCreate.
Deleteauseraccount
Important
Whenyoudeleteanaccountyouremovetheuseraccountfromtheloginscreen.Youalsoremoveallles,settingsand
programdatastoredontheuseraccount.
19

AXISCameraStationS1148Recorder
ManageWindows®useraccounts
1.GotoSettings>Accounts>Otherpeople.
2.GototheaccountyouwanttoremoveandclickRemove.
Changeauseraccount'spassword
1.Loginwithanadministratoraccount.
2.GotoUserAccounts>UserAccounts>Manageanotheraccountinsequence.
You’llseealistwithalluseraccountsonthedevice.
3.Selecttheuseraccountwhosepasswordyouwouldliketochange.
4.ClickChangethepassword.
5.EnterthenewpasswordandclickChangepassword.
Createapasswordresetdiskforauseraccount
WerecommendtocreateapasswordresetdiskusingaUSBashdrive.Then,ifyouforgetyourpassword,youcanresetthe
password.WithoutaUSBresetdisk,youcan’tresetthepassword.
Ifyou’reusingWindows10,version1803youcanaddsecurityquestionstoyourlocalaccountincaseyouforgetyourpassword,
soyoudon'tneedtocreateapasswordresetdisk.Todothis,gottoStartandclickSettings>Sign-inoptions>Updateyour
securityquestions.
1.Signintoyourdevicewithalocaluseraccount.Youcan’tcreateapasswordresetdiskforaconnectedaccount.
2.PlugaUSBashdriveintoyourdevice.
3.Ifthere’sanydataontheUSBashdrive,backitup.
4.FromtheWindows®searcheld,gotoCreateapasswordresetdisk.
5.IntheForgottenPasswordwizard,clickNext.
6.SelectyourUSBashdriveandclickNext.
7.TypeyourcurrentpasswordandclickNext.
8.Followtheonscreeninstructions.
9.RemovetheUSBashdriveandkeepitinasafeplacewhereyou'llrememberit.Youdon'thavetocreateanewdiskwhen
youchangeyourpasswordevenifyouchangeitseveraltimes.
20

AXISCameraStationS1148Recorder
ManageAXISCameraStationuseraccounts
ManageAXISCameraStationuseraccounts
Congureuserpermissions
GotoConguration>Security>UserpermissionstoviewalistoftheusersandgroupsthathavebeenaddedtoAXISCamera
Station.
Note
AdministratorsofthecomputeronwhichtheAXISCameraStationserverisinstalledareautomaticallygivenadministrator
privilegestoAXISCameraStation.Youcan’tchangeorremovetheadministratorsgroup'sprivileges.
Beforeauserorgroupcanbeadded,theuserorgroupmustberegisteredonthelocalcomputerorhaveanWindowsActiveDirectory
useraccount.UsingWindowsActiveDirectory,ahighlevelofsecuritycanbeimplemented.
Whenauserispartofagroup,theusergetsthehighestrolepermissionthatisassignedtotheindividualandthegroup.
Whenauserispartofagroup,theusergetstheaccessgrantedasanindividualandalsoreceivestherightsaspartofagroup.For
example,auserisgivenaccesstocameraXasanindividual.Theuserisalsoamemberofagroup.Thegroupisgivenaccessto
camerasYandZ.TheuserthenhasaccesstocamerasX,YandZ.
IftherearesecurityconcernsregardingtheaccesstothecomputerbyadesignatedAXISCameraStationuser,createastandarduser
accountthatyouthenuseforaccesstoAxisCameraStation.YoucanthenelevatetheaccounttoadministratorinConguration>
Security>Userpermissions.
Thelistconsistsofthefollowinginformation:
ItemDescription
IconIndicatestheentryisagrouporasingleuser.
NameUsernameasitappearsinthelocalcomputerorActiveDirectory.
DomainDomainnamewheretheuserorgroupisregistered.
RoleTheaccessrolegiventotheuserorgroup.
Possiblevalues:Administrator,Operator,andViewer.
DetailsDetaileduserinformationasitappearsinthelocalcomputerorActiveDirectory.
ServerServernamewheretheuserorgroupisregistered.Onlyavailablewhenconnectingto
multipleAXISCameraStationservers.
Toaddusersorgroups,seeAddusersorgroups.
Tochangeuseraccessrightsforauserorgroup,clicktheuserorgroupandmakechanges.ClickApply.
Toremoveauserorgroup,selecttheuserorgroupandclickRemove.Inthepop-updialog,clickOKtoremovetheuserorgroup.
Addusersorgroups
UseraccountsinMicrosoftWindowsandActiveDirectoryusersandgroupscanaccessAXISCameraStation.ToaddausertoAXIS
CameraStation,youhavetoaddusersoragrouptoWindows.
ToaddauserorgroupinMicrosoftWindows:AddingauserinWindowsmayvarydependingonwhichversionofWindowsyou
arerunning.FollowtheinstructionsonMicrosoft'ssite.IfyouareconnectedtoanActiveDirectorydomainnetwork,consult
yournetworkadministrator.
Addusersorgroups
1.GotoConguration>Security>UserpermissionsandclickAdd.
21

AXISCameraStationS1148Recorder
ManageAXISCameraStationuseraccounts
2.WhenconnectingtomultipleAXISCameraStationservers,selectaserverfromtheSelectedserverdrop-downlist.
3.SelectServertosearchforusersorgroupsonthelocalcomputer,orselectDomaintosearchforActiveDirectoryusersor
groups.WhenconnectingtomultipleAXISCameraStationservers,youcanselectwhichservertosearchfor.
4.SelectUsersorGroupstosearchforonlyusersorgroups.
5.Thelistofusersorgroupsisdisplayed.UsersandgroupsthathavealreadybeenaddedtoAXISCameraStationarenotlisted.
-Iftherearetoomanyusersorgroups,thesearchresultisnotdisplayed.UsetheTypetosearcheldtorene
thesearchandndaspecicuserorgroup.
-Ifthedomainusersearchfails,theServicelogonaccountmustbechanged.
6.SelecttheusersorgroupsandclickAdd.Theusersorgroupsareaddedtothelistandshowninitalics.
Congureauserorgroup
1.Selectauserorgroupinthelist.
2.UnderRole,selectAdministrator,Operator,orViewer.
3.IfyouhaveselectedOperatororViewer,youcanconguretheuserorgroupprivileges.SeeUserorgroupprivileges.
4.ClickSave.Theuserorgroupinthelistisnotinitalicsandreadytobeused.
Userorgroupprivileges
Therearethreerolesthatcanbegiventoauserorgroup.Forhowtodeneaccessprivilegesforauserorgroup,seeAddusersor
groups.
•Administrator:Fullaccesstotheentiresystem,includingaccesstoliveandrecordedvideoofallcameras,accesstoallI/O
portsandviews.Therefore,youdonotneedtospecifyanycamera,I/Oorviewprivilegesforauserwiththisrole.Thisrole
isrequiredinordertocongureanythinginthesystem.
•Operator:AccesstoliveandrecordedvideoofselectedcamerasandaccesstoselectedI/Oportsandviews.Anoperator
hasfullaccesstoallfunctionalityofAXISCameraStationexceptsystemconguration.
•Viewer:AccesstolivevideoofselectedcamerasandaccesstoselectedI/Oportsandviews.Aviewerdoesnothaveaccess
torecordedvideoorsystemconguration.
Cameras
ThefollowingaccessprivilegesareavailableforusersorgroupswiththeOperatororViewerrole.
•Access:Allowaccesstothecameraandallcamerafeatures.
•Video:Allowaccesstolivevideofromthecamera.
•Audiolisten:Allowaccesstolistenfromthecamera.
•Audiospeak:Allowaccesstospeaktothecamera.
•ManualRecording:Allowtostartandstoprecordingsmanually.
•MechanicalPTZ:AllowaccesstomechanicalPTZcontrols.OnlyavailableforcameraswithmechanicalPTZ.
•PTZpriority:SetthePTZpriority.Alowernumbermeansahigherpriority.0meansthatnopriorityisassigned.An
administratorhasthehighestpriority.WhenarolewithhigherpriorityoperatesaPTZcamera,otherscan’toperatethe
samecamerafor10secondsbydefault.OnlyavailableforcameraswithmechanicalPTZandMechanicalPTZisselected.
Views
22

AXISCameraStationS1148Recorder
ManageAXISCameraStationuseraccounts
ThefollowingaccessprivilegesareavailableforusersorgroupswiththeOperatororViewerrole.Youcanselectmultipleviews
andsettheaccessprivileges.
•Access:AllowaccesstotheviewsinAXISCameraStation.
•Edit:AllowtoedittheviewsinAXISCameraStation.
I/O
ThefollowingaccessprivilegesareavailableforusersorgroupswiththeOperatororViewerrole.TheI/Oportsarelistedbydevice.
•Access:AllowfullaccesstotheI/Oport.
•Read:AllowtoviewthestateoftheI/Oport.Theuserisnotabletochangetheportstate.
•Write:AllowtochangethestateoftheI/Oport.
System
Theaccessprivilegesthatcan’tbeconguredaregreyedoutandlistedunderRoleprivileges.Theprivilegeswithcheckmarkmeans
theuserorgrouphavethisprivilegebydefault.
ThefollowingaccessprivilegesareavailableforusersorgroupswiththeOperatorrole.
•Takesnapshots:Allowtakingsnapshotsintheliveviewandrecordingsmodes.
•Exportrecordings:Allowexportingrecordings.
•Generateincidentreport:Allowgeneratingincidentreports.
•Preventaccesstorecordingsolderthan:Preventaccessingrecordingsolderthanthespeciednumberofminutes.When
usingsearch,theuserwillnotndrecordingsolderthanthespeciedtime.Recordingsandbookmarksolderthan
thespeciedtimecan'tbeplayed.
ThefollowingaccessprivilegesareavailableforusersorgroupswiththeViewerrole.
•Takesnapshots:Allowtakingsnapshotsintheliveviewandrecordingsmodes.
23

AXISCameraStationS1148Recorder
Manageyourdevice
Manageyourdevice
UpdateWindows®
Windows®10periodicallychecksforupdates.Whenanupdateisavailable,yourdeviceautomaticallydownloadstheupdatebut
you'vetoinstallitmanually.
Note
Recordingwillbeinterruptedduringascheduledsystemrestart.
Tomanuallycheckforupdates:
1.GotoSettings>Update&Security>WindowsUpdate.
2.ClickCheckforupdates.
CongureWindowsupdatesettings
SometimesyoumightwanttochangehowandwhenWindows
®
updates.
Note
Allongoingrecordingsstopduringascheduledsystemrestart.
1.OpentheRunapp.
-GotoWindowsSystem>Run,or
-pressWINandR.
2.Typegpedit.mscandclickOK.TheLocalGroupPolicyEditoropens.
3.GotoComputerConguration>AdministrativeTemplates>WindowsComponents>WindowsUpdate.
4.Congurethesettingsasrequired,seeexample.
Example
Toautomaticallydownloadandinstallupdateswithoutanyuserinteractionandhavethedevicerestartifnecessaryoutofofce
hoursusethefollowingconguration:
1.OpenAlwaysautomaticallyrestartatthescheduledtimeandselect:
1.1Enabled
1.2Therestarttimerwillgiveusersthismuchtimetosavetheirwork(minutes):15.
1.3ClickOK.
2.OpenCongureAutomaticUpdatesandselect:
2.1Enabled
2.2CongureAutomaticupdates:Autodownloadandscheduletheinstall
2.3ScheduleInstallday:EverySunday
2.4ScheduleInstalltime:00:00
2.5ClickOK.
3.OpenAllowAutomaticUpdatesimmediateinstallationandselect:
24

AXISCameraStationS1148Recorder
Manageyourdevice
3.1Enabled
3.2ClickOK.
ChangetheRAID
CAUTION
ChangingtheRAIDdeletesalldatafromyourdisks.
1.BootLifecycleController:
1.1Poweronyourdevice.
1.2WhenyouseetheAXISsplashscreen,pressF10.
2.IntheLifecycleController,gotoHardwareConguration>CongurationWizardsandselectRAIDConguration.
3.SelecttheRAIDControlleronwhichyouwanttohavetheRAIDcreated.Detailsofanyvirtualdisk(s)availableonthe
selectedcontrollerwillbeshowninthetabledisplayedonthepagebelowthecontrollerlist.ForeignCongurationwillbe
displayedifthereareanyforeignoruninitializedHDD(s)availableontheserver.
Note
•ClearforeigncongurationclearsalltheforeignHDDsavailableontheRAIDcontrollerselected.
•IgnoreforeignCongurationignorestheforeignHDDsavailableontheRAIDcontrollerwhilecreatingtheRAID.
4.ClearorignoreforeignHDDsanduninitializedHDDs.
Ifyouwant,youcaninitializetheuninitializeddisks:
4.1Inthelistofallnon-RAID(uninitialized)HDDs,selecttheHDDsyouwanttoconverttoRAIDcapable(initialize)
andclickNexttoinitializethem.
4.2SelectthecorrespondingoptionontheCongurationWizards:RAIDCongurationpage.
5.SelectaRAIDlevel.Thedefaultsettingsare:
-S114824TB:RAID5
-S114864TB:RAID5
-S1148140TB:RAID6
-S1132:RAID5
6.SelectthephysicaldisksfromthetableandclickNext.
Iftheyou’veselectedIgnoreforeignconguration,theforeignHDDsarenotdisplayedinthetable.
7.Enterthevirtualdiskattributes.
8.ClickNext.
9.ReviewthesettingsandclickFinish.
10.LifecycleControllerdisplaysamessagetoindicatethatallthecurrentdataaboutthevirtualdisksavailableonthe
controllerwillbelost.ClickOKtocontinue.
11.ClickOKandFinish.
12.Exitthewizardandrebootthesystem.
25

AXISCameraStationS1148Recorder
Manageyourdevice
Addaharddrive
Thissectionexplainshowtoinstallaharddrive,howyouaddittotheexistingRAIDarray,andwhatyoumustcongureinWindows®.
Note
YoucanonlyaddaharddrivetoS1 14824TBandS1 14864TB.
Note
ThefollowinginstructionsaretobeusedwhenaddingadditionalstorageintotheAXISS1 1-series.Theseinstructions
areasis,andAxisCommunicationsABtakesnoresponsibilityforlossofdataand/orcongurationduringthesesteps.
Thestandardprecautionsshouldbetakentobackupdatathatisbusinesscritical.Thefollowingprocedureofexpanding
storagewillnotbesupportedbyAxisTechnicalSupport.
Note
Toavoidelectrostaticdischarge,itisrecommendedthatyoualwaysuseastaticmatandstaticstrapwhileworking
oncomponentsintheinteriorofthesystem.
Warranty
AxisCommunicationsABgrantstotheoriginalpurchaser(thedistributor)ahardwarewarrantyforthenetworkvideorecorders
mentionedabove.Detailedinformationaboutwarrantyisavailableat:axis.com/support/warranty-and-rma/warranty.
Workow
1.Removethebezelonpage26
2.Installtheharddriveonpage26
3.AddnewdrivetoRAIDarrayonpage27
4.CongureWindows®onpage27
Removethebezel
1.Locatethebezelkey.
2.Unlockthebezelwiththekey.
3.Slidethereleaselatchupandpulltheleftendofthebezel.
4.Unhooktherightendandremovethebezel.
Installtheharddrive
CAUTION
•UseonlyharddrivesthathavebeentestedandapprovedforusewithAXISS1148.
•Wheninstallingaharddrive,ensurethattheadjacentdrivesarefullyinstalled.Insertingaharddrivecarrierandattempting
tolockitshandlenexttoapartiallyinstalledcarriercandamagethepartiallyinstalledcarrier'sshieldspringandmakeit
unusable
•CombiningSASandSATAharddrivesinthesameRAIDvolumeisnotsupported.
1.Pressthereleasebuttonandslidetheharddiskblankoutoftheharddriveslot.
2.Installaharddriveintheharddrivecarrier.
3.Pressthereleasebuttononthefrontoftheharddrivecarrierandopentheharddrivecarrierhandle.
4.Inserttheharddrivecarrierintotheharddriveslotuntilthecarrierconnectswiththebackplane
26

AXISCameraStationS1148Recorder
Manageyourdevice
5.Closetheharddrivecarrierhandletolocktheharddriveinplace.
AddnewdrivetoRAIDarray
CAUTION
ChangingtheRAIDdeletesalldatafromyourdisks.
1.BootLifecycleController:
1.1Poweronyourdevice.
1.2WhenyouseetheAXISsplashscreen,pressF10.
2.IntheLifecycleController,gotoHardwareConguration>CongurationWizardsandselectRAIDConguration.
3.SelecttheRAIDControlleronwhichyouwanttohavetheRAIDcreated.Detailsofanyvirtualdisk(s)availableonthe
selectedcontrollerwillbeshowninthetabledisplayedonthepagebelowthecontrollerlist.ForeignCongurationwillbe
displayedifthereareanyforeignoruninitializedHDD(s)availableontheserver.
Note
•ClearforeigncongurationclearsalltheforeignHDDsavailableontheRAIDcontrollerselected.
•IgnoreforeignCongurationignorestheforeignHDDsavailableontheRAIDcontrollerwhilecreatingtheRAID.
4.ClearorignoreforeignHDDsanduninitializedHDDs.
Ifyouwant,youcaninitializetheuninitializeddisks:
4.1Inthelistofallnon-RAID(uninitialized)HDDs,selecttheHDDsyouwanttoconverttoRAIDcapable(initialize)
andclickNexttoinitializethem.
4.2SelectthecorrespondingoptionontheCongurationWizards:RAIDCongurationpage.
5.SelectaRAIDlevel.Thedefaultsettingsare:
-S114824TB:RAID5
-S114864TB:RAID5
-S1148140TB:RAID6
-S1132:RAID5
6.SelectthephysicaldisksfromthetableandclickNext.
Iftheyou’veselectedIgnoreforeignconguration,theforeignHDDsarenotdisplayedinthetable.
7.Enterthevirtualdiskattributes.
8.ClickNext.
9.ReviewthesettingsandclickFinish.
10.LifecycleControllerdisplaysamessagetoindicatethatallthecurrentdataaboutthevirtualdisksavailableonthe
controllerwillbelost.ClickOKtocontinue.
11.ClickOKandFinish.
12.Exitthewizardandrebootthesystem.
CongureWindows®
1.Right-clicktheWindows®-symbolattheStartmenuandselectDiskManagement.
27

AXISCameraStationS1148Recorder
Manageyourdevice
2.GotoAction>AllTasks>ExtendVolume.TheExtendVolumeWizardstarts.
3.ClickNext.
4.SelectthediskthathasunusedspaceandclickNext.Usuallythisdiskisselectedbythewizard.
5.ClickFinish.
DiskManagementnowshowstheextendvolumeandyoursystemisreadytousetheextendedvolume.
28

AXISCameraStationS1148Recorder
Troubleshooting
Troubleshooting
CheckthecurrentBIOSversion
Whenyoutroubleshootadevice,alwayscheckthecurrentBIOSversion.Ifyourdevicedoesn'thavethelatestversion,werecommend
toupgrade.Thelatestversionmaycontainacorrectionthatxesyourproblem.
TocheckthecurrentBIOS:
1.Poweronthedevice.
2.WaituntilyouseetheAxissplashscreen.You’llseetheversionnumberabovethesplashscreen.
UpgradetheBIOS
WerecommendtokeeptheBIOSuptodate.
Ifyoudon’thaveaccesstoWindows®:updatepackageinstructionsforEFI
1.Gotothesupportpagesondell.comandenteryourservicetag.GotoDrivers&Downloadsanddownloadthe.ele.
2.CopytheletoaUSBdevice.
3.PlugintheUSBdeviceandpressF11duringPOSTtoenterBIOSBootManager.
4.GotoSystemUtilitiesmenu>BIOSUpdateFileExplorer.
5.SelecttheUSBdeviceandnavigatethroughthedirectorycontentstondtheexecutable(.e).
6.Launchtheexecutableandfollowtheinstructionsprovidedbytheashutility.
IfyouhaveaccesstoWindows®:updatepackageinstructionsforWindows®Dup
1.Browsetothelocationwhereyoudownloadedtheleanddouble-clickthenewle.
2.Readoverthereleaseinformationinthedialogwindow.
3.Downloadandinstallanyprerequisitesidentiedinthedialogwindowbeforeproceeding.
4.InstallanynecessaryEmbeddedSystemsManagementrmwarepriortothisBIOSupdate.
5.ClickInstall.
6.Followtheonscreeninstructions.
Rundiagnostics
Runningdiagnosticshelpyoutoidentifythecauseforasystemissue.Thediagnosticstestyoursystemhardwarewithoutrequiring
additionalequipmentorriskingdataloss.
1.Whilethesystemisbooting,pressF11toenterBootManager.
Alternatively,pressF10toenterLifecycleController.
2.UsetheupanddownarrowstogotoSystemUtilities>HardwareDiagnostics.
3.NotetheerrorcodeAXISTechnicalSupport.
29

AXISCameraStationS1148Recorder
Troubleshooting
Performasystemrecovery
Ifthedevicehashadacompletesystemfailure,youmustusearecoveryimagetorecreatetheWindows®system.Todownloadthe
AXISRecoveryKit,contactAXISTechnicalSupportandsupplytheserialnumberofyourdevice.
1.DownloadtheAXISRecoveryKitandAXISISOtoUSBTool.
2.InsertaUSBdriveintoyourcomputer.
-UseaUSBdrivewithaminimumof16GBto32GB.
-TheUSBdrivewillbeformatted,andallexistingdatawillbeerased.
3.RuntheAXISISOtoUSBToolandfollowtheonscreeninstructions.
WritingdatatotheUSBdrivetakesapproximately10to15min.Don’tremovetheUSBdriveuntiltheprocessiscomplete.
4.AftertheISOtoUSBtooliscomplete,taketheUSBdriveandplugitintoyourdevice.
5.Startyourdevice.
6.WhenyouseetheAXISsplashscreen,pressF1 1.
7.ClickOne-shotUEFIBootMenu.
8.NavigatetoyourUSBdriveandpressENTER.ThesystembootsintotheAXISRecoveryKit.
9.ClickReinstallOperatingSystem.
Therecoverytakesroughly10to15mintocomplete.Younddetailedinstructionsinthedownloadfortherecoverykit.
Createatechnicalsupportreport
TheExportTechSupportReportfeatureallowsyoutoexportthetechnicalsupportreporttoaUSBdriveoranetworkshare
(CIFS/NFS).Inthereportyoucancollectthefollowingdata:
•Hardware
•RAIDcontrollerlogs
Tocreateatechnicalsupportreport:
1.DuringPower-on-self-test(POST),pressF10tostartLifecycleController.
2.GotoHardwareDiagnostics>ExportTechSupportReport.
3.ReadthetermsandconditionsandclickNext.
Youmustacceptthetermsandconditionstoallowtechnicalsupporttousethetechnicalsupportreportdata.
4.SelectthedataoptionswhichyouwanttoincludeinthetechnicalsupportreportandclickNext.
5.EntertherequiredexportsettingsinformationandclickNext.
-ToexportthereporttoaUSBdrive:selecttheUSBdriveoptionandthenselectthenameoftheUSBDriveand
enterthelepathdetailstowherethereportistoexport.
-ToexportthereporttoNFS:selecttheNFSoptionandentertherequiredinformation.
-ToexportthereporttoCIFS:selecttheCIFSoptionandentertherequiredinformation.
ClickTestNetworkConnectiontoverifyiftheLifecycleControllercanconnecttotheIPaddressthatisprovided.
Bydefault,itpingstheGatewayIP,DNSServerIP,hostIPandProxyIP.
6.VerifyyourselectionandclickFinish.
30

AXISCameraStationS1148Recorder
Troubleshooting
LifecycleControllerretrievestheselectedreportdataandexportsthereportletothespeciedlocation.Thiscan
takeafewminutes.
EnableIDRAC
YoucansetuptheIPaddressorusethedefaultiDRACIPaddress192.168.0.120tocongureinitialnetworksettings,including
settingupDHCPorthestaticIPforiDRAC.Bydefault,thededicatediDRACnetworkcardisdisabled.TheiDRACissharingthe
networkcardonLOM1(LANonMotherboard).Inthecaseofbladeservers,theiDRACnetworkinterfaceisdisabledbydefault.
TosetupiDRACIPusingiDRACsettingsutility:
1.Turnonthemanagedsystem.
2.PressF2duringPower-onSelf-test(POST).
3.IntheSystemSetupMainMenupage,clickiDRACSettings.
4.ClickNetwork.
5.EnableNIC.
6.Specifytheothernetworksettings.
7.ClickBack,Finish,andthenYes.Thenetworkinformationissavedandthesystemreboots.
YoucanopentheiDRACwebpagefromanysupportedbrowser.Thedefaultlogininformationis:
-Username:root
-Password:availableonthebackoftheinformationtag.
8.AfteryoucongureiDRACIPaddress,ensurethatyouchangethedefaultusernameandpasswordaftersettingupthe
iDRACIPaddress.
Note
Ifthereisanyaccessissue:
•TrytopingtheiDRACIPtocheckthatthenetworkcongurationhasbeenreplied.
•CheckwhichLOM(networkcard)hasbeenselectedintheiDRACnetworksettings.TheLOMcanbesharedwiththe
servernetworkcardsorusethededicatediDRACNIC's.
Troubleshootthepowersupplyunit
Note
Afterinstallingapowersupplyunit,allowseveralsecondsforthesystemtorecognizethepowersupplyunitanddetermineif
itthepowersupplyworksproperly.
1.Ensurethatnolooseconnectionsexist.Forexample,loosepowercables.
2.EnsurethatthepowersupplyhandleLEDindicatesthatthepowersupplyisworkingproperly.
3.Checkthestatusofthepowerindicatoronthepowersupplyunit.
-Ifthepowerindicatorisgreen,resetthepowersupplyunit.Ifthisdoesnotxtheissue,testthesystem
withagoodpowersupplyunit.
-Ifthepowerindicatorisamber,thisindicatesapowersupplyunitfaultcondition.Replacethepowersupplyunit
withagoodpowersupplyunitandchecktheindicatorstatus.
-Iftheissueisresolved,considerreplacingthepowersupplyunit.
31

AXISCameraStationS1148Recorder
Troubleshooting
4.Ifyouhavearedundantpowersupplyconguration,ensurethatbothpowersupplyunitsareofthesametypeand
wattage.YoumayhavetoupgradetoahigherwattagePSU.
5.EnsurethatyouuseonlypowersupplyunitswiththeExtendedPowerPerformance(EPP)labelontheback.
6.Resetthepowersupplyunit.
7.Iftheproblempersists,contactAxisTechnicalSupport.
Troubleshootmemoryerrors
1.UpgradetheBIOStothelatestversion.
2.Iftheerrorspersist,contactAxisTechnicalSupport.
TroubleshootAXISCameraStation
ForinformationabouthowtotroubleshootAXISCameraStation,gototheAXISCameraStationusermanual.
32
AXISCameraStationS1148Recorder
Productoverview
Productoverview
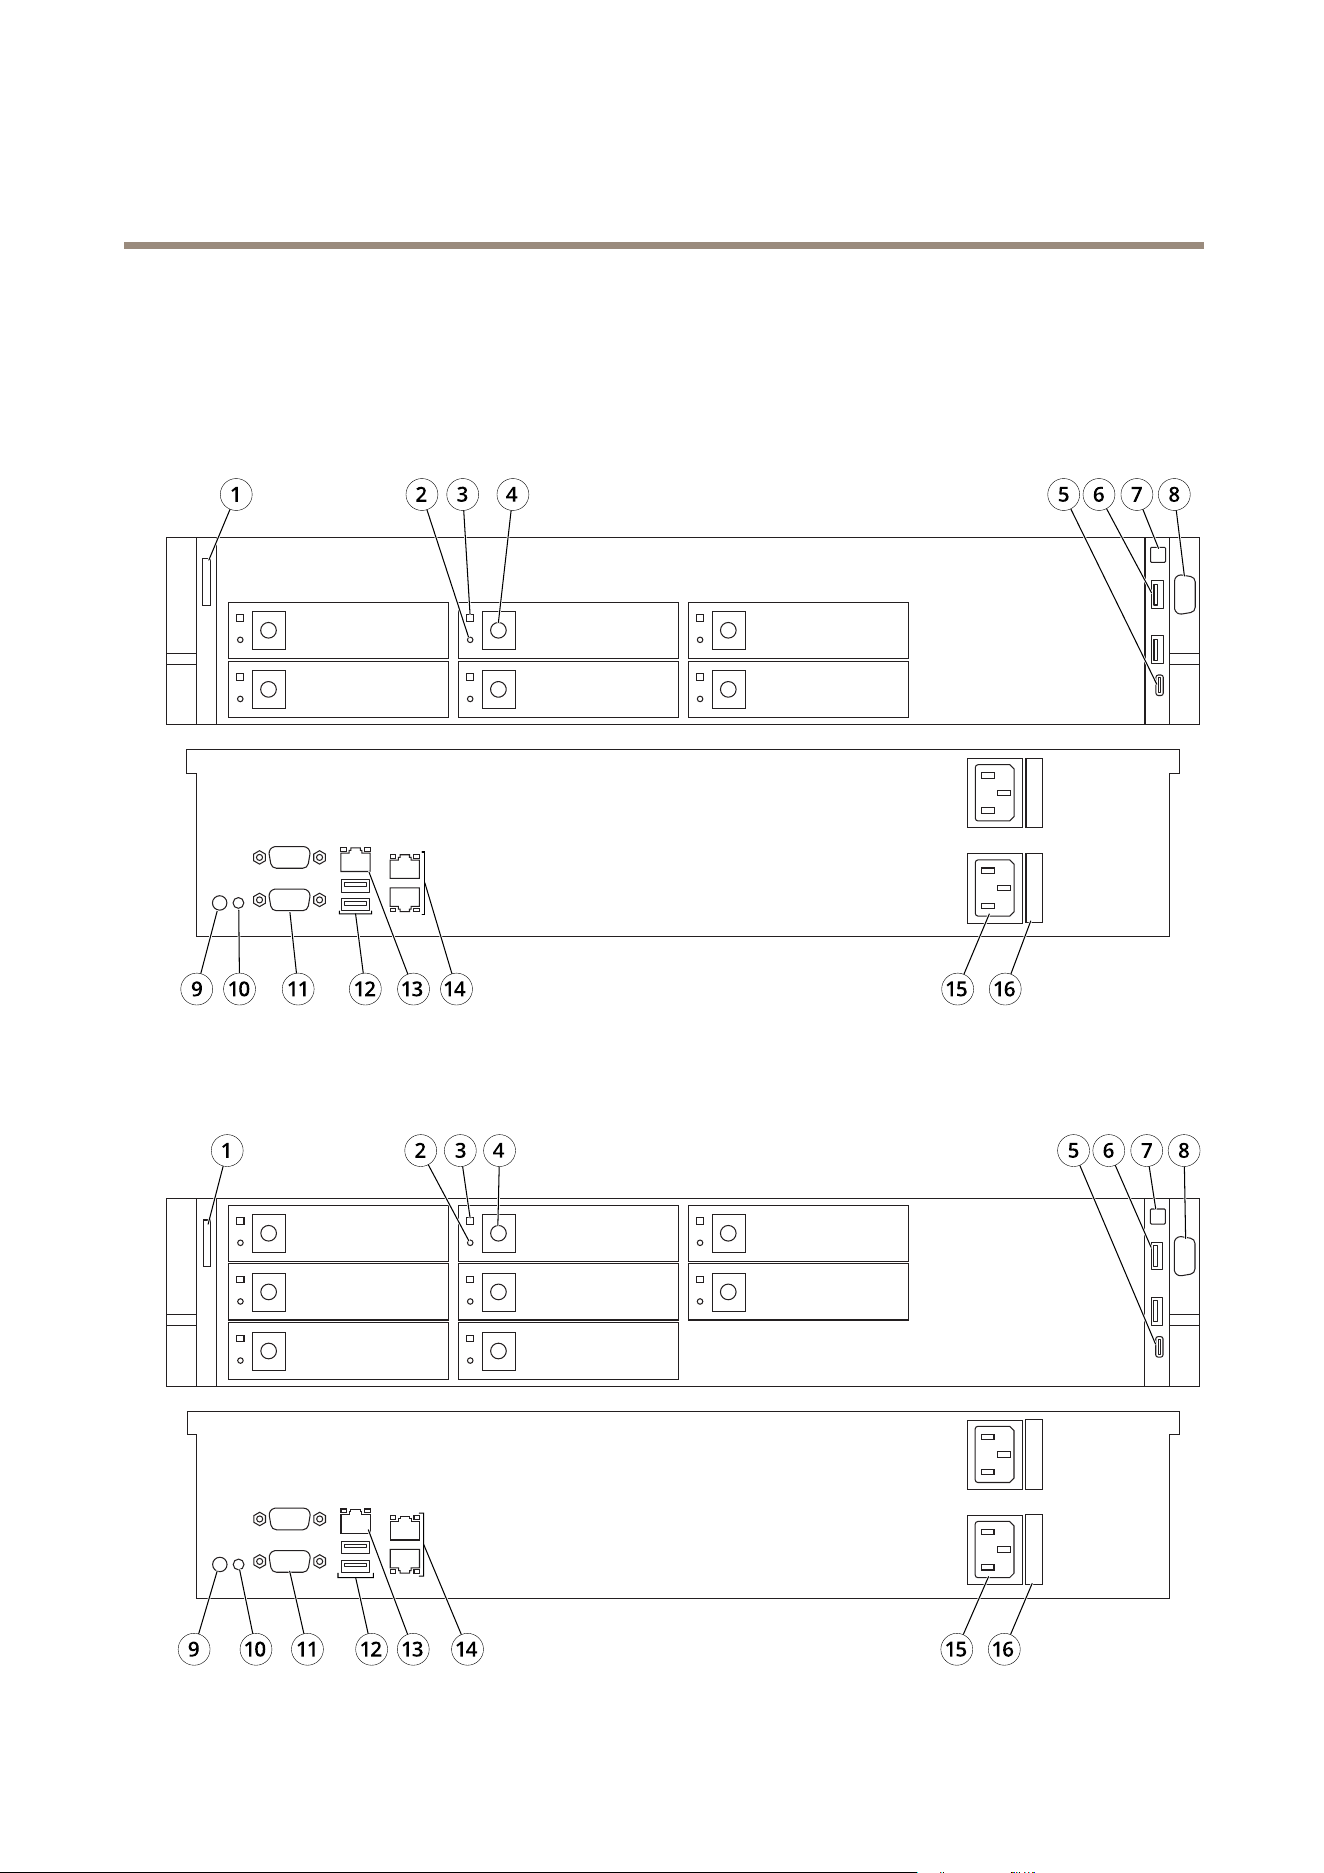
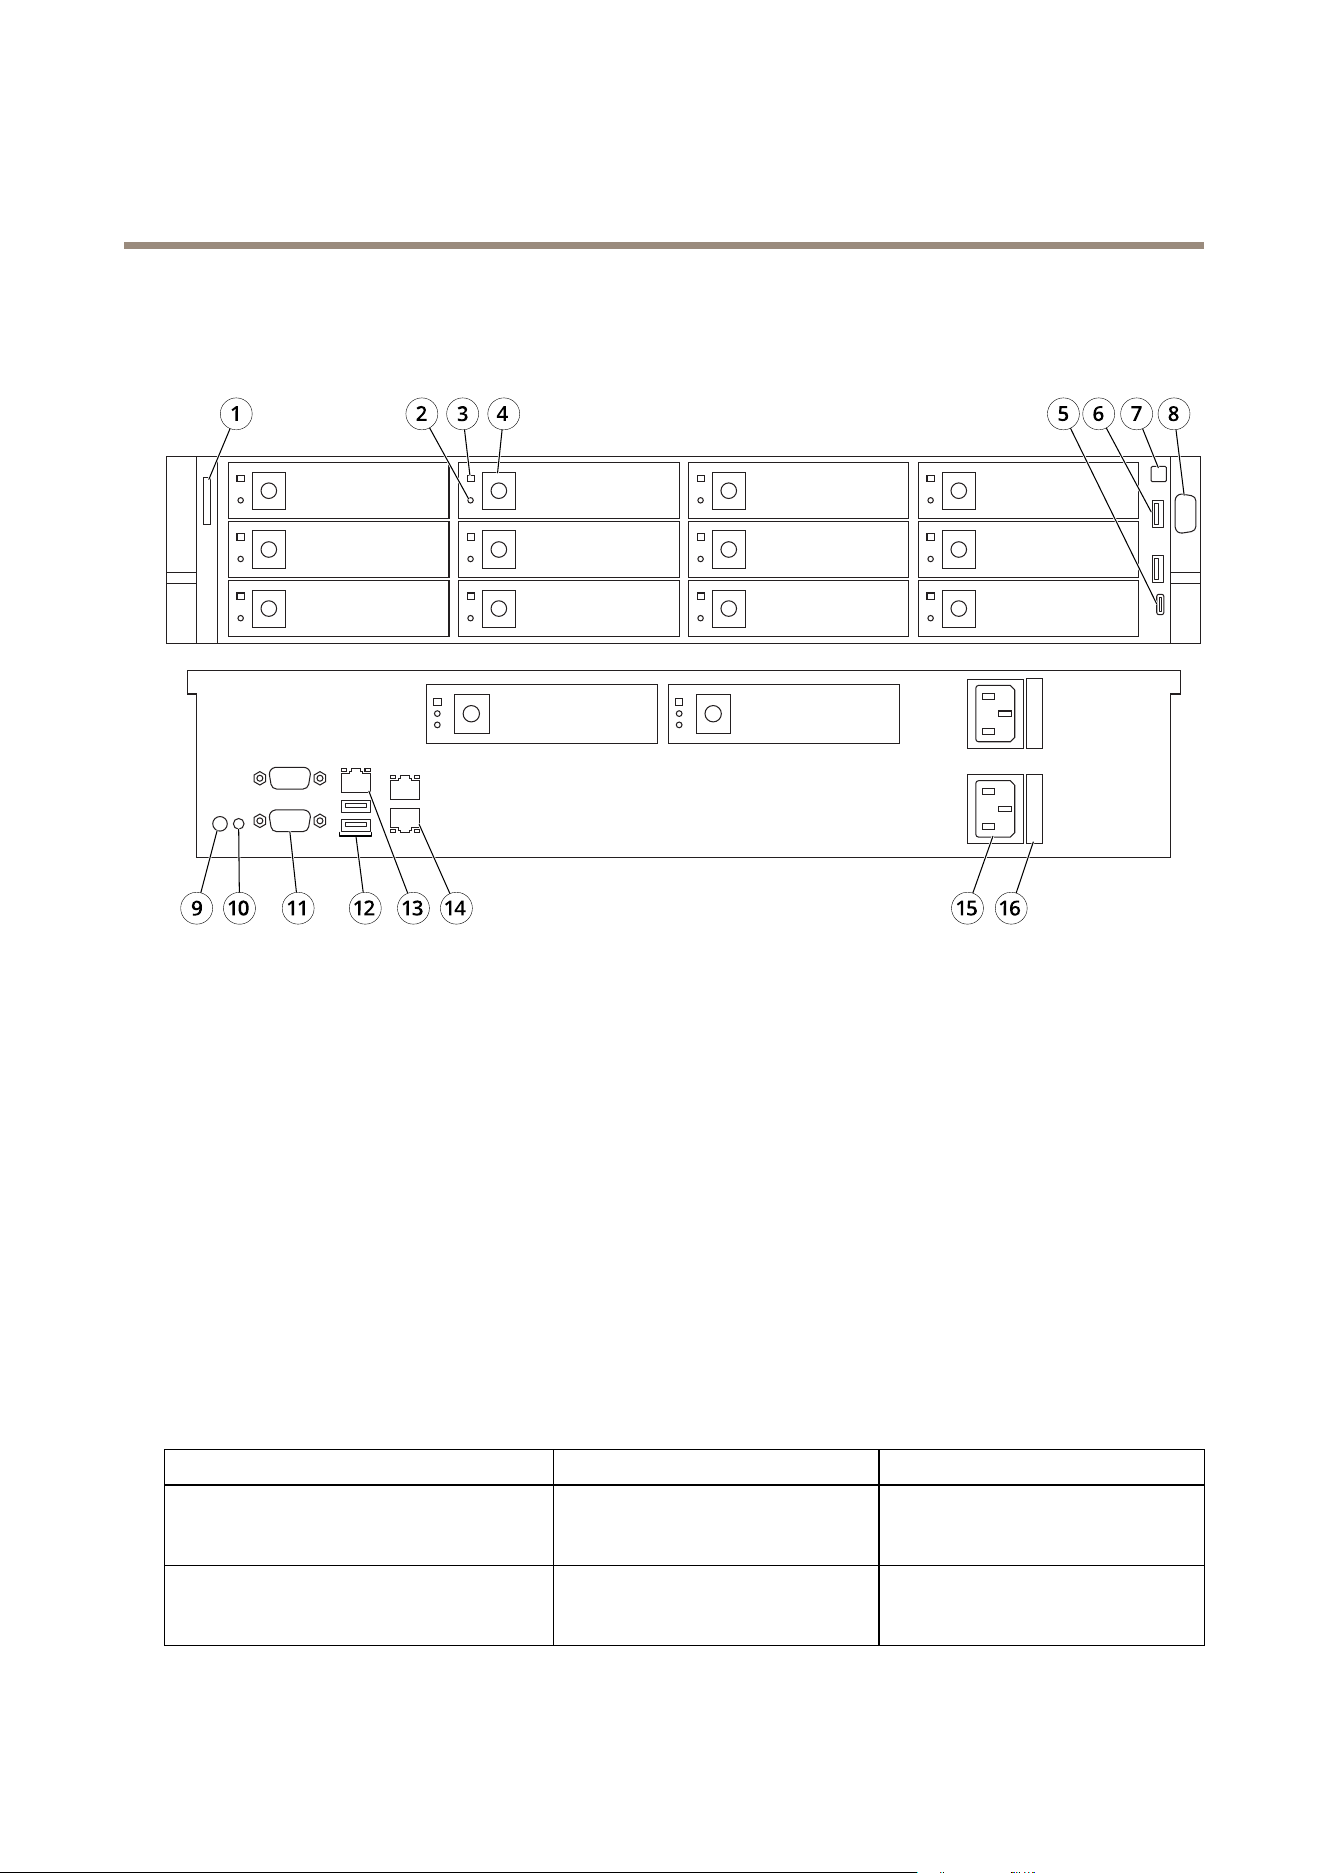
Frontandrearsides
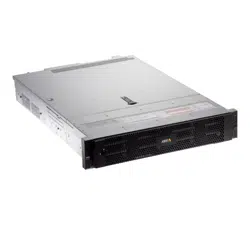
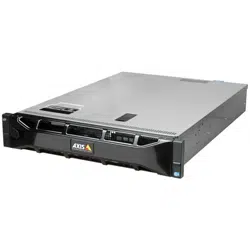
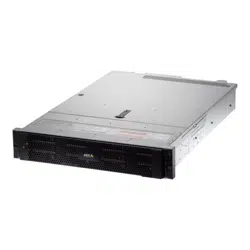
S114824TB
S114864TB
33
AXISCameraStationS1148Recorder
Productoverview
S1148140TB
1
iLED
2
DriveactivityLED
3
DrivestatusLED
4
Openingbutton
5
USB3.1Type-C
6
USB2.1
7
SystempowerLED/powerbutton
8
VGA
9
Systemidenticationbutton
10
Systemstatusindicatorcableport
11
VGA
12
USB3.1
13
iDRAC9dedicatednetworkport
14
Ethernet(RJ45)1GbE
15
Powerconnector
16
Powercablelock
Specications
SystemhealthandIDindicators
LEDDescriptionAction
BluesolidThesystemisturnedon,systemis
healthyandsystemIDmodeisnot
active.
PressthesystemhealthandsystemID
buttontoswitchtosystemIDmode.
BlueblinkingThesystemIDmodeisactive.Pressthesystemhealthandsystem
IDbuttontoswitchtosystemhealth
mode.
34

AXISCameraStationS1148Recorder
Productoverview
AmbersolidThesystemisinfail-safemode.
-
AmberblinkingThesystemisexperiencingafault.
Checkthesystemeventlogforthe
specicerrormessage.
IDRACquicksync2indicator
LEDDescriptionAction
Off(defaultstate)
TheiDRACQuickSync2
featureisturnedoff.
PresstheiDRACQuickSync2buttontoturnontheiDRACQuick
Sync2feature.
IftheLEDfailstoturnon,resettheleftcontrolpanelexcableand
checkagain.
Whitesolid
TheiDRACQuick
Sync2isreadyto
communicate.
PresstheiDRACQuickSync2buttontoturnoff.
IftheLEDfailstoturnoff,restartthesystem.
BlinkswhiterapidlyDatatransferactivity
-
BlinkswhiteslowlyFirmwareupdateisin
progress.
-
Blinkswhitevetimesrapidly
andthenturnsoff
TheiDRACQuickSync2
featureisdisabled.
CheckifiDRACQuickSync2featureisconguredtobedisabledby
iDRAC.
AmbersolidThesystemisinfail-safe
mode.
Restartthesystem.
Amberblinking
TheiDRACQuickSync
2hardwareisnot
respondingproperly.
Restartthesystem.
NICindicators
LEDDescription
Linkandactivityindicatorsareoff
TheNICisnotconnectedtothenetwork.
Linkindicatorisgreenandactivityindicatorisblinkinggreen
TheNICisconnectedtoavalidnetworkatitsmaximum
portspeedanddataisbeingsentorreceived.
Linkindicatorisamberandactivityindicatorisblinkinggreen
TheNICisconnectedtoavalidnetworkatlessthanits
maximumportspeedanddataisbeingsentorreceived.
Linkindicatorisgreenandactivityindicatorisoff
TheNICisconnectedtoavalidnetworkatitsmaximum
portspeedanddataisnotbeingsentorreceived.
Linkindicatorisamberandactivityindicatorisoff
TheNICisconnectedtoavalidnetworkatlessthat
itsmaximumportspeedanddataisnotbeingsentor
received
Linkindicatorisblinkinggreenandactivityisoff
NICidentifyisenabledthroughtheNICconguration
utility.
Powersupplyunitindicators
LEDDescription
GreenAvalidpowersourceisconnectedtothePSUandthe
PSUisoperational.
Blinkingamber
IndicatesaproblemwiththePSU
NotilluminatedPowerisnotconnected.
35

AXISCameraStationS1148Recorder
Productoverview
Blinkinggreen
WhenthermwareofthePSUisbeingupdated,thePSU
handleblinksgreen.CAUTION:Donotdisconnectthe
powercordorunplugthePSUwhenupdatingrmware.If
rmwareupdateisinterruptedthePSUsdonotfunction.
Blinkinggreenandturnsoff
Whenhot-pluggingaPSU,thePSUhandleblinksgreen
vetimesatarateof4Hzandturnsoff.Thisindicates
aPSUmismatchwithrespecttoefciency,featuresset,
healthstatus,orsupportedvoltage.
CAUTION
•IftwoPSUsareinstalled,boththePSUsmust
havethesametypeoflabel.Forexample,
ExtendedPowerPerformance(EPP)label.Mixing
PSUsfrompreviousgenerationsofPowerEdge
serversisnotsupported,evenifthePSUshave
thesamepowerrating.ThisresultsinaPSU
mismatchconditionorfailuretoturnthesystem
on.
•WhencorrectingaPSUmismatch,replaceonly
thePSUwiththeblinkingindicator.Swapping
thePSUtomakeamatchedpaircanresult
inanerrorconditionandunexpectedsystem
shutdown.Tochangefromahighoutput
congurationtoalowoutputcongurationor
viceversa,youmustturnoffthesystem.
•ACPSUssupportboth240Vand120Vinput
voltageswiththeexceptionofTitaniumPSUs,
whichsupportonly240V.Whentwoidentical
PSUsreceivedifferentinputvoltages,they
canoutputdifferentwattages,andtriggera
mismatch.
•IftwoPSUsareused,theymustbeofthesame
typeandhavethesamemaximumoutputpower.
•CombiningACandDCPSUsisnotsupportedand
triggersamismatch.
Powerindicators
LEDDescription
GreenAvalidpowersourceisconnectedtothePSUandthe
PSUisoperational.
Blinkingamber
IndicatesaproblemwiththePSU.
NotilluminatedPowerisnotconnected.
Blinkinggreen
Whenhot-pluggingaPSU,thePSUindicatorblinksgreen.
ThisindicatesthatthereisaPSUmismatchwithrespectto
efciency,featureset,healthstatus,orsupportedvoltage.
36

AXISCameraStationS1148Recorder
Productoverview
CAUTION
•WhencorrectingaPSUmismatch,replaceonly
thePSUwiththeblinkingindicator.Swapping
thePSUtomakeamatchedpaircanresult
inanerrorconditionandunexpectedsystem
shutdown.TochangefromaHighOutput
congurationtoaLowOutputcongurationor
viceversa,youmustturnoffthesystem.
•IftwoPSUsareused,theymustbeofthesame
typeandhavethesamemaximumoutputpower.
•CombiningACandDCPSUsisnotsupported
andtriggersamismatch.
Harddriveindicators
LEDDescription
FlashesgreentwicepersecondIdentifyingdriveorpreparingforremoval.
Off
Drivereadyforinsertionorremoval.
Note
Thedrivestatusindicatorremainsoffuntilall
harddrivesareinitializedafterthesystemis
turnedon.Drivesarenotreadyforremovalduring
thistime.
Flashesgreen,amberandthenturnsoffPredicteddrivefailure.
FlashesamberfourtimespersecondDrivehasfailed.
FlashesgreenslowlyDriveisrebuilding.
Steadygreen
Driveisonline.
Flashesgreenfor3s,amberfor3s,andthenturnsoffafter6sRebuildstopped.
37


UserManualVer.M5.2
AXISCameraStationS1148Recorder
Date:August2021
©AxisCommunicationsAB,2018-2021
PartNo.T10125777