12 VOLT / 120 VOLT DUAL POWER
INFLATOR/DEFLATOR
MODEL: ACAP322
Any product/return issues,
please feel free to contact us directly via
E-mail: [email protected]
2
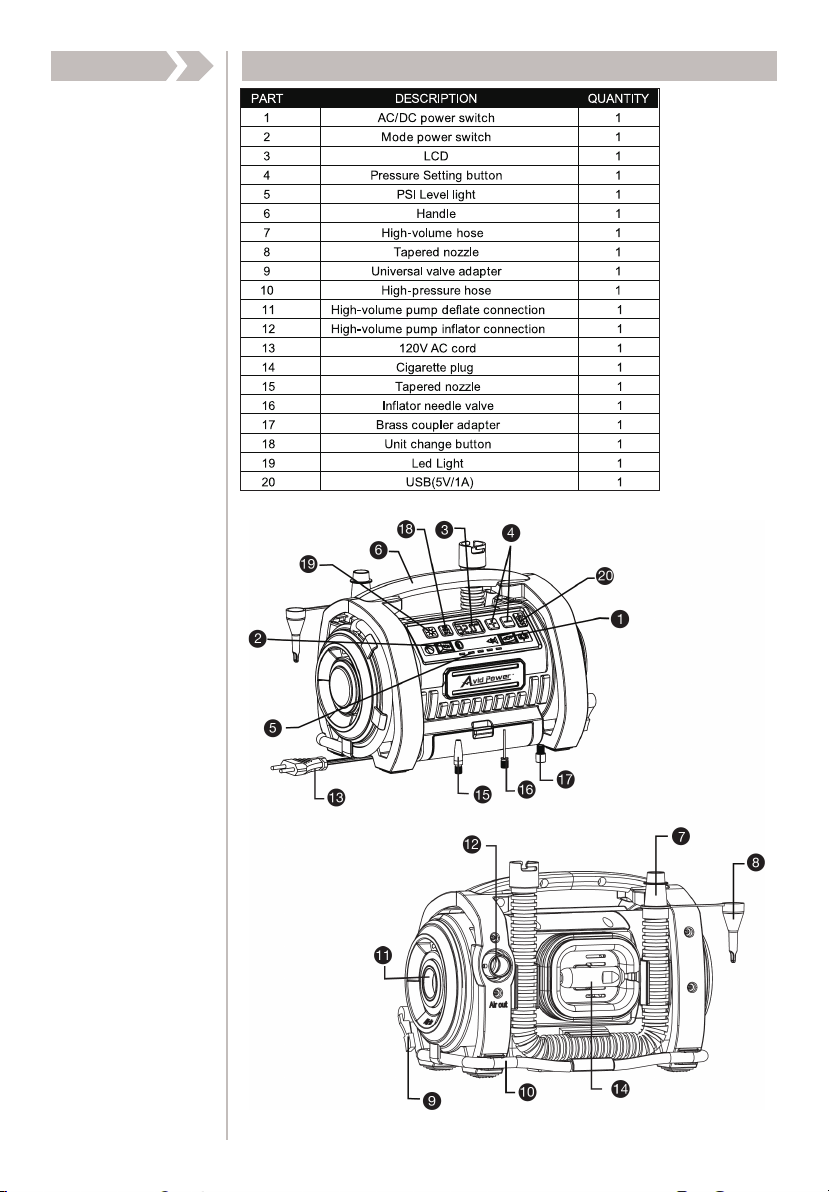
PACKAGE CONTENTS

2
IMPORTANT SAFETY INSTRUCTIONS
READ AND UNDERSTAND ALL INSTRUCTIONS. Failure to follow
all instructions listed below, may result in electric shock, fire and/or
serious personal injury.
SAVE THESE INSTRUCTIONS WORK AREA
1. Keep your work area clean and well lit. Cluttered benches and dark
areas invite accidents. Keep bystanders, children, and visitors away
while operating an inflator. Distractions can cause you to lose control.
2. Operate inflator in an open area at least 18 in. away from any wall or
object that could restrict the flow of fresh air to ventilation openings.
ELECTRICAL SAFETY
1. To reduce the risk of electrical shock, do not put inflator in water or
other liquid. Do not place or store appliance where it can fall or be
pulled into a tub or sink.
2. Use this product only with batteries and chargers.
PERSONAL SAFETY
1. Stay alert, watch what you are doing and use common sense when
operating an inflator. Do not use inflator while tired or under the
influence of drugs, alcohol, or medication. A moment of inattention
while operating inflator may result in serious personal injury.
2. Dress properly. Do not wear loose clothing or jewelry. Contain long
hair. Keep your hair, clothing, and gloves away from moving parts.
Loose clothes, jewelry, or long hair can be caught in moving parts.
3. Do not overreach. Keep proper footing and balance at all times.
Proper footing and balance enable better control of the inflator in
unexpected situations.
4. Use safety equipment. Always wear eye protection. Dust mask,
non-skid safety shoes, hard hat, or hearing protection must be used
for appropriate conditions.
5. Eye protection is required to guard against flying fasteners and debris
which could cause severe eye injury.
When using electric appliances, basic precautions should always
be followed, including the following.
3

3
IMPORTANT SAFETY INSTRUCTIONS
6. Do not wear loose clothing or jewelry. Contain long hair. Loose
clothes, jewelry, or long hair can be drawn into air vents.
7. Do not use on a ladder or unstable support. Stable footing on a solid
surface enables better control of the inflator in unexpected situations.
8. Do not disassemble the inflator.
9. Do not operate inflator near flammable liquids or in gaseous or
explosive atmospheres. Internal sparks may ignite fumes.
10. Do not store your inflator in a damp or wet location. Do not store in
locations where the temperature is less than 50°F or more than
100°F. Do not store in outside sheds or in vehicles.
INFLATOR USE AND CARE
1. Check hoses for weak or worn condition before each use, making
certain all connections are secure. Do not use if defect is found.
Purchase a new hose or notify an authorized service center for
examination or repair.
2. Release all pressures within the system slowly. Dust and debris
may be harmful.
3. Do not use inflator if switch does not turn it on or off. An inflator that
cannot be controlled with theswitch is dangerous and must be
repaired.
4. Place the switch off position before making any adjustments,
changing accessories, or storing the inflator. Such preventive safety
measures reduce the risk of starting the inflator accidentally.
5. Store idle inflators out of reach of children and other untrained
persons. Inflators are dangerous in the hands of untrained users.
6. Check for misalignment or binding of moving parts, breakage of
parts, and any other condition that may affect the inflator’s operation.
If damaged, have the inflator serviced before using. Many accidents
are caused by poorly maintained tools.
7. Use only accessories that are recommended by the manufacturer for
your model. Accessories that may be suitable for one inflator may
create a risk of injury when used on another inflator.
4

4
IMPORTANT SAFETY INSTRUCTIONS
8. Keep the inflator and its handle dry, clean and free from oil and
grease. Always use a clean cloth when cleaning. Never use brake
fluids, gasoline, petroleum- based products, or any strong solvents
to clean your inflator. Following this rule will reduce the risk of loss
of control and deterioration of the enclosure plastic.
9. Never point any inflator toward yourself or others.
10. Keep the exterior of the inflator dry, clean, and free from oil and
grease. Always use a clean cloth when cleaning. Never use brake
fluids, gasoline, petroleum- based products, or any strong solvents
to clean the unit. Following this rule will reduce the risk of deterioration
of the enclosure plastic.
11. Do not exceed the pressure rating of any component in the system.
12. Protect material lines and air lines from damage or puncture. Keep
hose and power cord away from sharp objects, chemical spills, oil,
solvents, and wet floors.
SERVICE
1. Inflator service must be performed only by qualified repair personnel.
Service or maintenance performed by unqualified personnel may
result in a risk of injury.
2. When servicing an inflator, use only identical replacement parts.
Follow instructions in the Maintenance section of this manual. Use of
unauthorized parts or failure to follow Maintenance instructions may
create a risk of shock or injury.
5

6
UNPACKING
This product has been shipped completely assembled.
Carefully remove the product and any accessories from the
box. Make sure that all items listed in the packing list are
included.
Do not use this product if it is not completely assembled
or if any parts appear to be missing or damaged. Use of
a product that is not properly and completely assembled
FRXOGUHVXOWLQVHULRXVSHUVRQDOLQMXU\
Inspect the product carefully to make sure no breakage or
damage occurred during shipping.
Do not discard the packing material until you have care-fully
inspected and satisfactorily operated the product.
SYMBOLS
ASSEMBLY
IMPORTANT SAFETY INSTRUCTIONS FOR ALL BATTERY
SYMBOLS
The following signal words and meanings are intended to explain the levels of risk associated with this product.
Never charge batteries at temperatures below 0 °C or above 40 °C.
Do not charge batteries in an environment which has high air humidity or at a high
ambient temperature.
Do not cover batteries and/or the battery charger during the charging process.
Use only original batteries in the supplied battery charger.
Battery and charger heat up during the charging process. This is perfectly normal!
Never remove the battery while the machine is running The device should only
be used for a maximum continuous duration of 5 minutes.
After 5 minutes it should be allowed to cool down.
Before inflating an item, first determine its own particular pressure value. tems to be
inflated should be held firmly or clamped.
Ensure that there is a proper connection between the device and the item to be inflated.
The air connector and adapter must always be kept clean.
SYMBOL SIGNAL MEANING
DANGER:
Indicates an imminently hazardous situation, which, if not avoided, will result
in death or serious injury.
WARNING:
WARNING:
Indicates a potentially hazardous situation, which, if not avoided, could result
in death or serious injury.
CAUTION:
Indicates a potentially hazardous situation, which, if not avoided, may result in
minor or moderate injury.
NOTICE:
(Without Safety Alert Symbol) Indicates important information not related to an
injury hazard, such as a situation that may result in property damage.
5 — English
SYMBOLS
Some of the following symbols may be used on this product. Please study them and learn their meaning. Proper
interpretation of these symbols will allow you to operate the product better and safer.
Safety Alert Indicates a potential personal injury hazard.
Read Operator’s Manual
To reduce the risk of injury, user must read and understand
operator’s manual before using this product.
Eye Protection
Always wear eye protection with side shields marked to comply
with ANSI Z87.1.
Wet Conditions Alert Do not expose to rain or use in damp locations.
Recycle Symbols
This product uses lithium-ion or nickel-cadmium batteries. Local,
state or federal laws may prohibit disposal of batteries in ordinary
trash. Consult your local waste authority for information regarding
available recycling and/or disposal options.
Hot Surface
To reduce the risk of injury or damage, avoid contact with any
hot surface.
V Volts Voltage
min Minutes Time
Direct Current Type or a characteristic of current
n
o
No Load Speed Rotational speed, at no load
.../min Per Minute Revolutions, strokes, surface speed, orbits etc., per minute
SYMBOL NAME
DESIGNATION/EXPLANATION
6 — English
ASSEMBLY
UNPACKING
This product has been shipped completely assembled.
Carefully remove the product and any accessories from
the box. Make sure that all items listed in the packing list
are included.
WARNING:
Do not use this product if it is not completely assembled
or if any parts appear to be missing or damaged. Use of
a product that is not properly and completely assembled
could result in serious personal injury.
Inspect the product carefully to make sure no breakage
or damage occurred during shipping.
Do not discard the packing material until you have care-
fully inspected and satisfactorily operated the product.
PACKING LIST
20v/220v Inflator/Deflator
Tapered Nozzle
Inflator Needle Valve
Brass Coupler Adapter
High Volume Hose
Operator’s Manual
6

PACKING LIST
1*12V/120V Inflator/Deflator
1* Tapered Nozzle
1* Ball Needle Valve
1* Bike Valve Adapter
1* High Volume Hose
1* User Manual
ASSEMBLY
NOTE:
If any parts are damaged or missing, do not operate this product until the parts are
replaced. Use of this product with damaged or missing parts could result in serious
personal injury.
FEATURES
PRODUCT SPECIFICATIONS
Motor............................................................................................12V DC/120V AC
High Pressure Hose Length...........................................................................71cm
High Volume Hose Length..............................................................................49cm
Gauges...........................................................................................Digital Readout
Maximum Pressure ....................................................................................125PSI
NOTE:
For different objects, the max PSI that this unit can be achieved is different.
--Car tires: 80 PSI
--Motorcycle tires: 80 PSI
--Bicycles tires: 100 PSI
--Other inflatable objects: 125 PSI
7

KNOW YOUR INFLATOR/DEFLATOR
For safe use, please understand the key information on this inflator and in this
operator manual. Be familiar with all operating features and safety rules before
using this product.
ACCESSORIES STORAGE
Accessories provided with the inflator can be placed in the storage area located on
the right side of the tool.
DIGITAL GAUGE
The digital gauge measures and displays the air pressure, monitors pressure output.
HOSE STORAGE
The high volume hose can easily inflate or deflate items such as air mattresses, rafts,
floats, and other low pressure items requiring large quantities of air.
MODE POWER SWITCH(FIG. 1)
This three-position power switch operates the high-volume and high pressure hoses.
When the switch is in the center position, all pump are off.
FEATURES
LED LIGHT(FIG. 2)
If you need led light, please press the led light button.
FIG.1
FIG.2
8

FEATURES
UNIT CHANGE(FIG. 3)
The inflator has three measure unit (PSI/BAR/KPA). You can press the button
to adjust.
FIG.3
PSI LEVEL LIGHT (FIG. 4)
During working, the PSI level light will flash in sequence. The level light will start
flash and turn green light until it reach the target psi.
FIG.4
DUAL HOSES(FIG.5)
The inflator has two hoses for two types of inflation. The high pressure hose is
for inflating high pressure items like tires and sports balls. The high-volume
hose is designed for inflating or deflating low pressure, high volume items like
air rafts, air mattress, floats.
FIG.5
High Pressure Hose High Volume Hose
9

10
OPERATION INSTRUCTIONS
INFLATION OPERATION
Step 1: Choose the power supply
12V DC Power (FIG. 6)
To turn the inflator on, first insert the cigarette plug into the car’s Cigarette lighter socket.
Then press the Power Switch into right.
FIG.6
120V AC Power (FIG. 7)
To turn on inflator, insert the 120 Volt AC Power Cord into a grounded 120 Volt AC Outlet
and then press the Power Switch into left.
FIG.7
Step 2: Connect the Air Chuck to the Valve Stem
1. Push the air chuck clamp up so that it is in the unlock position.
2. Then place the air chuck on the valve stem and make sure the
threaded section of the valve stem is inside the air chuck.
3. Pressing air chuck clamp down until it stops or is parallel with the
air hose.
A- Air chuck clamp in
unlocked position
B- Air chuck clamp in
locked position
C -Valve stem
D -Air chuck
E -Air hose
F -Air chuck clamp
C
D
E
F

Improperly attached hoses or accessories can become detached under pressure
and cause serious injury. Possible air leaks can cause faulty pressure readings.
Make sure all connections are tightly secured.
NOTE:
OPERATION INSTRUCTIONS
Step 3: Set the Pressure Value (FIG.8)
1.Press “PSI” button to read the current tire pressure on the gauge.
2.Press “PSI” button again to select tire pressure measurement unit from PSI, KPA, BAR.
3.Press “+” or “-” button to set the desired pressure
4.The digital display will flash the value three times and then reverse to the current
pressure value. This means that the preset value has been set successfully.
FIG.8
Step 4: Choose High-pressure/High-volume Mode
High-pressure Mode (FIG. 9)
Press this switch into right for inflating high pressure items like tires, sports balls
and more.
FIG.9
11

OPERATION INSTRUCTIONS
High-volume Mode (FIG. 10)
Press this switch into left for inflating or deflating low pressure but high volume items
like air rafts, air mattress, floats.
The tire pump will start inflating after you press the high-pressure/high-volume mode
switch. When it reaches the preset pressure value, the device will automatically stop
working.
NOTE:
If the high pressure/ high volume button or AC/DC button is on neutral positions,
the unit will not work. So If you want to stop it, just make one of these two switches
on neutral position.
HIGH FLOW HOSE INSTALLATION
INFLATION(FIG. 11)
For inflation, install this hose on the port marked with “air out” (12).
The inflator has a tolerance of +or– 2PSI and will automatically shut off when
the preset value reaches.
FIG.10
FIG.11
12

DEFLATION(FIG. 12)
OPERATION INSTRUCTIONS
For deflation, install this hose on the port marked with “air in”(11).
DEFLATION OPERATION
The deflating function only works under high-volume mode for deflating high volume
items like air rafts, air mattress, floats. This function does not work for high pressure
but low flow objects, such as tires, basketballs and footballs.
Steps:
1.Select the power supply
2. Install the high flow tube on the port marked with “air in”.
3. Turn on high-volume ( press the mode power switch into left)
FIG.12
13

For inflating sport balls like basketball, football, etc. The following two pictures shows
how to hoop up the nozzle to air chuck.
Note: Do not fully insert the ball needle into the air chuck to prevent the vent
hole of needle from being completely blocked.
Sport Balls Needle
Correct
Wrong
OPERATION INSTRUCTIONS
FIG.14
FIG.13
ATTACHMENTS
Bike Valve Adapter
Tapered Nozzle
14

TROUBLESHOOTING
PROBLEM POSSIBLE CAUSE CORRECTIVE ACTION
Unit will not
start.
1. Preset pressure setting may
be below the actual pressure
of the item you are inflating.
2. Cord not plugged in.
1. Adjust Preset pressure setting to
higher pressure.
2. Plug into a working 120 Volt AC
Outlet
TROUBLESHOOTING