User Manual
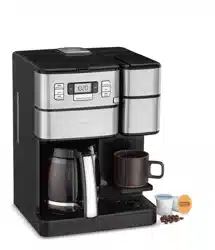
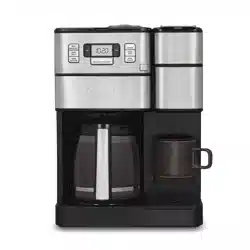
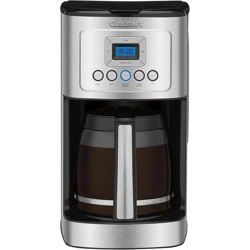
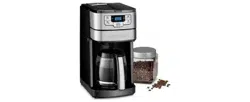
12-CUP COFFEEMAKER FEATURES AND BENEFITS
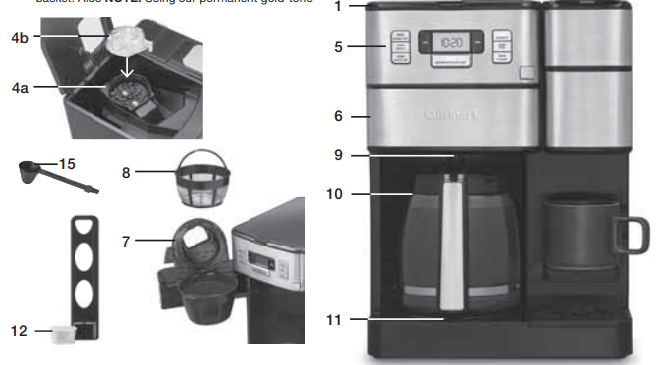
1. Coffeemaker Reservoir Cover
Flips back for easy filling and to access to the grinder compartment.
2. Coffeemaker Water Reservoir
With water level indicator window.
3. Showerhead (not shown)
Distributes water evenly over coffee, reducing temperature loss as water passes through grounds.
4. Grinder Assembly
Removable for easy filling and cleaning.
a. Grinder Basket with Stainless Steel Blade
b. Grinder Lid Use the recess on each side of the lid to remove lid for easy addition of beans. NOTE: Lid must be in place for unit to operate.
5. Control Panel
See detailed illustration.
6. Filter Basket Door with Release Button
Open to access coffee filter.
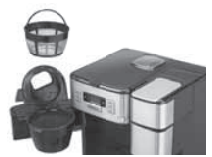
7. Filter Basket
Remove lid to access. Holds paper filter or Cuisinart permanent gold-tone filter. NOTE: Lid must be in place for unit to operate. NOTE: Cover becomes hot after coffee is brewed. Use caution when removing cover.
8. Gold-Tone Cuisinart Commercial-Style Filter
A note about filters: When using our permanent filter, position handle toward front of the unit so it does not interfere with the flow of coffee into the filter basket. Also NOTE: Using our permanent gold-tone filter may allow some fine coffee grounds to fall into, and appear as sediment in the carafe.
9. Brew Pause™
Stops flow of coffee from basket when carafe is removed from the heater plate, so a cup can be poured mid-brew.
10. Carafe
The easy-pour, no-drip, 12-cup carafe has an ergonomic handle and brewed coffee markings.
11. Heater Plate
Keeps coffee warm after brewing. Scratch resistant with nonstick coating.
12. Charcoal Water Filter
Eliminates chlorine, bad tastes and odors from tap water. Holder keeps filter firmly in place. NOTE: Follow directions for preparing and inserting filter.
13. Ready Tone (not shown)
Signals the end of the brew cycle with five beeps.
14. Power Loss Backup System (not shown)
One-minute protection if a breaker trips, unit is unplugged, or power fails. Holds all programmed information, including time of day, Auto On time and Auto Off time.
15. Measuring Scoop with Brush
16. Basket Paper Filters included (not shown)
SINGLE-SERVE COFFEEMAKER FEATURES AND BENEFITS
17. 40-Ounce Water Reservoir
18. Brew Handle
19. Brew Head
20. Brewing Chamber
Holds Removable Capsule Holder or reusable filter cup.
21. Flip-Down Shelf
To accommodate smaller brews.
22. Removable Drip Tray Plate
23. Removable Capsule Holder
24. Charcoal Water Filter
Eliminates chlorine, bad tastes and odors from tap water. Holder keeps filter firmly in place. NOTE: Follow directions for preparing and inserting filter

GETTING TO KNOW YOUR CONTROL PANEL 12-CUP COFFEEMAKER CONTROLS
1. Clock/LCD Display
Displays time of day, Auto On, and Auto Off times.
2. Hour and Minute Buttons
Use to set hours and minutes for time of day,
Auto On, and Auto Off times.
3. Carafe
Press to activate Carafe Brew Mode.
4. Grind Off Button
Select when using pre-ground coffee to turn off the grinder.
5. BOLD Setting
Use to select bolder coffee fl avor strength.
6. AUTO ON
Select to program Auto On time. Press to activate Auto On feature and start brewing coffee at the programmed time.
7. Brew/Off/Auto Off Button
Used to begin the brew cycle. When in carafe brew mode: Programs coffeemaker to automatically shut off 0 to 4 hours after brew cycle is complete.
8. Clean Button
Indicator light appears when it is time to decalcify your coffeemaker.
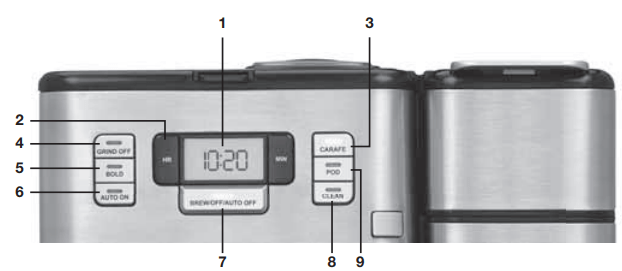
SINGLE-SERVE COFFEEMAKER CONTROLS
9. Pod Button
Press once to activate single-serve side. Use to select desired size of single-serve brew (8, 10, 12 oz.).
10. Brew/Off/Auto Off Button
Press to begin single-serve brew cycle.
11. Clock/LCD display
When in Pod Brew mode:
a. Will display the last brew size selected. To change the brew size, press and hold the POD button to scroll through size options.
b. The Add Water icon indicates the need to add water to brew.
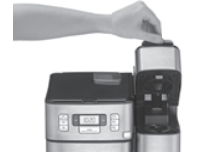
CHARCOAL WATER FILTER
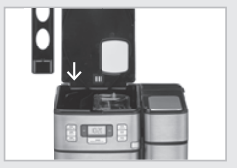
INSERTING THE WATER FILTER
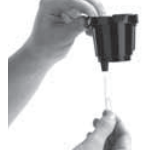
1. Remove the filter from the polybag and soak, fully immersed, in cold tap water for 15 minutes.
2. Lift the water filter holder out of the water reservoir of the 12-cup coffeemaker side.
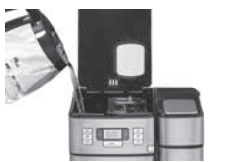
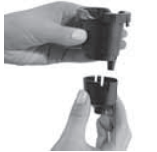
3. Press down on the filter compartment and pull toward you to open.
4. Place filter into the holder and snap closed.
Be careful – improper placement can tear the filter skin.

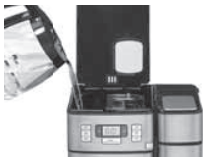
5. Flush filter by running cold tap water through holes in bottom of compartment for 10 seconds.
6. Allow the filter to drain completely.
7. Slide the water filter holder back into the channel in the water reservoir, pushing down to the base of the unit.
NOTE: Repeat steps 1–7 above on the single serve side.
NOTE: We recommend changing the water filter every 60 days or after 60 uses, and more often if you have hard water.
Replacement filters can be purchased in stores, by calling Cuisinart Consumer Service
SETTING UP YOUR 12-CUP COFFEEMAKER
INITIAL CLEANING
Perform an initial cleaning before making your first beverage. Follow these instructions, without adding coffee.
1. Insert charcoal water filter. Follow directions for the preparation and insertion of the charcoal water filter on the left.
2. Fill water reservoir.
3. Make sure carafe is in place.
4. If you haven’t already, plug the power cord into an independent outlet. When the coffeemaker is plugged in, the unit will automatically turn on.
5. Press the Carafe button once to enter Carafe Brew Mode. Press the Grind Off button to deactivate the grinder.
6. Press the Brew/Off/Auto Off button once and allow the brew cycle to run until it is complete.
7. The one-time cleaning process is complete. Discard hot water. Your coffeemaker is ready to use.
PROGRAMMING YOUR 12-CUP COFFEEMAKER
SETTING THE CLOCK
When the coffeemaker is plugged in, 12:00 will flash in the display for 10 seconds, indicating the unit is in Time Set mode. If 12:00 stops flashing, simply press and hold Hour or Minute button to return to flashing Time Set mode. Hold buttons down to scroll through the digits, or press and release to advance one digit at a time. When scrolling, the numbers will advance slowly and then speed up. When the number displayed approaches the desired time, press and release to advance one digit at a time. Be sure the PM indicator is on if a PM time is desired.
SETTING THE AUTO ON TIME
When you enter the AUTO ON time set mode, the previously selected AUTO ON time, or the default time (12:00) will flash.
1. Press and hold the AUTO ON button until the display begins to flash. Use the Hour and Minute buttons as above to program your start-brew time.
2. Press the AUTO ON button once to confirm the set time and activate the program. The white light will illuminate, indicating the AUTO ON function has been activated. LCD will display the current time.
NOTE: Be sure to set any additional preference before the AUTO ON cycle begins.
3. AUTO ON brew cycle begins and the LED will turn off. The Carafe and Brew white indicator lights will illuminate when the brew cycle begins at the time you have selected. When the brew cycle is complete, Brew indicator light will turn blue, indicating the unit is in Keep Warm mode. Lights will turn off when the Keep Warm cycle ends.
NOTE: To start brew time at the same time the next day, simply press and release AUTO ON button once more. The white AUTO ON light will turn on.
SETTING THE AUTO OFF TIME
Press and hold the AUTO OFF button until the display is flashing. Use the Hour and Minute buttons as above to program your coffeemaker to shut off from 0 to 4 hours after brew cycle is finished.
MAKING COFFEE WITH WHOLE BEANS
Follow instructions in Setting Up Your 12-Cup Coffeemaker .
1. Insert charcoal water filter
Follow directions for the preparation and insertion of the filter.
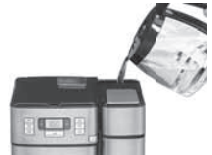
2. Fill the water reservoir
Open the reservoir cover and pour in water, using the water level window indicator to measure the number of cups desired.
NOTE: Do not exceed the 12-cup line. Doing so could cause carafe to overflow.
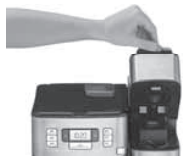
3. Add Beans
Lift the grinder basket lid, using the recess on either side. Fill the basket with the desired quantity of beans and replace lid.
NOTE: Use 1 level scoop (1 tablespoon) of whole beans per cup. For 1 to 4 cups, use 1½ level scoops per cup. Do not add more than 14 scoops. This could cause the grinder to malfunction and/or the coffeemaker to overflow.

4. Insert Coffee Filter
Press the filter basket door release button to open door and place either a paper filter OR permanent filter in the basket.
- Paper Filter – Place a basket paper filter in the basket, making sure the filter is completely open and touching the side walls and bottom of basket.
- Cuisinart’s Commercial-Style Permanent Filter - Be sure the filter handle is facing away from the grinder basket, so it does not interfere with the flow of ground coffee into the filter basket.
NOTE: Some ground coffee may flow into the carafe.
5. Put Filter Basket in Place and Close Filter Door
6. Before brewing
Make sure the glass carafe is in position on the heater plate and the top cover is closed. Plug the cord into an electrical outlet.
NOTE: This coffeemaker is equipped with a safety interlock system, which prevents the unit from operating if the cover is open or the grinder cover is left out. If you try to turn the unit on with the cover open, the carafe indicator will flash continuously until the missing parts are installed and you close the lid. If you open the cover during the grinding process, the carafe indicator will fl ash, the grinder will stop grinding and, if brewing, the brewing will stop.
Once the missing parts are in place and the cover is closed, the carafe indicator will turn off. The brewing process can be restarted by pressing the BREW/OFF/AUTO OFF Button. Restarting the process will not affect coffee results. If you do not want the grinder to come on again, press the Grind Off button before pressing the Brew button.
7. Brewing coffee
Press the Carafe button to enter the carafe brew mode. Press the BREW/OFF/AUTO OFF Button to begin brewing. The white indicator light will illuminate and flash slowly. Or, set the Auto On function and the Auto On indicator will light.
8. After brewing
When the brewing cycle is complete, coffee will continue to stream from the filter for several seconds.
When streaming completely stops, five beeps will sound and you can now enjoy your coffee.
NOTE: Reservoir cover may be hot during and directly after brewing. Wait at least 10 minutes before opening.
MAKING COFFEE WITH PRE-GROUND BEANS
1. Fill the Reservoir and Insert Filter
See steps #1 and #2 in “Making Coffee with Whole Beans”.
2. Add Pre-Ground Coffee
Press the filter basket door release button to open door and place either a paper filter OR the permanent filter in the basket. Add ground coffee the close filter door. Our recipe suggestion: Use 1 level scoop (1 tablespoon) of ground coffee per cup. Adjust the recipe according to taste.
NOTE: The maximum capacity for ground coffee is 16 level scoops (16 tablespoons), using either a paper or permanent filter. Exceeding that amount may cause overflow if the coffee is too finely ground.
3. Press the Grind Off Button
When this function is activated, the white LED will come on.
4. Follow Steps 5-8 in “Making Coffee with Whole Beans”
TIPS AND HINTS
- If you buy large portions of beans, separate them into one- or two-week portions and store them in airtight containers in the freezer. Preserve freshness by minimizing exposure to air, light, and moisture. Once beans are removed from the freezer, keep them in a sealed container at room temperature, since damaging condensation can occur when beans move from cold to warmer temperatures.
- Some experts feel freezing dark-roast beans can cause oils to coagulate; others disagree. You’ll have to decide that one for yourself!
12 - CUP COFFEEMAKER CLEANING AND MAINTENANCE
COMPLETELY CLEAN AND DRY ALL PARTS AFTER EVERY USE. Always turn unit off and remove the plug from the electrical outlet before cleaning.
Open the reservoir lid and remove the grinder basket lid by using the recessed area on each side of the lid. Then remove grinder basket. Open filter basket door, remove filter basket cover, filter basket and filter basket holder. The grinder basket, grinder basket lid, filter basket and filter basket cover can be washed in warm, soapy water and rinsed thoroughly, or cleaned in the upper rack of the dishwasher. Dry all parts after every use.
Do not put any water in the unit once the grinder basket has been removed. Wipe the area under the grinder basket with a damp cloth. If water gets into the grinder motor, the motor may become damaged and may malfunction. Once clean, reverse the above steps.
Remove the carafe from the heating plate. Discard any remaining coffee. The carafe and lid can be washed in warm, soapy water and rinsed thoroughly, or placed in a dishwasher. The carafe and carafe lid should be placed on the upper rack only.
Do not use any scouring agents or harsh cleansers on any part of the coffeemaker.
Never immerse base unit in water or other liquids. To clean base, simply wipe with a clean, damp cloth and dry before storing. Fingerprints and other blemishes on the housing can be washed off with soap and water or a nonabrasive cleaning solution. Wipe heater plate with a clean, damp cloth. Never use rough, abrasive materials or cleansers to clean the heater plate. Do not dry the inside of the water reservoir with a cloth, as lint may remain.
Maintenance: Any other servicing should be performed by an authorized service representative
DESCALING
Descaling refers to the removal of calcium deposits that form over time on the metal parts of the coffeemaker.
To Descale Your Coffeemaker:
Depending on the mineral content of water in your area, calcium deposits (scale) may build up in your coffeemaker. Though scale is not toxic, it can affect performance. Descaling the coffeemaker when the CLEAN indicator signals it is time to do so will help protect the heating element and other parts that come into contact with water. For optimal performance, descale coffeemaker every 3 to 6 months. If calcium deposits build up faster, the CLEAN light will illuminate, indicating 12-cup coffeemaker should be descaled.
NOTE: Before decalcifying your unit, remove the charcoal water filter from the water reservoir.
To clean:
1. Fill the water reservoir to capacity with a mixture of one-third white vinegar and two-thirds water.
2. Press the Carafe button once to activate the carafe side. Press and hold the CLEAN button. When the CLEAN LED indicator flashes, the coffeemaker is in Clean mode.
NOTE: The grinder assembly must be in the correct position to activate the carafe side. If the assembly is not in place, the carafe LED will flash, indicating the carafe side cannot be activated.
3. When the cycle is completed, 5 beeps will sound and the coffeemaker will shut off.
4. If the CLEAN indicator illuminates once more, repeat the cleaning procedure with a fresh solution of vinegar and water. NOTE: One cleaning cycle is usually sufficient.
5. When the CLEAN indicator remains off, run one cycle with a full reservoir of fresh, cold water to rinse the unit.
6. Return the charcoal water fi lter to the holder inside the water reservoir and your coffeemaker is ready to brew! NOTE: If the CLEAN indicator light turns on and you do not wish to descale now, simply press the CLEAN button once and the LED indicator will turn off. However, the CLEAN indicator will turn on again during subsequent brewing cycles until the descaling procedure is complete.
SETTING UP YOUR SINGLESERVE COFFEEMAKER
INITIAL CLEANING
Perform an initial cleaning before making your first beverage. Follow these instructions, without inserting a capsule.
1. Insert charcoal water filter if you haven’t already.
2. Fill the water reservoir dedicated to the single-serve side of the unit
3. If you haven’t already, plug the power cord into an independent outlet. When the coffeemaker is plugged in, the unit will automatically turn on.
4. Open and close the brew head. Do not add a capsule.
5. Place mug on the drip tray.
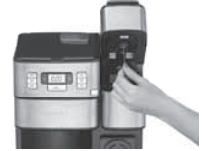
6. Press the POD button once to enter single-serve mode. The POD indicator light will turn on and the LCD display will show the default brew size 10 oz.
7. Press the BREW/OFF/AUTO OFF button once. The indicator light will flash and the hot water will start to dispense momentarily.
8. The one-time cleaning process is complete. Discard hot water. Your brewer is ready to use.
USING THE SINGLESERVE COFFEEMAKER
Follow instructions in Setting Up Your Single-Serve Coffeemaker above.
BREWING
1. Add water into the 40-ounce water reservoir.
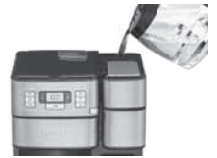
2. Plug the power cord into an independent outlet. When the coffeemaker is plugged in, the unit will automatically turn on.
3. Place mug on the drip tray.
NOTE: Adjust positioning of the mug depending on size and the selected brew amount. Shelf flips down to accommodate shorter mugs and the drip tray can be removed to accommodate travel mugs.
4. Select a capsule.
NOTE: Do not remove the foil lid or puncture the capsule.
5. Open the brew head and place a capsule in the brewing chamber. Close brew head.
Caution: There are two sharp needles in the brewing chamber that puncture the capsule, one above and one below. To avoid risk of injury, do not put your fingers in the capsule brewing chamber.
6. Press the POD button once to enter single-serve mode. The POD indicator light will turn on and the LCD display will show the default brew size 10 oz. or the previously used setting.
NOTE: The Add Water indicator will appear on the LCD when water level is below 13.5 ounces and no brewing can be done. To activate the single-serve mode, simply fill the water reservoir and press the POD button to continue to brew as usual.
7. To change the brew size, press the POD button continuously to scroll through size options until the desired cup size setting is displayed on the LCD display (8, 10, or 12 oz).
8. To begin brewing, press the Brew/Off/Auto Off button once. The indicator light will begin to flash slowly and the beverage will start to dispense momentarily.
NOTE: To cancel brewing, simply press the Brew/ Off/Auto Off button once again and the brewing process will be stopped.
Caution: There is very hot water in the capsule chamber during the brewing process. To avoid risk of injury, do not lift the handle or open the capsule chamber during the brewing process.
9. Once fully dispensed, all of the lights will go off and the LCD will display the current time.
10. Enjoy your cup of coffee!
11. Lift the handle, then remove and dispose of the used capsule. Close the brew head and your brewer is ready to use again!
Caution: Capsule will be hot.
BREWING WITH THE HOMEBARISTA™ REUSABLE FILTER CUP
The Single-Serve Coffeemaker can be used with a reusable coffee capsule (not included), which allows you to use your own ground coffee. Try the Cuisinart HomeBarista™ Reusable Filter Cup for your favorite coffee or tea. Available in stores.
1. Fill the filter basket within the reusable capsule with ground coffee, making sure not to fill past the max indicator. Adjust the amount to your personal preference. Do not tamp the grounds. Make sure there are no grounds remaining on the upper rim of the filter basket. Close lid.
NOTE: Max fill: 2.5 scoops or 15 grams.
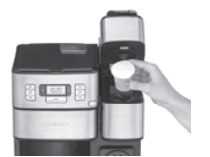
2. Remove the capsule holder from the brewing chamber by pulling toward you.
2a. Drop the reusable coffee capsule into the brewing chamber. There is no need to snap it into place.
2b. Follow brewing instructions.
Caution: There are two sharp needles in the brewing chamber that puncture the capsule, one above and one below. To avoid risk of injury, do not put your fingers in the brewing chamber.
3. After brewing, raise the handle and remove the reusable coffee capsule. Use caution, as the reusable coffee capsule will be hot.
4. Replace the capsule holder, ensuring that the arrow on capsule rim aligns with the arrow on the brewing chamber. Gently push the capsule holder to snap into place.
NOTE: This coffeemaker is compatible with most reusable coffee capsules.
SINGLE-SERVE COFFEEMAKER CLEANING AND MAINTENANCE
CLEANING EXTERNAL PARTS
We recommend regular cleaning of the coffeemaker’s external components.
1. Never immerse the coffeemaker in water or other liquids. The housing and other external components may be cleaned with a soapy, damp, nonabrasive cloth.
2. To remove the drip tray, simply slide it toward you, keeping it level at all times in order to prevent spills. The drip tray and drip tray plate are dishwasher safe. Do not clean drip tray with cleansers, steel wool pads or other abrasive materials.
CLEANING THE CAPSULE HOLDER
Caution: There are sharp needles that puncture the capsule above and below. To avoid risk of injury, do not put your fingers in the capsule brewing chamber.
1. The capsule holder is top-shelf dishwasher safe (use low temperature cycle). To remove, lift the handle to open the brewing chamber. Grasp the top of the capsule holder and pull up.
2. Cleaning the Funnel – To remove funnel from capsule holder, hold funnel in left hand, twist bottom away from you slightly and pull away from capsule holder. The funnel is top-rack dishwasher safe.
NOTE: The funnel may be tight the fi rst few times you try to remove it; this is normal and will loosen with continued use.
3. Cleaning the Exit Needle – The exit needle is located on the inside bottom of the capsule holder assembly. Should a clog arise because of coffee grounds, it can be cleaned using a paper clip or similar tool. Remove capsule holder from unit, then remove funnel from capsule holder and insert the paper clip into exit needle to loosen the clog and push it out.
Replace funnel onto capsule holder by lining up tabs in funnel with notches on capsule holder, twist toward you until it locks into place. After cleaning, replace capsule holder, being sure to align the arrow on the capsule holder rim with arrow on the brewing chamber.
4. Cleaning the Piercing Needle – The piercing needle is located on the inside of the brewing chamber. Should a clog arise because of coffee grounds, it can be cleaned using a paper clip or similar tool. Insert paper clip to loosen the clog and push it out.
DESCALING
Mineral content in water varies from place to place. Depending on the mineral content of the water in your area, calcium deposits or scale tend to build up in most coffeemakers. Though scale is nontoxic, it can hinder performance from time to time.
Your SS-GB1 is designed to keep the internal heating element on the Single-Serve side free from excess water which will limit any calcium buildup. However, if you feel more comfortable descaling your coffeemaker, please follow the following steps.
NOTE: Before descaling your coffeemaker, remember to remove the charcoal water filter from the water filter holder located in the water reservoir.
To begin, you will need the following:
13 oz. of distilled white vinegar
26 oz. of water
16 oz. ceramic mug or container (do not use paper cup) Access to a sink
Step 1: First Vinegar Rinse
1. Fill water reservoir with 13 oz. of white vinegar and 26 oz. of water.
2. Place the ceramic mug or container on the drip tray.
3. Press the POD button to enter single-serve mode and select the 12 oz. brew size setting. Press the BREW/OFF/AUTO OFF button once to start.
4. Discard contents of mug into the sink.
5. Repeat until ADD WATER light comes on.
6. When descaling is complete, all LED lights will turn off.
7. Discard any remaining diluted vinegar into sink.
Step 2: Fresh Water Rinse
1. Repeat Step 1 three times, using fresh water in place of vinegar.
2. This will clean the coffeemaker plumbing and remove any residual vinegar taste.
MAINTENANCE
Any other servicing should be performed by an authorized service representative.