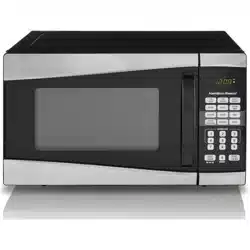
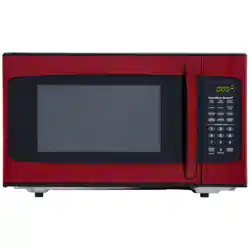
Owner’s Manual Microwave oven for Hamilton Beach P90D23AL-WR
Important grounding instructions
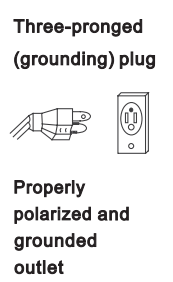
This appliance must be grounded. In the event of an electrical short circuit, grounding reduces the risk of electric shock by providing an escape wire for the electric current.
WARNING: Improper use of the grounding plug can result in a risk of electric shock.
Electrical Requirements
- The electrical requirements are 120 volt 60 Hz, AC only, 20 amp.
- It is recommended that a separate circuit serving only the oven be provided.
- The oven is equipped with a 3-prong grounding plug. It must be plugged into awall receptacle that is properly installed and grounded.
Power Supply Cord
1.Ashort power supply cord is provided to reduce the risks resulting from becoming entangled in or tripping over a longer cord.
2. Longer cord sets or extension cords are available and may be used if care is exercised in their use.
3. Iflong cord or extension cord is used:
- The marked electrical rating of the cord set or extension cord should be at least as great as the electrical rating of the appliance.
- The extension cord must be a grounding-type 3-wire cord and the longer cord should be arranged so that it will not drape over the counter top or table top where it can be pulled on by children or tripped over unintentionally.
Notes:
- If you have any questions about the grounding or electrical instructions. consult a qualified electrician or service person.
- Neither manufacturer nor the dealer can accept any liability for damage to the oven or personal injury resulting from failure to observe the electrical connection procedures.
Radio or TV Interference
- Should there be any interference caused by the microwave oven to your radio or TV, check that the microwave oven is on a different circuit, relocate the radio or TV as far away from the oven as feasible or check position and signal of receiving antenna.
Precaution to avoid possible exposure to excessive microwave energy
- Do not attempt to operate this oven with the door open since open-door operation can result in harmful exposure to microwave energy. It is important not to defeat or tamper with the safety interlocks.
- Do not place any object between the oven front face and the door or allow soil or cleaner residue to accumulate on sealing surfaces.
- Do not operate the oven if it is damaged.It is particularly important that the oven door close properly and that there is no damage to the:
1. Door (bent)
2. Hinges and latches (broken or loosened)
3. Door seals and sealing surfaces
- The oven should not be adjusted orrepaired by anyone except properly qualified service personnel.
Features and Benefits
- 0.9.cu. ft.Oven Cavity
- 10 Power Levels
- Six Express Cook One-touch Settings
- Electronic Digital Display With Clock (LED)
- Turntable
- Time Cook
- Time And Weight Defrost
- Remind Signal
- kitchen Timer
Specifications
- Model: P90D23AL-WR/WRB/WRR
- Power Source:120V ~ 60Hz
- Power Consumption: 1350W.
- Maximum Output: 900W
- Oven Capacity: 0.9 cu. ft.
- Turntable Diameter: 10.6 inches
- External Dimensions: 19.02x15.6x11.06 inches
- Net Weight: 32.12 lbs
How To Test For A Microwave-safe Dish
To determine if a dish is microwave-safe, place the dish in the microwave along with a glass measuring cup filled with one cup of water. Microwave for one minute on high and then carefully feel the dish. If it is warm, it is not microwave-safe.
Arcing- The microwave term for sparks in the oven. Caused by:
- Metal or foil touching the side of the microwave
- Upturned edges of foil not wrapped around the food
- Metals in the microwave such as twist ties, meat pins or metal rimmed dishes
- Recycled paper towels in the microwave that contain small flecks of metal
Materials For Use In Microwave
To avoid arcing and other hazards. follow these instructions for the use of safe materials in the microwave.
- Browning dish: Follow manufacturer's instructions.The bottom of browning dish must be at least 3/16 inch (0.5 cm) above the turntable. Incorrect usage may cause the turntable to break.
- Dinnerware: Microwave- safe only. Follow manufacturer's instructions. Do not use cracked or chipped dishes.
- Glassware: Heat-resistant oven glassware only. Make sure there is no metallic trim.
- Oven cooking bags: Follow manufacturer's instructions. Do not close with metal tie. Make slits to allow steam to escape.
- Paper plates/cups: Use for short-term cooking/warming only. Do not leave oven unattended while cooking.
- Paper towels: Use to cover food for reheating and absorbing fat. Use with supervision for short-term cooking only.
- Parchment paper: Use as a cover to prevent splattering or a wrap for steaming.
- Plastic: Microwave- safe only. Follow the manufacturer's instructions. Boiling bags and tightly closed plastic bags should be slit. pierced or vented as directed by package. Due to various manufacturers you may receive varying performance results when using a bacon tray.
- Plastic wrap: Microwave-safe only. Use to cover food during cooking to retain moisture. Do not allow plastic wrap to touch food.
- Thermometers: Microwave-safe only.
- Wax paper: Use as a cover to prevent splattering and retain moisture.
Materials To Avoid In Microwave
- Metal pans and bakeware
- Recycled paper products
- Non-heat-resistant glass.
- Food storage bags
- Dishes with metallic trim
- Brown paper bags
- Non-microwave-safe plastics (e.g. margarine tubs)
- Metal twist ties
Setting up your microwave
Installation
- Remove all packing materials and accessories. Examine the oven for any damage such as dents or broken door. Do not install if oven is damaged.
- Select a level surface that provides enough open space for ventilation. Allow for 3 inches of open space next to the sides and back of the microwave. Allow for 12 inches of open space above the microwave. Do not place any items on top of microwave and do not remove the legs from the bottom of the microwave.
- Place the microwave as far away as possible from radios and televisions. Microwave may cause interference to these appliances.
- Plug the microwave into a standard household outlet. Check the rating label of the microwave to ensure the voltage and frequency are compatible with the outlet.
- Do not install microwave coven over a range cook top or other heat-producing appliance. Heat can damage the microwave and void the warranty.
Names of Oven Parts and Accessories
Remove the oven and all materials from the carton.
Your oven comes with the following accessories:
- Glass tray 1
- Turntable ring assembly 1
- instruction maunal 1
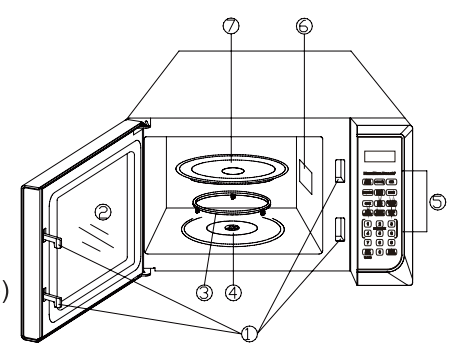
1. Safety interlock system
2. Observation window
3. Turntable ring assembly
4. Turntable shaft
5. Control panel
6. Wave Guide (Do not remove)
7. Glass tray
WARNING : FIRE AND SHOCK HAZARD. Do not remove the mica board located on the right, inside wall of the cooking compartment. Unplug the microwave immediately and contact service support if the mica board becomes damaged or is missing.
Turntable Installation
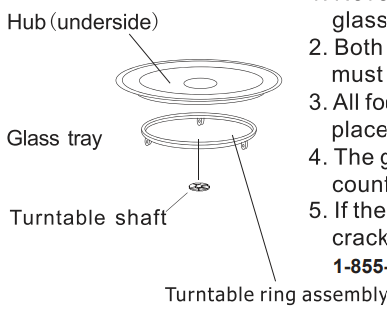
- Never place the glass upside down. The glass tray should never be restricted.
- Both glass tray and turntable ring assembly must always be used during cooking.
- All food and containers of food are always placed on the glass tray for cooking.
- The glass tray rotates either clockwise or counter-clockwise; this is normal.
- If the glass tray or turntable ring assembly cracks or breaks, contact service support.
Control Panel operation
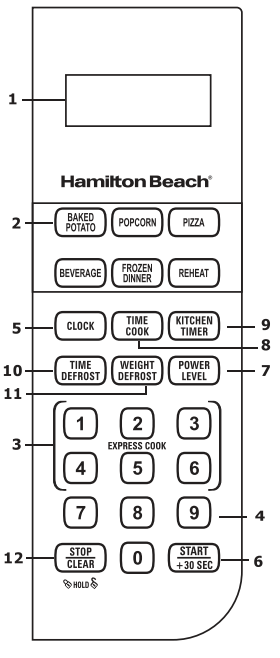
1. Display: Cooking time. power. indicators and present time are displayed.
2. One-touch Cook: Instant settings to cook popular foods.
3. Express Cook: Number Pads (1-6)
4. Number Pads (0-9): Touch to set time. weight or the amount.
5. Clock: Touch to set the clock.
6. Start/+30 Sec: Touch to start a cooking program. Press it to add 30 seconds during cooking program.
7. Power Level: Use to set microwave power levels
8. Time Cook: Use for multi-stage cooking. It enables cooking at multiple power and time settings automatically.
9. Kitchen Timer: The KITCHEN TIMER function can be used alone. even in the process of cooking.
10. Time Defrost: Touch to set defrosting time.
11. Weight Defrost: Touch to set the weight of the food to be defrosted.
12. Stop/Clear: Stop a cooking program. Clear all previous settings before cooking.
Operation Instructions
Setting The Clock
This is a 24 or 12 hour clock, and you can select it by pressing CLOCK pad. During cooking, the current time can be seen by touching CLOCK pad. FOR EXAMPLE: Suppose you want to set the oven clock time to 8:30.
- In standby mode touch CLOCK pad once to select 12 hour clock, press again to select 24 hour clock.
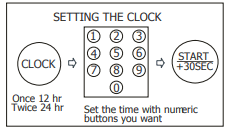
- Use the number pads to enter the correct time (touch number pads 8 3 0 in order to enter 8:30).
- Press START/+30SEC pad to complete the CLOCK setting.
Setting The Kitchen Timer
- In standby state or during cooking, touch KITCHEN TIMER pad.
- Enter the amount of time you want to count down by touching the number pads. The maximum time is 99 min. 99 sec.
- Press START/+30SEC pad to complete the KITCHEN TIMER setting
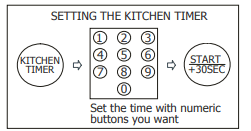
Note: The KITCHEN TIMER function can be used in any cooking process. You can check the countdown time by pressing KITCHEN TIMER pad, but if press STOP/CLEAR pad when the display shows the time, the function is cancelled.
Add 30 sec
- In standby mode, press START/+30 SEC pad repeatedly to enter cooking time.
- The oven will start automatically at 100% high power level(each for 30 seconds, up to 99minutes 59seconds).
- During cooking, (except auto cook and weight defrost) you can add cooking time by touching START/+30 SEC pad.
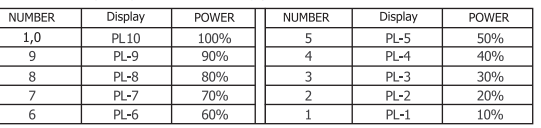
Time Cook: During cooking, the current power level can be seen by touching POWER LEVEL pad. You can adjust the power level by pressing the number pads when the display shows it.
- Touch Time Cook pad.
- Use the number pads to enter cooking time. The longest time is 99 minutes 99 seconds.
- Touch POWER LEVEL pad to select microwave power (from PL10 to PL-1).
- Touch START/+30 SEC pad.
Setting the Time Defrost: During defrosting program, the system will pause and sound beeps to remind user to turn food over, and then press START/+30 SEC pad to resume.
- Touch Time Defrost pad
- Enter desired defrosting time by touching correct number pads. The longest time you can set is 99 min. 99sec
- TouchSTART/+30 SEC pad.
Setting Weight Defrost: The defrosting time and power level are adjusted automatically once the weight is programmed.
- Touch Weight Defrost pad
- Use the number pads to enter the food weight (touch 1,2, to enter 12 OZ).
- Touch START/+30 SEC pad.
Note:
1. Weight must be in pounds and ounces. Ounce weights less than 10 must be preceded by a 0. If label gives weight in pounds only, change the fraction of a pound to ounces by using the chart. Maximum weight is 6lbs.
Converting Fractions of a Pound to Ounces:
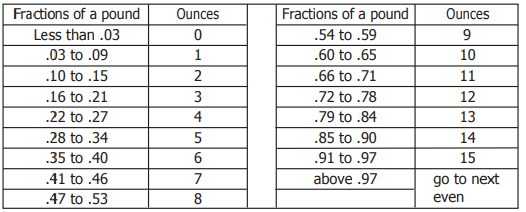
2. During cooking, the system will pause and sound beeps to remind user to turn food over, and then press START/+30 SEC pad to resume.
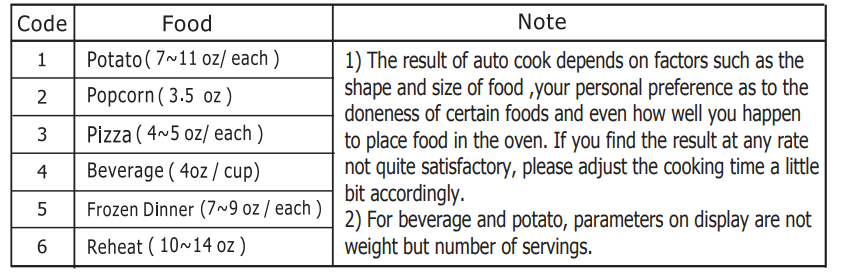
One touch Cook: For the following menus, you do not need to input cooking power and time. Follow the steps below.
- Place food into oven and close it
- Touch the correct auto menu to select the weight or the amount
- Touch START/+30 SEC pad to start the program.
Two - stage Cooking: Some recipes require different stages of cooking at different temperatures.
SET STAGE 1:
1.Place food into oven and close it. Touch TIME COOK pad.
2.Use the number pads to set a cooking time.
3.Touch POWER LEVEL pad.
4.Use the number pads to enter the power level.
NOTE: DO NOT TOUCH START/+30 SEC PAD. and continue to set the stage 2.
SET STAGE 2:
5.Touch TIME COOK pad.
6.Use the number pads to set a cooking time.
7.Touch POWER LEVEL pad.
8.Use the number pads to enter the power level.
9.Touch START/+30SEC to start.
Setting Child Lock: The child lock prevents unsupervised operation by children
- To set the child lock: In standby mode, press and hold STOP/CLEAR pad for 3 seconds, then a beep will sound. In the lock state, the oven can’t be operated. To cancel the child lock: Press and hold STOP/CLEAR pad for 3 seconds, then a beep will sound, and the oven can be operated.
Care and cleaning
- Turn off the microwave and unplug the power cord from the wall socket when cleaning.
- Keep the inside of the microwave clean. When food splatters or spilled liquids adhere to microwave walls, wipe with a damp cloth. Mild detergents may be used if the microwave gets very dirty. Avoid using spray or other harsh cleaners. They may stain, streak, or dull the door surface.
- The outside of the microwave should be cleaned with a damp cloth. To prevent damage to the operating parts inside the microwave, water should not be allowed to seep into the ventilation openings.
- Wipe the window on both sides with a damp cloth to remove any spills or splatters.
- Do not allow the control panel to become wet. Clean with a soft, damp cloth. When cleaning the panel, leave the microwave door open to prevent it from accidentally turning on.
- If steam accumulates inside or around the outside of the door, wipe with a soft cloth. This may occur when the microwave is operated under high humidity. This is normal.
- It may be necessary to remove the glass tray for cleaning. Wash the tray in warm. soapy water or in a dishwasher. The roller ring and microwave floor should be cleaned regularly to avoid excessive noise. Wipe the bottom surface of the microwave with a mild detergent. e
- The roller ring may be washed in mild, soapy water or in a dishwasher. When removing the roller ring. be sure to replace it in the proper position.
- Remove odors from your microwave by combining a cup of water with the juice and skin of one lemon in a microwaveable bowl. Microwave for 5 minutes. Wipe thoroughly and dry with a soft cloth.
- If the light bulb burns out. please contact a certified electrician to have it replaced.
- The microwave should be cleaned regularly and any food deposits should be removed. Failure to maintain the microwave in a clean condition could lead to deterioration of surfaces that could adversely affect the life of the unit and could possibly result in a hazardous situation.
- Please do not dispose of this appliance into a regular garbage receptacle. Please check to see where you can dispose of such appliances.
Troubleshooting
1. Dim oven light
- In low power cooking, oven light may become dim: This is normal
2. Steam accumulating on door or hot air coming out of vents during cooking
- Food releases steam during cooking: This is normal
3. Oven is startes accidentally with no food in it
- Microwave is started accidentally with no food in it: No damage will occur if the microwave runs for less than 20 seconds
4. Interference with TV reception
- Microwave operation may affect radio and TV reception: This is normal
5. Microwave will not start
- Power cord not pugged in tightly
- A fuse is blown or circuit breaker trips
- Problem with eleactrical outlet
=> Unplug wait 10 seconds, then plug in again. Replace fuse or reset circuit breaker. Consult with professional eletrician
6. Glass turntable makes noise during operation
- The microwave cavity is dirty: Clean the microwave and turntable with warm water and microwave safe cleaning products
7. Popcorn is over cooked or under cooked with 'Popcorn' easy seeting
- Incorrect power level selected for size of popcorn bag: Refer "Popcorn" setting instrutions. Always follow manufacturer's instructions for popcorn if the cooking time for the preset setting differs from the manufacturer's recommended time. Never leave popcorn cooking unattended