User manual Refrigerator
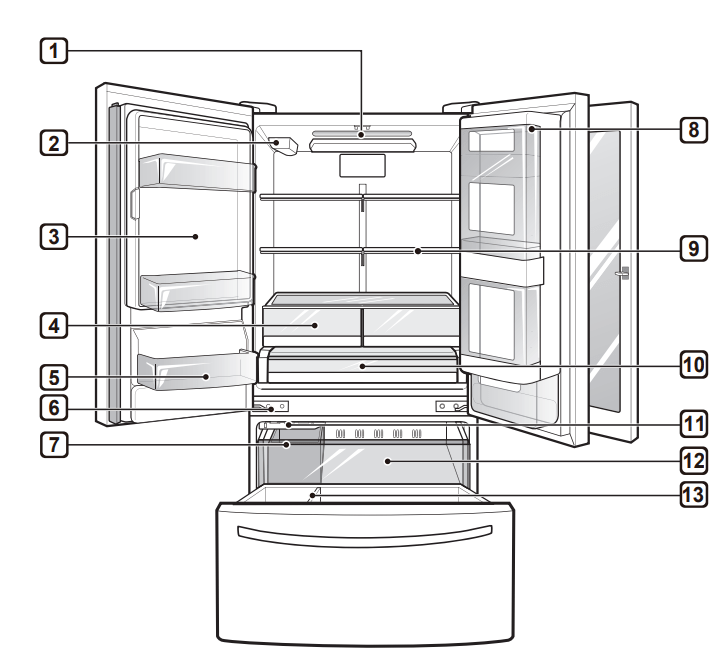
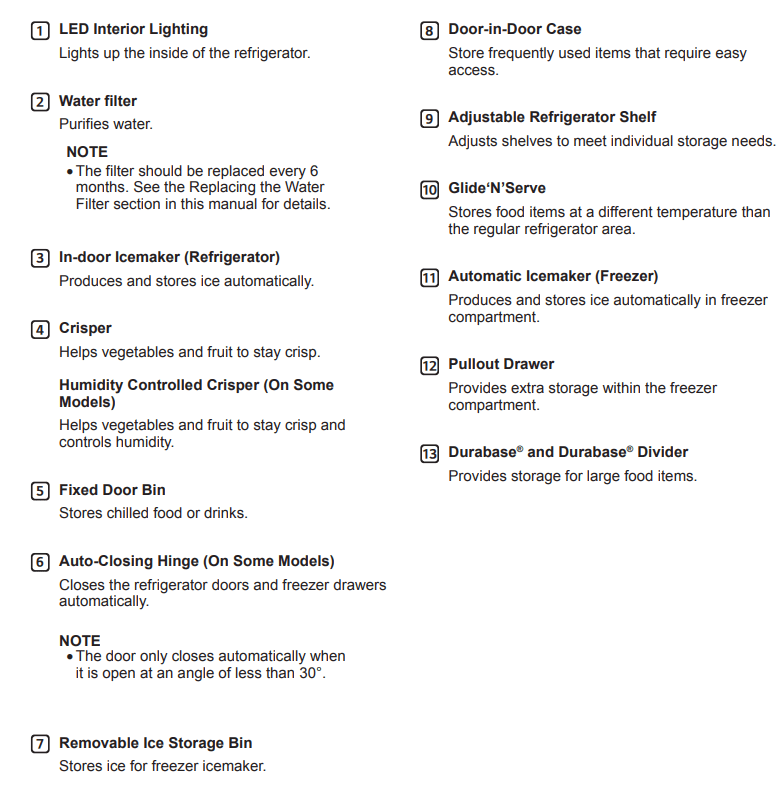
PRODUCT OVERVIEW
The images in this guide may be different from the actual components and accessories, which are subject to change by the manufacturer without prior notice for product improvement purposes.
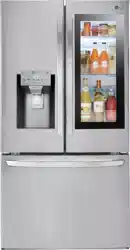
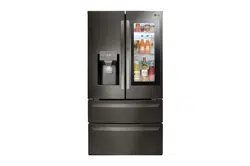
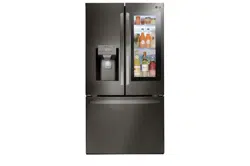
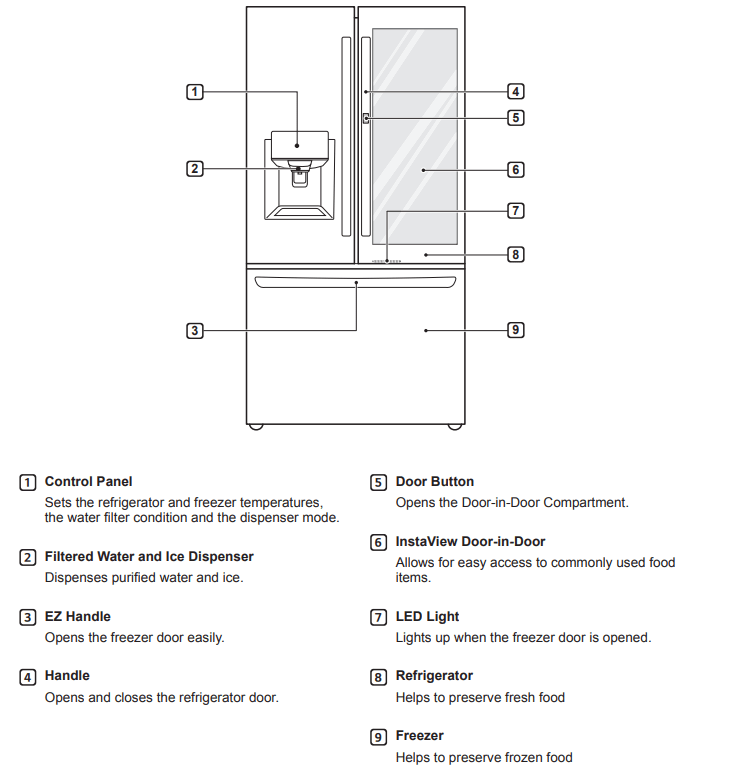
Exterior
Interior
Door-in-Door: LFXS26596*/LFXS28596*/LFXC22596*
OPERATION
Before Use
 Clean the refrigerator. Clean the refrigerator thoroughly and wipe off all dust that accumulated during shipping. CAUTION
- Wipe adhesive residue off with your thumb or dish detergent. Do not use sharp objects or abrasive, flammable, or alcohol-based cleaners.
- Do not peel off the model or serial number label or the technical information on the rear surface of the refrigerator.
 Open refrigerator and freezer doors to ventilate the interior. The inside of the refrigerator may smell like plastic at first. Remove any adhesive tape from inside the refrigerator and open the refrigerator doors and the freezer drawers for ventilation.
 Connect the power supply. Check if the power supply is connected before use. Read the “Turning On The Power” section.
 Turn off the icemaker Turn off the icemaker if the refrigerator is not yet connected to the water supply. NOTE: The icemaker water valve may buzz if the icemaker is turned on while the refrigerator is not connected to the water supply
 Wait for the refrigerator to cool. Allow the refrigerator to run for at least two to three hours before putting food in it. Check the flow of cold air in the freezer compartment to ensure proper cooling.
CAUTION: Putting food in the refrigerator before it has cooled could cause the food to spoil, or a bad odor to remain inside the refrigerator.
 The refrigerator makes a loud noise after initial operation. This is normal. The volume will decrease as the temperature decreases.
Control Panel
- Depending on the model, some of the following functions may not be available.
- When the refrigerator is in the Power Saving Mode, the display remains off until a door is opened or a button is pressed. Once on, the display remains on for 20 seconds.
Control Panel Features
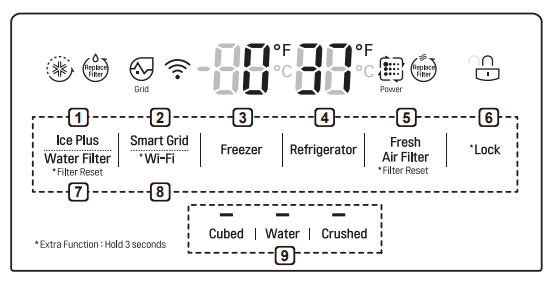
1. Ice Plus: This function increases both ice making and freezing capabilities.
- Press the Ice Plus button to illuminate the icon and activate the function for 24 hours. The function automatically shuts off after 24 hours.
- Stop the function manually by pressing the button once more.
2. Smart Grid
- Press the Smart Grid button to turn the Smart Grid function On/Off. When the function is on, the icon illuminates. The Smart Grid function automatically turns on when the refrigerator is connected to the Wi-Fi network.
- When the refrigerator is responding to a Demand Response (DR) message from the electric company, the Grid text illuminates.
3. Freezer
- Indicates the set temperature of the freezer compartment in Celsius (°C) or Fahrenheit (°F).
- The default freezer temperature is 0°F (-18 °C). Press the Freezer button repeatedly to select a new set temperature from -6 °F to 8 °F (-21 °C to -13 °C).
4. Refrigerator Temperature
- Indicates the set temperature of the refrigerator compartment in Celsius (°C) or Fahrenheit (°F)
- The default refrigerator temperature is 37 °F (3 °C). Press the Refrigerator button repeatedly to select a new set temperature from 33 °F to 46 °F (1 °C to 8 °C).
- NOTE
- To change the temperature mode from °F to °C (or vice versa) press and hold the Refrigerator and Freezer Temperature buttons simultaneously for approximately five seconds. The temperature indicator on the display window switches between Celsius and Fahrenheit.
- The displayed temperature is the target temperature, and not the actual temperature of the refrigerator. The actual refrigerator temperature depends on the food inside the refrigerator
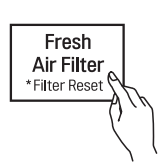
5. Fresh Air Filter
- The Fresh Air Filter helps remove odors from the refrigerator. The Fresh Air Filter has two settings, Auto and Power. In Auto mode, the Fresh Air Filter cycles on and off in increments of ten minutes on and 110 minutes off. If set to the Power mode, the Fresh Air Filter stays on continuously for four hours, cycling on and off in increments of ten minutes on and five minutes off. After four hours, the Fresh Air Filter switches back to Auto mode.
- Press the Fresh Air Filter button repeatedly to toggle between Power mode and Auto mode.
- NOTE
- Replace the air filter when the Replace Filter icon turns on. After replacing the air filter, press and hold the Fresh Air Filter button for three seconds to turn the icon light off. Replace the air filter approximately every six months.
- Refer to the Replacing the Fresh Air Filter section for details.
6. * Lock: The Lock function disables every other button on the display.
- When power is initially connected to the refrigerator, the Lock function is off.
- To lock the control panel buttons, press and hold the Lock button until the closed Lock
 icon appears in the display and the function is activated.
- To disable the Lock function, press and hold the Lock button for approximately three seconds.
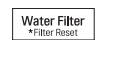
7. Water Filter: Replace the water filter when the Replace Filter icon turns on. After replacing the water filter, press and hold the Water Filter button for three seconds to turn the icon light off. Replace the water filter approximately every six months.
8. * Wi-Fi
- The Wi-Fi button, when used with the LG SmartThinQ app, allows the refrigerator to connect to a home Wi-Fi network. Refer to the Smart Functions section for information on the initial setup of the application.
- The Wi-Fi icon shows the status of the refrigerator's network connection. The icon illuminates when the refrigerator is connected to the Wi-Fi network.
- Press and hold the Wi-Fi button for 3 seconds to connect to the network. The icon blinks while the connection is being made, then turns on once the connection is successfully made.
3 and 8 SABBATH (On Some Models): Sabbath mode is used on the Jewish Sabbath and holidays.
- To turn Sabbath mode on, touch the display to activate it, then press and hold the Freezer and Wi-Fi buttons for 3 seconds until Sb appears in the display.
- Sabbath mode automatically turns off after 96 hours.
- To turn Sabbath mode off manually, press and hold the Freezer and Wi-Fi buttons for 3 seconds.
- Once turned on, Sabbath mode is maintained even after a power outage.
- Selecting Sabbath mode automatically turns off the Alarm functions. The dispenser and InstaView function are disabled.
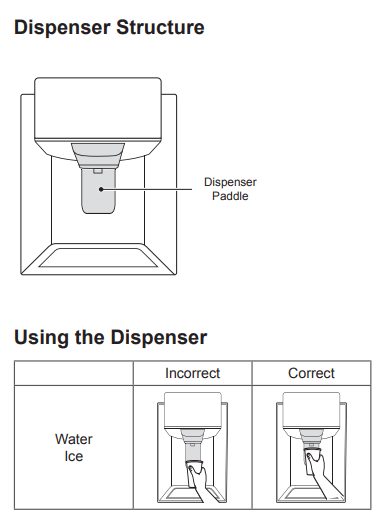
9. Dispenser Mode: Press the buttons to select cubed ice, water, or crushed ice. The LED illuminates over the mode selected
Ice and Water Dispenser
CAUTION
- Keep children away from the dispenser. Children may play with or damage the controls.
- Throw away the first few batches of ice (about 140 - 160 cubes) after installation. This is also necessary if the refrigerator has not been used for a long time.
- If ice or water dispenses unexpectedly, turn off the water supply and contact an LG Electronics Customer Information Center.
- Never use a glass that is exceptionally narrow or deep. Ice may jam in the ice passage and refrigerator performance may be affected.
NOTE
- To dispense cold water or ice, push on the dispenser paddle with a glass.
- The first ice and water dispensed may include particles or odor from the water supply line or the water tank. Throw away the first few batches of ice (about 140 - 160 cubes). This is also necessary if the refrigerator has not been used for a long time.
- The dispenser will not operate when either of the refrigerator doors is open.
- If discolored ice is dispensed, check the water filter and water supply. If the problem continues, contact an LG Electronics Customer Information Center. Do not use the water or ice until the problem is corrected.
- Dispense ice into a glass before filling it with water or other beverages. Splashing may occur if ice is dispensed into a glass that already contains liquid.
- Some dripping may occur after dispensing. Hold the cup beneath the dispenser for a few seconds after dispensing to catch all of the drops.
- Keep containers at an appropriate distance from the dispensers. Tall, narrow glasses should be held far enough from the ice outlet to prevent ice from jamming in the ice chute. A container with a very small opening should be held as close to the dispenser as possible to avoid spilling.
- Keep the glass at a proper distance from the ice outlet. A glass held too close to the outlet may prevent ice from dispensing.
Locking the Dispenser: Press the Lock button on the control panel for 3 seconds to lock or unlock the dispenser and all of the control panel functions.
Ice Compartment
- CAUTION: Keep hands and tools out of the ice compartment door and dispenser chute. Failure to do so may result in damage or personal injury
- Keep the ice compartment door closed tightly. If the ice compartment door is not closed tightly, the cold air in the ice bin will freeze food in the refrigerator compartment. This could also cause the icemaker to stop producing ice.
In-Door Ice Bin
- The icemaker stops producing ice when the in-door ice bin is full.
- During use, the ice may stack unevenly in the bin, causing the icemaker to misread the number of ice cubes and stop producing ice. Shaking the ice bin to level the ice within it can reduce this problem.
- To prevent ice cubes from melting and leaking from the dispenser, ALWAYS empty the ice bin when the icemaker is turned OFF for more than a few hours.
- The ice passage may become blocked with frost if only crushed ice is used. Remove the frost that accumulates by removing the ice bin and clearing the passage with a rubber spatula. Dispensing cubed ice can also help prevent frost buildup.
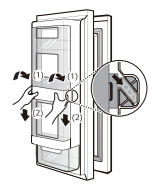
Detaching the In-Door Ice Bin
1. Gently pull the handle to open the ice compartment.
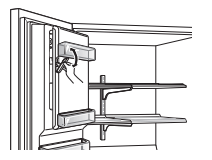
2. To remove the in-door ice bin, grip the front handle, slightly lift the lower part, and slowly pull out the bin as shown.
Assembling the In-Door Ice Bin
1. Carefully insert the in-door ice bin, slanting the top slightly to fit it under the icemaker.
2. Gently push the handle to close the ice compartment.
CAUTION
- When handling the ice bin, keep hands away from the icemaker tray area to avoid personal injury.
- Storing cans or other items in the ice bin will damage the icemaker.
- Never use thin crystal glasses or containers to collect ice. Such containers may chip or break resulting in glass fragments in the ice.
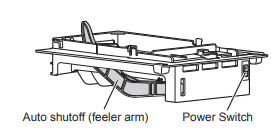
- Avoid touching the auto shutoff (feeler arm) when replacing the ice bin. See the label on the ice compartment door for details.
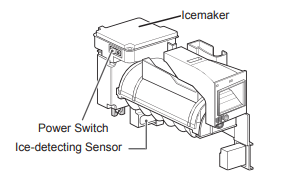
Automatic Icemaker
In-Door Icemaker
NOTE
- Ice is made in the automatic in-door icemaker and sent to the dispenser. The icemaker produces 70 - 182 cubes in a 24-hour period, depending on freezer compartment temperature, room temperature, number of door openings and other operating conditions.
- It takes about 12 to 24 hours for a newly installed refrigerator to begin making ice.
- Ice-making stops when the in-door ice bin is full. When full, the in-door ice bin holds approximately 6 to 8 (12-16 oz.) glasses of ice.
- Foreign substances or frost on the ice-detecting sensor can interrupt ice production. Make sure the sensor area is clean at all times for proper operation.
- To increase ice production, use the Ice Plus function. The function increases both ice making and freezing capabilities.
Freezer Icemaker
NOTE
- The automatic freezer icemaker produces 12 cubes at a time, 50-110 pieces within a 24 hour period if conditions are favorable. This amount may vary according to the environment (ambient temperature around the appliance, frequency of the door being opened, amount of food stored in the appliance, etc.).
- If the ice bin is completely filled with ice, ice production will stop.
- Sound of ice dropping into the ice bin is normal.
- The icemaker produces ice once approximately 48 hours have passed after the appliance is initially installed.
- Discard the first ice cubes produced after initial install.
- Ice cubes which are stored in the ice bin for a long time may clump together and be difficult to separate. If this happens, empty the ice bin completely and clean it before reinstalling it.
WARNING Personal Injury Hazard
- DO NOT place fingers or hands on the automatic ice making mechanism while the refrigerator is plugged in.
- To avoid personal injury, keep hands out of the ice door and passage.
CAUTION: Never store beverage cans or other items in the ice bin for the purpose of rapid cooling. Doing so may damage the icemaker or the containers may burst.
Turning the Automatic Icemakers On or Off
- To turn off one of the automatic icemakers, set the icemaker switch to OFF (O). To turn on the automatic icemaker, set the switch to ON (I).
Normal Sounds You May Hear
- Keeping the power turned on to the icemakers before the water line is connected can damage the icemakers.
- The icemaker water valve will buzz as the icemaker fills with water. If the power switch is in the ON (I) position, it will buzz even if it has not yet been hooked up to water. To stop the buzzing, move the power switch to OFF (O).
- You will hear the sound of cubes dropping into the bin and water running in the pipes as the icemaker refills.
NOTE: Do not keep the power turned on to the icemakers if the water line is not connected. Doing so can damage the icemakers
Preparing for Vacation
- Set both icemaker power switches to OFF (O) and shut off the water supply to the appliance.
- If the ambient temperature will drop below freezing, have a qualified technician drain the water supply system to prevent serious property damage due to flooding caused by ruptured water lines or connections.
NOTE: The ice bin should be emptied any time the power switch is turned to the OFF (O) position.
Storing Food
- Depending on the model, some of the following functions may not be available.
- Each compartment inside the refrigerator is designed to store different types of food. Store food in the optimal space to enjoy the freshest taste
CAUTION
- Do not overfill or pack items too tightly into door bins. Doing so may cause damage to the bin or personal injury if items are removed with excessive force.
- Do not store glass containers in the freezer. Contents may expand when frozen, break the container and cause injury
NOTE
- If you are leaving home for a short period, like a short vacation, the refrigerator should be left on. Refrigerated foods that are able to be frozen will stay preserved longer if stored in the freezer.
- If you are leaving the refrigerator turned off for an extended period, remove all food and unplug the power cord. Clean the interior, and leave the doors open to prevent fungi from growing in the refrigerator.
- Do not store food with high moisture content towards the top of the refrigerator. The moisture could come in direct contact with the cold air and freeze.
- Wash food before storing it in the refrigerator. Vegetables should be washed, and food packaging should be wiped down to prevent adjacent foods from being contaminated.
- If the refrigerator is kept in a hot and humid place, frequent opening of the door or storing a lot of vegetables in the refrigerator may cause condensation to form. Wipe off the condensation with a clean cloth or a paper towel.
- If the refrigerator door or freezer drawer is opened or closed too often, warm air may penetrate the refrigerator and raise its temperature. This can increase the running costs of the unit.
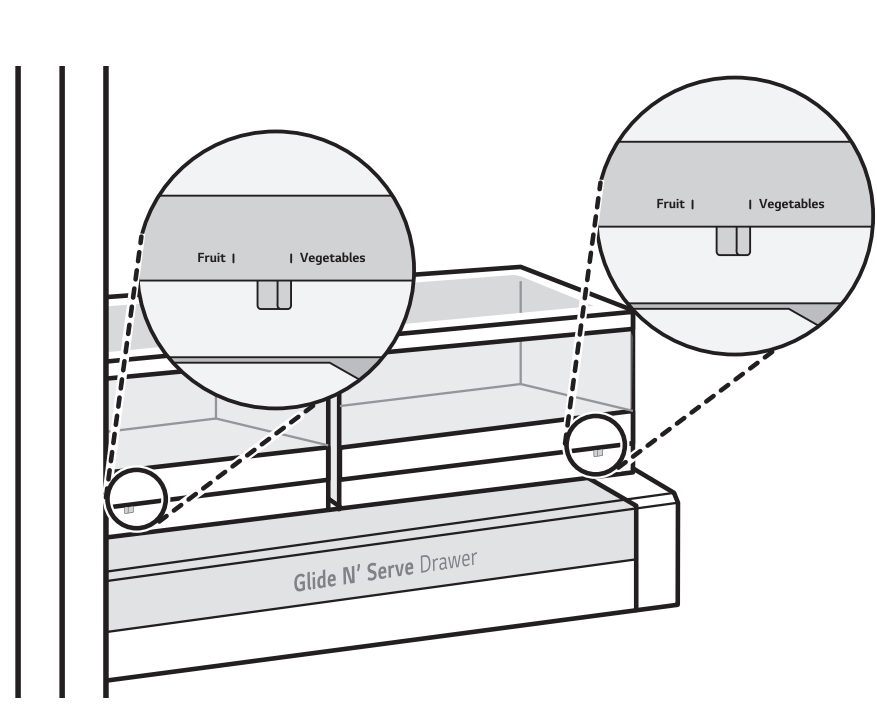
Humidity Controlled Crispers (On Some Models)
- The crispers provide fresher tasting fruit and vegetables by letting you easily control humidity inside the drawer.
- You can control the amount of humidity in the moisture-sealed crispers by adjusting the control to any setting between Vegetables and Fruit.
- Vegetables keeps moist air in the crisper for best storage of fresh, leafy vegetables.
- Fruit lets moist air out of the crisper for best storage of fruit.
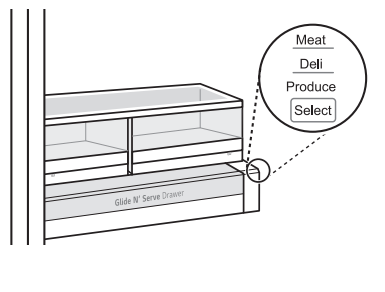
Glide‘N’Serve (On Some Models)
- The Glide’N’Serve provides storage space with a variable temperature control that can keep the compartment at a slightly different temperature than the refrigerator section. This drawer can be used for large party trays, deli items and beverages. (This drawer should not be used to store vegetables that require high humidity.)
- Press the Select button to choose between Produce (Cold), Deli (Colder) and Meat (Coldest)
Durabase®
- The Durabase® divider allows you to organize the Durabase® area into sections. It can be adjusted from side to side to accommodate items of different sizes.
- WARNING: If the Durabase® divider is removed, there is enough open space for children or pets to crawl inside. To prevent accidental child and pet entrapment or suffocation risk, DO NOT allow children or pets to touch or go near the drawer
Detaching/Assembling the Storage Bins
- Some bins may vary in appearance and will only fit in one location.
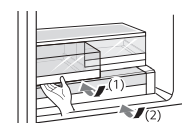
Glide'N'Serve and Crispers
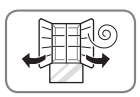
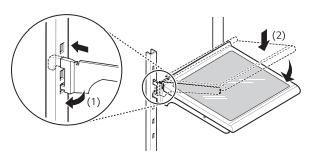
1. To remove the humidity controlled crispers and the Glide'N'Serve, pull out the crisper (1) or Glide'N'Serve (2) to full extension, lift the front up, and pull straight out.
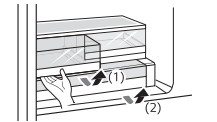
2. To install, slightly tilt up the front, insert the crisper or drawer into the frame and push it back into place.
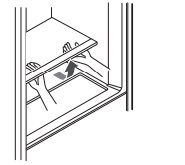
Crisper Cover: To remove, lift the front of the cover up until it detaches from the back wall of the cabinet, then pull it out.
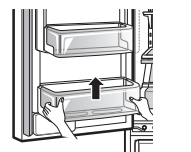
Door Bins The door bins are removable for easy cleaning and adjustment.
- To remove the bin, simply lift the bin up and pull straight out.
- To replace the bin, slide it in above the desired support and push down until it snaps into place.
CAUTION
- Regularly detach and wash the storage bins and shelves; they can become easily contaminated by food.
- Do not apply excessive force while detaching or assembling the storage bins.
- Do not use the dishwasher to clean the storage bins and shelves.
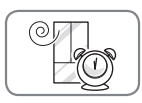
InstaView Door-in-Door (On Some Models)
- The InstaView function on the Door-in-Door lets you see if you’re running low on frequently used items like beverages and snacks, without opening the refrigerator door.
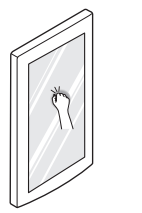
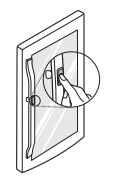
- Knock twice on the glass to turn the LED light inside the Door-in-Door on or off.
- The LED light turns off automatically after 10 seconds
- The InstaView Door-in-Door function is disabled when the right refrigerator door is open, for two seconds after closing the door, and when the ice dispenser is in use.
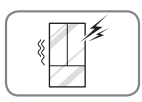
- Knock near the center of the glass. Knocking near the edges of the glass may not activate the InstaView Door-in-Door function properly.
- Knock hard enough that the knocking sound is audible.
- The InstaView Door-in-Door function may activate if a loud noise occurs near the refrigerator.
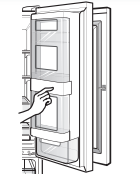
Door-in-Door Compartment To access the Door-in-Door compartment, lightly press the button on the right refrigerator door handle.
Door-in-Door Case: To open the Door-in-Door case, pull evenly on the marked area. The Door-in-Door case is removable for easy cleaning and adjustment.
1. To remove the Door-In-Door case, lift up and pull out.
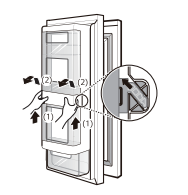
2. To replace the Door-in-Door case, line up the tabs on the Door-In-Door case with the slots on the door and push down until it snaps into place.
Adjusting the Refrigerator Shelves
- The shelves in the refrigerator are adjustable to meet individual storage needs. Your model may have full or split shelves.
- Adjusting the shelves to fit items of different heights will make finding the exact item you want easier.
Detaching the Shelf (Half Shelf Type)
1. Tilt up the front of the shelf and then lift the shelf straight up.
2. Pull the shelf out.

Assembling the Shelf (Half Shelf Type)
- Tilt the front of the shelf up and guide the shelf hooks into the slots at a desired height.
- Lower the front of the shelf so that the hooks drop into the slots.
Using the Folding Shelf (On Some Models)
- Store taller items, such as a gallon container or bottles, by pushing the front half of the shelf underneath the back half of the shelf. Pull the front of the shelf forward to return to a full shelf.
SMART FUNCTIONS
- For appliances with the
 or
or  logo
logo
LG SmartThinQ Application
- The LG SmartThinQ application allows you to communicate with the appliance using a smartphone.
Before Using LG SmartThinQ
- Use a smartphone to check the strength of the wireless router (Wi-Fi network) near the appliance.
- If the distance between the appliance and the wireless router is too far, the signal strength becomes weak. It may take a long time to register or installation may fail.
- Turn off the Mobile data or Cellular Data on your smartphone.
- Connect your smartphone to the wireless router.
Installing the LG SmartThinQ Application Search for the LG SmartThinQ application from the Google Play Store or Apple App Store on a smart phone. Follow instructions to download and install the application.
LG SmartThinQ Application Features
- Firmware Update: Keep the appliance performance updated.
- Energy Monitoring (On Some Models): This feature keeps track of the refrigerator’s power consumption and the number of door openings.
- Remote Control: Control the refrigerator set temperature, Fresh Air Filter and Ice Plus from the smart phone app.
- Push Messages: If the door remains open for more than ten minutes, you will receive a push message. When Ice Plus is finished, you will receive a push message.
- Smart Diagnosis™: This function provides useful information for diagnosing and solving issues with the appliance based on the pattern of use.
- Settings: Allows you to set various options on the refrigerator and in the application.
NOTE
- If you change your wireless router, Internet service provider, or password, delete the registered appliance from the LG SmartThinQ application and register it again.
- This information is current at the time of publication. The application is subject to change for product improvement purposes without notice to users.
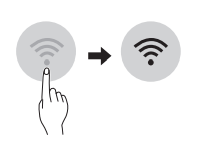
Connecting to Wi-Fi: The Wi-Fi button, when used with the LG SmartThinQ application, allows the refrigerator to connect to a home Wi-Fi network. The Wi-Fi icon shows the status of the refrigerator’s network connection. The icon illuminates when the refrigerator is connected to the Wi-Fi network.
Initial Appliance Registration: Run the LG SmartThinQ application and follow the instructions in the application to register the appliance.
Re-registering the Appliance or Registering Another User: Press and hold the Wi-Fi button for 3 seconds to temporarily turn it off. Run the LG SmartThinQ application and follow the instructions in the application to register the appliance.
NOTE: To disable the Wi-Fi function, press and hold the Wi-Fi button for 3 seconds. Wi-Fi icon will be turned off.
Wireless LAN Module Specifications
| Model |
LCW-004 |
| Frequency Range |
2412 - 2462 MHz |
| Output Power (Max) |
IEEE 802.11 b : 22.44 dBm
IEEE 802.11 g : 24.68 dBm
IEEE 802.11 n : 24.11 dBm
|
MAINTENANCE
Cleaning
WARNING: Use non-flammable cleaner. Failure to do so can result in fire, explosion, or death.
CAUTION
- Do not use an abrasive cloth or sponge when cleaning the interior and exterior of the refrigerator.
- Do not place your hand on the bottom surface of the refrigerator when opening and closing the doors.
- When lifting the hinge free of the latch, be careful that the door does not fall forward.
General Cleaning Tips
- Both the refrigerator and freezer sections defrost automatically; however, clean both sections once a month to prevent odors.
- Wipe up spills immediately.
- Unplug the refrigerator or disconnect power before cleaning.
- Remove all removable parts, such as shelves.
- Use a clean sponge or soft cloth and a mild detergent in warm water. Do not use abrasive or harsh cleaners.
- Hand wash, rinse and dry all surfaces thoroughly.
- When cleaning the inside or outside of the appliance, do not wipe it with a rough brush, toothpaste, or flammable materials. Do not use cleaning agents containing flammable substances.
- This may cause discoloration or damage to the appliance.
- Flammable substances: alcohol (ethanol, methanol, isopropyl alcohol, isobutyl alcohol, etc.), thinner, bleach, benzene, flammable liquid, abrasive, etc.
Exterior
- Waxing external painted metal surfaces helps provide rust protection. Do not wax plastic parts. Wax painted metal surfaces at least twice a year using appliance wax (or auto paste wax). Apply wax with a clean, soft cloth.
- For products with black stainless steel exterior, spray glass cleaner on a clean, microfiber cloth and rub in direction of grain. Do not spray glass cleaner directly at the display panel. Do not use harsh or abrasive cleaners.
- For products with a standard stainless steel exterior, use a damp microfiber cloth and rub in the direction of the grain. Dry with a paper towel to avoid streaks. For stubborn stains and fingerprints, use a few drops of liquid dish soap in water, and rinse with hot water before drying. Do not use abrasive or harsh cleaners.
Inside Walls
- Allow freezer to warm up so the cloth will not stick. To help remove odors, wash the inside of the refrigerator with a mixture of baking soda and warm water. Mix 2 tablespoons of baking soda to 1 quart of water (26 g soda to 1 liter water.) Be sure the baking soda is completely dissolved so it does not scratch the surfaces of the refrigerator.
Door Liners and Gaskets
- Use a clean sponge or soft cloth and a mild detergent in warm water. Do not use cleaning waxes, concentrated detergents, bleaches, or cleaners containing petroleum on plastic refrigerator parts.
Plastic Parts (covers and panels)
- Use a clean sponge or soft cloth and a mild detergent in warm water. Do not use glass cleaners, abrasive cleansers, or flammable fluids. These can scratch or damage the material.
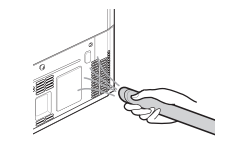
Condenser Coils
- Use a vacuum cleaner with a brush or crevice attachment to clean the condenser cover and vents. Do not remove the panel covering the condenser coil area.
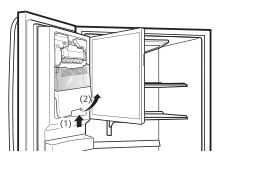
Replacing the Fresh Air Filter
Replace the Fresh Air Filter:
- Approximately every six months.
- When the Replace Filter
 icon turns on.
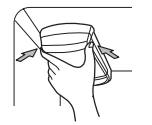
1. Rotate the filter cover counterclockwise to release the tabs, and remove the cover.
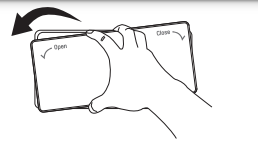
2. Remove the filter from the inside of the cover by pressing the side of the filter in and pulling the center out.

3. Place the new filter inside of the cover with the side that says FRONT facing outward.
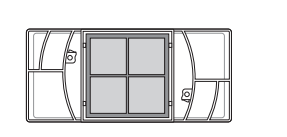
4. Align 1 tab on the filter cover with hooks 2 on the refrigerator wall.

5. Rotate the air filter cover clockwise until the hooks engage and the cover locks in place.
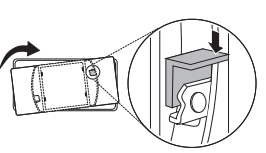
6. Press and hold the Fresh Air Filter button on the control panel for 3 seconds to reset the filter sensor.
Replacing the Water Filter
Replace the Water Filter :
- Approximately every six months.
- When the Replace Filter
 icon turns on.
- When the water dispenser output decreases.
Before Replacing the Water Filter:
- If the top shelf, located below the water filter, is in the highest position, it will need to be removed prior to replacing the water filter.
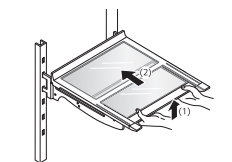
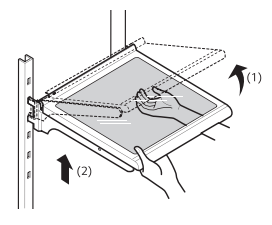
- To remove any shelf : Tilt up the front of the shelf (1) and lift (2). Pull the shelf out.
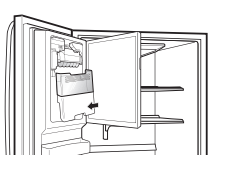
1. Remove the old water filter. Lower or remove the top left shelf to allow the water filter to rotate all the way down. Pinch the sides to open the water filter cover.
2. Pull the water filter downward and turn it counterclockwise before pulling it out. Make sure to rotate the filter down completely before pulling it out of the manifold hole.
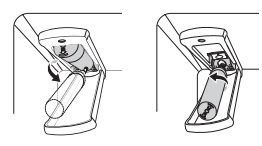
3. Replace with a new water filter. Take the new water filter out of its packing and remove the protective cover from the o-rings. With the water filter tabs in the horizontal position, push the new water filter into the manifold hole and turn it clockwise until it stops.

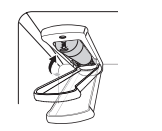
4. Close the water filter cover. The cover will click when closed correctly.
5. After the water filter is replaced, dispense 2.5 gallons of water (flush for approximately 5 minutes) to remove trapped air and contaminants from the system.
6. After changing the filter, press and hold the Water Filter button for three seconds to reset the indicator light.
TROUBLESHOOTING
FAQs: Frequently Asked Questions
1. Q: What are the best temperature settings for my refrigerator and freezer?
- A: The default setting for the refrigerator is 37° Fahrenheit (3° Celsius). The default setting for the freezer is 0° Fahrenheit (-18° Celsius). Adjust these settings as necessary to keep food at desired temperatures. Milk should be cold when stored on the inner shelf of the refrigerator. Ice cream should be firm and ice cubes should not melt in the freezer. To switch the display from Fahrenheit to Celsius, press and hold the Freezer and Refrigerator buttons until you hear a beep and the settings in the display change. On some models, you can also select the Refrigerator Manager application on the display and use the Unit button.
2. Q: How do I set the refrigerator and freezer temperatures?
- A: Continually press the Refrigerator or Freezer button on the control panel until the desired temperature appears. The numbers will cycle from highest to lowest and then return to the highest again with continuous pressing. On some models, you can also set the temperatures in the Refrigerator Manager application on the display.
3. Q: Why do I hear a buzzing noise from my refrigerator periodically?
- A: This may happen if you do not have a water source attached to your refrigerator and the icemaker is turned on. If you do not have a water source attached to the back of the refrigerator you should turn the icemaker off.
4. Q: Why does the icemaker tray look crooked?
- A: This is a normal part of the icemaker cycle. The icemaker tray may appear level or with a slight tilt. The change in position is to assist in the freezing process.
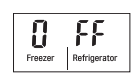
5. Q: My refrigerator is powered on and the controls are working, but it’s not cooling and the display shows “OFF” (see below). What is wrong?
- A: The refrigerator is in Demo Mode. This mode disables cooling to save energy while the appliance is on display in a store. To restore normal operation, press and hold the Refrigerator and Ice Plus buttons for 5 seconds or until you hear a beep and the temperature settings appear on the display. Use the same procedure to return the refrigerator to Demo Mode, if desired.
Before Calling for Service
Review this section before calling for service; doing so will save you both time and money.
Cooling
| Problem |
Possible Cause |
Solutions |
| Refrigerator and Freezer section are not cooling. |
The refrigerator control is set to OFF (some models).
|
Turn the control ON. Refer to the Setting the Controls section for proper temperature settings.
|
| Refrigerator is set to Demo Mode |
Demo Mode allows the lights and control display to work normally while disabling cooling, to save energy while the refrigerator is on the showroom floor. See the FAQs section of this manual for instructions on how to disable Demo Mode. |
| Refrigerator is in the defrost cycle. |
During the defrost cycle, the temperature of each compartment may rise slightly. Wait 30 minutes and confirm the proper temperature has been restored once the defrost cycle has completed. |
| Refrigerator was recently installed. |
It may take up to 24 hours for each compartment to reach the desired temperature. |
| Refrigerator was recently relocated. |
If the refrigerator was stored for a long period of time or moved on its side, it is necessary for the refrigerator to stand upright for 24 hours before connecting it to power. |
| Cooling system runs too much. |
Refrigerator is replacing an older model. |
Modern refrigerators require more operating time but use less energy due to more efficient technology |
| Refrigerator was recently plugged in or power restored. |
The refrigerator will take up to 24 hours to cool completely |
| The door is opened often or a large amount of food / hot food was added. |
Adding food and opening the door warms the refrigerator, requiring the compressor to run longer in order to cool the refrigerator back down. In order to conserve energy, try to get everything you need out of the refrigerator at once, keep food organized so it is easy to find, and close the door as soon as the food is removed. (Refer to the Food Storage Guide.) |
| Doors are not closed completely. |
Firmly push the doors shut. If they will not shut all the way, the "Doors will not close correctly or pop open" section. |
| Refrigerator is installed in a hot location. |
The compressor will run longer under warm conditions. At normal room temperatures (70 °F) expect your compressor to run about 40 % to 80 % of the time. Under warmer conditions, expect it to run even more often. The refrigerator should not be operated above 110 °F. |
| Condenser / back cover is clogged. |
Use a vacuum cleaner with an attachment to clean the condenser cover and vents. Do not remove the panel covering the condenser coil area. |
| Interior moisture buildup. |
Doors are opened often or for long periods of time. |
When the doors are opened often or for long periods of time, warm, humid air enters the compartment. This raises the temperature and moisture level within the compartment. To lessen the effect, reduce the frequency and duration of door openings. |
| Doors are not closed correctly |
See the "Doors will not close correctly or pop open" section. |
| Weather is humid. |
Humid weather allows additional moisture to enter the compartments when the doors are opened leading to condensation or frost. Maintaining a reasonable level of humidity in the home will help to control the amount of moisture that can enter the compartments |
|
Defrost cycle recently completed.
|
During the defrost cycle, the temperature of each compartment may rise slightly and condensation may form on the back wall. Wait 30 minutes and confirm that the proper temperature has been restored once the defrost cycle has completed
|
| Food is not packaged correctly. |
Food stored uncovered or unwrapped, and damp containers can lead to moisture accumulation within each compartment. Wipe all containers dry and store food in sealed packaging to prevent condensation and frost. |
| Food is freezing in the refrigerator compartment. |
Food with high water content was placed near an air vent.
|
Rearrange items with high water content away from air vents.
|
| Refrigerator temperature control is set incorrectly |
If the temperature is too cold, adjust the control one increment at a time and wait for the temperature to stabilize. Refer to the Control Panel section for more information. |
| Refrigerator is installed in a cold location. |
When the refrigerator is operated in temperature below 41°F (5°C), food can freeze in the refrigerator compartment. The refrigerator should not be operated in temperature below 55°F (13°C). |
| Refrigerator or Freezer section is too warm. |
Refrigerator was recently installed. |
It may take up to 24 hours for each compartment to reach the desired temperature. |
|
The air vents are blocked. Cold air circulates from the freezer to the fresh food section and back again through air vents in the wall dividing the two sections.
|
Locate air vents by using your hand to sense airflow and move all packages that block vents and restrict airflow. Rearrange items to allow air to flow throughout the compartment.
|
Cooling/Ice & Water
| Problem |
Possible Cause |
Solutions |
| Refrigerator or Freezer section is too warm |
Doors are opened often or for long periods of time.
|
When the doors are opened often or for long periods of time, warm, humid air enters the compartment. This raises the temperature and moisture level within the compartment. To lessen the effect, reduce the frequency and duration of door openings.
|
| Unit is installed in a hot location. |
The refrigerator should not be operated in temperatures above 110 °F |
| A large amount of food or hot food was added to either compartment. |
Adding food warms the compartment requiring the cooling system to run. Allowing hot food to cool to room temperature before putting it in the refrigerator will reduce this effect. |
| Doors not closed correctly. |
See the Doors will not close correctly or pop open section in Parts & Features Troubleshooting. |
| Temperature control is not set correctly. |
If the temperature is too warm, adjust the control one increment at a time and wait for the temperature to stabilize. |
| Defrost cycle has recently completed. |
During the defrost cycle, the temperature of each compartment may rise slightly and condensation may form on the back wall. Wait 30 minutes and confirm the proper temperature has been restored once the defrost cycle has completed. |
| Refrigerator or Freezer section is too cold. |
Incorrect temperature control settings. |
If the temperature is too cold, adjust the control one increment at a time and wait for the temperature to stabilize. Refer to the Control Panel for more information. |
| Frost or ice crystals form on frozen food (inside of sealed package). |
Condensation from food with a high water content has frozen inside of the food package. |
This is normal for food items with a high water content. |
| Food has been left in the freezer for a long period of time. |
Do not store food items with high water content in the freezer for a long period of time. |
| Frost or ice crystals form on frozen food (outside of package). |
Door is opened frequently or for long periods of time.
|
When the doors are opened often or for long periods of time, warm, humid air enters the compartment. This raises the temperature and moisture level within the compartment. Increased moisture will lead to frost and condensation. To lessen the effect, reduce the frequency and duration of door openings.
|
|
Door is not closing properly.
|
Refer to the Doors will not close correctly or pop open section in the Troubleshooting section.
|
Ice & Water
| Problem |
Possible Cause |
Solutions |
| Icemaker is not making enough ice. |
Demand exceeds ice storage capacity.
|
The icemaker will produce approximately 70-184 cubes in a 24 hour period.
|
| House water supply is not connected, valve is not turned on fully, or valve is clogged. |
Connect the refrigerator to a cold water supply with adequate pressure and turn the water shutoff valve fully open. If the problem persists, it may be necessary to contact a plumber. |
| Water filter has been exhausted. |
Replacing the water filter is recommended: Approximately every six months. When the water filter indicator turns on. When the water dispenser output decreases. When the ice cubes are smaller than normal. |
| Low house water supply pressure. |
The water pressure must be between 20 and 120 psi on models without a water filter and between 40 and 120 psi on models with a water filter. If the problem persists, it may be necessary to contact a plumber. |
| Reverse Osmosis filtration system is used. |
Reverse osmosis filtration systems can reduce the water pressure below the minimum amount and result in icemaker issues. (Refer to the Connecting the Water Line section.) |
| Tubing connecting refrigerator to house supply valve is kinked. |
The tubing can kink when the refrigerator is moved during installation or cleaning resulting in reduced water flow. Straighten or repair the water supply line and arrange it to prevent future kinks. |
| Doors are opened often or for long periods of time. |
If the doors of the unit are opened often, ambient air will warm the refrigerator which will prevent the unit from maintaining the set temperature. Lowering the refrigerator temperature can help, as well as not opening the doors as frequently. |
| Doors are not closed completely. |
If the doors are not properly closed, ice production will be affected. See the "Doors will not close correctly or pop open" section in Parts & Features Troubleshooting for more information. |
| The temperature setting for the freezer is too warm. |
The recommended temperature for the freezer compartment for normal ice production is 0°F. If the freezer temperature is warmer, ice production will be affected. |
| Icemaker is not making ice |
Refrigerator was recently installed or icemaker recently connected.
|
It may take up to 24 hours for each compartment to reach the desired temperature and for the icemaker to begin making ice.
|
| Icemaker not turned on. |
Locate the icemaker ON/OFF and confirm that it is turned on. |
| Icemaker is not making ice |
The ice detecting sensor is obstructed.
|
Foreign substances or frost on the ice-detecting sensor can interrupt ice production. Make sure that the sensor area is clean at all times for proper operation.
|
| The refrigerator is not connected to a water supply or the supply shutoff valve is not turned on. |
Connect the refrigerator to the water supply and turn the water shutoff valve fully open. |
| Icemaker shutoff (arm or sensor) obstructed. |
If your icemaker is equipped with an ice shutoff arm, make sure that the arm moves freely. If your icemaker is equipped with the electronic ice shutoff sensor, make sure that there is a clear path between the two sensors. |
| Reverse osmosis water filtration system is connected to your cold water supply |
Reverse osmosis filtration systems can reduce the water pressure below the minimum amount and result in icemaker issues. (Refer to the Connecting the Water Line section.) |
| Ice has bad taste or odor. |
Water supply contains minerals such as sulfur.
|
A water filter may need to be installed to eliminate taste and odor problems. NOTE: In some cases, a filter may not help. It may not be possible to remove all minerals/ odor/taste in all water supplies.
|
| Icemaker was recently installed. |
Ice that has been stored for too long will shrink, become cloudy, and may develop a stale taste. Throw away old ice and make a new supply. |
| The food has not been stored properly in either compartment. |
Rewrap the food. Odors may migrate to the ice if food is not wrapped properly |
| The interior of the refrigerator needs to be cleaned. |
See the Maintenance section for more information. |
| The ice storage bin needs to be cleaned. |
Empty and wash the bin (discard old cubes). Make sure that the bin is completely dry before reinstalling it. |
| Icemaker is making too much ice. |
Icemaker shutoff (arm/ sensor) is obstructed. |
Empty the ice bin. If your icemaker is equipped with an ice shutoff arm, make sure that the arm moves freely. If your icemaker is equipped with the electronic ice shutoff sensor, make sure that there is a clear path between the two sensors. Reinstall the ice bin and wait 24 hours to confirm proper operation. |
Parts & Features
| Problem |
Possible Cause |
Solutions |
| Doors will not close correctly or pop open. |
Food packages are blocking the door open.
|
Rearrange food containers to clear the door and door shelves.
|
| Ice bin, crisper cover, pans, shelves, door bins, or baskets are out of position. |
Push bins all the way in and put crisper cover, pans, shelves and baskets into their correct positions. See the Operation section for more information. |
| The doors were removed during product installation and not properly replaced. |
Remove and replace the doors according to the Removing and Replacing Refrigerator Handles and Doors section. |
| Refrigerator is not leveled properly. |
See Door Alignment in the Refrigeration Installation section to level refrigerator. |
| Doors are difficult to open. |
The gaskets are dirty or sticky.
|
Clean the gaskets and the surfaces that they touch. Rub a thin coat of appliance polish or kitchen wax on the gaskets after cleaning.
|
| Door was recently closed. |
When you open the door, warmer air enters the refrigerator. As the warm air cools, it can create a vacuum. If the door is hard to open, wait one minute to allow the air pressure to equalize, then see if it opens more easily. |
| Refrigerator wobbles or seems unstable |
Leveling legs are not adjusted properly.
|
Refer to the Leveling and Door Alignment section.
|
| Floor is not level. |
It may be necessary to add shims under the leveling legs or rollers to complete installation. |
| Lights do not work. |
LED interior lighting failure. |
The refrigerator compartment lamp is LED interior lighting, and service should be performed by a qualified technician. |
| Refrigerator has an unusual odor. |
The Air Filter may need to be set to the MAX setting or replaced. |
Set the Air Filter to the MAX setting. If the odor does not go away within 24 hours, the filter may need to be replaced. See the Replacing the Air Filter section for replacement instructions. |
| The interior of the refrigerator is covered with dust or soot. |
The refrigerator is located near a fire source, such as a fireplace, chimney, or candle. |
Make sure that the refrigerator is not located near a fire source, such as a fireplace, chimney or candle. |
Noises
| Problem |
Possible Cause |
Solutions |
| Clicking |
The defrost control will click when the automatic defrost cycle begins and ends. The thermostat control (or refrigerator control on some models) will also click when cycling on and off. |
Normal Operation |
| Rattling |
Rattling noises may come from the flow of refrigerant, the water line on the back of the unit, or items stored on top of or around the refrigerator.
|
Normal Operation
|
| Refrigerator is not resting solidly on the floor. |
Floor is weak or uneven or leveling legs need to be adjusted. See the Leveling and Door Alignment section. |
| Refrigerator with linear compressor was jarred while running |
Normal Operation |
| Whooshing |
Evaporator fan motor is circulating air through the refrigerator and freezer compartments.
|
Normal Operation
|
| Air is being forced over the condenser by the condenser fan. |
Normal Operation |
| Gurgling |
Refrigerant flowing through the cooling system. |
Normal Operation |
| Popping |
Contraction and expansion of the inside walls due to changes in temperature. |
Normal Operation |
| Sizzling |
Water dripping on the defrost heater during a defrost cycle. |
Normal Operation |
| Vibrating |
If the side or back of the refrigerator is touching a cabinet or wall, some of the normal vibrations may make an audible sound. |
To eliminate the noise, make sure that the sides and back cannot vibrate against any wall or cabinet. |
| Dripping |
Water running into the drain pan during the defrost cycle. |
Normal Operation |
| Pulsating or highpitched sound |
Your refrigerator is designed to run more efficiently to keep your food items at the desired temperature. The high efficiency compressor may cause your new refrigerator to run longer than your old one, but it is still more energy efficient than previous models. While the refrigerator is running, it is normal to hear a pulsating or high-pitched sound. |
Normal Operation |
Wi-Fi Network
| Problem |
Possible Cause |
Solutions |
| Your home appliance and smartphone is not connecting to the Wi-Fi network. |
The password for the Wi-Fi that you are trying to connect to is incorrect.
|
Find the Wi-Fi network connected to your smartphone and remove it, then register your appliance on LG SmartThinQ application.
|
| Mobile data for your smartphone is turned on. |
Turn off the Mobile data on your smartphone before registering the appliance. |
| The wireless network name (SSID) is set incorrectly |
The wireless network name (SSID) should be a combination of English letters and numbers. (Do not use special characters.) |
| The router frequency is not 2.4 GHz. |
Only a 2.4 GHz router frequency is supported. Set the wireless router to 2.4 GHz and connect the appliance to the wireless router. To check the router frequency, check with your Internet service provider or the router manufacturer. |
| The router is too far from the appliance. |
If the appliance is too far from the router, the signal may be weak and the connection may not be configured correctly. Move the router closer to the appliance or purchase and install a Wi-Fi repeater. |