USER INSTRUCTIONS SINGLE AND DOUBLE OVEN
OVEN USE
Feature Guide
This manual covers several models. Your model may have some or all of the items listed. Refer to this manual or Frequently Asked Questions (FAQs) section of our website at www.whirlpool.com for more detailed instructions. In Canada, reference the Customer Service section at www.whirlpool.ca.
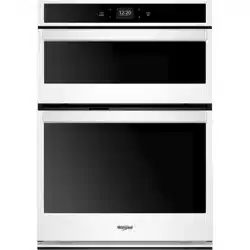
Single Oven

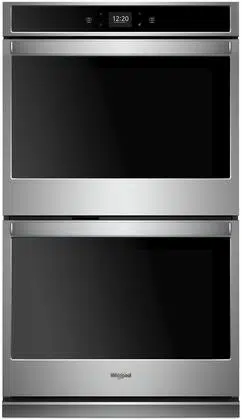
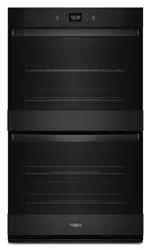
Double Oven

Tools  : Oven Use Functions
- Enables you to personalize the audible tones and oven operation to suit your needs. See the “Tools” and “More Modes” sections.
Home  : Home Screen
- If pressed once, it enables the user to return to the “Cooking Methods” and “Assisted Cooking” screen. If pressed twice, the time of day is displayed.
Favorites 
- The Favorites keypad allows the user to save the cycles that they use on a frequent basis
Oven Light  : Oven Cavity Light
- The oven light is controlled by a keypad on the oven control panel. While the oven door is closed, press the Oven Light keypad to turn the light on and off. When the oven door is opened, the oven light will automatically turn on.
Oven Power (Single ovens only)  : Oven Function Power
- The Oven Power keypad begins oven function and wakes it from sleep mode.
Oven Cancel (Single ovens only)  : Oven Function Cancel
- The Oven Cancel keypad stops any oven function except the Clock, Timer, and Control Lock in the selected oven.
Upper Lower (Double ovens only)  : Oven Function Power/Cancel
- The Upper and Lower keypad turns the selected oven on and wakes it from Sleep mode. If the selected oven is already on, the Upper or Lower keypad stops any oven function except the Clock, Timer, and Control Lock in the selected oven.
Touch Panel
The touch panel houses the control menu and function controls. The touch keypads are very sensitive and require only a light touch to activate. Scroll up, down, left, or right to explore the different options and features.
For more information about the individual controls, see their respective sections in this manual.
Display
The display is for both the menu and oven function controls. The touch panel allows you to scroll through the oven menus. The display is very sensitive and requires only a light touch to activate and control.
When an oven is in use, the display will show the clock, mode, oven temperature, kitchen timer, and oven timer, if set. If the oven timer is not set, you can set it from this screen.
After approximately 2 minutes of inactivity, the display will go into sleep mode and the display will dim.
When the oven is in operation, the display will remain bright. During use, the display will show menus and the appropriate selections for the options being chosen.
Display Navigation
If the oven is off, touch the Oven Power or Upper or Lower keypad for the desired oven to activate the menu. From this screen, all automatic cooking programs can be activated, all manual cooking programs can be set, options can be adjusted, and instructions, preparation, and tips can be accessed.
Setup and Demo Mode
- Select STORE DEMO MODE to enter Demo Mode. OR 1. Select NEXT to enter into product use.
- Follow the prompts on the display screen to select a language, set up Wi-Fi/connect to network, accept the terms of service and set the time. NOTE: The display screen will show the time and date (default screen/standby mode).
- If you selected Store Demo Mode, select TRY THE PRODUCT to explore various features and options of the product. NOTE: Select VIEW PRODUCT VIDEOS to view a video about how to navigate and interact with the product and explore Voice Control.
- Scroll and select EXPLORE.
- Select the Tools keypad. To exit Demo Mode, see the “Tools” section.
Cooking Methods
BAKE - Baking and Roasting
- Press the Oven Power or Upper or Lower keypad for the desired oven.
- Select COOKING METHODS.
- Select BAKE.
- Select the desired temperature by scrolling left to right or manually by selecting the grid in the upper right corner and entering the Bake temperature into the keypad.
- Select START to begin preheating. A tone will sound when preheating is complete. NOTE: To quickly preheat the oven, see the “Rapid Preheat” section for more information.
- Press the Oven Cancel or Upper or Lower keypad for the desired oven when finished.
BROIL - Broiling
- Press the Oven Power or Upper or Lower keypad for the desired oven.
- Select COOKING METHODS.
- Select BROIL.
- Select the desired temperature by scrolling left to right or manually by selecting the grid in the upper right corner and entering the Broil temperature into the keypad.
- Select START.
- Press the Oven Cancel or Upper or Lower keypad for the desired oven when finished
KEEP WARM - Food must be at serving temperature before placing it in the warmed oven.
- Press the Oven Power or Upper or Lower keypad for the desired oven.
- Select COOKING METHODS.
- Select KEEP WARM.
- Select the desired temperature by scrolling left to right or manually by selecting the grid in the upper right corner and entering the desired temperature into the keypad.
- Select START.
- Press the Oven Cancel or Upper or Lower keypad for the desired oven when finished.
RAPID - Rapid Oven Preheating: Provides the fastest preheat time for the Bake function. Rapid Preheat is preset to off.
- Select RAPID to toggle between turning the rapid preheat off and on.
- The current setting will be displayed.
IMPORTANT: This feature should only be used for one-rack baking. Unused racks should be removed prior to Rapid Preheat. A standard rack should be used for Rapid Preheat. If preheating for the BAKE cycle has already started, Rapid Preheat may be started by selecting Rapid.
DELAY START
Delayed Start Delay Start is used to enter the ending cook time for an oven function with a delayed start. Once the cooking method is selected, input the bake temperature. Select DELAY START and follow the prompts on the screen.
NOTE: Delay Start should not be used for foods such as breads and cakes because they may not bake properly.
COOK TIME - Timed Cooking
- Cook Time allows the oven to be set to turn on at a certain time of day, cook for a set length of time, and/or shut off automatically.
Favorites
The Favorites feature stores the oven mode and temperature for your favorite recipe. As you continue to utilize your Favorites tool, your product will refine and tailor suggestions towards your cooking cravings/needs.
NOTE: A select set of Favorites and suggestions may be automatically shown on the Home screen based on your meal times.
To save a recipe, select the Favorites keypad and follow the prompts on the screen to customize your favorites.
Add an image or name to the favorite to customize it to your preferences.
Assisted Cooking
Assisted cooking helps you select the right mode for your everyday cooking needs. Some modes allow you to skip preheat.
Follow the prompts on screen for guidance throughout the cooking process.
Aluminum Foil
IMPORTANT: To avoid permanent damage to the oven bottom finish, do not line the oven bottom with any type of foil or liner.
For best cooking results, do not cover entire oven rack with foil because air must be able to move freely.
To catch spills, place foil on rack below dish. Make sure foil is at least 1/2" (13 mm) larger than the dish and that it is turned up at the edges.
Positioning Racks and Bakeware
Racks
- Position racks before turning on the oven.
- Do not position racks with bakeware on them.
- Make sure racks are level.
- Place food so it will not rise into the broil element. Allow at least 1/2" (13 mm) between pans and the broil element.
To move a rack, pull it out to the stop position, raise the front edge, and then lift it out. Use the following illustration and charts as a guide for positioning racks.
Rack Positions: Upper and Lower Oven
Broiling
For hamburger patties to have a well-seared exterior and a rare interior, use a flat rack in position 6. Side 1 should cook for approximately 3 minutes. Side 2 should cook for approximately 3 to 4 minutes. Expect a moderate degree of smoke when broiling.
Traditional Cooking
Rack Position 1 or 2: Large roasts, turkeys, angel food, bundt cakes, quick breads, pies
Rack Position 2: Yeast breads, casseroles, meat and poultry
Rack Position 2 or 3 when single-rack baking; 2 and 5 when multi-rack baking: Cookies, biscuits, muffins, cakes
Baking Layer Cakes on Two Racks
For best results when baking cakes on two racks, use rack positions 2 and 5 with the Bake function. Place the cakes on the racks as shown. Keep at least 2" (5.0 cm) of space between the front of the racks and the front of the cakes.

Baking Cookies on Two Racks
For best results when baking cookies on two racks, use rack positions 2 and 5.
Bakeware - To cook food evenly, hot air must be able to circulate. Allow 2" (5.0 cm) of space around bakeware and oven walls. Use the following chart as a guide.
1 Center of rack
2 Side by side or slightly staggered.
2 or 3 Refer to the previous illustration.
NOTE: Bakeware materials and color may affect results. Dark, dull, non-stick, or glass pans may require shorter baking times, in contrast insulated or stainless steel pans may require longer baking times. Follow bakeware manufacturer’s recommendations.
Oven Vent(s)
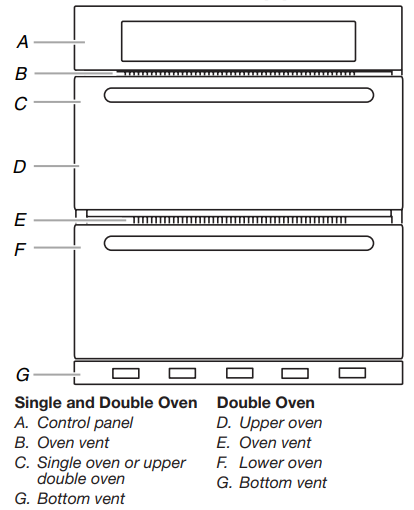
The oven vent(s) should not be blocked or covered since they allow the inlet of fresh air into the cooling system. Also, the bottom vent should not be blocked or covered since it allows the inlet of fresh air into the cooling system and the outlet of hot air from the cooling system. Blocking or covering vents will cause poor air circulation, affecting cooking, cleaning, and cooling results.
Preheating and Oven Temperature
Preheating - When beginning a Bake cycle, the oven will begin preheating after Start is pressed. The oven will take approximately 12 to 17 minutes to reach 350°F (177°C) with all of the oven racks provided with your oven inside the oven cavity. Higher temperatures will take longer to preheat. The preheat cycle rapidly increases the oven temperature. The actual oven temperature will go above your set temperature to offset the heat lost when your oven door is opened to insert food. This ensures that when you place your food in the oven, the oven, will begin at the proper temperature. Insert your food when the preheat tone sounds. Do not open the door during preheat before the tone sounds.
Rapid Preheat - Rapid Preheat can be used to shorten the preheating time. Only one standard flat oven rack should be in the oven during Rapid Preheat. Extra racks should be removed prior to starting. The preheating cycle should be completed before placing food in the oven. When the Rapid Preheat cycle is complete, the oven starts a normal Bake cycle. IMPORTANT: Rapid Preheat should be used only for one-rack baking.
Oven Temperature - While in use, the oven elements will cycle on and off as needed to maintain a consistent temperature, but they may run slightly hot or cool at any point in time due to this cycling. Opening the oven door while in use will release the hot air and cool the oven which could impact the cooking time and performance. It is recommended to use the oven light to monitor cooking progress. Before baking and roasting, position racks according to the “Positioning Racks and Bakeware” section. When roasting, it is not necessary to wait for the oven preheat cycle to end before putting food in unless it is recommended in the recipe.
Baking and Roasting
The oven will take approximately 12 to 17 minutes to reach 350°F (177°C) with all oven racks inside the oven cavity. The preheat cycle rapidly increases the temperature inside the oven cavity. Higher temperatures will take longer to preheat. Factors that impact preheat times include room temperature, oven temperature, and the number of racks. Unused oven racks can be removed prior to preheating your oven to help reduce preheat time. The actual oven temperature will go above the set temperature to offset the heat lost when the oven door is opened to insert food. This ensures that the oven will begin at the proper temperature when you place food in the oven. Insert food when the preheat tone sounds. Do not open the door during preheat until the tone sounds.
During baking or roasting, the bake and broil elements will cycle on and off in intervals to maintain the oven temperature.
Depending on the model, if the oven door is opened during baking or roasting, the heating elements (bake and broil) will turn off approximately 30 seconds after the door is opened. They will turn on again approximately 30 seconds after the door is closed.
Frozen Bake: Frozen Bake Technology automatically adjusts the manufacturer’s bake time by combining preheating and baking to deliver great packaged frozen food results without the wait. There are multiple preprogramed food options. When using Frozen BakeTM Technology, it is important that you follow all manufacturer’s instructions including venting, covering, stirring or placing on a baking sheet to ensure a good result. When cooking frozen meals, only cook items that provide instructions for cooking in a conventional oven. Place your dish in the center of the rack and select one of the rack positions recommended for Frozen Bake in the “Positioning Racks and Bakeware” section and bake only one package or pan at a time. Use the temperature and maximum bake time from the package. A tone will alert you to check the food for doneness before the cook time is complete and again at the end of the cook time. The display will prompt you to add additional cook time if needed.
Broiling
When broiling, no preheating is necessary unless recommended otherwise in the recipe. Position food on grid in a broiler pan, and then place it in the center of the oven rack. Close the oven door to ensure proper broiling temperature. NOTE: Odors and smoke are normal the first few times the oven is used or if the oven is heavily soiled.
Changing the temperature when broiling allows more precise control when cooking. The lower the broil setting, the slower the cooking. Thicker cuts and unevenly shaped pieces of meat, fish and poultry may cook better at lower broil settings. Place the food in the upper or lower oven. Refer to the “Positioning Racks and Bakeware” section for more information.
On lower settings, the broil element will cycle on and off to maintain the proper temperature.
- For best results, use a broiler pan and grid. It is designed to drain juices and help avoid spatter and smoke. If you would like to purchase a broiler pan, one may be ordered. Please refer to the “Accessories” section for more information.
OVEN CARE
Self-Cleaning Cycle
Prepare Oven:
- Remove the broiler pan, grid, cookware and bakeware, and, on some models, the temperature probe from the oven.
- Remove oven racks to keep them shiny and easy to slide. See the “General Cleaning” section for more information.
- Remove any foil from the oven because it may burn or melt, damaging the oven.
- Hand clean inside door edge and the 11 /2" (3.8 cm) area around the inside oven cavity frame, being certain not to move or bend the gasket. This area does not get hot enough during high-temp self-cleaning to remove soil. Do not let water, cleaner, etc., enter slots on door frame. Use a damp cloth to clean this area.
- Wipe out any loose soil to reduce smoke and avoid damage. At high temperatures, foods react with porcelain. Staining, etching, pitting, or faint white spots can result. This is normal and will not affect cooking performance.
How the Cycle Works
IMPORTANT: The heating and cooling of porcelain on steel in the oven may result in discoloring, loss of gloss, hairline cracks, and popping sounds.
The Self-Cleaning cycle uses very high temperatures, burning soil to a powdery ash. Suggested clean times are 3 hours for light soil, 4 hours for medium soil, and 5 hours for heavy soil.
Once the oven has completely cooled, remove ash with a damp cloth. To avoid breaking the glass, do not apply a cool damp cloth to the inner door glass before it has completely cooled. The oven lights will not work during the Self-Cleaning cycle.
NOTE: The oven has a two-speed cooling fan motor. During the Self-Cleaning cycle, the fan(s) will operate at its highest speed to increase airflow to better exhaust the hotter air through the oven vent(s). An increase in noise may be noticeable during and after the Self-Cleaning cycle until the oven cools.
Before Self-Cleaning, make sure the door is closed completely or it will not lock and the cycle will not begin. When the oven is locked, the doors of the oven cannot be opened. To avoid damage to the doors, do not force the doors open when the oven is locked.
- Touch the Tools keypad.
- Select the Self Clean icon. (On double-oven models) Select Upper Cavity or Lower Cavity.
- Select type of Self-Cleaning: Steam: 1 hour: Clean up after everyday light spills using lower heat and 11 /4 cups (295.74 mL) of water. High temp: 4 hours: 3 hour cycle and 1 hour cooling. High temp: 5 hours: 4 hour cycle and 1 hour cooling. High temp: 6 hours: 5 hour cycle and 1 hour cooling.
- Follow the prompts on the oven display to prepare the oven.
- Select START to begin the cleaning process. OR Select DELAY START to set a delayed Self-Cleaning cycle. See the “To Delay Start Self-Cleaning Cycle” Section.
- When the oven is completely cooled, remove ash with a damp cloth.
To Delay Start Self-Cleaning Cycle: Follow steps 1 through 4 above, then:
- Select DELAY START.
- Select the start time of when the Self-Cleaning cycle should begin by scrolling from left to right.
- Select START DELAY. The oven doors will automatically lock after the Delay Start countdown. When the Self-Cleaning cycle is complete and the oven cools, the oven doors will unlock.
- When the oven is completely cooled, remove ash with a damp cloth.
To Stop Self-Cleaning Anytime: Touch the Oven Cancel Keypad for single oven models, or the keypads for double oven models. If the oven temperature is too high, the door will remain locked. It will not unlock until the oven cools.
Steam Clean
IMPORTANT: Because the water in the oven bottom is hot, do not open the oven door during the Steam Clean cycle. Touch the Oven Cancel keypad for single oven models and the Upper/Lower keypads for double oven models at any time to end the cycle. The display will return to the time of day.
Helpful Hints
- Once the Steam Clean cycle is complete and the oven is completely cooled, remove all remaining water in the bottom of the oven with a sponge or cloth.
- Wipe any remaining moisture from the oven door interior, oven cavity interior sides, and cooktop.
- Use a soft brush or nylon scrubber to wipe the oven interior.
- This may help with more stubborn stains.
- It is recommended to use distilled or filtered water, as tap water may leave mineral deposits on the oven bottom. Use a cloth soaked with vinegar or lemon juice to remove any mineral deposits that may be left after the Steam Clean cycle.
- If the oven is heavily soiled, use the Self-Cleaning cycle. The
- Steam Clean cycle may be used first to eliminate most of the debris, resulting in a more effective self-cleaning.
To Steam Clean:
- Open the oven door of the selected oven and remove all racks and accessories from the oven cavity.
- Pour 10 oz (295.7 mL) of distilled or filtered water into the oven bottom. Then close the oven door.
- Touch the Tools keypad. (On double-oven models) Select Upper Cavity or Lower Cavity.
- Select STEAM CLEAN.
- Select START.
- After approximately 1 hour, a tone will sound to signal the end of the cycle. Touch the keypad for single oven models and the keypads for double oven models to clear the display.
- When the oven is completely cooled, remove any excess water with a sponge or cloth and wipe down oven interior. If needed, use a non-scratch copper scrubbing pad to remove stubborn soils.
General Cleaning
EXTERIOR PORCELAIN ENAMEL SURFACES (on some models): Food spills containing acids, such as vinegar and tomato, should be cleaned as soon as the entire oven is cool. These spills may affect the finish
Cleaning Method:
- Glass cleaner, mild liquid cleaner or nonabrasive scrubbing pad: Gently clean around the model/serial/rating plate because scrubbing may remove numbers.
- Affresh® Kitchen and Appliance Cleaner Part Number W10355010 (not included): See the “Accessories” section for more information.
STAINLESS STEEL (on some models): To avoid damage to stainless steel surfaces, do not use soap-filled scouring pads, abrasive cleaners, steel-wool pads, gritty washcloths or abrasive paper towels. Damage may occur to stainless steel surfaces, even with one-time or limited use.
Cleaning Method: Rub in direction of grain to avoid damaging.
- Affresh® Stainless Steel Cleaner Part Number W10355016: See the “Accessories” section for more information.
METALLIC PAINT (on some models): Do not use abrasive cleaners, cleaners with bleach, rust removers, ammonia or sodium hydroxide (lye) because paint surface may stain.
CONTROL PANEL AND OVEN DOOR EXTERIOR: To avoid damage, do not use abrasive cleaners, steel-wool pads, gritty washcloths, or abrasive paper towels.
Cleaning Method:
- Glass cleaner and soft cloth or sponge: Apply glass cleaner to soft cloth or sponge, not directly on panel.
- Affresh® Kitchen and Appliance Cleaner Part Number W10355010 (not included): See the “Accessories” section for more information.
OVEN RACKS
Cleaning Method:
- Steel-wool pad.
- For racks that have discolored and are harder to slide, a light coating of vegetable oil applied to the rack guides will help them slide.
OVEN CAVITY AND OVEN DOOR INTERIOR: Do not use oven cleaners. Food spills should be cleaned after the oven cools. At high temperatures, foods react with porcelain and staining, etching, pitting, or faint white spots can result.
Cleaning Method:
- Self-Cleaning cycle: See the “Self-Cleaning Cycle” section first.
- For optimal door cleaning results, wipe away any deposits with a damp sponge before running cycle.
Oven Lights
The oven light(s) are standard 25-watt appliance bulbs. Before replacing, make sure the oven is cool and the controls are turned off.
To Replace:
- Disconnect power.
- Open oven door.
- Turn the glass bulb cover in the back of the oven counterclockwise to remove.
- Turn bulb counterclockwise to remove from socket.
- Replace bulb, and then bulb cover, by turning clockwise.
- Reconnect power.
TROUBLESHOOTING
Nothing will operate
- Household fuse is blown, or a circuit breaker is tripped: Replace the fuse or reset the circuit breaker. If the problem continues, call an electrician.
Oven will not operate
- Control Lock is on: “Control Lock” will display on the screen. Scroll up to unlock.
- Sabbath Mode is set: See the “Sabbath Mode” section. On double oven models, one oven is self-cleaning: When one oven is self-cleaning, the other oven cannot be set or turned on.
Oven temperature too high or too low
- Oven temperature needs adjustment: See the “Temperature Calibration” section.
Display shows messages
- Power failure: On some models, reset the clock if needed. See “Preferences” in the “Tools” section.
- Error code (display shows letter followed by number): Press the oven Cancel keypad to clear the display. If it reapears, call for service. See the “Warranty” section for contact information.
- Demo Mode (product is in Demo Mode): See “To Exit Demo Mode” in the “Tools” section
Clean cycle did not work on all spills
- Several cooking cycles between Clean cycles or spills on oven walls and doors: Run additional Clean cycles. The affresh® Kitchen and Appliance Cleaner can be used for stubborn soils. See the “Accessories” and “Self-Cleaning Cycle” sections for more information.
Warm air coming from oven vent
- Warm air coming from the oven vent is normal. During a self-clean cycle, the air stream is increased.
- The cooling fan may operate both during an oven’s cycle and after the cycle has ended, causing warm air to exit from the oven vent.
Long preheat times
- Not all cycles require preheating. See cycle instructions for preheat recommendations. Most cycles preheat to 350°F (177°C) in 12 to 17 minutes. Higher temperatures will take more time. Removing unused oven racks prior to preheating can help reduce preheat time.
Self-Cleaning cycle will not operate
- The oven door is open: Close the oven door all the way.
- The function has not been entered: See the “Self-Cleaning Cycle” section.
- A Timed Self-Clean cycle has been set: See the “Self-Cleaning Cycle” section.
- On double oven models, one oven is self-cleaning: When one oven is self-cleaning, the other oven cannot be set to self-clean.
Oven cooking results not what expected
- The set temperature was incorrect: Double-check the recipe in a reliable cookbook.
- Oven temperature needs adjustment: See “Temperature Calibration” in the “More Modes” section.
- Oven was not preheated: See the “Baking and Roasting” section.
- Racks were positioned improperly: See the “Positioning Racks and Bakeware” section.
- Not enough air circulation around bakeware: See the “Positioning Racks and Bakeware” section.
- Batter distributed unevenly in pan: Check that batter is level in the pan.
- Darker browning of food caused by dull or dark bakeware: Lower the oven temperature 25°F (15°C) or move rack to a higher position in the oven.
- Lighter browning of food caused by shiny or light colored bakeware: Move rack to a lower position in the oven.
- Incorrect length of cooking time was used: Adjust cooking time.
- Oven door was not closed: Be sure that the bakeware does not keep the door from closing.
- Oven door was opened during cooking: Oven peeking releases oven heat and can result in longer cooking times.
- Rack is too close to bake burner, making baked items too brown on bottom: Move rack to higher position in the oven.
- Pie crusts browning too quickly: Use aluminum foil to cover the edge of the crust and/or reduce baking temperature.