Model: ROOKMAX | Colour: Dark Green (-50~800℃)
1. Overview

The ERICKHILL Infrared Thermometer is a non-contact digital temperature measurement tool. It uses an infrared sensor to measure surface temperatures from a distance, displaying results on a backlit LCD screen. It is designed for applications such as cooking, automotive repair, electrical maintenance, and HVAC checks.
1.1 Package Contents
- 1 x Infrared Thermometer
- 2 x AAA Batteries
- 1 x User Manual (this document)
1.2 Key Specifications
- Measuring Range: -50℃ to 800℃ (-58℉ to 1472℉)
- Response Time: 0.5 seconds
- Distance-to-Spot Ratio: 12:1
- Emissivity: Adjustable
- Display: LCD with adjustable backlight
- Laser: Class 2 red laser for targeting
- Power Source: 2 x AAA batteries (included)
- Auto Shut-off: After 15 seconds of inactivity
- Certifications: CE, RoHS, UKCA, FCC, FDA
2. Product Features
2.1 Device Overview
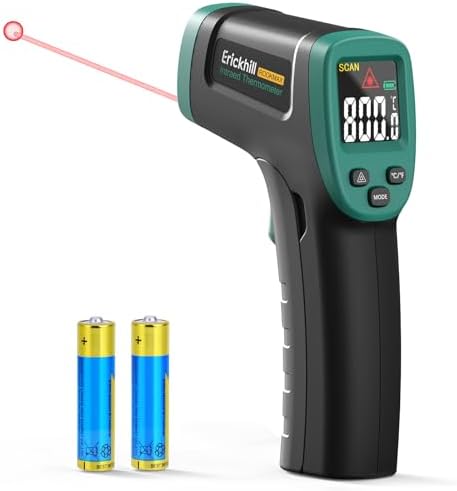
The device has a pistol-grip design with a trigger for operation. The main components are:
- LCD Display: Shows temperature readings, unit symbols (℃/℉), battery status, and mode indicators.
- Trigger: Press and hold to take a measurement. The laser activates when the trigger is pressed.
- Laser Aperture: Emits a red laser dot to indicate the center of the measurement area.
- Infrared Sensor: Located inside the aperture, it detects infrared radiation from the target.
- Mode Buttons: Buttons for adjusting settings (e.g., emissivity, backlight, unit change).
2.2 Laser Guidance and Distance-to-Spot Ratio
The red laser helps aim the thermometer. The 12:1 distance-to-spot ratio means that at a distance of 12 inches (30 cm) from the target, the measured area (spot size) is approximately 1 inch (2.5 cm) in diameter. For accurate readings, ensure the target is larger than the spot size.
2.3 Adjustable Emissivity
Emissivity is a measure of how efficiently a surface emits infrared energy. Different materials have different emissivity values (typically from 0.1 to 1.0). This thermometer allows you to adjust the emissivity setting to improve accuracy for specific materials like shiny metal, glass, or painted surfaces. The default setting is typically 0.95, suitable for most organic materials and painted surfaces.
2.4 Backlit LCD Display
The LCD screen features an adjustable backlight for use in low-light conditions or bright sunlight. The display shows:
- Current temperature reading
- Temperature unit (℃ or ℉)
- Low battery indicator
- Backlight indicator
- Emissivity value (if in setting mode)
- Laser on indicator
2.5 Energy-Saving Design
The device includes an automatic power-off function to conserve battery life. It will turn off after approximately 15 seconds of no trigger activity. A low battery indicator will appear on the display when battery replacement is needed.
3. Use Guide
3.1 Initial Setup
- Open the battery compartment on the back or handle of the thermometer.
- Insert the two included AAA batteries, observing the correct polarity (+/-).
- Close the battery compartment.
- The device may beep or the display may briefly illuminate.
3.2 Taking a Basic Measurement
- Point the thermometer at the object you wish to measure.
- Press and hold the trigger. The laser will activate to aid targeting.
- Keep the thermometer steady and ensure the laser dot is on the desired measurement point.
- The temperature will be displayed on the LCD screen within 0.5 seconds.
- Release the trigger to turn off the laser. The last reading may remain on the display for a few seconds.
Note: Ensure the object fills the measurement spot. The closer you are to the target, the smaller the spot size.
3.3 Switching Between ℃ and ℉
To change the temperature unit:
- Ensure the device is on (display is active).
- Press the unit button (typically labeled "℃/℉").
- The display will toggle between Celsius (℃) and Fahrenheit (℉).
3.4 Adjusting the Backlight
To turn the backlight on or off, or adjust its brightness:
- Press the backlight button (usually symbolized by a lightbulb icon).
- Each press may cycle through brightness levels or simply turn the backlight on/off, depending on the model.
3.5 Adjusting Emissivity
For more accurate readings on non-standard surfaces:
- Enter the emissivity setting mode (refer to the specific button sequence, often involving holding a button for several seconds).
- Use the up/down or adjustment buttons to set the emissivity value. Common values include 0.95 for wood/paint, 0.3-0.5 for polished metal.
- Press the trigger or a confirm button to save the setting and exit the mode.
3.6 Common Applications
- Cooking/BBQ: Check oil temperature (e.g., 180℃ for frying), monitor grill or oven surfaces, measure food temperature.
- Vehicle Repair: Scan engine components, brakes, or exhaust systems for abnormal heating.
- Electrical Maintenance: Identify overheating circuits, fuse boxes, or electrical panels.
- HVAC: Check vent temperatures, radiator surfaces, or air conditioner performance.
- DIY/Hobbies: Monitor temperatures in processes like soap making, chocolate tempering, or dough fermentation.


4. Safety and Maintenance
Warnings
- Class 2 Laser: Do not stare directly into the laser beam or point it at anyone's eyes. The laser is for aiming purposes only.
- Not for Human Body Temperature: This device is designed for measuring surface temperatures of objects. It is not accurate or safe for measuring human or animal body temperature.
- High Temperatures: Be cautious when measuring very hot surfaces to avoid burns. The device measures from a distance to improve safety.
- Batteries: Use only the specified battery type (2x AAA). Remove batteries if the device will not be used for an extended period.
- Environment: Do not use in explosive atmospheres or expose to water. Designed for indoor use.
4.1 Cleaning
Wipe the exterior with a soft, slightly damp cloth. Do not use abrasive cleaners or submerge the device in water. Keep the infrared sensor and laser aperture clean and free of dust or debris.
4.2 Battery Replacement
- Open the battery compartment.
- Remove the old batteries and dispose of them properly.
- Insert two new AAA batteries.
- The low battery indicator on the display will disappear.
4.3 Storage
Store the thermometer in a cool, dry place. Avoid extreme temperatures and high humidity.
5. Troubleshooting
| Problem | Possible Cause | Solution |
|---|---|---|
| No display/device does not turn on. | Batteries are dead, inserted incorrectly, or missing. | Replace or correctly insert 2 AAA batteries. |
| Readings are inaccurate or inconsistent. | Target is too small, too far away, or has low emissivity (e.g., shiny metal). | Move closer to the target. Ensure the target fills the spot size. Adjust the emissivity setting for reflective surfaces. |
| Laser dot is not visible. | Laser may be off in settings, or the device is malfunctioning. | Ensure the laser is enabled (usually activates with the trigger). Check user settings. |
| Display is difficult to read. | Ambient light is too bright or too dim. | Turn on or increase the LCD backlight brightness. |
| Device turns off quickly. | Auto shut-off function is active. | This is normal. Press the trigger again to reactivate. |
6. Specifications and Compliance
- Brand: ERICKHILL
- Model Name/Number: ROOKMAX
- Outer Material: Plastic (ABS)
- Dimensions: Approximately 14.5 cm in length
- Power Consumption: Low (battery powered)
- Compliance: CE, FCC, FDA, RoHS, UKCA standards
- Laser Classification: Class 2
- Warranty: 36 months after-sale service and lifetime technical support.
Note: Specifications are subject to change. Refer to the product label for the most accurate information.