Model: BG01
Overview
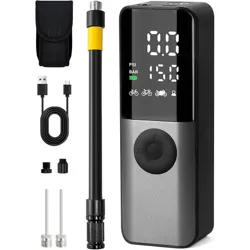
The GPUTEK Electric Bicycle Pump is a portable, rechargeable pump designed for inflating bicycle, motorcycle, and sports ball tires. It features an automatic stop function, a digital pressure gauge, and compatibility with common valve types.

Package Contents
- GPUTEK Electric Bike Pump (Main Unit)
- Air Hose
- USB-C Charging Cable
- Ball Needle
- Dunlop Valve Adapter
- Waterproof Storage Bag

Product Features & Specifications
Physical Specifications
- Colour: Black and Gray
- Material: Acrylonitrile Butadiene Styrene (ABS)
- Dimensions: 5.74 x 2 x 1.6 inches (14.6 x 5.1 x 4.1 cm)
- Weight: 0.76 lbs (0.34 kg)
Performance Specifications
- Maximum Pressure: 150 PSI
- Air Flow Capacity: 20 Liters Per Minute
- Power Source: Rechargeable Polymer Lithium Battery (charged via USB-C)
- Battery Life: A full charge can inflate approximately 6 road bike tires or 9 mountain bike tires.
- Cooling System: Designed for continuous operation without overheating.

Display and Controls
The pump features an LCD screen that shows real-time pressure (PSI). The unit has buttons for power, mode selection, and setting the target pressure.
- LCD Display: Shows current pressure and target pressure.
- Memory Function: Remembers the last used mode and pressure setting.
- Automatic Stop: The pump stops automatically when the preset pressure is reached.
- LED Light: Built-in light for use in low-light conditions.

Valve Compatibility
The pump uses a dual-purpose hose designed for Presta and Schrader valves. A Dunlop adapter is included.
- Schrader Valve (Standard/Auto): Use with the hose head fully tightened.
- Presta Valve (Road Bike): Unscrew the hose head and pull out the built-in brass fitting to adapt.
- Dunlop Valve: Attach the included Dunlop adapter to the tightened hose head.

Note on Hose Design: The hose is a newly designed Presta and Schrader 2-in-1 hose. The hose head has two parts. When fully tightened, it is suitable for Schrader valves. Unscrewing the head and pulling out the built-in brass fittings adapts it for Presta valves. Installing the Dunlop adapter in the tightened state is suitable for Dunlop valves.
Use Guide
Initial Setup and Charging
- Remove all components from the packaging.
- Fully charge the pump before first use using the provided USB-C cable. Connect the cable to the pump's USB-C port and a standard USB power adapter (not included) or computer USB port.
- The pump is ready for use when the battery indicator on the display is full.
Connecting to a Tire Valve
- Identify your tire valve type (Schrader, Presta, or Dunlop).
- For Schrader Valves: Ensure the hose head is fully tightened. Press the connector firmly onto the valve.
- For Presta Valves: First, unscrew the small lock nut on the Presta valve stem (if present). Unscrew the hose head and pull out the built-in brass fitting. Press the connector firmly onto the valve.
- For Dunlop Valves: Screw the included Dunlop adapter onto the tightened hose head. Then attach it to the valve.
- Ensure the connection is secure to prevent air leaks.
Important Operating Instruction for Presta Valves: If you notice inaccurate pressure readings or a sudden pressure spike that causes inflation to stop immediately when using this product with a Presta valve, it is due to the lock nut not being completely loosened. This blocks the valve and prevents the pump from working properly. Reconnect the hose and valve, ensuring that the lock nut is properly loosened to prevent pressure blockages.
Setting Pressure and Inflating
- Press the power button to turn on the pump. The LCD will illuminate.
- Use the mode (M) and pressure adjustment (+/-) buttons to set your desired pressure (2-150 PSI). Refer to your bicycle or equipment manual for recommended pressure.
- Once the target pressure is set, the pump will begin inflating automatically when properly connected to the valve.
- The LCD will display the rising real-time pressure. The pump will stop automatically when the target pressure is reached.
- After inflation is complete, quickly disconnect the hose from the tire valve to prevent air from escaping.
- Press the power button to turn off the pump.
Inflating Sports Balls
- Screw the included ball needle into the end of the air hose (where the valve adapter would normally connect).
- Moisten the needle tip slightly.
- Insert the needle into the ball's inflation hole.
- Set a low target pressure (typically 5-12 PSI for balls like soccer, basketball, or volleyball).
- Follow the same inflation steps as for tires. Do not over-inflate.
Storage and Portability
The pump comes with a waterproof storage bag. Place the pump, hose, and all accessories inside the bag. The bag can be attached to your bike frame for transport.

Compatibility and Limitations
This product is suitable for inflating:
- Road Bicycles
- Mountain Bikes
- City/Gravel Bikes
- E-Bikes
- Motorcycles and Scooters
- Sports Balls (Basketball, Soccer, Volleyball, Rugby)
This product is NOT suitable for inflating:
- Cars, Trucks, or other large vehicle tires
- Air Mattresses
- Other large inflatables requiring high volume/low pressure

Care and Maintenance
- Store the pump in a cool, dry place.
- Keep the USB-C charging port clean and free of debris.
- Periodically check the hose and connectors for wear or damage.
- Do not submerge the pump in water. The storage bag is waterproof, but the pump unit is not.
- Recharge the battery after extended periods of non-use to maintain battery health.
Troubleshooting
| Problem |
Possible Cause |
Solution |
| Pump does not turn on. |
Battery is depleted. |
Charge the pump using the USB-C cable. |
| Pump stops immediately after starting. |
Incorrect valve connection (especially Presta valve lock nut not loosened). Target pressure may be set lower than current tire pressure. |
Reconnect the hose, ensuring a proper seal and that Presta lock nuts are fully loosened. Check and adjust the target pressure setting. |
| Pressure reading is inaccurate or jumps. |
Loose connection or blocked valve (see Presta valve note). |
Disconnect and reconnect the hose securely. Ensure valve is clear. |
| Pump does not reach target pressure. |
Battery is low. Significant air leak. |
Recharge the pump. Check all connections for leaks. |
| Pump becomes warm during use. |
Normal operation during extended inflation. |
The pump has a cooling system and is designed for continuous use. This is normal. |
Warranty and Support
This product is covered by a 2-year warranty from GPUTEK.
Manufacturer Contact Information: 1
For support, contact the seller through your Amazon.ca order details page.