The Geevon Atomic Wall Clock is a digital clock that receives radio time signals for automatic time setting. It displays time, date, day of the week, moon phase, and indoor/outdoor temperatures. It includes an alarm with snooze function and an adjustable backlight.
Key Components:
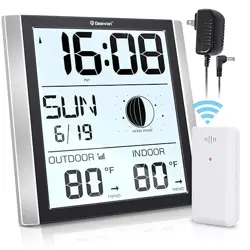
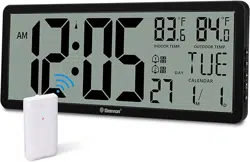
Main clock unit with 8.8-inch LCD display
One wireless outdoor temperature sensor
Power adapter (80 inches in length)
Instruction manual
Note: Requires 3 AAA batteries for the clock (not included) and 2 AAA batteries for the outdoor sensor (not included).
2. Features
2.1 Display Information
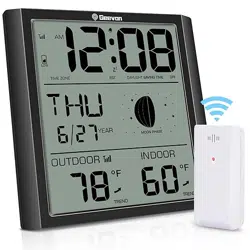
The main screen simultaneously shows:
Time (12-hour or 24-hour format)
Date (Month/Day)
Day of the week
Moon phase
Indoor temperature
Outdoor temperature (from wireless sensor)
Daily minimum and maximum temperature records with trend indicators
2.2 Atomic Timekeeping
Receives daily WWVB radio signal updates from the NIST atomic clock in Colorado.
Automatically adjusts for Daylight Saving Time (DST) when enabled.
Selects from 7 North American time zones: EST, AST, HAST, AKST, PST, MST, CST.
Accuracy maintained within one second.
2.3 Temperature Monitoring
Indoor Range: 0°C to 50°C (32°F to 122°F)
Outdoor Range: -30°C to 70°C (-22°F to 158°F)
Accuracy: ±1°C within 0°C to +50°C range.
Wireless sensor has a range of up to 200 feet (60 meters) from the clock.
Temperature units (°C/°F) are selectable.
2.4 Alarm and Snooze
One alarm setting with a gradually ascending "beeping" sound.
Snooze function provides an extra 5 minutes of sleep when activated.
Alarm duration is 2 minutes. If no action is taken, it will not continue.
2.5 Backlight
Adjustable backlight for the LCD display.
For permanent backlight, the power adapter must be connected.
When operating on batteries only, the backlight can be activated temporarily.
Insert 3 AAA batteries into the battery compartment on the back of the clock.
Insert 2 AAA batteries into the outdoor temperature sensor.
The clock display will turn on. It may show a default time and date.
For permanent backlight, connect the included power adapter to the clock and a wall outlet.
3.2 Setting the Time Zone and DST
Critical Step: The clock must be manually set to the approximate correct time (within ±2 minutes) before it will synchronize with the atomic signal.
Locate the control buttons on the back of the clock.
Use the buttons to manually set the time, date, and time zone. Refer to the included quick-start guide for specific button functions.
Select your correct time zone from the 7 available options.
Turn the Daylight Saving Time (DST) function ON or OFF as needed for your location.
Place the clock in its desired location. The atomic sync process typically occurs automatically at night.
Important: All buttons are temporarily unavailable (for 1-2 minutes) when the clock is receiving the atomic signal. The backlight will also temporarily turn off during reception. Operation will return to normal once the signal is received.
3.3 Outdoor Sensor Placement
Place the outdoor sensor within 200 feet (60 meters) of the main clock unit.
For best wireless range, avoid placing it behind large metal objects, thick walls, or metal surfaces.
Protect the sensor from direct sunlight, rain, and snow to ensure accurate temperature readings. You may need to improvise a protective cover.
The sensor can be mounted using its integrated stand or hanging hole (mounting hardware not included).
4. Use Guide
4.1 Reading the Display
Familiarize yourself with the on-screen information:
Time & Format: The central large digits show the time. Verify if it's in 12H or 24H format.
Date and Day: Typically shown near the top or bottom of the display.
Moon Phase: A graphical icon shows the current moon phase.
Temperatures: "IN" indicates indoor temperature. "OUT" indicates temperature from the wireless sensor.
Min/Max & Trend: The display records the daily high and low temperatures and shows an arrow indicating if the temperature is rising, falling, or steady.
4.2 Using the Alarm
Use the buttons on the back of the clock to set the desired alarm time.
Ensure the alarm is turned ON.
When the alarm sounds, press the "SNOOZE" button (on the back) for 5 additional minutes of sleep.
To stop the alarm, press any other button.
4.3 Activating the Backlight
With Power Adapter: The backlight can be set to remain on permanently.
On Battery Power: Gently tap the top of the clock casing to activate the backlight for a few seconds.
4.4 Switching Between °C and °F
Use the temperature unit button on the back of the clock to toggle between Celsius (°C) and Fahrenheit (°F). The change applies to both indoor and outdoor readings.
5. Troubleshooting
Clock does not sync with atomic time:
Ensure the correct time zone is selected.
Verify the DST setting is correct for your location.
Manually set the time to within 2 minutes of the correct time. The sync often occurs at night.
Place the clock near a window, away from large metal structures or concrete walls, to improve signal reception.
No outdoor temperature reading or "---" displayed:
Check batteries in the outdoor sensor.
Reduce the distance between the sensor and the clock.
Remove obstacles causing wireless interference.
Outdoor sensor drains batteries quickly: This is a known issue reported by some users. Consider using high-quality, long-life batteries.
Backlight flickers or turns off: Ensure the power adapter is fully plugged in. If on battery power, the backlight is only temporary.
Buttons on the back are unresponsive: The clock may be in the process of receiving the atomic signal. Wait 1-2 minutes and try again.
Moon phase appears incorrect: Some users report the moon phase graphic may be reversed (e.g., black circle for full moon). This is a known display characteristic.
6. Specifications
Model: Geevon 228614C / GN-228614-T2
Display: 8.8-inch LCD TN
Power Supply (Clock): 3 x AAA batteries (not included) or 5V DC power adapter (included)
Power Supply (Sensor): 2 x AAA batteries (not included)
Wireless Frequency: 433 MHz or 868 MHz
Atomic Signal: WWVB (North America only)
Item Weight: 0.71 kg (1.57 lbs)
Warranty: 12 months
7. Warranty and Support
This product is backed by a 12-month limited warranty from Geevon.
For product support or warranty claims, contact the seller through your Amazon order page or visit the Geevon Store on Amazon.