Model: AOJ-70C
1. Overview
The Berrcom Pulse Oximeter is a portable, fingertip device designed to non-invasively measure your blood oxygen saturation (SpO2) and pulse rate (PR). It is intended for spot-checking by adults and children in home environments.
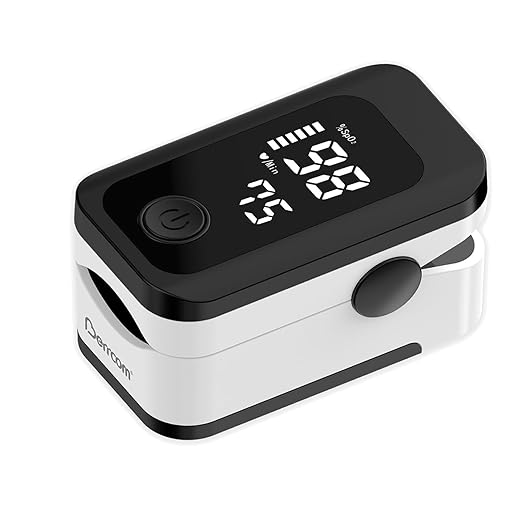
The device features a large, dual-direction LED display, one-button operation, and an automatic power-off function.
2. Features and Specifications
2.1 Key Features
- Fast & Accurate Measurement: Delivers SpO2 and pulse readings in approximately 8 seconds with a measurement accuracy of ±2%.
- Large LED Display: Easy-to-read screen that can be viewed from two directions. The display orientation can be changed with a button press.
- One-Button Operation: Simple to use with a single control button.
- Alarm Function: Provides an audible alarm and flashing display if SpO2 falls below 94% or if pulse rate is outside the 50-130 bpm range.
- Automatic Power Off: Powers down automatically 30 seconds after the finger is removed to conserve battery life.
- Portable Design: Compact, lightweight, and includes a lanyard for easy carrying.
- Silicone Shading: Helps prevent external light from interfering with measurements.

2.2 Technical Specifications
| Parameter | Specification |
|---|---|
| Measurement Accuracy | ±2% |
| Measuring Range (SpO2) | 0% to 100% |
| Measuring Range (Pulse Rate) | 20 to 250 bpm |
| Display Type | LED |
| Power Source | 2 x AAA alkaline batteries (included) |
| Battery Life | Approximately 30 hours |
| Auto Power-Off | ~30 seconds after finger removal |
| Colour Options | Black, White |
3. Understanding the Display
The LED screen shows the following information:
- SpO2 (%): Your blood oxygen saturation level.
- PR (bpm): Your pulse rate (heartbeats per minute).
- Pulse Bar Graph: A visual indicator that fluctuates with your heartbeat.

Interpreting Readings
Blood Oxygen Saturation (SpO2): A normal reading for a healthy individual is typically 95% or higher. Readings consistently below 94% may require medical attention.
Pulse Rate (PR): A normal resting heart rate for adults is between 60 and 100 beats per minute (bpm).
4. Use Guide
4.1 Inserting Batteries
- Open the battery compartment cover on the side of the device.
- Insert two AAA batteries, observing the correct polarity (+ and -) as indicated inside the compartment.
- Close the cover securely.
4.2 Taking a Measurement
- Ensure your finger is clean, dry, and warm. Remove any nail polish.
- Open the clip by pressing on the hinged end of the oximeter.
- Insert your finger fully into the rubberized opening until the fingertip touches the inner stop. The nail should face upwards.
- Release the clip. Ensure your finger is positioned correctly and you can see a red light inside the device.
- Press the single button on the front of the device. Keep your hand still and do not talk during the measurement.
- Within 8 seconds, your SpO2 and PR readings will stabilize and be displayed on the screen.
- After reading the results, remove your finger. The device will automatically power off after approximately 30 seconds.

4.3 Changing Display Orientation
Each press of the button (when no finger is inside) will rotate the display 180 degrees. This allows the screen to be read from either direction.
5. Alarms and Indicators
The device is equipped with a visual and audible alarm system:
- Low SpO2 Alarm: If the measured SpO2 is below 94%, the SpO2 value will flash on the display and an audible alarm will sound.
- Abnormal Pulse Rate Alarm: If the measured pulse rate is below 50 bpm or above 130 bpm, the pulse rate value will flash on the display and an audible alarm will sound.
These alarms are intended to alert you to potentially significant readings. Consult a healthcare professional if you receive consistent alarm readings or have concerns about your health.
6. Care and Maintenance
- Clean the device surface with a soft, dry cloth. Do not immerse in water or use liquid cleaners.
- Store in a dry place, protected from extreme temperatures, direct sunlight, and dust.
- Remove the batteries if the device will not be used for an extended period.
- Avoid dropping or subjecting the device to strong impacts.
7. Troubleshooting
| Problem | Possible Cause & Solution |
|---|---|
| No display when button is pressed. | Check battery installation (correct polarity). Replace with new batteries if necessary. |
| Unstable or no reading. | Ensure finger is inserted correctly and fully. Keep hand still during measurement. Cold fingers or poor circulation can affect readings. |
| Red light inside is not visible. | Check battery power. Ensure finger is positioned correctly to trigger the sensor. |
| Readings seem inaccurate. | Ensure the device is not exposed to strong ambient light. Remove nail polish. Allow a few minutes of rest before taking a measurement after physical activity. |
8. Important Notes
- This device is for spot-checking and sports/aviation use. It is not intended for continuous monitoring or as a medical diagnostic device without consultation with a healthcare professional.
- Do not rely solely on this device for medical decisions. Always consult a doctor for diagnosis and treatment.
- The device is suitable for children and adults. Ensure the finger clip fits the user's finger properly for an accurate reading.
- Keep the device away from strong electromagnetic interference (e.g., mobile phones, microwave ovens).