1. Overview
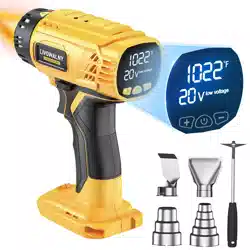
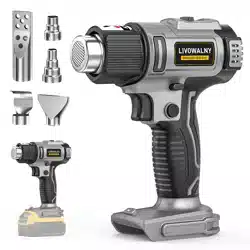
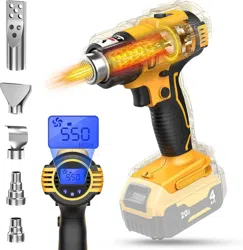
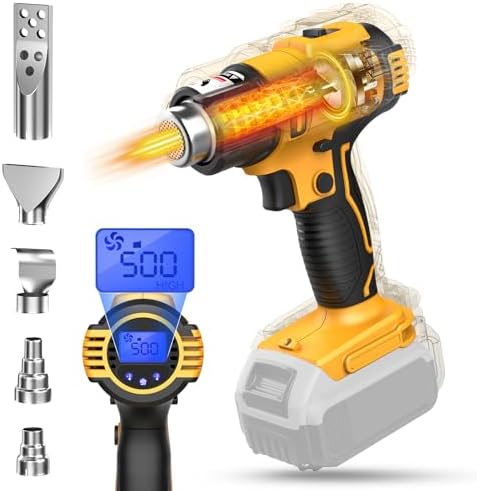
This manual provides instructions for the LIVOWALNY Cordless Heat Gun. This is a 350W, battery-powered hot air tool designed for applications such as shrink tubing, PVC wrapping, crafting, and epoxy resin work. The tool is compatible with Dewalt 20V lithium-ion batteries (battery not included) and features an LCD digital display for temperature and airflow monitoring.

The tool is cordless, providing portability for use in areas without direct power access. It includes five interchangeable nozzles for different tasks.
2. Features and Specifications
2.1 Key Features
- LCD Digital Display: A blue-backlit LCD shows real-time temperature (°F/°C) and airflow speed.
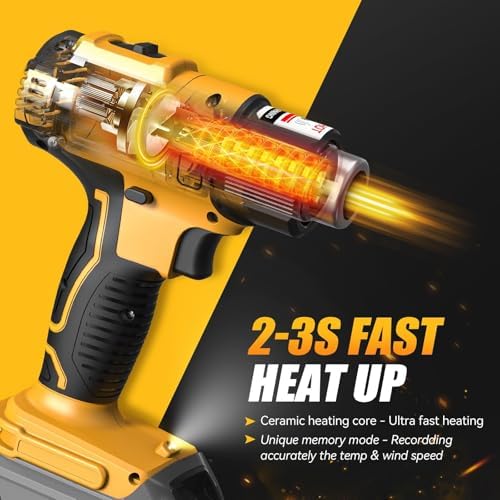
- Fast Heating: Heats to maximum temperature in approximately 2-3 seconds.
- Variable Temperature Control: Two operating modes:
- Mode I: 50-300°C (122-572°F)
- Mode II: 300-550°C (572-1022°F)
- Adjustable Airflow: Six speed settings across two ranges:
- Range I: 100-180 L/min
- Range II: 220-280 L/min (Maximum airflow: 9.9 CFM)
- Overheat Protection: Automatically shuts off if the internal temperature exceeds safe limits.
- Power-Off Memory: Retains the last used temperature and airflow settings when powered off.
- Locking Temperature Mode: A button allows the temperature setting to be locked for hands-free operation.
- Ceramic Heating Core: Provides efficient and consistent heat generation.
- Safety Switch: A trigger lock prevents accidental activation.
2.2 Technical Specifications
- Power: 350 Watts
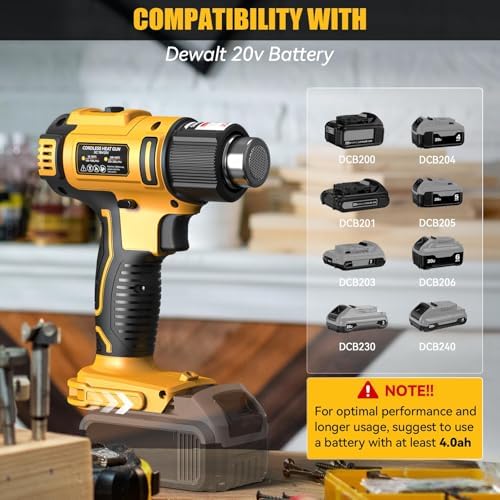
- Power Source: Compatible with Dewalt 20V Lithium-Ion Batteries (Model examples: DCB206, DCB205, DCB204, DCB181, DCB182, DCB200, DCB203). Battery is NOT included.
- Voltage: 20V
- Temperature Range: 50-550°C (122-1022°F)
- Airflow Rate: Up to 9.9 Cubic Feet Per Minute (CFM)
- Dimensions: 6.3 x 2.76 x 7.87 inches
- Weight: 1.87 pounds (without battery)
- Included Components: Heat gun body and five nozzles (3-step/4-step, reflector, flat, charcoal).
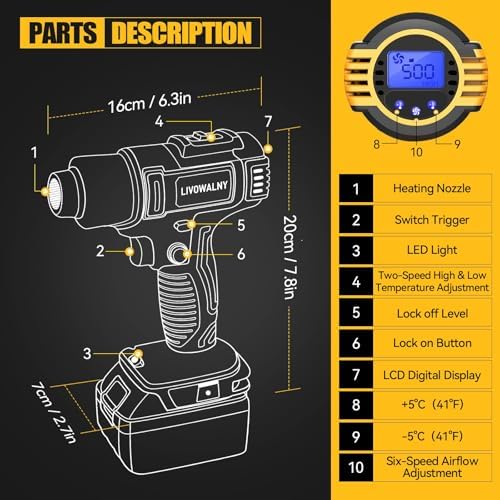
3. Component Identification
- Air Outlet / Nozzle Mount: Front opening where nozzles attach. Hot air exits here.
- LCD Display: Shows set temperature, actual temperature, and airflow level.
- Control Buttons: Buttons for increasing/decreasing temperature and airflow speed. A separate button for locking the temperature setting.
- Safety Lock Switch: Slide switch located near the trigger to prevent unintentional operation.
- Trigger: Main power trigger. Must be pressed simultaneously with the safety switch to activate.
- Battery Port: Slot at the rear of the handle for inserting a compatible Dewalt 20V battery.
- Ventilation Intakes: Vents on the sides of the body for air intake. Keep these clear during operation.
3.1 Nozzle Guide
- 3-Step / 4-Step Nozzle: For focused heat on small areas. Used for detailed soldering, shrink wrapping, and vinyl application.
- Reflector Nozzle: Spreads heat in a wider pattern. Used for shrinking tubing and bending pipes.
- Flat Nozzle: Concentrates heat in a narrow, flat stream. Used for paint removal.
- Charcoal Nozzle: Used to ignite BBQ coals or other combustible materials.
4. Use Guide

4.1 Initial Setup
- Ensure the heat gun is switched off and the safety lock is engaged.
- Insert a fully charged, compatible Dewalt 20V battery into the battery port at the rear of the handle until it clicks into place.
Note: For optimal performance and longer runtime, use a battery with a capacity of at least 4.0Ah.
- Select the appropriate nozzle for your task and push it firmly onto the air outlet until it is secure.
4.2 Basic Operation
- Power On: Slide the safety lock switch to the unlocked position.
- Set Temperature & Airflow: Use the '+' and '-' buttons to select the desired temperature mode (I or II) and specific temperature. Use the separate airflow button to adjust the fan speed. The LCD will display your settings.
- Activate Heat: Squeeze and hold the trigger. The display will show the rising temperature. The tool will reach its set temperature within a few seconds.
- Locking Mode (Optional): For prolonged use, you can press the temperature lock button after setting your parameters. This allows you to release the trigger while the gun continues to output heat. Press the trigger again to deactivate the lock.
- Power Off: Release the trigger. For safety, slide the safety lock switch back to the locked position when finished.
4.3 Common Applications
- Heat Shrink Tubing: Use the reflector or step nozzle. Apply heat evenly around the tubing until it shrinks tightly.
- PVC/ Vinyl Wrapping: Use the step nozzle to gently heat the material, making it pliable for stretching and adhesion.
- Crafting & Epoxy Resin: Use low heat (Mode I) and a step nozzle to pop surface bubbles in resin or to emboss crafts.
- Paint Removal: Use the flat nozzle and high heat (Mode II) to soften paint for scraping.
- Thawing Pipes: Use a medium temperature and keep the gun moving to avoid concentrating heat on one spot.
5. Safety and Maintenance
5.1 Safety Instructions
- Always wear heat-resistant gloves and safety glasses during operation.
- Never point the air outlet at people, animals, or flammable materials.
- Keep the air intake vents clear of obstructions.
- Allow the tool to cool completely before changing nozzles, touching the front section, or storing it.
- Do not leave the tool unattended while it is powered on or hot.
- Use the tool in a well-ventilated area.
- This tool is not a hair dryer or a space heater. Do not use it for these purposes.
- Keep the tool out of reach of children.
- Battery Safety: Remove the battery from the tool when not in use to prevent accidental discharge. Use only compatible Dewalt 20V batteries and chargers.
5.2 Maintenance
- Allow the tool to cool after use.
- Wipe the exterior with a dry, soft cloth. Do not use liquids or solvents.
- Ensure the air intake vents are free of dust and debris.
- Check nozzles for damage or clogging before use.
- Store the tool and nozzles in a dry, cool place.
5.3 Troubleshooting
- Tool does not turn on: Check that the battery is charged and properly inserted. Ensure the safety lock is disengaged.
- Heat output is low or inconsistent: Verify the temperature and airflow settings. Check that the air intakes are not blocked.
- Tool shuts off unexpectedly: The overheat protection may have activated. Allow the tool to cool for 10-15 minutes. Check if the battery is depleted.
- LCD display is blank: Check battery connection and charge level.
6. Compliance and Warranty
Warranty: This product is covered by a 1-year limited warranty from the date of purchase. The warranty covers defects in materials and workmanship.
Manufacturer: LIVOWALNY
Part Number: SKU070120004
ASIN: B0BVBB4MZX
For warranty service or support, contact the seller through your Amazon purchase history or visit the LIVOWALNY store page on Amazon.