This manual provides instructions for the safe and effective use of the LIVOWALNY Cordless Heat Gun, compatible with DeWalt 20V MAX batteries. This is a bare tool; batteries and charger are not included.
1. Overview

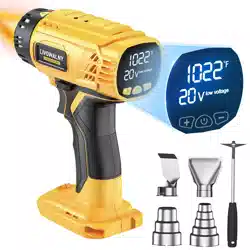
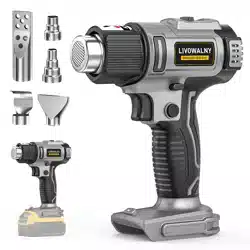
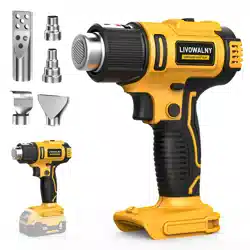
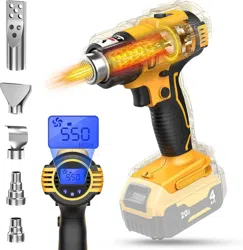
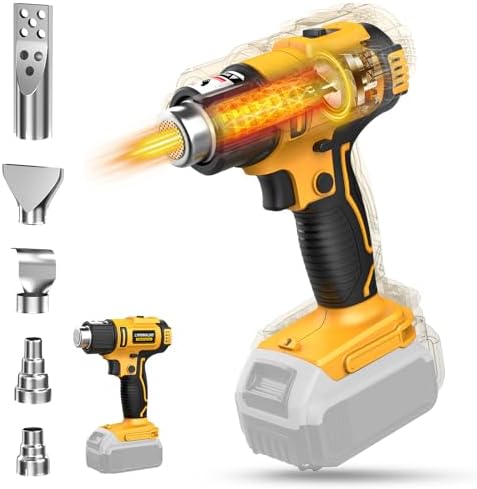
The LIVOWALNY Cordless Heat Gun is a 350W portable hot air tool designed for use with DeWalt 20V MAX lithium-ion battery platforms. It features two temperature settings, a maximum airflow of 7 CFM, and includes five interchangeable nozzles for various applications.
Key Characteristics:
- Power Source: Compatible with DeWalt 20V MAX batteries (Tool only, battery not included).
- Power Rating: 350 Watts.
- Temperature Range: Two settings: 300°C / 572°F (Low) and 550°C / 1022°F (High).
- Design: Cordless, ergonomic pistol-grip design.
- Included Accessories: Five nozzles (3-step/4-step, reflector, flat, charcoal).
2. Safety Information
WARNING: This tool produces extreme heat and can cause severe burns, fire, or electric shock if misused. Always follow these safety instructions.
2.1 General Safety
- Read and understand all instructions before use.
- Do not operate in explosive atmospheres or near flammable materials, vapors, or dust.
- Keep the tool away from children and pets.
- Always wear appropriate personal protective equipment (PPE), including safety glasses and heat-resistant gloves.
- Ensure the work area is clean, dry, and well-ventilated.
- Never leave the tool unattended while it is powered on or cooling down.
2.2 Tool-Specific Warnings
- Burns: The nozzle, air output, and nearby surfaces become extremely hot during and after use. Do not touch the nozzle or direct hot air towards skin, body parts, or flammable objects.
- Battery Safety: Use only compatible DeWalt 20V MAX lithium-ion batteries. Do not use damaged batteries. Remove the battery when the tool is not in use to prevent accidental discharge.
- Overheat Protection: The tool has an automatic shut-off feature if it exceeds safe operating temperatures. If this occurs, allow the tool to cool completely before attempting to use it again.
- Battery Recommendation: For optimal performance and runtime, use a battery with a capacity of at least 4.0 Ah.
3. Components and Controls
3.1 Main Tool
- (A) Air Outlet / Nozzle Mount: The front opening where nozzles attach and hot air is expelled.
- (B) Safety Switch: A button located on the handle that must be pressed and held for the tool to operate. Prevents accidental activation.
- (C) Trigger Switch: The main power trigger. The safety switch (B) and trigger (C) must be pressed simultaneously to activate the heater and fan.
- (D) Temperature Mode Button: A button to select between the two temperature settings (Low/High). It also functions as a lock button for continuous operation.
- (E) Battery Port: Located at the rear of the handle, accepts compatible DeWalt 20V MAX batteries.
3.2 Included Nozzles
Five nozzles are included for different tasks. Allow the tool to cool completely before changing nozzles.
- 3-Step / 4-Step Nozzle: For concentrated heat on small areas. Used for detailed soldering, shrink wrapping, and vinyl application.
- Reflector Nozzle: Focuses heat in a ring pattern. Ideal for evenly shrinking tubing or bending plastic pipes.
- Flat Nozzle: Spreads heat over a wider area. Suitable for paint stripping or thawing surfaces.
- Charcoal Nozzle: Used to safely ignite charcoal for barbecues.
4. Operation Guide
4.1 Initial Setup
- Ensure the tool is off and the battery is removed.
- Select the appropriate nozzle for your task and push it firmly onto the air outlet until it is secure.
- Insert a fully charged, compatible DeWalt 20V MAX battery into the battery port (E).
4.2 Basic Use
- Point the nozzle in a safe direction, away from yourself and any obstructions.
- Press and hold the Safety Switch (B) with your thumb or finger.
- While holding the safety switch, squeeze the Trigger (C). The fan will start, and the heating element will begin to warm up.
- To select temperature, press the Temperature Mode Button (D).
- One press selects Low temperature (300°C / 572°F).
- Another press selects High temperature (550°C / 1022°F).
- Apply heat to your workpiece, keeping the nozzle moving to avoid overheating one spot.
- Release the trigger to stop heating. The fan may continue briefly to cool the element.
4.3 Continuous Operation (Lock Mode)
For extended tasks, you can engage the lock function for hands-free operation.
- Start the tool by pressing the safety switch and trigger as described above.
- While the tool is running, press and hold the Temperature Mode Button (D) for 2-3 seconds. The tool will now run without needing to hold the trigger.
- To disengage the lock, squeeze and release the trigger once.
- Warning: Never leave the tool running in lock mode unattended.
4.4 After Use
- Turn off the tool and disengage the lock mode if active.
- Place the tool on a heat-resistant surface and allow it to cool completely.
- Once cool, remove the battery from the tool for storage.
- Store the tool and nozzles in a dry, safe place out of reach of children.
5. Common Applications
This heat gun is suitable for a variety of DIY and professional tasks. Always test on a small, inconspicuous area first.
- Heat Shrinking Tubing: Use the reflector or step nozzle to evenly apply heat to shrink tubing for electrical insulation.
- Vinyl Wrapping & Bending Plastic: Use the step or flat nozzle to soften vinyl or plastic for forming and shaping.
- Paint Stripping: Use the flat nozzle to soften paint for removal with a scraper. Work in a well-ventilated area.
- Thawing: Use the flat nozzle to thaw frozen pipes or locks from a safe distance.
- Soldering (Low Temp): Use the step nozzle for heat-shrink solder connectors or low-temperature soldering applications.
- Crafting: Use for embossing, drying glue, or shaping certain craft materials.
- Igniting Charcoal: Use the dedicated charcoal nozzle to light barbecue coals.
6. Care and Maintenance
- Cleaning: Ensure the tool is off, disconnected from battery, and completely cool. Wipe the exterior with a dry, soft cloth. Do not use liquids or solvents. Keep air intake vents clear of debris.
- Nozzle Care: Nozzles may become discolored with use; this is normal. Ensure they are free of melted material or blockages.
- Storage: Store in a clean, dry location. Remove the battery before long-term storage.
- No User-Serviceable Parts: Do not attempt to disassemble the tool. Internal repairs must be performed by qualified personnel.
7. Troubleshooting
| Problem |
Possible Cause |
Solution |
| Tool does not turn on. |
Battery not installed, depleted, or incompatible. Safety switch not engaged. |
Install a charged, compatible DeWalt 20V battery. Ensure you are pressing and holding the safety switch while pulling the trigger. |
| Tool runs but no heat is produced. |
Heating element may have overheated and triggered protection. |
Allow the tool to cool down completely. Ensure air vents are not blocked. Try again with a fully charged battery. |
| Tool shuts off unexpectedly during use. |
Overheat protection activated. Battery may be depleted. |
Let the tool cool. Check battery charge level and replace/ recharge if necessary. |
| Reduced airflow or heat. |
Air intake or nozzle may be obstructed. |
Turn off, cool, and check for blockages in the nozzle and rear air vents. Clean if necessary. |
| Battery drains very quickly. |
Using a low-capacity battery. Operating on High temperature setting. |
Use a battery with a higher capacity (4.0 Ah or greater). Use the Low temperature setting when possible to conserve power. |
8. Technical Specifications
- Manufacturer: LIVOWALNY
- Model/Part Number: SKU070120001 (HeatPro Core)
- Power Input: 350 Watts
- Voltage: 20V DC (Compatible with DeWalt 20V MAX Platform)
- Temperature Settings: Low: 300°C / 572°F, High: 550°C / 1022°F
- Airflow: Maximum 7 CFM
- Battery: Not Included. Compatible with DeWalt 20V Lithium-Ion batteries (e.g., DCB200, DCB204, DCB206 series).
- Weight (Tool Only): Approximately 1.78 lbs (0.81 kg)
- Dimensions (L x W x H): Approximately 7.87 x 6.3 x 2.76 inches
9. Compliance and Support
This product is designed to meet general safety standards for power tools. For customer service or to report an issue with the product or seller, use the contact methods provided on the original point of purchase (e.g., the Amazon product page).
Important Reminder: This manual is based on information available from the product listing. Specifications and included accessories are subject to change by the manufacturer. Always refer to the latest documentation provided with your specific product.