Overview
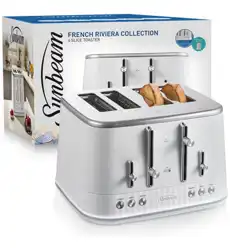
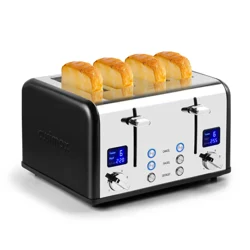
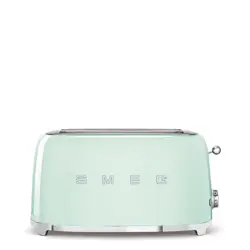
This manual provides instructions for the safe and effective use of the KitchMix 4-Slice Stainless Steel Toaster. This appliance features dual independent controls, an LCD timer, extra-wide slots, and multiple specialized functions for toasting a variety of bread products.

Features and Specifications
Physical Specifications
- Brand: KITCHMIX
- Model Number: 8200E
- Color: Stainless Steel (also available in Black, Cream, Gray, Red, White)
- Material: Stainless Steel
- Dimensions (D x W x H): 10.43" x 11.5" x 7.09"
- Weight: 2.53 kg (5.58 lbs)
Technical Specifications
- Slot Count: 4
- Slot Width: 1.5 inches (Extra Wide)
- Wattage: 1650W
- Voltage: 120V (For use in the United States)
- Display Type: LCD Timer Screen (Dual Screens)
- Browning Settings: 6 Shade Levels
Key Features
- Dual Independent Controls: Two separate control panels allow you to toast different items with different settings simultaneously.
- LCD Timer Screens: One screen per control panel displays the countdown during the toasting cycle.
- Specialty Functions: Bagel, Defrost, Reheat, and Cancel buttons.
- Manual High-Lift Lever: Allows you to raise toast higher than its natural pop-up position for easy and safe removal.
- Removable Crumb Trays: Two trays located at the back for easy cleanup.
- Cord Storage: A wrap under the toaster base helps manage the power cord.
Safety Information
WARNING: To reduce the risk of fire, electric shock, or injury:
- This appliance is for household use only. Do not use outdoors.
- Do not immerse the toaster, cord, or plug in water or any other liquid.
- Unplug the toaster from the outlet when not in use and before cleaning.
- Do not operate the toaster with a damaged cord or plug, or if it has malfunctioned.
- The outside surfaces will become hot during use. Do not touch hot surfaces. Use the high-lift lever or handles.
- Do not toast oily, buttery, or watery foods as this may cause a fire hazard.
- Do not insert any objects, including utensils or fingers, into the toaster slots.
- Keep the toaster away from flammable materials, including curtains, wall coverings, and paper.
- This toaster is not intended for use by persons (including children) with reduced physical, sensory, or mental capabilities.
- Always empty the crumb tray regularly to avoid a buildup of crumbs, which can catch fire.
Parts and Controls
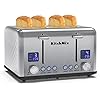
- Toasting Slots (4): 1.5-inch wide slots with self-centering guides.
- Control Panels (2): Located on the front, one for the left two slots and one for the right two slots. Each contains:
- LCD Timer Screen: Displays the countdown for the selected toasting cycle.
- Browning Control Dial/Knob: Selects the desired shade from 1 (light) to 6 (dark).
- Function Buttons: Bagel, Defrost, Reheat, and Cancel.
- High-Lift Lever: The large lever used to lower bread into the toaster and to manually raise it for removal.
- Removable Crumb Trays (2): Slide-out trays located at the back of the toaster base.
- Cord Storage Wrap: Located underneath the toaster base.
- Power Cord: With a polarized plug.
Use Guide
Before First Use
- Remove all packaging materials.
- Wipe the exterior with a damp cloth and dry thoroughly. Do not immerse the toaster in water.
- Operate the toaster without any bread on the highest browning setting to burn off any manufacturing residues. Ensure the room is well-ventilated.
Basic Toasting
- Plug the toaster into a standard 120V electrical outlet.
- Place slices of bread, bagel halves, English muffins, or waffles into the slots. Do not force food.
- Select the desired browning level (1-6) using the dial on the relevant control panel.
- Press the high-lift lever down until it clicks and locks into position. The LCD screen will illuminate and begin the countdown.
- When toasting is complete, the lever will pop up automatically. For safer removal of smaller items, you can manually raise the lever higher than its natural stop.
- If you wish to stop toasting early, press the Cancel button. The lever will pop up immediately.
Note: The two control panels operate independently. You can toast two different items with different settings at the same time.
Specialty Functions
- Bagel Function: Press the Bagel button before lowering the lever. This function toasts the cut side of bagels and English muffins while gently warming the outside.
- Defrost Function: Press the Defrost button before lowering the lever for frozen bread, waffles, or pastries. This adds extra time to the cycle to ensure consistent toasting from frozen.
- Reheat Function: Press the Reheat button to warm previously toasted bread without further browning.
- Cancel Function: Press at any time during a toasting cycle to stop immediately.
When a specialty function is selected, its corresponding indicator light may illuminate (if present).
Compatible Foods
- Sliced bread (white, wheat, rye, etc.)
- Bagel halves
- English muffin halves
- Frozen waffles and pancakes
- Thicker artisan bread slices (fits in 1.5" slots)
DO NOT TOAST: Oily foods (buttered bread), watery foods, pastries with loose fillings, or any food wrapped in packaging.
Cleaning and Maintenance
- Always unplug the toaster and allow it to cool completely before cleaning.
- Exterior: Wipe with a soft, damp cloth. Do not use abrasive cleaners or scouring pads.
- Crumb Trays:
- Pull the crumb trays straight out from the back of the toaster.
- Empty crumbs into the trash.
- Wash trays in warm, soapy water, rinse, and dry thoroughly.
- Slide the trays back into place.
- Interior: Turn the toaster upside down over a trash bin and gently shake to dislodge any loose crumbs. Do not use utensils to scrape the inside.
- Cord Storage: Wrap the power cord around the base storage wrap to keep your counter tidy.
Troubleshooting
| Problem |
Possible Cause |
Solution |
| Toaster does not turn on. |
Not plugged in. Outlet has no power. |
Ensure the plug is firmly inserted into a working outlet. |
| Lever will not stay down. |
Toaster is not plugged in. Crumb tray is not fully inserted. |
Plug in the toaster. Ensure the crumb tray is correctly seated. |
| Toast is too light or too dark. |
Browning setting is incorrect. |
Adjust the browning control dial. Lower numbers for lighter toast, higher numbers for darker. |
| Food is stuck. |
Food item was too small or improperly placed. |
Unplug the toaster and let it cool completely. Use the high-lift lever to raise the item. Never use metal utensils. |
| Smoke or unusual odor. |
Buildup of crumbs. Toasting oily or sugary foods. |
Unplug the toaster, let it cool, and clean the crumb trays. Do not toast prohibited foods. |