Model: AT3501-7
Table of Contents
Safety Information
Read all instructions before using this polisher.
- Electrical Safety: This is a corded electric tool (120V, 60Hz). Ensure your outlet matches these specifications. Do not use outdoors or on wet surfaces.
- Personal Protection: Always wear safety glasses. Consider wearing a dust mask, especially when sanding or compounding.
- Work Area Safety: Keep the work area clean and well-lit. Ensure the power cord is positioned to avoid tripping or contact with the spinning backing plate.
- Tool Use & Care: Do not force the tool. Use the correct speed setting for your task. The machine may stop if excessive pressure is applied on speed settings 1-3. If more power is needed, restart and select a higher speed.
- Service: Have the tool serviced by a qualified repair person. Do not disassemble the tool.
Product Overview
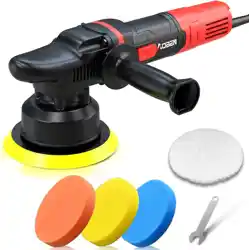
The AOBEN Car Buffer Polisher is a 6-inch dual-action (random orbital) polisher designed for automotive detailing tasks such as polishing, waxing, and light compounding. Its random orbital motion helps minimize the risk of creating swirl marks or burning through paint, making it suitable for beginners and enthusiasts.

Technical Specifications
- Model: AT3501
- Type: Dual Action / Random Orbital Polisher
- Power Source: Corded Electric
- Voltage: 120V, 60Hz
- Power: 700W
- Speed Settings: 6 Variable Speeds
- Speed Range: 1000 - 4500 RPM (No Load)
- Backing Plate Size: 6 inch
- Pad Size: 6.5 inch (included foam pads)
- Dimensions: 14.17" x 2.95" x 4.92"
- Weight: 5.29 lbs
- Material (Head Shell): Plastic (provides heat insulation)
Package Contents
Verify you have received all items:
- 1 x AOBEN Car Polisher (Main Unit)
- 1 x 6-inch Polishing Disc (Backing Plate)
- 4 x 6.5-inch Buffing Pads:
- 3 x Foam Pads (Orange - Heavy, Blue - Medium, Yellow - Fine)
- 1 x Synthetic Wool Polishing Pad (for wax removal)
- 1 x Wrench (for attaching backing plate)
- 1 x User Manual (this document)

Features & Controls
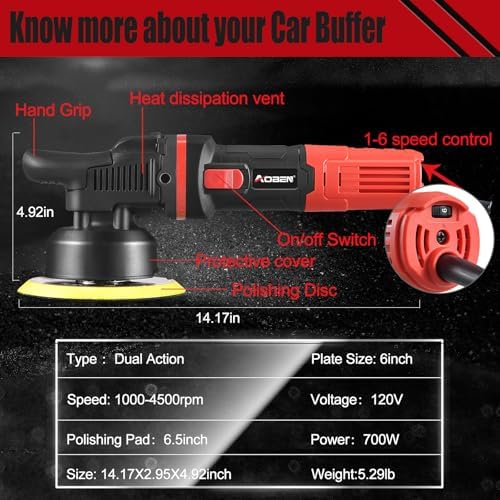
Main Unit
- Ergonomic Handle: A top handle is integrated into the body. A detachable side handle can be attached to either the left or right side of the tool head for comfortable operation.
- Speed Control Dial: Located near the handle. Rotate to select between 6 speed settings (1-6).
- Power Switch / Trigger: Located under the handle. Press and hold to operate the tool.
- Heat Insulation Head Shell: The plastic housing around the polishing head helps dissipate heat during extended use.
- Dust-Proof Vents: Vents on the body aid in cooling the motor.
Backing Plate & Pads
- 6-inch Backing Plate: The metal disc that attaches to the polisher's spindle. The included 6.5-inch foam pads are larger to ensure the hard edge of the backing plate does not contact the work surface.
- Foam Pads:
- Orange (Heavy): For cutting, removing oxidation, and heavy defects.
- Blue (Medium): For polishing and cleaning.
- Yellow (Fine): For applying wax, sealants, and final finishing.
- Synthetic Wool Pad: Primarily used for removing excess wax or applying certain compounds.
Operation Guide
Initial Setup
- Attach the Backing Plate: Ensure the polisher is unplugged. Thread the 6-inch backing plate onto the spindle by hand. Use the included wrench to tighten it securely.
- Attach a Buffing Pad: Peel the protective liner from the hook-and-loop (Velcro) backing on the foam pad. Press the pad firmly and evenly onto the backing plate.
- Attach the Side Handle (Optional): Screw the side handle into the threaded hole on either the left or right side of the polisher head, depending on your preference.
Selecting Speed & Pad
Match the speed setting and pad type to your task:
- Waxing / Sealing (Speed 1-3): Use the Yellow fine foam pad. Apply minimal pressure.
- Polishing / Cleaning (Speed 3-4): Use the Blue medium foam pad.
- Removing Defects / Oxidation (Speed 4-6): Use the Orange heavy foam pad. Use higher speeds for more aggressive correction.
- Removing Excess Wax: Use the Synthetic Wool pad at a low speed.
Note: It is normal for the motor to stop if excessive pressure is applied on lower speed settings (1-3). If this happens, release the trigger, select a higher speed, and resume operation with lighter pressure.
Polishing Technique
- Prepare the Surface: Wash and dry the vehicle thoroughly. Work in a shaded, cool area.
- Apply Product: Apply a small amount of polish, compound, or wax directly to the pad or in a few dots on the work area (approx. 2' x 2' section).
- Start the Polisher: Plug in the tool. Hold it firmly. Before making contact with the surface, press the trigger to start the pad spinning.
- Work the Area: Place the spinning pad flat against the surface. Move the polisher slowly in overlapping passes, covering the entire section. Keep the polisher moving to avoid generating excessive heat in one spot.
- Check Your Work: Wipe off the residue with a clean microfiber towel to inspect the results.
- Change Pads: Use a dedicated pad for each type of product (e.g., one pad for compound, a clean pad for polish, another for wax).
Multi-Purpose Use: This polisher can also be used on other surfaces like boats, furniture, pianos, flooring, and metal objects. Always test on an inconspicuous area first.
Care & Maintenance
- Cleaning Pads: Clean pads regularly with pad conditioning brush or under running water. Allow them to air dry completely before reuse.
- Cleaning the Tool: Unplug the polisher. Wipe the exterior with a dry cloth. Do not immerse any part of the tool in water or use solvents.
- Cord Inspection: Regularly inspect the power cord for damage. Do not use if the cord is damaged.
- Storage: Store the tool and accessories in a clean, dry place. Avoid placing heavy objects on the power cord.
- Motor Vents: Keep the dust-proof ventilation slots clear of obstructions to ensure proper cooling.