Overview
This manual provides instructions for the TPE Automatic 6V/12V 1.5A Battery Charger. This trickle charger is designed for maintaining and charging a variety of 6V and 12V lead-acid batteries.

The charger features automatic voltage detection, a multi-stage charging process, and multiple safety protections. It is suitable for use with automotive, motorcycle, marine, and small equipment batteries.
Features and Specifications
Key Features
- Dual Voltage Output: Automatically detects and charges 6V and 12V lead-acid batteries.
- Automatic Multi-Stage Charging: Charges through five automated steps: Qualification, Soft Start, Bulk Charge, Absorption, and Maintenance.
- Wide Compatibility: Suitable for AGM, GEL, SLA, VRLA, and Flooded (WET) lead-acid battery types.
- Comprehensive Safety Protections: Includes over-voltage, over-current, short-circuit, reverse polarity, and overheat protection.
- 72-Hour Safety Timer: Prevents overcharging by limiting the main charge cycle to 72 hours before switching to float maintenance mode.
- Maintenance (Float) Mode: Can be left connected indefinitely to maintain battery charge.
- Compact and Portable: Small, lightweight design for easy storage and transport.

Technical Specifications
- Input Voltage: 100-240V AC, 50/60Hz
- Output Voltage: 6V / 12V DC (Automatic detection)
- Charging Current: 1.5A
- Battery Capacity (Charging): 5 - 40 Ah
- Battery Capacity (Maintenance): Up to 60 Ah
- Minimum Starting Voltage: Below 2V
- Dimensions (L x W x H): 3.3" x 1.96" x 1.37" (84mm x 50mm x 35mm)
- Weight: 9.9 oz (300 g)
- Protection Rating: IP64
- Certifications: ETL, PSE, CE, FCC, RoHS, RCM
- Manufacturer Part Number: TPE-LA-612-1M
Package Contents
- TPE 6V/12V 1.5A Automatic Battery Charger
- AC power cord
- Alligator clip battery cables
- SAE quick-connect cable
- User manual (this document)

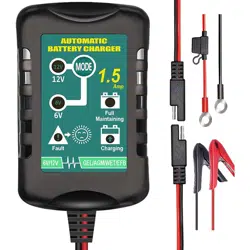
Charger Components and Indicators

The charger's interface consists of the following elements:
- Power (I/O) Button: Turns the charger on and off.
- Mode Button: Selects between different battery types (e.g., Standard, AGM). The specific function may vary; refer to the LED indicators.
- LED Status Indicators:
- Power (Green): Illuminates when the charger is connected to AC power and turned on.
- Charging (Red): Illuminates when the battery is being charged in Bulk or Absorption mode.
Maintenance (Green): Illuminates when the battery is fully charged and the charger is in Float/Maintenance mode.
- Fault (Red): Flashes to indicate an error condition such as reverse polarity, bad battery, or over-temperature.
- Output Connectors: Two ports for connecting the included alligator clip cable or SAE quick-connect cable.
Use Guide
Safety Precautions
- Read all instructions before use.
- Charge batteries in a well-ventilated area.
- Do not disassemble the charger.
- Ensure the AC power cord and output cables are not damaged before use.
- Do not expose the charger to rain, snow, or liquids.
- This charger is for lead-acid batteries only. Do not use with lithium-ion, NiMH, or other non-compatible battery chemistries.
Preparing for Charging
- For a battery installed in a vehicle: Turn the vehicle's ignition and all accessories OFF.
- If possible, remove the battery from the vehicle for charging.
- Clean the battery terminals to ensure a good connection.
- Ensure the battery area is free of flammable materials and well-ventilated.
- If the battery has removable caps, check the electrolyte level and top up with distilled water if necessary (for flooded batteries only). Do not overfill.
Connection Instructions
- Connect to the Battery:
- Connect the RED alligator clip (positive +) to the POSITIVE (+) battery terminal.
- Connect the BLACK alligator clip (negative -) to the NEGATIVE (-) battery terminal or a clean, unpainted metal part of the vehicle chassis (ground).
- WARNING: Reverse connection will trigger a fault. Always connect positive to positive first.
- Connect to Power: Plug the AC power cord into a standard 110-240V wall outlet.
- Turn On the Charger: Press the Power (I/O) button. The charger will automatically detect battery voltage (6V or 12V).

Charging Process
- Once connected and powered on, the charger will begin its automatic sequence:
- Qualification: Tests if the battery can accept a charge.
- Soft Start: Begins charging at a low current.
- Bulk Charge: Charges at the full 1.5A rate until the battery voltage nears its peak.
- Absorption: Holds voltage at a constant level while current tapers down.
- Maintenance (Float): Switches to a low, maintenance voltage to keep the battery fully charged without overcharging.
- Monitor the LED indicators:
- A steady red light indicates the battery is charging (Bulk/Absorption phases).
- A steady green light indicates the battery is fully charged and the charger is in Maintenance mode.
- The 72-hour safety timer starts when charging begins. If the battery does not reach full charge within 72 hours, the charger will stop the main charge cycle and switch to Maintenance mode to protect the battery.
Disconnection
- Press the Power (I/O) button to turn the charger OFF.
- Unplug the AC power cord from the wall outlet.
- Disconnect the BLACK alligator clip from the battery or chassis.
- Disconnect the RED alligator clip from the battery.
Using the SAE Quick-Connect
For permanent or semi-permanent installation (e.g., on a motorcycle or seasonal equipment):
- Connect the SAE cable's ring terminals directly to the battery terminals (red to positive, black to negative).
- Route the SAE connector to a convenient, protected location.
- When charging is needed, simply plug the charger's output connector into the SAE cable. No alligator clips are required.
- The SAE connector includes a quick-cut-off safety feature.

Troubleshooting
- Charger does not turn on (no LEDs):
- Check that the AC power cord is firmly plugged into the wall outlet and the charger.
- Check the wall outlet for power.
- Fault LED is flashing:
- Check for reverse polarity (red clip to positive, black clip to negative). Disconnect and correct the connections.
- The battery voltage may be too low (below 2V) or the battery may be damaged and unable to accept a charge.
- The charger may have overheated. Allow it to cool in a well-ventilated area.
- Charger stays in charging mode (red LED) for an extended time:
- The battery may be very deeply discharged. Allow the full 72-hour cycle to complete.
- The battery capacity may be larger than 40Ah, requiring more time to charge. The charger will switch to Maintenance mode after 72 hours.
- Charger will not switch to Maintenance (green) mode:
- Ensure the battery capacity is within the specified range (5-40Ah for charging).
- The 72-hour safety timer may not have elapsed. Wait for the cycle to complete.
Care and Maintenance
- Store the charger in a cool, dry place.
- Periodically inspect the AC power cord and output cables for cracks, fraying, or damage. Do not use if damaged.
- Keep the charger clean and free of dust. Wipe with a dry cloth.
- Do not place heavy objects on the cables or charger.