1. Overview
This manual provides instructions for the Gain Express Portable CO2 Meter, a handheld device designed to monitor indoor air quality. The meter measures carbon dioxide (CO2) concentration, temperature, and relative humidity.

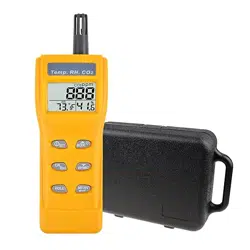
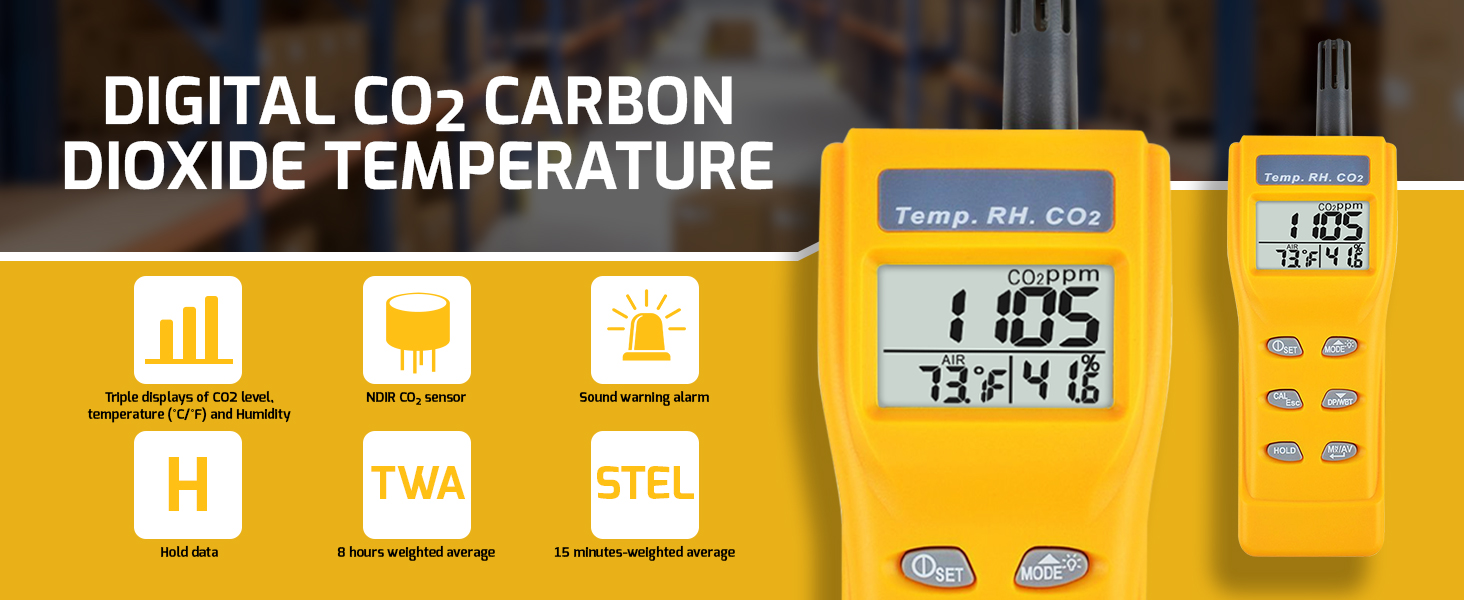
The device features a portable handle, a digital display, and uses a Non-Dispersive Infrared (NDIR) sensor for stable CO2 measurement. It is intended for use in environments such as homes, offices, classrooms, and other indoor spaces to assess ventilation and air quality.
2. Features & Specifications
2.1 Key Features
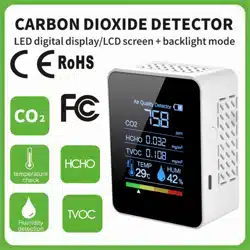
- Multi-Parameter Measurement: Simultaneously displays CO2 concentration, temperature, humidity, dew point, and wet bulb temperature.
- Audible Alarm: Alerts the user when CO2 levels exceed a preset threshold.
- Portable Handle Design: Allows for easy carrying and handheld use.
- Manual Calibration: Supports user calibration for CO2 and humidity sensors to maintain accuracy.
- Dual Power Source: Can operate on an included battery or an optional 9V adaptor (adaptor not included). The device automatically switches to adaptor power when connected.
- Stable NDIR Sensor: Provides reliable and consistent CO2 readings.
2.2 Technical Specifications
- Brand: Gain Express
- Model Number: A017755
- Style: Digital CO2 Meter
- Color: Yellow
- Item Weight: 200 Grams
- Power Source: Battery Powered (Dual source: Battery or 9V adaptor)
2.3 Measurement Ranges & Accuracy
- CO2 Concentration:
- Range: 0 to 9999 ppm (parts per million)
- Accuracy: 0~2000 ppm (±50 ppm or ±5% of reading); 2000~9999 ppm (±10% of reading)
- Temperature:
- Range: -10°C to 60°C
- Accuracy: ±0.6°C
- Upper Temperature Rating: 60°C
- Relative Humidity:
- Range: 0.1% to 99.9% RH
- Accuracy: ±3% RH
- Operating Humidity: 99.9% RH
- Dew Point: Range: -20.0°C to 59.9°C
- Wet Bulb Temperature: Range: -5.0°C to 59.9°C
3. Product Components
Based on available information, the product package includes:
- Gain Express Portable CO2 Meter (Yellow)
- Battery (installed)
- User documentation
Note: A 9V DC adaptor is not included. It can be purchased separately if required for extended use.
4. Use Guide
4.1 Initial Setup and Power On
- Ensure the battery is properly installed in the compartment on the back or bottom of the unit.
- To turn the device on, locate and press the power button. The digital display will illuminate.
- The meter will initiate a startup sequence. Allow a few moments for the sensors to stabilize and begin displaying readings.

4.2 Taking Measurements
- Hold the meter by its handle or place it on a stable surface in the area you wish to monitor.
- Ensure the sensor vents on the device are not obstructed.
- Observe the digital display. It will show real-time readings for CO2 (in ppm), temperature (°C), and humidity (%RH).
- For accurate CO2 readings, avoid breathing directly onto the device and allow several minutes for the reading to stabilize in a new environment.
4.3 Understanding the Display & Indicators
The digital screen shows multiple values simultaneously. Identify the following:
- CO2 Value: Typically the largest or primary number, displayed in ppm.
- Temperature Value: Displayed in degrees Celsius (°C).
- Humidity Value: Displayed as a percentage (%RH).
- Alarm Indicator: A visual icon or symbol may appear when the CO2 alarm is triggered.
- Battery Indicator: A symbol showing the remaining battery power.
4.4 Alarm Function
- The device features an audible alarm for high CO2 concentration.
- The default alarm threshold is typically set by the manufacturer (e.g., 1000 ppm). Refer to specific device settings to confirm or adjust this level if the functionality is provided.
- When the measured CO2 level exceeds the set threshold, the device will emit a beeping sound.
- To acknowledge and silence the alarm, press the appropriate button (often labeled "ALM" or similar). The visual indicator may remain until levels drop below the threshold.
4.5 Calibration
For maintaining accuracy, the device supports manual calibration:
- CO2 Calibration: Should be performed in a fresh air environment with known low CO2 levels (approximately 400 ppm). Use the calibration function as per the device's specific menu.
- Humidity Calibration: Can be performed using a calibrated reference hygrometer. Access the calibration mode to adjust the reading to match the reference.
Important: Calibration procedures may require specific button sequences. For detailed steps, consult the physical manual included with the product.
4.6 Power Management
- Battery Use: The device operates on the installed battery. The battery life depends on usage frequency and alarm activity.
- Using a 9V Adaptor: To use wall power, connect a compatible 9V DC adaptor (center-positive polarity, not included) to the DC jack on the device. The internal battery will be automatically disconnected while the adaptor is plugged in.
- Replace the battery when the low battery indicator appears on the display.
5. Safety & Maintenance
5.1 Safety Precautions
- Do not disassemble, modify, or attempt to repair the device.
- Keep the device away from water, excessive moisture, and direct exposure to extreme temperatures outside its operating range (-10°C to 60°C).
- Do not block the sensor inlet/outlet vents.
- Use only the specified battery type or a compatible 9V DC adaptor.
- This device is for indoor air quality assessment and is not a safety device for life-threatening gas concentrations.
5.2 Care and Cleaning
- Wipe the exterior casing with a soft, dry cloth.
- Do not use abrasive cleaners, solvents, or sprays directly on the device.
- Ensure the sensor vents remain clean and free of dust. Use compressed air or a soft brush to gently remove debris if necessary.
- Store the device in a cool, dry place when not in use for extended periods. Remove the battery if storing for a very long time.
6. Troubleshooting
- No Display / Will Not Power On:
- Check that the battery is correctly installed and has sufficient charge. Replace if necessary.
- If using an adaptor, ensure it is properly connected and provides 9V DC power.
- Inaccurate or Unstable Readings:
- Allow more time for the sensor to stabilize in the new environment (can take several minutes).
- Ensure the device is not in a direct airflow (like from an HVAC vent) or in a confined, stagnant corner.
- Consider performing a manual calibration as described in section 4.5.
- Alarm Sounds Continuously:
- The CO2 level in the room is likely high. Increase ventilation by opening windows or doors.
- Silence the alarm by pressing the alarm button. The alarm will sound again if levels remain high.
- Low Battery Indicator: Replace the battery promptly.