
W10849529C
ELECTRIC OR GAS DRYER USE AND CARE GUIDE
GUIDE D’UTILISATION ET D’ENTRETIEN
SÈCHE-LINGE ÉLECTRIQUE OU À GAZ
SECADORA A GAS O ELÉCTRICA
MANUAL DE USO Y CUIDADO
GUIDA ALL’USO E ALLA MANUTENZIONE
DELL’ASCIUGATRICE ELETTRICA O A GAS
ELEKTRO- ODER GASTROCKNER – BEDIENUNGS- UND PFLEGEANLEITUNG
Table of Contents
Table des matières
DRYER SAFETY .......................................................................... 2
SPECIFICATIONS ........................................................................ 4
CHECK YOUR VENT SYSTEM FOR GOOD AIR FLOW ............ 4
USE AUTOMATIC DRY CYCLES FOR
BETTER FABRIC CARE AND ENERGY SAVINGS..................... 4
SÉCURITÉ DU SÈCHE-LINGE .................................................. 13
CARACTERISTIQUES ................................................................ 15
VÉRIFICATION D’UNE CIRCULATION D’AIR
ADÉQUATE POUR LE SYSTÈME D’ÉVACUATION ................. 16
UTILISATION DES PROGRAMMES AUTOMATIQUES
POUR UN MEILLEUR SOIN DU TISSU ET DAVANTAGE
D’ÉCONOMIES D’ÉNERGIE ...................................................... 16
Índice
SEGURIDAD DE LA SECADORA .............................................. 29
ESPECIFICACIONES ................................................................. 31
REVISE QUE EL SISTEMA DE VENTILACIÓN
TENGA UN BUEN FLUJO DE AIRE .......................................... 32
USE LOS CICLOS SECADO AUTOMÁTICO PARA
UN MEJOR CUIDADO DE LAS TELAS Y AHORRO
DE ENERGÍA.................... ...........................................................32
4KMEDC215
4KMEDC315
4KMEDC415
4KMEDC425
3LMEDC315
3LMEDC415
CONTROL PANEL & FEATURES ................................................ 5
CYCLE GUIDE ............................................................................. 6
USING YOUR DRYER ................................................................. 7
DRYER CARE .............................................................................. 9
TROUBLESHOOTING ............................................................... 11
WARRANTY ............................................................................... 13
ASSISTANCE OR SERVICE ...................................................... 28
TABLEAU DE COMMANDE ET CARACTÉRISTIQUES ............ 17
GUIDE DE PROGRAMMES ....................................................... 18
UTILISATION DU SÈCHE-LINGE .............................................. 19
ENTRETIEN DU SÈCHE-LINGE ................................................ 21
DÉPANNAGE. ............................................................................. 23
GARANTIE .................................................................................. 26
ASSISTANCE OU SERVICE ....................................................... 28
PANEL DE CONTROL Y CARACTERÍSTICAS ......................... 33
GUÍA DE CICLOS ....................................................................... 34
USO DE SU SECADORA ........................................................... 35
CUIDADO DE LA SECADORA ................................................... 37
SOLUCIÓN DE PROBLEMAS. ................................................... 39
GARANTÍA .................................................................................. 41
AYUDA O SERVICIO TÉCNICO ................................................. 43
Sommario
SICUREZZA DELL’ASCIUGATRICE ......................................... 44
SPECIFICHE .............................................................................. 46
CONTROLLO DEL SISTEMA DI SFIATO
PER IL CORRETTO FLUSSO DELL’ARIA ................................ 46
USO DEI CICLI DI ASCIUGATURA AUTOMATICA PER
UNA MIGLIORE CURA DEI TESSUTI E PER RISPARMIARE
ENERGIA ................................................................................... 46
PANNELLO COMANDI E FUNZIONI ........................................ 47
GUIDA AI CICLI ......................................................................... 48
USO DELL’ASCIUGATRICE ...................................................... 49
MANUTENZIONE DELL’ASCIUGATRICE ................................ 51
RISOLUZIONE DEI PROBLEMI ................................................ 53
GARANZIA ................................................................................. 55
SERVIZIO DI ASSISTENZA ...................................................... 56
Inhaltsverzeichnis
SICHERHEITSHINWEISE ......................................................... 58
TECHNISCHE DATEN ............................................................... 60
ÜBERPRÜFEN DES ABLUFTSYSTEMS AUF GUTE
LUFTZIRKULATION .................................................................. 61
AUTOMATISCHE TROCKENPROGRAMME FÜR
TEXTILSCHONENDES TROCKNEN UND ENERGIESPAREN
... 61
BEDIENFELD UND FUNKTIONEN ........................................... 62
PROGRAMMLEITFADEN .......................................................... 63
VERWENDEN DES TROCKNERS ............................................ 64
PFLEGE DES TROCKNERS ..................................................... 66
STÖRUNGSBEHEBUNG ........................................................... 68
GARANTIE ................................................................................. 70
UNTERSTÜTZUNG ODER KUNDENDIENST .......................... 71
2
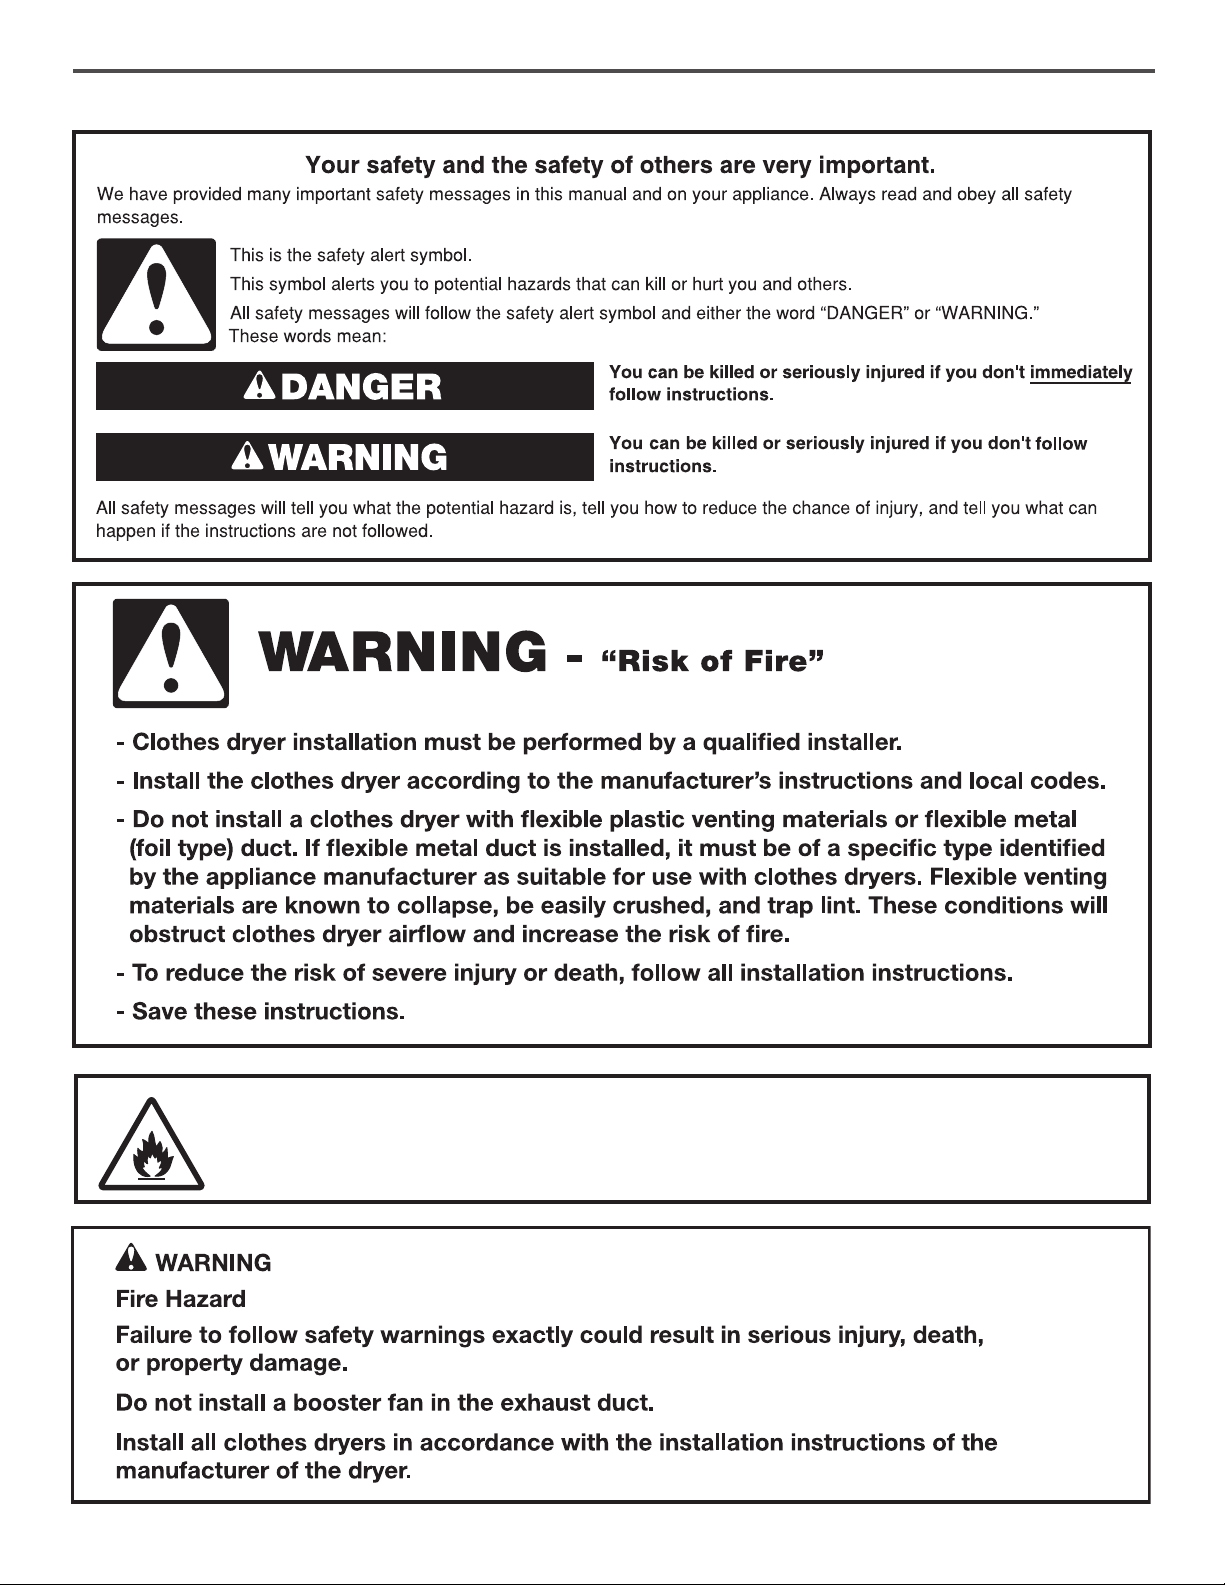
DRYER SAFETY
CAUTION – RISK OF FIRE/FLAMMABLE MATERIALS
This is an additional safety alert symbol that alerts you to the risk of re.
3
FOR YOUR SAFETY
1. DO NOT USE OR STORE PETROL OR OTHER FLAMMABLE MATERIALS IN THIS APPLIANCE OR NEAR THIS APPLIANCE.
2. DO NOT SPRAY AEROSOLS IN THE VICINITY OF THIS APPLIANCE WHILE IT IS IN OPERATION.
3. DO NOT MODIFY THIS APPLIANCE.
■ The dryer should not be used if industrial chemicals have
been used for cleaning.
■ Remove all objects from pockets, such as lighters and
matches, before placing items in the dryer.
■ Before the dryer is removed from service or discarded,
remove the doors to the drying compartment.
■ Do not reach into the dryer if the drum is moving. A door
switch is tted for your safety.
■ Do not install or store the dryer where it will be exposed to
the weather.
■ Do not tamper with controls.
■ Do not continue to use this appliance if it appears to be
faulty.
■ Do not repair or replace any part of the dryer or attempt any
maintenance unless specically recommended in this Use
and Care Guide. Repairs and servicing should only be
carried out by competent service personnel.
■ Do not use fabric softeners or products to eliminate static
unless recommended by the manufacturer of the fabric
softener or product. Follow their instructions.
■ Clean dryer lint screen before or after each load.
Do not operate dryer without lint screen in place.
■ Keep area around the exhaust and inlet openings and
adjacent surrounding areas free from the accumulation of
lint, dust, and dirt.
■ The interior of the dryer and exhaust vent should be
cleaned periodically by qualied service personnel.
■ See Installation Instructions for earthing instructions.
■ Do not dry unwashed items in this dryer.
■ The nal part of a tumble dryer cycle occurs without heat
(cool down cycle) to ensure that the items are left at a
temperature that ensures the items will not be damaged.
■ Items such as foam rubber (latex foam), shower caps,
waterproof textiles, rubber backed articles, and clothes
or pillows tted with foam rubber pads must only be dried
on a clothesline.
■ If the supply cord is damaged, it must be replaced by the
manufacturer or its service agent or a similarly qualied
person in order to avoid a hazard.
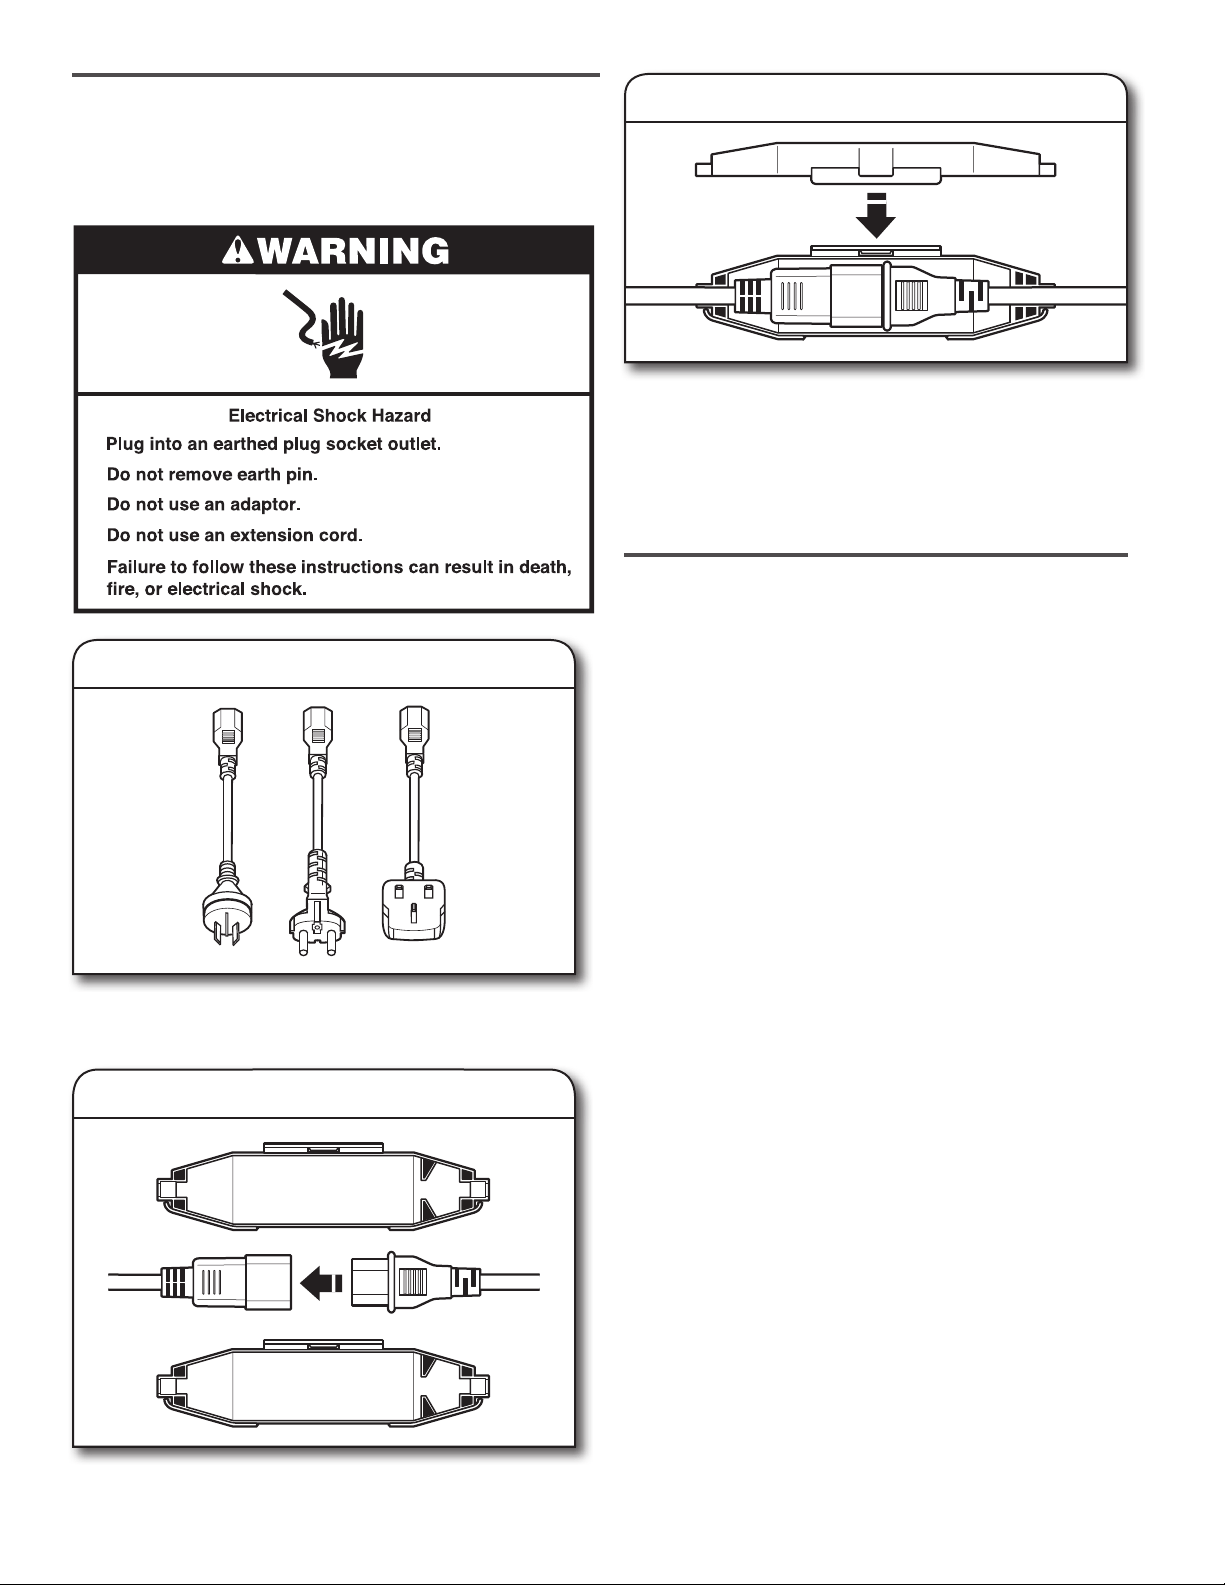
WARNING:
Never stop a tumble dryer cycle before the end
of the drying cycle unless all items are quickly removed and
spread out so that the heat is dissipated.
IMPORTANT SAFETY INSTRUCTIONS
WARNING:
To reduce the risk of re, electric shock, or injury to persons when using the dryer, follow basic precautions,
including the following:
SAVE THESE INSTRUCTIONS
■ Read all instructions before using the dryer.
■ Keep a minimum clearance of 100 mm (4 in.) between the
rear of the dryer and any wall.
■ The operation of this appliance may affect the operation
of other types of appliances which take their air supply
for safe combustion from the same room. There has to
be adequate ventilation to replace exhausted air and thus
avoid the back-ow of gases into the room from appliances
burning other fuels, including open res, when operating
the tumble dryer. If in doubt, consult the appliance manu-
facturers.
■ Do not obstruct the air supply to the dryer (see Installation
Instructions for minimum clearances).
■ Do not place items exposed to cooking oils in your dryer.
Oil-affected items can ignite spontaneously, especially
when exposed to heat sources such as in a tumble dryer.
The items become warm causing an oxidation reaction in
the oil. Oxidation creates heat. If the heat cannot escape,
the items can become hot enough to catch re. To reduce
the risk of re due to contaminated loads, the nal part of a
tumble dryer cycle occurs without heat (cool down period).
Avoid stopping a tumble dryer before the end of the drying
cycle unless all items are quickly removed and spread out
so that the heat is dissipated. Piling, stacking, or storing
oil-affected items can prevent heat from escaping and so
create a re hazard.
■ If it is unavoidable to dry in the dryer items that have been
soiled with substances such as cooking oil, acetone, alco-
hol, petrol, kerosene, spot removers, turpentine, waxes and
wax removers, or that have been contaminated by hair care
products, they should be washed in hot water with an extra
amount of detergent before being dried in the dryer. These
items may give off vapours that could ignite or explode.
Such washing will reduce, but not eliminate, the hazard.
■ This appliance is not intended for use by persons (includ-
ing children under 8 years of age) with reduced physical,
sensory, or mental capabilities, or lack of experience and
knowledge, unless they have been given supervision or
instructions concerning use of the appliance by persons
responsible for their safety.
■ Cleaning and user maintenance by children must be super-
vised.
■ Children should be supervised to ensure that they do not
play with the appliance.
■ Children less than 3 years of age should be kept away from
the appliance unless continuously supervised.
4
IMPORTANT SAFETY INSTRUCTIONS
precautions, including the following:
WARNING:
Read all instructions before using the dryer.
Keep a minimum clearance of 100 mm (4 in.) between the
rear of the dryer and any wall.
The operation of this appliance may affect the operation of
other types of appliances which take their air supply for safe
combustion from the same room. There has to be adequate
ventilation to replace exhausted air and thus avoid the
back-ow of gases into the room from appliances burning
other fuels, including open res, when operating the tumble
dryer. If in doubt, consult the appliance manufacturers.
Do not obstruct the air supply to the dryer (see Installation
Instructions for minimum clearances).
Do not place items exposed to cooking oils in your dryer.
Oil-affected items can ignite spontaneously, especially when
exposed to heat sources such as in a tumble dryer. The
items become warm causing an oxidation reaction in the oil.
Oxidation creates heat. If the heat cannot escape, the items
can become hot enough to catch re. Piling, stacking or
storing oil-affected items can prevent heat from escaping
and so create a re hazard.
If it is unavoidable to dry in the dryer items that have been
soiled with substances such as cooking oil, acetone, alcohol,
petrol, kerosene, spot removers, turpentine, waxes and wax
removers, or that have been contaminated by hair care
products, should be washed in hot water with an extra
amount of detergent before being dried in the dryer. These
items may give off vapours that could ignite or explode. Such
washing will reduce, but not eliminate, the hazard.
This appliance is not intended for use by persons (including
children) with reduced physical, sensory or mental
capabilities, or lack of experience and knowledge, unless
they have been given supervision or instructions concerning
use of the appliance by persons responsible for their safety.
Children should be supervised to ensure that they do not
play with the appliance.
The dryer should not be used if industrial chemicals have
been used for cleaning.
Before the dryer is removed from service or discarded,
remove the doors to the drying compartment.
Do not reach into the dryer if the drum is moving. A door
switch is tted for your safety.
Do not install or store the dryer where it will be exposed
to the weather.
Do not tamper with controls.
Do not continue to use this appliance if it appears to be
faulty.
Do not repair or replace any part of the dryer or attempt
any maintenance unless specically recommended in this
Use and Care Guide. Repairs and servicing should only
be carried out by competent service personnel.
Do not use fabric softeners or products to eliminate static
unless recommended by the manufacturer of the fabric
softener or product. Follow their instructions.
Clean dryer lint screen before or after each load. Do not
operate dryer without lint screen in place.
Keep area around the exhaust and inlet openings and
adjacent surrounding areas free from the accumulation of
lint, dust, and dirt.
The interior of the dryer and exhaust vent should be
cleaned periodically by qualied service personnel.
See Installation Instructions for earthing instructions.
Do not dry unwashed items in this dryer.
Items such as foam rubber (latex foam), shower caps,
waterproof textiles, rubber backed articles and clothes or
pillows tted with foam rubber pads must only be dried
on a clothesline.
SAVE THESE INSTRUCTIONS
WARNING: Never stop a tumble dryer cycle before the
end of the drying cycle unless all items are quickly removed
and spread out so that the heat is dissipated.
To reduce the risk of re, electric shock, or injury to persons when using the dryer, follow basic
The nal part of a tumble dryer cycle occurs without heat
(cool down cycle) to ensure that the items are left at a
temperature that ensures the items will not be damaged.
If the supply cord is damaged, it must be replaced by the
manufacturer or its service agent or a similarly qualied
person in order to avoid a hazard.
4
CHECK YOUR VENT SYSEM FOR GOOD AIR FLOW
Good air ow
Along with heat, dryers require good air ow to efciently
dry laundry. Proper venting will reduce your drying times
and improve your energy savings. See Installation
Instructions.
The venting system attached to the dryer plays a big role
in good air ow.
Service calls caused by improper venting are not covered
by the warranty and will be paid by the customer, regardless
of who installed the dryer.
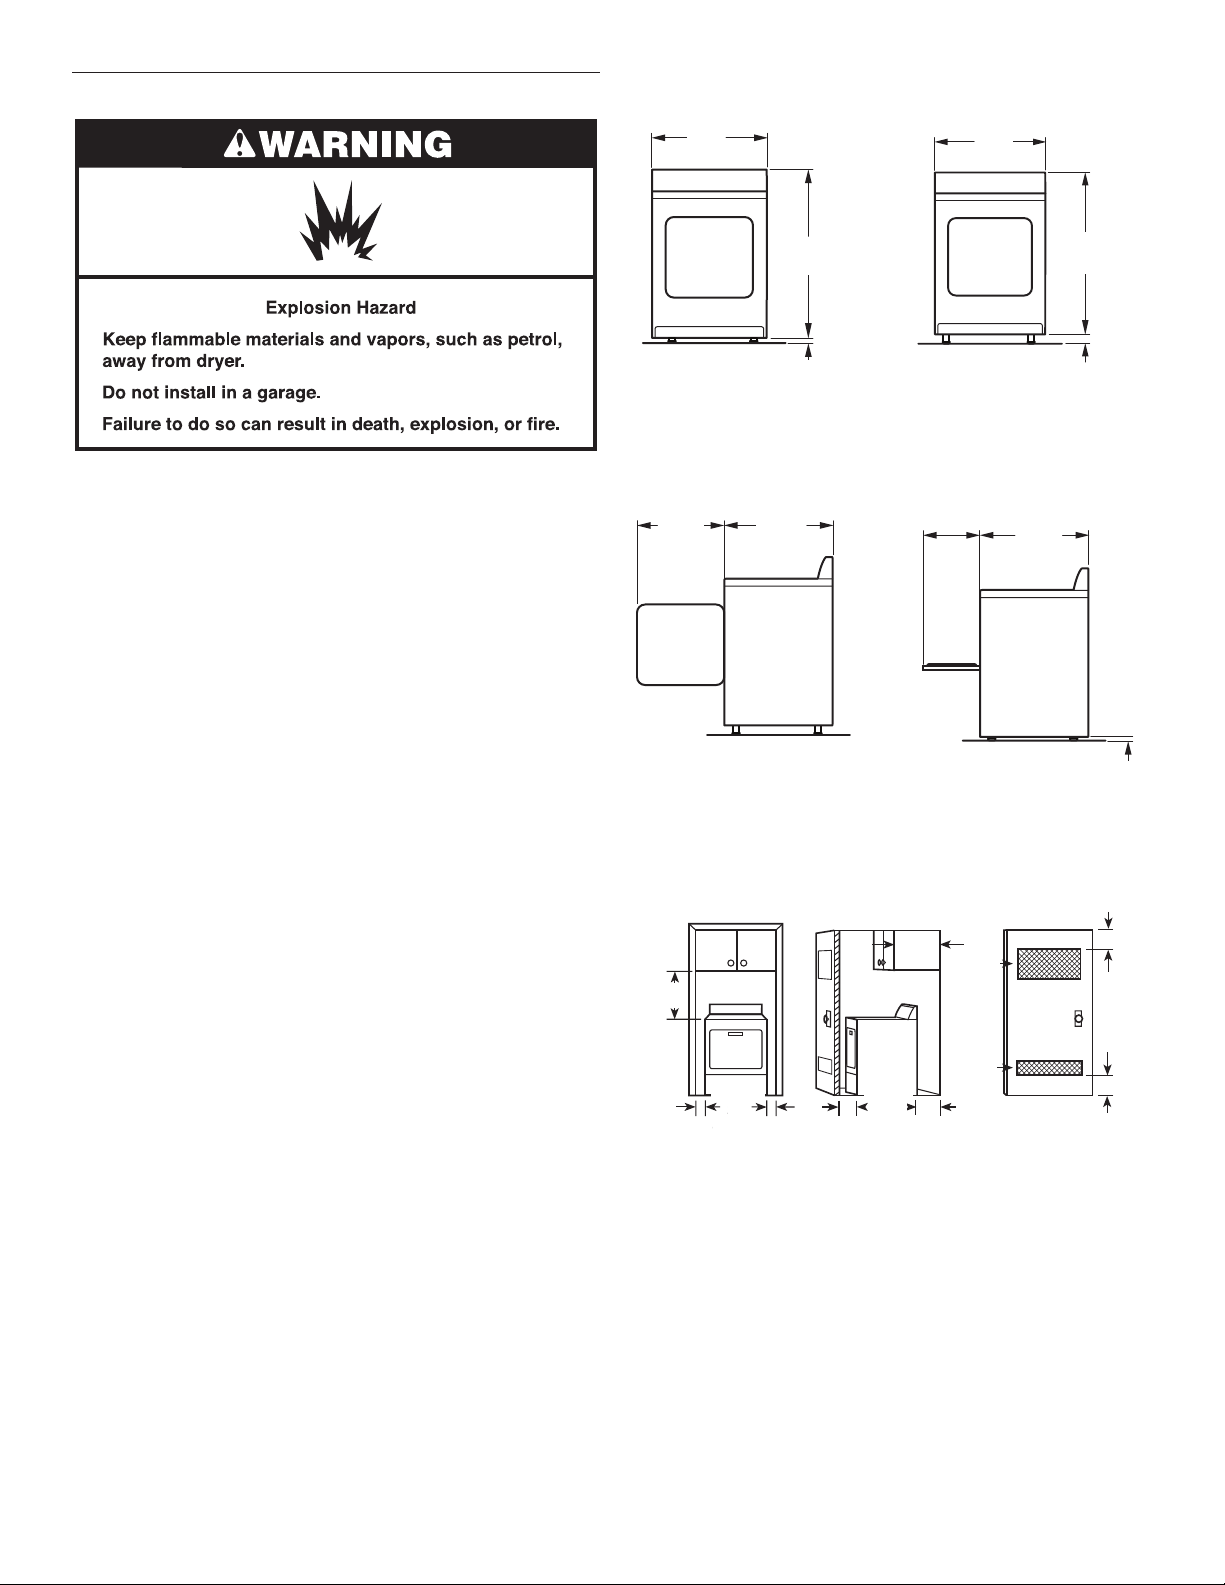
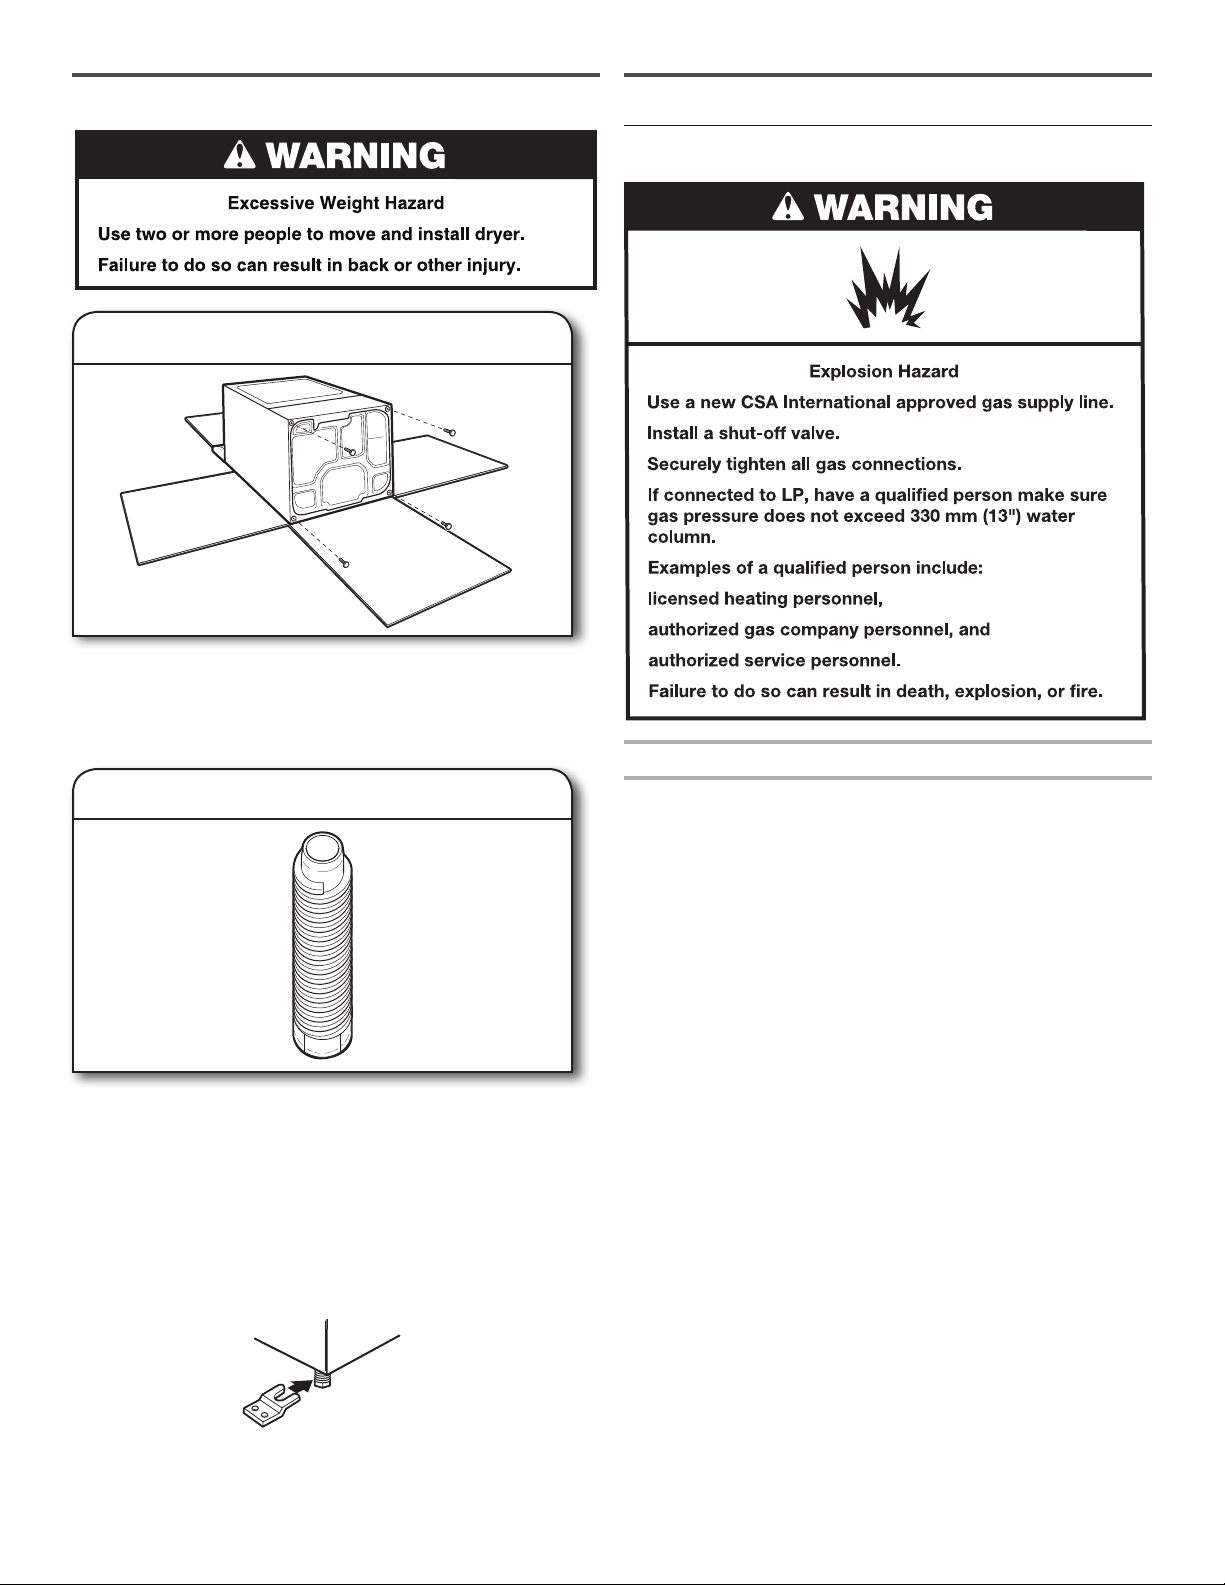
WARNING
Fire Hazard
Use a heavy metal vent.
Do not use a plastic vent.
Do not use a metal foil vent.
Failure to follow these instructions can result in death
or fire.
To maintain good air ow:
Good Better
USE AUTOMATIC DRY CYCLES FOR BETTER FABRIC CARE AND ENERGY SAVINGS
Use the Automatic Dry cycles to provide the most energy savings and enhanced fabric care from the dryer. During Automatic Dry
cycles, drying air temperature or moisture level are sensed in the load. This sensing occurs throughout the drying cycle and the
dryer shuts off when the load reaches the selected dryness.
With Timed Dry, the dryer runs the amount of time set and sometimes results in shrinkage, wrinkling, and static due to over-drying.
Use Timed Dry for the occasional damp load that needs a little more drying time or when using the drying rack.
■ Clean your lint screen before each load.
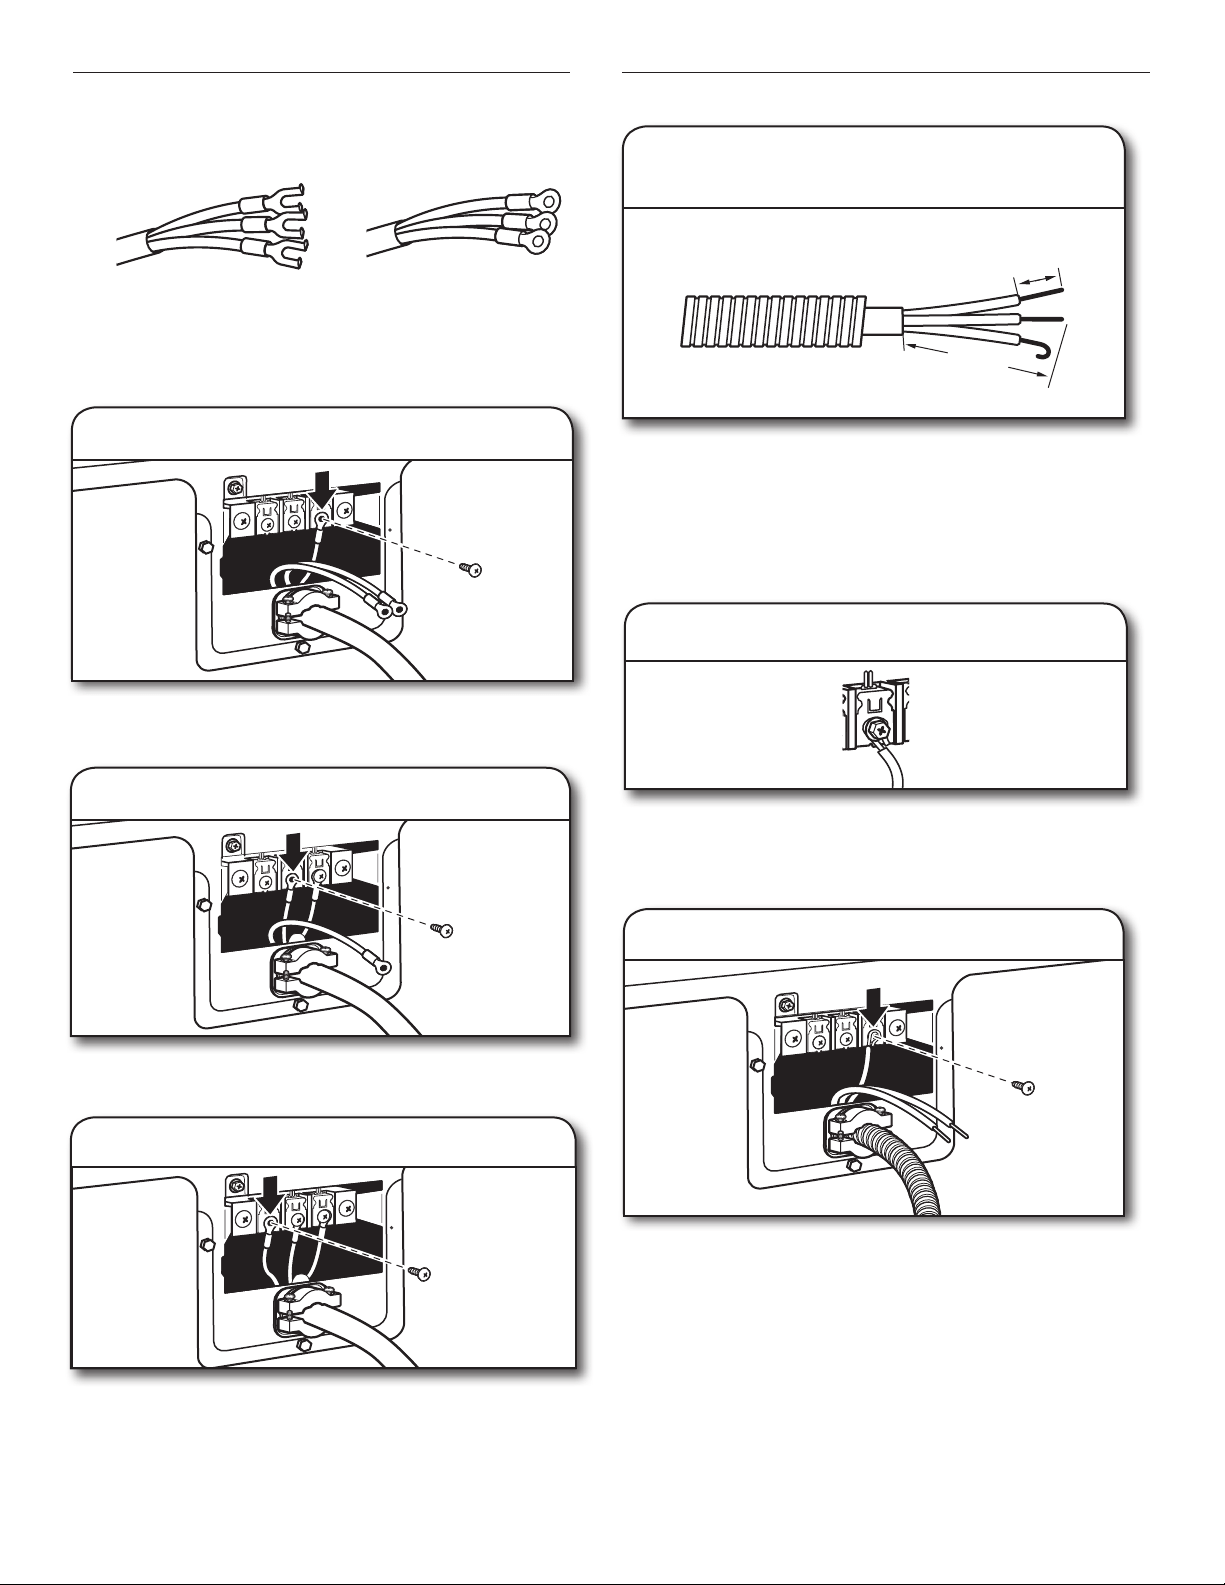
■ Replace plastic or foil vent material with 102 mm (4")
diameter heavy, rigid vent material.
■
4"
102 mm
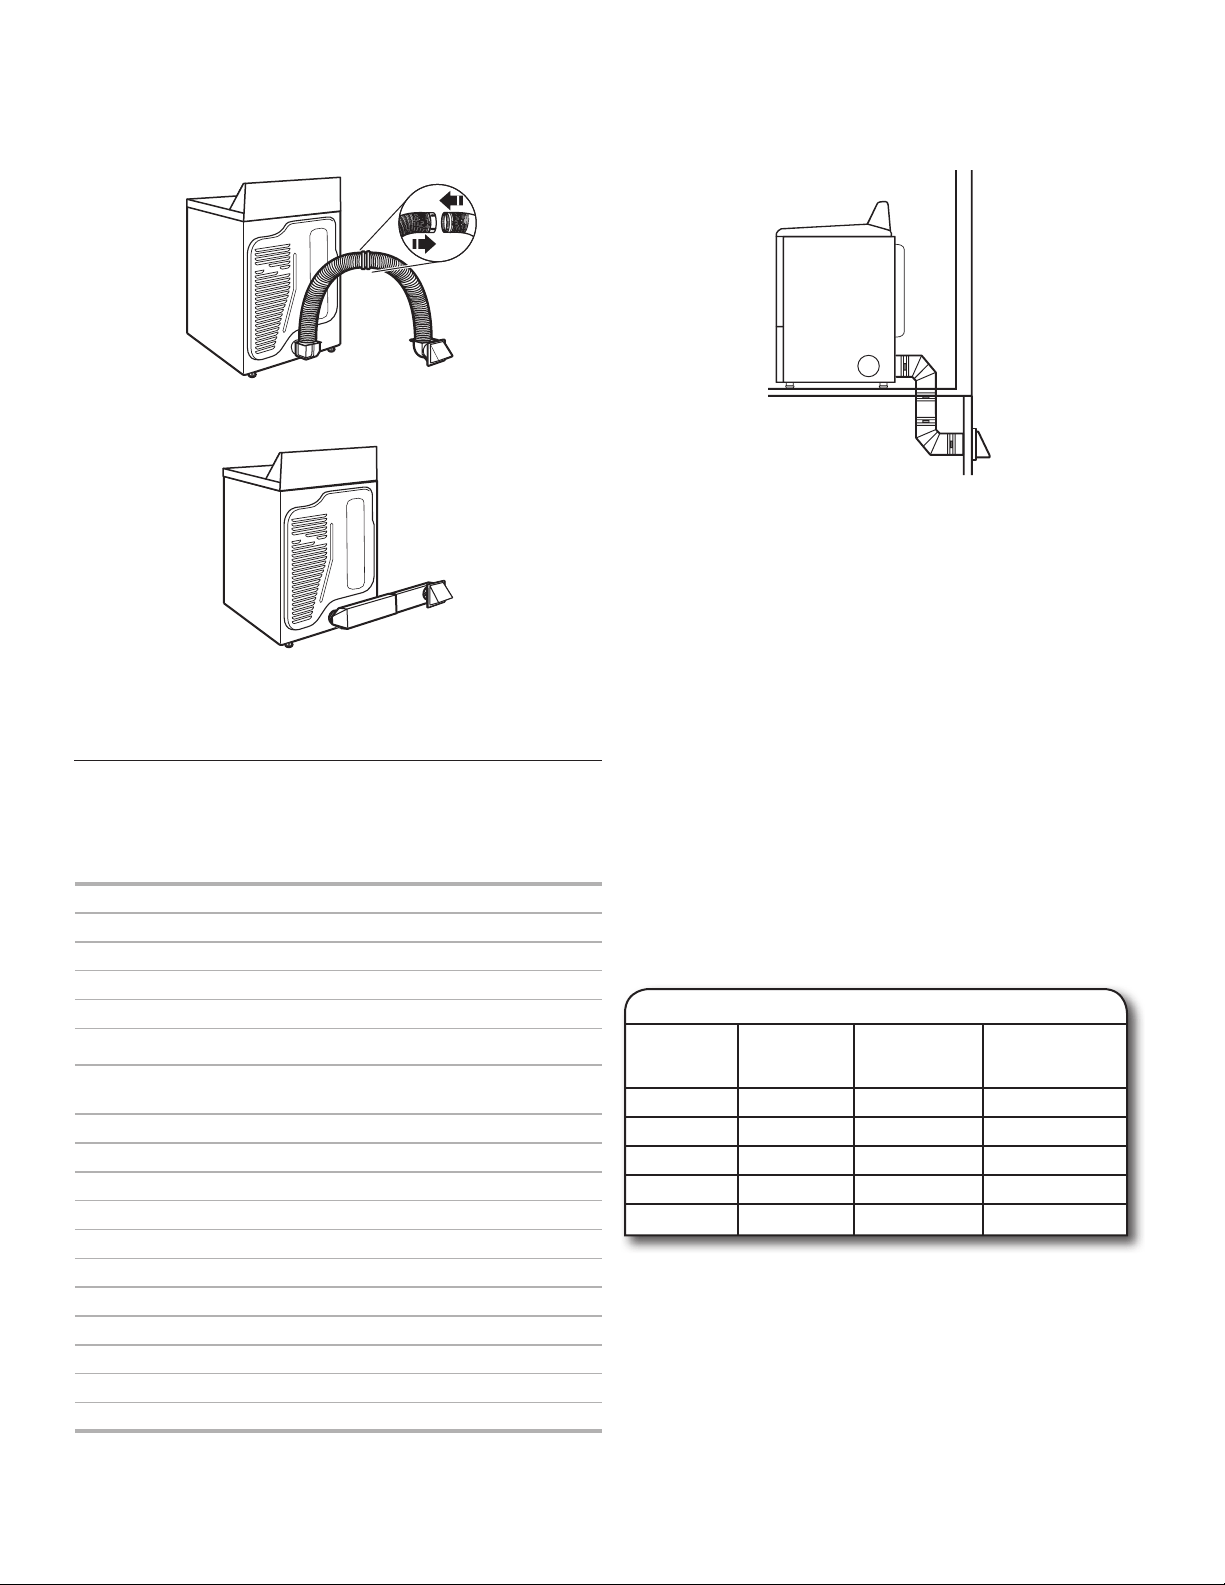
Use the shortest length of vent possible.
■ Use no more than four 90° elbows in a vent system;
each bend and curve reduces air flow.
■ Remove lint and debris from the exhaust hood.
■ Remove lint from the entire length of the vent sys-
tem at least every 2 years. When cleaning is com-
plete, be sure to follow the Installation Instructions
supplied with your dryer for final product check.
■ Clear away items from the front of the dryer.
SPECIFICATIONS
These units are sold in multiple regions with different
requirements for measuring capacity. Below are a few
of the valid forms of measure posted on this product:
Dry Linen Capacity: A weight measure that reects
a maximum load size that can be loaded into the dryer.
IEC Capacity: The capacity measure that represents
the maximum capacity of dry linens and textiles which
the manufacturer declares can be treated in a specic cycle.
Models
3LMEDC315FW
3LMEDC415FW
4KMEDC215FW
4KMEDC315FW
4KMEDC415FW
4KMEDC425FW
Rated Voltage 220–240 V 2N~ 220–240 V 2N~
Rated Frequency 50 Hz 60 Hz
Rated Current 20 Amps 20 Amps
Dry Linen Capacity
(Maximum)
15 kg (33 lb) 15 kg (33 lb)
IEC Capacity 7 kg (15 lb) 7 kg (15 lb)
Height 1067 mm (42") 1067 mm (42")
Width 737 mm (29") 737 mm (29")
Depth 706 mm (27
13
⁄16") 706 mm (27
13
⁄16")
5
CONTROL PANEL & FEATURES
WRINKLE CONTROL FEATURE (on some models)
When you are unable to remove a load of clothes from the
dryer as soon as it stops, wrinkles can form. The Wrinkle
Control feature periodically tumbles, rearranges, and uffs
the load to help keep wrinkles from forming.
■ Get 40minutes of heat-free, periodic tumbling at the end
of a cycle. Turn the Wrinkle Control knob to on or off at
any time before the cycle has ended.
DRYER CYCLE KNOB
Use your Dryer Cycle Knob to select available cycles on
your dryer. Turn the knob to select a cycle for your laundry
load. See “Cycle Guide” for detailed descriptions of cycles.
TIMED DRY
Will run the dryer for the specied time on the control.
On models with a selectable temperature knob, you may
choose a setting based on the fabrics in your load. Drying
time and temperature will depend on your dryer model.
AUTOMATIC DRY
Senses moisture in the load or air temperature and shuts
off when the load reaches the selected dryness level.
Gives the best drying in the shortest time. Drying time will
vary based on fabric type, load size, and dryness setting.
1
2
3
TEMPERATURE
Select a drying temperature based on the fabrics in your
load. If you are unsure of the temperature to select for a
load, select the lower setting rather than the higher setting.
START/STOP
The Cycle Signal produces an audible sound when the
drying cycle is nished. Promptly removing clothes at the
end of the cycle reduces wrinkling.
Turn the Start/Stop knob to select the desired setting
(On or Off). Press the Start/Stop knob to start the dryer.
NOTE: When the Wrinkle Control setting is selected,
the tone will sound every 5 minutes until the clothes
are removed or the Wrinkle Control setting ends.
2 31
4
4
Not all features and options are available on all models.
Appearance may vary.
2 4
6
Not all cycles and settings are available on all models.
NOTE: Government energy certications for the Maytag Gas and Electric models were based on the Timed Dry cycle with the
Maximum drying temperature setting. The as - shipped defaults of Sensor Dry, Automatic Dry, Normal cycle, Low heat, Wrinkle Shield
were not used.
CYCLE GUIDE – AUTOMATIC DRY CYCLES
CYCLE GUIDE – TIMED DRY CYCLES
Not all cycles and settings are available on all models.
TIMED DRY – Will run the dryer for the specied time on the control.
NOTE: If loads do not seem as dry as you would like, select More Dry next time you dry a similar load. If loads seem drier than you
like, select Less Dry next time you dry a similar load.
Setting the Drying Temperature
If your dryer has multiple heat settings:
A High temperature setting may be used for drying heavy-
weight items such as towels and work clothes.
A Low to Medium temperature setting may be used for dry-
ing medium-weight items such as sheets, blouses, dresses,
underwear, permanent press fabrics, and some knits.
Use the No Heat setting for foam, rubber, plastic,
or heat-sensitive fabrics.
Line-dry bonded or laminated fabrics.
NOTE: If you have questions about drying temperatures
for various loads, refer to the care label directions.
Items to Dry: Cycle: Temperature:
Available
Options: Cycle Details:
Jeans, heavy work
clothes, towels
More Dry
Normal or
Energy
Preferred
High Wrinkle Control/
Wrinkle Prevent
Temperature
Cycle Signal
Automatic cycles give the best drying in the
shortest time. Drying time varies based on
fabric type, load size, and dryness setting.
Select a drying temperature based on the
fabrics in your load. If you are unsure of the
temperature to select for a load, select the
lower setting rather than the higher setting.
Work clothes,
medium-weight
fabrics, sheets
Normal or
Energy
Preferred
Medium Wrinkle Control/
Wrinkle Prevent
Temperature
Cycle Signal
Casual, shirts, pants,
lightweight items,
synthetics, delicates,
athletic wear
Delicate or
Less Dry
Normal or
Energy
Preferred
Low Wrinkle Control/
Wrinkle Prevent
Temperature
Cycle Signal
Items to Dry: Cycle: Temperature:
Available
Options: Cycle Details:
Large or heavy items
such as thick towels
or robes
Heavy Dry Any Temperature Choose High to dry large or heavy loads.
Any load Damp Dry/
Freshen Up
Any Temperature Dries items to a damp level or for items that
do not require an entire drying cycle.
Rubber, plastic,
heat-sensitive fabrics
Air Fluff/
Air Dry
No Heat Temperature No-heat drying.
7
USING YOUR DRYER
1. Clean the lint screen
Clean the lint screen before each load. Pull the lint screen out
of its holder. Roll lint off the screen with your ngers. Do not rinse
or wash screen to remove lint. Push the lint screen rmly back
into place.
For additional cleaning information, see “Dryer Care.”
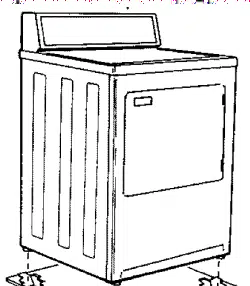
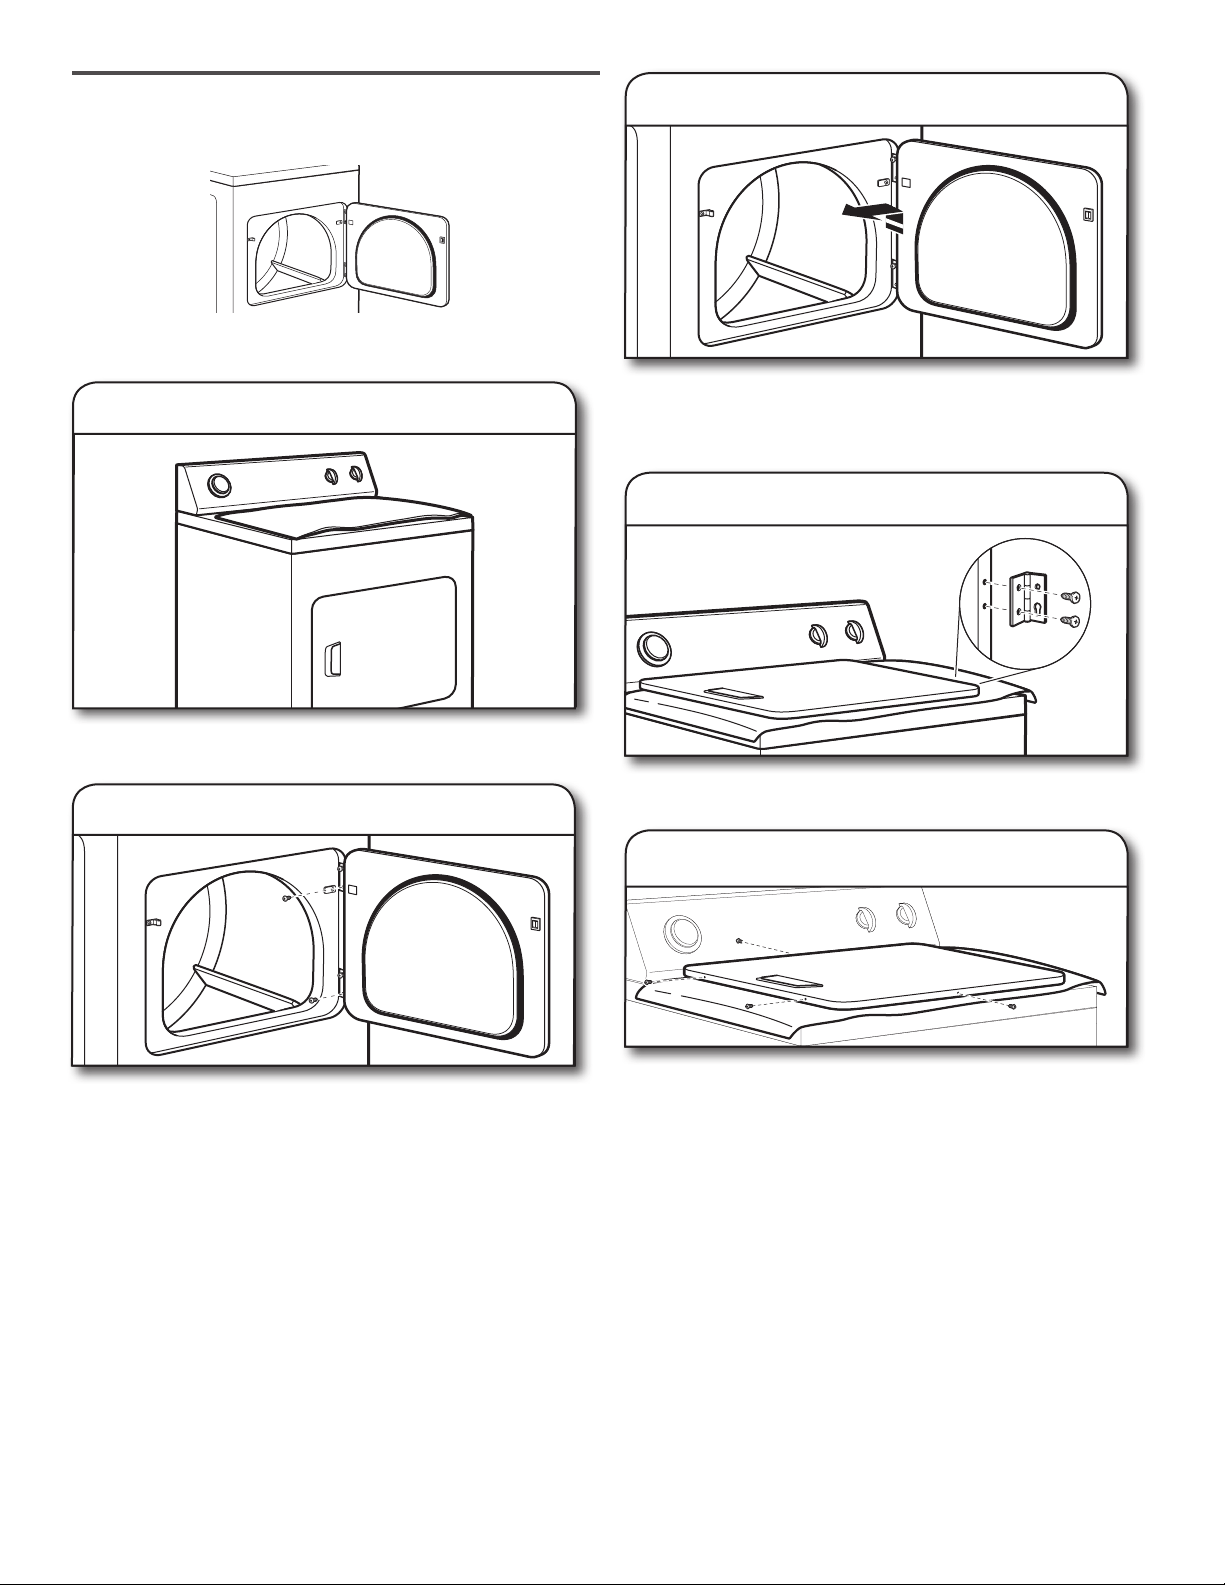
2. Load the dryer
Place laundry in the dryer. Close the door.
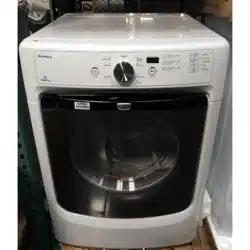
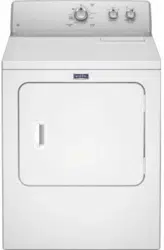
NOTE: Your model may have a different door than the one
shown. Some models have drop-down doors.
Do not tightly pack the dryer; clothes should be able to tumble
freely.
WARNING
Fire Hazard
No washer can completely remove oil.
Do not dry anything that has ever had any type of oil on
it (including cooking oils).
Items containing foam, rubber, or plastic must be dried
on a clothesline or by using an Air Cycle.
Failure to follow these instructions can result in death
or fire.
WARNING: To reduce the risk of fire, electric shock, or injury to
persons, read the IMPORTANT SAFETY INSTRUCTIONS before
operating this dryer.
Before using your dryer, wipe the dryer drum with a damp cloth
to remove dust from storing and shipping.
8
5. Press START/STOP to begin cycle
Press and hold the Start/Stop knob to begin the cycle.
To end the cycle early, turn the Start/Stop knob to OFF.
Promptly remove garments after cycle has completed to reduce
wrinkling. Use the Wrinkle Control feature to avoid wrinkling
when you are unable to remove a load from the dryer as soon
as it stops.
4. Set cycle settings and options
Select cycle settings and options by turning the knob to the
desired position.
NOTE: Not all options and settings are available with all cycles.
Temperature
Turn the Temperature knob to change the drying temperature
setting. See “Setting the Drying Temperature.”
Wrinkle Control feature (on some models)
Get 40 minutes of heat-free, periodic tumbling at the end
of a cycle. Turn the Wrinkle Control knob to select NO
to turn off at any time before the cycle has ended.
3. Select the desired cycle
Select the desired cycle for your load. See the “Cycle Guide”
for more information about each cycle.
AUTOMATIC DRY Cycles
You can select a different dryness level, depending on your
load, by turning the knob to dryness level.
Selecting More Dry, Normal, Energy Preferred, or Less Dry
automatically adjusts the dryness level at which the dryer will
shut off. Once a dry level is set, it cannot be changed without
stopping the cycle.
Automatic Dry cycles give the best drying in the shortest time.
Drying time varies based on fabric type, load size, and dryness
setting.
NOTE: More Dry removes more load moisture. Less Dry
removes less moisture and is used for loads you may want to
put on a hanger to complete drying.
9
DRYER CARE
Keep dryer area clear and free from items that would
block the air ow for proper dryer operation. This includes
clearing piles of laundry in front of the dryer.
Cleaning the lint screen
Every load cleaning
The lint screen is located in the dryer. A screen blocked by
lint can increase drying time.
To clean:
1. Pull the lint screen out of its holder. Roll lint off the
screen with your ngers. Do not rinse or wash screen
to remove lint. Wet lint is hard to remove.
2. Push the lint screen rmly back into place.
IMPORTANT:
■ Do not run the dryer with the lint screen loose,
damaged, blocked, or missing. Doing so can cause
overheating and damage to both the dryer and fabrics.
■ If lint falls off the screen into the dryer during removal,
check the exhaust hood and remove the lint. See
“Venting Requirements” in the Installation Instructions.
■ Clean space where lint
screen is located, as
needed. Using a vacuum,
gently remove any lint that
has accumulated outside of
the lint screen.
As-needed cleaning
Laundry detergent and fabric softener residue can build
up on the lint screen. This buildup can cause longer drying
times for your clothes or cause the dryer to stop before
your load is completely dry. The screen is probably
clogged if lint falls off while the screen is in the dryer.
Clean the lint screen with a nylon brush every 6 months,
or more frequently, if it becomes clogged due to a residue
buildup.
To wash:
1. Roll lint off the screen with your ngers.
2. Wet both sides of lint screen with hot water.
3. Wet a nylon brush with hot water and liquid detergent.
Scrub lint screen with the brush to remove residue
buildup.
4. Rinse screen with hot water.
5. Thoroughly dry lint screen with a clean towel.
Reinstall screen in dryer.
Cleaning the dryer interior
To clean dryer drum
1. Apply a liquid, nonammable household cleaner to the
stained area of the drum and rub with a soft cloth until
stain is removed.
2. Wipe drum thoroughly with a damp cloth.
3. Tumble a load of clean cloths or towels to dry the drum.
NOTE: Garments that contain loose dyes, such as denim
blue jeans or brightly colored cotton items, may discolor the
dryer interior. These stains are not harmful to your dryer and
will not stain future loads of clothes. Dry these items inside
out to avoid drum staining.
Removing accumulated lint
From inside the dryer cabinet
Lint should be removed every 2 years, or more often,
depending on dryer usage. Cleaning should be done
by a qualied servicer.
From the exhaust vent
Lint should be removed every 2 years, or more often,
depending on dryer usage.
Cleaning the dryer location
10
Vacation, storage, and moving care
Non-Use or Storage Care
Operate your dryer only when you are at home. If you will
be on vacation or not using your dryer for an extended
period of time, you should:
1. Unplug dryer or disconnect power.
2. (For gas dryers only): Close shut-off valve to gas
supply line.
3. Clean lint screen. See “Cleaning the lint screen.”
Moving Care
For power supply cord-connected dryers:
1. Unplug the power supply cord.
2. Make sure leveling legs are secure in dryer base.
3. Use tape to secure dryer door.
For direct-wired dryers:
1. Turn off power at fuse or breaker box.
2. Disconnect wiring.
3. Make sure leveling legs are secure in dryer base.
4. Use tape to secure dryer door.
For gas dryers:
1. Unplug or disconnect power to dryer.
2. Close shut-off valve in gas supply line.
3. Disconnect gas supply line pipe and remove ttings
attached to dryer pipe.
4. Cap the open fuel supply line.
5. Make sure leveling legs are secure in dryer base.
6. Use tape to secure dryer door.
Reinstalling the Dryer
Follow the Installation Instructions to locate, level,
and connect the dryer.
Changing the drum light
(on some models)
1. Unplug dryer or disconnect power.
2. Open the dryer door. Locate the light bulb cover
on the back wall of the dryer. Using a Phillips-head
screwdriver, remove the screw located in the lower
right-hand corner of the cover. Remove the cover.
3. Turn bulb counterclockwise. Replace the bulb with
a 10 watt appliance bulb only. Replace the cover and
secure with the screw.
4. Plug into a grounded outlet or reconnect power.
11
First try the solutions suggested here to possibly avoid the cost of a service call.
If you experience Possible Causes Solution
Clothes are not drying
satisfactorily; drying times
are too long
Lint screen or lint screen housing is
clogged with lint.
Clean lint screen before each load. Clean space where
lint screen is located, as needed. Using a vacuum, gently
remove any lint that has accumulated outside of the lint
screen.
The Air Fluff/Air Dry cycle or No Heat
temperature setting has been selected.
Select the right cycle for the types of garments being
dried. See “Cycle Guide.”
Load too large and heavy to dry quickly. Separate the load to tumble freely.
Exhaust vent or outside exhaust hood
clogged with lint, restricting air movement.
Run the dryer for 5–10 minutes. Hold your hand under
the outside exhaust hood to check air movement. If you
do not feel air movement, clean exhaust system of lint
or replace exhaust vent with heavy metal or exible
metal vent. Make sure vent is not crushed or kinked.
See Installation Instructions.
Fabric softener sheets blocking the grille. Use only one fabric softener sheet and use it only once.
Exhaust vent not the correct length. Check that the exhaust vent is not too long or has
too many turns. Long venting will increase drying times.
Make sure vent is not crushed or kinked. See Installation
Instructions.
Exhaust vent diameter not the
correct size.
Use 102mm (4") diameter vent material.
Dryer located in a room with
temperature below 7ºC (45ºF).
Proper operation of dryer cycles requires temperatures
above 7ºC (45ºF).
Dryer located in a closet without adequate
opening.
Closet doors must have ventilation openings at the top
and bottom of the door. The front of the dryer requires
a minimum of 25mm (1") of airspace and, for most
installations, the rear of the dryer requires 127mm (5").
See Installation Instructions.
Dryer will not run Door not closed completely. Make sure the dryer door is closed completely.
Start/Stop knob not turned to ON setting. Turn Start/Stop knob to ON setting.
Start/Stop knob not pressed rmly
or held long enough.
Press and hold the Start/Stop knob until you hear the dryer
drum moving.
Household fuse is blown or circuit breaker
has tripped.
Electric dryers use 2 household fuses or circuit breakers.
The drum may be turning, but you may not have heat.
Replace both fuses or reset the circuit breaker. If the
problem continues, call an electrician.
Incorrect power supply. Electric dryers require 240 volt power supply. Check with
a qualied electrician.
Wrong type of fuse. Use a time-delay fuse.
Unusual sounds Dryer had a period of non-use. If the dryer hasn’t been used for awhile, there may be a
thumping sound during the rst few minutes of operation.
A coin, button, or paper clip is caught
between the drum and front or rear of
the dryer.
Check the front and rear edges of the drum for small
objects. Clean out pockets before laundering.
It is a gas dryer. The gas valve clicking is a normal operating sound.
The four legs are not installed, or the dryer
is not level front to back and side to side.
The dryer may vibrate if not properly installed.
See Installation Instructions.
Clothing knotted or balled up. When balled up, the load will bounce, causing the dryer
to vibrate. Separate the load items and restart the dryer.
No heat Household fuse is blown or circuit breaker
has tripped.
The drum may be turning, but you may not have heat.
Electric dryers use 2 household fuses or circuit breakers.
Replace both fuses or reset the circuit breaker. If the
problem continues, call an electrician.
Supply line valve not open. For gas dryers, make sure the supply line valve is open.
Incorrect power supply. Electric dryers require 240 volt power supply.
Check with a qualied electrician.
TROUBLESHOOTING
12
TROUBLESHOOTING
First try the solutions suggested here to possibly avoid the cost of a service call.
If you experience Possible Causes Solution
Cycle time too short Automatic cycle ending early. The load may not be contacting the sensor strips.
Level the dryer.
Use Timed Dry for very small loads. Change the Dry Level
setting on Automatic Dry cycles.
Increasing or decreasing the Dry Level setting will change
the amount of drying time in a cycle.
Lint on load Lint screen clogged. Lint screen should be cleaned before each load.
Stains on load or drum Dryer fabric softener not properly used. Add dryer fabric softener sheets at the beginning of the
cycle. Fabric softener sheets added to a partially dried
load can stain your garments.
Drum stains are caused by dyes in clothing (usually blue
jeans). These will not transfer to other clothing.
Loads are wrinkled Load not removed from dryer at the end
of the cycle.
Select Wrinkle Control feature to tumble the load without
heat to avoid wrinkling.
Dryer tightly packed. Dry smaller loads that can tumble freely to reduce the
chance of wrinkles forming.
Odors You have recently been painting, staining,
or varnishing in the area where your dryer
is located.
If so, ventilate the area. When the odors or fumes are gone
from the area, rewash and dry the clothing.
The electric dryer is being used for the
rst time.
The new electric heating element may have an odor.
The odor will be gone after the rst cycle.
Load is too hot Laundry items removed from the dryer
before the end of the cycle.
Allow Cool Down cycle to nish before removing
laundry from dryer. All cycles are cooled slowly to reduce
wrinkling and make it easier to handle. Items removed
before Cool Down may feel very warm.
A high temperature cycle was used,
or a separate temperature control was
set on High.
Select a lower temperature and use an automatic drying
cycle. These cycles sense the temperature or the moisture
level in the load and shut off when the load reaches the
selected dryness. This reduces overdrying.
LATIN AMERICA SERVICE
For other countries in Latin America, see our Warranty Card Latin America and visit our Whirlpool Latinoamerica website
www.whirlpool-latam.com.

13
MAYTAG LAUNDRY
LIMITED WARRANTY
1. Commercial, non-residential, multiple-family use, or use inconsistent
with published user, operator, or installation instructions.
2. In-home instruction on how to use your product.
3. Service to correct improper product maintenance or installation,
installation not in accordance with electrical or plumbing codes, or
correction of household electrical or plumbing (i.e. house wiring,
fuses, or water inlet hoses).
4. Consumable parts (i.e. light bulbs, batteries, air or water filters, etc.).
5. Conversion of your product from natural gas or propane gas or
reversal of appliance doors.
6. Damage from accident, misuse, abuse, fire, floods, acts of God, or
use with products not approved by Maytag.
7. Repairs to parts or systems to correct product damage or defects
caused by unauthorized service, alteration, or modification of the
appliance.
8. Cosmetic damage including scratches, dents, chips, and other
damage to appliance finishes unless such damage results from
defects in materials and workmanship and is reported to Maytag
within 30 days.
9. Discoloration, rust, or oxidation of surfaces resulting from caustic or
corrosive environments, including but not limited to, high salt
concentrations, high moisture or humidity, or exposure to chemicals.
10. Pick-up or delivery. This product is intended for in-home repair.
11. Travel or transportation expenses for service in remote locations
where an authorized Maytag servicer is not available.
12. Removal or reinstallation of inaccessible appliances or built-in
fixtures (i.e. trim, decorative panels, flooring, cabinetry, islands,
countertops, drywall, etc.) that interfere with servicing, removal, or
replacement of the product.
13. Service or parts for appliances with original model/serial numbers
removed, altered, or not easily determined.
The cost of repair or replacement under these excluded
circumstances shall be borne by the customer.
ATTACH YOUR RECEIPT HERE. PROOF OF PURCHASE IS
REQUIRED TO OBTAIN WARRANTY SERVICE.
Please have the following information available when you call the
Customer eXperience Center:
■
Name, address, and telephone number
■
Model number and serial number
■
A clear, detailed description of the problem
■
Proof of purchase including dealer or retailer name and address
FIRST YEAR LIMITED WARRANTY (PARTS AND LABOR)
For one year from the date of purchase, when this major appliance
is installed, operated, and maintained according to instructions
attached to or furnished with the product, Maytag brand of
Whirlpool Corporation or Whirlpool Canada LP (hereafter
“Maytag”) will pay for factory specified parts and repair labor to
correct defects in materials or workmanship that existed when this
major appliance was purchased.
SECOND THROUGH TENTH YEAR LIMITED WARRANTY
(DRUM MOTOR AND STAINLESS STEEL BASKET ONLY -
LABOR NOT INCLUDED)
In the second through tenth years from the date of original
purchase, when this major appliance is installed, operated, and
maintained according to instructions attached to or furnished
with the product, Maytag will pay for factory specified parts for
the following components to correct non-cosmetic defects in
materials or workmanship in these parts that prevent function of
this major appliance and that existed when this major appliance
was purchased. This is a limited 10 year warranty on the below
named parts only and does not include repair labor.
■ Drum (Side Walls Only)
■ Drive Motor
YOUR SOLE AND EXCLUSIVE REMEDY UNDER THIS
LIMITED WARRANTY SHALL BE PRODUCT REPAIR AS
PROVIDED HEREIN. Service must be provided by a Maytag
designated service company. This limited warranty is valid only
in the United States or Canada and applies only when the major
appliance is used in the country in which it was purchased. This
limited warranty is effective from the date of original consumer
purchase. Proof of original purchase date is required to obtain
service under this limited warranty.
DISCLAIMER OF IMPLIED WARRANTIES
IMPLIED WARRANTIES, INCLUDING ANY IMPLIED WARRANTY OF MERCHANTABILITY OR IMPLIED WARRANTY OF FITNESS FOR A
PARTICULAR PURPOSE, ARE LIMITED TO TEN YEARS OR THE SHORTEST PERIOD ALLOWED BY LAW. Some states and provinces
do not allow limitations on the duration of implied warranties of merchantability or fitness, so this limitation may not apply to you. This warranty
gives you specific legal rights, and you also may have other rights that vary from state to state or province to province.
LIMITATION OF REMEDIES; EXCLUSION OF INCIDENTAL AND CONSEQUENTIAL DAMAGES
YOUR SOLE AND EXCLUSIVE REMEDY UNDER THIS LIMITED WARRANTY SHALL BE PRODUCT REPAIR AS PROVIDED HEREIN.
MAYTAG SHALL NOT BE LIABLE FOR INCIDENTAL OR CONSEQUENTIAL DAMAGES. Some states and provinces do not allow the
exclusion or limitation of incidental or consequential damages, so these limitations and exclusions may not apply to you. This warranty gives
you specific legal rights, and you also may have other rights that vary from state to state or province to province.
DISCLAIMER OF REPRESENTATIONS OUTSIDE OF WARRANTY
Maytag makes no representations about the quality, durability, or need for service or repair of this major appliance other than the
representations contained in this Warranty. If you want a longer or more comprehensive warranty than the limited warranty that comes
with this major appliance, you should ask Maytag or your retailer about buying an extended warranty.
01/14
IF YOU NEED SERVICE:
1. Before contacting us to arrange service, please determine whether your product requires repair. Some questions can be addressed
without service. Please take a few minutes to review the Troubleshooting or Problem Solver section of the Use and Care Guide, or
visit https://www.maytag.com/product_help.
2. All warranty service is provided exclusively by our authorized Maytag Service Providers. In the U.S. and Canada, direct all requests
for warranty service to:
TEN YEAR LIMITED WARRANTY
WHAT IS COVERED
WHAT IS NOT COVERED
Maytag Customer eXperience Center
In the U.S.A. call 1-800-688-9900. In Canada call 1-800-807-6777.
If outside the 50 United States and Canada, contact your authorized Maytag dealer to determine if another warranty applies.

14
SÉCURITÉ DU SECHE-LINGE
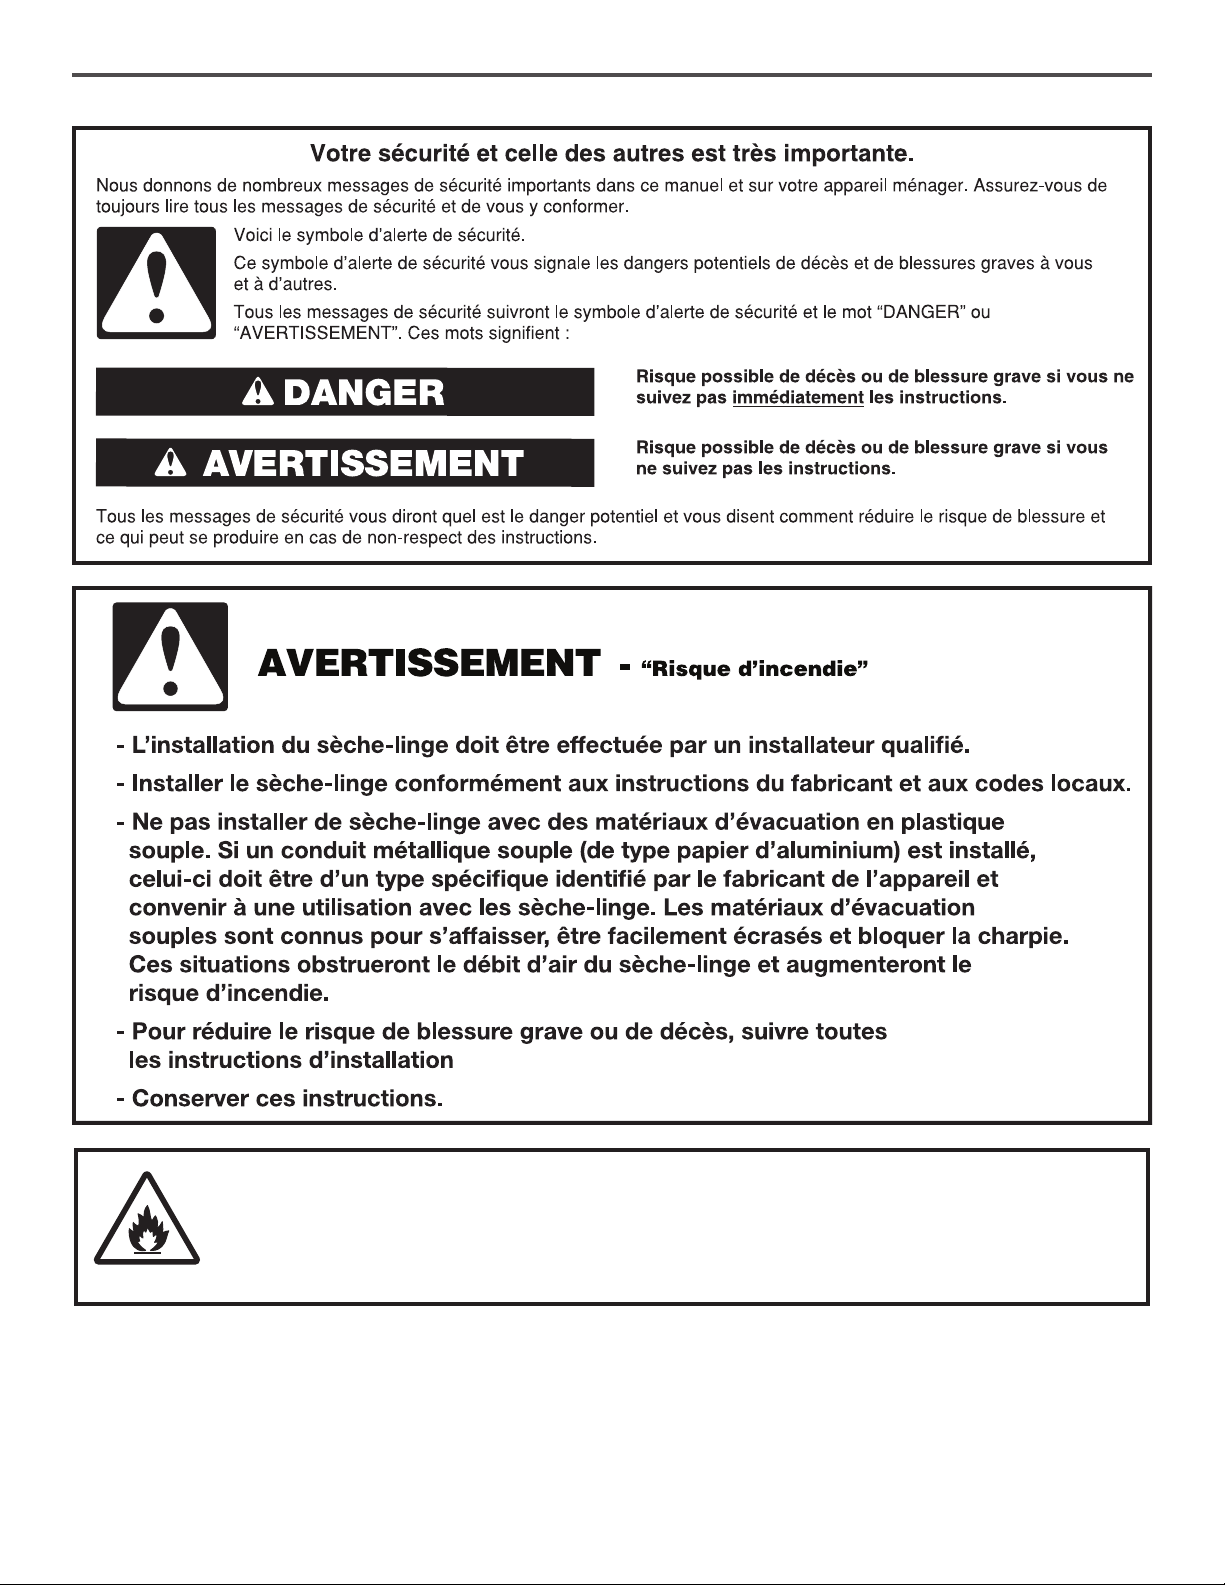
Risque possible de décès ou de blessure grave si vous ne
suivez pas immédiatement les instructions.
Risque possible de décès ou de blessure grave si vous
ne suivez pas les instructions.
Tous les messages de sécurité vous diront quel est le danger potentiel et vous disent comment réduire le risque de blessure et
ce qui peut se produire en cas de non-respect des instructions.
Votre sécurité et celle des autres est très importante.
Nous donnons de nombreux messages de sécurité importants dans ce manuel et sur votre appareil ménager. Assurez-vous de
toujours lire tous les messages de sécurité et de vous y conformer.
AVERTISSEMENT
DANGER
Voici le symbole d’alerte de sécurité.
Ce symbole d’alerte de sécurité vous signale les dangers potentiels de décès et de blessures graves à vous
et à d’autres.
Tous les messages de sécurité suivront le symbole d’alerte de sécurité et le mot “DANGER” ou
“AVERTISSEMENT”. Ces mots signifient :
MISE EN GARDE –
RISQUE D’INCENDIE/
DE MATÉRIAUX INFLAMMABLES
C’est un symbole supplémentaire d’alerte de sécurité qui des alertes vous au risque d’incendie.
15
POUR VOTRE SECURITE
1. NE PAS UTILISER OU REMISER D’ESSENCE OU AUTRES MATÉRIAUX INFLAMMABLES DANS CET APPAREIL MÉNAGER
O U À PROXIMITÉ DE CELUI-CI.
2. NE PAS VAPORISER D’AÉROSOLS À PROXIMITÉ DE CET APPAREIL MÉNAGER LORSQU’IL EST EN FONCTIONNEMENT.
3. NE PAS MODIFIER CET APPAREIL MÉNAGER.
■ Ne pas utiliser la sécheuse si l’on a utilisé des produits
chimiques industriels pour le nettoyage.
■ Vider les poches de tous objets comme les briquets et
allumettes avant de placer les vêtements dans la sécheuse.
■ Retirer les portes du compartiment de séchage avant de
retirer la sécheuse pour un entretien ou de le mettre au
rebut.
■ Ne pas accéder à l’intérieur de la sécheuse pendant le
fonctionnement du tambour. Pour votre sécurité, l’appareil
est pourvu d’un contacteur de porte.
■ Ne pas installer ou entreposer la sécheuse dans un endroit
où elle serait exposée aux intempéries.
■ Ne pas effectuer d’intervention non autorisée sur les
commandes.
■ Ne pas utiliser cette sécheuse si elle semble défectueuse.
■ Ne pas procéder à l’entretien, à la réparation ou au
remplacement de n’importe quelle pièce de la sécheuse, à
moins que ceci ne soit spéciquement recommandé dans
le guide d’utilisation et d’entretien. Seule une personne
compétente est habilitée à effectuer une intervention de
réparation ou d’entretien sur cet appareil.
■ Ne pas utiliser d’assouplissant ou de produits pour éliminer
l’électricité statique à moins que cela ne soit recommandé
par le fabricant de l’assouplissant ou du produit. Suivre
leurs instructions.
■ Nettoyer le ltre à peluches de la sécheuse avant ou après
chaque charge.
Ne pas utiliser la sécheuse si le ltre à peluches n’est pas
installé.
■ La zone située autour des ouvertures de prise ou
d’évacuation d’air et les zones adjacentes doivent être
exemptes de peluches et poussières.
■ L’intérieur de la sécheuse et le conduit d’évacuation doivent
être nettoyés régulièrement par un personnel d’entretien
qualié.
■ Voir les instructions d’installation pour les instructions de
mise à la terre.
■ Ne pas faire sécher d’articles non lavés dans cette
sécheuse.
■ La partie nale du programme de séchage par culbutage a
lieu sans chaleur (programme de refroidissement) pour que
les articles soient laissés à une température qui ne risque
pas de les endommager.
■ Les articles tels que le caoutchouc mousse (mousse de
latex), les bonnets de douche, les textiles imperméabilisés,
les articles avec endos de caoutchouc et les vêtements ou
oreillers rembourrés avec matelassage en mousse doivent
être séchés uniquement sur une corde à linge.
■ Si le cordon d’alimentation est endommagé, il doit être
remplacé par le fabricant, son agent de service ou toute
autre personne qualiée an d’éviter tout danger.
AVERTISSEMENT: Ne jamais arrêter une sécheuse
pendant le culbutage avant la n du programme de séchage à
moins de retirer les articles rapidement et de les étendre an
de dissiper la chaleur.
IMPORTANTES INSTRUCTIONS DE SÉCURITÉ
AVERTISSEMENT:
An de réduire le risque d’incendie, de décharge électrique ou de blessures lors de l’utilisation de la
sécheuse, il convient d’observer certaines précautions fondamentales, notamment:
CONSERVER CES INSTRUCTIONS
■ Lire toutes les instructions avant d’utiliser la sécheuse.
4
IMPORTANT SAFETY INSTRUCTIONS
precautions, including the following:
WARNING:
Read all instructions before using the dryer.
Keep a minimum clearance of 100 mm (4 in.) between the
rear of the dryer and any wall.
The operation of this appliance may affect the operation of
other types of appliances which take their air supply for safe
combustion from the same room. There has to be adequate
ventilation to replace exhausted air and thus avoid the
back-ow of gases into the room from appliances burning
other fuels, including open res, when operating the tumble
dryer. If in doubt, consult the appliance manufacturers.
Do not obstruct the air supply to the dryer (see Installation
Instructions for minimum clearances).
Do not place items exposed to cooking oils in your dryer.
Oil-affected items can ignite spontaneously, especially when
exposed to heat sources such as in a tumble dryer. The
items become warm causing an oxidation reaction in the oil.
Oxidation creates heat. If the heat cannot escape, the items
can become hot enough to catch re. Piling, stacking or
storing oil-affected items can prevent heat from escaping
and so create a re hazard.
If it is unavoidable to dry in the dryer items that have been
soiled with substances such as cooking oil, acetone, alcohol,
petrol, kerosene, spot removers, turpentine, waxes and wax
removers, or that have been contaminated by hair care
products, should be washed in hot water with an extra
amount of detergent before being dried in the dryer. These
items may give off vapours that could ignite or explode. Such
washing will reduce, but not eliminate, the hazard.
This appliance is not intended for use by persons (including
children) with reduced physical, sensory or mental
capabilities, or lack of experience and knowledge, unless
they have been given supervision or instructions concerning
use of the appliance by persons responsible for their safety.
Children should be supervised to ensure that they do not
play with the appliance.
The dryer should not be used if industrial chemicals have
been used for cleaning.
Before the dryer is removed from service or discarded,
remove the doors to the drying compartment.
Do not reach into the dryer if the drum is moving. A door
switch is tted for your safety.
Do not install or store the dryer where it will be exposed
to the weather.
Do not tamper with controls.
Do not continue to use this appliance if it appears to be
faulty.
Do not repair or replace any part of the dryer or attempt
any maintenance unless specically recommended in this
Use and Care Guide. Repairs and servicing should only
be carried out by competent service personnel.
Do not use fabric softeners or products to eliminate static
unless recommended by the manufacturer of the fabric
softener or product. Follow their instructions.
Clean dryer lint screen before or after each load. Do not
operate dryer without lint screen in place.
Keep area around the exhaust and inlet openings and
adjacent surrounding areas free from the accumulation of
lint, dust, and dirt.
The interior of the dryer and exhaust vent should be
cleaned periodically by qualied service personnel.
See Installation Instructions for earthing instructions.
Do not dry unwashed items in this dryer.
Items such as foam rubber (latex foam), shower caps,
waterproof textiles, rubber backed articles and clothes or
pillows tted with foam rubber pads must only be dried
on a clothesline.
SAVE THESE INSTRUCTIONS
WARNING: Never stop a tumble dryer cycle before the
end of the drying cycle unless all items are quickly removed
and spread out so that the heat is dissipated.
To reduce the risk of re, electric shock, or injury to persons when using the dryer, follow basic
The nal part of a tumble dryer cycle occurs without heat
(cool down cycle) to ensure that the items are left at a
temperature that ensures the items will not be damaged.
If the supply cord is damaged, it must be replaced by the
manufacturer or its service agent or a similarly qualied
person in order to avoid a hazard.
■ Laisser un dégagement minimal de 100mm (4po)
entre l’arrière de la sécheuse et les éventuelles parois
environnantes.
■ L’utilisation de cet appareil peut affecter celle d’autres
appareils dont la source d’approvisionnement en air
se fait dans la même pièce pour une combustion sans
danger. Lorsqu’on utilise la sécheuse, une aération
adéquate est nécessaire pour renouveler l’air rejeté et
pour éviter le retour dans la pièce de gaz en provenance
d’appareils ménagers utilisant d’autres carburants comme
combustible, y compris les feux ouverts. En cas de doute,
consulter le fabricant de l’appareil.
■ Ne pas obstruer l’alimentation en air de la sécheuse
(voir les instructions d’installation pour les dégagements
minimaux).
■ Ne pas placer d’articles tâchés d’huile de cuisson dans la
sécheuse. Des articles ayant été au contact d’huile peuvent
s’enammer spontanément, surtout s’ils sont exposés
à des sources de chaleur, comme celle que produit une
sécheuse. Les articles peuvent chauffer, entraînant une
réaction d’oxydation de l’huile. Le phénomène d’oxydation
crée de la chaleur. Si la chaleur ne peut pas s’échapper,
les articles peuvent devenir sufsamment chauds pour
prendre feu. Pour réduire le risque d’incendie dû à des
charges contaminées, la partie nale du programme de
séchage par culbutage s’effectue sans chaleur (période
de refroidissement). Éviter d’arrêter une sécheuse pendant
le culbutage avant la n du programme de séchage, à
moins de retirer et d’étendre rapidement tous les articles
an que la chaleur se dissipe. Le fait d’empiler, d’entasser
ou d’entreposer des articles ayant été au contact d’huile
peut empêcher la chaleur de s’échapper et créer un risque
d’incendie.
■ Si on doit faire sécher dans la sécheuse des articles ayant
été souillés par des substances telles que de l’huile de
cuisson, de l’acétone, de l’alcool, du pétrole, du kérosène,
des produits détachants, de la térébenthine, de la cire, du
décapant pour cire ou des produits de coiffure, les laver à
l’eau chaude avec un supplément de détergent avant de
les sécher dans la sécheuse. Ces articles sont susceptibles
de dégager des vapeurs qui pourraient s’enammer ou
exploser. Les laver ainsi au préalable permet de réduire,
mais non de supprimer ce risque.
■ Cet appareil ne convient pas à une utilisation par des
personnes (y compris des enfants de moins de 8 ans) à
capacités physiques, sensorielles ou mentales réduites, ou
possédant un manque d’expérience et de connaissances,
à moins qu’elles ne soient placées sous supervision ou
qu’elles aient reçu des instructions concernant l’utilisation
de l’appareil par une personne responsable de leur sécurité.
■ Le nettoyage et l’entretien par des enfants doivent être
supervisés.
■ Les enfants doivent être placés sous surveillance an de
s’assurer qu’ils ne jouent pas avec l’appareil.
■ Les enfants de moins de 3ans doivent être tenus à
l’écart de l’appareil s’ils ne peuvent pas être surveillés en
permanence.
16
CARACTERISTIQUES
Ces appareils sont vendus dans diverses régions aux critères
de capacité de mesure différents. Vous trouverez ci-dessous
quelques unes des formes de mesures valables indiquées
sur ce produit :
Capacité linge sec : Poids reétant la taille de charge maximale
pouvant être placée dans le lave-linge.
Capacité IEC : Mesure de capacité représentant la capacité
maximale de linge sec et de textiles pour lesquels le fabricant
conseille un programme spécique de traitement.
Modèles
3LMEDC315FW
3LMEDC415FW
4KMEDC215FW
4KMEDC315FW
4KMEDC415FW
4KMEDC425FW
Tension nominale 220–240 V 2N~ 220–240 V 2N~
Fréquence nominale 50 Hz 60 Hz
Courant nominal 20 Amps 20 Amps
Capacité linge sec
(maximum)
15 kg (33 lb) 15 kg (33 lb)
Capacité IEC 7 kg (15 lb) 7 kg (15 lb)
Hauteur 1067 mm (42") 1067 mm (42")
Largeur 737 mm (29") 737 mm (29")
Profondeur 706 mm (27
13
⁄16") 706 mm (27
13
⁄16")
17
VÉRIFICATION D’UNE CIRCULATION D’AIR ADÉQUATE POUR LE SYSTÈME
D’ÉVACUATION
Maintenir une bonne circulation d’air
en effectuant les opérations suivantes :
■ Nettoyer le filtre à charpie avant chaque charge.
■ Remplacer le matériau de conduits d’évacuation en
plastique ou en aluminium par des conduits d’évacuation
lourds et rigides de 102 mm (4") de diamètre.
■ Toujours employer les conduits d’évacuation les plus
courts possible.
■ Ne pas utiliser plus de quatre coudes à 90° dans un
circuit d’évacuation car chaque inclinaison et courbe
réduit le flux d’air.
■ Retirer la charpie et les résidus du clapet d’évacuation.
■ Retirer la charpie sur toute la longueur du circuit
d’évacuation au moins tous les 2 ans. Après le
nettoyage, veuillez suivre les instructions d’installation
fournies avec le sèche-linge pour une vérification finale
de l’appareil.
■ Dégager tout article qui se trouverait devant
le sèche-linge.
CIRCULATION D’AIR ADÉQUATE
Un sèche-linge a besoin de chaleur et d’une circulation
d’air adéquate pour sécher efcacement le linge. Une
ventilation adéquate réduit les durées de séchage et accroît
les économies d’énergie. Voir les Instructions d’installation.
Le système d’évacuation xé au sèche-linge joue un rôle
important dans la circulation de l’air.
Les interventions de dépannage causées par une ventilation
incorrecte ne sont pas couvertes par la garantie et seront
à la charge du client, quel que soit l’installateur du
sèche-linge.
UTILISATION DES PROGRAMMES AUTOMATIQUES POUR UN MEILLEUR SOIN
DU TISSU ET DAVANTAGE D’ÉCONOMIES D’ÉNERGIE
Risque d’incendie
Utiliser un conduit d’évacuation en métal lourd.
Ne pas utiliser un conduit d’évacuation en plastique.
Ne pas utiliser un conduit d’évacuation en feuille
de métal.
Le non-respect de ces instructions peut causer
un décès ou un incendie.
AVERTISSEMENT
Bon
Mieux
Utiliser les programmes de séchage automatique pour réaliser un maximum d’économies d’énergie et pour que la sécheuse
apporte un soin supérieur aux tissus. Durant les programmes de séchage automatique, la température de séchage de l’air ou le
niveau d’humidité sont détectés dans la charge. Cette détection se produit tout au long du programme de séchage et la sécheuse
s’éteint lorsque la charge atteint le degré de séchage sélectionné.
Avec l’option de séchage minuté, la sécheuse fonctionne pendant la durée réglée, ce qui peut parfois entraîner le rétrécissement
ou le froissement des vêtements et l’accumulation d’électricité statique due au séchage excessif. Utiliser le séchage minuté pour
une charge encore humide nécessitant un peu de temps supplémentaire ou lors de l’utilisation de la grille de séchage.
18
TABLEAU DE COMMANDE ET CARACTÉRISTIQUES
CARACTÉRISTIQUE Wrinkle Control
(sur certains modèles)
Lorsqu’on ne peut pas enlever une charge du sèche-linge
dès qu’elle s’arrête, des faux plis peuvent se former. La
caractéristique Wrinkle Control effectue un culbutage de la
charge, la réagence et l’aère à intervalles réguliers
pour aider à éviter la formation de faux plis.
■ Obtenez 40 minutes de culbutage périodique sans
chaleur à la fin d’un programme. Appuyer sur le bouton
Wrinkle Control pour activer ou désactiver cette fonc-
tion à tout moment avant la fin d’un programme.
BOUTON DE PROGRAMME DU SÈCHE-LINGE
Utiliser le bouton de programme de séchage pour
sélectionner les programmes disponibles sur le sèche-
linge. Tourner le bouton de programme pour sélectionner
un programme correspondant à la charge de linge.
Voir “Guide de programmes” pour des descriptions
de programmes détaillées.
Séchage minuté
Ceci fait fonctionner le sèche-linge pour la durée
spéciée sur le module de commande. Pour
les modèles dotés d’un bouton de sélection de
température, vous pouvez choisir un réglage en
fonction des tissus de votre charge. Le temps de
séchage et la température dépendront du modèle
de votre sèche-linge.
1
2
3
Programmes automatiques
Détecte l’humidité de la charge et la température de l’air
et s’éteint lorsque la charge a atteint le degré de séchage
sélectionné. Permet d’obtenir le meilleur rendement de
séchage en un minimum de temps. Le temps de séchage
variera en fonction du type de tissu, du volume de la
charge et du réglage de séchage.
TEMPERATURE (température)
Choisir une température de séchage en fonction des
tissus de votre charge. Si vous hésitez sur la température à
sélectionner pour une charge donnée, choisir le réglage plus
bas plutôt que le réglage plus élevé.
START/STOP (mettre en marche/arrêt)
Le signal de n de programme émet un signal sonore qui
indique la n du programme de séchage. Le fait de sortir
rapidement les vêtements à la n du programme permet
de réduire le froissement.
Tourner le bouton Start/Stop (mettre en marche/arrêt)
pour activer ou désactiver le réglage désiré. Appuyer
sur le bouton Start/Stop (mettre en marche/arrêt)
pour mettre le sèche-linge en marche.
REMARQUE : Lorsque le réglage Wrinkle Control est
sélectionné, un signal sonore retentit toutes les 5 minutes
jusqu’à soient retirés ou que le réglage Wrinkle Control se
termine.
4
Certains programmes et options ne sont pas disponibles sur certains modèles.
L’apparence des appareils peut varier.
2 31 4
2 4
19
Certains programmes ne sont pas disponibles sur certains modèles.
REMARQUE – Les certications de performance énergétique du gouvernement pour les modèles Maytag électriques ou au gaz sont
fondées sur le programme Timed Dry (séchage minuté) utilisant le réglage de température de séchage maximum. Les valeurs par
défaut congurées à l’usine pour les éléments séchage par détection, séchage automatique, programme normal, chaleur faible et
antifroissement n’ont pas été utilisées.
GUIDE DES PROGRAMMES – PROGRAMMES DE SÉCHAGE AUTOMATIQUE
GUIDE DES PROGRAMMES – PROGRAMMES DE SÉCHAGE MINUTÉS
Certains programmes ne sont pas disponibles sur certains modèles.
TIMED DRY (séchage minuté) – Fait fonctionner la sécheuse pour la durée spéciée sur le module de commande.
REMARQUE: Si les charges ne semblent pas aussi sèches que désiré, sélectionner More Dry (plus sec) la prochaine fois que l’on
séchera une charge semblable. Si la charge semble plus sèche que désiré, sélectionner Less Dry (moins sec) la prochaine fois que l’on
séchera une charge semblable.
Réglage de la température de séchage
Si la sécheuse comporte plusieurs réglages de chaleur:
On peut utiliser un réglage de température élevée pour
sécher les articles lourds tels que les serviettes et les
vêtements de travail.
Une température réglée sur Low (basse) à Medium (moyenne)
peut être utilisée pour sécher les articles moyennement
lourds tels que draps, chemisiers, robes, sous-vêtements,
tissus à pressage permanent et certains tricots.
Utiliser un réglage No Heat (sans chaleur) pour la mousse, le
caoutchouc, le plastique ou les tissus sensibles à la chaleur.
Sécher sur une corde à linge les tissus doublés ou
multicouches.
REMARQUE: Pour toute question concernant les
températures de séchage pour diverses charges, consulter les
instructions sur l’étiquette de soin.
Articles à sécher: Programme: Température: Options disponibles: Détails du programme:
Jeans, vêtements de
travail lourds, serviettes
More Dry
(plus sec)
Normal ou
Energy Preferred
(éconergique)
High (Élevée) Wrinkle Control/Wrinkle
Prevent (antifroissement)
Température
Cycle signal
(signal de programme)
Les programmes automatiques offrent
un séchage idéal en un temps record.
Ladurée de séchage varie en fonction
du type de tissu, de la taille de la
charge et du réglage de niveau de
séchage.
Choisir une température de
séchage en fonction des tissus de
votre charge. Si l’on hésite sur la
température à sélectionner pour
une charge donnée, choisir un
réglage inférieur plutôt qu’un réglage
supérieur.
Vêtements de travail,
tissus de poids moyen,
draps
Normal ou
Energy Preferred
(éconergique)
Medium
(Moyenne)
Wrinkle Control/Wrinkle
Prevent (antifroissement)
Température
Cycle signal
(signal de programme)
Articles ordinaires,
pantalons, articles
légers, synthétiques,
délicats, vêtements de
sport
Delicate or Less
Dry (delicat ou
moins sec)
Normal ou
Energy Preferred
(éconergique)
Low (Basse) Wrinkle Control/Wrinkle
Prevent (antifroissement)
Température
Cycle signal
(signal de programme)
Articles à sécher: Programme: Température: Options disponibles: Détails du programme:
Articles lourds ou
volumineux tels que
serviettes épaisses ou
peignoirs
Heavy Dry
(séchage intense)
N’importe
laquelle
Température Sélectionner High (élevé) pour sécher
des charges importantes ou lourdes.
N’importe quelle charge Damp Dry/
Freshen Up
(séchage
humide/
rafraîchissement)
N’importe
laquelle
Température Sèche les articles jusqu’à un niveau
humide ou pour les articles qui ne
nécessitent pas un programme de
séchage complet.
Caoutchouc, plastique,
tissus sensibles à la
chaleur
Air Fluff/Air Dry
(duvetage a l’air/
sechage a l’air)
No Heat
(sans chaleur)
Température Séchage sans chaleur.
20
UTILISATION DU SECHE-LINGE
1. Nettoyer le ltre à charpie
Nettoyer le ltre à charpie avant chaque charge. Enlever le ltre
à charpie en le tirant tout droit vers le haut. Enlever la charpie
du ltre en la roulant avec les doigts. Ne pas rincer ni laver le ltre
pour enlever la charpie. Remettre le ltre à charpie fermement en
place.
Pour plus d’informations sur le nettoyage, voir “Entretien du
sèche-linge”.
2. Charger le sèche-linge
Placer le linge dans le sèche-linge. Fermer la porte.
REMARQUE : La porte de votre modèle peut différer de celle
gurant sur l’illustration. Certains modèles peuvent comporter
des portes à ouverture vers le bas.
Ne pas surcharger le sèche-linge; les vêtements doivent pouvoir
culbuter librement.
Risque d'explosion
Garder les matières et les vapeurs inflammables, telle
que l’essence, loin de la sécheuse.
Ne pas faire sécher un article qui a déjà été touché par
un produit inflammable (même après un lavage).
Le non-respect de ces instructions peut causer
un décès, une explosion ou un incendie.
AVERTISSEMENT
AVERTISSEMENT : Pour réduire le risque d’incendie, de choc
électrique ou de blessures à autrui, lire les IMPORTANTES
INSTRUCTIONS DE SÉCURITÉ avant de faire fonctionner
ce sèche-linge.
Avant d’utiliser le sèche-linge, essuyer le tambour du sèche-linge
avec un linge humide pour enlever la poussière accumulée au
cours de l’entreposage et de l’expédition.
21
4. Sélectionner les réglages et options
du programme
Sélectionner les réglages et options du programme en tournant
le bouton sur la position souhaitée.
REMARQUE : Tous les réglages et options ne sont pas
disponibles avec tous les programmes.
Temperature (température)
Tourner le bouton Temperature (température) pour modier
le réglage de la température de séchage. Voir “Réglage de la
température de séchage ”.
Caractéristique Wrinkle Control (antifroissement)
(sur certains modèles)
Obtener 40 minutes de culbutage périodique sans chaleur
à la n d’un programme. Tourner le bouton Wrinkle Control
pour désactiver cette fonction à tout moment avant la n
d’un programme.
3. Sélectionner le programme désiré
5. Appuyer sur le bouton Start/Stop
(mettre en marche/arrêt) pour
démarrer un programme
Appuyer sans relâcher sur le bouton Start/Stop (mettre en
marche/arrêt) pour démarrer le programme.
Pour nir le cycle plus tôt, mettre le bouton Start/Stop
(mettre en marche/arrêt/) sur OFF.
Retirer rapidement les vêtements une fois le programme terminé
pour réduire le froissement. Utiliser la caractéristique Wrinkle
Control pour éviter le froissement lorsqu’on ne peut pas retirer
une charge du sèche-linge dès que celle-ci s’arrête.
Sélectionner le programme souhaité pour la charge. Voir le
“Guide de programmes” pour plus d’informations sur chaque
programme.
Programmes AUTOMATIC DRY (séchage automatique)
Selon votre charge, vous pouvez sélectionner un degré de
séchage différent en tournant le bouton sur le degré de
séchage.
La sélection de More Dry (plus sec), Normal (normal), Energy
Preferred (éconergique) ou Less Dry (moins sec) règle
automatiquement le degré de séchage qui commandera l’arrêt
de la sécheuse. Après avoir sélectionné un certain degré
de séchage, il est impossible de le modier sans arrêter le
programme.
Les programmes de séchage automatique offrent un séchage
idéal en un minimum de temps. La durée de séchage varie en
fonction du type de tissu, de la taille de la charge et du réglage
de niveau de séchage.
REMARQUE: Le séchage avancé élimine davantage
d’humidité de la charge. La fonction Less Dry (moins sec)
élimine moins d’humidité et est utilisée pour les charges que
l’on souhaite placer sur un cintre pour qu’elles nissent de
sécher.
22
ENTRETIEN DU SECHE-LINGE
Éviter de laisser autour du sèche-linge des éléments qui
pourraient obstruer la circulation de l’air et empêcher le
bon fonctionnement du sèche-linge. Ceci implique de
dégager également les éventuelles piles de linge placées
devant le sèche-linge.
Nettoyage de l’intérieur du seche-linge
Nettoyage du tambour du sèche-linge
1. Appliquer un nettoyant domestique liquide et
ininammable sur la surface tachée du tambour
et frotter avec un linge doux jusqu’à ce que la tache
soit supprimée.
2. Essuyer complètement le tambour avec un linge humide.
3. Faire culbuter une charge de linge ou de serviettes
propres pour sécher le tambour.
REMARQUE : Les vêtements contenant des teintures
instables, tels que jeans en denim ou articles en coton de
couleur vive, peuvent décolorer l’intérieur du sèche-linge.
Ces taches ne sont pas nocives pour votre sèche-linge et
ne tacheront pas les vêtements des charges futures. Sécher
ces articles sur l’envers pour éviter de tacher le tambour.
Retirer la charpie accumulée
De l’intérieur de la caisse du sèche-linge
Retirer la charpie tous les 2 ans, ou plus souvent, selon
l’utilisation du sèche-linge. Le nettoyage doit être effectué
par un personnel d’entretien qualié.
Dans le conduit d’évacuation
Retirer la charpie tous les 2 ans, ou plus souvent, selon
l’utilisation du sèche-linge.
Nettoyer l’emplacement du sèche-linge
AVERTISSEMENT
Nettoyer le ltre à charpie
Nettoyage avant chaque charge
Le ltre à charpie se trouve dans l’ouverture de la porte
du sèche-linge. Un ltre obstrué de charpie peut
augmenter la durée de séchage.
Nettoyage :
1. Enlever le ltre à charpie en le tirant tout droit vers le haut.
Enlever la charpie du ltre en la roulant avec les doigts. Ne
pas rincer ni laver le ltre pour enlever la charpie. La charpie
mouillée s’enlève difcilement.
2. Remettre le ltre à charpie fermement en place.
IMPORTANT :
■ Ne pas faire fonctionner le sèche-linge avec un filtre
à charpie déplacé, endommagé, bloqué ou manquant.
Ceci peut entraîner une surchauffe et endommager
le sèche-linge et les tissus.
■ Si de la charpie tombe dans le sèche-linge
au moment du retrait du filtre, vérifier le conduit
d’évacuation et retirer la charpie. Voir “Exigences
concernant l’évacuation” dans les Instructions
d’installation.
■ Nettoyer l’espace où se
trouve le filtre à charpie,
selon les besoins. A l’aide
d’un aspirateur, enlever
doucement toute la charpie
qui s’est accumulée à
l’extérieur du filtre à charpie.
Nettoyage au besoin
Des résidus de détergent ou d’assouplisseur de tissu
peuvent s’accumuler sur le ltre à charpie. Cette
accumulation peut entraîner des temps de séchage
plus longs, ou entraîner l’arrêt du sèche-linge avant
que la charge ne soit complètement sèche. Si de la
charpie tombe du ltre alors qu’il est dans le sèche-linge,
il est probablement obstrué.
Nettoyer le ltre à charpie avec une brosse de nylon tous
les six mois ou plus fréquemment s’il se bouche en raison
d’une accumulation de résidus.
Nettoyage :
1. Enlever la charpie du ltre en la roulant avec les doigts.
2. Mouiller les deux côtés du ltre à charpie avec de l’eau
chaude.
3. Mouiller une brosse en nylon avec de l’eau chaude et
du détergent liquide. Frotter le ltre avec la brosse pour
enlever l’accumulation de résidus.
4. Rincer le ltre à l’eau chaude.
5. Bien sécher le ltre à charpie avec une serviette propre.
Réinstaller le ltre dans le sèche-linge.

23
Précautions à prendre avant les
vacances, un entreposage ou un
déménagement
Entretien en cas de non-utilisation ou
d’entreposage
On ne doit faire fonctionner le sèche-linge que lorsqu’on est
présent. Si l’utilisateur doit partir en vacances ou n’utilise
pas le sèche-linge pendant une période prolongée, il con-
vient d’exécuter les opérations suivantes :
1. Débrancher le sèche-linge ou déconnecter l’alimentation
électrique.
2. (Pour les sèche-linges à gaz uniquement) : Fermer le
robinet d’arrêt de la canalisation d’alimentation en gaz.
3. Nettoyer le ltre à charpie. Voir “Nettoyage du ltre à
charpie”.
Précautions à prendre avant un
déménagement
Sèche-linges alimentées par cordon d’alimentation :
1. Débrancher le cordon d’alimentation électrique.
2. S’assurer que les pieds de nivellement sont solidement
xés à la base du sèche-linge.
3. Utiliser du ruban adhésif pour xer la porte
du sèche-linge.
Pour les sèche-linges avec raccordement direct :
1. Déconnecter la source de courant électrique alimentant le
boîtier de distribution (fusibles ou disjoncteur).
2. Déconnecter le câblage.
3. S’assurer que les pieds de nivellement sont solidement
xés à la base du sèche-linge.
4. Utiliser du ruban adhésif pour xer la porte du sèche-linge.
Pour les sèche-linges à gaz :
1. Débrancher le sèche-linge ou déconnecter la source de
courant électrique.
2. Fermer le robinet d’arrêt de la canalisation de gaz.
3. Débrancher le tuyau de la canalisation de gaz et retirer les
raccords xés sur le tuyau du sèche-linge.
4. Recouvrir la canalisation de gaz ouverte.
5. S’assurer que les pieds de nivellement sont solidement
xés à la base du sèche-linge.
6. Utiliser du ruban adhésif pour xer la porte du sèche-linge.
Réinstallation du sèche-linge
Suivre les Instructions d’installation pour choisir
l’emplacement, régler l’aplomb du sèche-linge et la raccorder.
Changement de la lampe du tambour
(sur certain modèles)
1. Débrancher le sèche-linge ou déconnecter la source
de courant électrique.
2. Ouvrir la porte du sèche-linge. Trouver le couvercle de
l’ampoule d’éclairage sur la paroi arrière du sèche-linge.
À l’aide d’un tournevis Phillips, retirer la vis située à
l’angle inférieur droit du couvercle. Enlever le couvercle.
3. Tourner l’ampoule dans le sens antihoraire. Remplacer
l’ampoule uniquement par une ampoule de 10 watts
pour appareil électroménager. Réinstaller le couvercle
et le xer avec la vis.
4. Brancher le sèche-linge ou reconnecter la source de
courant électrique.
24
DÉPANNAGE
Essayer d’abord les solutions suggérées ici pour éviter le coût d’une intervention de dépannage.
Si les phénomènes
suivants
se produisent
Causes possibles Solution
Le séchage des
vêtements n’est
pas satisfaisant, les
durées de séchage
sont trop longues
ou la charge est trop
chaude
Le ltre à charpie ou le logement du ltre
à charpie est obstrué par de la charpie.
Le ltre à charpie doit être nettoyé avant chaque charge.
Nettoyer l’espace où se trouve le ltre à charpie, selon les
besoins. A l’aide d’un aspirateur, enlever doucement toute
la charpie qui s’est accumulée à l’extérieur du ltre à charpie.
Le programme Air Fluff/Air Dry
(duvetage à l’air/séchage à l’air)
ou la température No Heat
(sans chaleur) a été selectionné.
Choisir le bon programme pour le type de vêtements à sécher.
Voir “Séchage à l’air”.
La charge est trop grosse et trop lourde
pour sécher rapidement.
Séparer la charge pour qu’elle culbute librement.
Le conduit d’évacuation ou le clapet
d’évacuation à l’extérieur est obstrué
de charpie, restreignant le mouvement
de l’air.
Faire fonctionner le sèche-linge pendant 5 à 10 minutes.
Tenir la main sous le clapet d’évacuation à l’extérieur pour
vérier le mouvement de l’air. Si aucun mouvement d’air
n’est perceptible, ôter la charpie présente dans le système
d’évacuation ou remplacer le conduit d’évacuation par un
conduit en métal lourd ou exible en métal. Voir les Instructions
d’installation.
Des feuilles d’assouplissant de tissu
obstruent la grille.
Utiliser seulement une feuille d’assouplissant par charge
et l’utiliser une seule fois.
Le conduit d’évacuation n’est pas
de la bonne longueur.
Vérier que le conduit d’évacuation n’est pas trop long
ou ne comporte pas trop de changements de direction.
Un long conduit augmentera les durées de séchage. S’assurer
que le conduit d’évacuation n’est pas écrasé ou déformé.
Voir les Instructions d’installation.
Diamètre du conduit d’évacuation
de taille incorrect.
Utiliser un composant de 102 mm (4") de diamètre.
Le sèche-linge se trouve-t-elle dans
une pièce où la température ambi ante
est inférieure à 7°C (45°F).
Le bon fonctionnement des programmes du sèche-linge
nécessite une température ambiante supérieure à 7°C (45°F).
Sèche-linge placé dans un placard. Les portes du placard doivent comporter des ouvertures
d’aération au sommet et en bas de la porte. Un espace
minimum de 25 mm (1") est nécessaire à l’avant du sèche-linge
et, pour la plupart des installations, un espace de 127 mm (5")
est nécessaire à l’arrière du sèche-linge. Voir les Instructions
d’installation.
Le sèche-linge
ne fonctionne pas
La porte n’est pas bien fermée. S’assurer que la porte du sèche-linge est complètement fermée.
Bouton Start/Stop (mettre en marche/
arrêt) pas mis sur ON.
Mettre le bouton Start/Stop (mettre en marche/arrêt) sur ON.
L’utilisateur n’a pas appuyé ferme-
ment sur le bouton Start/Stop (mise en
marche/arrêt) ou ne l’a pas maintenu ap-
puyé pendant sufsamment longtemps.
Appuyer sans relâcher sur le bouton Start/Stop (mise en
marche/arrêt) jusqu’à ce que le bruit du tambour du sèche-linge
en mouvement se fasse entendre.
Un fusible du domicile est grillé ou
le disjoncteur est ouvert.
Les sèche-linges électriques utilisent 2 fusibles ou disjoncteurs.
Le tambour peut tourner, mais sans chaleur. Remplacer le fusible
ou réarmer le disjoncteur. Si le problème persiste, appeler un
électricien.
Alimentation électrique incorrecte. Les sèche-linges électriques nécessitent une alimentation
électrique de 240 V. Vérier avec un électricien qualié.
Type de fusible incorrect. Utiliser un fusible temporisé.
Sons inhabituels Un sèche-linge comporte une
période de non-fonctionnement.
Si le sèche-linge n’a pas été utilisé depuis quelque temps,
il est possible qu’elle émette des bruits saccadés au cours
des premières minutes de fonctionnement.
Une pièce de monnaie, un bouton ou
un trombone est coincé entre le tambour
et l’avant ou l’arrière du sèche-linge.
Vérier les bords avant et arrière du tambour pour voir
si de petits objets y sont coincés. Vider les poches avant
de faire la lessive.
Il s’agit-d’un sèche-linge à gaz. Le déclic du robinet de gaz est un bruit de fonctionnement
normal.
Les quatre pieds ne sont pas installés
et le sèche-linge n’est pas d’aplomb de
l’avant vers l’arrière et transversalement.
Le sèche-linge peut vibrer si elle n’est pas correctement installé.
Voir les Instructions d’installation.
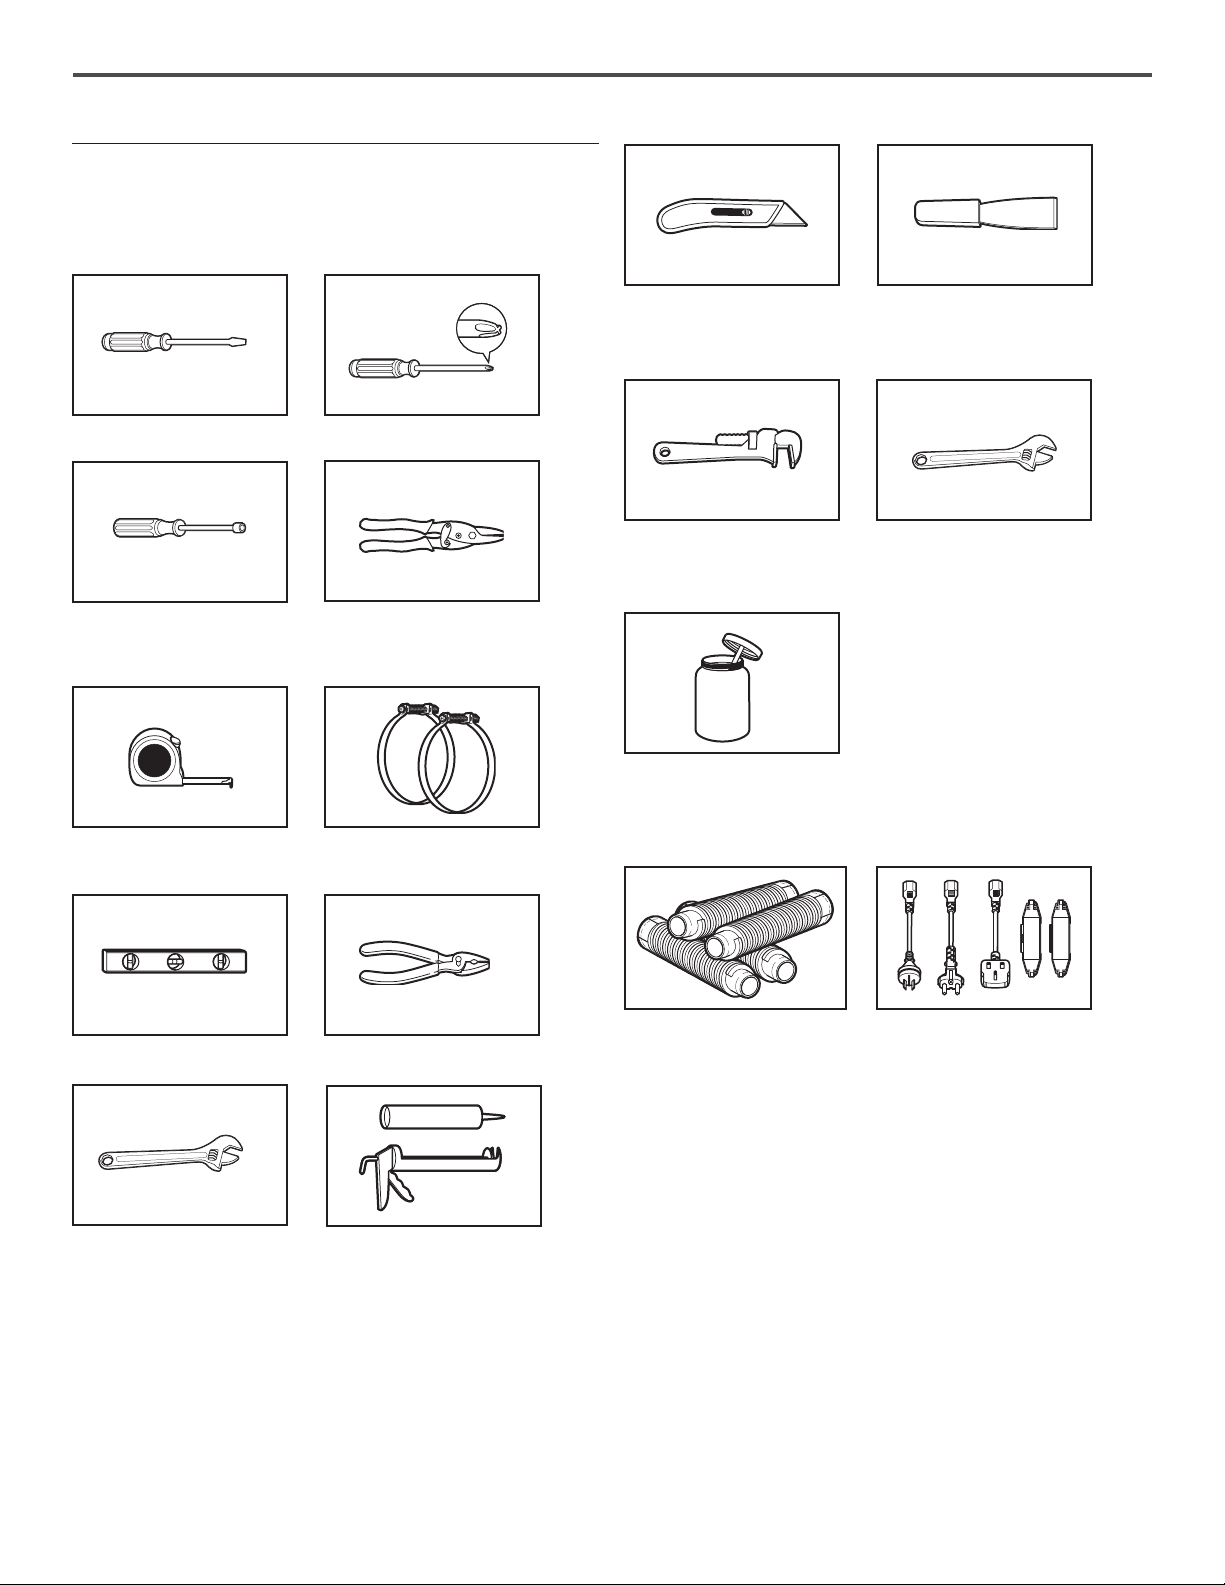
25
Essayer d’abord les solutions suggérées ici pour éviter le coût d’une intervention de dépannage.
Si les phénomènes
suivants
se produisent
Causes possibles Solution
Sons inhabituels (suite) Vêtements emmêlés ou en boule. Une charge en boule rebondit, ce qui fait vibrer
le sèche-linge. Séparer les articles dans la charge
et remettre le sèche-linge en marche.
Absence de chaleur Un fusible du domicile est grillé ou
le disjoncteur est ouvert.
Le tambour peut tourner, mais sans chaleur.
Les sèche-linges électriques utilisent 2 fusibles
ou disjoncteurs. Remplacer les deux fusibles
ou réarmer le disjoncteur. Si le problème persiste,
appeler un électricien.
Robinet de la canalisation de gaz non
ouvert.
Pour les sèche-linges à gaz, vérier que le robinet
de la canalisation est ouvert.
Alimentation électrique incorrecte. Les sèche-linges électriques nécessitent une alimentation
électrique de 240 V. Vérier avec un électricien qualié.
Temps de programme
trop court
Un programme automatique se termine
prématurément.
La charge n’est peut-être pas en contact avec les bandes
de détection. Régler l’aplomb du sèche-linge.
Utiliser le séchage minuté pour des charges de très
petite taille. Modier le réglage de degré de séchage
pour les programmes automatiques.
L’augmentation ou la diminution du degré de séchage
modiera la durée de séchage d’un programme. Si le
séchage des charges se termine systématiquement trop
tôt, voir aussi Changement des réglages par défaut de
programmes automatiques.
Charpie sur la charge Filtre à charpie obstrué. Le ltre à charpie doit être nettoyé avant chaque charge.
Taches sur la charge
ou sur le tambour
Assouplissant de tissu pour sèche-linge
utilisé de manière incorrecte.
Ajouter les feuilles d’assouplissant de tissu au début
du programme. Les feuilles d’assouplissant de tissu
ajoutées à une charge partiellement sèche peuvent tacher
les vêtements.
Les taches sur le tambour sont dues aux teintures
contenues dans les vêtements (les jeans en général).
Elles ne se transmettront pas aux autres vêtements.
Charges froissées Charge non retirée du sèche-linge
à la n du programme.
Sélectionner la caractéristique Wrinkle Control'
(anti-froissement) pour faire culbuter la charge
sans chaleur an d’éviter le froissement.
Sèche-linge surchargé. Faire sécher de plus petites charges qui peuvent culbuter
librement permet de réduire la formation de faux-plis.
Odeurs Vous avez récemment employé de la
peinture, de la teinture ou du vernis dans
la pièce où votre sèche-linge est installée.
Si c’est le cas, aérer la pièce. Une fois les odeurs
ou émana tions disparues, laver et sécher à nouveau
les vêtements.
Le sèche-linge électrique est utilisé
pour la première fois.
Le nouvel élément d’émission de chaleur peut
émettre une odeur. L’odeur disparaîtra après le premier
programme.
La charge est trop
chaude
Vous avez retiré des vêtements
du sèche-linge avant la n du
programme.
Laisser le programme de refroidissement s’achever avant
de retirer le linge du sèche-linge. Toutes les charges sont
refroidies lentement pour réduire le froissement et faciliter
leur manipulation. Des articles retirés avant la période de
refroidissement peuvent sembler très chauds.
Vous avez utilisé un programme
à température élevée ou réglé
une commande de température
indépendante sur High (Élevée).
Sélectionner une température plus basse et utiliser
un programme de séchage automatique. Ces programmes
détectent la température ou le degré d’humidité de
la charge, et l’appareil s’arrête lorsque la charge atteint
le degré de séchage sélectionné. Ceci réduit le risque
de séchage excessif.
DÉPANNAGE
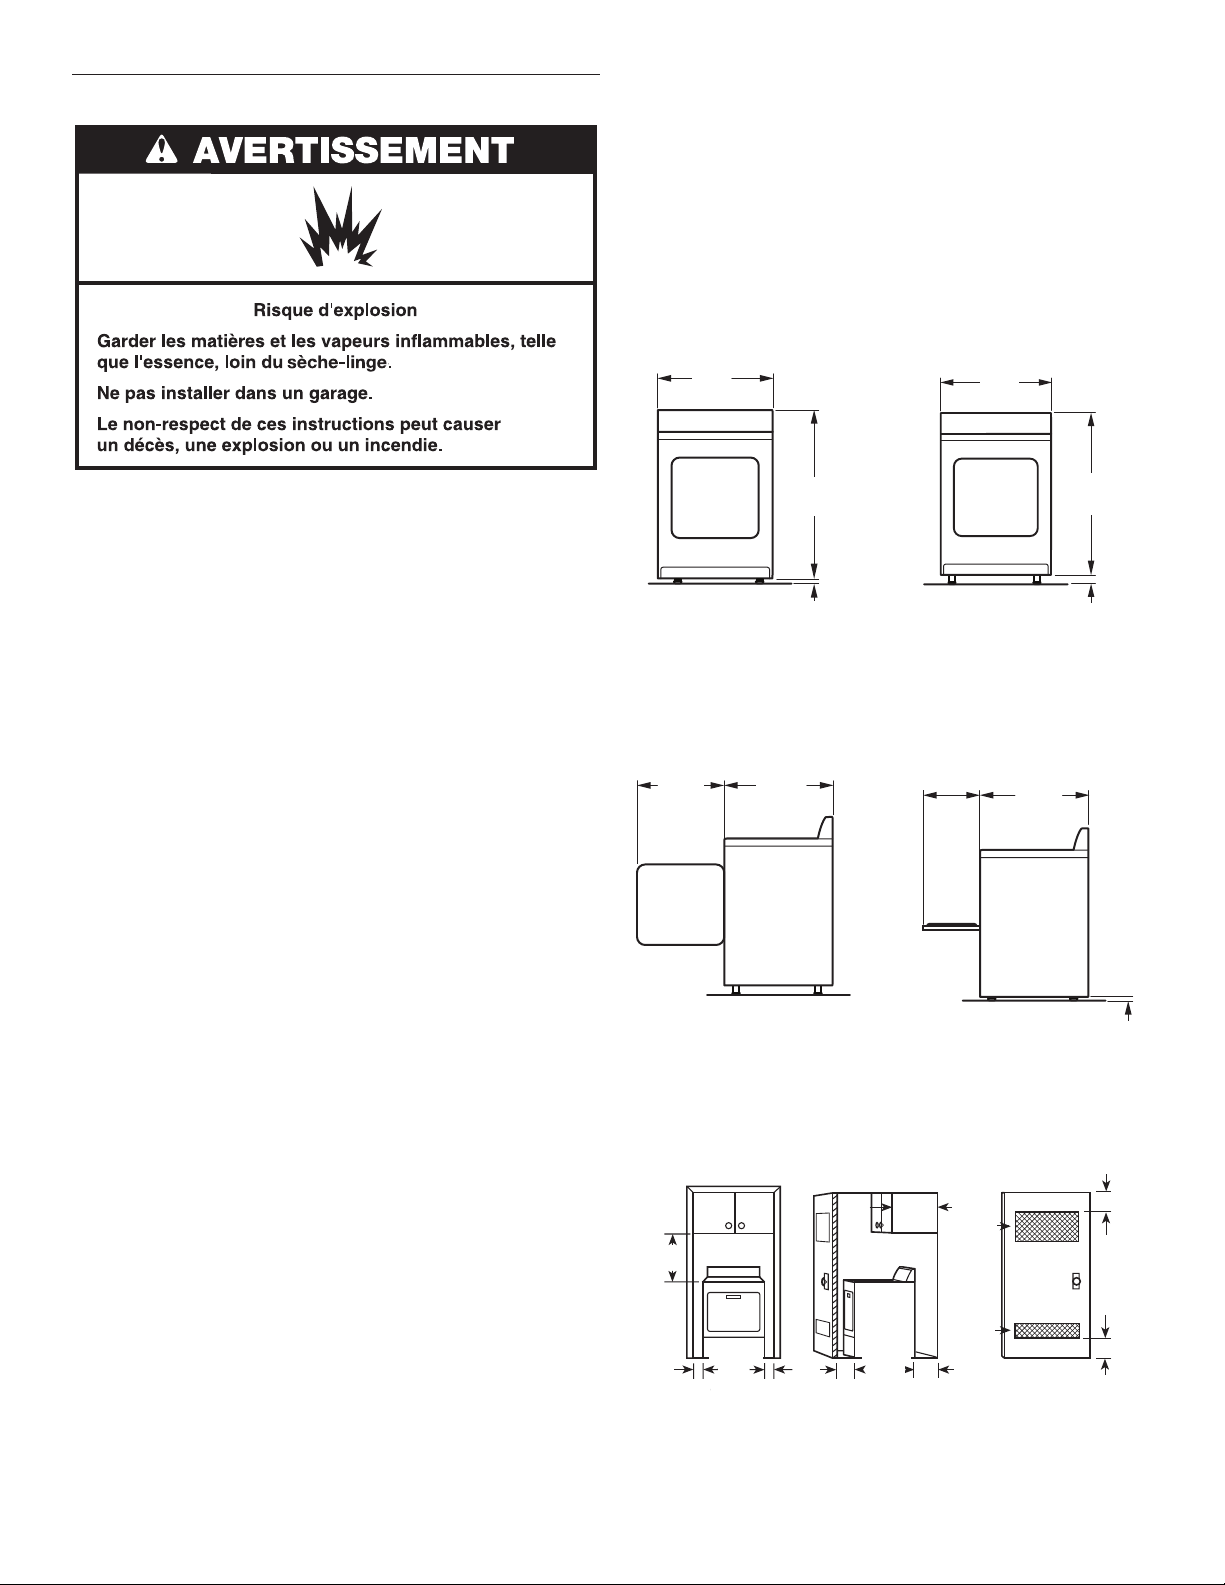
26
GARANTIE DES APPAREILS
DE BUANDERIE MAYTAG
1. Usage commercial, non résidentiel ou par plusieurs familles, ou non-
respect des instructions de l’utilisateur, de l’opérateur ou des
instructions d’installation.
2. Visite d’instruction à domicile pour montrer à l’utilisateur comment
utiliser l’appareil.
3. Visites de service pour rectifier une installation ou un entretien fautifs
du produit, une installation non conforme aux codes d’électricité ou
de plomberie, ou la rectification de l’installation électrique ou de la
plomberie du domicile (ex : câblage électrique, fusibles ou tuyaux
d’arrivée d’eau du domicile).
4. Pièces consomptibles (ex : ampoules, batteries, filtres à air ou à eau,
etc.).
5. Conversion de votre produit du gaz naturel ou du gaz de propane,
ou inversion des portes de l’appareil.
6. Dommages causés par : accident, mésusage, abus, incendie,
inondations, catastrophe naturelle ou l’utilisation de produits non
approuvés par Maytag.
7. Réparations aux pièces ou systèmes dans le but de rectifier
un dommage ou des défauts résultant d’une réparation, d’une
altération ou d’une modification non autorisée de l’appareil.
8. Défauts d’apparence, notamment les éraflures, traces de choc,
fissures ou tout autre dommage subi par le fini de l’appareil
ménager, à moins que ces dommages ne résultent de vices de
matériaux ou de fabrication et ne soient signalés à Maytag dans les
30 jours.
9. Décoloration, rouille ou oxydation des surfaces résultant
d’environnements caustiques ou corrosifs incluant des
concentrations élevées de sel, un haut degré d’humidité ou une
exposition à des produits chimiques (exemples non exhaustifs).
10. Enlèvement ou livraison. Ce produit est conçu pour être réparé à
l’intérieur du domicile.
11. Frais de déplacement et de transport pour le dépannage/la
réparation dans une région éloignée où une compagnie de service
Maytag autorisée n’est pas disponible.
12. Retrait ou réinstallation d’appareils inaccessibles ou de dispositifs
préinstallés (ex : garnitures, panneaux décoratifs, plancher, meubles,
îlots de cuisine, plans de travail, panneaux de gypse, etc.) qui
entravent le dépannage, le retrait ou le remplacement du produit.
13. Service et pièces pour des appareils dont les numéros de série et
de modèle originaux ont été enlevés, modifiés ou ne peuvent pas
être facilement identifiés.
Le coût d’une réparation ou d’un remplacement dans le cadre
de ces circonstances exclues est à la charge du client.
ATTACHEZ ICI VOTRE REÇU DE VENTE. UNE PREUVE
D’ACHAT EST OBLIGATOIRE POUR OBTENIR L’APPLICATION
DE LA GARANTIE.
Lorsque vous appelez le centre d’eXpérience de la clientèle, veuillez
garder à disposition les renseignements suivants :
■
Nom, adresse et numéro de téléphone
■
Numéros de modèle et de série
■
Une description claire et détaillée du problème rencontré
■
Une preuve d’achat incluant le nom et l’adresse du marchand
ou du détaillant
GARANTIE LIMITÉE DURANT LA PREMIÈRE ANNÉE
(PIÈCES ET MAIN-D’ŒUVRE)
Pendant un an à compter de la date d’achat, lorsque ce gros
appareil ménager est installé utilisé et entretenu conformément
aux instructions jointes à ou fournies avec le produit, la marque
Maytag de Whirlpool Corporation ou Whirlpool Canada LP
(ci-après désignées “Maytag”) paiera pour les pièces spécifiées
par l’usine et la main-d’œuvre pour corriger les vices de matériaux
ou de fabrication qui existaient déjà lorsque ce gros appareil
ménager a été acheté.
GARANTIE LIMITÉE DE LA DEUXIÈME ANNÉE À
LA DIXIÈME ANNÉE INCLUSIVEMENT (MOTEUR
DU TAMBOUR ET PANIER EN ACIER INOXYDABLE
UNIQUEMENT - MAIN-D’ŒUVRE NON COMPRISE)
De la deuxième à la dixième année inclusivement à compter de
la date d’achat initiale, lorsque ce gros appareil ménager est
installé, utilisé et entretenu conformément aux instructions jointes
à ou fournies avec le produit, Maytag paiera pour les pièces
de rechange spécifiées par l’usine concernant les composants
suivants pour corriger les défauts non esthétiques de matériau ou
de fabrication desdites pièces qui empêchent le gros appareil de
fonctionner et qui étaient déjà présentes lorsque ce gros appareil
ménager a été acheté. La présente garantie est une garantie
limitée de 10 ans sur les pièces énumérées ci-dessous et elle ne
comprend pas la main-d’œuvre de réparation.
■ Tambour (parois latérales uniquement)
■ Moteur d’entraînement
LE SEUL ET EXCLUSIF RECOURS DU CLIENT DANS LE
CADRE DE LA PRÉSENTE GARANTIE LIMITÉE CONSISTE
EN LA RÉPARATION PRÉVUE CI-DESSUS. Le service doit
être fourni par une compagnie de service désignée par Maytag.
Cette garantie limitée est valide uniquement aux États-Unis ou
au Canada et s’applique exclusivement lorsque le gros appareil
ménager est utilisé dans le pays où il a été acheté. La présente
garantie limitée est valable à compter de la date d’achat initial
par le consommateur. Une preuve de la date d’achat d’origine
est exigée pour obtenir un service dans le cadre de la présente
garantie limitée.
SI VOUS AVEZ BESOIN DE SERVICE :
1. Avant de nous contacter pour obtenir un dépannage, veuillez déterminer si des réparations sont nécessaires pour votre produit.
Certains problèmes peuvent être résolus sans intervention de dépannage. Prenez quelques minutes pour parcourir la section
Dépannage ou Résolution des problèmes du guide d’utilisation et d’entretien, ou rendez-vous sur le site
https://www.maytag.com/product_help.
2. Tout service sous garantie doit être effectué exclusivement par nos fournisseurs de dépannage autorisés Maytag. Aux É.-U. et au
Canada, dirigez toutes vos demandes de service sous garantie au :
Centre d’eXpérience de la clientèle Maytag
Aux É.-U., composer le 1-800-688-9900. Au Canada, composer le 1-800-807-6777.
Si vous résidez à l’extérieur du Canada et des 50 États des États-Unis, contactez votre marchand Maytag autorisé pour déterminer si une
autre garantie s’applique.
GARANTIE LIMITÉE DE DIX ANS
CE QUI EST COUVERT
CE QUI N’EST PAS COUVERT

27
CLAUSE D’EXONÉRATION DE RESPONSABILITÉ AU TITRE DES GARANTIES IMPLICITES
LES GARANTIES IMPLICITES, Y COMPRIS LES GARANTIES APPLICABLES DE QUALITÉ MARCHANDE OU D’APTITUDE À UN
USAGE PARTICULIER, SONT LIMITÉES DIX ANS OU À LA PLUS COURTE PÉRIODE AUTORISÉE PAR LA LOI. Certains états et
certaines provinces ne permettent pas de limitation sur la durée de garanties implicites de qualité marchande ou d’aptitude à un usage
particulier, de sorte que la limitation ci-dessus peut ne pas être applicable dans votre cas. Cette garantie vous confère des droits
juridiques spécifiques, et vous pouvez également jouir d’autres droits qui peuvent varier d’une juridiction à l’autre.
LIMITATION DES RECOURS; EXCLUSION DES DOMMAGES FORTUITS OU INDIRECTS
LE SEUL ET EXCLUSIF RECOURS DU CLIENT DANS LE CADRE DE LA PRÉSENTE GARANTIE LIMITÉE CONSISTE EN LA
RÉPARATION PRÉVUE CI-DESSUS. MAYTAG N’ASSUME AUCUNE RESPONSABILITÉ POUR LES DOMMAGES FORTUITS OU
INDIRECTS. Certains états et certaines provinces ne permettent pas l’exclusion ou la limitation des dommages fortuits ou indirects de
sorte que ces limitations et exclusions peuvent ne pas être applicables dans votre cas. Cette garantie vous confère des droits juridiques
spécifiques, et vous pouvez également jouir d’autres droits qui peuvent varier d’une juridiction à l’autre.
EXONÉRATION DE RESPONSABILITÉ EN DEHORS DE LA GARANTIE
Maytag ne prend aucun engagement quant à la qualité ou la durabilité de l’appareil, ou en cas de dépannage ou de réparation nécessaire sur
ce gros appareil ménager, autre que les engagements énoncés dans la présente garantie. Si vous souhaitez une garantie prolongée ou plus
complète que la garantie limitée fournie avec ce gros appareil ménager, renseignez-vous auprès de Maytag ou de votre détaillant à propos de
l’achat d’une extension de garantie.
01/14
28
Maytag Brand Appliances
Customer eXperience Center
553 Benson Road
Benton Harbor, MI 49022-2692
1-800-344-1274
Maytag Brand Appliances
Customer eXperience Centre
Unit 200-6750 Century Ave
Mississauga, Ontario L5N 0B7
1-800-688-2002
You can write with any questions or concerns at:
Our consultants provide assistance with
Please include a daytime phone number in your correspondence.
If you need replacement parts or to order accessories
We recommend that you use only FSP
Factory Specified Parts.
These parts will fit right and work right because they are made with the same precision
used to build every new MAYTAG
appliance.
To locate FSP
replacement parts or accessories, go to www.maytagpartsonline.com.
Questions? Call us toll free at 1-800-344-1274 or in Canada call 1-800-688-2002.
In the U.S.A.
Features and specifications on our full line of appliances.
Installation information.
Specialized customer assistance (Spanish speaking,
hearing impaired, limited vision, etc.).
In the U.S.A. and Canada
Use and maintenance procedures.
Accessory and repair parts sales.
Referrals to local dealers, repair parts distributors,
and service companies. Maytag designated service
technicians are trained to fulfill the product warranty and
provide after-warranty service, anywhere in the United
States and Canada.
Pour commander des pièces de rechange ou des accessoires
Pour commander des pièces de rechange, nous vous recommandons d’utiliser seulemen t
des pièces spécifiées par l’usine. Ces pièces conviendront et fonctionneront bien parce qu’elles sont fabriquées
selon les mêmes spécifications précises utilisées pour construire chaque nouvel appareil MAYTAG.
Pour trouver des pièces de rechange FSP ou des accessoires, visiter le www.maytag.ca.
Des questions? Composer le numéro sans frais 1-800-688-2002.
Pour plus d’assistance
Vous pouvez nous soumettre toute question ou toute
problème en écrivant à l’adresse ci-dessous :
Maytag Brand Appliances
Centre pour l’eXpérience de la clientèle
Unit 200-6750 Century Ave
Mississauga, Ontario L5N 0B7
1-800-688-2002
Dans votre correspondance, veuillez indiquer un numéro
de téléphone où nous pouvons vous joindre dans la journée.
Nos consultants fournissent
l’assistance pour :
Procédés d’utilisation et d’entretien.
Vente d’accessoires et de pièces de rechange.
Références aux concessionnaires, compagnies de service
de réparation et distributeurs de pièces de rechange
locaux. Les techniciens de service désignés par Maytag
sont formés pour remplir la garantie des produits et fournir
un service après la garantie, partout au Canada.
ASSISTANCE OR SERVICE
Before calling for assistance or service, please check “Troubleshooting” or visit www.maytag.com/owners .
It may save you the cost of a service call. If you still need help, follow the instructions below.
When calling, please know the purchase date and the complete model and serial number of your appliance.
This information will help us to better respond to your request.
ASSISTANCE OU SERVICE
Avant de faire un appel pour obtenir de l’assistance ou un entretient, vérifier la section “Dépannage” ou consulter
www.maytag.ca/owners. Cette vérification peut vous faire économiser le coût d’une visite de réparation.
Si vous avez encore besoin d’aide, suivre les instructions ci-dessous.
Lors d’un appel, garder à portée de main la date d’achat et les numéros de modèle et de série de votre appareil.
Ces renseignements nous aideront à mieux répondre à votre demande.
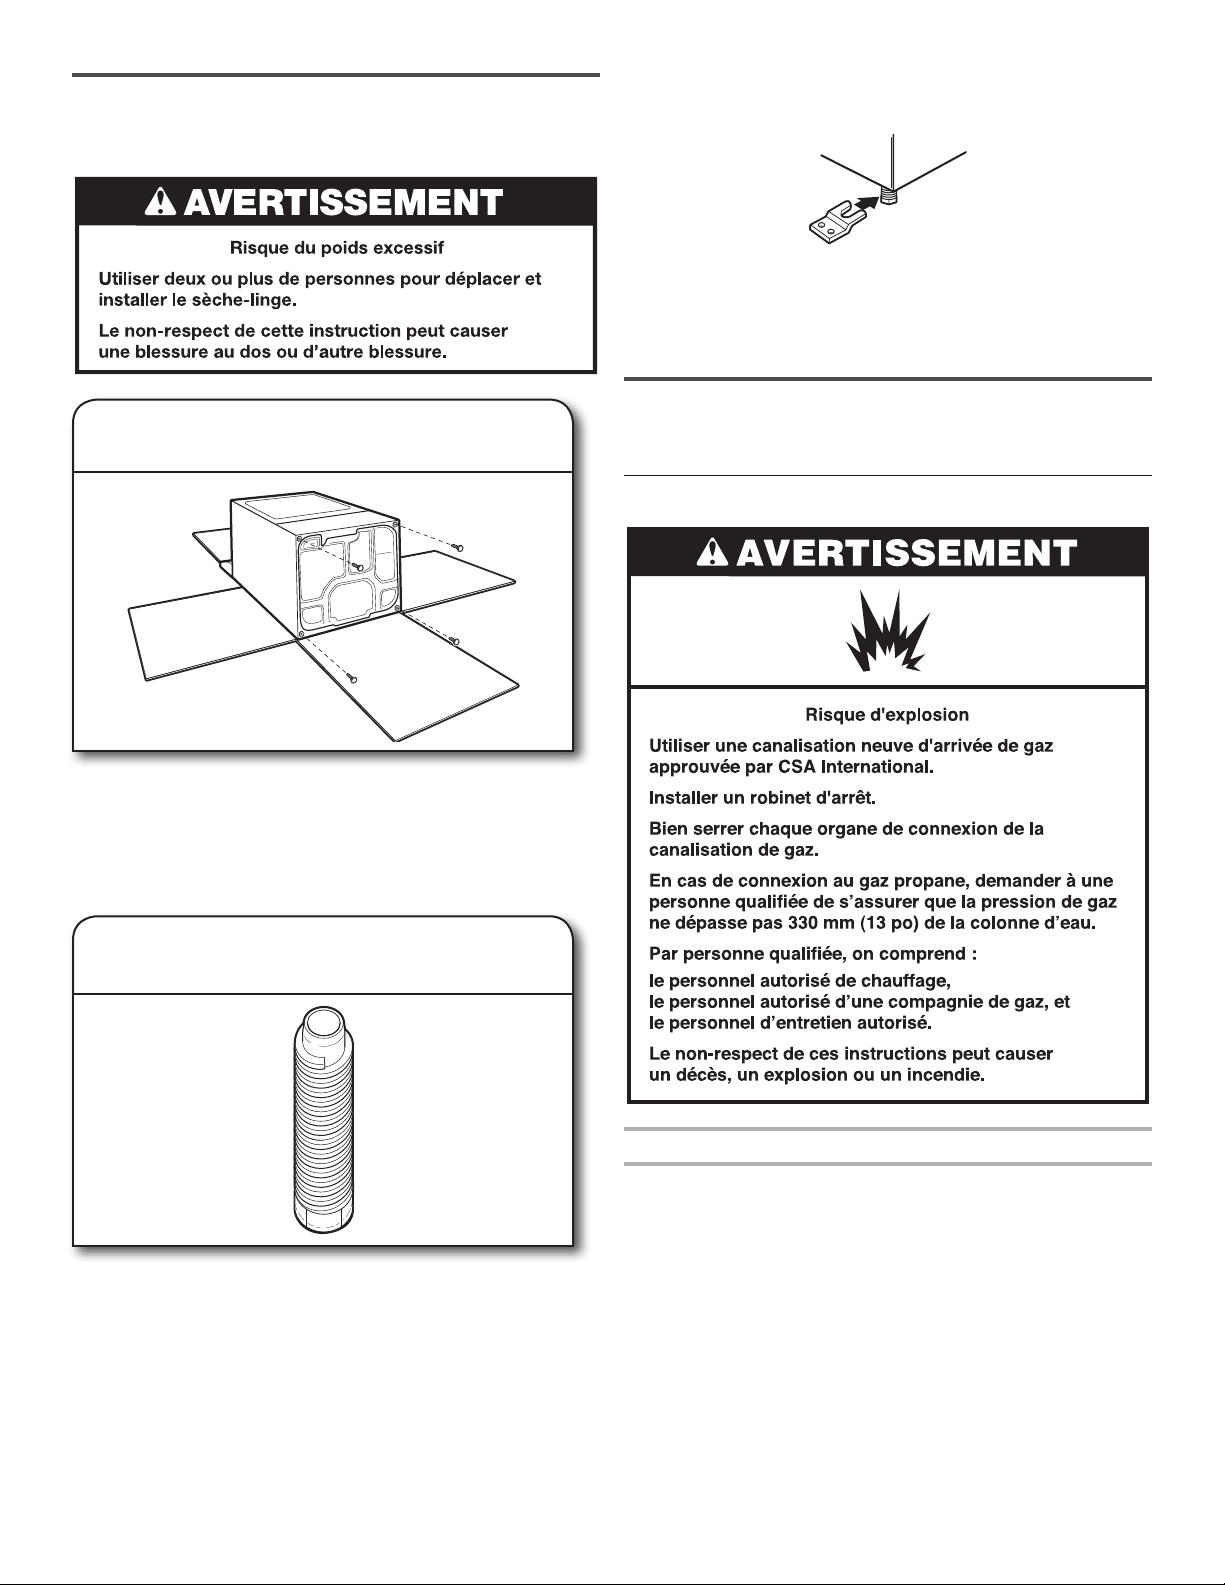
29
Si no sigue las instrucciones de inmediato, usted puede
morir o sufrir una lesión grave.
Si no sigue las instrucciones, usted puede morir o sufrir
una lesión grave.
Todos los mensajes de seguridad le dirán el peligro potencial, le dirán cómo reducir las posibilidades de sufrir una lesión y lo que
puede suceder si no se siguen las instrucciones.
Su seguridad y la seguridad de los demás es muy importante.
Hemos incluido muchos mensajes importantes de seguridad en este manual y en su electrodoméstico. Lea y obedezca siempre
todos los mensajes de seguridad.
ADVERTENCIA
PELIGRO
Este es el símbolo de alerta de seguridad.
Este símbolo le llama la atención sobre peligros potenciales que pueden ocasionar la muerte o una lesión a
usted y a los demás.
Todos los mensajes de seguridad irán a continuación del símbolo de advertencia de seguridad y de la palabra
“PELIGRO” o “ADVERTENCIA”. Estas palabras significan:
SEGURIDAD DE LA SECADORA
PRECAUCIÓN –
RIESGO DE INCENDIO/
DE MATERIALES INFLAMABLES
Éste es un símbolo adicional de la alarma de la seguridad que las alarmas usted al riesgo de incendio.
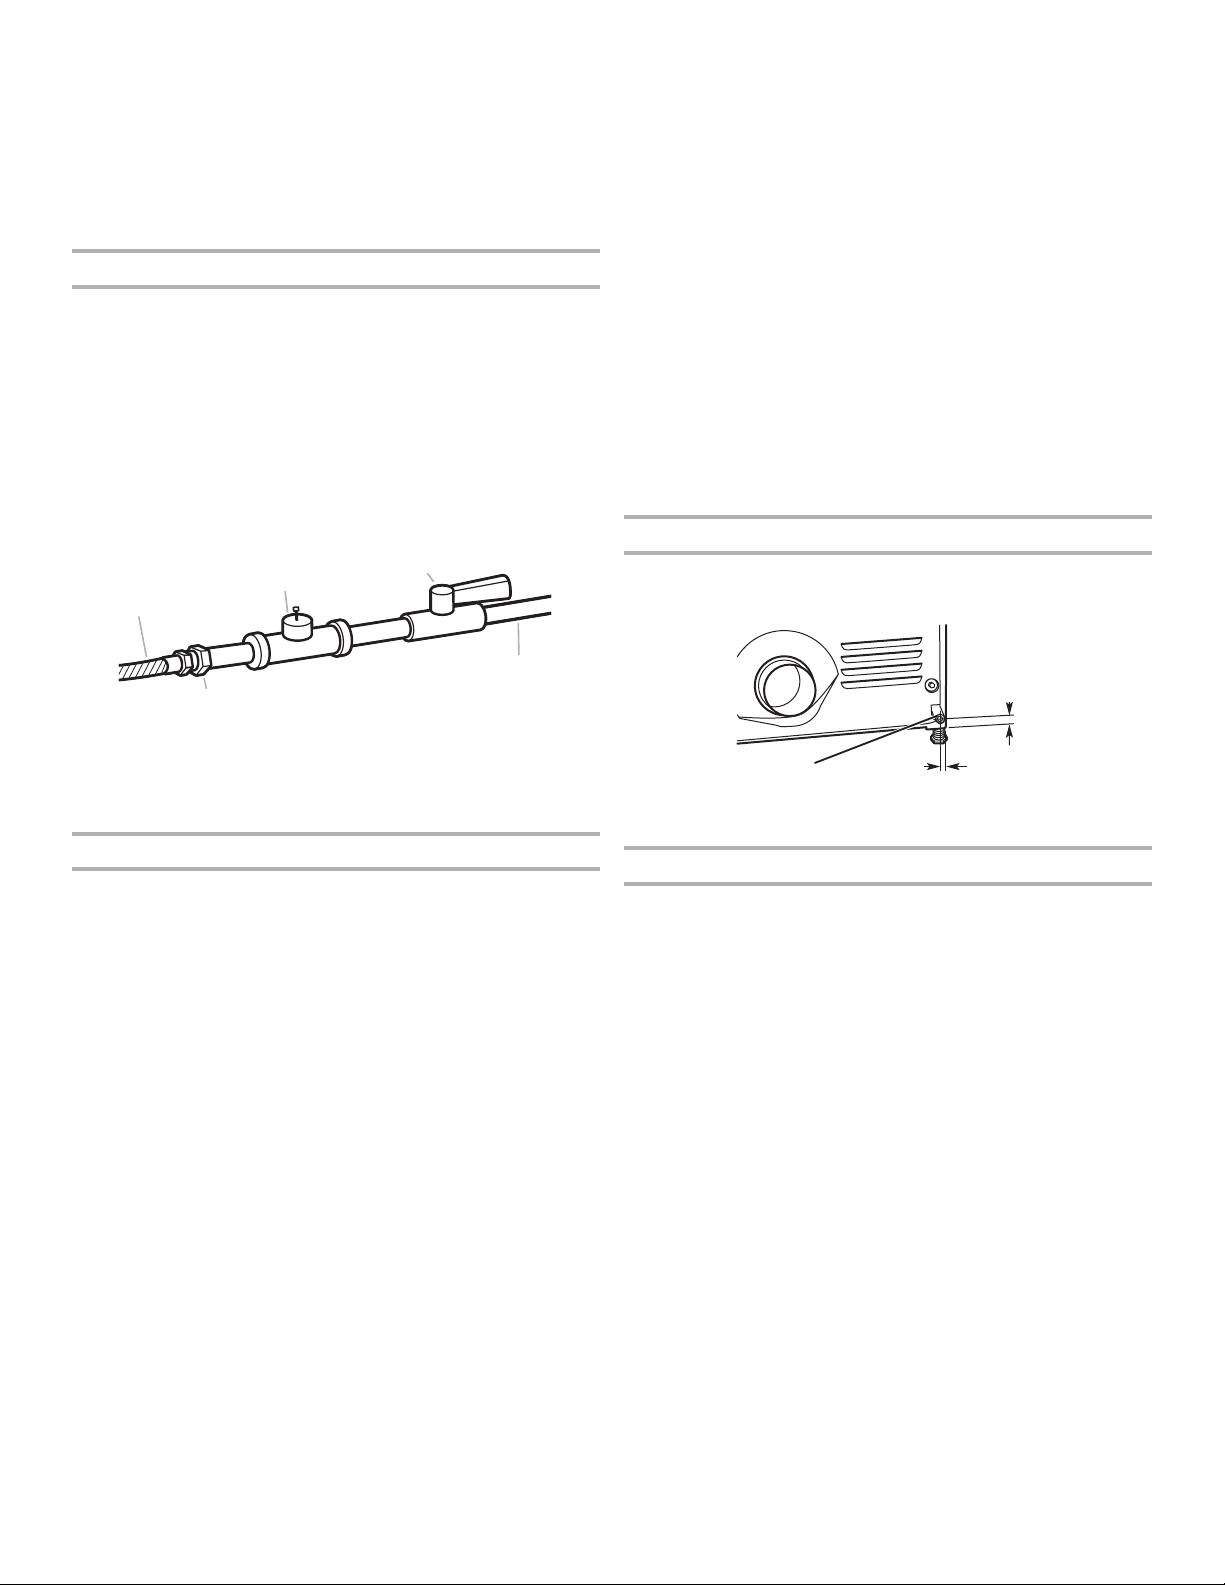
30
PARA SU SEGURIDAD
1. NO USE NI GUARDE GASOLINA NI OTROS MATERIALES INFLAMABLES DENTRO DE ESTE APARATO NI CERCA DEL MISMO.
2. NO ROCÍE CON AEROSOLES EN LA PROXIMIDAD DE ESTE APARATO MIENTRAS ESTÉ EN FUNCIONAMIENTO.
3. NO MODIFIQUE ESTE APARATO.
■ No deberá usarse la secadora si se han usado productos
químicos industriales para la limpieza.
■ Retire todos los objetos de los bolsillos, como
encendedores y fósforos, antes de colocar artículos en la
secadora.
■ Quite la puerta de la secadora al compartimiento de secado
antes de ponerla fuera de funcionamiento o de descartarla.
■ No introduzca las manos en la secadora cuando el tambor
está en movimiento. Para su seguridad se ha encajado un
interruptor de puerta.
■ No instale o almacene esta secadora donde estará
expuesta a la intemperie.
■ No trate de forzar los controles.
■ No continúe usando este aparato si parece estar
defectuoso.
■ No repare o reemplace ninguna pieza de la secadora
ni trate de repararla a menos que esto se recomiende
especícamente en este Manual uso y cuidado.
Lareparación y el servicio deben ser hechos solamente por
un personal de servicio competente.
■ No utilice suavizantes de telas o productos para eliminar
la estática de prendas a menos que lo recomiende el
fabricante del suavizante de telas o del producto en uso.
Siga sus instrucciones.
■ Limpie el ltro de pelusa antes o después de cada carga.
No ponga a funcionar la secadora sin el ltro de pelusa en
su lugar.
■ Mantenga el área alrededor de la abertura de ventilación y
entrada y las áreas adyacentes a esta abertura sin pelusa,
polvo o tierra.
■ La parte interior de la secadora y el ducto de escape se
deben limpiar periódicamente. Esta limpieza la debe llevar
a cabo un personal de servicio calicado.
■ Vea las instrucciones de instalación para las instrucciones
de conexión a tierra.
■ No seque en esta secadora artículos que no hayan sido
lavados.
■ La parte nal de un ciclo de rotación en la secadora ocurre
sin calor (ciclo de enfriamiento) para asegurarse de que los
artículos se dejen a una temperatura que asegure que no
se dañarán.
■ Los artículos tales como goma espuma (espuma de látex),
gorras de baño, telas a prueba de agua, artículos con
reverso de goma y prendas o almohadas rellenas de goma
espuma, deberán secarse solamente en el tendedero.
■ Si se ha dañado el cable de suministro de energía, deberá
ser reemplazado por el fabricante, el agente de servicio
o una persona similarmente calicada con el n de evitar
riesgos.
ADVERTENCIA: Nunca detenga una secadora que
esté girando antes de que se termine el ciclo de secado, a
menos que todos los artículos se hayan sacado y separado
rápidamente, para que se disipe el calor.
INSTRUCCIONES IMPORTANTES DE SEGURIDAD
ADVERTENCIA:
A n de reducir el riesgo de incendio, choque eléctrico o de daño a las personas que usen la secadora,
deben seguirse las precauciones básicas, incluidas las siguientes:
GUARDE ESTAS INSTRUCCIONES
■ Lea todas las instrucciones antes de usar la secadora.
4
IMPORTANT SAFETY INSTRUCTIONS
precautions, including the following:
WARNING:
Read all instructions before using the dryer.
Keep a minimum clearance of 100 mm (4 in.) between the
rear of the dryer and any wall.
The operation of this appliance may affect the operation of
other types of appliances which take their air supply for safe
combustion from the same room. There has to be adequate
ventilation to replace exhausted air and thus avoid the
back-ow of gases into the room from appliances burning
other fuels, including open res, when operating the tumble
dryer. If in doubt, consult the appliance manufacturers.
Do not obstruct the air supply to the dryer (see Installation
Instructions for minimum clearances).
Do not place items exposed to cooking oils in your dryer.
Oil-affected items can ignite spontaneously, especially when
exposed to heat sources such as in a tumble dryer. The
items become warm causing an oxidation reaction in the oil.
Oxidation creates heat. If the heat cannot escape, the items
can become hot enough to catch re. Piling, stacking or
storing oil-affected items can prevent heat from escaping
and so create a re hazard.
If it is unavoidable to dry in the dryer items that have been
soiled with substances such as cooking oil, acetone, alcohol,
petrol, kerosene, spot removers, turpentine, waxes and wax
removers, or that have been contaminated by hair care
products, should be washed in hot water with an extra
amount of detergent before being dried in the dryer. These
items may give off vapours that could ignite or explode. Such
washing will reduce, but not eliminate, the hazard.
This appliance is not intended for use by persons (including
children) with reduced physical, sensory or mental
capabilities, or lack of experience and knowledge, unless
they have been given supervision or instructions concerning
use of the appliance by persons responsible for their safety.
Children should be supervised to ensure that they do not
play with the appliance.
The dryer should not be used if industrial chemicals have
been used for cleaning.
Before the dryer is removed from service or discarded,
remove the doors to the drying compartment.
Do not reach into the dryer if the drum is moving. A door
switch is tted for your safety.
Do not install or store the dryer where it will be exposed
to the weather.
Do not tamper with controls.
Do not continue to use this appliance if it appears to be
faulty.
Do not repair or replace any part of the dryer or attempt
any maintenance unless specically recommended in this
Use and Care Guide. Repairs and servicing should only
be carried out by competent service personnel.
Do not use fabric softeners or products to eliminate static
unless recommended by the manufacturer of the fabric
softener or product. Follow their instructions.
Clean dryer lint screen before or after each load. Do not
operate dryer without lint screen in place.
Keep area around the exhaust and inlet openings and
adjacent surrounding areas free from the accumulation of
lint, dust, and dirt.
The interior of the dryer and exhaust vent should be
cleaned periodically by qualied service personnel.
See Installation Instructions for earthing instructions.
Do not dry unwashed items in this dryer.
Items such as foam rubber (latex foam), shower caps,
waterproof textiles, rubber backed articles and clothes or
pillows tted with foam rubber pads must only be dried
on a clothesline.
SAVE THESE INSTRUCTIONS
WARNING: Never stop a tumble dryer cycle before the
end of the drying cycle unless all items are quickly removed
and spread out so that the heat is dissipated.
To reduce the risk of re, electric shock, or injury to persons when using the dryer, follow basic
The nal part of a tumble dryer cycle occurs without heat
(cool down cycle) to ensure that the items are left at a
temperature that ensures the items will not be damaged.
If the supply cord is damaged, it must be replaced by the
manufacturer or its service agent or a similarly qualied
person in order to avoid a hazard.
■ Mantenga un espacio mínimo de por lo menos 100 mm
(4pulg.) entre la parte posterior de la secadora y cualquier
pared.
■ El funcionamiento de este aparato puede afectar el
funcionamiento de otros tipos de aparatos que obtienen
el suministro de aire para la combustión segura desde la
misma habitación. Debe haber una ventilación adecuada
para reemplazar el aire de salida y de esta manera evitar
el contraujo de gases en la habitación proveniente de
aparatos que quemen otros combustibles, incluyendo
fuegos abiertos, cuando haga funcionar la secadora con
rotación. Si tiene dudas, consulte a los fabricantes de
electrodomésticos.
■ No obstruya el suministro de aire a la secadora (vea las
Instrucciones de instalación para conocer los espacios
mínimos).
■ No coloque los objetos expuestos a aceite para cocinar en
su secadora. Los artículos impregnados con aceite pueden
incendiarse espontáneamente, especialmente cuando se
los expone a fuentes de calor, como a una secadora que
gira. Los artículos pueden calentarse, lo que causa una
reacción de oxidación en el aceite. La oxidación produce
calor. Si el calor no puede escapar, los artículos pueden
ponerse lo sucientemente calientes como para prenderse
fuego. Para reducir el riesgo de incendio debido a cargas
contaminadas, la parte nal de un ciclo en la secadora se
produce sin calor (período de enfriamiento). Evite detener
una secadora antes de que termine el ciclo de secado a
menos que todos los objetos se saquen rápidamente y
separen de modo que el calor se disipe. Si se hacen pilas,
se amontonan o se guardan artículos impregnados con
aceite, esto impedirá que el calor escape y generará un
peligro de incendio.
■ Si no puede evitar secar artículos que se hayan ensuciado
con substancias tales como aceite de cocina, acetona,
alcohol, gasolina, queroseno, quitamanchas, aguarrás,
ceras y quitaceras, o que hayan sido contaminados por
productos para el cuidado del cabello, deberá lavarlos en
agua caliente con una cantidad adicional de detergente
antes de secarlos en la secadora. Estos artículos pueden
despedir vapores que pueden encenderse o causar una
explosión. Este lavado reducirá pero no eliminará el riesgo.
■ Este aparato no ha sido diseñado para ser usado por
personas (incluidos niños menores de 8 años de edad) con
capacidad física, sensorial o mental reducida, o falta de
experiencia y conocimiento, a menos que lo hagan bajo
supervisión o siguiendo las instrucciones relativas al uso
del aparato, a cargo de personas responsables por su
seguridad.
■ Si la limpieza y el mantenimiento del usuario serán
efectuados por niños, debe supervisarlos.
■ Los niños deben estar bajo supervisión para garantizar de
que no jueguen con el aparato.
■ Debe mantener a los niños menores de 3 años de edad
alejados del electrodoméstico, a menos que estén bajo
supervisión constante.

31
ESPECIFICACIONES
Estas unidades se venden en varias regiones con requisitos
diferentes para medir la capacidad. A continuación se enumeran
algunas de las formas válidas de medición indicadas en este
producto:
Capacidad de carga con artículos secos: Una medida de peso
que reeje el tamaño máximo de carga que se pueda poner en la
secadora.
Capacidad IEC (Comisión electrotécnica internacional):
La medida de capacidad que representa la capacidad máxima
de artículos y telas secas que el fabricante declara que pueden
tratarse en un ciclo especíco.
Modelos
3LMEDC315FW
3LMEDC415FW
4KMEDC215FW
4KMEDC315FW
4KMEDC415FW
4KMEDC425FW
Tensión de Alimentación 220–240 V 2N~ 220–240 V 2N~
Frecuencia de
Operación
50 Hz 60 Hz
Consumo de Corriente 20 Amps 20 Amps
Capacidad de carga
con artículos secos
(máximo)
15 kg (33 lb) 15 kg (33 lb)
Capacidad IEC 7 kg (15 lb) 7 kg (15 lb)
Altura 1067 mm (42") 1067 mm (42")
Ancho 737 mm (29") 737 mm (29")
Profundidad 706 mm (27
13
⁄16") 706 mm (27
13
⁄16")
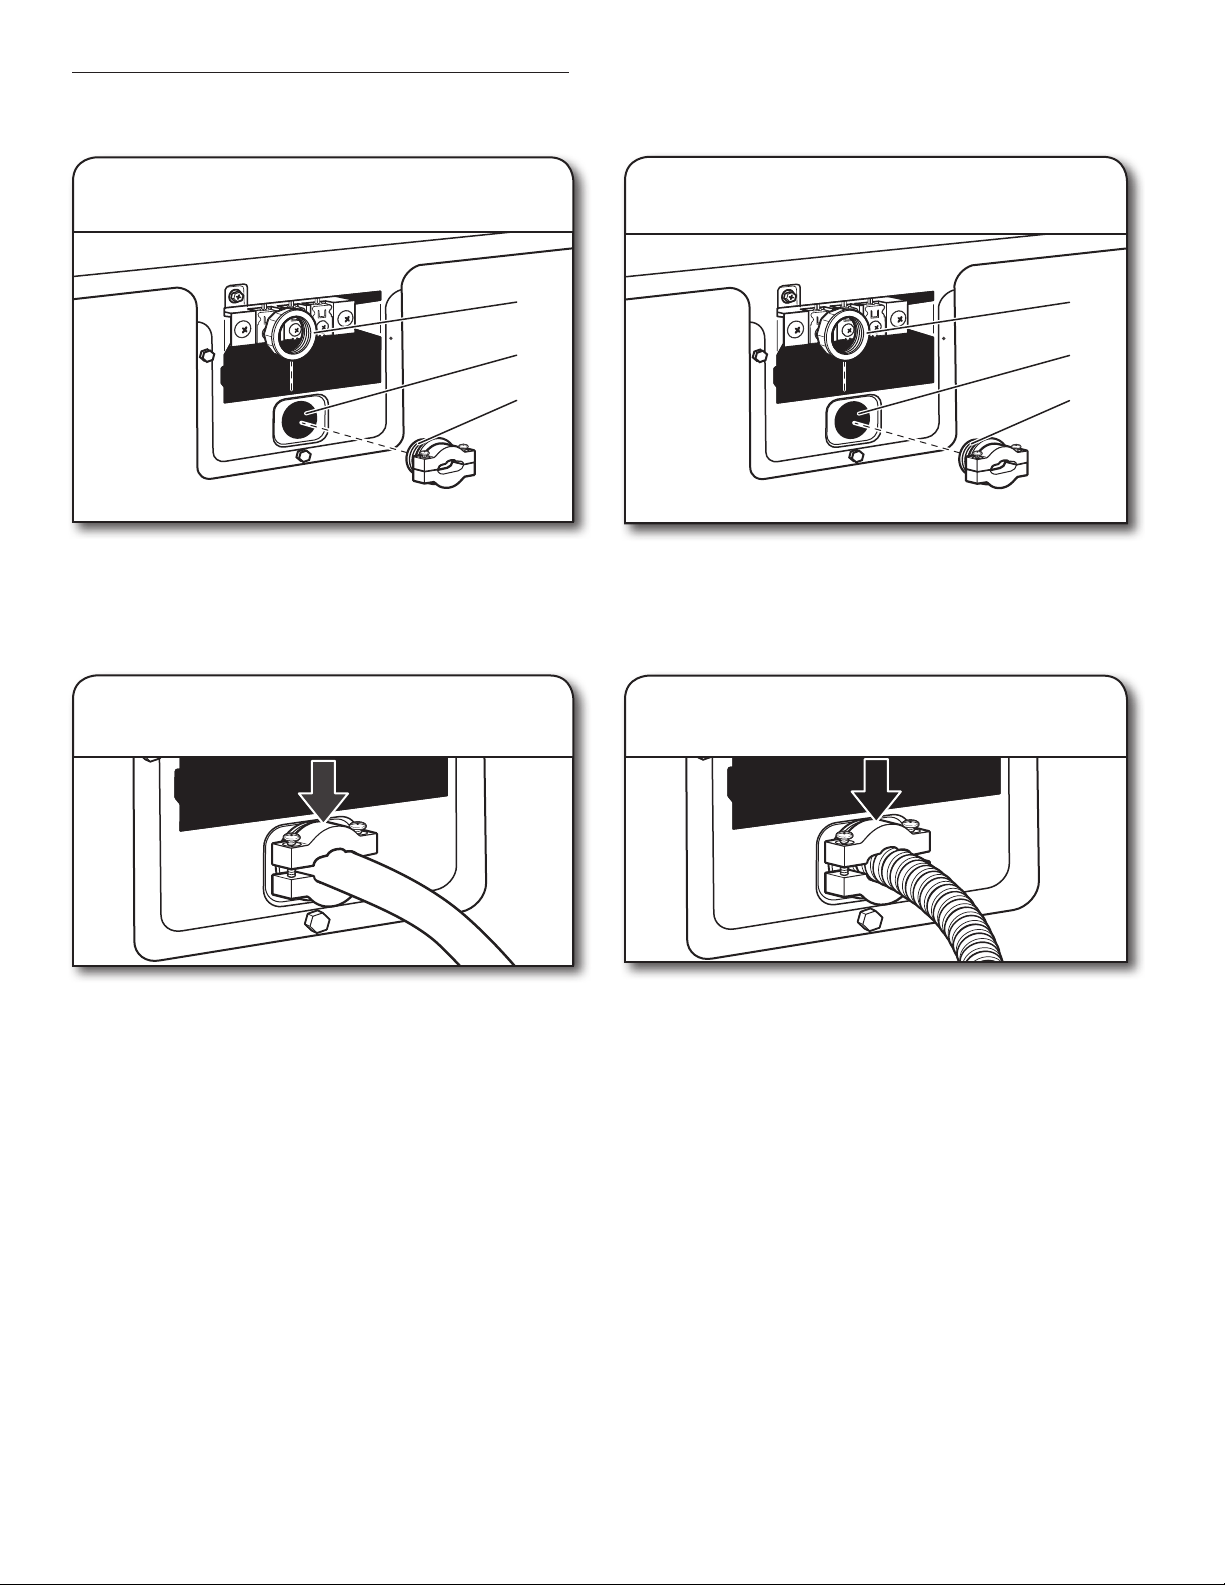
32
REVISE QUE EL SISTEMA DE VENTILACIÓN TENGA UN BUEN FLUJO DE AIRE
BUEN FLUJO DE AIRE
Además del calor, las secadoras también necesitan
un buen ujo de aire para secar las prendas ecazmente.
La ventilación adecuada reducirá la duración del secado y
mejorará su ahorro de energía. Consulte las Instrucciones
de instalación.
El sistema de ventilación sujeto a la secadora juega
un papel muy importante para el ujo de aire adecuado.
Las visitas de servicio debidas a la ventilación inadecuada
no están cubiertas por la garantía y correrán por cuenta
del cliente, sin importar quién haya instalado la secadora.
Mantenga un buen ujo de aire
haciendo lo siguiente:
Bien
Mejor
USE LOS CICLOS AUTOMATIC DRY (SECADO AUTOMÁTICO)
PARA UN MEJOR CUIDADO DE LAS TELAS Y AHORRO DE ENERGÍA
■ Limpiar el filtro de pelusa antes de cada carga.
■ Reemplazar el material del ducto de plástico u hoja
de metal con uno de metal pesado rígido de 102 mm (4")
de diámetro.
■
4"
102 mm
Use un ducto con la longitud más corta posible.
■ No utilice más de 4 codos de 90° en un sistema
de ventilación; cada ángulo y curva reduce el flujo
de aire.
■ Quite la pelusa y los desechos de la capota
de ventilación.
■ Quite la pelusa de toda la longitud del sistema
de ventilación al menos cada 2 años. Cuando haya
terminado la limpieza, revise por última vez el producto
asegurándose de seguir las Instrucciones de instalación
que acompañan a su secadora.
■ Retire los artículos que estén frente a la secadora.
Utilice los ciclos de Automatic Dry (Secado automático) para obtener el mayor ahorro de energía y un mejor cuidado de las telas
con la secadora. Durante los ciclos de Automatic Dry (Secado automático), se detectan la temperatura del aire de secado o el
nivel de humedad en la carga. Esta detección se realiza durante todo el ciclo de secado y la secadora se apaga cuando la carga
alcanza el nivel de sequedad seleccionado.
Con Timed Dry (Secado programado), la secadora funciona durante el tiempo seleccionado y algunas veces puede dar lugar a
encogimiento, arrugas y estática a causa del exceso de secado. Utilice Timed Dry (Secado programado) ocasionalmente para las
cargas húmedas que necesiten un poco más de tiempo de secado o cuando utilice el estante de secado.
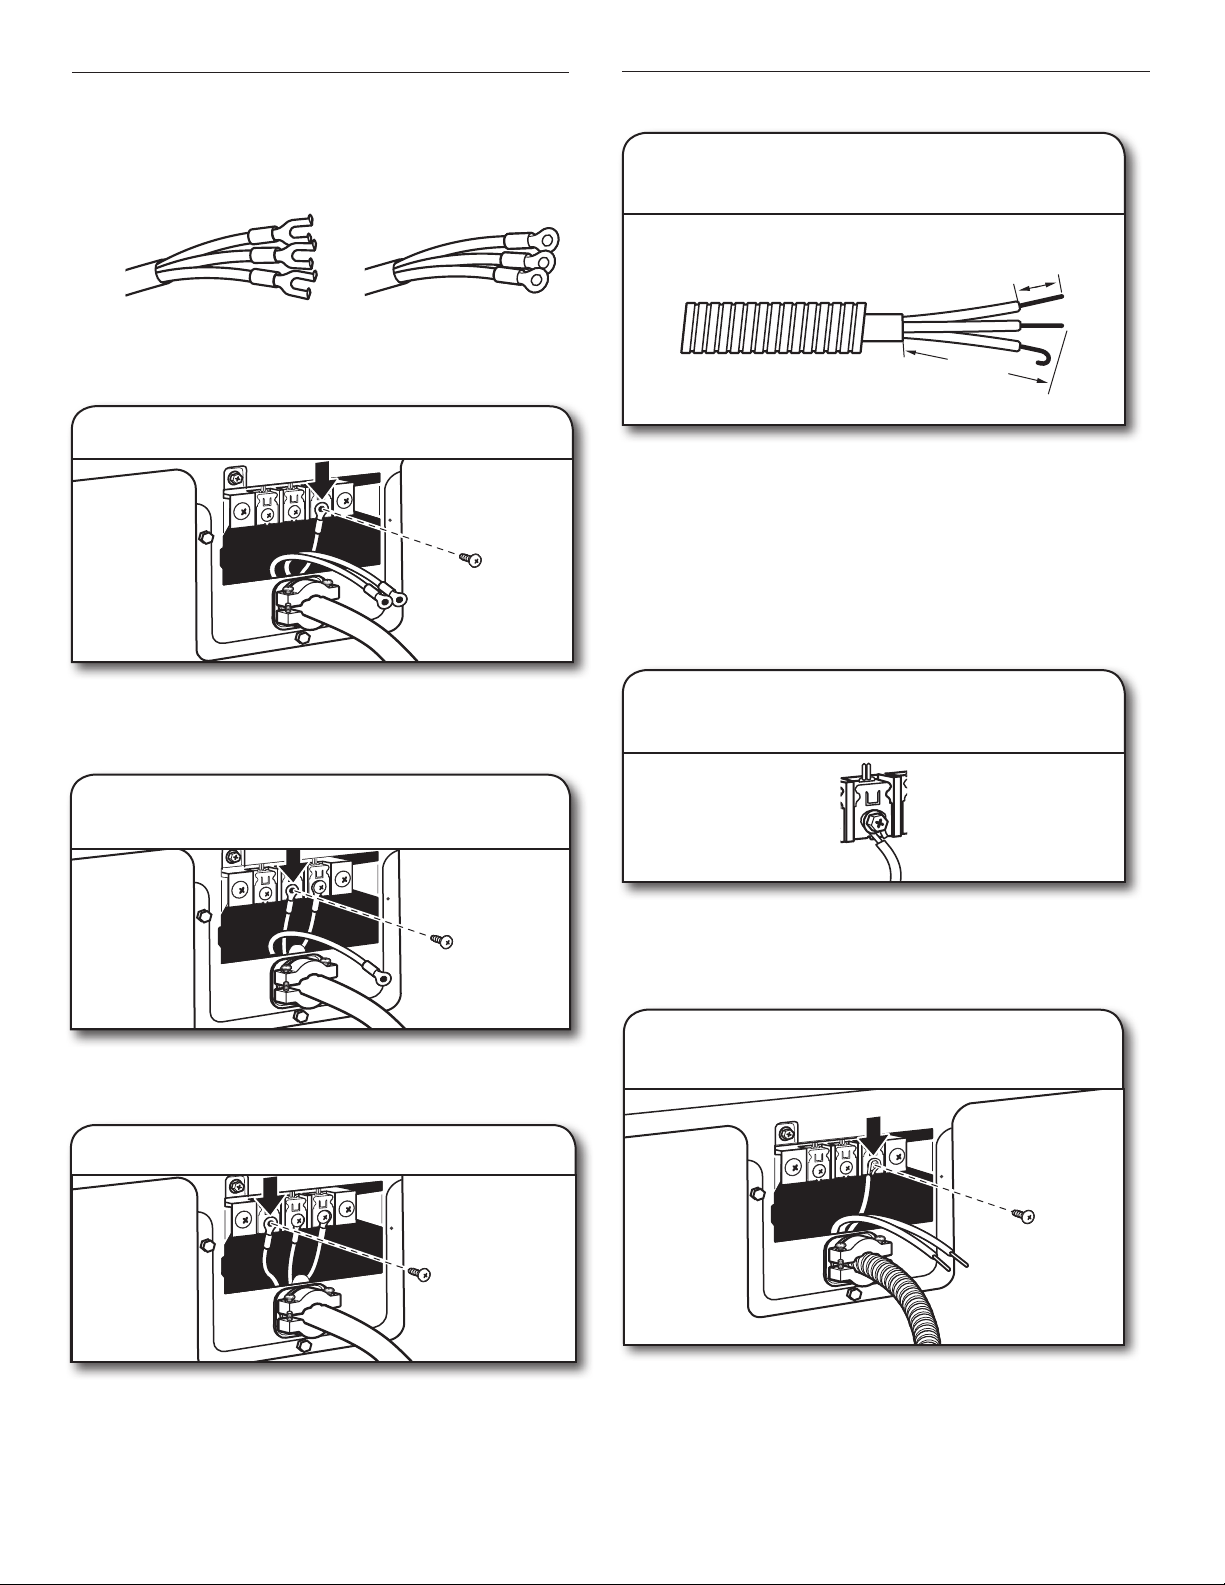
33
PANEL DE CONTROL Y CARACTERÍSTICAS
CARACTERÍSTICA WRINKLE CONTROL
(en algunos modelos)
Si no es posible retirar la carga de la secadora tan
pronto como ésta se detenga, se pueden formar arrugas.
La característica de Protección contra arrugas Wrinkle
Control periódicamente da vueltas, acomoda y esponja
la ropa para ayudar a evitar que se formen arrugas.
■ Obtenga 40 minutos de rotación periódica sin calor
al final del ciclo. Gire la perilla de Wrinkle Control hacia
ON (Encendido) o OFF (Apagado) en cualquier momento
antes de que termine el ciclo.
PERILLA DE CICLOS DE LA SECADORA
Utilice la perilla de ciclos de la secadora para seleccionar
entre los ciclos disponibles en su secadora. Gire la perilla
de ciclos de lavado para seleccionar un ciclo para su carga.
Consulte “Guía de ciclos” para ver descripciones detalladas
de los ciclos.
TIMED DRY (Secado programado)
Hará funcionar la secadora durante el tiempo
especicado en el control. En modelos con una
perilla para seleccionar la temperatura, puede elegir
un ajuste basado en las telas de su carga. El tiempo
y la temperatura de secado dependerán del modelo
de su secadora.
AUTOMATIC DRY (Secado automático)
Detecta la humedad en la carga o la temperatura
del aire y se apaga cuando la carga alcanza el nivel de
sequedad seleccionado. Le proporciona el mejor secado
en el tiempo más corto. El tiempo del secado variará
según el tipo de tela, el tamaño de la carga y el ajuste
de sequedad.
1
2
3
TEMPERATURE (Temperatura)
Seleccione una temperatura de secado según las telas de
su carga. Si tiene duda respecto a la temperatura que debe
seleccionar para una carga de ropa, elija el ajuste más bajo
en vez del ajuste más alto.
START/STOP (Inicio/Detenga)
La señal de ciclo emite un sonido audible una vez que el
ciclo de secado ha terminado. El quitar la ropa con prontitud
al nal del ciclo reduce la formación de arrugas.
Gire la perilla de Start/Stop (Inicio/Detenga) para seleccionar
el ajuste deseado (Encendido – On o Apagado – Off).
Presione la perilla de Start/Stop (Inicio/Detenga) para
poner en marcha la secadora.
NOTA: Cuando se selecciona el ajuste de Wrinkle Control
(Protección contra arrugas), se escuchará un tono cada
5 minutos hasta que se saque la ropa o hasta que se haya
terminado el ajuste Wrinkle Control.
4
No todas las características y opciones están disponibles en todos los modelos.
La apariencia puede variar.
2 31 4
2 4
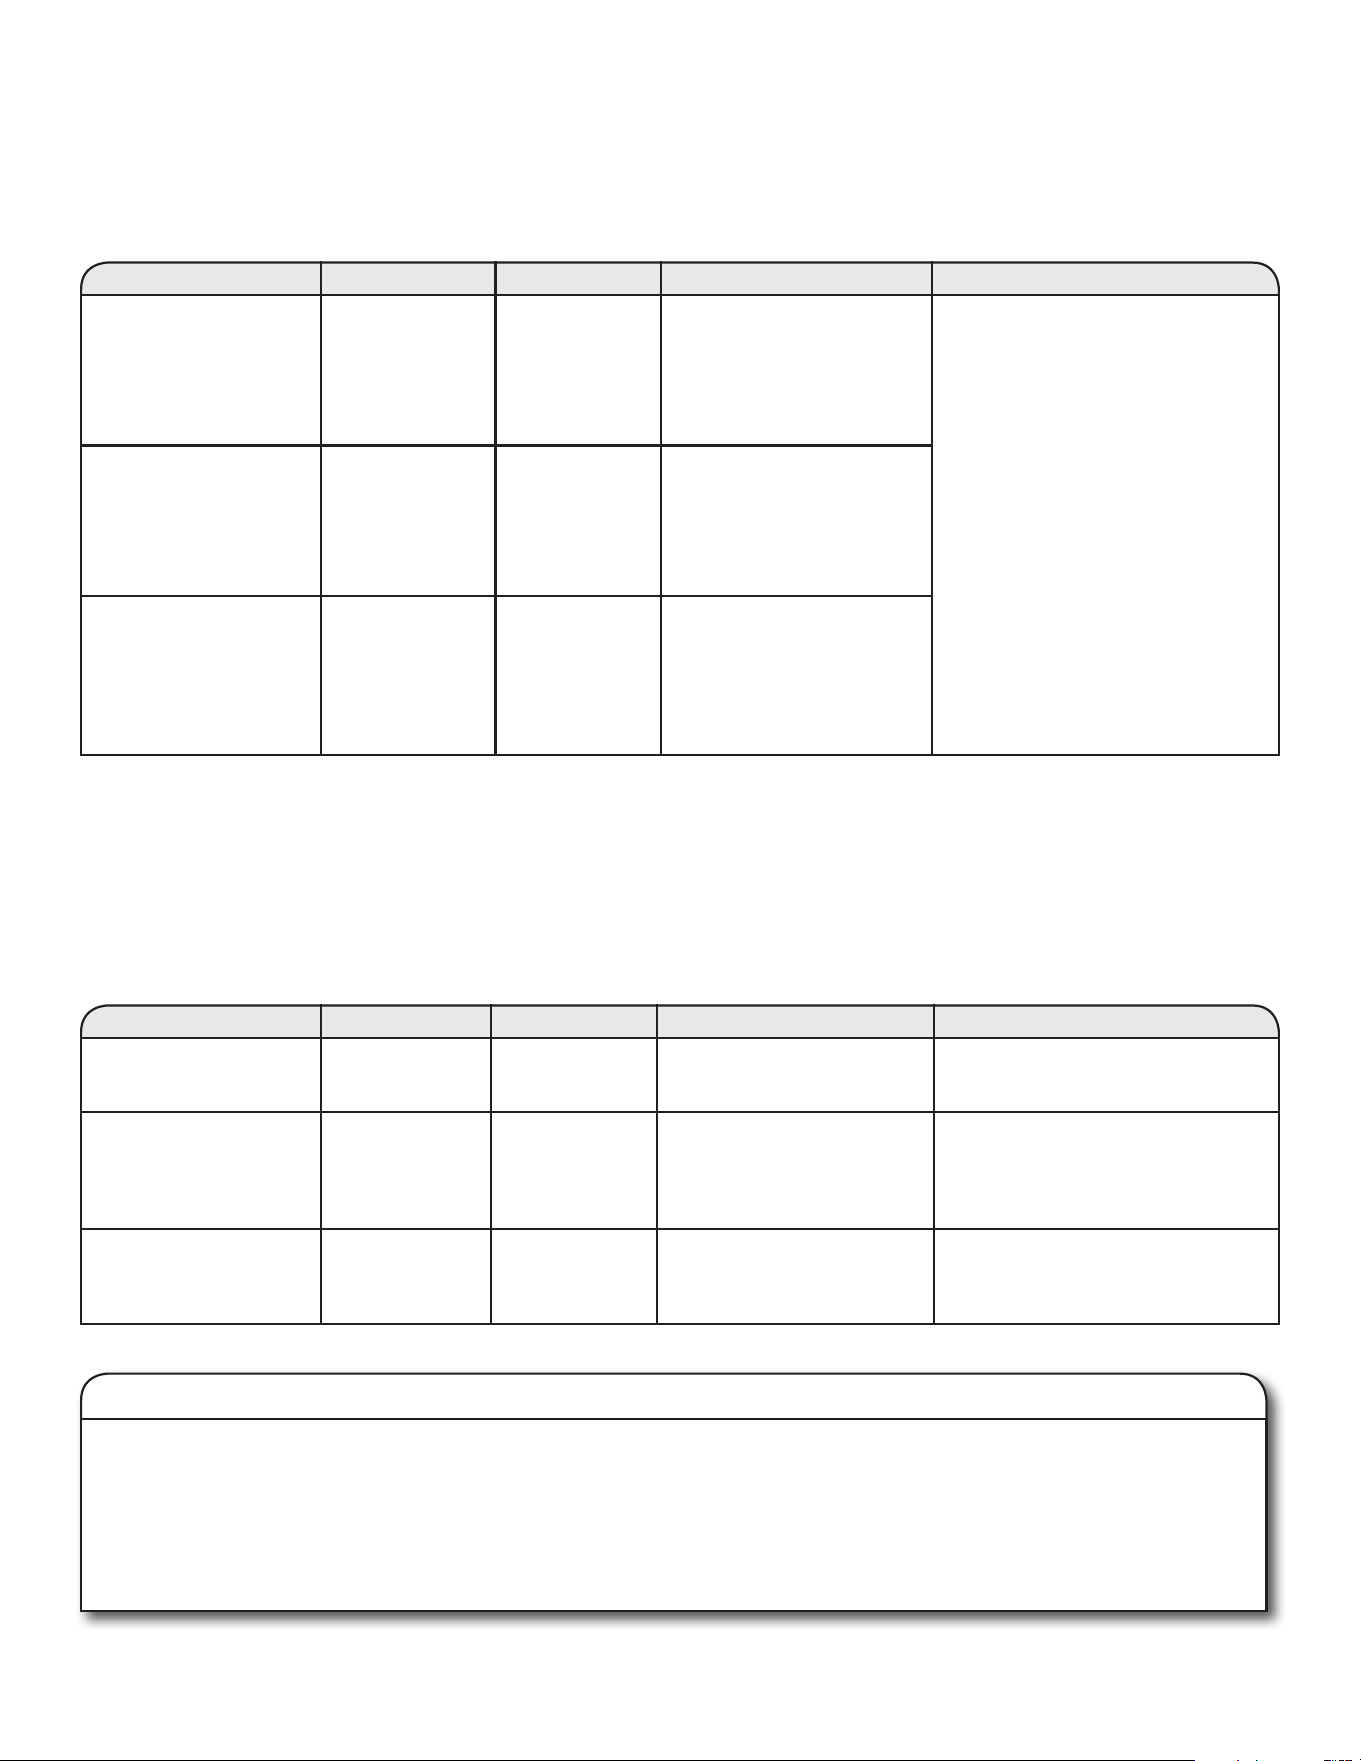
34
No todos los ciclos y ajustes están disponibles en todos los modelos.
NOTA: Las certicaciones de energía gubernamentales para los modelos Maytag Gas y Electric se basan en el ciclo Timed Dry
(Secado programado) con el ajuste de temperatura máximo de secado. Los ciclos predeterminados que fueron enviados de Sensor
Dry (Secado por sensor), Automatic Dry (Secado automático), Normal, Low heat (Calor bajo), Wrinkle Shield (Antiarrugas) no se
utilizaron.
GUÍA DE CICLOS: CICLOS AUTOMATIC DRY (SECADO AUTOMÁTICO)
GUÍA DE CICLOS: CICLOS TIMED DRY (SECADO PROGRAMADO)
No todos los ciclos y ajustes están disponibles en todos los modelos.
TIMED DRY (Secado programado): hará funcionar la secadora durante el tiempo especicado en el control.
NOTA: Si las cargas no parecen estar tan secas como le gustaría, seleccione More Dry (Más seco) la próxima vez que seque una
carga similar. Si le parece que las prendas están más secas de lo que las desea, seleccione Less Dry (Menos seco) la próxima vez que
seque una carga similar.
Cómo jar la temperatura de secado
Si su secadora tiene múltiples ajustes de calor:
Puede usar un ajuste de temperatura High (Alta) para secar
artículos pesados, como toallas y ropa de trabajo.
Puede usar un ajuste de temperatura Low (Baja) a Medium
(Media) para secar artículos de peso intermedio, como
sábanas, blusas, vestidos, ropa interior, telas de planchado
permanente y algunos tejidos de punto.
Use el ajuste No Heat (Sin calor) para artículos de espuma,
goma, plástico o telas sensibles al calor.
Seque en el tendedero las telas laminadas o tratadas.
NOTA: si tiene dudas respecto a la temperatura de secado
que debe seleccionar para distintas cargas de ropa, consulte
las instrucciones de cuidado de las etiquetas.
Artículos para secar: Ciclo: Temperatura: Opciones disponibles: Detalles de los ciclos:
Pantalones de mezclilla,
ropa de trabajo pesada,
toallas
More Dry
(Más seco)
Normal o Energy
Preferred (Ahorro
de energía)
High (Alta) Wrinkle Control
(Control de arrugas)/
Wrinkle Prevent
(Prevención de arrugas)
Temperatura
Cycle Signal (Señal de ciclo)
Los ciclos automáticos le
proporcionan el mejor secado en
el tiempo más corto. El tiempo de
secado varía según el tipo de tela,
el tamaño de la carga y el ajuste de
sequedad.
Seleccione una temperatura de
secado según las telas de su carga.
Si tiene dudas respecto de la
temperatura que debe seleccionar
para una carga de ropa, elija el
ajuste más bajo en lugar del ajuste
más alto.
Ropa de trabajo, telas
de peso mediano,
sábanas
Normal o Energy
Preferred (Ahorro
de energía)
Medium (Media) Wrinkle Control
(Control de arrugas)/
Wrinkle Prevent (Prevención
de arrugas)
Temperatura
Cycle Signal (Señal de ciclo)
Ropa informal, camisas,
pantalones, artículos
livianos, prendas
sintéticas, ropa
delicada, ropa deportiva
Delicate or
Less Dry
(Delicado o
Menos seco)
Normal o Energy
Preferred (Ahorro
de energia)
Low (Baja) Wrinkle Control
(Control de arrugas)/
Wrinkle Prevent (Prevención
de arrugas)
Temperatura
Cycle Signal (Señal de ciclo)
Artículos para secar: Ciclo: Temperatura: Opciones disponibles: Detalles de los ciclos:
Artículos grandes o
pesados tales como
toallas gruesas o batas
Heavy Dry
(Secado intenso)
Cualquiera Temperatura Elija una temperatura alta para secar
cargas grandes o pesadas.
Cualquier carga Damp Dry
(Secado
húmedo)/
Freshen Up
(Refrescar)
Cualquiera Temperatura Seca los artículos hasta dejarlos
húmedos o para artículos que no
necesitan un ciclo completo de
secado.
Goma, plástico, telas
sensibles al calor
Air Fluff
(Esponjar)/
AirDry
(Secado al aire)
No Heat (Sin
calor)
Temperatura Secado sin calor.
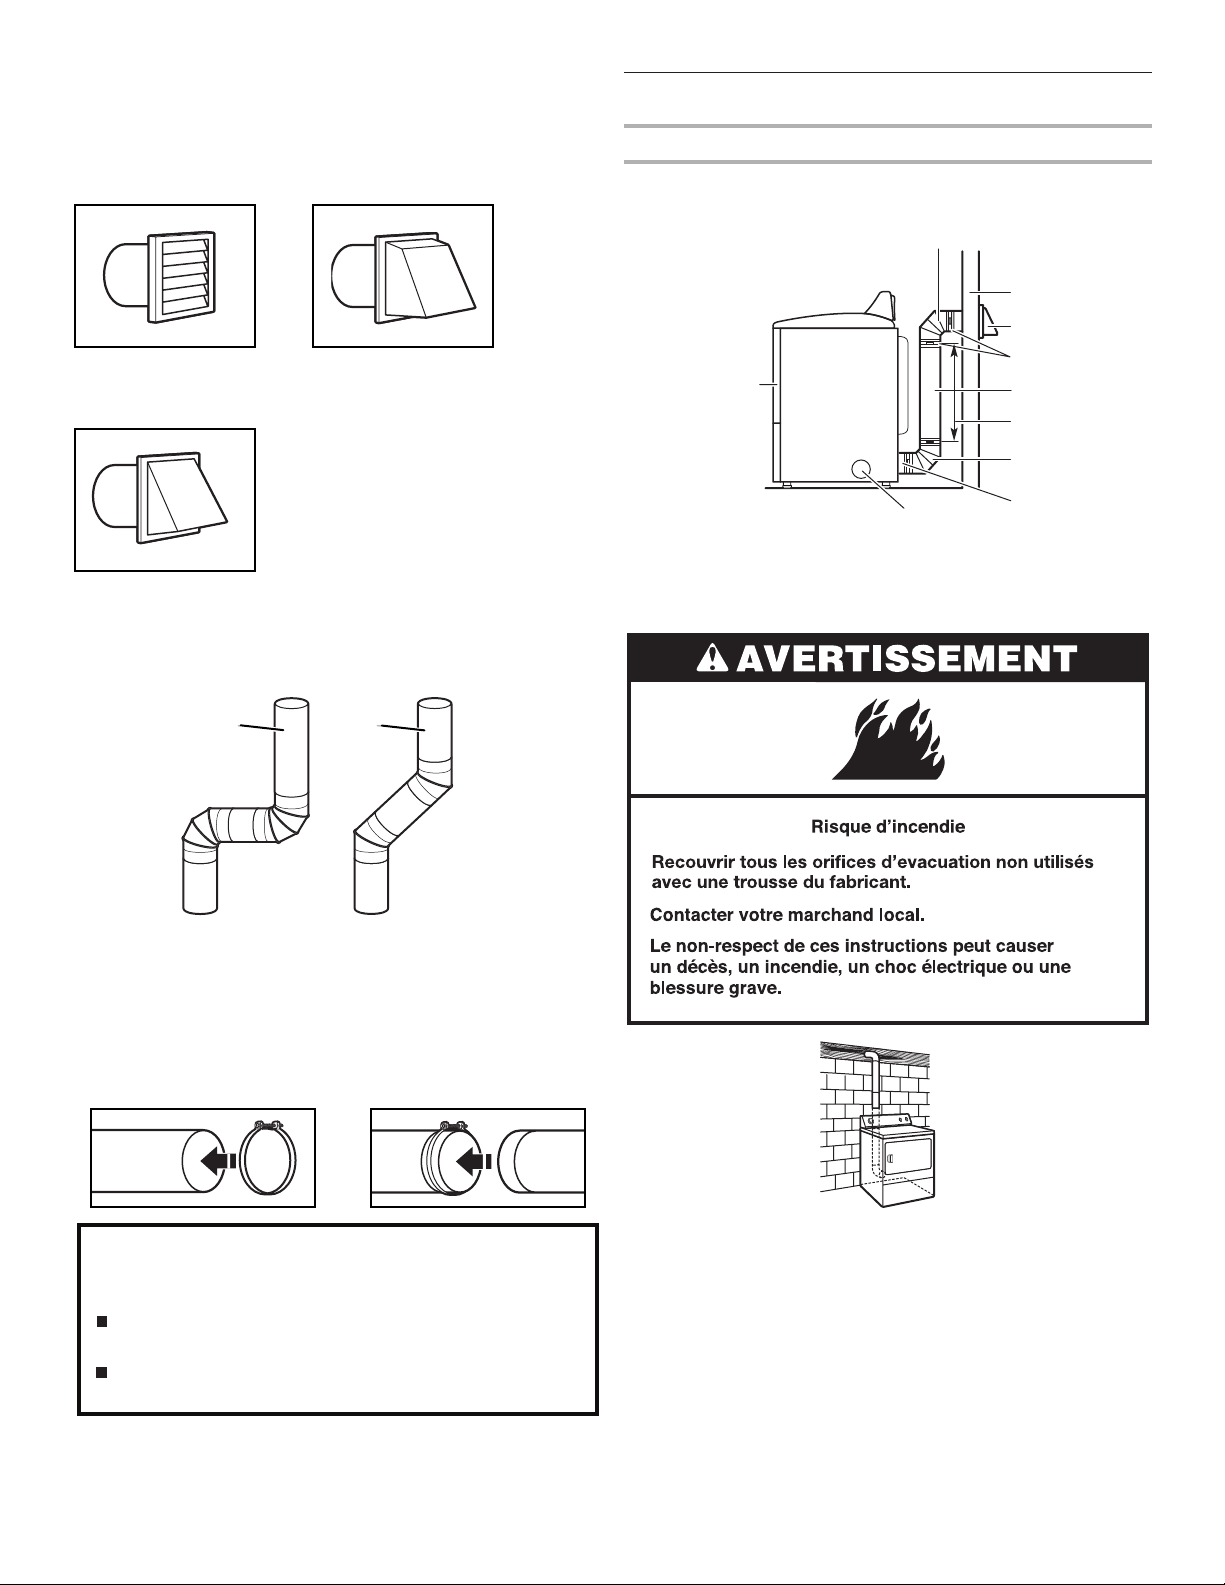
35
USO DE SU SECADORA
1. Limpie el ltro de pelusa
Limpie el ltro de pelusa antes de cada carga. Jale el ltro
de pelusa fuera del receptáculo. Quite la pelusa enrollándola
con los dedos. No enjuague ni lave el ltro para quitar la pelusa.
Empuje el ltro de pelusa rmemente hasta que quede en
su lugar.
Para obtener más información sobre la limpieza, vea “Cuidado
de la secadora”.
2. Cargue la secadora
Ponga la ropa en la secadora. Cierre la puerta.
NOTA: Su modelo puede tener una puerta diferente
de la que se muestra. Algunos modelos tienen puertas
de abertura vertical.
No cargue la secadora de manera apretada; las prendas deben
poder girar libremente.
ADVERTENCIA: A fin de reducir el riesgo de incendio, choque
eléctrico o daños personales, lea las INSTRUCCIONES
IMPORTANTES DE SEGURIDAD antes de operar esta secadora.
Antes de usar la secadora, limpie el tambor de la misma con
un paño húmedo para quitar el polvo que se acumuló durante
el almacenaje y envío.
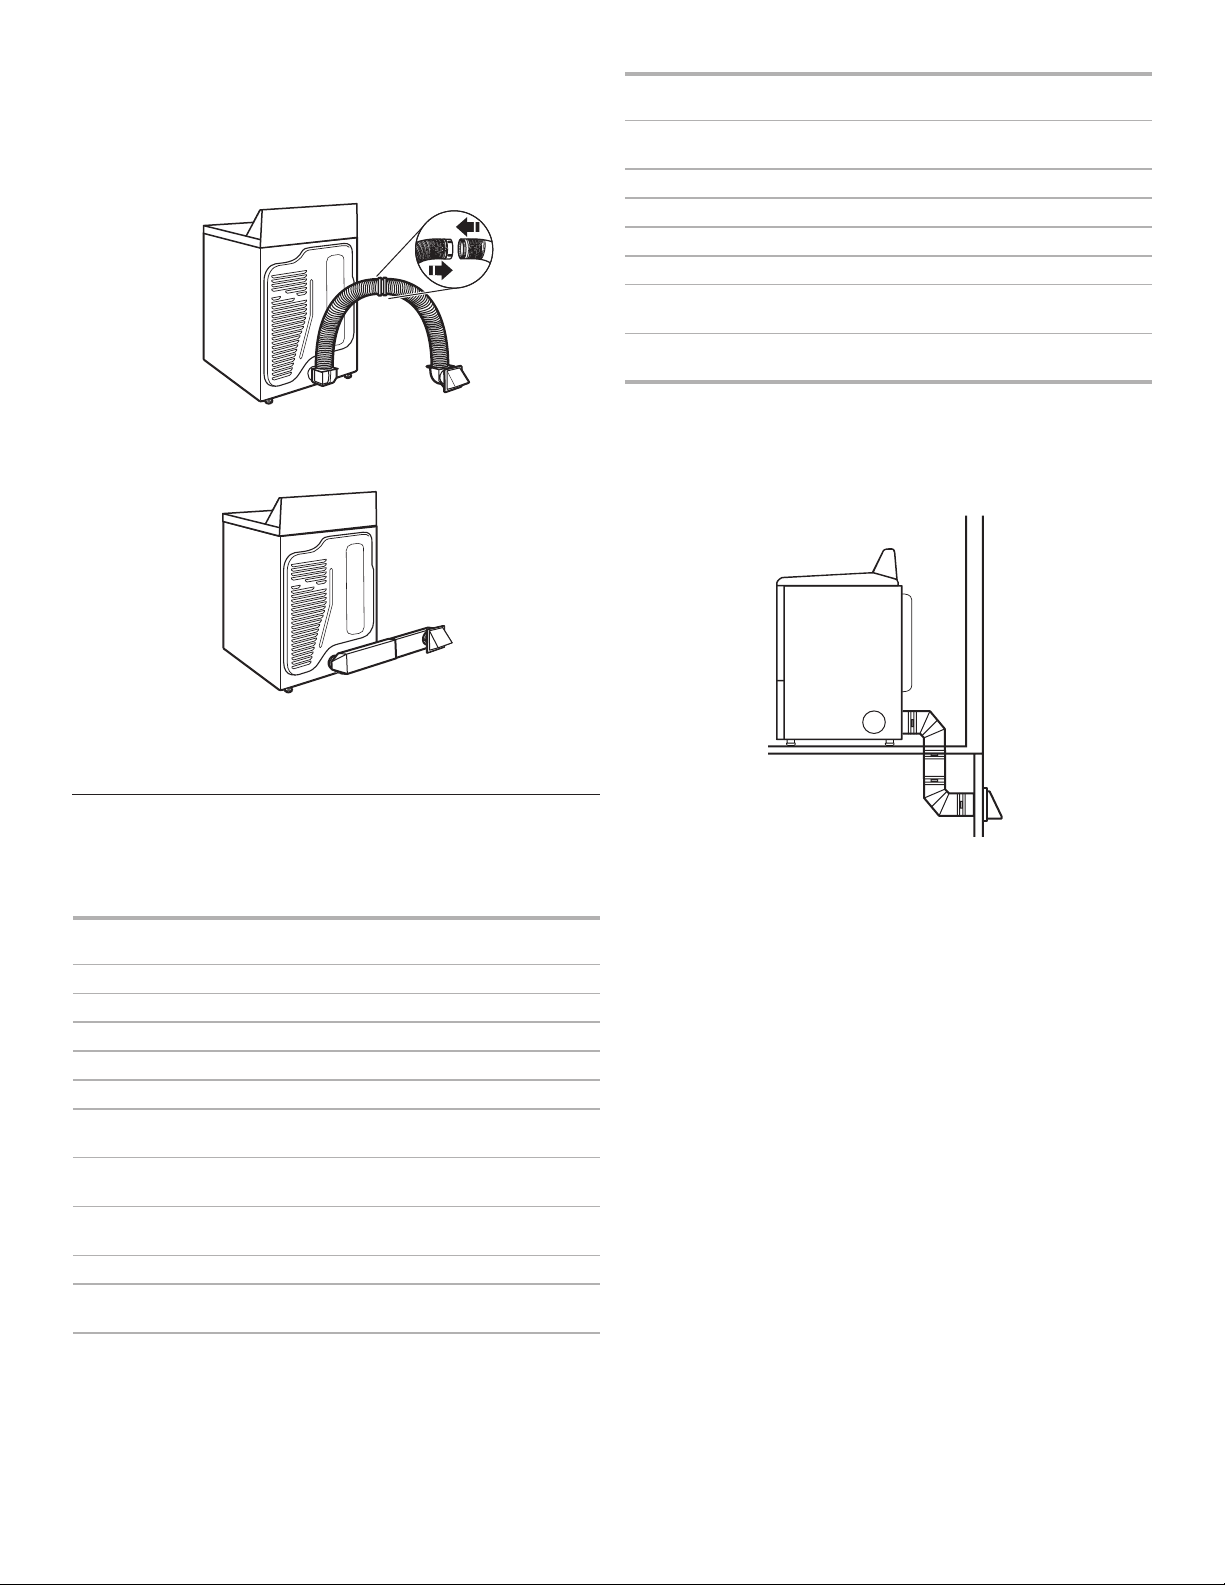
36
5. Presione START/STOP (Inicio/
Detenga) para comenzar el ciclo
Empuje y sostenga la perilla de Start/Stop (Inicio/Detenga) para
comenzar el ciclo.
Para nalizar antes el ciclo, coloque la perilla de Start/Stop
(Inicio/Detenga) en la posición OFF (Apagado).
Saque las prendas en cuanto se haya completado el ciclo
para reducir las arrugas. Use la característica de Wrinkle
Control (Protección contra arrugas) para evitar que se formen
arrugas cuando no puede sacar la carga de la secadora en
cuanto se detiene.
4. Fije los ajustes y las opciones
del ciclo
Seleccione los ajustes y las opciones del ciclo girando la perilla
hacia la posición deseada.
NOTA: No todas las opciones y ajustes están disponibles con
todos los ciclos.
Temperature (Temperatura)
Gire la perilla de Temperature (Temperatura) para cambiar
el ajuste de temperatura de secado. Vea “Cómo jar la
temperatura de secado”.
Característica Wrinkle Control (en algunos modelos)
Obtenga 40 minutos de rotación periódica sin calor al nal
de un ciclo. Gire la perilla de Wrinkle Control para seleccionar
NO (Non) en cualquier momento antes de que termine el ciclo.
3. Seleccione el ciclo deseado
Seleccione el ciclo deseado para su carga. Para obtener más
información acerca de cada ciclo, vea la “Guía de ciclos”.
Ciclos de AUTOMATIC DRY (Secado automático)
Puede seleccionar un nivel de sequedad diferente, según la
carga, girando la perilla hacia el nivel de sequedad.
Si selecciona More Dry (Más seco), Normal (normal), Energy
Preferred (Ahorro de energía) o Less Dry (Menos seco), se
ajusta automáticamente el nivel de sequedad, en el cual se
apagará la secadora. Una vez que se haya jado el nivel de
secado, no podrá cambiarse si no se detiene el ciclo.
Los ciclos de Automatic Dry (Secado automático) le
proporcionan el mejor secado en el tiempo más corto.
Eltiempo de secado varía según el tipo de tela, el tamaño de
la carga y el ajuste de sequedad.
NOTA: More Dry (Más seco) quita más humedad de la carga.
Less Dry (Menos seco) quita menos humedad y se usa para las
cargas que desee terminar de secar en una percha.
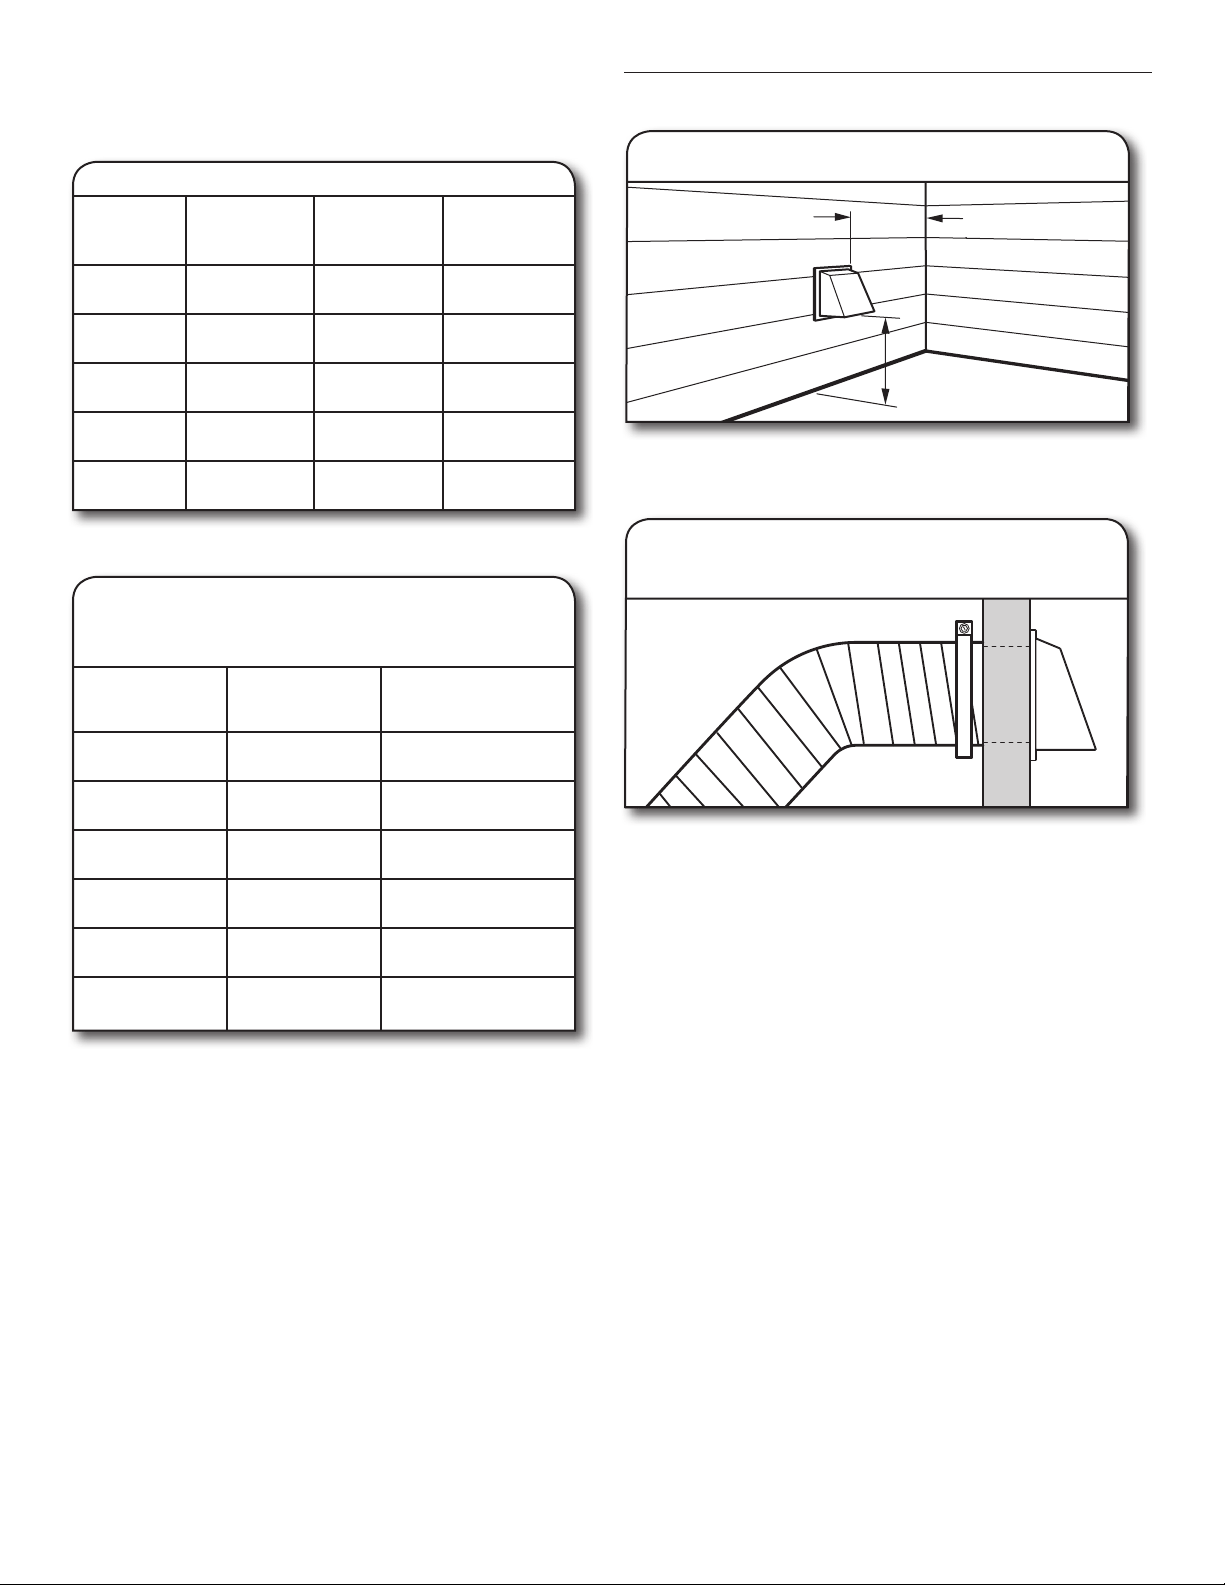
37
CUIDADO DE LA SECADORA
Mantenga el área donde está la secadora despejada y
libre de artículos que pudieran obstruir el ujo de aire para
el funcionamiento adecuado de la secadora. Esto incluye
despejar las pilas de ropa que estén frente a la secadora.
Limpieza del ltro de pelusa
Limpieza de cada carga
El ltro de pelusa está ubicado dentro de la secadora.
Un ltro obstruido con pelusa puede aumentar el tiempo
de secado.
Para limpiar:
1. Jale el ltro de pelusa fuera del receptáculo. Quite
la pelusa del ltro enrollándola con sus dedos. No
enjuague ni lave el ltro para quitar la pelusa. La pelusa
mojada es difícil de quitar.
2. Empuje el ltro de pelusa rmemente de vuelta
en su lugar.
IMPORTANTE:
■ No ponga a funcionar la secadora con un filtro de
pelusa flojo, dañado, obstruido o sin él. El hacerlo
puede causar un sobrecalentamiento y dañar tanto
la secadora como la ropa.
■ Si al quitar la pelusa del filtro, ésta cae en la secadora,
revise la capota de ventilación y quite la pelusa. Vea
“Requisitos de ventilación” en las Instrucciones de
instalación.
■ Limpie el espacio donde se
encuentra el filtro de pelusa
según sea necesario. Elimine
con cuidado todas las pelusas
que se hayan acumulado fuera
del filtro con un aspirador.
Limpieza según la necesidad
Los residuos de detergente de lavandería y suavizante
de telas pueden acumularse en el ltro de pelusa. Esta
acumulación puede ocasionar tiempos de secado más
prolongados para su ropa, o hacer que la secadora se
detenga antes de que su carga esté completamente seca.
El ltro está probablemente obstruido si la pelusa se cae
del mismo mientras está dentro de la secadora.
Limpie el ltro de pelusa con un cepillo de nailon cada
6 meses o con más frecuencia si éste se obstruye debido
a la acumulación de residuos.
Para lavarlo:
1. Quite la pelusa del ltro enrollándola con sus dedos.
2. Moje ambos lados del ltro de pelusa con agua caliente.
3. Moje un cepillo de nylón con agua caliente y detergente
líquido. Talle el ltro de pelusa con el cepillo para quitar
la acumulación de residuos.
4. Enjuague el ltro con agua caliente.
5. Seque meticulosamente el ltro de pelusa con una toalla
limpia. Vuelva a colocar el ltro en la secadora.
Limpieza del interior de la secadora
Para limpiar el tambor de la secadora
1. Aplique un limpiador líquido doméstico no inamable al
área manchada del tambor y frote con un paño suave
hasta que desaparezca la mancha.
2. Limpie el tambor minuciosamente con un paño húmedo.
3. Ponga a funcionar la secadora con una carga de ropa
limpia o toallas para secar el tambor.
NOTA: Las prendas de colores que destiñen tales como
mezclillas o artículos de algodón de colores vivos, pueden
teñir el interior de la secadora. Estas manchas no dañan
su secadora ni mancharán las cargas futuras de ropa.
Seque estos artículos al revés para evitar que se manche
el tambor.
Eliminación de pelusa acumulada
En el interior de la carcasa de la secadora
Según el uso de la secadora, se debe quitar la pelusa
cada 2 años, o con más frecuencia. La limpieza deberá
efectuarlaun representante de servicio calicado.
En el ducto de escape
La pelusa debe ser quitada cada 2 años, o con más
frecuencia, de acuerdo con el uso de la secadora.
Limpieza del lugar donde está
la secadora
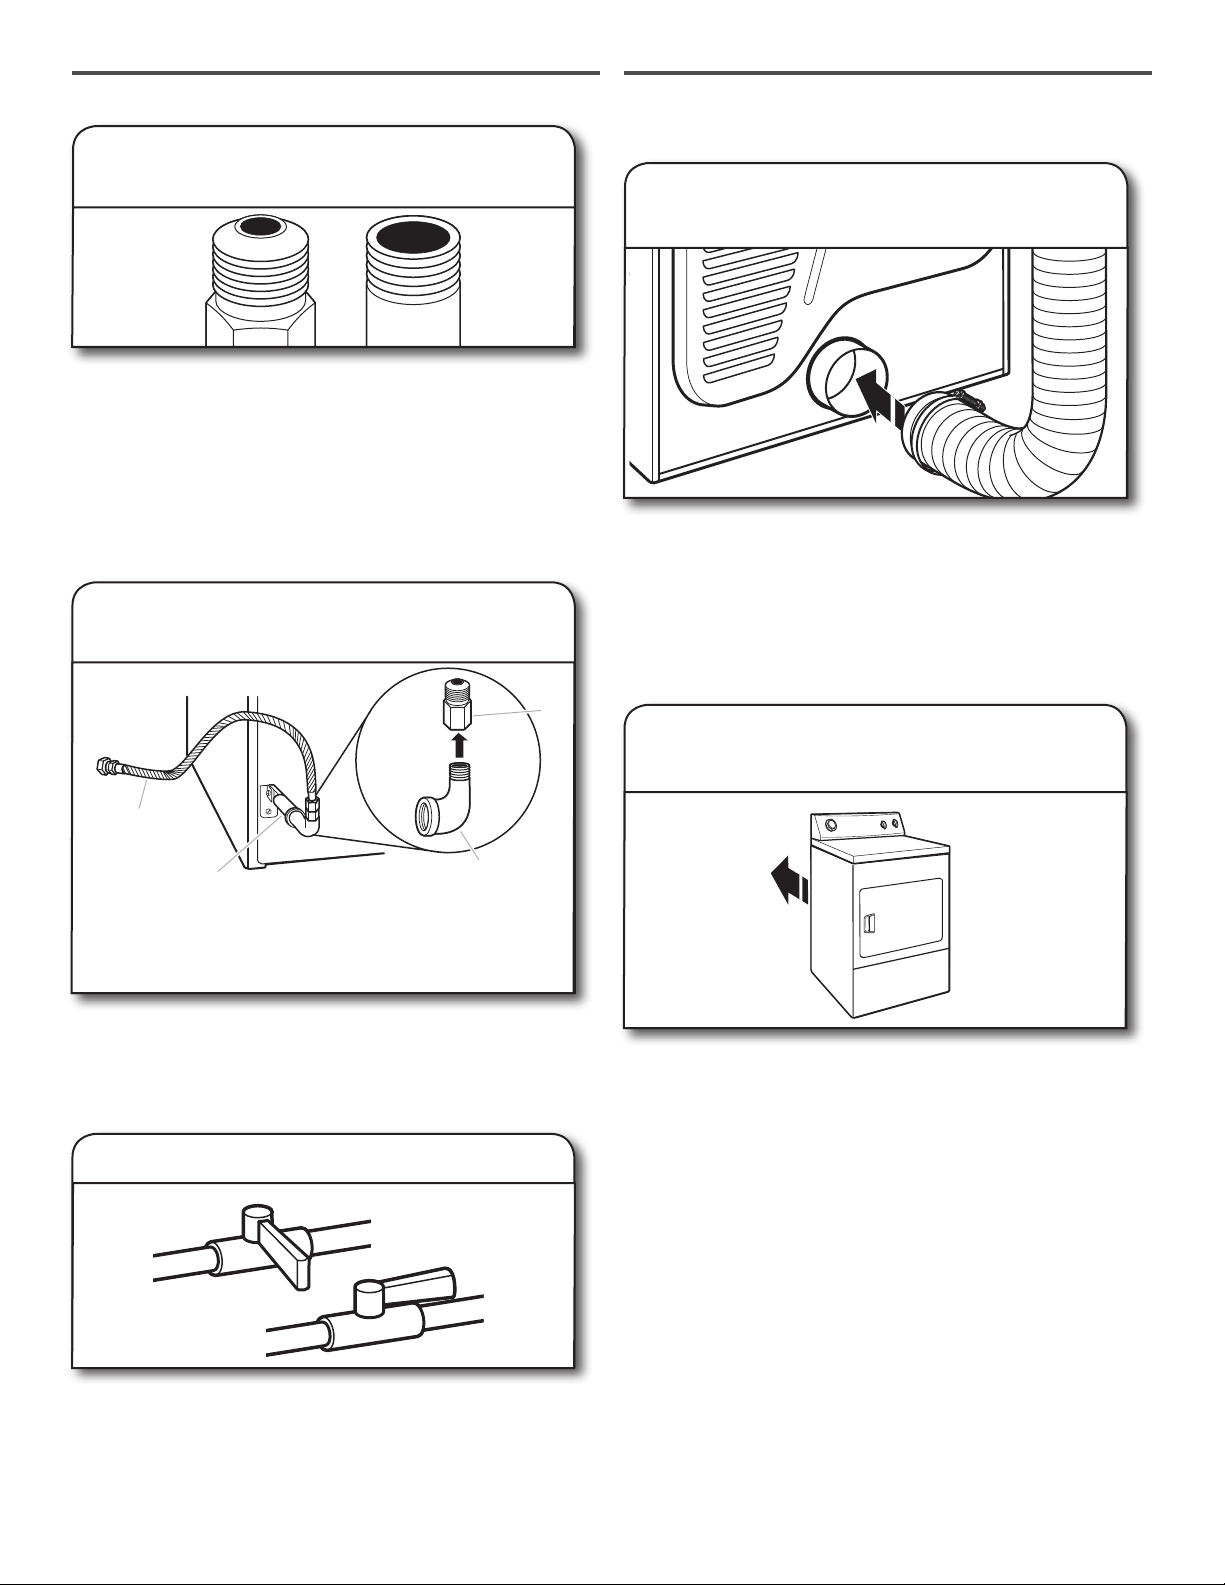
38
Cuidado para las vacaciones,
el almacenaje o en caso de mudanza
Cuidado durante la falta de uso
o el almacenamiento
Ponga la secadora a funcionar sólo cuando esté en casa.
Si va a salir de vacaciones o no va a usar su secadora por
un tiempo prolongado, usted deberá:
1. Desenchufar la secadora o desconectar el suministro de
energía.
2. (Solamente para las secadoras a gas): Cierre la válvula
de cierre a la línea de suministro de gas.
3. Limpiar el ltro de pelusa. Vea “Limpieza del ltro
de pelusa”.
Cuidado para la mudanza
Para secadoras conectadas con cable de suministro
eléctrico:
1. Desenchufe el cable de suministro de energía.
2. Asegúrese de que las patas niveladoras estén jas
en la base de la secadora.
3. Use cinta adhesiva protectora para asegurar la puerta
de la secadora.
Para secadoras con cableado directo:
1. Apague la electricidad en la caja de fusibles
o cortacircuitos.
2. Desconecte el cableado.
3. Asegúrese de que las patas niveladoras estén jas
en la base de la secadora.
4. Use cinta adhesiva protectora para asegurar la puerta
de la secadora.
Para las secadoras a gas:
1. Desenchufe la secadora o desconecte el suministro
de energía.
2. Cierre la válvula de cierre en la línea de suministro
de gas.
3. Desconecte el tubo de la línea de suministro de gas
y quite los accesorios sujetos al tubo de la secadora.
4. Ponga una tapa en la línea abierta del suministro de
combustible.
Cambio de la luz del tambor
(en algunos modelos)
1. Desenchufe la secadora o desconecte el suministro
de energía.
2. Abra la puerta de la secadora. Localice la cubierta del
foco de luz en la pared posterior de la secadora. Quite
el tornillo ubicado en la esquina inferior derecha de la
cubierta con un destornillador Phillips. Quite la cubierta.
3. Gire el foco en sentido contrario a las manecillas
del reloj. Reemplácelo únicamente con un foco para
electrodomésticos de 10 vatios. Vuelva a colocar
la cubierta en su lugar y asegúrela con el tornillo.
4. Enchufe en un contacto de conexión a tierra o reconecte
el suministro de energía.
5. Asegúrese de que las patas niveladoras estén jas
en la base de la secadora.
6. Use cinta adhesiva para asegurar la puerta
de la secadora.
Cómo volver a instalar la secadora
Siga las Instrucciones de instalación para ubicar, nivelar
y conectar la secadora.
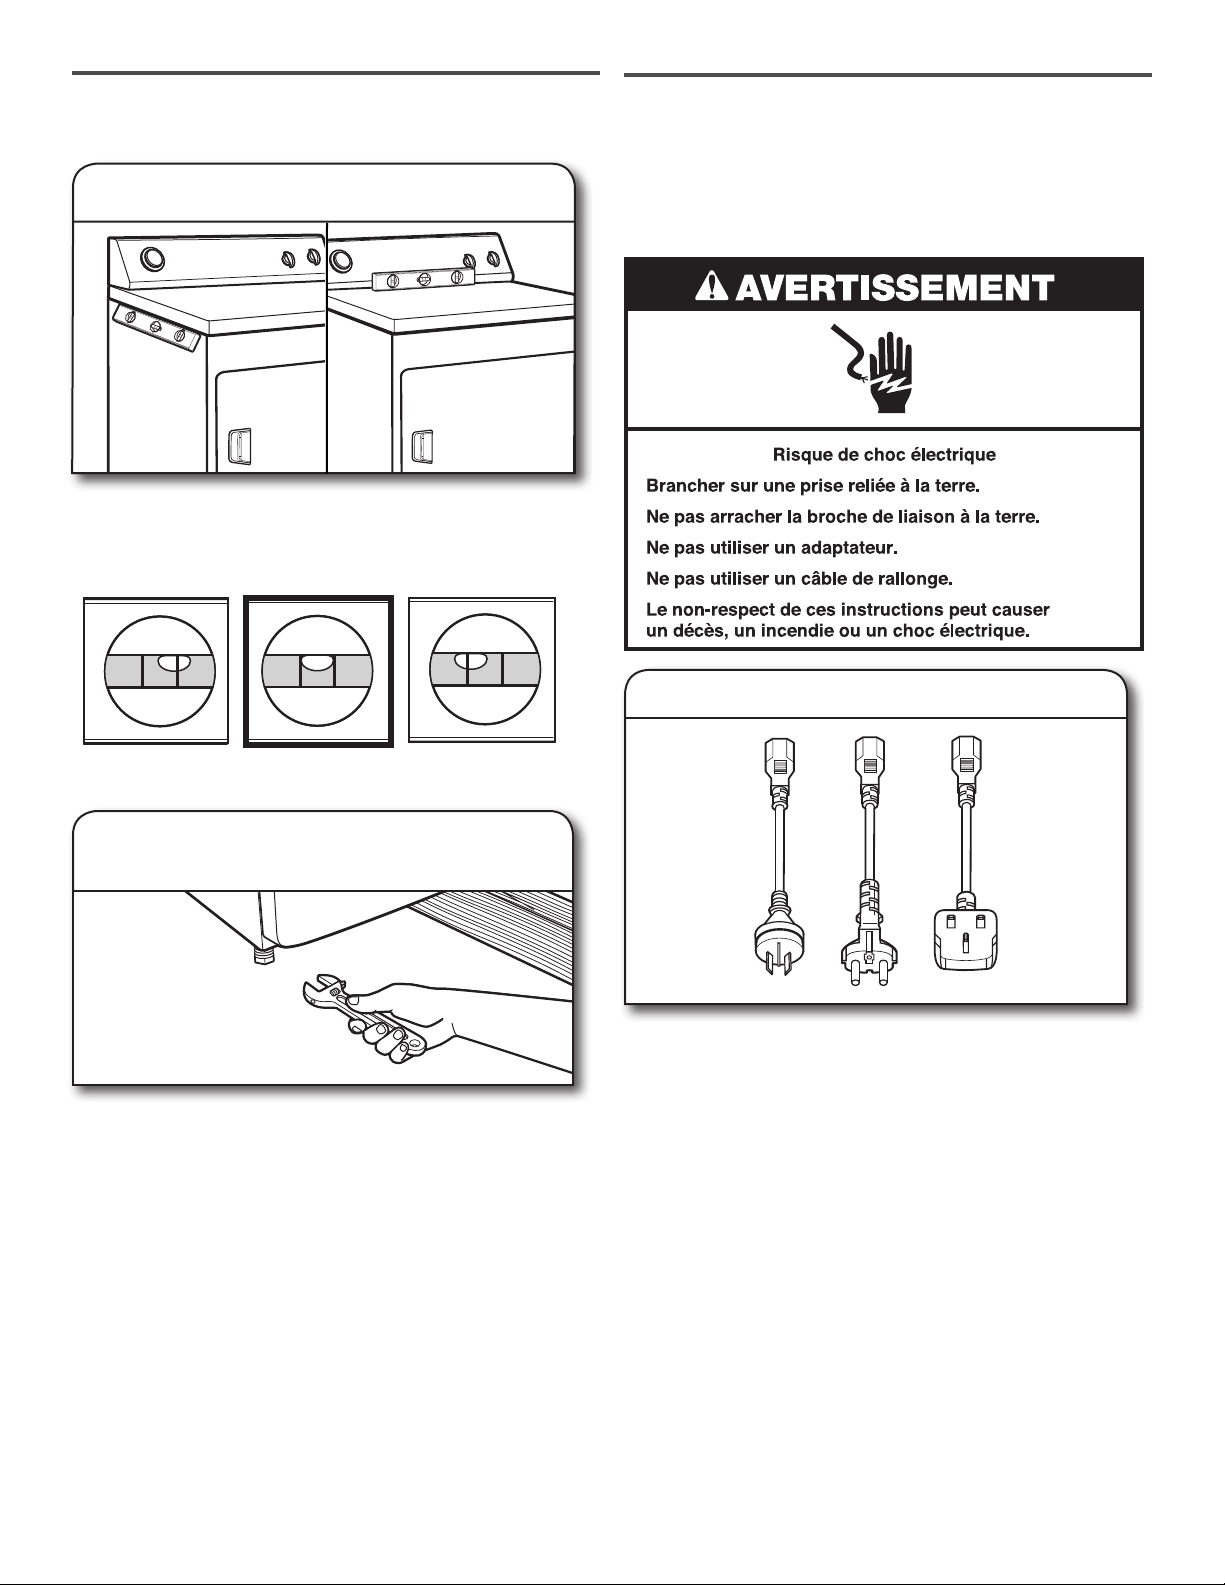
39
Pruebe primero las soluciones sugeridas aquí para posiblemente evitar una visita de servicio.
Si usted experimenta
lo siguiente
Causas posibles Solución
Las prendas no se secan
satisfactoriamente, los
tiempos de secado son
demasiado largos
Filtro de pelusa o su carcasa
obstruidos con pelusa.
El ltro de pelusa debe ser limpiado antes de cada carga. Limpie
el espacio donde se encuentra el ltro de pelusa según sea
necesario. Elimine con cuidado todas las pelusas que se hayan
acumulado fuera del ltro con un aspirador.
Se seleccionó el ajuste de
temperatura No Heat (Sin calor)
o el ciclo Air Fluff/Air Dry (Esponjar/
Secado al aire).
Seleccione el ciclo correcto para el tipo de prendas que se van
a secar. Vea “Guía de ciclos”.
La carga es demasiado voluminosa
y pesada para secarse con rapidez.
Separe la carga de modo que pueda rotar libremente.
Está obstruido con pelusa el ducto
de escape o la capota de ventilación
exterior, restringiendo el ujo del
aire.
Ponga a funcionar la secadora unos 5 a 10 minutos. Ponga
su mano debajo de la capota de ventilación exterior para
vericar el movimiento del aire. Si no lo siente, limpie la pelusa
del sistema de ventilación o reemplace el ducto de escape con
uno de metal pesado o de metal exible. Asegúrese de que el
ducto de escape no esté aplastado ni retorcido. Consulte las
Instrucciones de instalación.
Las hojas del suavizante de telas
están bloqueando la rejilla.
Use only one fabric softener sheet, and use it only once.
El ducto de escape no tiene el largo
correcto.
Controle el ducto de escape para vericar que no sea
demasiado largo ni dé demasiadas vueltas. Una ventilación
con un ducto largo aumentará el tiempo de secado. Asegúrese
de que el ducto de escape no esté aplastado ni retorcido.
Consulte las Instrucciones de instalación.
El ducto de escape no tiene el diá-
metro correcto.
Use un material de ventilación de 102 mm (4") e diámetro.
Secadora ubicada en una habitación
cuya temperatura está por debajo de
los 7ºC (45ºF).
El funcionamiento apropiado de los ciclos de la secadora
requiere temperaturas superiores a 7ºC (45ºF).
La secadora se encuentra en un
clóset sin la abertura apropiada.
Las puertas del armario deben tener aberturas de ventilación
en la parte superior e inferior de la puerta. La parte anterior
de la secadora necesita un mínimo de 25 mm (1") de espacio y,
para la mayoría de las instalaciones, la parte posterior necesita
127 mm (5"). Vea Instrucciones de instalación.
La secadora no funciona
La puerta no está cerrada por completo.
Cerciórese de que la puerta de la secadora esté bien cerrada.
La perilla de Start/Stop (Inicio/
Detenga) no se ha colocado
en la posición ON.
Gire la perilla de Start/Stop (Inicio/Detenga) a la posición ON.
No se presionó con rmeza o por
suciente tiempo el botón de Start/
Stop (Inicio/Detenga).
Presione la perilla de Start/Stop (Inicio/Detenga) hasta que es-
cuche el tambor de la secadora moviéndose.
Hay un fusible de la casa fundido
o se disparó el cortacircuitos.
Las secadoras eléctricas utilizan 2 fusibles o cortacircuitos
domésticos. El tambor quizás rote pero sin calor. Reemplace
ambos fusibles o reposicione el cortacircuitos. Si el problema
continúa, llame a un electricista.
Fuente de suministro eléctrico. Las secadoras eléctricas requieren un suministro eléctrico
de 240 voltios. Verique con un electricista calicado.
Tipo de fusible equivocado. Use un fusible retardador.
Sonidos raros La secadora no se utilizó por cierto
tiempo.
Si la secadora ha estado en desuso por una temporada, podrá oírse
un ruido de golpeteo durante los primeros minutos de funcionamiento.
Una moneda, un botón o un
sujetapapeles está atrapado entre
el tambor y la parte frontal o trasera
de la secadora.
Revise los bordes frontales y posteriores del tambor para
vericar si hay objetos pequeños. Limpie los bolsillos antes
del lavado.
Es una secadora a gas. El chasquido de la válvula de gas es un sonido de
funcionamiento normal.
No están instaladas las cuatro patas
ni la secadora está nivelada de
frente hacia atrás ni de lado a lado.
La secadora puede vibrar si no está instalada adecuadamente.
Vea “Instrucciones de instalación”.
La ropa está enredada o hecha un
ovillo.
Si la carga está hecha un ovillo, ésta rebotará haciendo vibrar a
la secadora. Separe los artículos de la carga y reinicie la secadora.
SOLUCIÓN DE PROBLEMAS
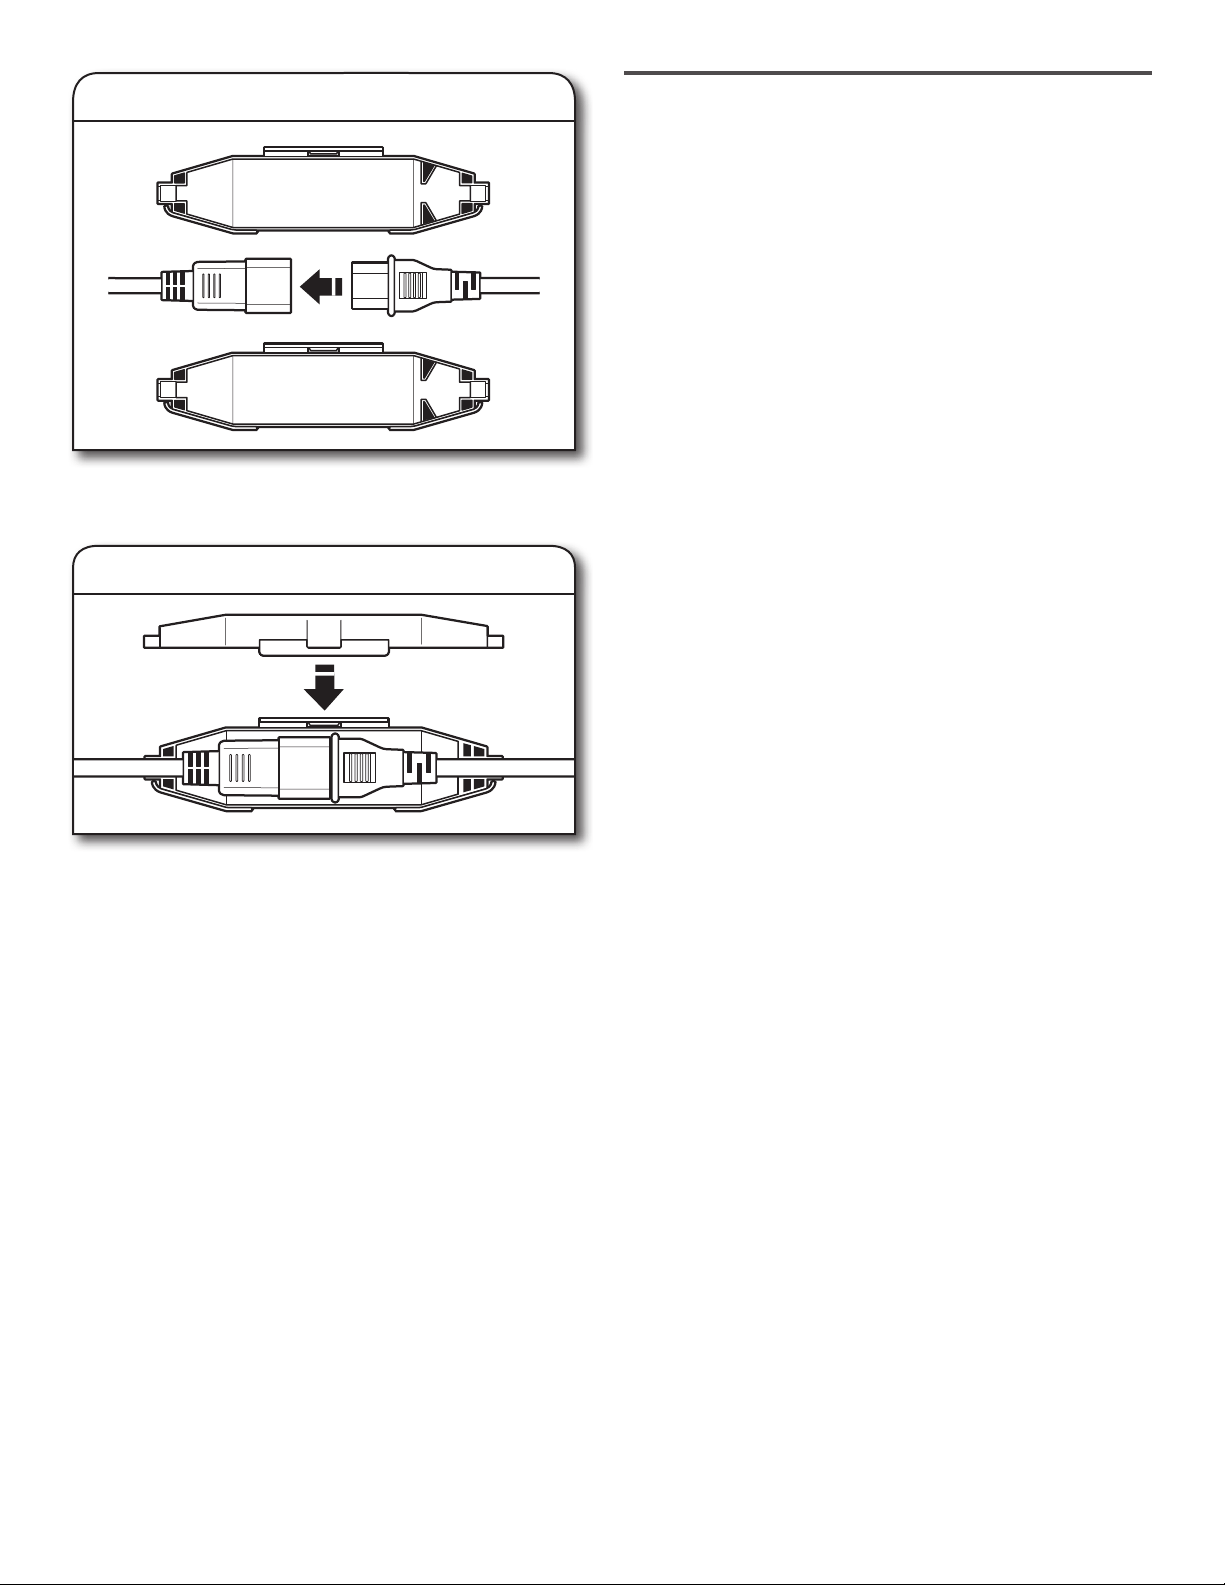
40
Pruebe primero las soluciones sugeridas aquí para posiblemente evitar una visita de servicio.
Si usted experimenta
lo siguiente
Causas posibles Solución
Sin calor Hay un fusible de la casa fundido
o se disparó el cortacircuitos.
El tambor quizás rote pero sin calor. Las secadoras
eléctricas utilizan 2 fusibles o cortacircuitos domésticos.
Reemplace el fusible o reposicione el cortacircuitos.
Si el problema continúa, llame a un electricista.
Válvula de la línea de suministro cerrada. Para secadoras a gas, asegúrese de que la válvula
de la línea de suministro esté abierta.
Fuente de suministro eléctrico incorrecto. Las secadoras eléctricas requieren un suministro eléctrico
de 240 voltios. Verique con un electricista calicado.
El tiempo del ciclo
es demasiado corto
El ciclo automático termina muy rápido. Quizás la carga no esté haciendo contacto con las bandas
del sensor. Nivele la secadora.
Use el Timed Dry (Secado programado) para cargas muy
pequeñas. Cambie el ajuste de nivel de sequedad en los
ciclos Automatic Dry (Secado automático).
Aumentar o disminuir el ajuste de nivel de secado
cambiará la cantidad de tiempo de secado en un ciclo.
Pelusa en la carga El ltro de pelusa está obstruido. El ltro de pelusa debe ser limpiado antes de cada carga.
Manchas en la carga
o en el tambor
No se usó de modo apropiado
el suavizante de telas para secadoras.
Agregue las hojas del suavizante de telas para secadora
al comienzo del ciclo. Las hojas del suavizante de telas
que se agregan a una carga parcialmente seca pueden
manchar las prendas.
Las manchas en el tambor son causadas por los tintes
en las prendas (habitualmente los pantalones de mezclilla).
Éstas no se transferirán a otras prendas.
Las cargas están
arrugadas
Se ha cargado la secadora de manera
apretada.
Seleccione la característica de Wrinkle Control para hacer
girar la carga sin calor, para evitar las arrugas.
La secadora está apretada. Seque cargas más pequeñas que puedan girar libremente
y reducir la formación de arrugas.
Olores Ha estado pintando, tiñendo o barnizando
recientemente en el área donde se
encuentra la secadora.
Si es así, ventile el área. Cuando los olores y el humo se
hayan ido del área, vuelva a lavar la ropa y luego séquela.
La secadora eléctrica se está usando
por primera vez.
El nuevo elemento calentador eléctrico puede emitir
un olor. El olor desaparecerá después del primer ciclo.
La carga está demasiado
caliente
Se han quitado los artículos de lavado
de la secadora antes del nal del ciclo.
Deje que termine el ciclo de Cool Down (Enfriamiento)
antes de quitar las prendas de la secadora. La carga
se enfría lentamente en todos los ciclos para reducir las
arrugas y hacer que la carga sea más fácil de manipular.
Es posible que los artículos que se han quitado antes del
Cool Down (Enfriamiento) queden muy calientes al tacto.
Se usó un ciclo con temperatura alta
o se jó un control separado de
temperatura en High (Alta).
Seleccione una temperatura más baja y use un ciclo
de Automatic Dry (Secado automático). Estos ciclos
detectan el nivel de humedad en la carga y se apagan
cuando la carga alcanza el grado de sequedad
seleccionado. Esto reduce el exceso de secado.
SOLUCIÓN DE PROBLEMAS
SERVICIO – AMERICA LATINA
Para otros países de Latinoamerica, consulte nuestro Certicado de Garantia Latinoamerica y visite nuestra página web
de Whirlpool Latinoamerica www.whirlpool-latam.com seleccione su país y luego Menú Atención al Cliente.
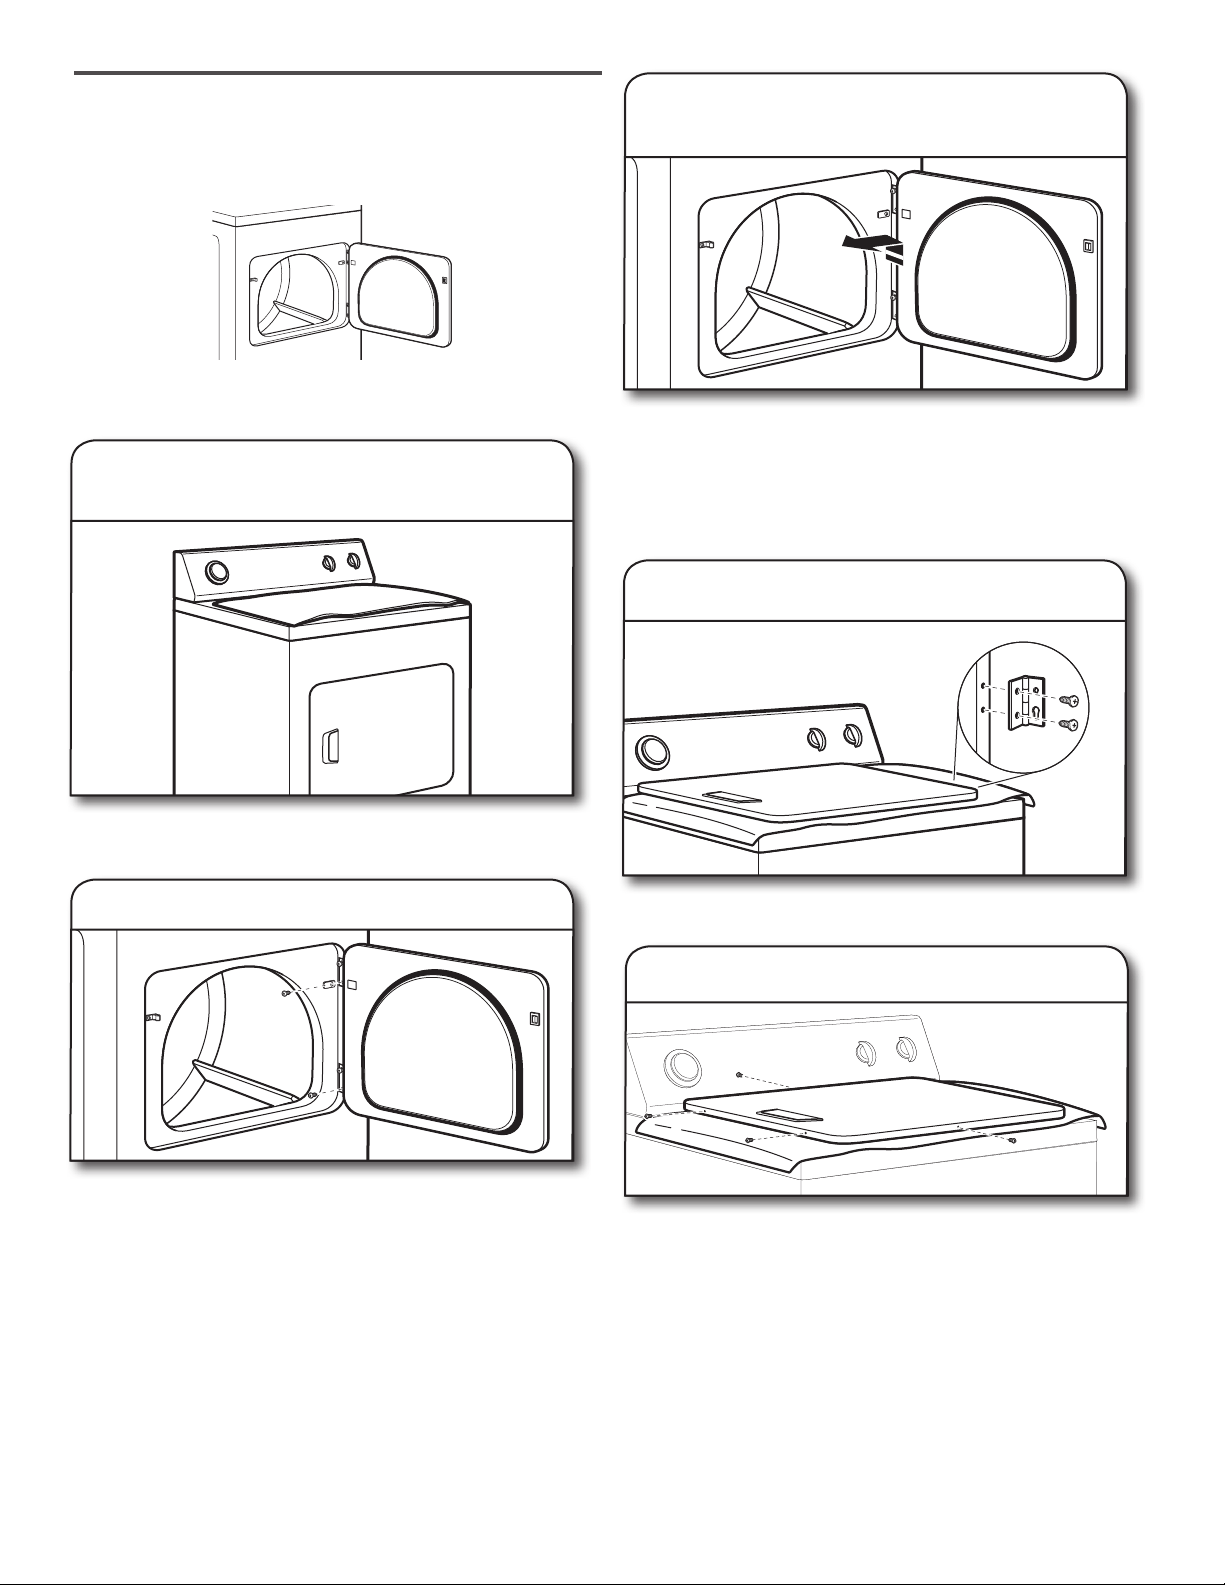
41
GARANTÍA LIMITADA DE
LOS PRODUCTOS DE
LAVANDERÍA MAYTAG
ADJUNTE SU RECIBO AQUÍ. SE REQUIERE UCOMPROBANTE DE
COMPRA PARA OBTENER SERVICIO BAJO LA GARANTÍA.
Tenga disponible la siguiente informaciócuando llame al Centro para la
eXperiencia del cliente:
■ Nombre, direccióy número de teléfono
■
Número de modelo y de serie
■
Una descripcióclara y detallada de problema
■
Comprobante de compra que incluya nombre y dirección del distribuidor
o minorista
GARANTÍA LIMITADA DURANTE EL PRIMER AÑO
(PIEZAS Y MANO DE OBRA)
Durante un año a partir de la fecha de compra, siempre y
cuando este electrodoméstico principal haya sido instalado,
operado y mantenido de conformidad con las instrucciones
adjuntas o provistas con el producto, la marca Maytag
de Whirlpool Corporation o Whirlpool Canada, LP (en lo
sucesivo denominada “Maytag”) pagará por el costo de las
piezas especificadas de fábrica y del trabajo de reparación
para corregir defectos en los materiales o en la mano
de obra, existentes en el momento de la compra de este
electrodoméstico principal.
GARANTÍA LIMITADA DEL SEGUNDO AL DÉCIMO AÑO
(SÓLO PARA EL MOTOR DEL TAMBOR Y LA CANASTA
DE ACERO INOXIDABLE; NO SE INCLUYE LA MANO DE
OBRA)
IDesde el segundo al décimo año desde la fecha de compra
original, siempre y cuando este electrodoméstico principal
haya sido instalado, operado y mantenido de acuerdo a las
instrucciones adjuntas o provistas con el producto, Maytag
pagará por las piezas especificadas de fábrica para los
siguientes componentes, para corregir defectos no estéticos
en los materiales o en la mano de obra de estas piezas, los
cuales eviten el funcionamiento del electrodoméstico principal
y que hayan existido en el momento de la compra de este
electrodoméstico principal. La presente es una garantía
limitada de 10 años para las piezas nombradas a continuación
solamente y no incluye la mano de obra de reparación.
■ Tambor (paredes laterales solamente)
■ Motor de accionamiento
SU ÚNICO Y EXCLUSIVO RECURSO SEGÚN LOS
TÉRMINOS DE ESTA GARANTÍA LIMITADA SERÁ EL DE
REPARAR EL PRODUCTO SEGÚN SE ESTIPULA EN LA
PRESENTE
El servicio deberá ser suministrado por una compañía de
servicio designada por Maytag. Esta garantía limitada es
válida solamente en Estados Unidos o en Canadá y se aplica
solamente cuando el electrodoméstico principal se use en el
país en el que se ha comprado. Esta garantía limitada está
en vigencia a partir de la fecha de la compra del consumidor
original. Se requiere una prueba de la fecha de compra original
para obtener servicio bajo esta garantía limitada.
SI NECESITA SERVICIO:
1. Antes de contactarnos para organizar la visita del servicio técnico, determine si su producto requiere reparación. Algunas cuestiones
pueden resolverse sin servicio técnico. Dedique unos minutos a revisar la sección de Solución de problemas del Manual de uso y cuidado
o visite https://www.maytag.com/product_help.
2. Todos los servicios bajo la garantía los brindan exclusivamente prestadores autorizados de servicio de Maytag. En EE. UU. y Canadá, dirija
todas las solicitudes de servicio técnico dentro de la garantía a:
Centro para la eXperiencia del cliente de Maytag
En los EE. UU., llame al 1-800-688-9900. En Canadá, llame al 1-800-807-6777.
Si usted se encuentra fuera de los cincuenta Estados Unidos y Canadá, póngase en contacto con su distribuidor autorizado de Maytag para
determinar si corresponde otra garantía.
GARANTÍA LIMITADA DE DIEZ AÑOS
QUÉ ESTÁ CUBIERTO QUÉ NO ESTÁ CUBIERTO
1. El uso comercial, no residencial, multifamiliar, o no consistente con las
instrucciones publicadas para el usuario, el operador o la instalación.
2. Instrucciones provistas en la casa para usar el producto.
3. Servicio técnico para corregir mantenimiento o instalación incorrectos del
producto, instalación no acorde con los códigos eléctricos o de plomería
o corrección de electricidad o plomería de la casa (es decir, cableado,
fusibles o mangueras de entrada de agua en la casa).
4. Piezas de consumo (por ejemplo, focos de luz, baterías, fi ltros de agua o
de aire, etc.).
5. Conversión del producto de gas natural a gas propano o inversión de las
puertas del electrodoméstico.
6. Daños causados por accidente, uso indebido, abuso, incendio,
inundación, actos fortuitos o uso con productos no aprobados por
Maytag
7. Reparaciones de piezas o sistemas para corregir daños o defectos
causados por servicio técnico, alteración o modifi cación no autorizados
del electrodoméstico.
8. Daños estéticos, que incluyen rayaduras, abolladuras, desportilladuras
u otro daño al acabado del electrodoméstico a menos que el mismo se
deba a defectos en los materiales o la mano de obra y se le informe a
Maytag en un lapso de 30 días.
9. Cambio de color, herrumbre u óxido de superfi cies causados por
ambientes cáusticos o corrosivos, incluso, entre otras cosas, altas
concentraciones de sal, alta humedad o condensación o exposición a
sustancias químicas.
10. Recogida o entrega. Este producto ha sido diseñado únicamente para
ser reparado en la casa.
11. Gastos de viajes o transporte para el servicio técnico en lugares remotos
donde no haya un proveedor de servicio técnico autorizado de Maytag
disponible.
12. Retiro o reinstalación de electrodomésticos inaccesibles o componentes
integrados (es decir adornos, paneles decorativos, pisos, gabinetes,
islas, encimeras, mampostería, etc.) que interfi eran con el servicio
técnico, el retiro o el reemplazo del producto.
13. Servicio técnico o piezas para electrodomésticos con números de
modelo/serie originales que se hayan removido, alterado o que no se
puedan determinar con facilidad.
El costo de la reparación o del reemplazo bajo estas circunstancias
de exclusión correrá por cuenta del cliente.
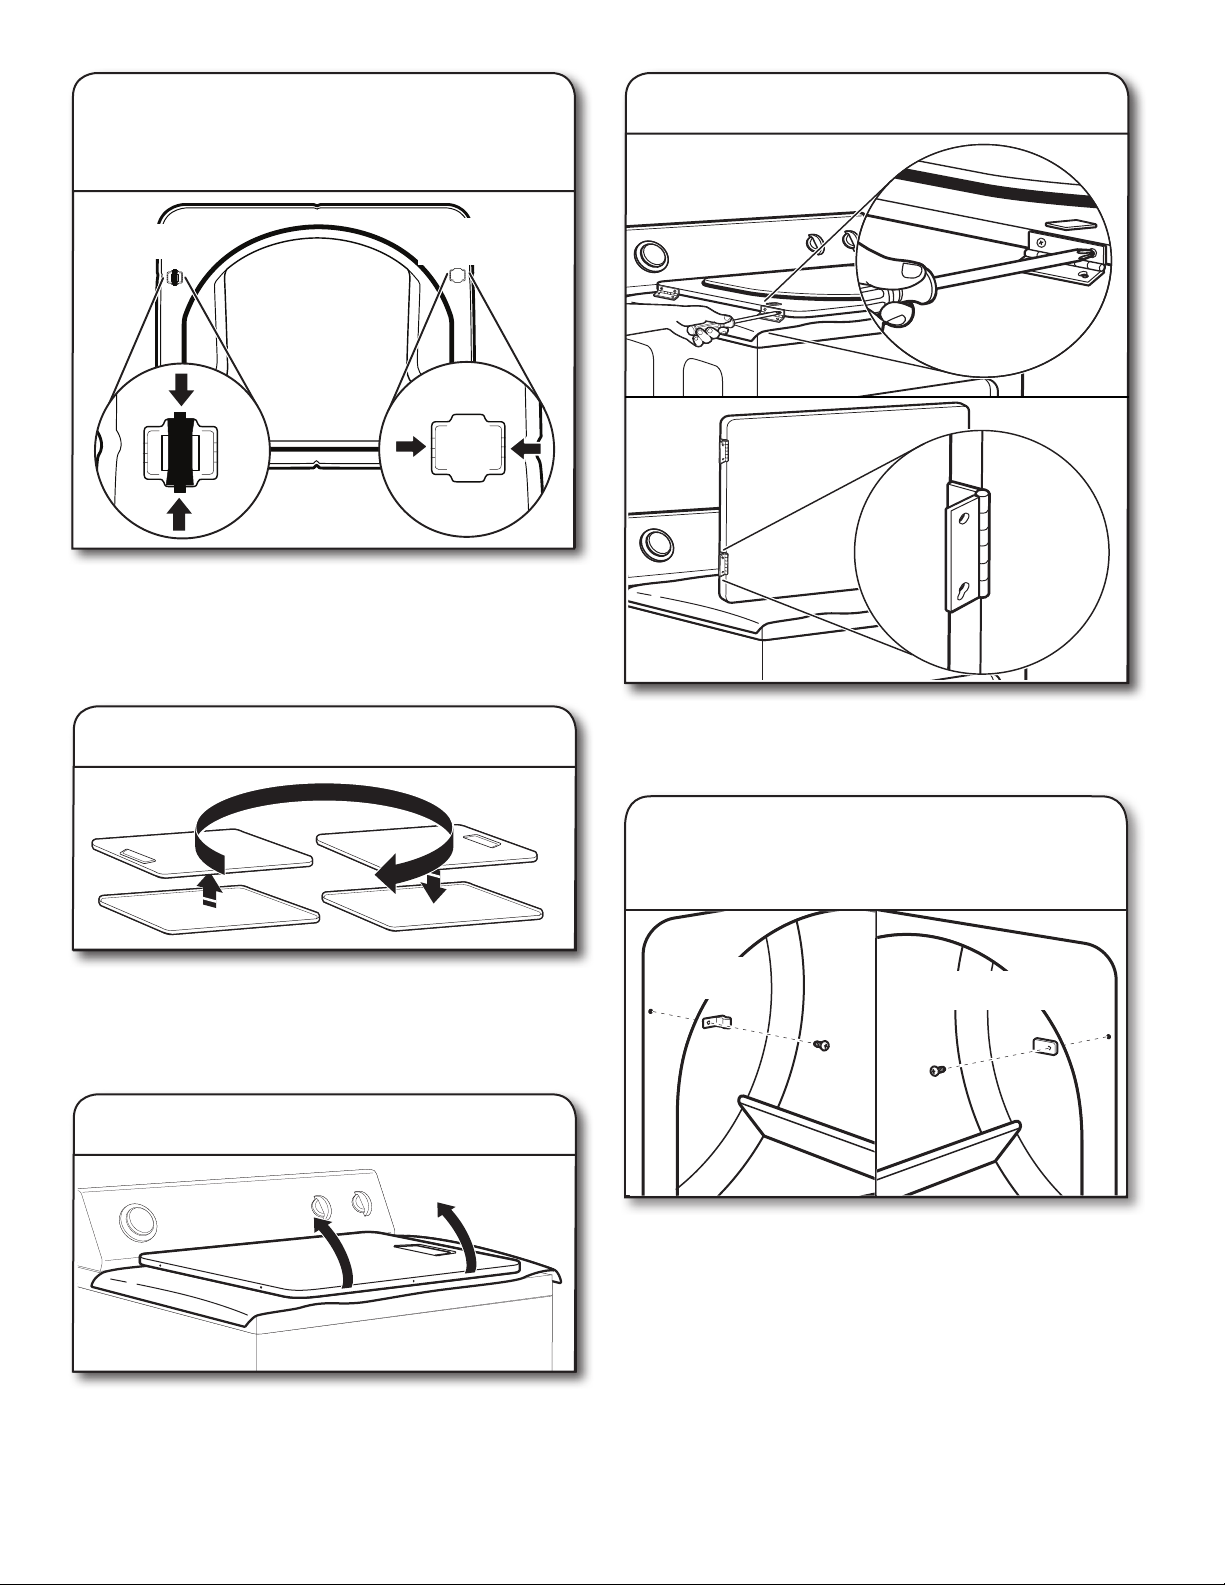
42
01/14
EXCLUSIÓN DE GARANTÍAS IMPLÍCITAS
LAS GARANTÍAS IMPLÍCITAS, INCLUSO CUALQUIER GARANTÍA IMPLÍCITA DE COMERCIABILIDAD O GARANTÍA IMPLÍCITA DE
ADECUACIÓN PARA UN PROPÓSITO PARTICULAR, ESTÁN LIMITADAS A DIEZ AÑOS O AL PERÍODO MÁS CORTO PERMITIDO
POR LEY.
Algunos estados y provincias no permiten la limitación de la duración de las garantías implícitas de comerciabilidad o capacidad, de modo
que la limitación antes indicada quizá no le corresponda. Esta garantía le otorga derechos legales específi cos y es posible que usted tenga
también otros derechos que varían de un estado a otro o de una provincia a otra.
EXCLUSIÓN DE DECLARACIONES FUERA DE LA GARANTÍA
Maytag no hace declaraciones acerca de la calidad, durabilidad o necesidad de servicio técnico o reparación de este aparato principal
aparte de las declaraciones incluidas en esta Garantía. Si usted desea una garantía con una duración más prolongada o más completa que
la garantía limitada que se incluye con este electrodoméstico principal, deberá dirigirse a Maytag o a su distribuidor acerca de la compra de
una garantía extendida.
LIMITACIÓN DE RECURSOS; EXCLUSIÓN DE DAÑOS INCIDENTALES Y CONSECUENTES
SU ÚNICO Y EXCLUSIVO RECURSO SEGÚN LOS TÉRMINOS DE ESTA GARANTÍA LIMITADA SERÁ EL DE REPARAR EL
PRODUCTO SEGÚN SE ESTIPULA EN LA PRESENTE. MAYTAG NO SE RESPONSABILIZARÁ POR DAÑOS INCIDENTALES O
CONSECUENTES. Algunos estados y provincias no permiten la exclusión o limitación de daños incidentales o consecuentes, de
modo que estas limitaciones y exclusiones quizás no le correspondan. Esta garantía le otorga derechos legales especí cos y es
posible que usted tenga también otros derechos que varían de un estado a otro o de una provincia a otra
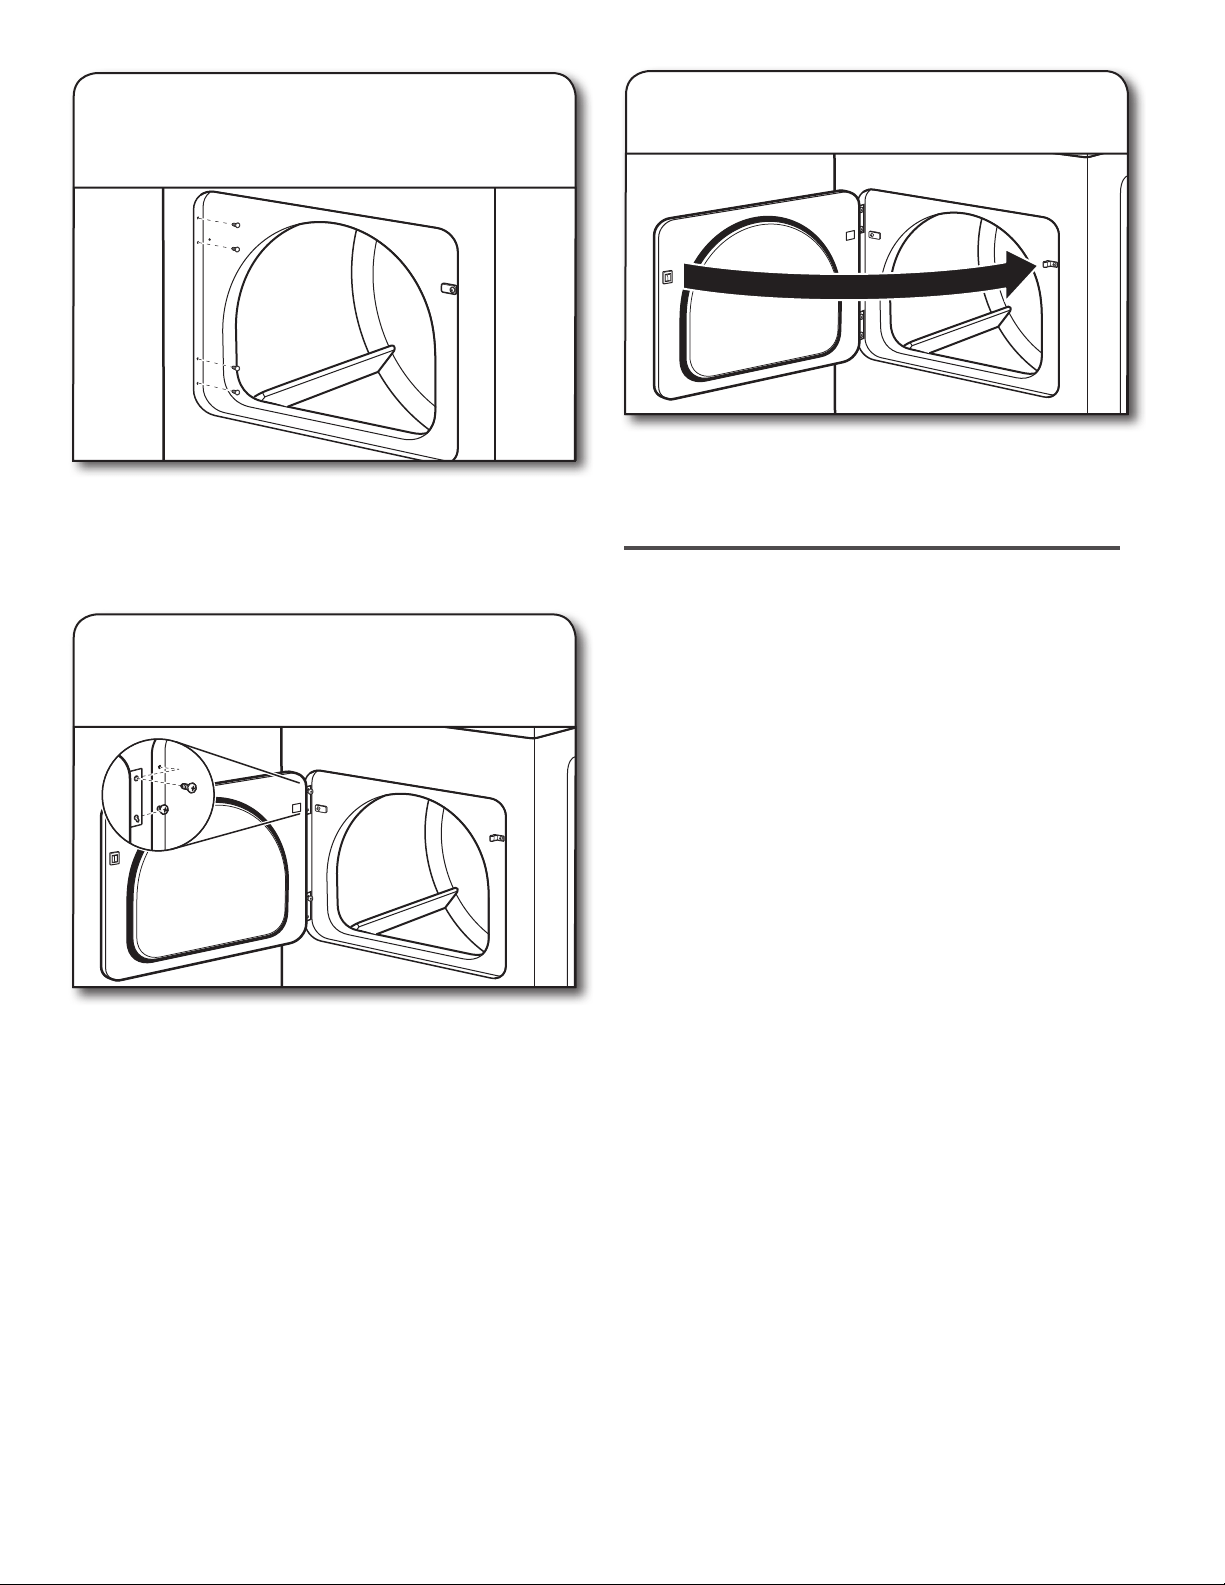
43
Ayuda o Servicio Técnico
Antes de llamar para solicitar ayuda o servicio técnico, consulte “Solución de problemas”
o visite www.maytag.com/owners. Esto le podría ahorrar el costo de una llamada de servicio técnico.
Si considera que aún necesita ayuda, siga las instrucciones que aparecen a continuación.
Cuando llame, tenga a mano la fecha de compra y el número completo del modelo y de la serie de su electrodoméstico.
Esta información nos ayudará a atender mejor a su pedido.
Maytag Brand Appliances
Customer eXperience Center
553 Benson Road
Benton Harbor, MI 49022-2692
1-800-344-1274
Maytag Brand Appliances
Customer eXperience Centre
Unit 200-6750 Century Ave
Mississauga, Ontario L5N 0B7
1-800-688-2002
Usted puede escribir con cualquier pregunta o preocupación a:
Nuestros consultores ofrecen ayuda para
Por favor incluya en su correspondencia un número de teléfono en el que se le pueda localizar durante el día.
En los EE. UU.
Características y especificaciones de nuestra línea
completa de electrodomésticos.
Información sobre la instalación.
Asistencia especializada para el cliente (habla hispana,
problemas de audición, visión limitada, etc.).
En los EE. UU. y Canadá
Procedimientos de uso y mantenimiento.
Venta de accesorios y partes para reparación.
Recomendaciones con distribuidores locales,
distribuidores de partes para reparación y compañías que
otorgan servicio. Los técnicos de servicio designados por
están capacitados para cumplir con la garantía
de producto y ofrecer servicio una vez que la garantía
termine, en cualquier lugar de losEstados Unidos y
Canadá.
Si necesita piezas de repuesto o pedir accesorios
Recomendamos que use solamente piezas especificadas de fábrica FSP.
Estas piezas encajarán bien y funcionarán bien ya que están fabricadas con la misma precisión empleada en la
fabricación de cada electrodoméstico nuevo de marca MAYTAG.
Para ubicar piezas de repuesto FSP o para accesorios, visite www.maytagpartsonline.com
¿Tiene preguntas? Llámenos al número gratuito 1-800-344-1274 o al 1-800-688-2002 en Canadá

44
SICUREZZA DELL’ASCIUGATRICE
AVVERTENZA – RISCHIO
D
’
INCENDIO
/
MATERIALI INFIAMMABILI
Ciò è un simbolo supplementare di allarme di sicurezza che allarmi voi al rischio d’incendio.

45
PER LA VOSTRA SICUREZZA
1. NON USARE O RIPORRE BENZINA O MATERIALI INFIAMMABILI NELL’APPARECCHIO O NELLE SUE VICINANZE.
2. NON USARE PRODOTTI SPRAY IN PROSSIMITÀ DELL’APPARECCHIO MENTRE È UN FUNZIONE.
3. NON MODIFICARE L’APPARECCHIO.
■ Non utilizzare l’asciugatrice se sono state usate sostanze
chimiche industriali per la pulizia.
■ Rimuovere tutti gli oggetti dalle tasche, come accendini e
ammiferi, prima di inserire i capi nell’asciugatrice.
■ Prima di dismettere o smaltire l’asciugatrice, rimuovere gli
sportelli del vano di asciugatura.
■ Non inserire la mano nell’asciugatrice se il tamburo è in
movimento. È predisposto un interruttore di sicurezza per lo
sportello.
■ Non installare o riporre l’asciugatrice in luoghi esposti agli
agenti atmosferici.
■ Non manomettere i comandi.
■ Non continuare a usare l’apparecchio se sembra difettoso.
■ Non riparare o sostituire parti dell’asciugatrice o tentare
alcuna manutenzione a meno che non sia chiaramente
indicato nella Guida all’uso e alla manutenzione. Le
riparazioni e la manutenzione devono essere eseguite
esclusivamente da personale di assistenza competente.
■ Non utilizzare ammorbidenti per tessuti per eliminare
l’elettricità statica a meno che non siano consigliati dal
fabbricante dell’ammorbidente o del prodotto. Seguire le
istruzioni del fabbricante.
■ Pulire il ltro pelucchi prima o dopo ogni carico.
Non mettere in funzione l’asciugatrice senza il ltro
pelucchi.
■ Mantenere pulita l’area intorno allo sato e alla presa
dell’aria, nonché le aree circostanti, eliminando pelucchi,
polvere e sporcizia.
■ L’interno dell’asciugatrice e il tubo di sato devono esser
puliti periodicamente da personale di assistenza qualicato.
■ Vedere le istruzioni di installazione per la messa a terra.
■ Non asciugare in asciugatrice capi che non siano stati
lavati.
■ La parte nale di un ciclo di asciugatura non utilizza calore
(ciclo di raffreddamento), per assicurare che i capi siano
lasciati a una temperatura che non li danneggi.
■ Capi in gommapiuma (schiuma di lattice) cufe per
doccia, tessuti impermeabili, articoli con fodera gommata
e indumenti o cuscini con imbottitura di gommapiuma
devono essere asciugati appesi.
■ Se il cavo di alimentazione è danneggiato, deve essere
sostituito dal produttore, da personale di assistenza o da
una persona con qualica analoga per evitare rischi.
AVVERTENZA: non arrestare mai l’asciugatrice prima
del termine del ciclo di asciugatura, salvo se si estraggono
velocemente tutti i capi e li si stende per disperdere il calore.
ISTRUZIONI IMPORTANTI PER LA SICUREZZA
AVVERTENZA:
Per ridurre il rischio di incendio, scossa elettrica o lesioni alle persone durante l’uso dell’asciugatrice, prendere
le dovute precauzioni di base, tra cui:
CONSERVARE QUESTE ISTRUZIONI
■ Leggere tutte le istruzioni prima di usare l’asciugatrice.
4
IMPORTANT SAFETY INSTRUCTIONS
precautions, including the following:
WARNING:
Read all instructions before using the dryer.
Keep a minimum clearance of 100 mm (4 in.) between the
rear of the dryer and any wall.
The operation of this appliance may affect the operation of
other types of appliances which take their air supply for safe
combustion from the same room. There has to be adequate
ventilation to replace exhausted air and thus avoid the
back-ow of gases into the room from appliances burning
other fuels, including open res, when operating the tumble
dryer. If in doubt, consult the appliance manufacturers.
Do not obstruct the air supply to the dryer (see Installation
Instructions for minimum clearances).
Do not place items exposed to cooking oils in your dryer.
Oil-affected items can ignite spontaneously, especially when
exposed to heat sources such as in a tumble dryer. The
items become warm causing an oxidation reaction in the oil.
Oxidation creates heat. If the heat cannot escape, the items
can become hot enough to catch re. Piling, stacking or
storing oil-affected items can prevent heat from escaping
and so create a re hazard.
If it is unavoidable to dry in the dryer items that have been
soiled with substances such as cooking oil, acetone, alcohol,
petrol, kerosene, spot removers, turpentine, waxes and wax
removers, or that have been contaminated by hair care
products, should be washed in hot water with an extra
amount of detergent before being dried in the dryer. These
items may give off vapours that could ignite or explode. Such
washing will reduce, but not eliminate, the hazard.
This appliance is not intended for use by persons (including
children) with reduced physical, sensory or mental
capabilities, or lack of experience and knowledge, unless
they have been given supervision or instructions concerning
use of the appliance by persons responsible for their safety.
Children should be supervised to ensure that they do not
play with the appliance.
The dryer should not be used if industrial chemicals have
been used for cleaning.
Before the dryer is removed from service or discarded,
remove the doors to the drying compartment.
Do not reach into the dryer if the drum is moving. A door
switch is tted for your safety.
Do not install or store the dryer where it will be exposed
to the weather.
Do not tamper with controls.
Do not continue to use this appliance if it appears to be
faulty.
Do not repair or replace any part of the dryer or attempt
any maintenance unless specically recommended in this
Use and Care Guide. Repairs and servicing should only
be carried out by competent service personnel.
Do not use fabric softeners or products to eliminate static
unless recommended by the manufacturer of the fabric
softener or product. Follow their instructions.
Clean dryer lint screen before or after each load. Do not
operate dryer without lint screen in place.
Keep area around the exhaust and inlet openings and
adjacent surrounding areas free from the accumulation of
lint, dust, and dirt.
The interior of the dryer and exhaust vent should be
cleaned periodically by qualied service personnel.
See Installation Instructions for earthing instructions.
Do not dry unwashed items in this dryer.
Items such as foam rubber (latex foam), shower caps,
waterproof textiles, rubber backed articles and clothes or
pillows tted with foam rubber pads must only be dried
on a clothesline.
SAVE THESE INSTRUCTIONS
WARNING: Never stop a tumble dryer cycle before the
end of the drying cycle unless all items are quickly removed
and spread out so that the heat is dissipated.
To reduce the risk of re, electric shock, or injury to persons when using the dryer, follow basic
The nal part of a tumble dryer cycle occurs without heat
(cool down cycle) to ensure that the items are left at a
temperature that ensures the items will not be damaged.
If the supply cord is damaged, it must be replaced by the
manufacturer or its service agent or a similarly qualied
person in order to avoid a hazard.
■ Mantenere una distanza minima di 100 mm (4”) tra il lato
posteriore dell’asciugatrice e la parete.
■ La messa in funzione dell’apparecchio può inuenzare la
messa in funzione di altri tipi di apparecchio che attingono
l’aria per la combustione sicura dallo stesso locale. Deve
essere presente un’aerazione adeguata che permetta la
sostituzione dell’aria consumata ed eviti che i gas derivanti
da altri apparecchi che bruciano altri carburanti, incluse
amme libere, riuiscano nell’ambiente durante l’utilizzo
dell’asciugatrice a tamburo. In caso di dubbio consultare i
produttori degli apparecchi.
■ Non ostruire la presa d’aria dell’asciugatrice (vedere le
Istruzioni di installazione per gli spazi liberi minimi).
■ Non inserire nell’asciugatrice capi che siano stati esposti a
oli da cucina. I capi sporchi di olio possono prendere fuoco
in modo spontaneo, specialmente se esposti a sorgenti di
calore, come nell’asciugatrice. Questi capi si riscaldano a
causa di una reazione di ossidazione nell’olio. L’ossidazione
genera calore. Se il calore non riesce a disperdersi i capi
possono riscaldarsi al punto di incendiarsi. Per ridurre
il rischio di incendio dovuto a carichi contaminati, la
parte nale del ciclo di asciugatura viene eseguito senza
calore (periodo di raffreddamento). Evitare di arrestare
l’asciugatrice prima del termine del ciclo di asciugatura,
salvo se si estraggono velocemente tutti i capi e li si allarga
per disperdere il calore. Quando i capi contaminati con olio
sono ammucchiati, impilati o riposti possono impedire la
dispersione del calore e creare un rischio di incendio.
■ Se è inevitabile asciugare in asciugatrice capi sporcati con
sostanze come olio da cucina, acetone, alcol, benzina,
kerosene, smacchiatori, acquaragia, cere e deceranti o che
sono stati contaminati con prodotti per capelli, è necessario
lavarli in acqua molto calda con una quantità di detergente
aggiuntiva prima di essere asciugati in asciugatrice. Questi
capi possono sprigionare vapori che potrebbero incendiarsi
o esplodere. Il lavaggio sopra descritto riduce ma non
elimina il rischio.
■ Questo apparecchio non è destinato all’uso da parte di
persone, inclusi bambini di età inferiore a 8 anni, con ridotte
capacità siche, sensoriali o mentali o con esperienza e
conoscenze inadeguate, a meno che non siano sorvegliati o
abbiano ricevuto istruzioni relative all’uso dell’apparecchio
da parte delle persone responsabili della loro sicurezza.
■ La pulizia e la manutenzione ordinaria non devono essere
effettuate da bambini senza la supervisione di un adulto.
■ Sorvegliare i bambini afnché non giochino con
l’apparecchio.
■ Tenere i bambini di età inferiore a 3 anni lontano
dall’apparecchio a meno che non siano direttamente
sorvegliati.
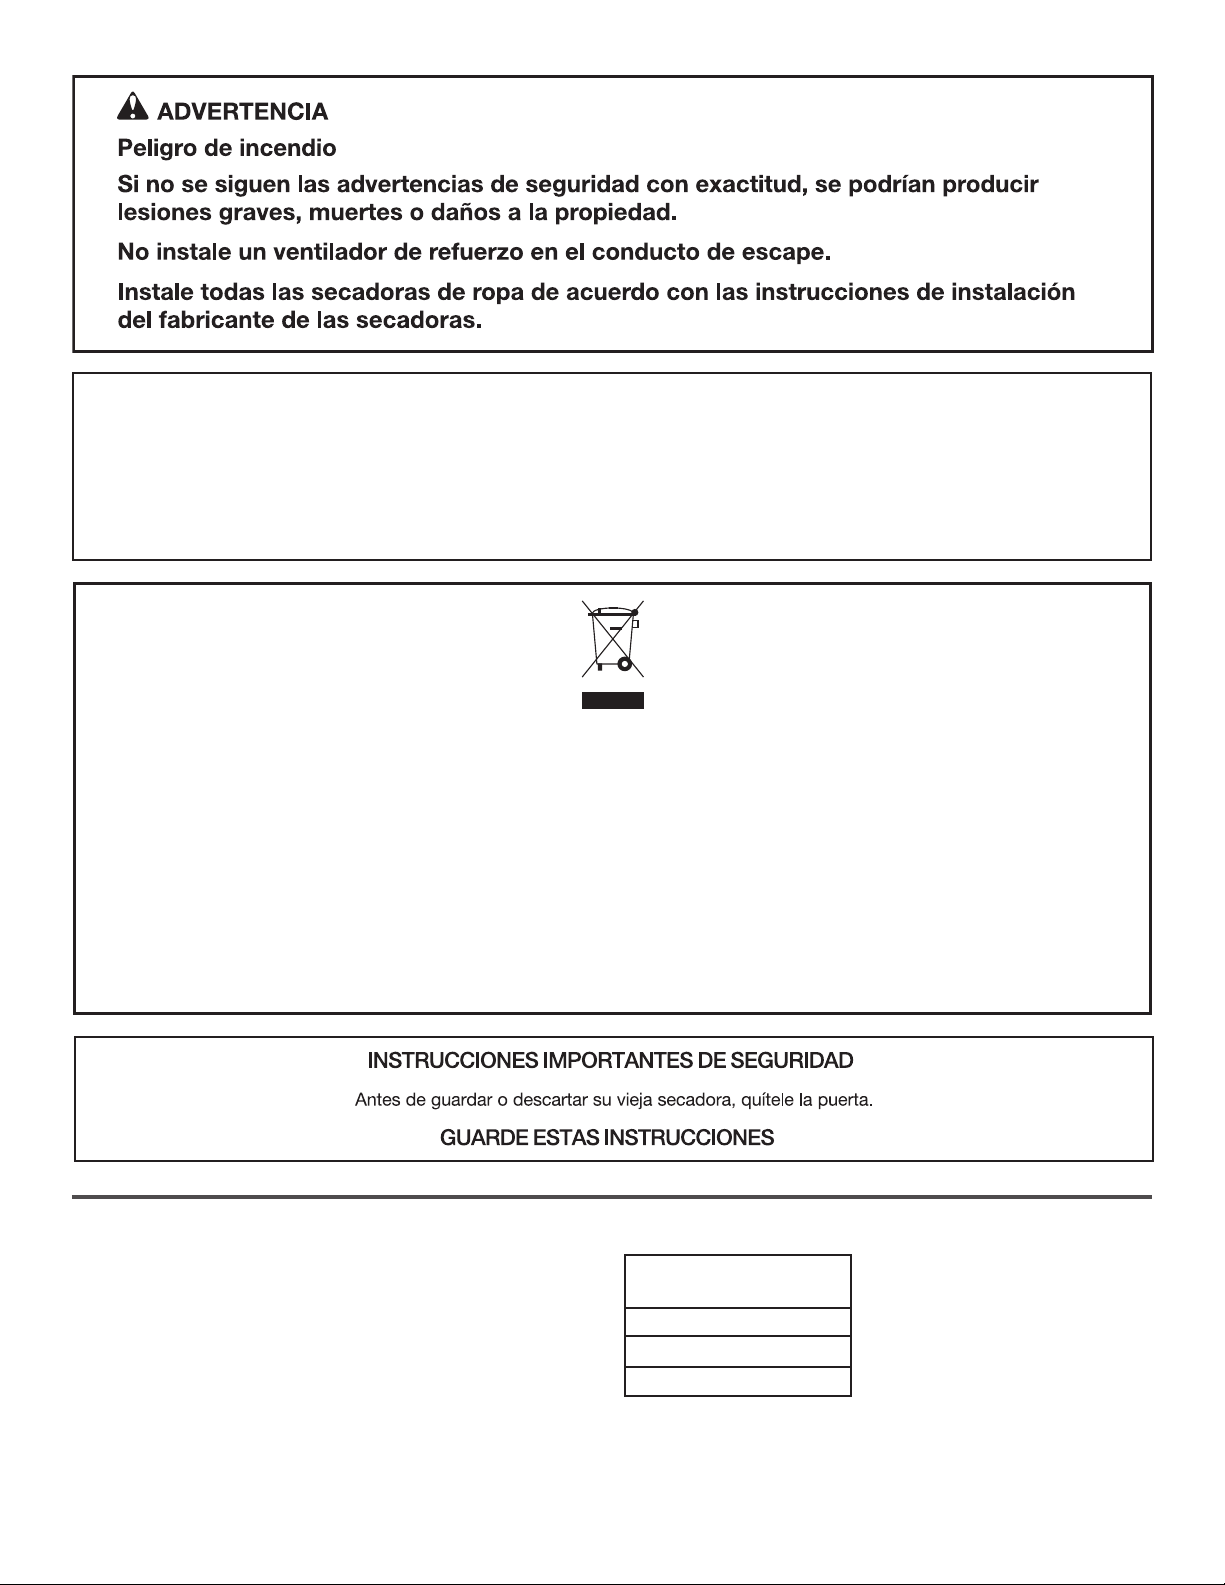
46
CONTROLLO DEL SISTEMA DI SFIATO PER IL CORRETTO FLUSSO DELL’ARIA
USO DEI CICLI DI ASCIUGATURA AUTOMATICA PER UNA MIGLIORE CURA DEI TES-
SUTI E PER RISPARMIARE ENERGIA
Modelli
3LMEDC315FW
3LMEDC415FW
4KMEDC215FW
4KMEDC315FW
4KMEDC415FW
4KMEDC425FW
Tensione nominale 220–240 V 2N~ 220–240 V 2N~
Frequenza nominale 50 Hz 60 Hz
Corrente nominale 20 Amps 20 Amps
Capacità lenzuola
asciutte (massima)
15 kg (33 lb) 15 kg (33 lb)
Capacità IEC 7 kg (15 lb) 7 kg (15 lb)
Altezza 1067 mm (42") 1067 mm (42")
Larghezza 737 mm (29") 737 mm (29")
Profondità 706 mm (27
13
⁄16") 706 mm (27
13
⁄16")
SPECIFICHE
Gli apparecchi sono commercializzati in varie regioni con
indicazioni diverse per misurare la capacità. Di seguito sono
riportati alcuni formati di misurazione validi pubblicati sul
prodotto:
Capacità lenzuola asciutte: misura di peso che corrisponde
alle dimensione massima del carico che può essere introdotto
nell’asciugatrice.
Capacità IEC: misura di capacità che corrisponde alla quantità
massima di lenzuola e tessili asciutti, dichiarata dal produttore,
che può essere trattata in uno specico ciclo.
Flusso dell’aria corretto
Oltre al calore, le asciugatrici hanno bisogno di un
corretto usso dell’aria per asciugare efcientemente
il bucato. Un’areazione appropriata riduce i tempi di
asciugatura e migliora il risparmio di energia. Vedere
le istruzioni di installazione.
Il tubo di sato applicato all’asciugatrice svolge un ruolo
essenziale per il corretto usso dell’aria.
Le chiamate all’assistenza riconducibili a un sistema di
aerazione inappropriato non sono coperte dalla garanzia
e saranno a carico del cliente, indipendentemente da chi
ha installato l’asciugatrice.
Per mantenere un corretto usso dell’aria:
Corretto
Ottimale
■ Pulire il filtro pelucchi prima di ogni carico.
■ Sostituire gli elementi di sfiato in plastica o lamina sottile
con tubi in materiale rigido e pesante di 102 mm (4 poll.)
di diametro.
■
4"
102 mm
Utilizzare tubi di sfiato della minor lunghezza possibile.
■ Non utilizzare più di 4 gomiti a 90° nel tubo di sfiato,
ogni piega e curva riducono il flusso dell’aria.
■ Rimuovere pelucchi e sporcizia dalla cappa dello sfiato.
■ Rimuovere i pelucchi da tutta la lunghezza del tubo
di sfiato almeno ogni due anni. Dopo aver completato
la pulizia, seguire scrupolosamente le istruzioni di
installazione in dotazione con l’asciugatrice per il
controllo finale del prodotto.
■ Tenere sgombra l’area davanti all’asciugatrice.
I cicli asciugatura automatica dell’asciugatrice consentono il massimo risparmio energetico e una migliore cura dei tessuti.
Durante i cicli di asciugatura automatica vengono rilevati la temperatura dell’aria di asciugatura o il livello di umidità nel carico.
La rilevazione viene effettuata durante tutto il ciclo di asciugatura e l’asciugatrice si spegne quando il carico raggiunge il livello di
asciugatura selezionato.
Con i cicli di asciugatura a tempo, l’asciugatrice funziona per il periodo di tempo impostato e, se viene selezionato un tempo di
asciugatura eccessivo, si possono a volte vericare restringimento, spiegazzamento ed elettricità statica. Utilizzare l’asciugatura a
tempo per carichi occasionali che necessitano di un tempo di asciugatura più lungo o quando si utilizza la griglia di asciugatura.
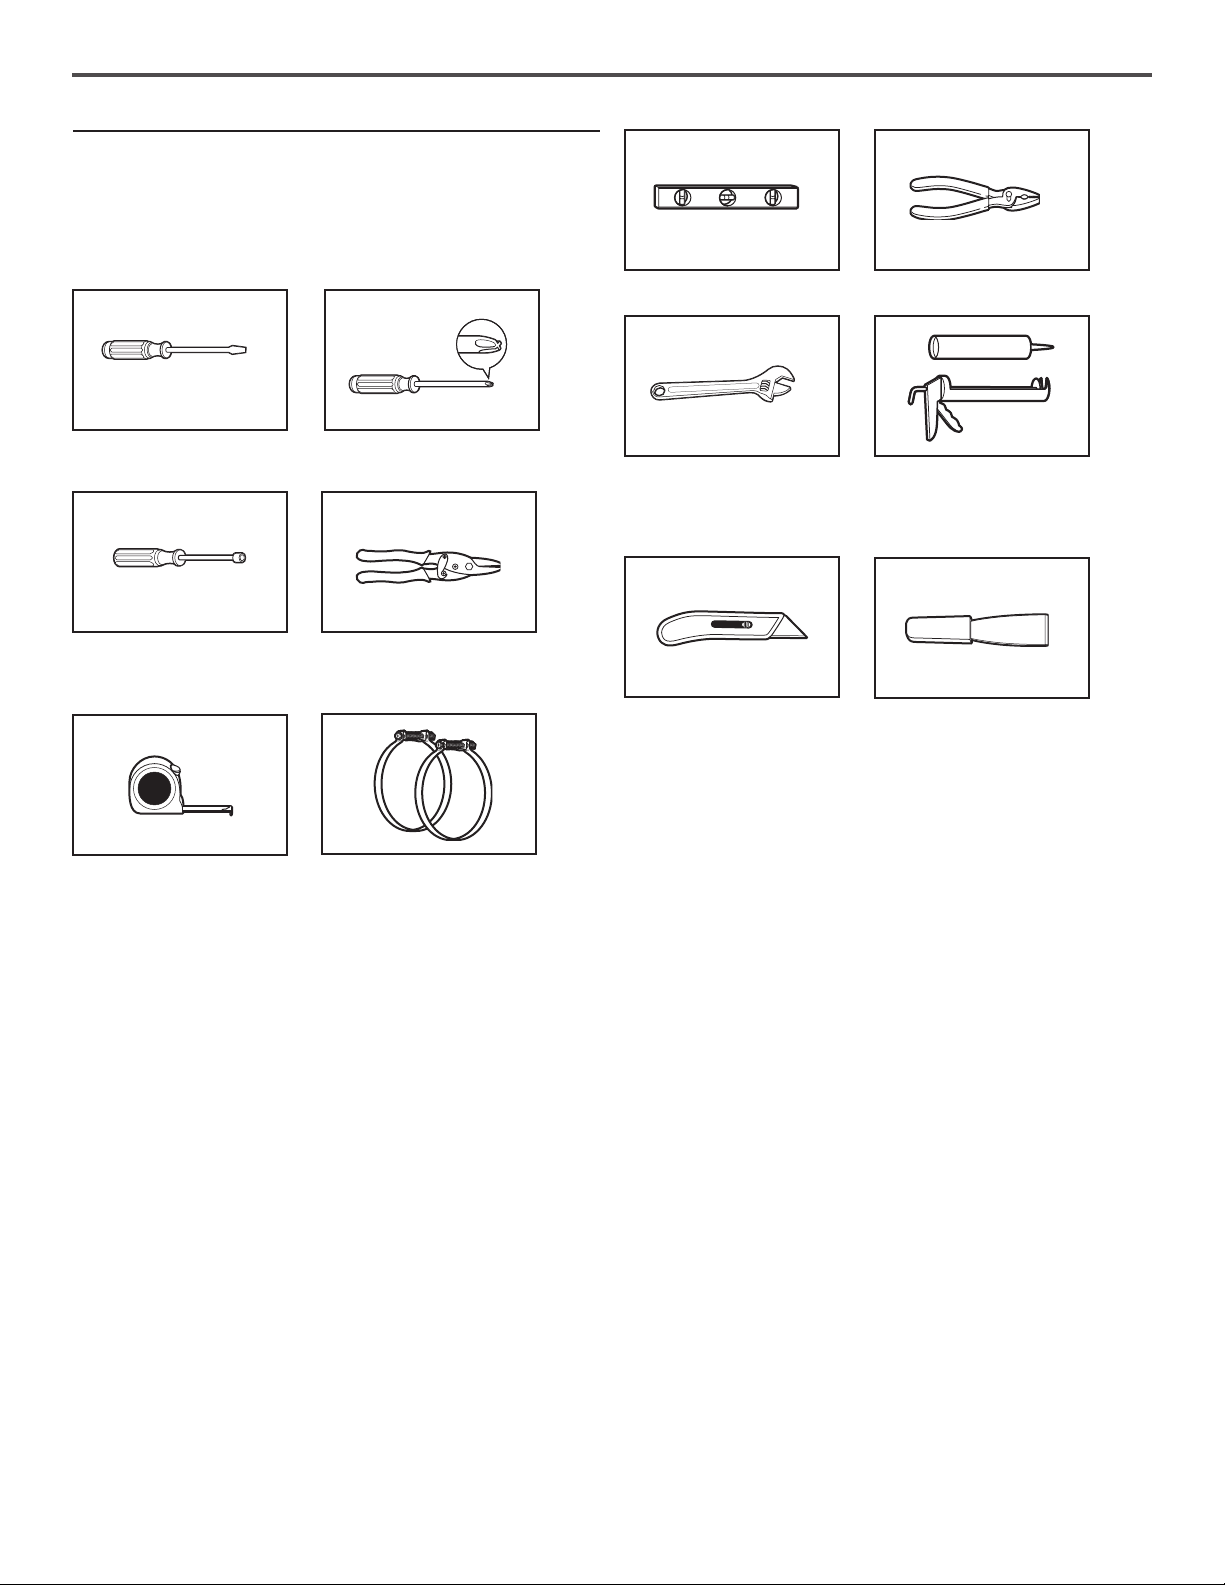
47
PANNELLO COMANDI E FUNZIONI
2 31 4
2 4
FUNZIONE WRINKLE CONTROL (su alcuni modelli)
Se non è possibile togliere un carico di indumenti
dall’asciugatrice appena si arresta, i capi possono risultare
spiegazzati. La funzione Wrinkle Control fa ruotare di tanto
in tanto il carico per smuoverlo, in modo da ridurre la
formazione di pieghe.
■ Rotazione periodica del bucato senza aria calda nei 40
minuti successivi alla fine del ciclo. Ruotare la manopola
Wrinkle Control su ON o OFF in qualsiasi momento prima
della fine del ciclo.
MANOPOLA CICLI ASCIUGATRICE
Usare la manopola dei cicli per selezionare il ciclo
dell’asciugatrice. Ruotare la manopola per selezionare
un ciclo in base al carico. Consultare la “Guida ai cicli”
per la descrizione dettagliata dei cicli.
TIMED DRY (Asciugatura a tempo)
L’asciugatrice entra in funzione per il tempo specicato
sul comando. Sui modelli dotati di manopola per la
selezione della temperatura, è possibile scegliere
un’impostazione in base ai tessuti da asciugare. Il tempo
e la temperatura di asciugatura variano a seconda del
modello di asciugatrice.
AUTOMATIC DRY (Asciugatura automatica)
Rileva l’umidità del carico o la temperatura dell’aria
e arresta il ciclo quando il carico raggiunge il livello
di asciugatura selezionato. Offre la miglior asciugatura
nel tempo più breve. Il tempo di asciugatura varia
in base al tipo di tessuto, alle dimensioni del carico
e all’impostazione del livello di asciugatura.
1
2
3
TEMPERATURE (Temperatura)
Selezionare una temperatura di asciugatura in base ai
tessuti del carico. In caso di dubbi su quale temperatura
scegliere per il carico, selezionare l’impostazione più bassa
invece che la più alta.
START/STOP (Avvio/Arresto)
La funzione Cycle Signal (Segnale ne ciclo) emette
un cicalino al termine del ciclo di asciugatura.
Rimuovere subito i capi al termine del ciclo
per ridurre lo spiegazzamento.
Ruotare la manopola Start/Stop per selezionare
l’impostazione desiderata (On o Off). Premere
la manopola Start/Stop per avviare l’asciugatrice.
NOTA: quando è selezionata la funzione Wrinkle Control
e il segnale ne ciclo è attivo, il cicalino suona ogni 5 minuti
no a quando i capi vengono estratti o no alla ne del ciclo
Wrinkle Control.
4
Le funzioni e le opzioni disponibili variano in base al modello.
L’aspetto esteriore può essere diverso.
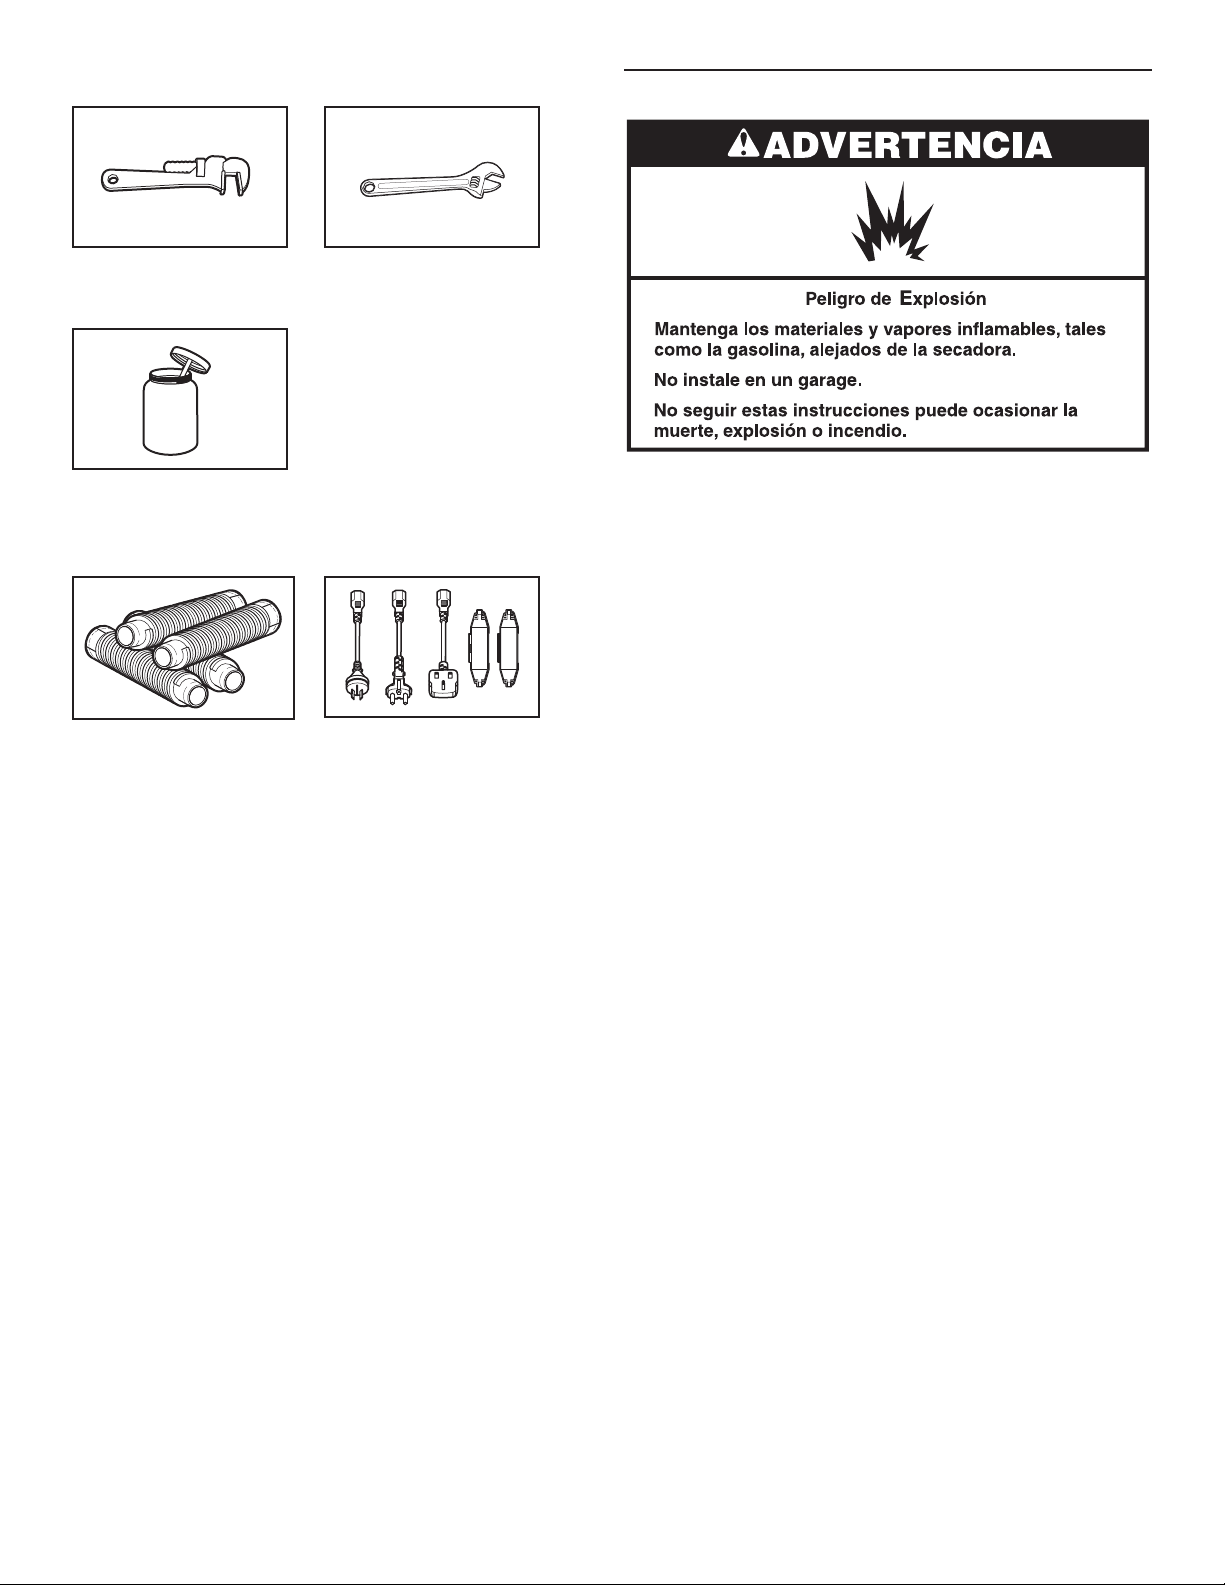
48
I cicli e le impostazioni variano in base al modello.
NOTA: le certicazioni energetiche per i modelli a gas ed elettrici di Maytag si basano sul ciclo Timed Dry con la temperatura
impostata al massimo. I valori predeniti di fabbrica di Sensor Dry (Asciugatura con sensore), Automatic Dry (Asciugatura automatica),
Normal cycle (Ciclo normale), Low heat (Bassa temperatura), Wrinkle Shield (Antipiega) non sono stati utilizzati.
GUIDA AI CICLI - CICLI AUTOMATIC DRY
GUIDA AI CICLI - CICLI TIMED DRY
I cicli e le impostazioni variano in base al modello.
TIMED DRY - L’asciugatrice entra in funzione per il tempo specicato sul comando.
NOTA: se i carichi non sembrano asciutti come previsto, la volta successiva che si asciuga un carico simile selezionare More Dry
(Più asciutto). Se i carichi sembrano più asciutti del previsto, la volta successiva che si asciuga un carico simile selezionare Less Dry
(Meno asciutto).
Impostazione della temperatura di asciugatura
Se l’asciugatrice dispone di più impostazioni per la
temperatura:
l’impostazione di temperatura alta è indicata per asciugare
capi pesanti come asciugamani e abiti da lavoro.
L’impostazione di temperatura da bassa a media è indicata
per asciugare capi di peso medio o leggeri, come lenzuola,
camicette, vestiti, biancheria intima, tessuti non stiro e alcuni
tipi di maglie.
Usare l’impostazione aria fredda per asciugare gommapiuma,
gomma, plastica o tessuti sensibili al calore.
Asciugare appesi i tessuti accoppiati o laminati.
NOTA: in caso di dubbi sulle temperature di asciugatura per
i vari carichi, fare riferimento alle indicazioni sull’etichetta di
lavaggio.
Capi da asciugare: Ciclo: Temperatura Opzioni disponibili Dettagli ciclo
Jeans, abiti da lavoro
robusti, asciugamani
More Dry
(Piùasciutto)
Normal (Normale)
o Energy Preferred
(Eco)
High (Alta) Wrinkle Control/
Wrinkle Prevent
(Antipiega)
Temperatura
Cycle Signal
(Segnalefine ciclo)
I cicli di asciugatura automatica offrono
la miglior asciugatura nel tempo più
breve. Il tempo di asciugatura varia in
base al tipo di tessuto, alle dimensioni
del carico e all’impostazione del livello
di asciugatura.
Selezionare una temperatura di
asciugatura in base ai tessuti del
carico. In caso di dubbi su quale
temperatura scegliere per il carico,
selezionare l’impostazione più bassa
invece che la più alta.
Abiti da lavoro, tessuti di
peso medio, lenzuola
Normal (Normale)
o Energy Preferred
(Eco)
Medium
(Media)
Wrinkle Control/
Wrinkle Prevent
(Antipiega)
Temperature
(Temperatura)
Cycle Signal
(Segnalefine ciclo)
Capi informali, camicie,
pantaloni, capi leggeri,
sintetici, delicati,
indumenti per lo sport
Delicate (Delicato)
o Less Dry (Meno
asciutto)
Normal (Normale)
o Energy Preferred
(Eco)
Low (Bassa) Wrinkle Control/
Wrinkle Prevent
(Antipiega)
Temperatura
Cycle Signal
(Segnalefine ciclo)
Capi da asciugare: Ciclo: Temperatura Opzioni disponibili Dettagli ciclo
Capi grandi o pesanti
come asciugamani
spessi o accappatoi
Heavy Dry
(Asciugatura
forte)
Qualsiasi Temperatura Scegliere High (Alta) per asciugare carichi
grandi o pesanti.
Tutti i carichi Damp Dry
(Umido)/
Freshen Up
(Rinfresca)
Qualsiasi Temperatura Asciuga i capi lasciandoli leggermente
umidi, è indicato per capi che non
richiedono un ciclo di asciugatura
completa.
Gomma, plastica, tessuti
sensibili al calore
Air Fluff/
Air Dry
(Arieggiatura)
No Heat (Aria
fredda)
Temperatura Asciugatura ad aria fredda.
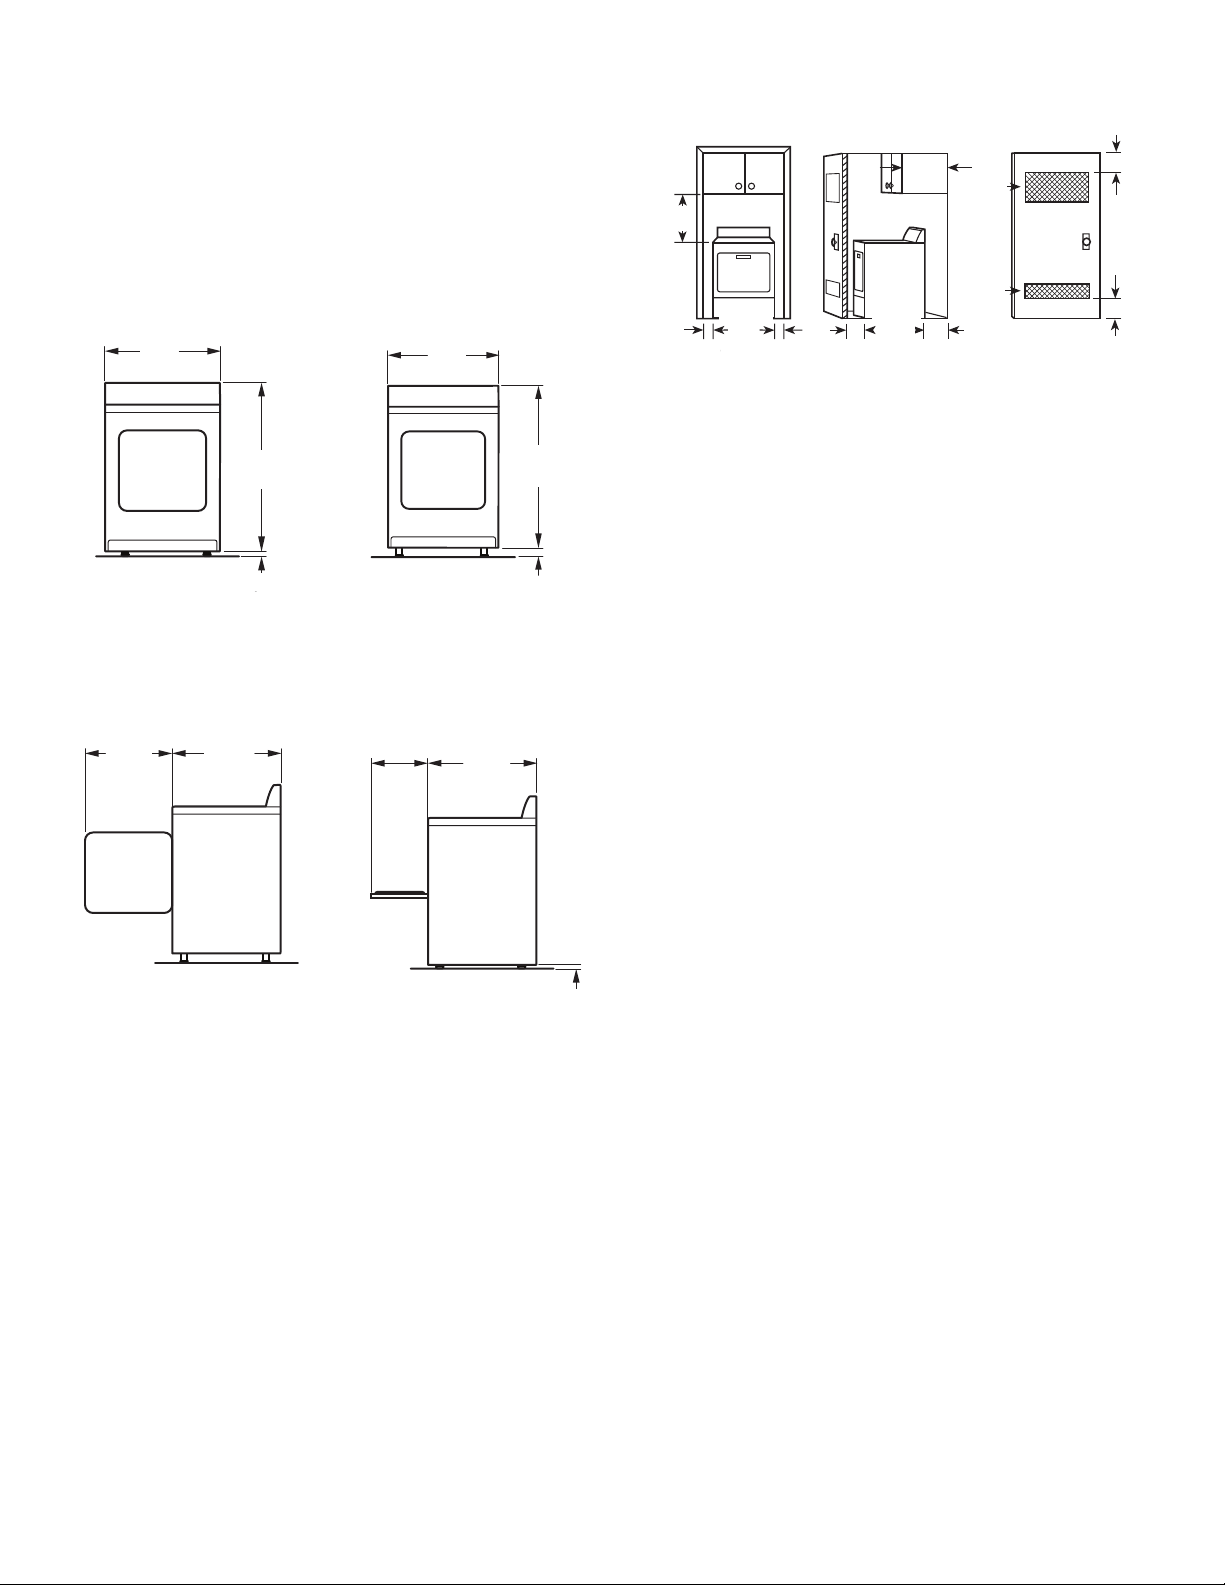
49
USO DELL’ASCIUGATRICE
1. Pulire il ltro pelucchi
Pulire il ltro pelucchi prima di ogni carico. Estrarre il ltro
pelucchi dal supporto. Passare le dita sul ltro per arrotolare
il velo di pelucchi e rimuoverlo. Non sciacquare o lavare il ltro
per rimuovere i pelucchi. Spingere il ltro pelucchi saldamente
in sede.
Per ulteriori informazioni sulla pulizia, vedere “Manutenzione
dell’asciugatrice”.
2. Caricare l’asciugatrice
Inserire il bucato nell’asciugatrice. Chiudere lo sportello.
NOTA: lo sportello del modello in dotazione potrebbe essere
diverso da quello mostrato in gura. Alcuni modelli hanno
sportelli che si aprono verticalmente.
Non riempire troppo l’asciugatrice, i capi devono poter girare
liberamente.
AVVERTENZA: per ridurre il rischio di incendio, scossa elettrica o
lesioni alle persone leggere la sezione ISTRUZIONI IMPORTANTI
PER LA SICUREZZA prima di mettere in funzione l’asciugatrice.
Prima di usare l’asciugatrice, passare un panno umido all’interno
del tamburo per rimuovere la polvere che può essersi accumulata
durante lo stoccaggio e la spedizione.
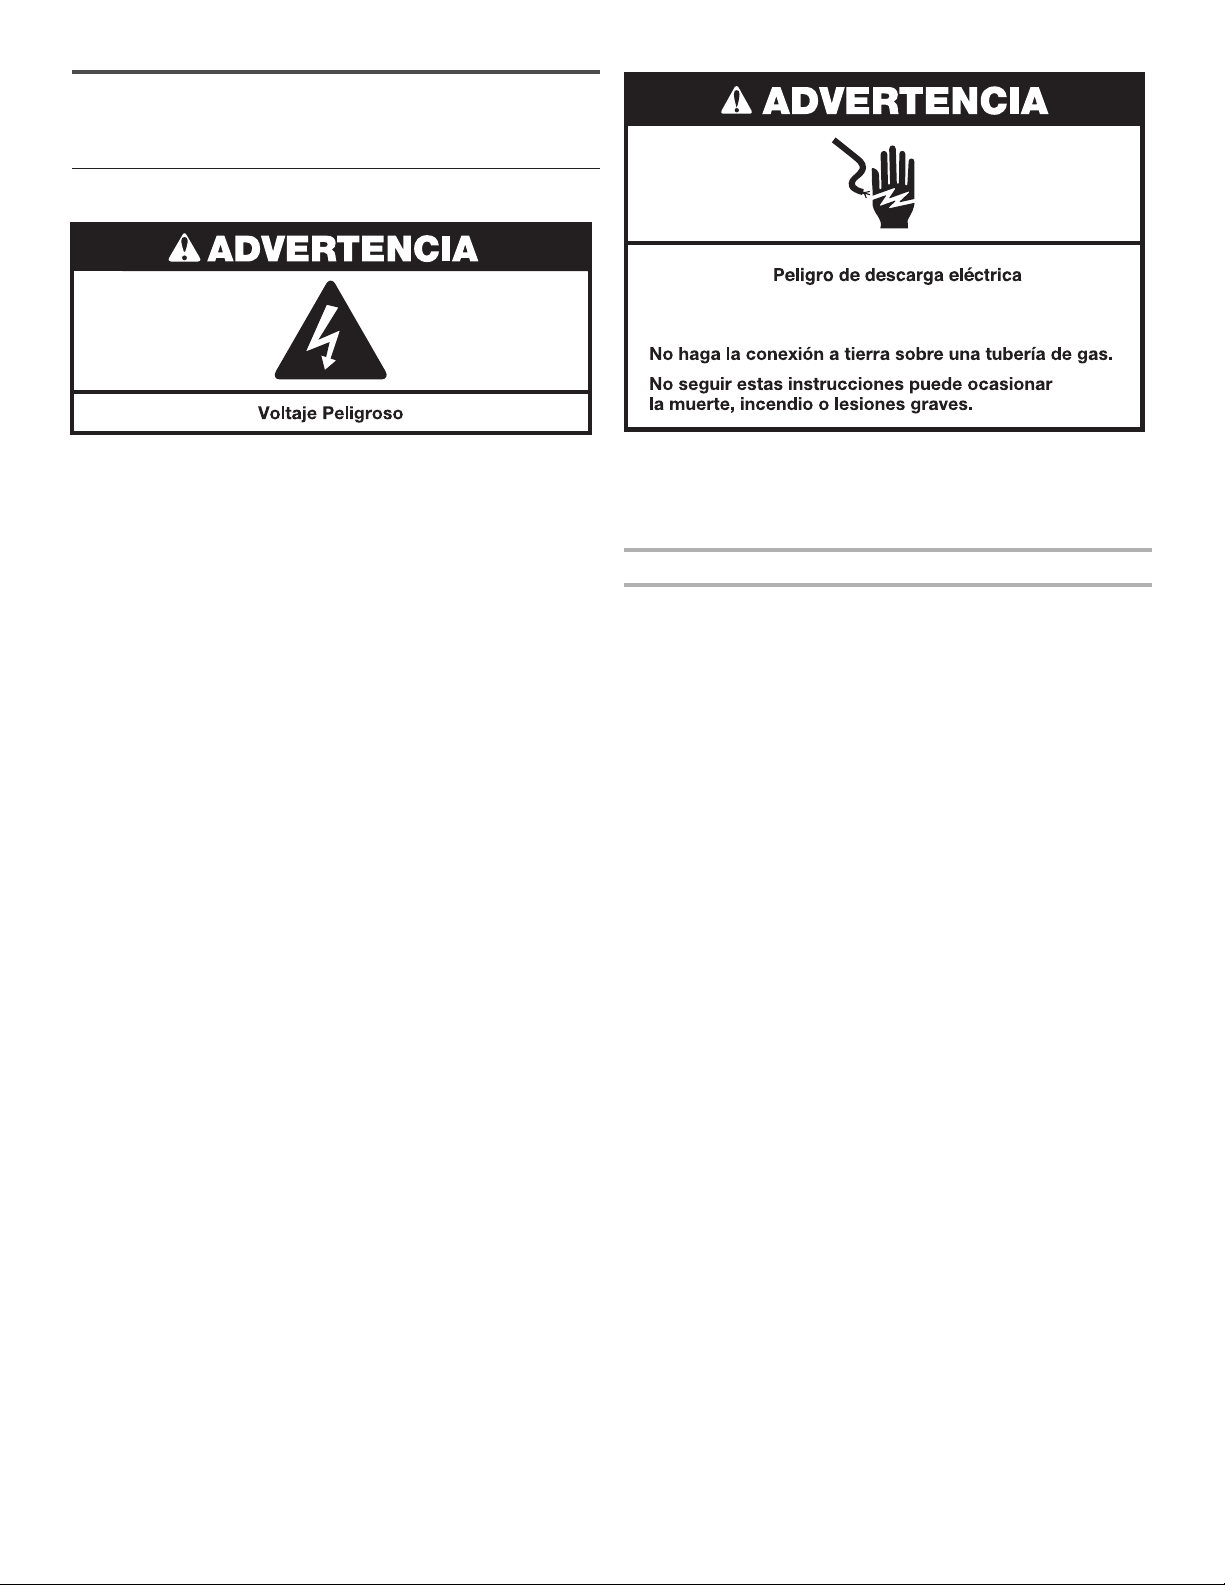
50
5. Premere START/STOP per iniziare
il ciclo
Tenere premuta la manopola Start/Stop per avviare il ciclo.
Per interrompere il ciclo prima della ne, portare la manopola
di Start/Stop su OFF.
Rimuovere i capi subito dopo il completamento del ciclo per
ridurre lo spiegazzamento. Usare la funzione Wrinkle Control
per evitare la formazione di pieghe se non si ha la possibilità
di estrarre subito il bucato dall’asciugatrice al termine del ciclo.
4. Impostare il ciclo e le opzioni
Ruotare la manopola nella posizione desiderata per selezionare
le impostazioni e le opzioni per il ciclo.
NOTA: le opzioni e le impostazioni dei cicli variano in base
al modello.
Temperature (Temperatura)
Ruotare la manopola della temperatura per cambiare
l’impostazione della temperatura. Vedere “Impostazione della
temperatura di asciugatura”.
Funzione Wrinkle Control (su alcuni modelli)
Rotazione periodica del bucato senza aria calda nei 40 minuti
successivi alla ne del ciclo. Portare la manopola Wrinkle
Control su NO per disattivare la funzione in qualsiasi momento
prima della ne del ciclo.
3. Selezionare il ciclo desiderato
Selezionare il ciclo desiderato in base al carico. Vedere
la “Guida ai cicli” per ulteriori informazioni sui singoli cicli.
Cicli AUTOMATIC DRY (Asciugatura automatica)
È possibile selezionare un diverso grado di asciugatura in
base al carico ruotando la manopola sul livello di asciugatura
desiderato.
Selezionare More Dry (Più asciutto), Normal (Normale), Energy
Preferred (Eco) o Less Dry (Meno asciutto) per regolare
automaticamente il livello di asciugatura a cui si spegnerà
l’asciugatrice. Una volta impostato, il livello di asciugatura non
si può modicare, a meno che non si arresti il ciclo.
I cicli di asciugatura automatica offrono la miglior asciugatura
nel tempo più breve. Il tempo di asciugatura varia in base al
tipo di tessuto, alle dimensioni del carico e all’impostazione
del livello di asciugatura.
NOTA: i cicli More Dry o Very Dry rimuovono più umidità dal
carico. Il ciclo Less Dry lascia il carico leggermente umido ed è
l’ideale per i capi per cui si desidera completare l’asciugatura
appendendoli.
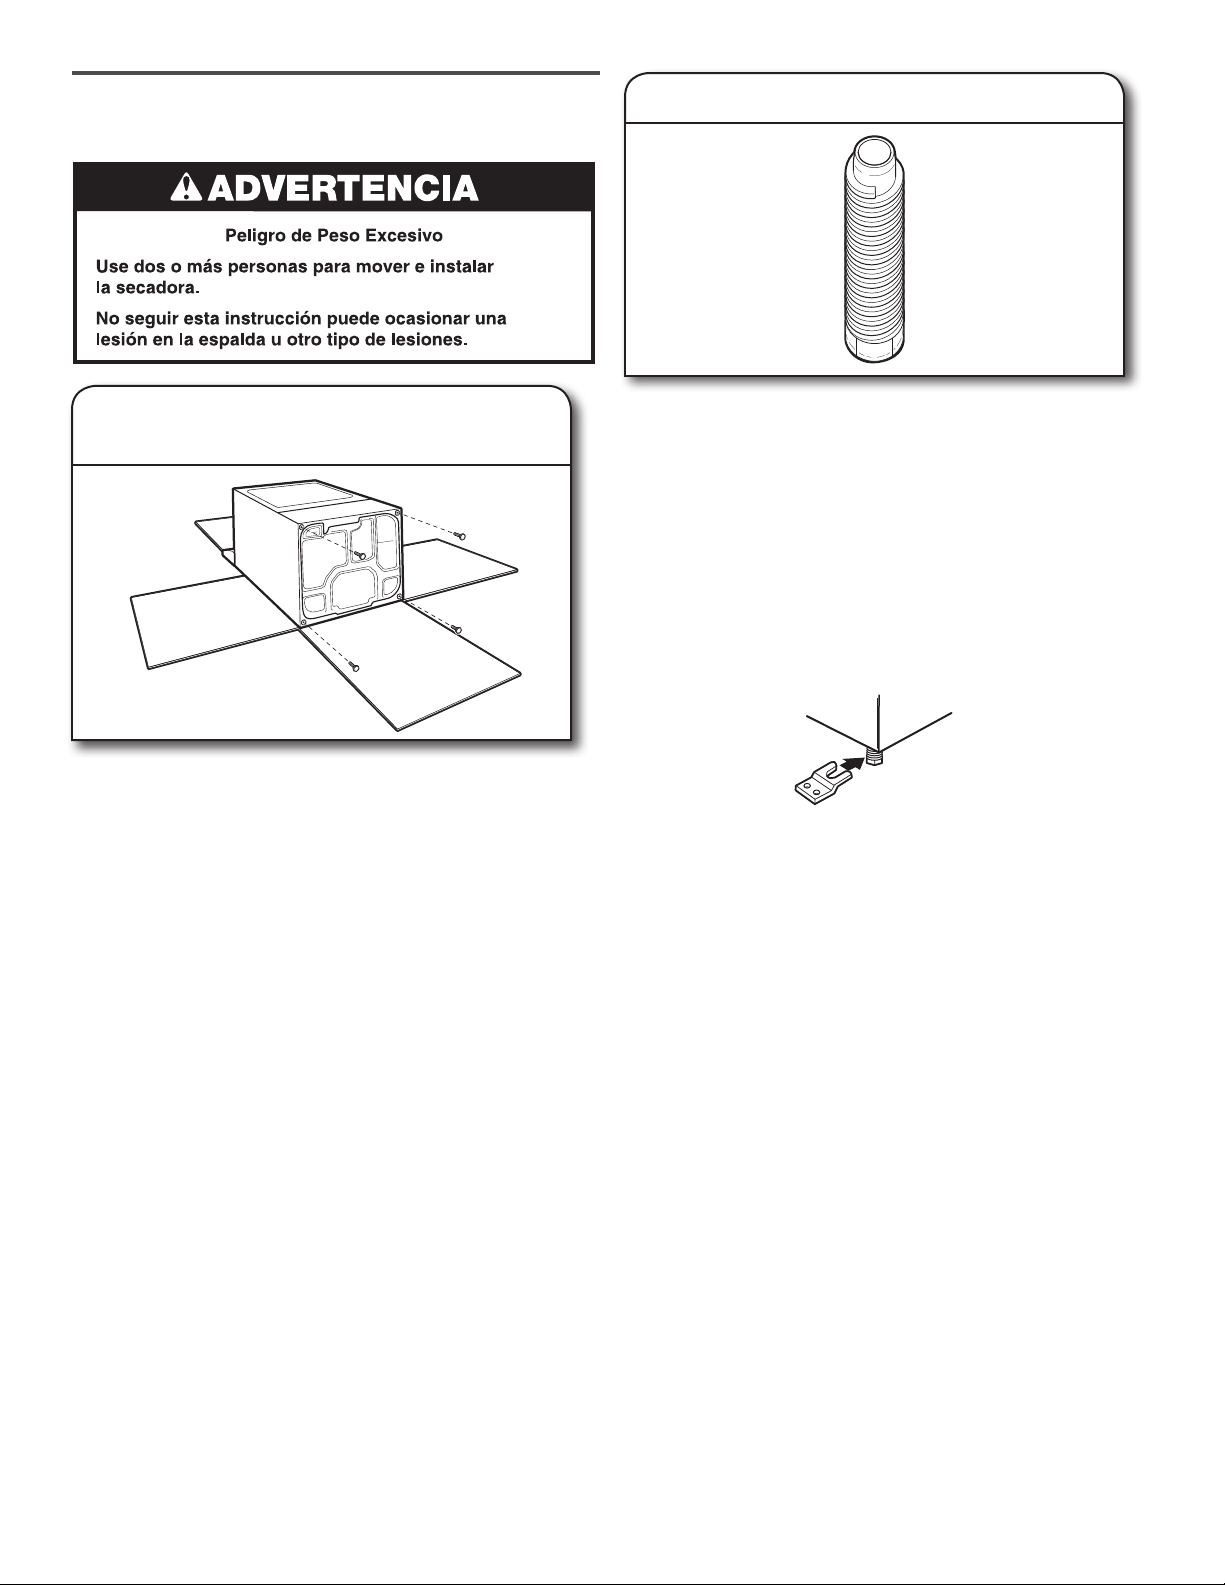
51
MANUTENZIONE DELL’ASCIUGATRICE
L’area in cui è riposta l’asciugatrice deve essere mantenuta
pulita e sgombra da oggetti che bloccano il usso dell’aria,
per consentire il corretto funzionamento dell’apparecchio.
Questo include anche non lasciare pile di bucato davanti
all’asciugatrice.
Pulizia del ltro pelucchi
Pulizia ad ogni carico
Il ltro pelucchi si trova nell’asciugatrice. Se il ltro è ostruito
dai pelucchi, il tempo di asciugatura può aumentare.
Per pulire il filtro:
1. Estrarre il ltro pelucchi dal supporto. Passare le dita
sul ltro per arrotolare il velo di pelucchi e rimuoverlo.
Non sciacquare o lavare il ltro per rimuovere i pelucchi.
Una volta bagnati, sarebbe difcile rimuoverli.
2. Spingere il ltro pelucchi saldamente in sede.
IMPORTANTE:
■ Non mettere in funzione l’asciugatrice se il filtro peluc-
chi è fissato male, danneggiato, ostruito o mancante. In
caso contrario si può causare surriscaldamento e dan-
neggiare sia l’asciugatrice che i tessuti.
■ Se i pelucchi cadono nell’asciugatrice durante la
rimozione, controllare la cappa dello sfiato e rimuovere
i pelucchi. Vedere “Requisiti di aerazione” nelle istruzi-
oni di installazione.
■ Pulire l’area in cui è
alloggiato il filtro pelucchi,
secondo necessità. Usare un
aspirapolvere per rimuovere
delicatamente i pelucchi
accumulati all’esterno del
filtro pelucchi.
Pulizia secondo necessità
Residui di detersivo e ammorbidente per bucato possono
accumularsi sul ltro pelucchi. L’accumulo può causare
tempi di asciugatura più lunghi o l’arresto dell’asciugatrice
prima che il carico sia completamente asciutto. Se i pelucchi
ricadono dal ltro mentre il ltro è montato nell'asciugatrice,
signica che probabilmente è intasato.
Pulire il ltro pelucchi con uno spazzolino di nylon ogni 6
mesi o con maggiore frequenza se si intasa per l’accumulo
di residui di lavaggio.
Per lavarlo:
1. Passare le dita sul ltro per arrotolare il velo di pelucchi
e rimuoverlo.
2. Bagnare entrambi i lati del ltro pelucchi con acqua
calda.
3. Bagnare una spazzola in nylon con acqua calda e
detergente liquido. Stronare la spazzola sul ltro per
rimuovere gli accumuli di residui di lavaggio.
4. Sciacquare il ltro con acqua calda.
5. Asciugare accuratamente il ltro pelucchi con uno
stronaccio pulito. Rimontare il ltro nell’asciugatrice.
Pulizia dell’interno dell’asciugatrice
Per pulire il tamburo dell’asciugatrice
1. Applicare un detergente domestico liquido non
inammabile all’area macchiata del tamburo e stronare
con un panno morbido no a rimuovere la macchia.
2. Pulire accuratamente il tamburo con un panno morbido.
3. Far girare un carico di panni o asciugamani puliti per
asciugare il tamburo.
NOTA: i capi che scoloriscono, come il denim dei jeans o
capi dai colori forti possono rilasciare colore nell’asciugatrice.
Questa macchie non causano danni all’asciugatrice e non
si trasferiscono sui futuri carichi da asciugare. Girare i capi
al rovescio prima di asciugarli per evitare che macchino il
tamburo.
Rimozione dei pelucchi accumulati
Dal vano interno dell’asciugatrice
I pelucchi devono essere rimossi ogni 2 anni o più spesso
a seconda dell’utilizzo dell’asciugatrice. La pulizia deve
essere effettuata da personale di assistenza qualicato.
Dal tubo di sato
I pelucchi devono essere rimossi ogni 2 anni o più spesso
a seconda dell’utilizzo dell’asciugatrice.
Pulizia dell’area in cui è collocata
l’asciugatrice
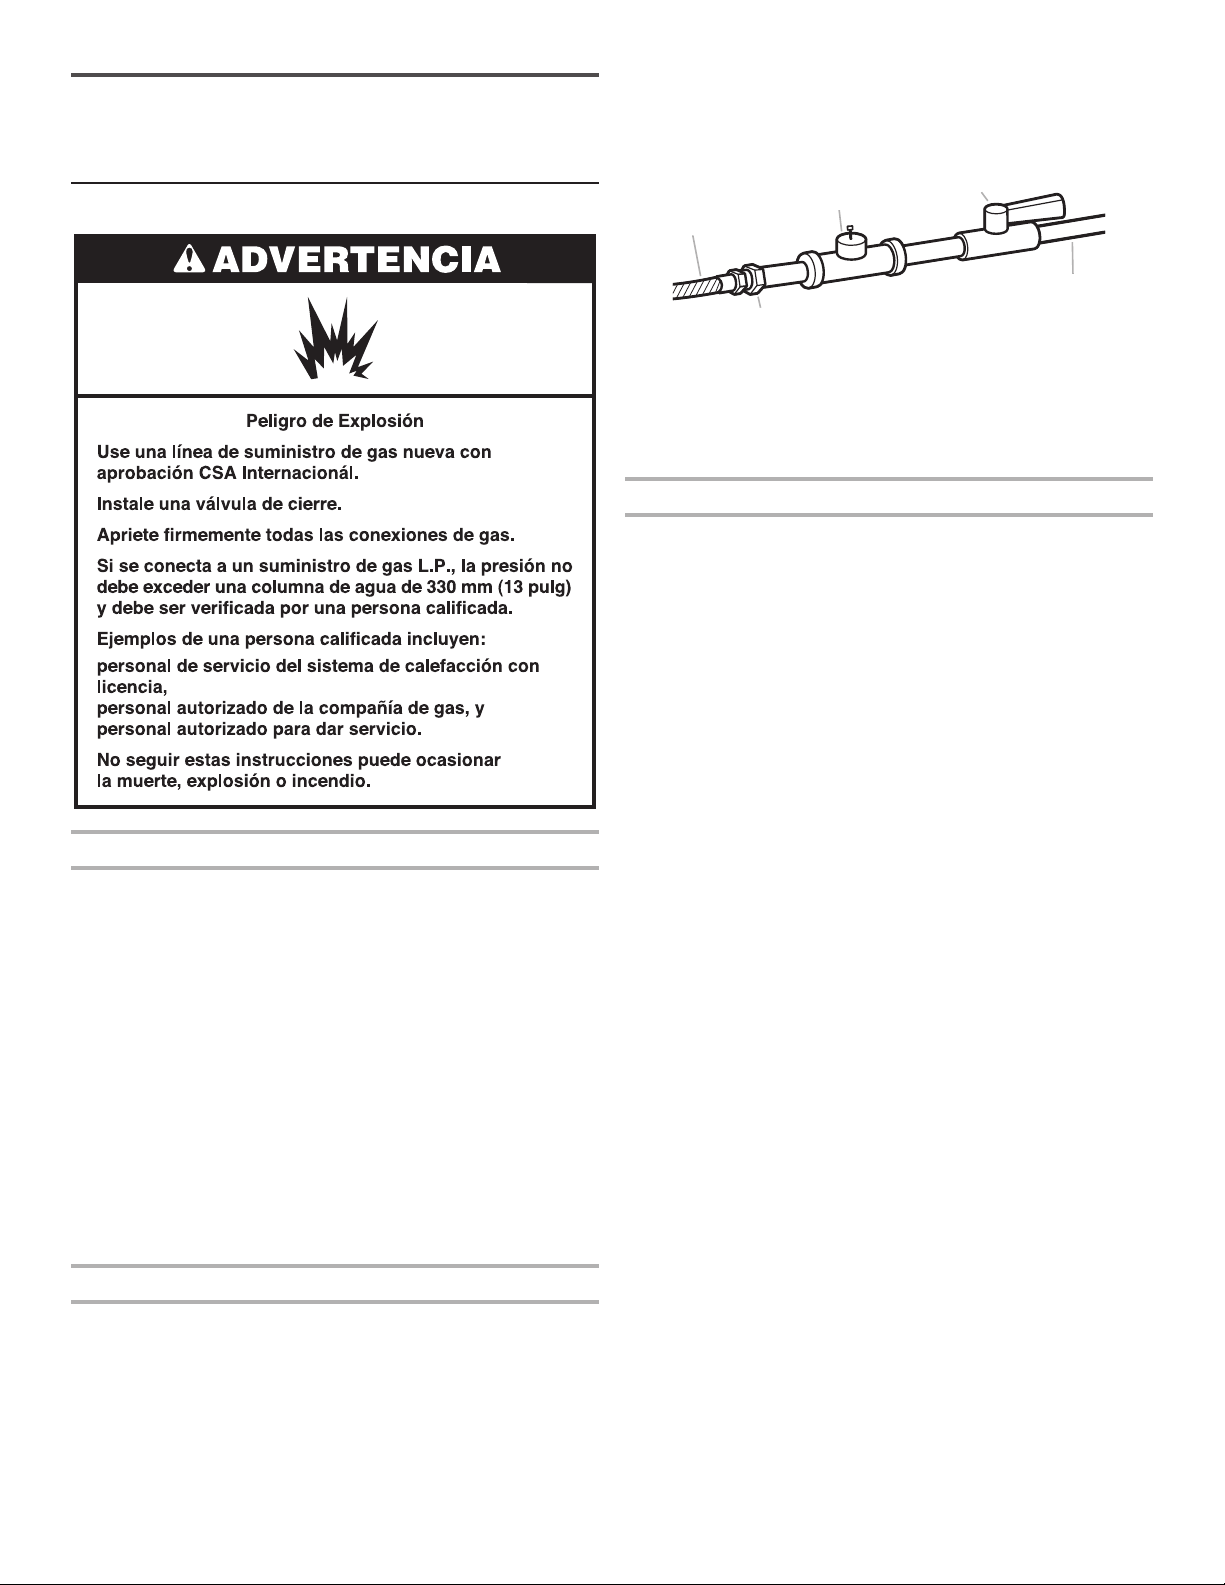
52
Inutilizzo, stoccaggio e trasporto
Inutilizzo o stoccaggio
Mettere in funzione l’asciugatrice solo quando si è in casa.
In caso di assenza prolungata per vacanze o altri motivi
o se non si utilizza l’asciugatrice per un lungo periodo
di tempo, eseguire queste operazioni:
1. Staccare la spina dell’asciugatrice o scollegare
l’alimentazione di rete.
2. (Solo per asciugatrici a gas): chiudere la valvola della
conduttura di alimentazione del gas.
3. Pulire il ltro pelucchi. Vedere “Pulizia del ltro pelucchi”.
TRASPORTO
Per le asciugatrici con cavo di alimentazione elettrica:
1. Scollegare il cavo di alimentazione elettrica.
2. Assicurarsi che i piedini di messa in piano siano ssati
nella base dell’asciugatrice.
3. Usare nastro adesivo per ssare lo sportello
dell’asciugatrice.
Per le asciugatrici a cablaggio diretto:
1. Disattivare l’alimentazione nella scatola fusibili o sul
quadro interruttori.
2. Scollegare i cablaggi.
3. Assicurarsi che i piedini di messa in piano siano ssati
nella base dell’asciugatrice.
4.
Usare nastro adesivo per ssare lo sportello dell’asciugatrice.
Per asciugatrici a gas:
1.
Togliere la spina o scollegare l’alimentazione all’asciugatrice.
2. Chiudere la valvola della conduttura di alimentazione
del gas.
3. Scollegare il tubo di alimentazione del gas e rimuovere
i raccordi del tubo sull'asciugatrice.
4. Tappare il tubo di alimentazione.
5. Assicurarsi che i piedini di messa in piano siano ssati
nella base dell’asciugatrice.
6.
Usare nastro adesivo per ssare lo sportello dell’asciugatrice.
Reinstallazione dell’asciugatrice
Seguire le istruzioni di installazione per posizionare, mettere
in piano ed eseguire i collegamenti dell’asciugatrice.
Sostituzione della lampadina
nel tamburo (su alcuni modelli)
1. Staccare la spina dell’asciugatrice o scollegare
l’alimentazione di rete.
2. Aprire lo sportello dell’asciugatrice. Individuare
il coperchio della lampadina sulla parete posteriore
dell’asciugatrice. Con un cacciavite a croce rimuovere
la vite sull’angolo in basso a destra del coperchio.
Rimuovere il coperchio.
3. Ruotare la lampadina in senso antiorario. Per la
sostituzione usare esclusivamente una lampadina per
elettrodomestici da 10 watt. Riposizionare il coperchio
e rimontare la vite.
4. Collegare a una presa con messa a terra o ricollegare
la corrente.
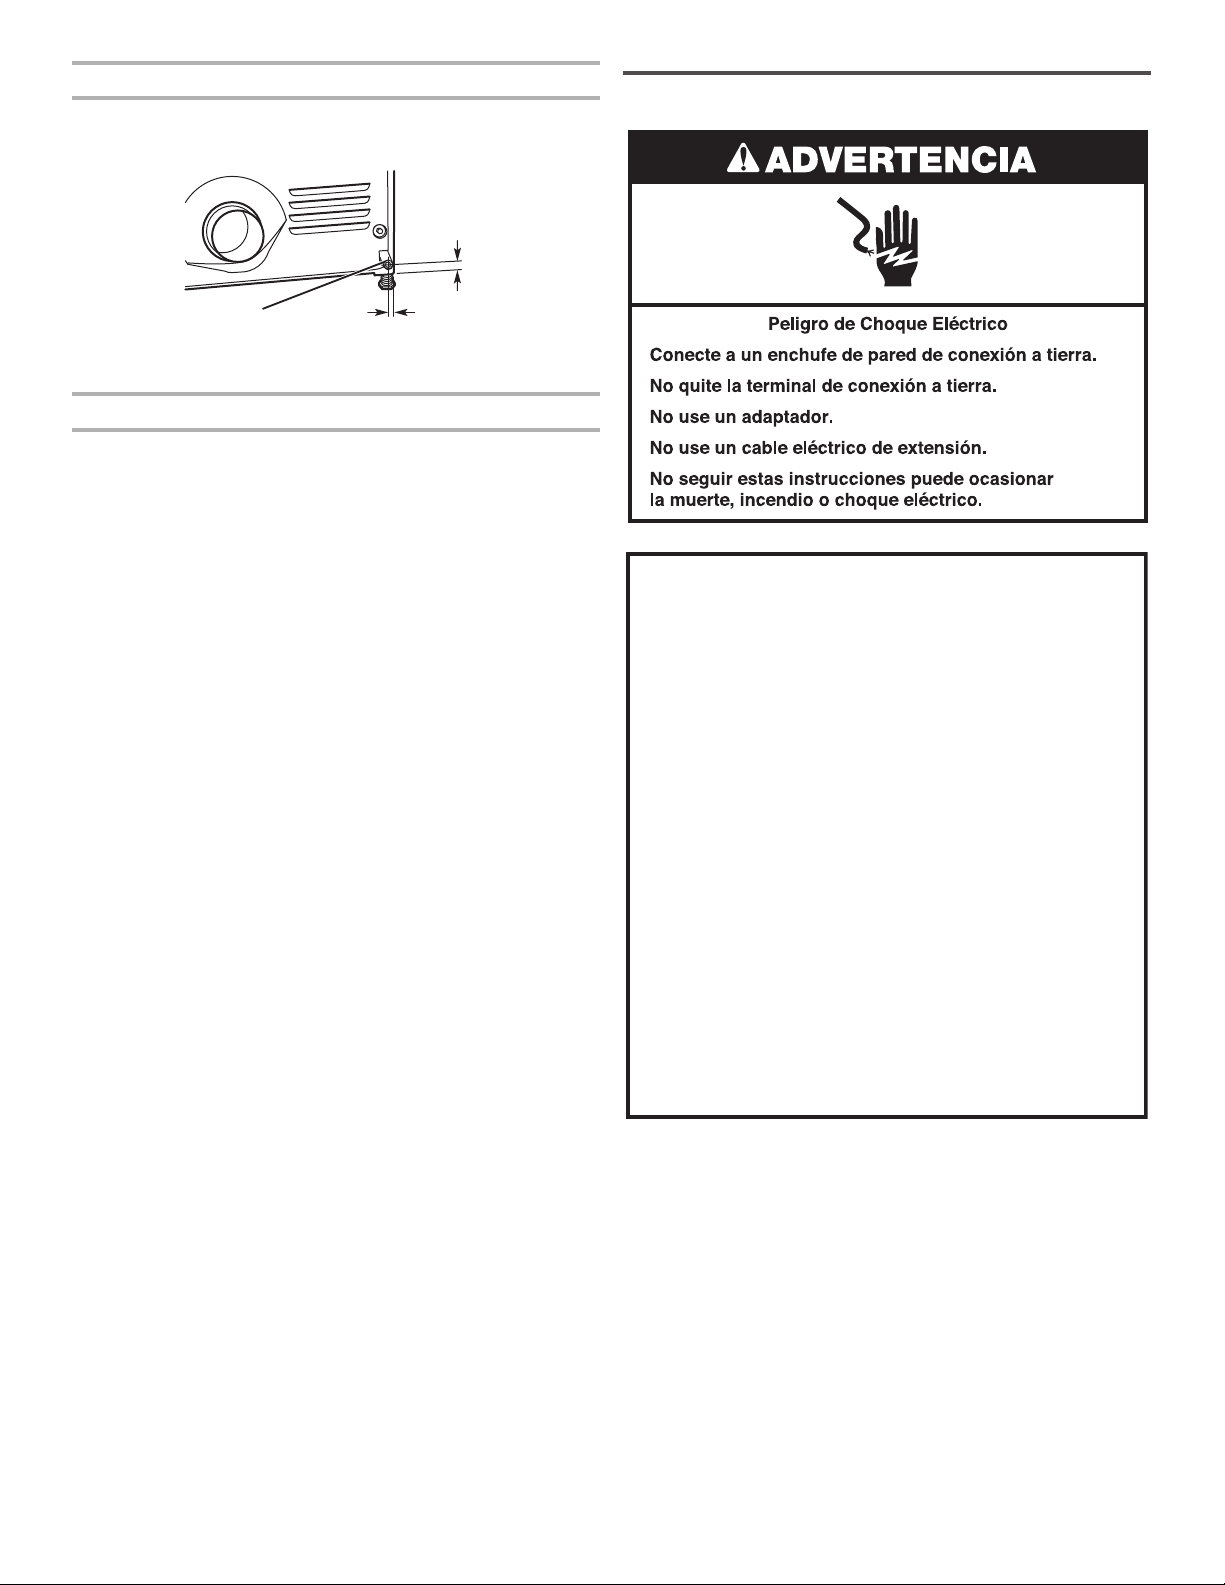
53
RISOLUZIONE DEI PROBLEMI
Provare le soluzioni indicate di seguito prima di contattare l’assistenza.
Problema Cause possibili Soluzione
I capi non sono
abbastanza asciutti,
i tempi di asciugatura
sono troppo lunghi
Il ltro pelucchi o l’alloggiamento del ltro
pelucchi sono ostruiti dai pelucchi.
Pulire il ltro pelucchi prima di ogni carico. Pulire l’area in
cui è alloggiato il ltro pelucchi, secondo necessità. Usare
un aspirapolvere per rimuovere delicatamente i pelucchi
accumulati all’esterno del ltro pelucchi.
È stato selezionato il ciclo Air Fluff/Air Dry
o la temperatura No Heat.
Selezionare il ciclo appropriato per il tipo di capi
da asciugare. Vedere “Guida ai cicli”.
Carico troppo voluminoso o pesante per
essere asciugato rapidamente.
Separare il carico per lasciarlo girare liberamente.
Tubo di scarico o cappa del tubo
di sato esterno intasato di pelucchi
che impediscono la circolazione dell’aria.
Far funzionare l’asciugatrice per 5–10 minuti. Tenere
una mano sotto la cappa del tubo di scarico esterna per
controllare se l’aria circola. Se non vi è circolazione dell’
aria, pulire il tubo di sato dai pelucchi o sostituirlo con
un tubo di metallo pesante o metallo essibile. Controllare
che il tubo di sato non sia schiacciato o piegato. Vedere
le istruzioni di installazione.
Fogli di ammorbidente per tessuti che
bloccano la griglia.
Usare solo un foglio di ammorbidente e usarlo una
sola volta.
Lunghezza errata del tubo di sato. Controllare che il tubo di sato non sia troppo lungo
e che non compia troppe curve. Se il tubo di sato è lungo
i tempi di asciugatura aumentano. Controllare che il tubo
di sato non sia schiacciato o piegato. Vedere le istruzioni
di installazione.
Dimensione errata del tubo di sato. Usare elementi di sato del diametro di 102 mm (4 poll.).
L’asciugatrice si trova in un locale con
temperatura al di sotto dei 7ºC (45ºF).
Per il corretto funzionamento dei cicli dell’asciugatrice
sono necessarie temperature superiori a 7ºC (45ºF).
L’asciugatrice si trova in uno sgabuzzino
senza aperture appropriate.
Le porte dello sgabuzzino devono avere aperture per
l’aerazione nella parte superiore e inferiore. Deve essere
lasciato uno spazio minimo di 25 mm (1 poll.) davanti
alla asciugatrice e, nella maggior parte delle installazioni,
uno spazio di 127 mm (5 poll.) sul lato posteriore. Vedere
le istruzioni di installazione.
L’asciugatrice non parte Lo sportello non è completamente chiuso. Assicurarsi che lo sportello dell’asciugatrice sia chiuso
completamente.
La manopola Start/Stop non è su ON. Portare la manopola Start/Stop su ON.
La manopolaStart/Stop non è stata
premuta a fondo o abbastanza a lungo.
Tenere premuta la manopola Start/Stop no a quando si
sente il rumore del tamburo dell’asciugatrice che si muove.
È bruciato il fusibile o è scattato
l’interruttore di circuito.
L’asciugatrice elettrica è dotata di 2 fusibili o interruttori di
circuito. Il tamburo gira ma non arriva aria calda. Sostituire
entrambi i fusibili o resettare l’interruttore di circuito. Se il
problema persiste, rivolgersi a un elettricista.
Alimentazione elettrica errata. Le asciugatrici elettriche funzionano a un’alimentazione
di 240 V. Vericare rivolgendosi a un elettricista qualicato.
Tipo di fusibile errato. Usare un fusibile ritardato.
Rumori anomali L’asciugatrice è rimasta inutilizzata
a lungo.
Se l’asciugatrice è rimasta inutilizzata a lungo, si potrebbe
sentire un rumore battente per i primi minuti di funzionamento.
Potrebbe essere rimasta una moneta, un
bottone o un fermaglio tra il tamburo e la
parte anteriore o posteriore dell’asciugatrice.
Controllare se vi sono piccoli oggetti sui bordi anteriore
e posteriore del tamburo. Vuotare tutte le tasche prima
del bucato.
È un asciugatrice a gas. Il ticchettare della valvola del gas è un normale rumore
di funzionamento.
Non sono stati installati i 4 piedini oppure
l’asciugatrice non è messa in piano.
Se non è installata correttamente, l’asciugatrice può
vibrare. Vedere le istruzioni di installazione.
I capi sono annodati o appallottolati. Se il carico è appallottolato, rimbalza facendo vibrare
l’asciugatrice. Separare i capi del carico e riavviare
l’asciugatrice.
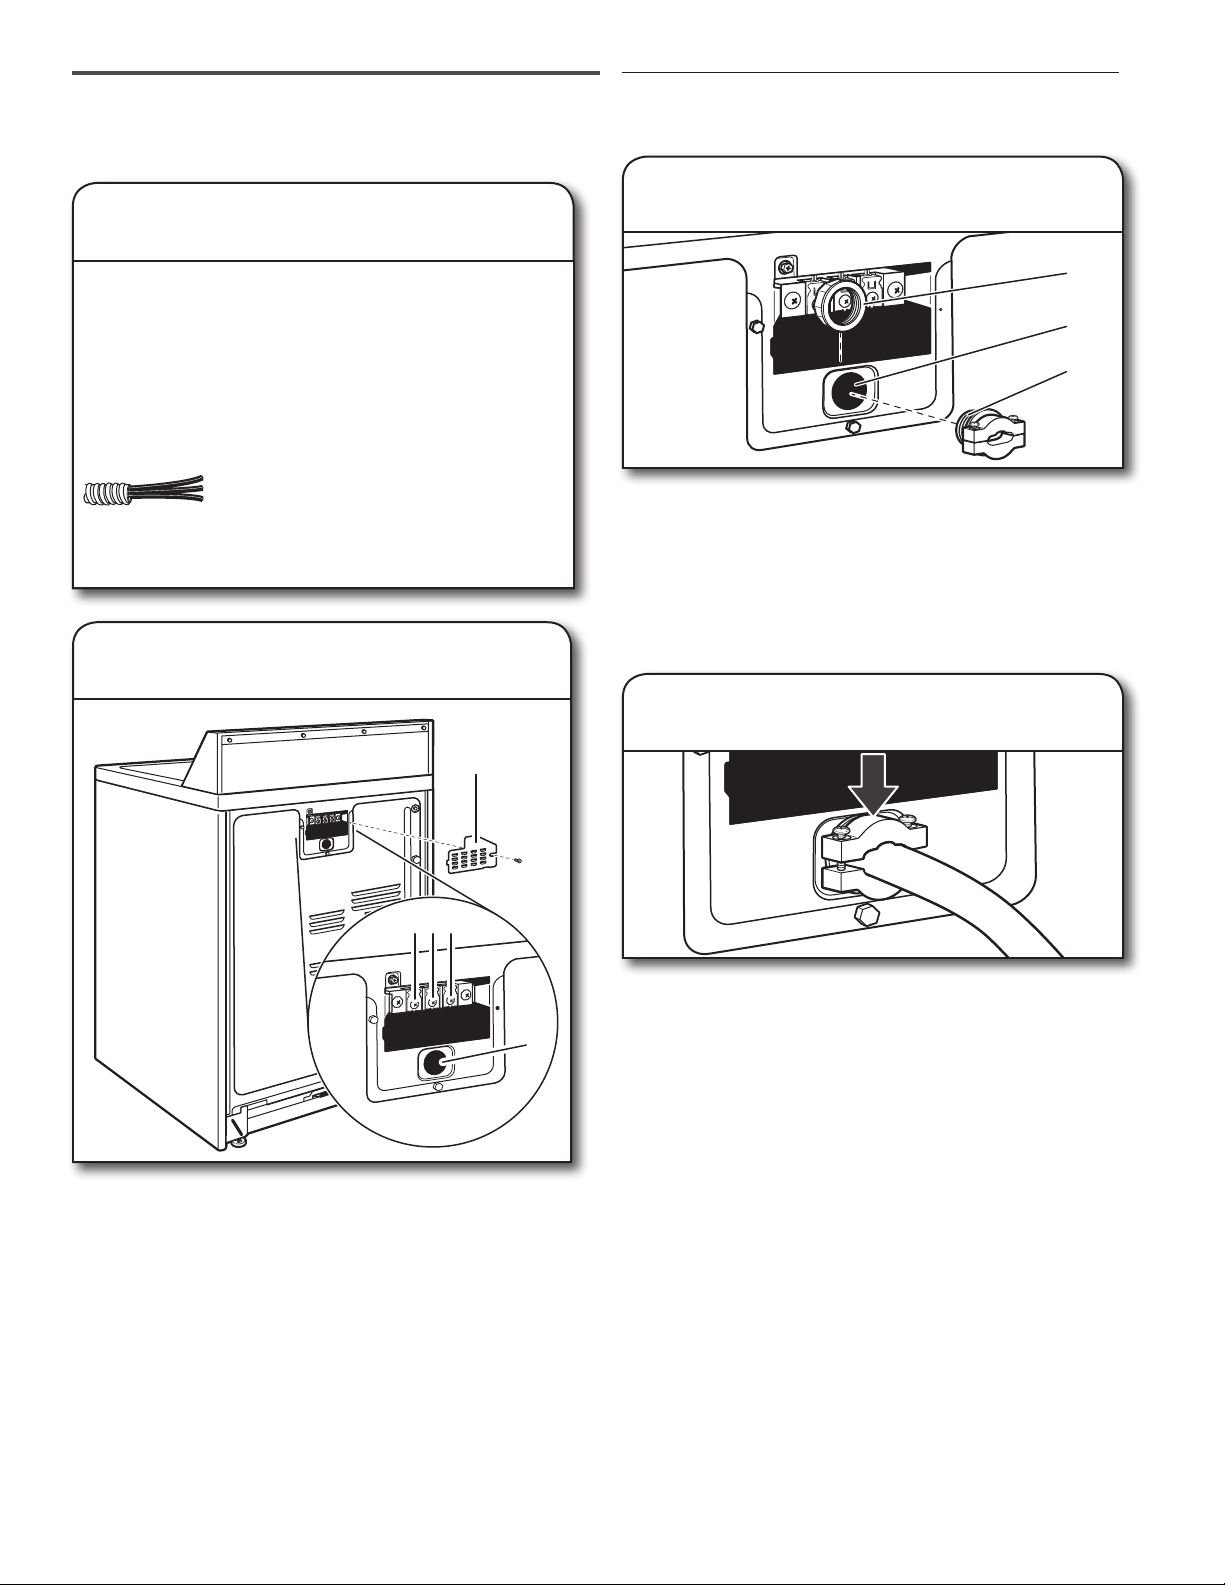
54
RISOLUZIONE DEI PROBLEMI
Provare le soluzioni indicate di seguito prima di contattare l’assistenza.
Problema Cause possibili Soluzione
Aria fredda È bruciato il fusibile o è scattato
l’interruttore di circuito.
Il tamburo gira ma non arriva aria calda. L’asciugatrice
elettrica è dotata di 2 fusibili o interruttori di circuito.
Sostituire entrambi i fusibili o resettare l’interruttore di
circuito. Se il problema persiste, rivolgersi a un elettricista.
La valvola della conduttura di alimentazione
non è aperta.
Per le asciugatrici a gas, controllare che sia aperta
la valvola della conduttura di alimentazione del gas.
Alimentazione elettrica errata. Le asciugatrici elettriche funzionano a un’alimentazione
di 240 V. Vericare rivolgendosi a un elettricista qualicato.
Tempo di ciclo troppo
breve
Il ciclo automatico è nito presto. È possibile che il carico non tocchi le strisce dei sensori.
Mettere l’asciugatrice in piano.
Usare l’asciugatura a tempo per i carichi molto piccoli.
Cambiare l’impostazione del livello di asciugatura sui cicli
di asciugatura automatica.
Se si aumenta o si diminuisce l’impostazione del livello
di asciugatura, il tempo del ciclo di asciugatura varia.
Pelucchi nel carico Il ltro pelucchi è ostruito. Il ltro pelucchi deve essere pulito prima di ogni carico.
Macchie sul carico o sul
tamburo
Utilizzo errato dell’ammorbidente per
tessuti nell’asciugatrice.
Aggiungere i fogli di ammorbidente per tessuto
nell’asciugatrice all’inizio del ciclo. Se si aggiungono i fogli
di ammorbidente per tessuto a un carico parzialmente
asciutto, i capi si possono macchiare.
Le macchie sul tamburo sono causate dalle tinture degli
indumenti (di solito dei jeans). Non macchiano gli altri
indumenti.
Il carico è spiegazzato Il carico non è stato rimosso
dall’asciugatrice alla ne del ciclo.
Selezionare la funzione Wrinkle Shield per far ruotare
il carico senza calore ed evitare lo spiegazzamento.
Asciugatrice troppo piena. Asciugare carichi più piccoli che possono girare
liberamente per ridurre la formazione di pieghe.
Odori Sono stati eseguiti di recente lavori di
tinteggiatura, coloritura o verniciatura
nell’area in cui si trova l’asciugatrice.
In tal caso areare il locale. Quando gli odori o i fumi sono
spariti dall’area, lavare di nuovo e asciugare il bucato.
L’asciugatrice è stata usata per la prima
volta.
La resistenza elettrica nuova emana un odore caratteristico,
che sparisce dopo il primo ciclo di asciugatura.
Il carico è troppo caldo Capi rimossi dall’asciugatrice prima della
ne del ciclo.
Attendere il completamento del ciclo di raffreddamento
prima di rimuovere la biancheria di asciugatura. Tutti i cicli
vengono raffreddati lentamente afnché i capi risultino
meno spiegazzati e sia più facile maneggiarli. I capi rimossi
prima del raffreddamento sono molto caldi.
È stato utilizzato un ciclo ad alta
temperatura o un comando di temperatura
separato è stato impostato su un valore
Hight (Alto).
Selezionare una temperatura più bassa e usare un ciclo di
asciugatura automatico. Questi cicli rilevano la temperatura
o il livello di umidità del carico e si arrestano quando il carico
ha raggiunto il livello di asciugatura selezionato. In questo
modo si riduce l’asciugatura eccessiva.
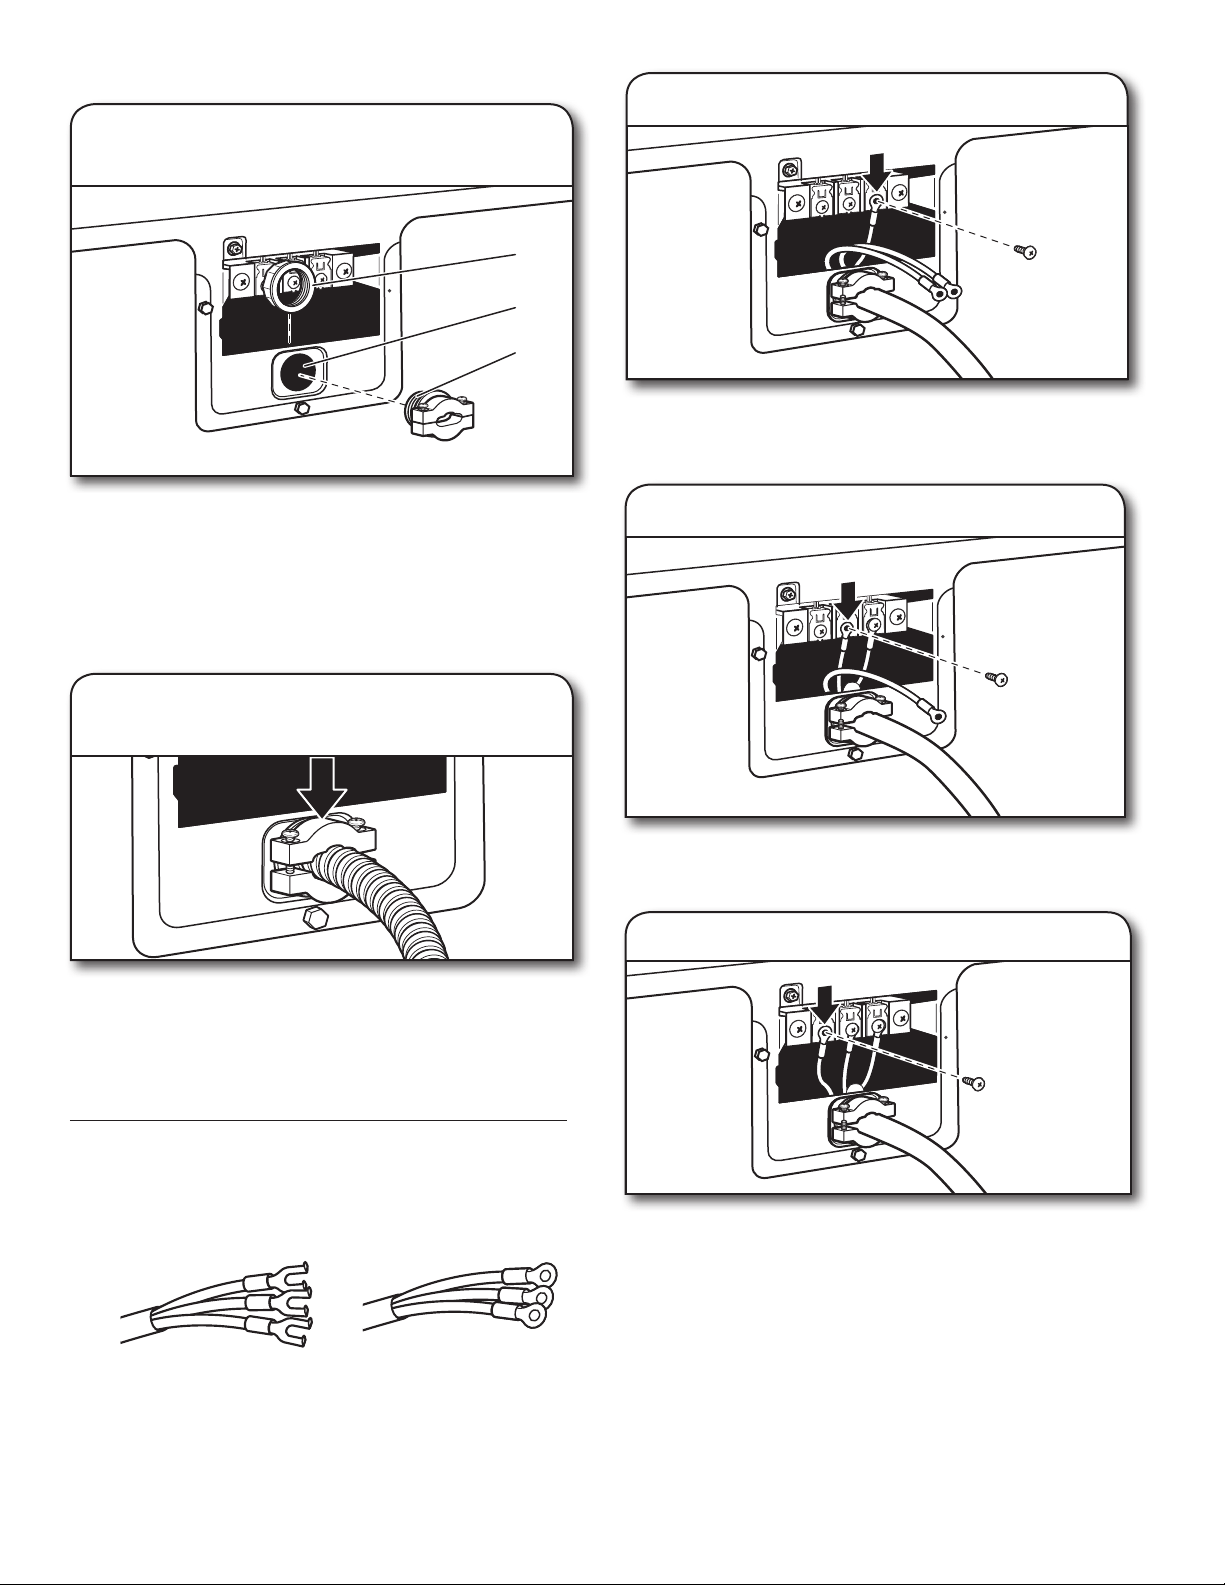
55
PER ASSISTENZA:
1. Prima di contattarci per organizzare l’assistenza, determinare se il prodotto necessita di interventi di riparazione. È possibile rispondere ad alcune
domande senza rivolgersi all’assistenza. Consultare la sezione relativa alla risoluzione dei problemi della Guida alla cura e alla manutenzione
oppure visitare il sito https://www.maytag.com/product_help.
2. Il servizio di assistenza in garanzia viene fornito esclusivamente dai fornitori di assistenza Maytag autorizzati. Negli USA e in Canada, indirizzare
tutte le richieste di assistenza in garanzia a:
Maytag Customer eXperience Center
Negli USA, chiamare il numero 1-800-688-9900. In Canada, chiamare il numero 1-800-807-6777.
Se al di fuori dei 50 Stati Uniti e del Canada, rivolgersi al concessionario autorizzato Maytag per determinare se è applicabile un’altra garanzia.
GARANZIA LIMITATA MAYTAG
LAUNDRY
APPLICARE QUI LA RICEVUTA. PER USUFRUIRE DEL SERVIZIO IN
GARANZIA È NECESSARIA LA PROVA D’ACQUISTO.
Preparare le informazioni indicate di seguito prima di chiamare il
Customer eXperience Center:
Ƀ Nome, indirizzo e numero di telefono
Ƀ Numero del modello e numero di serie
Ƀ Una descrizione chiara e dettagliata del problema
Ƀ La prova d’acquisto, completa del nome e indirizzo del
concessionario o del dettagliante
GARANZIA LIMITATA DI DIECI ANNI
VOCI INCLUSE NELLA GARANZIA VOCI ESCLUSE DALLA GARANZIA
GARANZIA LIMITATA AL PRIMO ANNO (RICAMBI E MANODOPERA)
Per un anno dalla data di acquisto, ove l’installazione, l’utilizzo e la
manutenzione di questo dispositivo siano avvenuti in conformità con le
istruzioni allegate o fornite con il prodotto, il marchio Maytag di Whirpool
Corporation o Whirlpool Canada LP (da questo momento “Maytag”)
sarà responsabile del rimborso delle parti indicate dalla fabbrica e della
manodopera per la correzione di difetti dei materiali o di fabbricazione
esistenti al momento dell’acquisto del dispositivo.
GARANZIA LIMITATA DAL SECONDO AL DECIMO ANNO
(SOLO MOTORE DEL TAMBURO E CESTELLO IN ACCIAIO
INOSSIDABILE, MANODOPERA NON INCLUSA)
Dal secondo al decimo anno dalla data di acquisto originale, ove
l’installazione, l’utilizzo e la manutenzione di questo dispositivo siano
stati eseguiti in conformità alle istruzioni allegate o fornite con il prodotto,
Maytag pagherà le spese relative alle parti indicate dalla fabbrica per
i componenti specicati di seguito, in caso di difetti non estetici dei
materiali o di fabbricazione esistenti al momento dell’acquisto del
dispositivo che ne impediscano il funzionamento. La presente è una
garanzia limitata di 10 anni soltanto sulle parti indicate di seguito e non
include la manodopera di riparazione.
Ƀ Tamburo (solo pareti laterali)
Ƀ Motore di trazione
UNICO E SOLO RIMEDIO DA PARTE DEL CLIENTE SOTTO LA
PRESENTE GARANZIA È LA RIPARAZIONE DEL PRODOTTO COME
SPECIFICATO DALLA PRESENTE GARANZIA. Gli interventi di
assistenza devono essere forniti da una azienda di servizi designata da
Maytag. La presente garanzia limitata è valida solo negli Stati Uniti o in
Canada e si applica solo se il dispositivo è utilizzato nel paese in cui è
stato acquistato. Il periodo della presente garanzia limitata decorre a
partire dalla data di acquisto originale. È necessaria una prova della data
di acquisto originale per ottenere l’assistenza coperta dalla presente
garanzia.
1. Uso commerciale, non residenziale, multifamiliare o uso non
conforme alle istruzioni per l’utente, per l’operatore o di installazione
pubblicate.
2. Istruzioni interne sulle modalità di utilizzo del prodotto.
3. Assistenza per correggere attività di manutenzione o installazione del
prodotto improprie, installazione non conforme ai requisiti elettrici o
idraulici o correzione di impianti elettrici o idraulici domestici (ovvero
cablaggi, fusibili o essibili di ingresso acqua domestici).
4. Parti di consumo (ovvero lampadine, batterie, ltri dell’aria o
dell’acqua, ecc.).
5. Conversione del prodotto da gas naturale o gas propano o inversione
degli sportelli dell’apparecchio.
6. Danno dovuto a incidenti, uso errato, uso improprio, incendi, alluvioni,
catastro naturali o utilizzo con prodotti non approvati da Maytag.
7. Riparazioni di parti o sistemi per correggere danni o difetti del
prodotto causati da assistenza non autorizzata, alterazioni o
modiche dell’apparecchio.
8. Danni estetici, inclusi graf, ammaccature, scaltture e altri danni alla
nitura dell’apparecchio salvo se tali danni siano il risultato di difetti
dei materiali o di fabbricazione e siano stati segnalati a Maytag entro
30 giorni.
9. Scoloritura, ruggine o ossidazione delle superci derivanti da ambienti
caustici o corrosivi, inclusi, a titolo esemplicativo, elevate
concentrazioni saline, elevata condensa o umidità o esposizione a
sostanze chimiche.
10. Ritiro o consegna. Questo prodotto deve essere riparato in loco.
11. Spese di viaggio o trasporto per l’assistenza in luoghi remoti in cui
non è disponibile un fornitore di assistenza autorizzato di Maytag.
12. Rimozione o reinstallazione di apparecchi non accessibili o di elementi
incorporati (ovvero pannelli decorativi, pavimentazioni, armadiature,
isole, piani di lavoro, cartongesso, ecc.) che interferiscono con
l’intervento di assistenza, la rimozione o la sostituzione del prodotto.
13. Assistenza o parti di apparecchi con numeri di modello/serie rimossi,
alterati o non facilmente riconoscibili.
Il costo della riparazione o sostituzione in queste circostanze
escluse è a carico del cliente.
01/14
ESCLUSIONE DI GARANZIE IMPLICITE
LE GARANZIE IMPLICITE, INCLUSE LE GARANZIE IMPLICITE DI COMMERCIABILITÀ O IDONEITÀ PER UNO SCOPO PARTICOLARE, SONO
LIMITATE A DIECI ANNI O AL PERIODO MINIMO CONSENTITO DALLA LEGGE. Alcuni stati e provincie non consentono limitazioni sulla durata delle
garanzie implicite di commerciabilità o idoneità; pertanto queste limitazioni potrebbero non essere applicabili. Questa garanzia fornisce all’acquirente
specici diritti legali e a sua volta l’acquirente può vantare altri diritti che possono variare a seconda dei diversi stati o province.
ESCLUSIONE DI RESPONSABILITÀ PER LE DICHIARAZIONI NON CONTENUTE NELLA GARANZIA
Maytag non rilascia alcuna dichiarazione sulla qualità, sulla durata o sulla necessità di manutenzione o di riparazione di questo
dispositivo, escluse le dichiarazioni contenute nella presente garanzia. Per una garanzia più lunga e completa rispetto alla
garanzia limitata fornita con questo dispositivo, rivolgersi al rivenditore Maytag per poter vericare la possibilità di un’estensione
del periodo di garanzia.
LIMITAZIONE DEI RIMEDI; ESCLUSIONE DI DANNI ACCIDENTALI E CONSEGUENTI
UNICO E SOLO RIMEDIO DA PARTE DEL CLIENTE SOTTO LA PRESENTE GARANZIA È LA RIPARAZIONE DEL PRODOTTO COME SPECIFICATO
DALLA PRESENTE GARANZIA. MAYTAG NON È RESPONSABILE DI INCIDENTI O DANNI DA ESSI DERIVANTI. Alcune stati e province non
riconoscono l’esclusione o le limitazioni di danni incidentali o conseguenti; pertanto questa limitazione ed esclusione potrebbe non essere
applicabile. Questa garanzia fornisce all’acquirente specici diritti legali e a sua volta l’acquirente può vantare altri diritti che possono variare a
seconda dei diversi stati o province.

56
SERVIZIO DI ASSISTENZA
Prima di rivolgervi al servizio di assistenza consultate la sezione “Risoluzione dei problemi”
o visitate il sito www.maytag.com/owners.
Potreste risparmiare il costo della chiamata all’assistenza. Se il problema non è risolvibile, seguite queste istruzioni.
Prima di chiamare, preparate a portata di mano le informazioni relative alla data di
acquisto e al modello e numero di serie completo dell’apparecchio.
Queste informazioni ci aiuteranno a rispondere meglio alla vostra richiesta.
Se vi occorrono parti di ricambio o se dovete ordinare accessori
Raccomandiamo di utilizzare esclusivamente i ricambi specicati dal produttore (FSP, Factory Specied Parts).
Questi ricambi si installano e funzionano correttamente perché sono realizzati con la stessa
precisione utilizzata per costruire tutte le nuove apparecchiature MAYTAG.
Per individuare ricambi e accessori FSP, visitate il sito www.maytagpartsonline.com.
Domande? Chiamate il numero verde 1-800-344-1274 o, in Canada, 1-800-688-2002.
I nostri consulenti vi forniranno assistenza per
Negli USA
■ Caratteristiche e speciche di tutta la nostra linea
di apparecchiature.
■ Informazioni per l’installazione.
■ Assistenza clienti specializzata (in lingua spagnola,
non udenti, ipovedenti ecc.).
Negli USA e in Canada
■ Procedure d’uso e di manutenzione.
■ Vendita di accessori e parti per la riparazione.
■ Contatti di concessionari locali, distributori di
ricambi e fornitori di servizi di assistenza. I tecnici
dell’assistenza di Maytag autorizzati sono preparati
per fornire il servizio in garanzia e post-garanzia,
ovunque negli Stati Uniti e in Canada.
Per dubbi o domande potete scrivere a:
Maytag Brand Appliances
Customer eXperience Center
553 Benson Road
Benton Harbor, MI 49022-2692
1-800-344-1274
Maytag Brand Appliances
Customer eXperience Centre
Unit 200-6750 Century Ave
Mississauga, Ontario L5N 0B7
1-800-688-2002
Ricordate di includere nel messaggio un numero telefonico diurno a cui contattarvi.
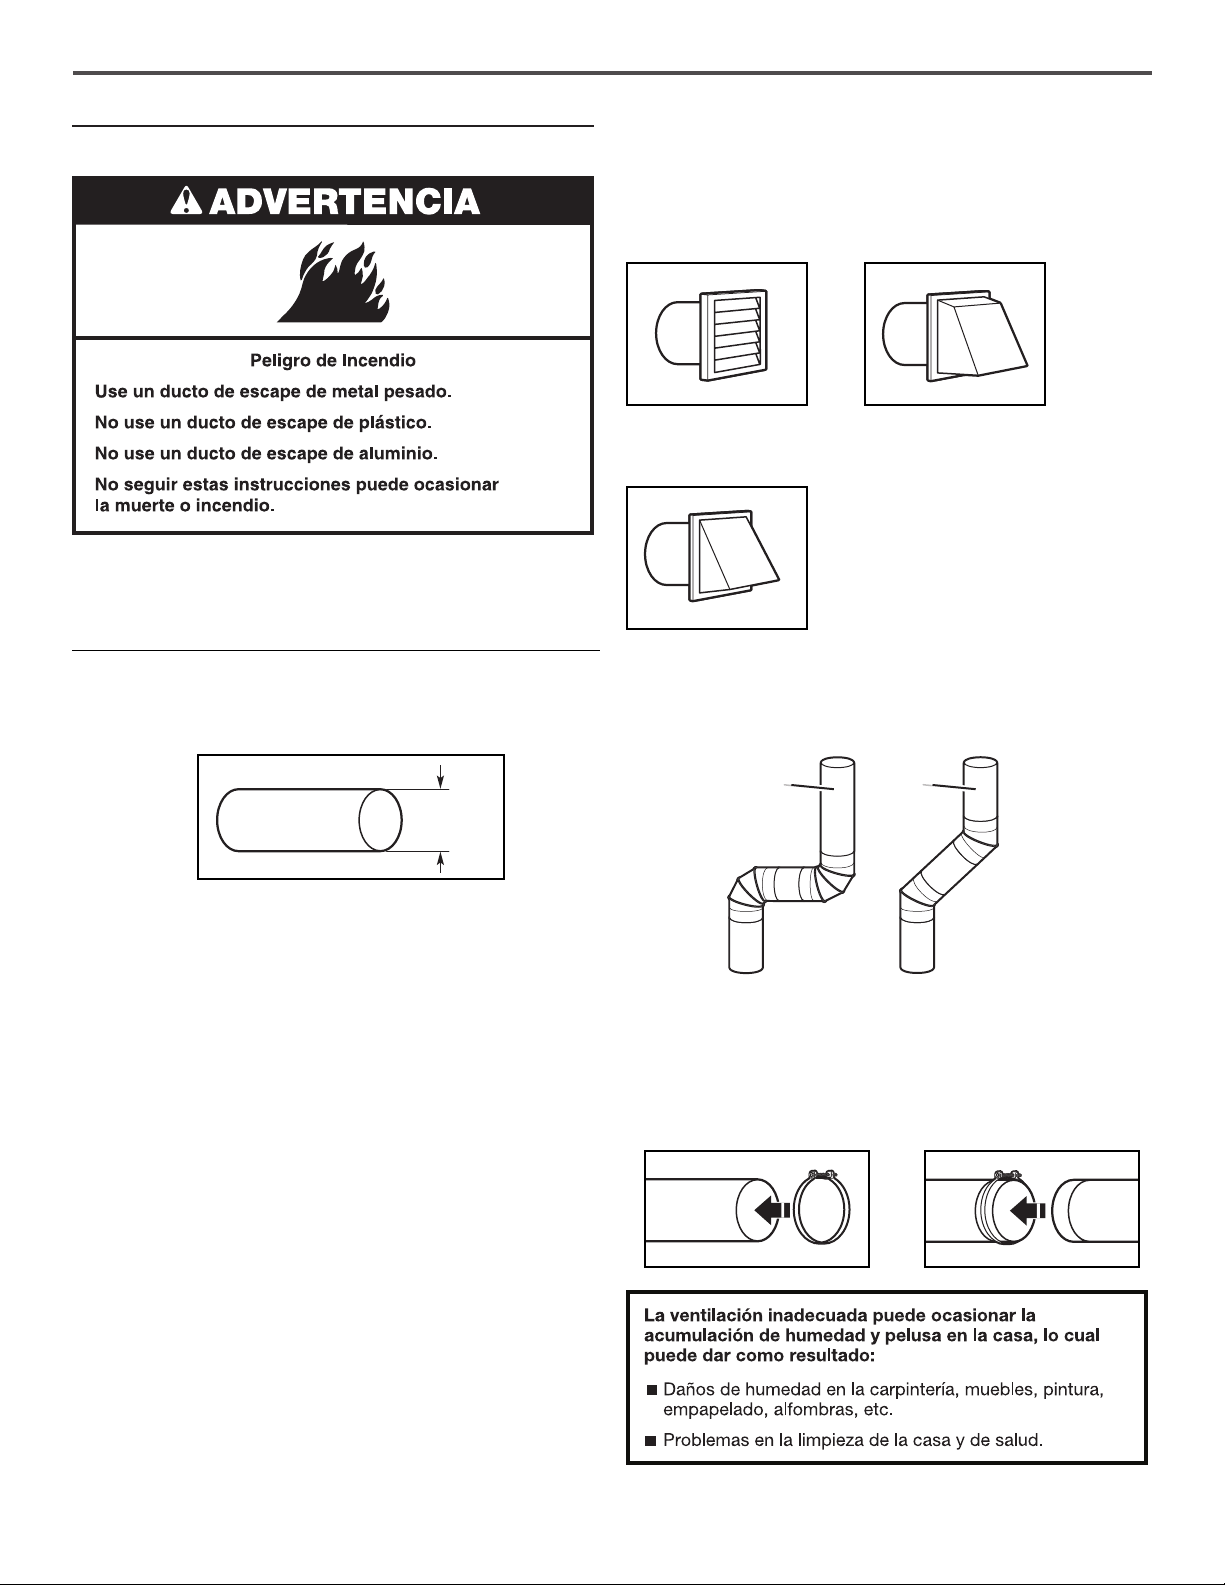
57
SICHERHEITSHINWEISE
- Die Installation des Wäschetrockners muss von einem qualifizierten Installateur
ausgeführt werden.
- Installieren Sie den Wäschetrockner gemäß den Anweisungen des Herstellers und den
lokalen Vorschriften.
- Installieren Sie für einen Wäschetrockner keine Abluftleitungen aus flexiblem Kunststoff
oder flexibler Metallfolie. Wird ein flexibler Metallkanal installiert, muss es sich um einen
speziellen Kanaltyp handeln, der vom Hersteller des Geräts als für die Verwendung mit
Wäschetrocknern geeignet ausgewiesen wird. Flexible Abluftkanäle sind bekannt dafür,
dass sie zusammenfallen, leicht zerdrückt werden und sich Flusen darin ansammeln.
Dadurch kann die Abluft des Wäschetrockners nicht ungehindert abgeführt werden, so
dass sich die Brandgefahr erhöht.
- Um die Gefahr schwerer oder tödlicher Verletzungen zu verringern, befolgen Sie alle
Installationsanweisungen.
- Bewahren Sie diese Anleitung auf.
ACHTUNG -
Brandgefahr
ACHTUNG -
BRANDGEFAHR/BRENNBARE MATERIALIEN
Dieses zusätzliche Warnsymbol weist auf Brandgefahr hin.
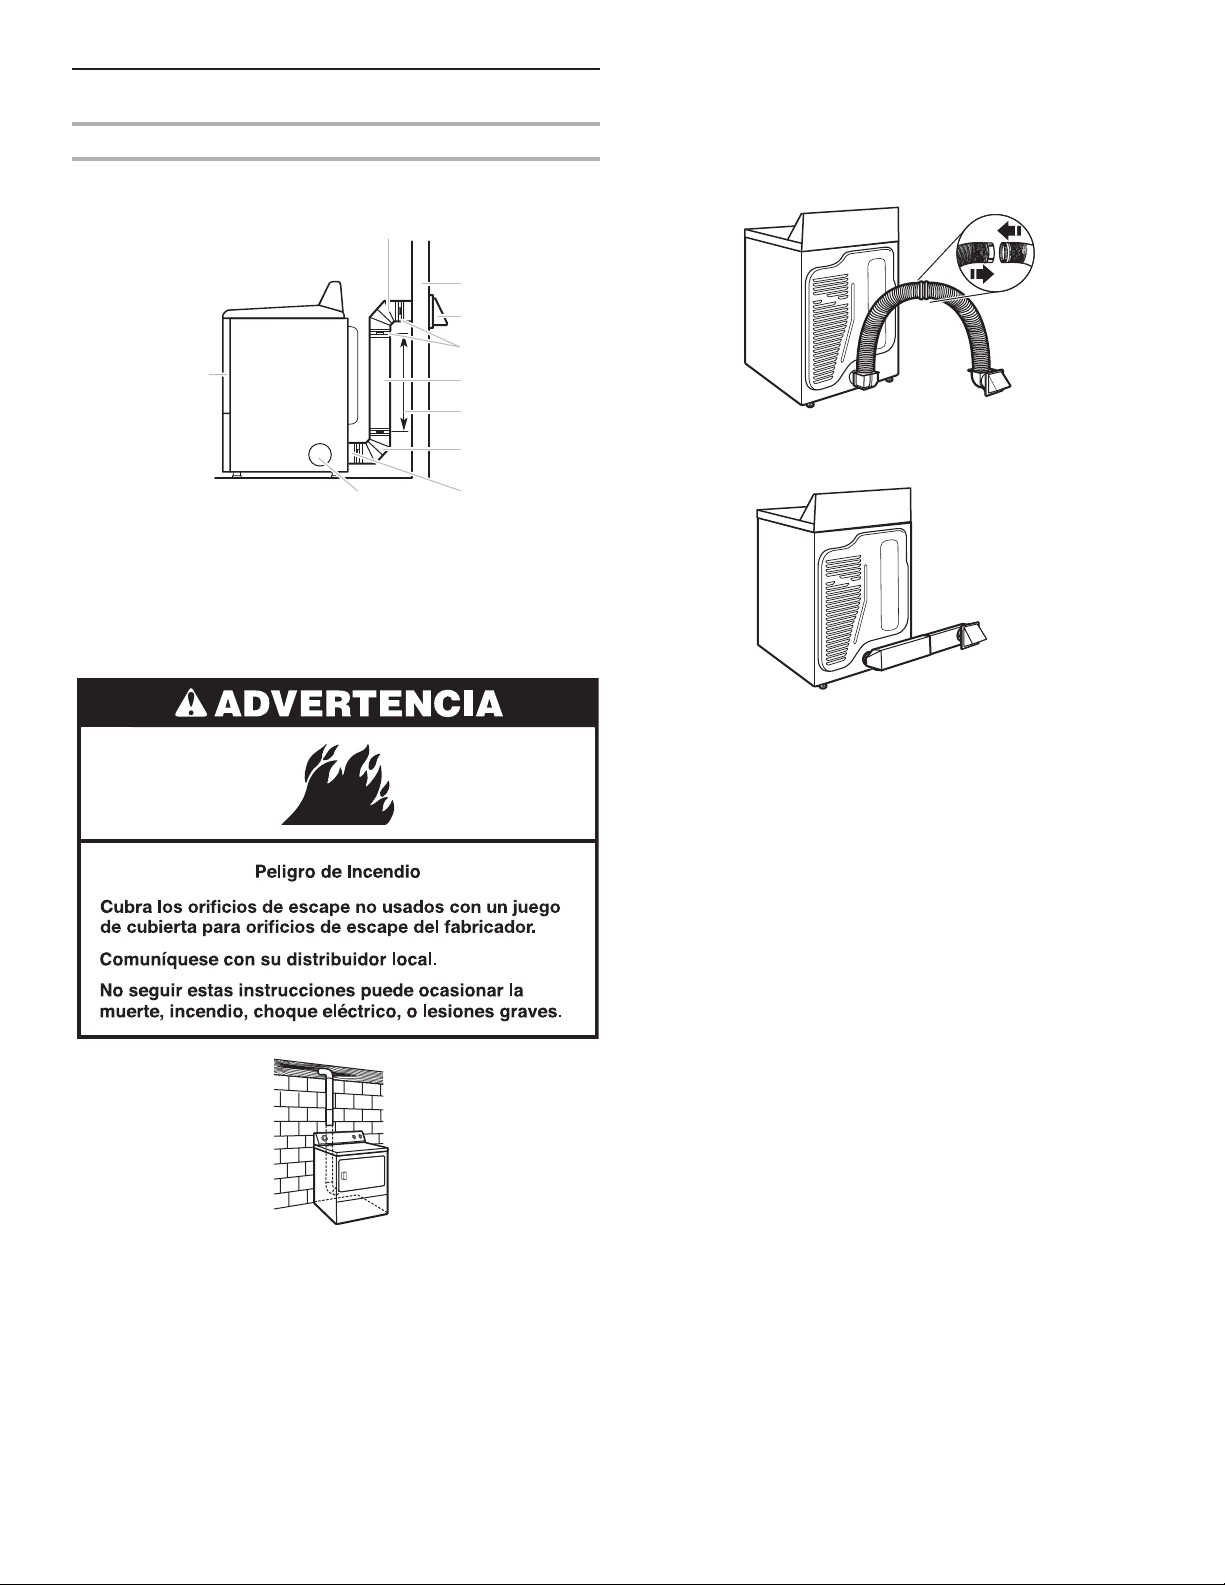
58
SICHERHEITSHINWEISE
1. LAGERN UND VERWENDEN SIE KEIN BENZIN, GAS ODER ANDERE ENTFLAMMBARE STOFFE IN DER NÄHE DIESES GERÄTS
ODER ANDERER GERÄTE.
2. VERSPRÜHEN SIE KEINE SPRAYS IN DER NÄHE DIESES GERÄTS, WENN ES IN BETRIEB IST.
3. AN DIESEM GERÄT DÜRFEN KEINE MODIFIKATIONEN VORGENOMMEN WERDEN.
■ Der Trockner darf nicht benutzt werden, wenn industrielle
Chemikalien für die Reinigung benutzt wurden.
■ Leeren Sie vor dem Trockengang alle Taschen und nehmen
Sie alle Gegenstände heraus, besonders Feuerzeuge und
Streichhölzer.
■ Bevor der Trockner außer Betrieb genommen oder entsorgt
wird, entfernen Sie die Türen zum Trockenraum.
■ Greifen Sie nicht in den Trockner, wenn sich die Trommel
bewegt. Zu Ihrer Sicherheit ist ein Türschalter verbaut.
■ Der Trockner darf an keinem Ort aufgestellt werden, an dem
er Witterungseinüssen ausgesetzt ist.
■ Nehmen Sie keine Veränderungen an den Bedienelementen
vor.
■ Benutzen Sie dieses Gerät nicht weiter, wenn es defekt zu
sein scheint.
■ Reparieren Sie den Trockner nicht selbst und tauschen
Sie keine Teile aus, wenn dies in der Bedienungsanleitung
und in der Pegeanleitung nicht ausdrücklich angegeben
ist. Reparaturen und Kundendienst dürfen nur von
kompetentem Servicepersonal durchgeführt werden.
■ Benutzen Sie keine Weichspüler und keine Produkte,
welche die Statik eliminieren, es sei denn, es wird vom
Hersteller des Weichspülers oder Produkts ausdrücklich
empfohlen. Befolgen Sie deren Anweisungen.
■ Reinigen Sie vor bzw. nach jedem Trockengang das
Fusselsieb des Trockners.
Der Trockner darf nur mit eingesetztem Fusselsieb in
Betrieb genommen werden.
■ Der Bereich um die Aus- und Einlassöffnungen und die
umgebenden Bereiche müssen stets von Fusseln-, Staub-
und Schmutzansammlungen befreit sein.
■ Der Innenraum des Trockners und das Abluftsystem sollten
regelmäßig durch qualiziertes Kundendienstpersonal
gereinigt werden.
■ Weitere Informationen zu den Erdungsanforderungen nden
Sie in den Installationsanweisungen.
■ Trocknen Sie in diesem Trockner keine ungewaschenen
Textilien.
■ Der letzte Teil des Trocknungsvorgangs erfolgt ohne Hitze
(Abkühlzyklus), um sicherzustellen, dass die Teile bei einer
Temperatur bleiben, die eine Beschädigung ausschließt.
■ Teile aus Schaumstoff (Latex), Duschhauben, wasserdichte
Textilien, gummierte Artikel und Kleider oder Kopfkissen,
die Schaumstoffpads enthalten, dürfen nur auf der
Wäscheleine getrocknet werden.
■ Wenn das Stromkabel beschädigt ist, muss es vom
Hersteller oder von einer empfohlenen Kundendienststelle
bzw. von ähnlich geschultem Fachpersonal ausgetauscht
werden, um Gefahren zu vermeiden.
ACHTUNG: Halten Sie einen Trocknungsvorgang nur dann
verfrüht vor dem Ende an, wenn Sie dann sofort alle Teile
herausnehmen und einzeln so legen/hängen, dass die Hitze
entweichen kann.
WICHTIGE SICHERHEITSHINWEISE
ACHTUNG:
Um das Risiko von Brand, Elektroschock oder Verletzungen von Personen beim Gebrauch des Trockners zu
verringern,befolgen Sie die grundlegenden Sicherheitsvorschriften einschließlich der Folgenden:
BITTE BEWAHREN SIE DIESE BEDIENUNGSANLEITUNG AUF
■ Lesen Sie vor dem ersten Gebrauch dieses Trockners alle
Anweisungen durch.
4
IMPORTANT SAFETY INSTRUCTIONS
precautions, including the following:
WARNING:
Read all instructions before using the dryer.
Keep a minimum clearance of 100 mm (4 in.) between the
rear of the dryer and any wall.
The operation of this appliance may affect the operation of
other types of appliances which take their air supply for safe
combustion from the same room. There has to be adequate
ventilation to replace exhausted air and thus avoid the
back-ow of gases into the room from appliances burning
other fuels, including open res, when operating the tumble
dryer. If in doubt, consult the appliance manufacturers.
Do not obstruct the air supply to the dryer (see Installation
Instructions for minimum clearances).
Do not place items exposed to cooking oils in your dryer.
Oil-affected items can ignite spontaneously, especially when
exposed to heat sources such as in a tumble dryer. The
items become warm causing an oxidation reaction in the oil.
Oxidation creates heat. If the heat cannot escape, the items
can become hot enough to catch re. Piling, stacking or
storing oil-affected items can prevent heat from escaping
and so create a re hazard.
If it is unavoidable to dry in the dryer items that have been
soiled with substances such as cooking oil, acetone, alcohol,
petrol, kerosene, spot removers, turpentine, waxes and wax
removers, or that have been contaminated by hair care
products, should be washed in hot water with an extra
amount of detergent before being dried in the dryer. These
items may give off vapours that could ignite or explode. Such
washing will reduce, but not eliminate, the hazard.
This appliance is not intended for use by persons (including
children) with reduced physical, sensory or mental
capabilities, or lack of experience and knowledge, unless
they have been given supervision or instructions concerning
use of the appliance by persons responsible for their safety.
Children should be supervised to ensure that they do not
play with the appliance.
The dryer should not be used if industrial chemicals have
been used for cleaning.
Before the dryer is removed from service or discarded,
remove the doors to the drying compartment.
Do not reach into the dryer if the drum is moving. A door
switch is tted for your safety.
Do not install or store the dryer where it will be exposed
to the weather.
Do not tamper with controls.
Do not continue to use this appliance if it appears to be
faulty.
Do not repair or replace any part of the dryer or attempt
any maintenance unless specically recommended in this
Use and Care Guide. Repairs and servicing should only
be carried out by competent service personnel.
Do not use fabric softeners or products to eliminate static
unless recommended by the manufacturer of the fabric
softener or product. Follow their instructions.
Clean dryer lint screen before or after each load. Do not
operate dryer without lint screen in place.
Keep area around the exhaust and inlet openings and
adjacent surrounding areas free from the accumulation of
lint, dust, and dirt.
The interior of the dryer and exhaust vent should be
cleaned periodically by qualied service personnel.
See Installation Instructions for earthing instructions.
Do not dry unwashed items in this dryer.
Items such as foam rubber (latex foam), shower caps,
waterproof textiles, rubber backed articles and clothes or
pillows tted with foam rubber pads must only be dried
on a clothesline.
SAVE THESE INSTRUCTIONS
WARNING: Never stop a tumble dryer cycle before the
end of the drying cycle unless all items are quickly removed
and spread out so that the heat is dissipated.
To reduce the risk of re, electric shock, or injury to persons when using the dryer, follow basic
The nal part of a tumble dryer cycle occurs without heat
(cool down cycle) to ensure that the items are left at a
temperature that ensures the items will not be damaged.
If the supply cord is damaged, it must be replaced by the
manufacturer or its service agent or a similarly qualied
person in order to avoid a hazard.
■ Zwischen der Rückseite des Trockners und allen Wänden
muss ein Mindestabstand von 100 mm (4 Zoll) eingehalten
werden.
■ Der Betrieb dieses Geräts kann den Betrieb anderer
Gerätetypen beeinträchtigen, deren Luftversorgung für
eine sichere Verbrennung aus dem gleichen Raum erfolgt.
Beim Betrieb des Trockners muss eine ausreichende
Raumbelüftung vorhanden sein für den Austausch
der verbrauchten Luft und damit für das Vermeiden
eines Rückstroms der Gase zurück in den Raum durch
Geräte, die andere Treibstoffe verbrennen, einschließlich
offener Feuer. Bitte wenden Sie sich bei Fragen an die
Gerätehersteller.
■ Die Belüftungsversorgung zum Trockner darf nicht blockiert
werden (Näheres zu den Mindestabständen siehe die
Installationsanweisung).
■ Trocknen Sie in Ihrem Trockner keine Textilien, die mit
Speiseölen in Berührung gekommen sind. Textilien mit
Ölecken können sich spontan entzünden, besonders
dann, wenn sie Wärmequellen ausgesetzt sind wie in einem
Trockner. Die warm gewordenen Textilien verursachen im
Öl eine Oxidationsreaktion. Oxidation erzeugt Hitze. Wenn
die Hitze nicht entweichen kann, können die Teile so heiß
werden, dass sie Feuer fangen. Um das Brandrisiko durch
eine verunreinigte Beladung zu reduzieren, erfolgt der
abschließende Teil des Trocknungsvorgangs ohne Hitze
(Zeit zum Abkühlen). Halten Sie einen Trocknungsvorgang
nur dann verfrüht vor dem Ende an, wenn Sie dann sofort
alle Teile herausnehmen und einzeln so legen/hängen, dass
die Hitze entweichen kann. Werden Textilien mit Ölecken
aufgehäuft, gestapelt oder gemeinsam gelagert, kann die
Hitze nicht entweichen, und es entsteht Brandgefahr.
■ Wenn es unvermeidlich ist, dass im Trockner Teile
getrocknet werden müssen, die mit Substanzen
wie Speiseöl, Azeton, Alkohol, Benzin, Kerosin,
Fleckenentferner, Terpentin, Wachs und Wachsentferner
verschmutzt oder durch Haarpegeprodukte verunreinigt
sind, dann sollten sie vor dem Trocknen im Trockner
in heißem Wasser mit einer Zusatzmenge Waschmittel
gewaschen werden. Diese Substanzen können Dämpfe
abgeben, die sich entzünden oder explodieren können.
Dieser Waschgang reduziert die Gefahr, eliminiert sie aber
nicht.
■ Dieses Gerät darf von Personen (einschließlich Kindern
unter 8 Jahren) mit herabgesetzten physischen,
sensorischen oder geistigen Fähigkeiten und Mangel an
Erfahrung und Kenntnissen nur unter Aufsicht oder nach
ausreichender Einweisung durch eine für ihre Sicherheit
verantwortliche Person benutzt werden.
■ Die Reinigung und Pege des Geräts darf von Kindern nicht
ohne Aufsicht durchgeführt werden.
■ Kinder müssen beaufsichtigt werden, sodass sie nicht mit
dem Gerät spielen können.
■ Kinder unter 3 Jahren dürfen das Gerät nur unter ständiger
Überwachung bedienen.
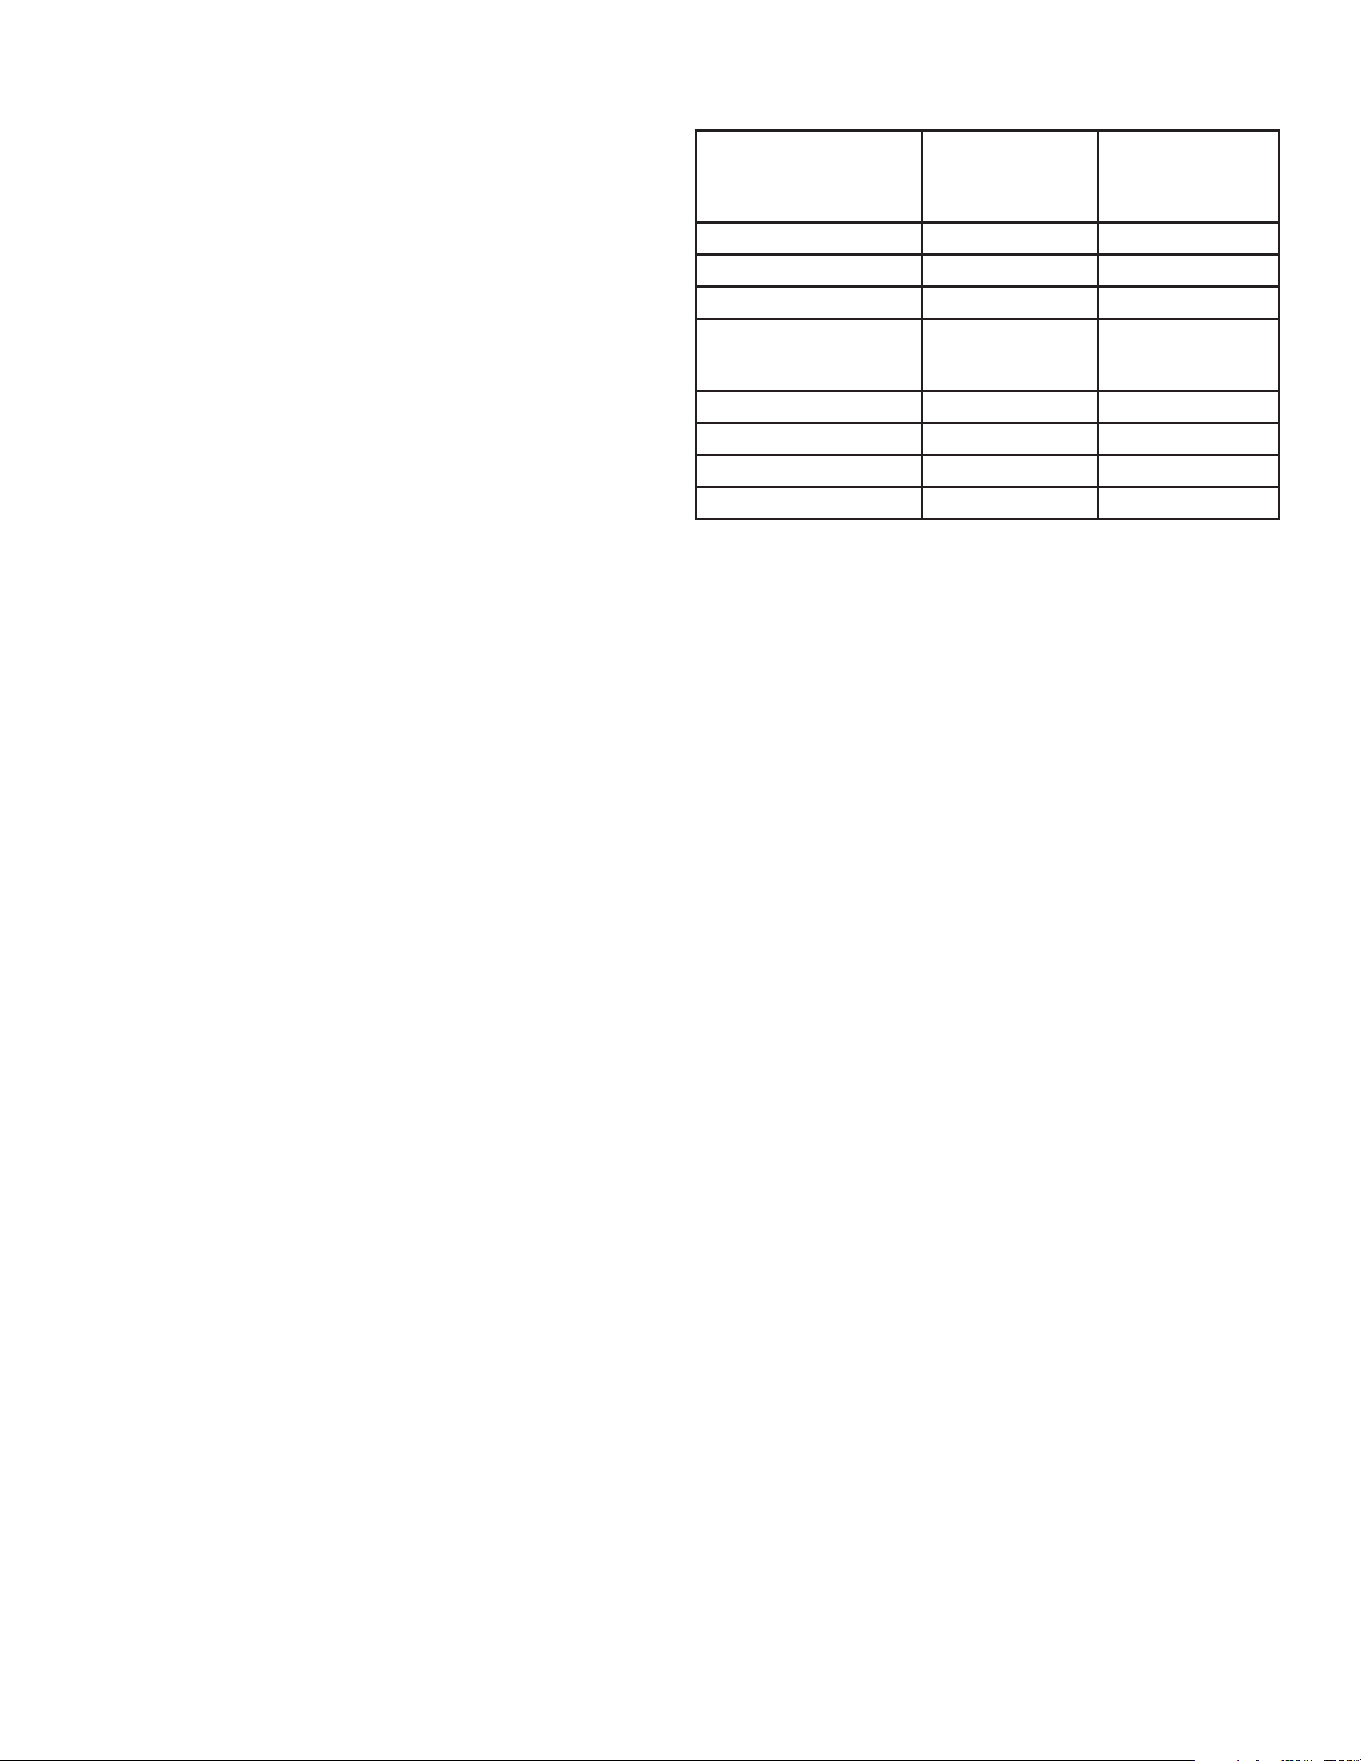
59
Diese Modelle werden in verschiedenen Regionen mit
unterschiedlichen Anforderungen an die Kapazitätsbemessung
verkauft. Im Folgenden sind gültige Bemessungsarten, die auf
diesem Produkt angegeben sind, aufgeführt.
Fassungsvermögen an Trockenwäsche: Eine Gewichtsangabe,
die das Höchstgewicht an Wäsche angibt, die in den Trockner
gegeben werden kann.
IEC-Kapazität: Die Kapazitätsangabe für die maximale Menge an
Trockenwäsche und Textilien, die laut Herstellerangabe mit einem
bestimmten Programm getrocknet werden kann.
TECHNISCHE DATEN
Modelle
3LMEDC315FW
3LMEDC415FW
4KMEDC215FW
4KMEDC315FW
4KMEDC415FW
4KMEDC425FW
Nennspannung 220–240 V 2N~ 220–240 V 2N~
Nennfrequenz 50 Hz 60 Hz
Nennstromstärke 20 Amps 20 Amps
Fassungsvermögen
an Trockenwäsche
(max.)
15 kg (33 lb) 15 kg (33 lb)
IEC-Kapazität 7 kg (15 lb) 7 kg (15 lb)
Höhe 1067 mm (42") 1067 mm (42")
Breite 737 mm (29") 737 mm (29")
Tiefe 706 mm (27
13
⁄16") 706 mm (27
13
⁄16")

60
ÜBERPRÜFEN DES ABLUFTSYSTEMS AUF GUTE LUFTZIRKULATION
Ausreichender Luftstrom
Für efzientes Wäschetrocknen benötigen Trockner nicht
nur Wärme, sondern auch einen ausreichend starken
Luftstrom. Durch einwandfreie Belüftung können Sie die
Trockendauer verringern und Energie sparen. Siehe die
Installationsanleitung.
Das mit dem Trockner verbundene Abluftsystem spielt
dabei eine wichtige Rolle.
Wenn Sie aufgrund unsachgemäßer Belüftung den
Kundendienst in Anspruch nehmen müssen, fallen die
Kosten nicht unter die Garantie und sind unabhängig
vom Installateur des Trockners vom Kunden zu tragen.
Brandgefahr
Verwenden Sie einen Abluftkanal aus stabilem Metall.
Verwenden Sie keinen Abluftkanal aus Kunststoff.
Verwenden Sie keinen Abluftkanal aus Metallfolie.
Befolgen Sie unbedingt diese Anweisungen.
Andernfalls besteht die Gefahr tödlicher Verletzungen
oder Brandgefahr.
ACHTUNG
So stellen Sie einen ausreichenden
Luftstrom sicher:
Gut Besser
AUTOMATISCHE TROCKENPROGRAMME FÜR TEXTILSCHONENDES TROCK-
NEN UND ENERGIESPAREN
■ Reinigen Sie das Flusensieb vor jedem Trockengang.
■ Ersetzen Sie einen Abluftkanal aus Kunststoff- oder
Folienmaterial durch einen Abluftkanal aus stabilem,
starren Material mit 102 mm Durchmesser.
■
4"
102 mm
Verwenden Sie einen möglichst kurzen Abluftkanal.
■ Das Abluftsystem darf nicht mehr als vier Biegungen
mit maximal 90° aufweisen. Jede Biegung verringert
den Luftstrom.
■ Entfernen Sie Flusen und Verschmutzungen von der
Abluftabdeckung.
■ Entfernen Sie mindestens alle 2 Jahre die Flusen
entlang des gesamten Abluftsystems. Prüfen Sie
nach der Reinigung das Gerät. Gehen Sie dazu wie
in der Installationsanleitung zum Trockner erläutert vor.
■ Lassen Sie den Platz vor dem Trockner frei.
Mit den Automatic Dry-Programmen können Sie am meisten Energie sparen und die Textilien besonders schonend trocknen.
Bei Automatic Dry-Programmen werden Lufttemperatur und Feuchtigkeitsgrad der Wäsche erkannt. Die Ermittlung dieser Werte
erfolgt während des Trockenprogramms immer wieder. Der Trockner schaltet sich aus, sobald die Wäsche die gewünschte
Trockenheit erreicht hat.
Mit Timed Dry läuft der Trockner die eingestellte Zeit lang. Aufgrund einer zu starken Trocknung der Wäsche kann es manchmal
zum Einlaufen von Kleidungsstücken, zu Knitterbildung und statischer Auadung kommen. Verwenden Sie Timed Dry für feuchte
Wäsche, die noch etwas länger getrocknet werden soll, oder zum Vortrocknen von Wäsche, die Sie auf dem Wäscheständer
trocknen wollen.
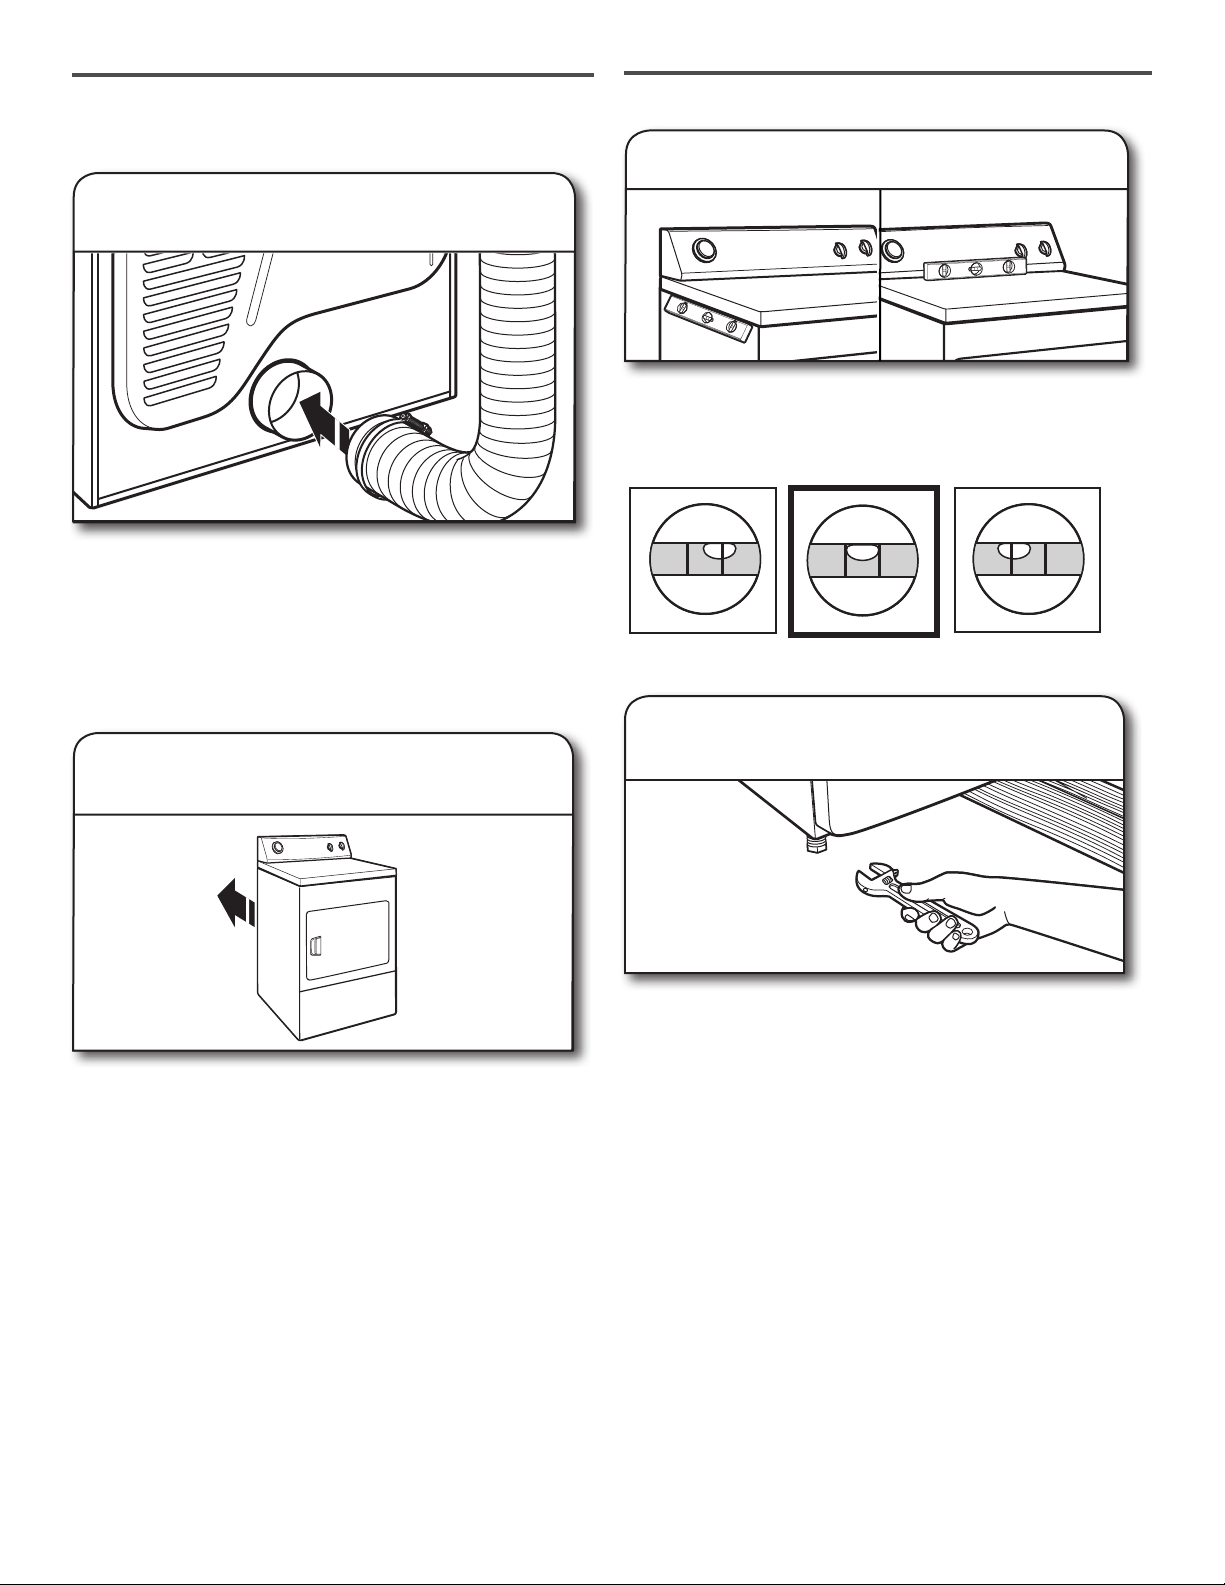
61
BEDIENFELD UND FUNKTIONEN
2 31 4
2 4
WRINKLE CONTROL-FUNKTION (bei manchen
Modellen)
Wenn Sie die Wäsche nicht unmittelbar nach dem
Trocknen aus dem Trockner nehmen können, kann es zu
Knitterbildung kommen. Mit der Wrinkle Control-Funktion
wird die Wäsche regelmäßig umgewälzt und aufgelockert,
so dass Knitterbildung vermieden wird.
■ 40Minuten regelmäßiges Umwälzen der Wäsche ohne
Wärme am Ende eines Programms. Sie können die Funk-
tion mit dem Knopf Wrinkle Control jederzeit vor dem
Programmende ein- oder ausschalten.
TROCKENPROGRAMMKNOPF
Mit dem Trockenprogrammknopf wählen Sie an Ihrem
Trockner das gewünschte Trockenprogramm aus. Drehen Sie
den Knopf und wählen Sie ein Programm für Ihre Wäsche
aus. Eine detaillierte Beschreibung der Trockenprogramme
nden Sie unter „Programmleitfaden“.
TIMED DRY
Der Trockner läuft die eingestellte Zeit lang. Bei Modellen,
bei denen sich die Temperatur einstellen lässt, können
Sie eine für die Textilien im Trockner geeignete Einstellung
auswählen. Trockendauer und Temperatur variieren je
nach Trocknermodell.
AUTOMATIC DRY
Die Feuchtigkeit der Wäsche und die Lufttemperatur
werden erkannt und der Trockner schaltet sich aus,
sobald die Wäsche den ausgewählten Trockenheitsgrad
erreicht hat. Damit erfolgt die optimale Trocknung
in der kürzestmöglichen Zeit. Die Trockendauer
hängt vom Textiltyp, der Wäschemenge und der
Trockenheitseinstellung ab.
1
2
3
TEMPERATURE
Wählen Sie eine für die Wäschestücke geeignete
Trockentemperatur aus. Wählen Sie im Zweifelsfall immer
die niedrigere statt der höheren Einstellung.
START/STOP
Wenn das Trockenprogramm zu Ende ist, ist ein akustisches
Signal zu hören. Wenn Sie die Kleidungsstücke daraufhin
umgehend herausnehmen, können Sie Knitterbildung
vermeiden.
Wählen Sie durch Drehen des Knopfs START/STOP die
gewünschte Einstellung aus (On (Ein) oder Off (Aus)).
Drücken Sie auf den Knopf START/STOP, um den Trockner
zu starten.
HINWEIS: Wenn die Wrinkle Control-Funktion ausgewählt
und das akustische Signal aktiviert wurde, ertönt das Signal
alle 5Minuten, bis die Wäsche herausgenommen wird oder
die Wrinkle Control-Funktion endet.
4
Nicht alle Modelle verfügen über alle Funktionen und Optionen.
Die Modelle können sich im Aussehen unterscheiden.
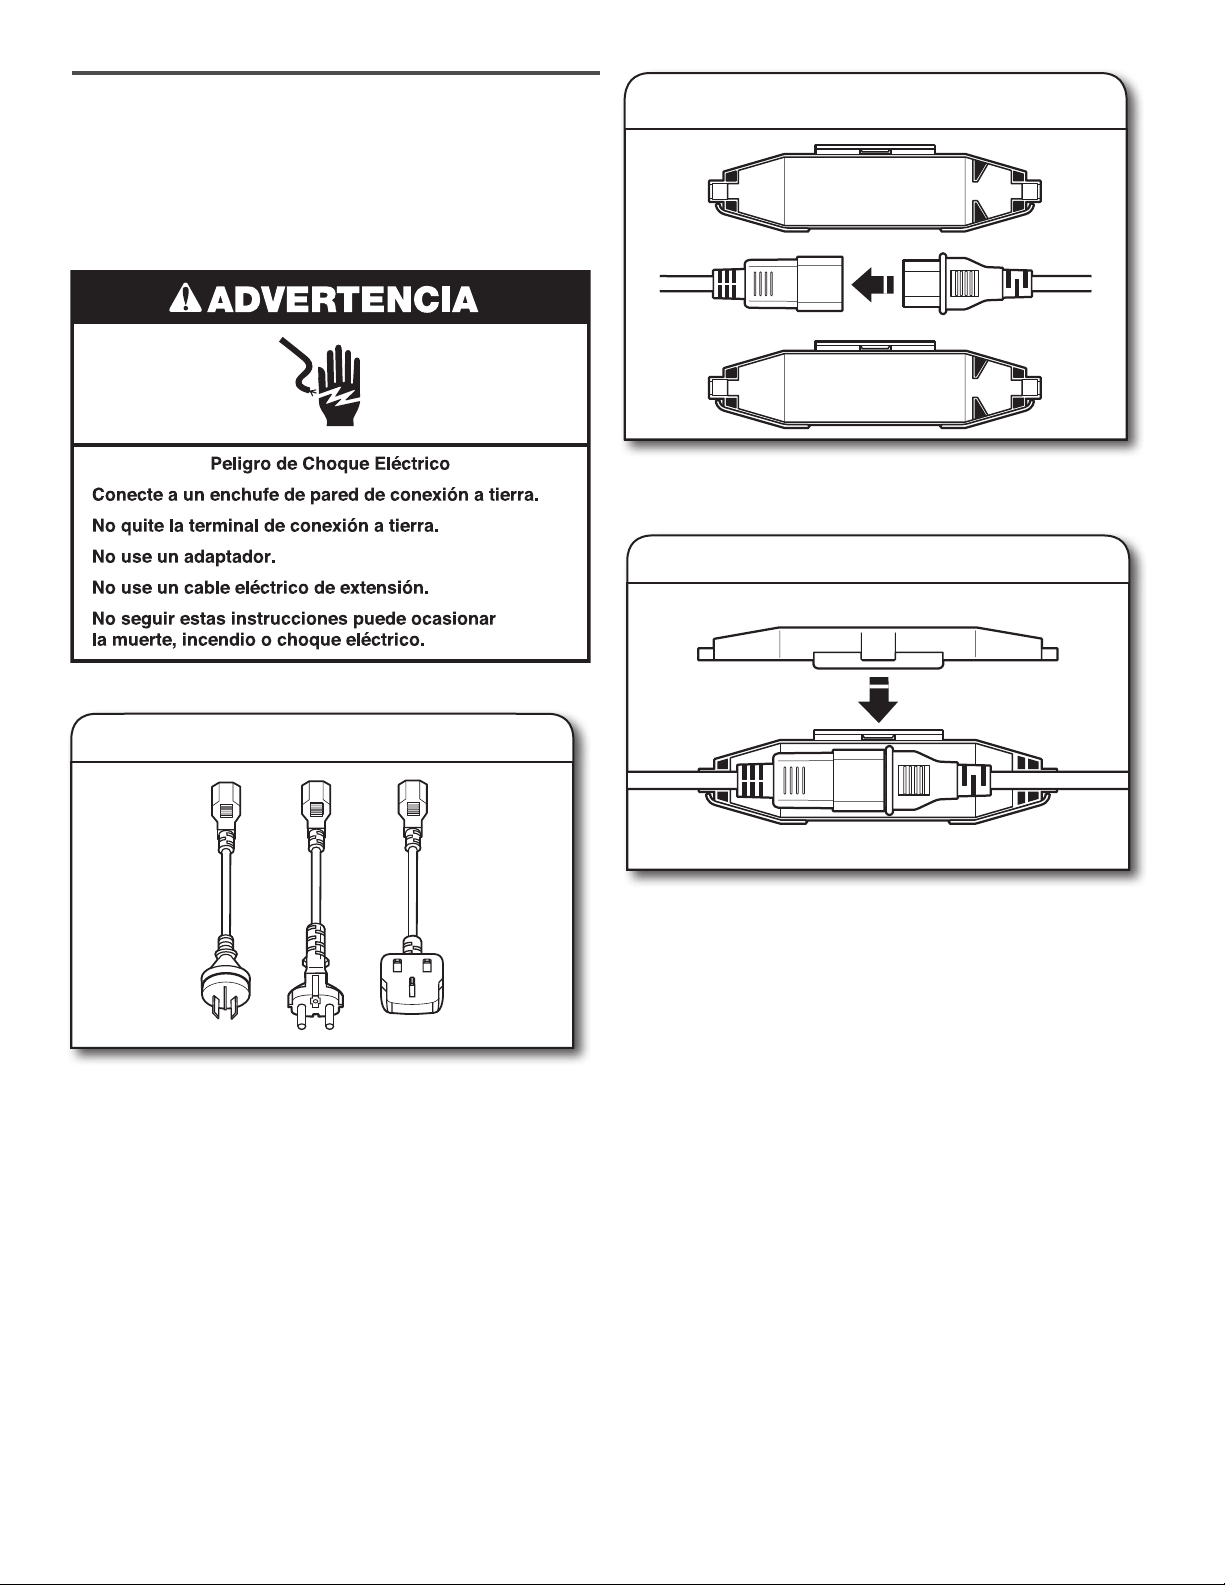
62
Nicht alle Modelle verfügen über alle Programme und Einstellungen.
HINWEIS: Energie-Zertizierungen für die Maytag Gas und Elektromodelle basieren auf dem zeitgesteuerten Trocknungsprogramm
(Timed Dry cycle) mit der Maximalen Trocknungstemperatureinstellung (Maximum drying temperatur). Die Standardeinheiten von
Sensor Dry, Automatic Dry, Normal cycle, Low heat, Wrinkle Shield wurden nicht verwendet.
PROGRAMMLEITFADEN – AUTOMATIC DRY-PROGRAMME
PROGRAMMLEITFADEN – TIMED DRY-PROGRAMME
Nicht alle Modelle verfügen über alle Programme und Einstellungen.
TIMED DRY (zeitgesteuertes Trocknen) – Der Trockner ist die eingestellte Zeit lang in Betrieb.
HINWEIS: Wenn Ihnen die Wäsche nicht trocken genug erscheint, wählen Sie das nächste Mal bei ähnlicher Wäsche More Dry. Wenn
Ihnen die Wäsche zu trocken erscheint, wählen Sie das nächste Mal bei ähnlicher Wäsche Less Dry.
Einstellen der Temperatur beim Trocknen
Wenn der Trockner über mehrere Temperatureinstellungen
verfügt:
Die Temperatureinstellung High können Sie für schwere
Wäschestücke wie Handtücher und Arbeitskleidung
verwenden.
Die Temperatureinstellungen Low bis Medium eignen sich
für das Trocknen mittelschwerer Textilien wie Laken, Blusen,
Kleider, Unterwäsche, bügelfreier Textilien und mancher
Trikotagen.
Verwenden Sie die Einstellung No Heat (ohne Wärme) für
Schaumstoff, Gummi, Kunststoff oder hitzeempndliche
Textilien.
Vliesstoffe, Verbundtextilien, gebondete, beschichtete oder
laminierte Textilien sollten Sie auf der Wäscheleine trocknen.
HINWEIS: Wenn Sie hinsichtlich der Trockentemperaturen
verschiedener Kleidungsstücke nicht sicher sind, lesen Sie die
Anweisungen auf den Pegeetiketten.
Zu trocknende
Wäsche: Programm: Temperatur:
Verfügbare Optionen:
Programmdetails:
Jeans, robuste
Arbeitskleidung,
Handtücher
More Dry
Normal
oder Energy
Preferred
High (Hoch) Wrinkle Control/
Wrinkle Prevent (Vermeidung
von Faltenbildung)
Temperature (Temperatur)
Cycle Signal
(Akustisches Signal)
Mit der Programmautomatik
erzielen Sie in der kürzestmöglichen
Zeit eine optimale Trocknung.
DieTrockendauer hängt vom
Textiltyp, der Wäschemenge und der
Trockenheitseinstellung ab.
Wählen Sie eine für die Wäschestücke
geeignete Trockentemperatur aus.
Wählen Sie im Zweifelsfall immer
die niedrigere statt der höheren
Einstellung.
Arbeitskleidung,
mittelschwere Textilien,
Laken
Normal
oder Energy
Preferred
Medium (Mittel) Wrinkle Control/
Wrinkle Prevent (Vermeidung
von Faltenbildung)
Temperature (Temperatur)
Cycle Signal
(Akustisches Signal)
Legere Kleidung,
Hemden, Hosen, leichte
Kleidungsstücke,
Synthetik, Feinwäsche,
Sportkleidung
Delicate oder
Less Dry
Normal
oder Energy
Preferred
Low (Niedrig) Wrinkle Control/
Wrinkle Prevent (Vermeidung
von Faltenbildung)
Temperature (Temperatur)
Cycle Signal
(Akustisches Signal)
Zu trocknende
Wäsche: Programm: Temperatur:
Verfügbare
Optionen: Programmdetails:
Große oder schwere
Wäschestücke wie
dicke Handtücher
oder Bademäntel
Heavy Dry Beliebig Temperature
(Temperatur)
Wählen Sie High bei großen oder schweren
Wäschestücken.
Beliebige Textilien Damp Dry/
(Bügeltrocken)
Freshen Up
(Auffrischen)
Beliebig Temperature
(Temperatur)
Für Wäschestücke, die feucht
bleiben sollen oder kein vollständiges
Trockenprogramm erfordern.
Gummi, Kunststoff,
hitzeempfindliche
Textilien
Air Fluff/
(Luftigmachen)
Air Dry
(Lufttrocknen)
No Heat (ohne
Wärme)
Temperature
(Temperatur)
Trocknen ohne Wärme.
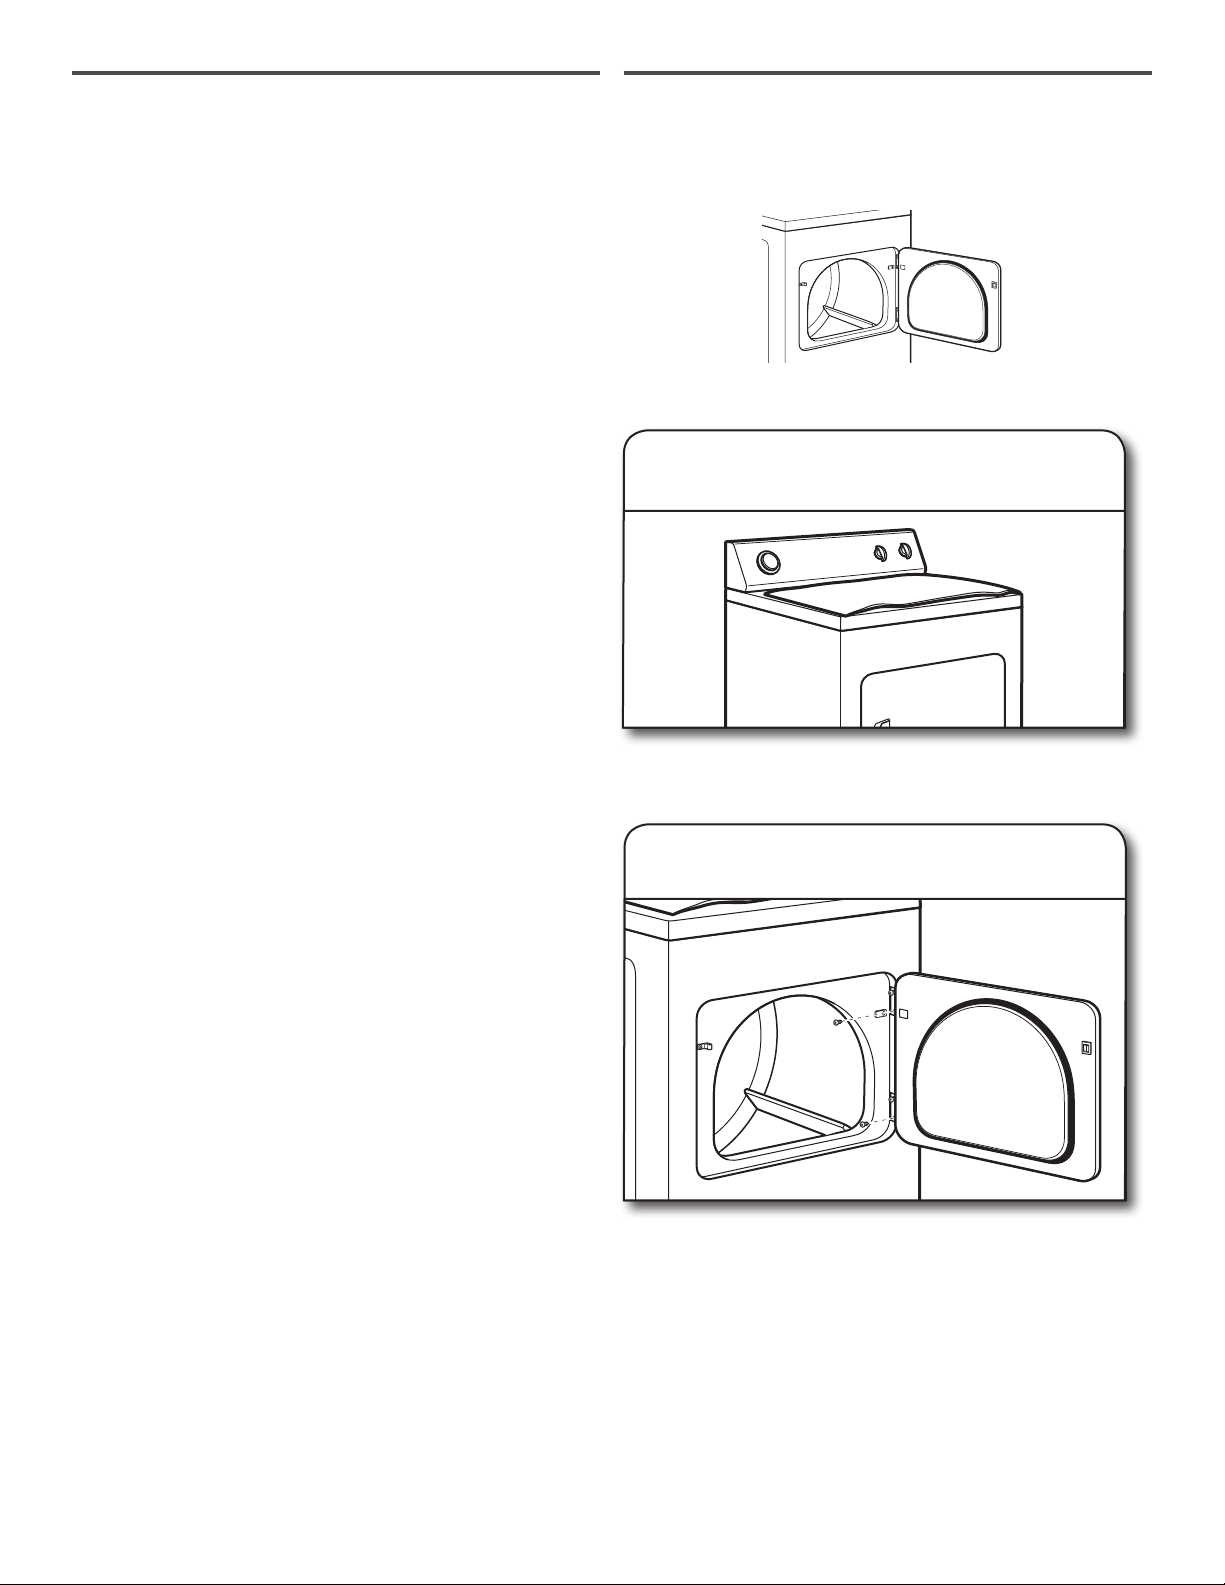
63
VERWENDEN DES TROCKNERS
1. Reinigen Sie das Flusensieb
Reinigen Sie das Flusensieb vor jedem Trockengang. Ziehen Sie
das Flusensieb aus der Halterung. Entfernen Sie die Flusen mit
den Fingern vom Sieb. Spülen oder waschen Sie das Sieb zum
Entfernen der Flusen nicht. Drücken Sie das Flusensieb wieder
fest an seine Position.
Weitere Reinigungsinformationen nden Sie unter „Pege des
Trockners“.
2. Füllen Sie den Trockner
Legen Sie Wäsche in den Trockner. Schließen Sie die Tür.
HINWEIS: Ihr Modell ist möglicherweise mit einer anderen Tür
als in der Abbildung zu sehen ausgestattet. Manche Modelle
sind Toplader und werden von oben befüllt.
Legen Sie nicht zu viele Wäschestücke in den Trockner. Die
Teile sollten sich locker umherwälzen lassen.
ACHTUNG
Explosionsgefahr
Halten Sie brennbare Materialien und Dämpfe wie
Benzin vom Trockner fern.
Geben Sie kein Wäschestück in den Trockner, das
jemals mit irgendetwas Entzündlichem verschmutzt
wurde (auch nicht nach dem Waschen).
Befolgen Sie unbedingt diese Anweisungen. Andernfalls
besteht die Gefahr tödlicher Verletzungen, Explosions-
oder Brandgefahr.
ACHTUNG
Brandgefahr
Keine Waschmaschine kann Ölrückstände komplett
entfernen.
Geben Sie kein Wäschestück in den Trockner, das jemals
mit Speiseöl oder sonstigem Öl verschmutzt wurde.
Wäschestücke mit Schaumstoff-, Gummi- oder
Kunststoffelementen müssen auf der Wäscheleine, in
einem Trockenschrank oder auf andere Weise
getrocknet werden.
Befolgen Sie unbedingt diese Anweisungen. Andernfalls
besteht die Gefahr tödlicher Verletzungen oder Brandgefahr.
ACHTUNG: Um die Brand-, Stromschlag- oder Verletzungsgefahr
zu verringern, lesen Sie vor Inbetriebnahme des Trockners bitte
die WICHTIGEN SICHERHEITSHINWEISE.
Wischen Sie vor der Inbetriebnahme des Trockners die Trommel
mit einem feuchten Tuch aus, um Staub vom Lagern und
Ausliefern des Geräts zu entfernen.
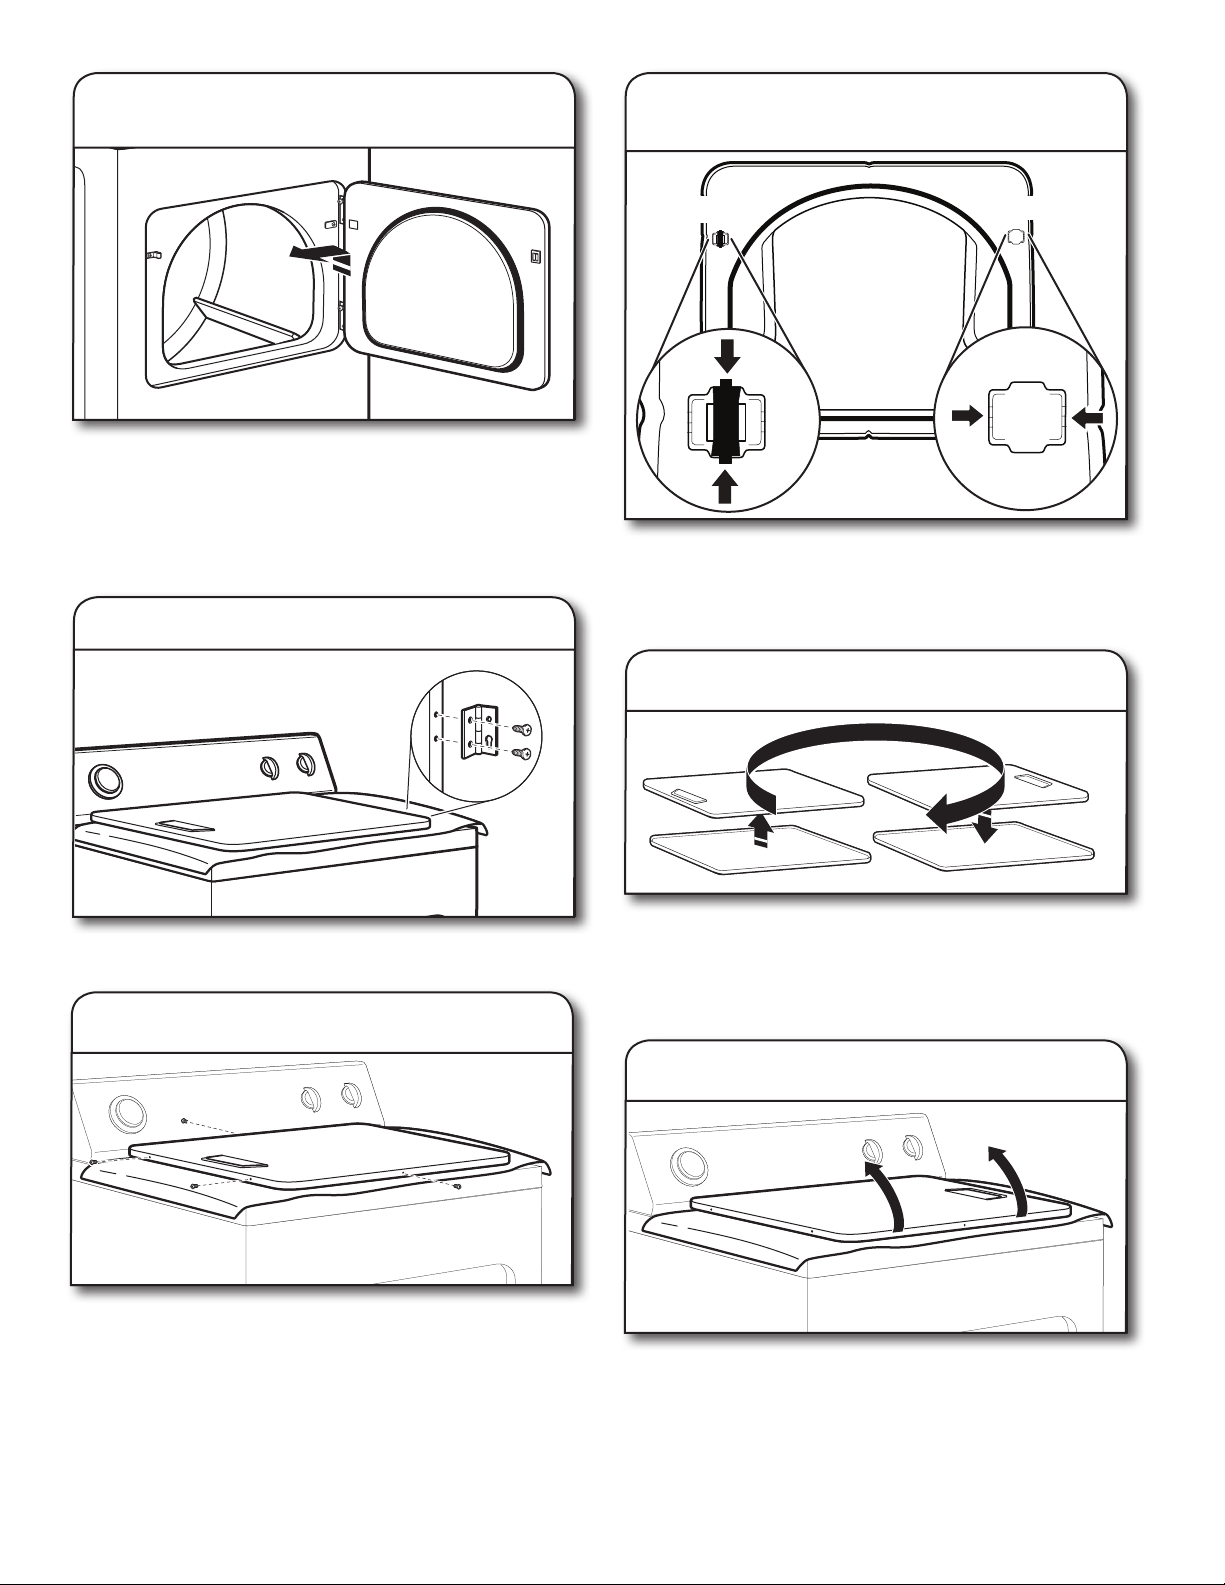
64
5. Drücken Sie START/STOP,
um den Trockengang zu starten
Halten Sie den Knopf START/STOP gedrückt, um den
Trockengang zu starten.
Wenn Sie das Programm vorzeitig beenden wollen, drehen
Sie den Knopf START/STOP auf OFF.
Wenn Sie die Kleidungsstücke nach dem Trockengang
umgehend herausnehmen, knittern sie nicht. Wenn Sie die
Wäsche nicht unmittelbar nach Programmende aus dem
Trockner nehmen können, stellen Sie die Wrinkle Control-
Funktion ein, damit sie nicht knittert.
4. Stellen Sie das Trockenprogramm
und die gewünschten Optionen ein
Wählen Sie Einstellungen und Optionen für das Programm,
indem Sie den Knopf auf die gewünschte Position drehen.
HINWEIS: Nicht alle Optionen und Einstellungen sind für alle
Programme verfügbar.
Temperatur
Drehen Sie den Temperaturknopf auf die gewünschte
Trockentemperatur. Siehe „Einstellen der Temperatur beim
Trocknen“.
Wrinkle Control-Funktion (bei manchen Modellen)
40 Minuten regelmäßiges Umwälzen der Wäsche ohne Wärme
am Ende eines Programms. Sie können den Knopf Wrinkle
Control jederzeit vor dem Programmende auf NO drehen
und damit ausschalten.
3. Wählen Sie das gewünschte
Programm aus
Wählen Sie das für Ihre Wäsche gewünschte
Trockenprogramm. Weitere Informationen zu den einzelnen
Programmen nden Sie unter „Programmleitfaden“.
AUTOMATIC DRY-Programme
Sie können je nach Wäsche einen anderen Trockenheitsgrad
auswählen, indem Sie den Knopf auf den gewünschten
Trockenheitsgrad drehen.
Mit More Dry, Normal, Energy Preferred oder Less Dry wird ein
bestimmter Trockenheitsgrad eingestellt, bei dem der Trockner
sich automatisch ausschaltet. Wenn ein Trockenheitsgrad
einmal eingestellt wurde, kann er ohne Stoppen des
Trockengangs nicht mehr geändert werden.
Mit den Automatic Dry-Programmen erzielen Sie in der
kürzestmöglichen Zeit eine optimale Trocknung. Die
Trockendauer hängt vom Textiltyp, der Wäschemenge und der
Trockenheitseinstellung ab.
HINWEIS: Mit More Dry wird der Wäsche mehr Feuchtigkeit
entzogen. Mit Less Dry wird weniger Feuchtigkeit entzogen.
Dieses Programm ist zum Vortrocknen von Wäsche gedacht,
die Sie zum vollständigen Trocknen noch auf die Leine oder
einen Kleiderbügel hängen wollen.
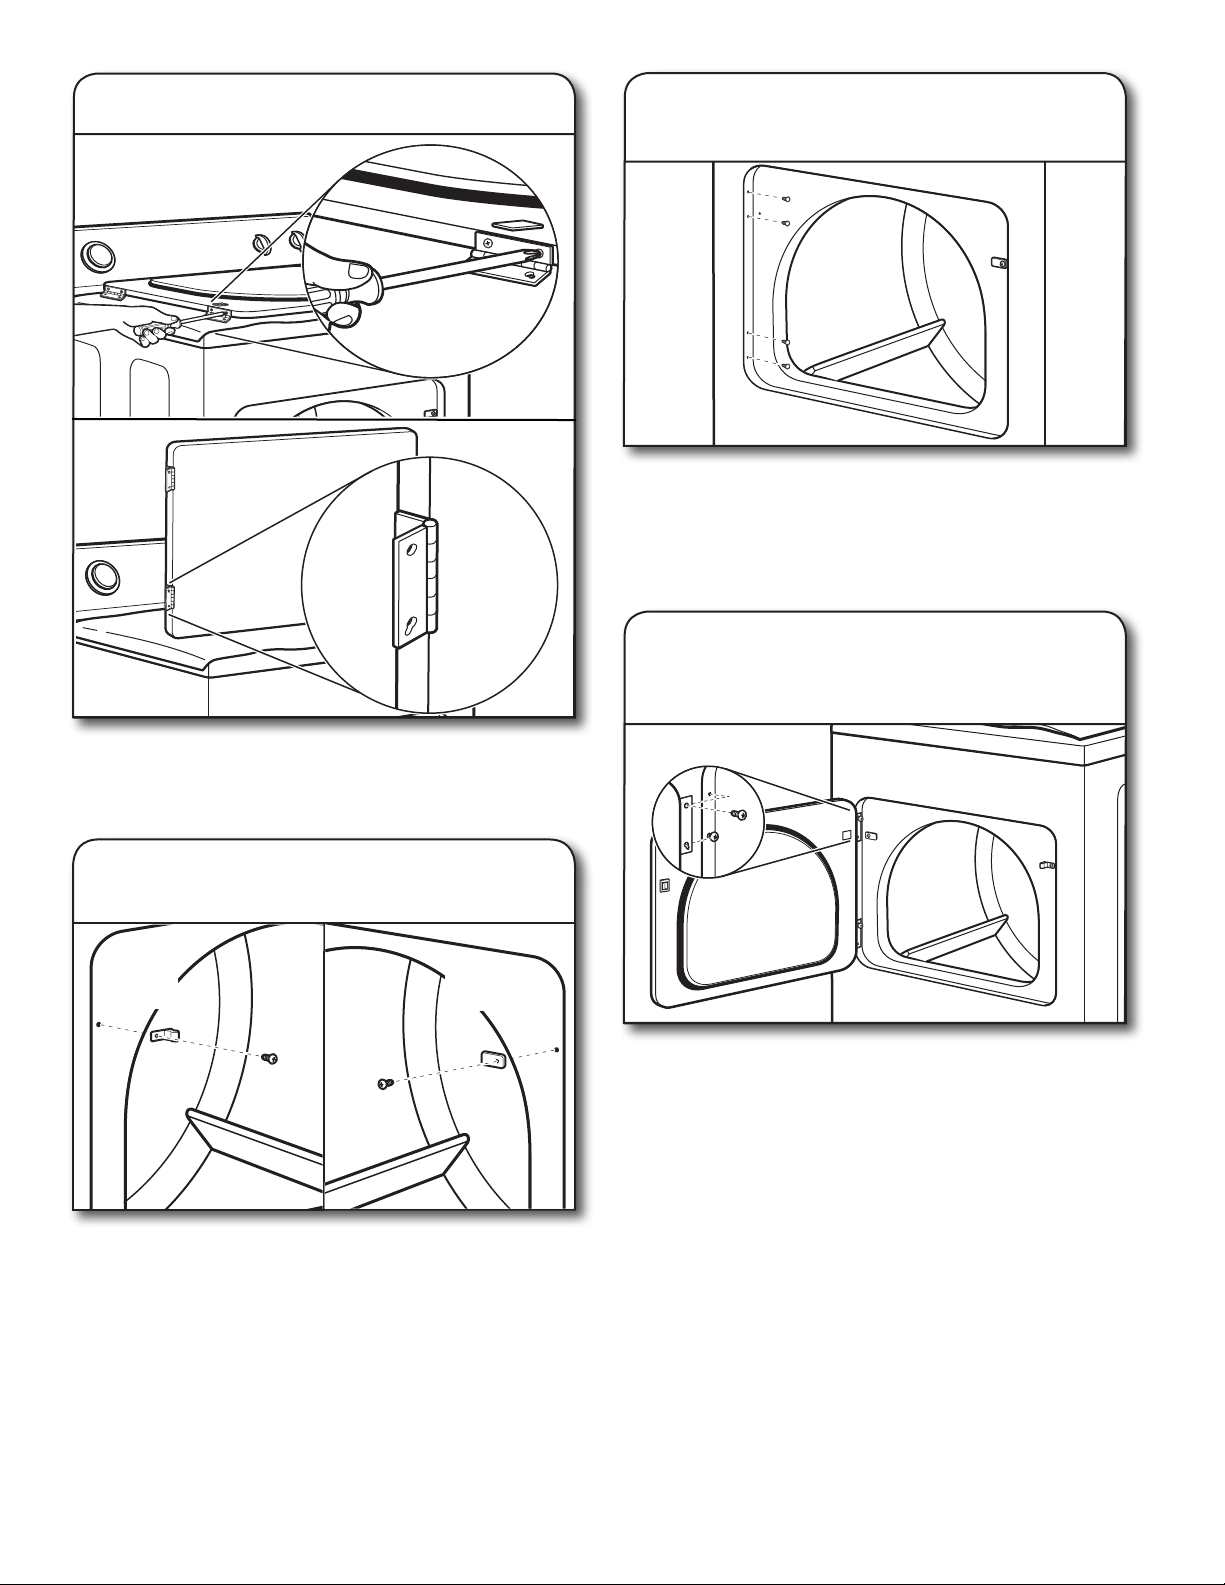
65
PFLEGE DES TROCKNERS
Halten Sie den Bereich um den Trockner sauber
und frei, damit der Luftstrom für den einwandfreien
Trocknerbetrieb nicht blockiert wird. Lassen Sie also
auch keine Wäscheberge vor dem Trockner liegen.
Reinigen des Flusensiebs
Reinigen vor jedem Trockengang
Das Flusensieb bendet sich im Trockner. Wenn das Sieb
voller Flusen ist, kann sich die Trockendauer verlängern.
Reinigung:
1. Ziehen Sie das Flusensieb aus der Halterung. Entfernen
Sie die Flusen mit den Fingern vom Sieb. Spülen oder
waschen Sie das Sieb zum Entfernen der Flusen nicht.
Nasse Flusen lassen sich nur schwer entfernen.
2. Drücken Sie das Flusensieb wieder fest an seine
Position.
WICHTIG:
■ Nehmen Sie den Trockner nicht in Betrieb, wenn
das Sieb lose, beschädigt oder verstopft ist oder fehlt.
Andernfalls besteht Überhitzungsgefahr und Trockner
und Textilien können beschädigt werden.
■ Wenn Flusen beim Entfernen vom Sieb
in den Trockner fallen, überprüfen Sie die
Abluftabdeckung und entfernen Sie die Flusen.
Siehe „Belüftungsanforderungen“
in der Installationsanleitung.
■ Reinigen Sie gegebenenfalls
den Bereich, an dem sich
das Flusensieb befindet.
Entfernen Sie mit einem
Staubsauger behutsam
alle Flusen, die sich
außerhalb des Flusensiebs
angesammelt haben.
Reinigung nach Bedarf
Waschmittel- und Weichspülerrückstände können sich
auf dem Flusensieb absetzen. Dadurch kann es zu längerer
Trockendauer kommen oder der Trockner stoppt, bevor die
Wäsche vollständig trocken ist. Wenn sich das Flusensieb
im Trockner bendet und Flusen herunterfallen, ist das Sieb
wahrscheinlich verstopft.
Reinigen Sie das Flusensieb alle 6 Monate bzw. öfter,
wenn es bereits vorher durch Flusen verstopft ist, mit
einer Nylonbürste.
Waschen:
1. Entfernen Sie die Flusen mit den Fingern vom Sieb.
2. Spülen Sie beide Seiten des Flusensiebs mit heißem
Wasser ab.
3. Tauchen Sie eine Nylonbürste in heißes Wasser mit
Reinigungsmittel. Schrubben Sie das Flusensieb mit
der Bürste, um Ablagerungen zu entfernen.
4. Spülen Sie das Flusensieb mit heißem Wasser ab.
5. Trocknen Sie das Flusensieb sorgfältig mit einem
sauberen Tuch. Bringen Sie das Flusensieb wieder
im Trockner an.
Reinigung im Trocknerinneren
So reinigen Sie die Trocknertrommel
1. Geben Sie einen üssigen, nicht entzündlichen
Haushaltsreiniger auf ein weiches Tuch und reiben
Sie verschmutzte Trommelbereiche damit ab, bis
die Trommel wieder sauber ist.
2. Wischen Sie die Trommel sorgfältig mit einem feuchten
Tuch aus.
3. Lassen Sie den Trockner mit sauberer Wäsche oder
Handtüchern laufen, um die Trommel zu trocknen.
HINWEIS: Durch abfärbende Kleidungsstücke wie
Bluejeans oder knallbunte Baumwollteile kann sich
das Innere des Trockners verfärben. Diese Flecken
schaden dem Trockner nicht und hinterlassen auch
auf nachfolgenden Kleidungsstücken im Trockner keine
Flecken. Drehen Sie abfärbende Kleidungsstücke vor
dem Trocknen auf links, um das Verfärben der Trommel
zu vermeiden.
Entfernen von Flusenansammlungen
Aus dem Trocknergehäuse
Flusen müssen je nach Trocknergebrauch mindestens alle
2Jahre entfernt werden. Lassen Sie die Reinigung von
einem qualizierten Servicetechniker ausführen.
Aus dem Abluftkanal
Flusen müssen je nach Trocknergebrauch mindestens alle
2Jahre entfernt werden.
Ordnung und Sauberkeit am Standort
des Trockners
ACHTUNG
Explosionsgefahr
Halten Sie brennbare Materialien und Dämpfe wie
Benzin vom Trockner fern.
Stellen Sie den Trockner bei der Installation in Neben-
oder Kellerräumen mindestens 460mm über dem
Boden auf.
Andernfalls besteht die Gefahr tödlicher Verletzungen,
Explosions- oder Brandgefahr.
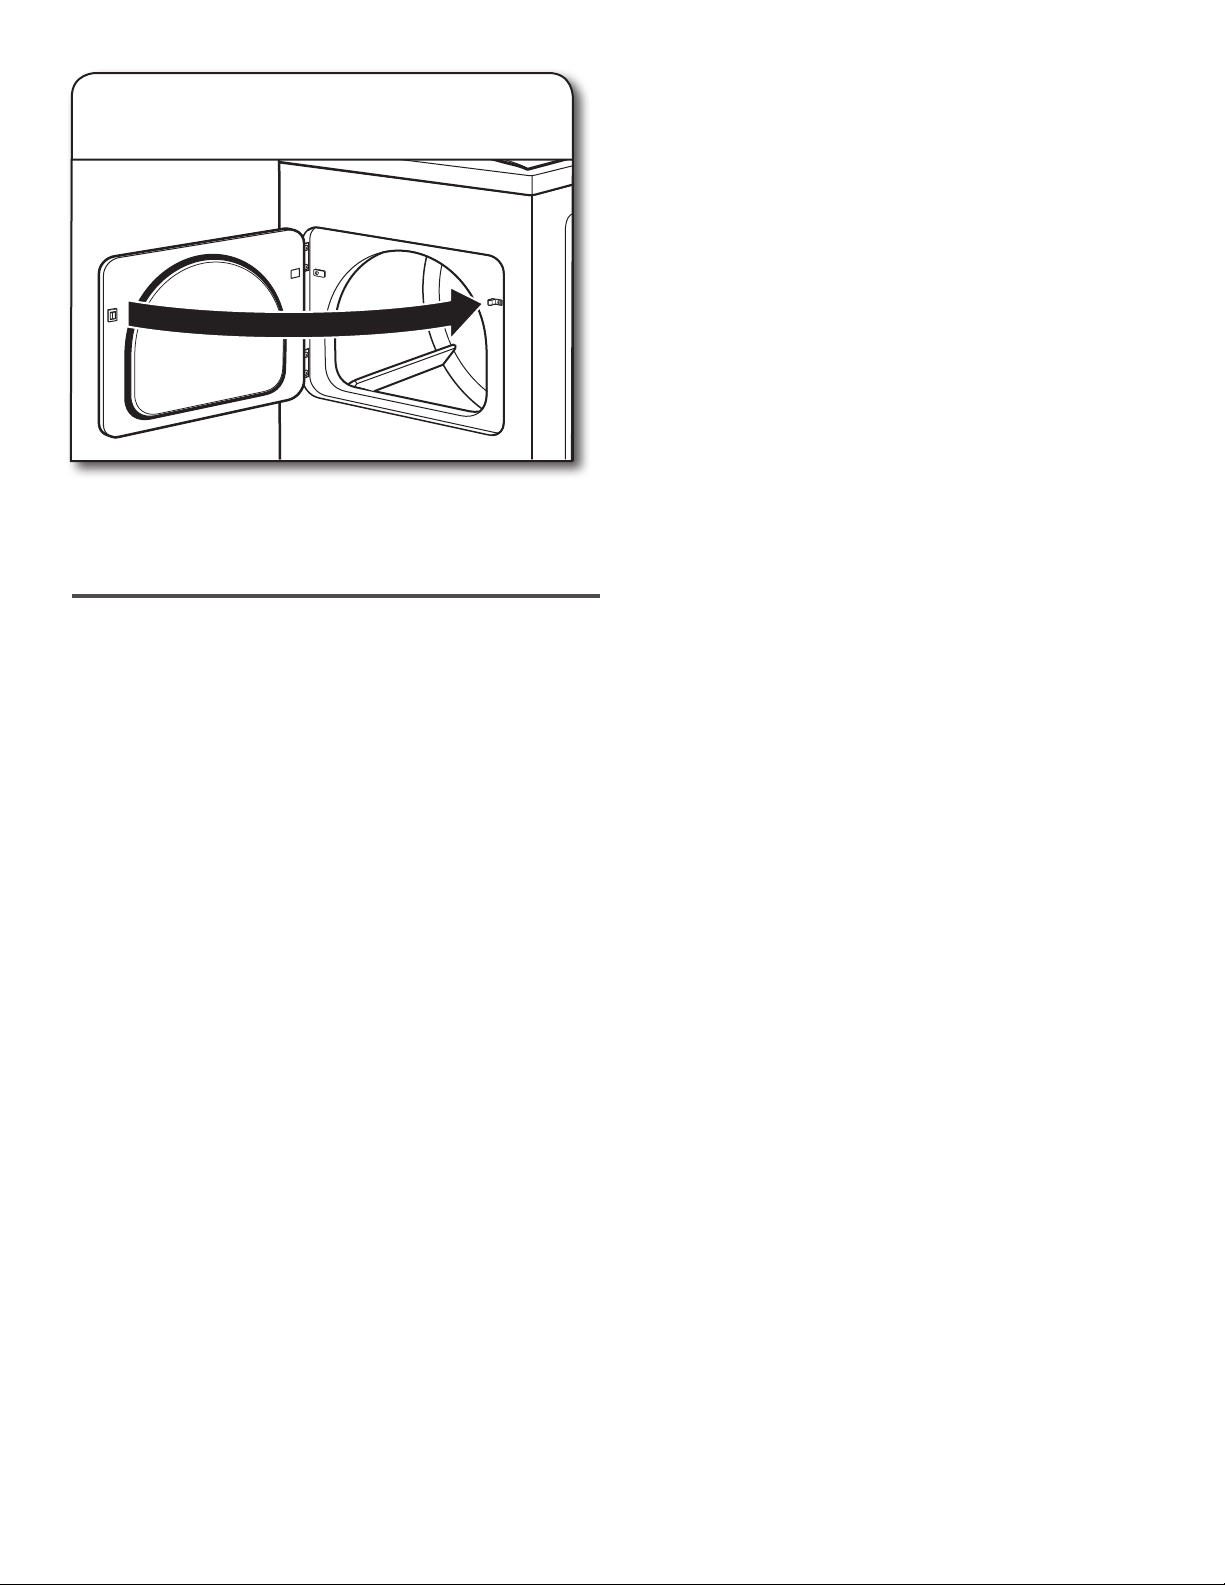
66
Urlaub, Lagerung und Transport
Vorgehen bei Nichtgebrauch oder
Lagerung
Lassen Sie den Trockner nur laufen, wenn Sie zuhause sind.
Gehen Sie folgendermaßen vor, wenn Sie in Urlaub fahren
oder den Trockner längere Zeit nicht verwenden wollen:
1. Trennen Sie den Trockner von der Stromversorgung.
2. Nur bei Gastrocknern: Schließen Sie das Absperrventil
der Gaszuleitung.
3. Reinigen Sie das Flusensieb. Siehe „Reinigen des
Flusensiebs“.
TRANSPORTVORBEREITUNGEN
Bei Trockner, die über ein Netzkabel angeschlossen
werden:
1. Ziehen Sie das Netzkabel aus der Steckdose.
2. Stellen Sie sicher, dass sich die Nivellierfüße im
Trocknersockel benden.
3. Sichern Sie die Trocknertür mit Klebeband.
Trockner mit Direktanschluss:
1. Schalten Sie die Stromversorgung über die Sicherung
oder oder Trennschalter aus.
2. Trennen Sie die Verkabelung.
3. Stellen Sie sicher, dass sich die Nivellierfüße im
Trocknersockel benden.
4. Sichern Sie die Trocknertür mit Klebeband.
Gastrockner:
1. Trennen Sie die Stromversorgung zum Trockner.
2. Schließen Sie das Absperrventil der Gaszuleitung.
3. Trennen Sie das Gaszuleitungsrohr und entfernen Sie die
Anschlussteile am Trocknerrohr.
4. Verschließen Sie die offene Gasleitung mit einer Kappe.
5. Stellen Sie sicher, dass sich die Nivellierfüße im
Trocknersockel benden.
6. Sichern Sie die Trocknertür mit Klebeband.
Neuinstallation des Trockners
Befolgen Sie zum Aufstellen, Ausrichten und
Anschließen des Trockners die Anweisungen
in der Installationsanleitung.
ACHTUNG
Stromschlaggefahr
Trennen Sie das Gerät vor Wartungsarbeiten von der
Stromversorgung.
Bringen Sie vor der Inbetriebnahme alle Teile und
Abdeckungen wieder an.
Andernfalls besteht die Gefahr von tödlichen
Verletzungen oder eines Stromschlags.
Auswechseln der Trommelbeleuchtung
(bei manchen Modellen)
1. Trennen Sie den Trockner von der Stromversorgung.
2. Öffnen Sie die Trocknertür. Die Birnenabdeckung
bendet sich an der hinteren Wand des Trockners.
Entfernen Sie mit einem Kreuzschlitzschraubendreher
die Schraube rechts unten an der Abdeckung. Nehmen
Sie die Abdeckung ab.
3. Drehen Sie die Birne gegen den Uhrzeigersinn. Tauschen
Sie die Birne ausschließlich gegen eine 10 Watt-Birne
aus. Bringen Sie die Abdeckung wieder an und sichern
Sie sie mit der Schraube.
4. Verbinden Sie das Gerät mit einer geerdeten Steckdose
bzw. mit der Stromversorgung.
67
STÖRUNGSBEHEBUNG
Versuchen Sie zunächst, das Problem mit den hier angegebenen Abhilfemaßnahmen zu beheben,
um die Kosten für den Kundendienst zu sparen.
Symptom Mögliche Ursachen Lösung
Kleidungsstücke
trocknen nicht
ausreichend,
Trockendauer
zu lang
Das Flusensieb oder der Bereich um das
Flusensieb ist mit Flusen verstopft.
Reinigen Sie das Flusensieb vor jedem Trockengang.
Reinigen Sie gegebenenfalls den Bereich um das
Flusensieb. Entfernen Sie mit einem Staubsauger
behutsam alle Flusen, die sich außerhalb des Flusensiebs
angesammelt haben.
Das Programm Air Fluff/Air Dry oder die
Temperatureinstellung No Heat wurde
ausgewählt.
Wählen Sie das geeignete Programm für die zu trocknenden
Kleidungsstücke aus. Siehe „Programmleitfaden“.
Für eine schnelle Trocknung benden sich
zu viele und zu schwere Wäschestücke im
Trockner.
Nehmen Sie einige Stücke heraus, so dass sich die
Wäsche locker umherwälzen lässt.
Der Abluftkanal oder die äußere
Abluftabdeckung ist mit Flusen verstopft,
was den Luftstrom behindert.
Lassen Sie den Trockner 5–10 Minuten laufen. Halten
Sie die Hand unter die äußere Abluftabdeckung und
prüfen Sie, ob Luft austritt. Wenn Sie keinen Luftstrom
spüren, reinigen Sie das Abluftsystem von Flusen oder
ersetzen Sie den Abluftkanal durch einen Abluftkanal
aus stabilem oder exiblem Metall. Stellen Sie sicher,
dass der Kanal nicht gequetscht oder geknickt ist.
Siehe die Installationsanleitung.
Trocknertücher blockieren das Gitter. Verwenden Sie immer nur ein Trocknertuch und verwenden
Sie es nur einmal.
Abluftkanal zu lang, gequetscht oder
geknickt.
Stellen Sie sicher, dass der Abluftkanal nicht zu lang
ist oder zu viele Biegungen aufweist. Bei einem langen
Abluftkanal verlängert sich die Trockendauer. Stellen Sie
sicher, dass der Kanal nicht gequetscht oder geknickt ist.
Siehe die Installationsanleitung.
Abluftkanal mit ungeeignetem
Durchmesser.
Achten Sie auf einen Durchmesser von 102mm.
Der Trockner bendet sich in einem Raum
mit Temperaturen unter 7ºC.
Für den einwandfreien Betrieb der Trockenprogramme sind
Temperaturen über 7ºC erforderlich.
Der Trockner bendet sich in einem
Schrank oder einer Kammer ohne
angemessene Lüftungsöffnungen.
Die Schrank- oder Kammertür muss oben und unten
Lüftungsöffnungen haben. Vor dem Trockner müssen
mindestens 25mm Platz frei sein und in der Regel sind
an der Rückseite des Trockners 127mm erforderlich.
Siehe die Installationsanleitung.
Trockner funktioniert nicht Die Tür ist nicht vollständig geschlossen. Stellen Sie sicher, dass die Tür vollständig geschlossen ist.
Der Knopf START/STOP wurde nicht auf
ON gestellt.
Stellen Sie den Knopf START/STOP auf ON.
Der Knopf START/STOP wurde nicht fest
oder lange genug gedrückt.
Halten Sie den Knopf START/STOP gedrückt, bis die
Bewegung der Trocknertrommel zu hören ist.
Eine Haushaltssicherung ist
durchgebrannt oder ein Trennschalter
wurde ausgelöst.
Elektrotrockner sind mit 2 Haushaltssicherungen oder
Trennschaltern abgesichert. Möglicherweise dreht sich
die Trommel, aber der Trockner erzeugt keine Wärme.
Tauschen Sie beide Sicherungen aus oder schalten
Sie den Trennschalter wieder ein. Bleibt das Problem
bestehen, wenden Sie sich bitte an einen Elektriker.
Falsche Stromversorgung. Für Elektrotrockner ist eine Stromversorgung mit 240Volt
erforderlich. Wenden Sie sich an einen qualizierten
Elektriker.
Falscher Sicherungstyp. Verwenden Sie eine träge Sicherung.
Ungewöhnliche
Geräusche
Der Trockner wurde längere Zeit nicht
benutzt.
Wenn der Trockner längere Zeit nicht benutzt wurde,
kann in den ersten Minuten des Betriebs ein Klopfen
zu hören sein.
Eine Münze, ein Knopf oder eine
Büroklammer ist zwischen die Trommel
und die Vorder- oder Rückseite des
Trockners gelangt.
Prüfen Sie den vorderen und hinteren Trommelrand
auf Kleinteile. Leeren Sie vor dem Waschen die Taschen
sämtlicher Kleidungsstücke.
Sie verwenden einen Gastrockner.
Das Klicken des Gasventils ist ein normales Betriebsgeräusch.
Die vier Füße sind nicht montiert oder
der Trockner steht nicht waagrecht
(Vorderseite - Rückseite, links - rechts).
Wenn der Trockner nicht ordnungsgemäß aufgestellt ist,
kann er vibrieren. Siehe die Installationsanleitung.
68
STÖRUNGSBEHEBUNG
Versuchen Sie zunächst, das Problem mit den hier angegebenen Abhilfemaßnahmen zu beheben,
um die Kosten für den Kundendienst zu sparen.
Symptom Mögliche Ursachen Lösung
Ungewöhnliche
Geräusche (Forts.)
Die Kleidungsstücke sind verknotet oder
zusammengeknüllt.
Bei einem Wäscheknäuel hüpft der Trocknerinhalt in
der Trommel und der Trockner vibriert. Trennen Sie die
Wäschestücke und starten Sie den Trockner erneut.
Keine Wärme Eine Haushaltssicherung ist
durchgebrannt oder ein Trennschalter
wurde ausgelöst.
Möglicherweise dreht sich die Trommel, aber der
Trockner erzeugt keine Wärme. Elektrotrockner sind mit
2 Haushaltssicherungen oder Trennschaltern abgesichert.
Tauschen Sie beide Sicherungen aus oder schalten
Sie den Trennschalter wieder ein. Bleibt das Problem
bestehen, wenden Sie sich bitte an einen Elektriker.
Das Ventil der Gaszuleitung wurde nicht
geöffnet.
Achten Sie bei Gastrocknern darauf, dass das Ventil der
Gaszuleitung geöffnet ist.
Falsche Stromversorgung. Für Elektrotrockner ist eine Stromversorgung mit 240
Volt erforderlich. Wenden Sie sich an einen qualizierten
Elektriker.
Programmdauer zu kurz Das automatische Programm endet
vorzeitig.
Die Wäsche im Trockner berührt die Sensorstreifen nicht.
Richten Sie den Trockner waagrecht aus.
Verwenden Sie bei geringer Befüllung des Trockners eine
Timed Dry-Einstellung. Ändern Sie die Einstellung für den
Trockenheitsgrad bei den Automatic Dry-Programmen.
Wenn Sie die Einstellung für den Trockenheitsgrad ändern,
ändert sich die Trockendauer der Programme.
Flusen auf Wäsche Das Flusensieb ist verstopft. Das Flusensieb muss vor jedem Trockengang gereinigt
werden.
Flecken auf Wäsche oder
Trommel
Trocknertücher wurden nicht
ordnungsgemäß verwendet.
Geben Sie zu Beginn eines Trockengangs ein
Trocknertuch zur Wäsche. Wenn Sie Trocknertücher
zu teilweise getrockneten Wäschestücken geben, können
sie Flecken hinterlassen.
Flecken in der Trommel sind auf Farbstoffe aus der
Kleidung (in der Regel Bluejeans) zurückzuführen. Diese
werden nicht auf andere Kleidungsstücke übertragen.
Knitterbildung Die Wäsche wurde nicht unmittelbar nach
dem Programmende aus dem Trockner
genommen.
Wählen Sie die Wrinkle Shield-Funktion, um die Wäsche
ohne Wärmezufuhr umherzuwälzen, damit sie nicht knittert.
Zu viel Wäsche im Trockner. Wenn Sie weniger Wäschestücke in den Trockner legen,
werden diese lockerer umhergewälzt, sodass sie nicht
knittern.
Gerüche Sie haben kürzlich in der Nähe des
Trockners frisch gestrichen, gebeizt
oder lackiert.
Lüften Sie in diesem Fall gründlich. Wenn der Bereich
wieder frei von Gerüchen ist, waschen und trocknen Sie
die Kleidungsstücke erneut.
Der Elektrotrockner wird zum ersten Mal
in Betrieb genommen.
Die Gerüche können vom neuen elektrischen Heizelement
stammen. Nach dem ersten Trockengang verschwinden
die Gerüche.
Wäsche ist zu heiß Die Wäsche wurde vor dem
Programmende aus dem Trockner
genommen.
Warten Sie, bis die Abkühlphase beendet ist, bevor Sie die
Wäsche aus dem Trockner nehmen. Bei allen Programmen
erfolgt eine langsame Abkühlung, damit die Wäschestücke
nicht knittern und sich angenehmer anfassen lassen.
Vor der Abkühlung herausgenommene Wäsche ist
möglicherweise unangenehm warm.
Ein Programm mit hoher Temperatur wird
verwendet oder die Temperatur wurde
separat zu hoch eingestellt.
Wählen Sie eine niedrigere Temperatur und ein
automatisches Trockenprogramm. Bei diesen Programmen
wird die Temperatur bzw. der Feuchtigkeitsgrad der
Wäsche gemessen und der Trockner schaltet sich aus,
wenn der gewünschte Trockenheitsgrawwwd erreicht ist.
Dadurch wird eine zu starke Trocknung vermieden.

69
WENN SIE DEN KUNDENDIENST BENÖTIGEN:
1. Bevor Sie uns für einen Kundendiensttermin kontaktieren, prüfen Sie bitte erst selbst, ob Ihr Produkt eine Reparatur benötigt. Einige Fragen
können ohne Kundendienstservice geklärt werden. Bitte nehmen Sie sich ein bisschen Zeit und lesen Sie den Abschnitt Störungsbehebung oder
lesen Sie die Bedienungs- und Pegeanleitung, oder besuchen Sie uns unter https://www.maytag.com/product_help.
2. Der gesamte Kundenservice auf Garantie wird von unseren autorisierten Maytag Kundendienstpartnern durchgeführt. In den USA und Kanada
richten Sie bitte alle Anfragen bezüglich des Kundenservice auf Garantie an:
Maytag Customer eXperience Center
In den USA Tel. 1-800-688-9900. In Kanada Tel. 1-800-807-6777.
Wenn Sie nicht innerhalb der 50 Staaten der USA und Kanada leben, kontaktieren Sie bitte Ihren autorisierten Maytag Händler, um abzuklären, ob
andere Garantien gültig sind.
MAYTAG LAUNDRY
EINGESCHRÄNKTE
GARANTIE
BRINGEN SIE IHREN BELEG HIER AN. DER KAUFNACHWEIS IST
ERFORDERLICH FÜR SERVICELEISTUNGEN AUF GARANTIE.
Bitte denken Sie daran, dass Sie die folgenden Informationen vor sich
liegen haben, wenn Sie sich an unseren Kundendienst, das Customer
eXperience Center wenden.
Ƀ Ihre vollständige Anschrift und Ihre Telefonnummer
Ƀ Modellnummer und Seriennummer
Ƀ Eine eindeutige, detaillierte Beschreibung des Problems
Ƀ Kaufnachweis mit Namen und Adresse des Händlers oder
Einzelhandels
ZEHN JAHRE EINGESCHRÄNKTE GARANTIE
GARANTIEDECKUNG - WAS IST ENTHALTEN? GARANTIEDECKUNG - WAS IST NICHT ENTHALTEN?
ERSTES JAHR EINGESCHRÄNKTE GARANTIE (TEILE UND
ARBEITSZEIT)
Ein Jahr lang ab dem Kaufdatum kommt die Marke Maytag der Whirlpool
Corporation oder Whirlpool Canada LP (im Folgenden “Maytag”
genannt), für spezielle Werksteile und Arbeitszeiten für Reparaturen
auf, um Materialfehler oder Fehler in der Ausführung zu beheben, die
bereits beim Kauf dieses Geräts vorhanden waren, wenn dieses Gerät in
Übereinstimmung mit den angehängten oder mitgelieferten Anweisungen
installiert, in Betrieb genommen und entsprechend gepegt/gewartet
wurde.
ZWEITES BIS ZEHNTES JAHR EINGESCHRÄNKTE GARANTIE
(NUR TROMMELMOTOR UND EDELSTAHLKORB - DIE
ARBEITSZEIT IST NICHT BEINHALTET)
Im zweiten Jahr bis zum zehnten Jahr ab dem Kaufdatum kommt
Maytag für spezielle Werksteile für die folgenden Komponenten auf,
um nicht-kosmetische Defekte im Material oder in der Ausführung in
diesen Komponenten zu beheben, welche die Funktion dieses Geräts
verhindern und die bereits beim Kauf dieses Geräts vorhanden waren,
als dieses Gerät gekauft wurde. Dies ist eine eingeschränkte 10-Jahres-
Garantie ausschließlich auf die unten genannten Teile; die Kosten für die
Reparaturarbeitszeit sind nicht in der Garantie enthalten.
Ƀ Trommel (nur Seitenwände)
Ƀ Antriebsmotor
IHRE RECHTE IM RAHMEN DIESER EINGESCHRÄNKTEN
GARANTIE BELAUFEN SICH AUSSCHLIESSLICH AUF EINE
PRODUKTREPARATUR. Der Service muss von einem autorisierten
Maytag Kundendienstunternehmen ausgeführt werden. Diese
eingeschränkte Garantie gilt nur in den USA bzw. in Kanada, und zwar
nur dann, wenn das Gerät im Land des Kaufs verwendet wird. Diese
eingeschränkte Garantie tritt mit dem Datum des Originalkaufbelegs
in Kraft. Der Nachweis des Originalkaufbelegs ist erforderlich, um den
Kundendienst unter dieser eingeschränkten Garantie zu erhalten.
1. Kommerzieller Gebrauch, Gebrauch außerhalb von Wohngebäuden,
Gebrauch von mehreren Familien oder Gebrauch, der nicht in
Übereinstimmung ist mit der veröffentlichten Bedienungsanleitung,
Gebrauchsanweisung oder Installationsanweisung.
2. Einweisung über den Gebrauch Ihres Produktes zu Hause.
3. Kundenservice zum Beheben einer unsachgemäß ausgeführten
Produktwartung oder Produktinstallation, die nicht in
Übereinstimmung mit den geltenden Vorschriften für elektrische
Leitungen oder Sanitäreinrichtungen ist/sind (wie die Verdrahtung des
Hauses, Sicherungen oder Wasserzulaufschläuche).
4. Verbrauchsteile (wie Glühbirnen, Batterien, Luft- oder Wasserlter
usw.).
5. Umbau Ihres Produkts von Erdgas oder Propangas oder der Wechsel
des Anschlags der Gerätetüren.
6. Schäden durch Unfälle, falsche Benutzung, unsachgemäße
Handhabung, Brand, Überschwemmungen und Flutwellen,
unvorhersehbare Naturereignisse, oder der Gebrauch des Geräts, der
von Maytag nicht zugelassen ist.
7. Reparaturen an Teilen oder Systemen zur Behebung von
Produktschäden oder Produktmängeln durch einen nicht autorisierten
Kundenservice, eine Änderung oder eine Modikation des Geräts.
8. Kosmetische Schäden einschließlich Kratzer, Dellen, Abplatzer und
andere Schäden an den Geräteoberächen, es sei denn, ein solcher
Schaden hat seine Ursache in Materialfehlern und Fehlern in der
Ausführung und wird Maytag innerhalb von 30 Tagen gemeldet.
9. Verfärbung, Rost oder Oxidation der Oberächen, die
durch kaustische oder korrosive Umgebungen verursacht
wurden, einschließlich, aber nicht darauf beschränkt, hohe
Salzkonzentrationen, hohe Luftfeuchtigkeit oder hohe Feuchtigkeit,
oder die Aussetzung an Chemikalien.
10. Abholung oder Lieferung. Dieses Gerät ist für die Reparatur zu Hause
bestimmt.
11. Reise- oder Transportkosten für den Kundenservice in entlegene
Gebiete, in denen kein autorisierter Maytag Kundenservice verfügbar
ist.
12. Aus- oder Wiedereinbau von nicht zugänglichen Geräten oder
Einbauvorrichtungen (wie Verkleidungen, Dekorpaneelen,
Bodenbelägen, Schränken, Inseln, Arbeitsplatten, Trockenwänden
usw.), die beim Kundenservice, Ausbau oder Austausch des Produkts
stören.
13. Kundenservice oder Teile für Geräte, bei denen die originalen Modell-/
Seriennummern entfernt, geändert oder nicht einfach feststellbar sind.
Die Kosten für Reparatur oder Austausch in nicht von der Garantie
abgedeckten Fällen gehen zu Lasten des Kunden.
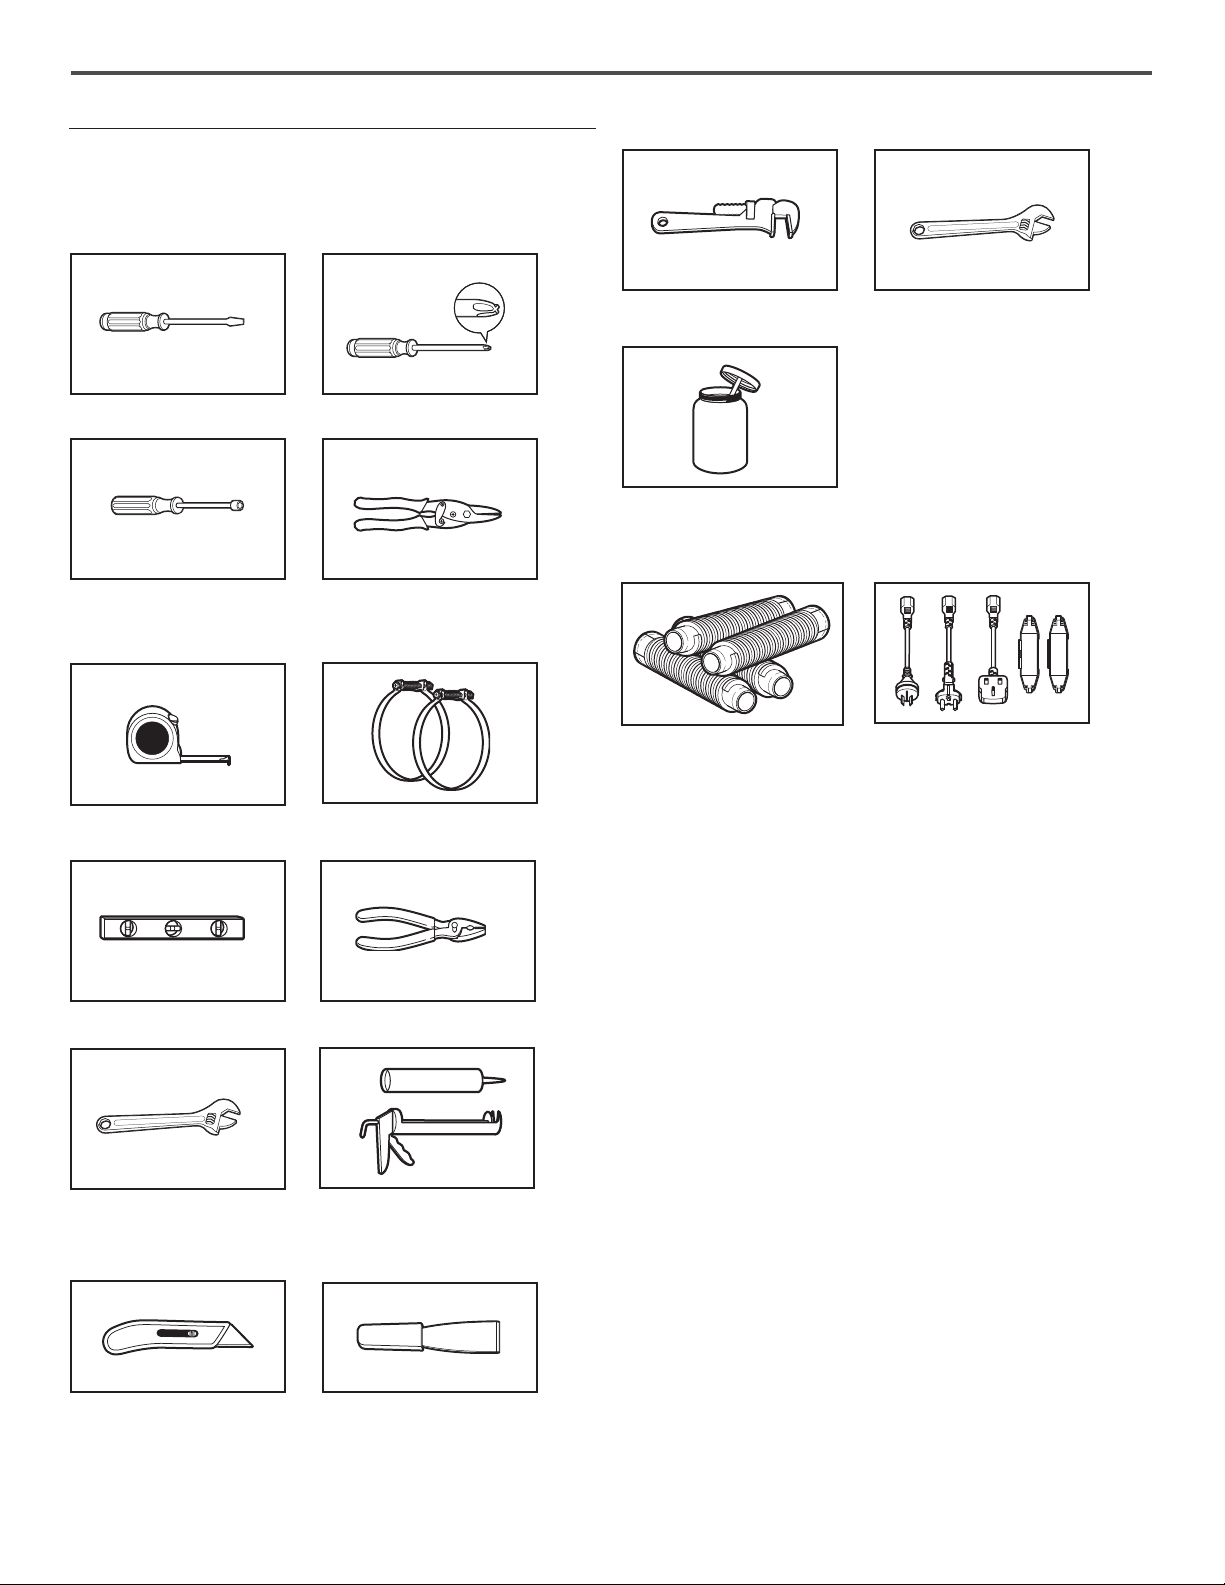
70
01/14
HAFTUNGS-/GEWÄHRLEISTUNGSAUSSCHLUSS
DIE GESETZLICHE GEWÄHRLEISTUNG, DARUNTER DIE IMPLIZIERTE GARANTIE ODER VERMARKTBARKEIT ODER IMPLIZIERTE GARANTIE
FÜR DIE EIGNUNG FÜR EINEN BESTIMMTEN ZWECK SIND AUF ZEHN JAHR BZW. DEN KÜRZESTEN GESETZLICH ZULÄSSIGEN ZEITRAUM
BESCHRÄNKT. Nicht in allen Bundesstaaten und Provinzen ist eine Einschränkung der Dauer der gesetzlichen Gewährleistung hinsichtlich
handelsüblicher Qualität sowie Eignung für einen bestimmten Zweck zulässig, sodass diese Einschränkung Sie unter Umständen nicht betrifft.
Im Rahmen dieser Garantie haben Sie bestimmte Rechte. Darüber hinaus haben Sie je nach Bundesstaat oder Provinz unter Umständen weitere
Rechte.
HAFTUNGSAUSSCHLUSS ODER AUSSAGEN AUSSERHALB DER GARANTIE
Maytag macht keine Aussagen über die Qualität, Lebensdauer oder Anforderung für Kundenservice oder Reparatur dieses
Geräts außer den in der vorliegenden Garantie enthaltenen. Wenn Sie eine längere oder umfassendere Garantie als die
eingeschränkte Garantie möchten, die mit diesem Gerät geliefert wird, dann fragen Sie bitte bei Maytag oder Ihrem Händler nach,
wie Sie eine erweiterte Garantie kaufen können.
BESCHRÄNKUNG DER RECHTSMITTEL, AUSSCHLUSS VON NEBEN- UND FOLGESCHÄDEN
IHRE RECHTE IM RAHMEN DIESER EINGESCHRÄNKTEN GARANTIE BELAUFEN SICH AUSSCHLIESSLICH AUF EINE PRODUKTREPARATUR.
MAYTAG ÜBERNIMMT KEINERLEI HAFTUNG FÜR NEBEN- ODER FOLGESCHÄDEN. Nicht in allen Bundesstaaten und Provinzen ist ein
Ausschluss von Neben- oder Folgeschäden bzw. eine Einschränkung in Bezug darauf zulässig, sodass diese Einschränkung und Ausschlüsse
Sie unter Umständen nicht betrifft. Im Rahmen dieser Garantie haben Sie bestimmte Rechte. Darüber hinaus haben Sie je nach Bundesstaat oder
Provinz unter Umständen weitere Rechte.
UNTERSTÜTZUNG ODER KUNDENDIENST
Bevor Sie Unterstützung oder den Kundendienst holen, prüfen Sie bitte Abschnitt „Fehlersuche“
oder besuchen Sie uns unter www.maytag.com/owners.
Unter Umständen sparen Sie die Kosten für das Holen des Kundendienstes. Wenn Sie noch immer
Hilfe benötigen, befolgen Sie die nachstehenden Anweisungen.
Wenn Sie den Kundendienst kontaktieren, halten Sie bitte das Kaufdatum und die vollständige
Modellnummer und Seriennummer Ihres Gerätes bereit.
Diese Informationen sind für uns erforderlich, um besser auf Ihre Anfrage antworten zu können.
Wenn Sie Ersatzteile benötigen oder Zubehörteile bestellen möchten
Wir empfehlen Ihnen, nur vom FSP-Teile (Werk spezizierte Teile) zu verwenden.
Diese Teile passen genau in Ihr Gerät und funktionieren korrekt, da sie mit der gleichen Präzision
gefertigt wurden wie jedes neue MAYTAG Gerät.
Sie nden die FSP-Ersatzteile bzw. Zubehörteile unter www.maytagpartsonline.com.
Haben Sie noch Fragen? Sie können uns kostenlos unter der Rufnummer 1-800-344-1274
oder in Kanada unter der Rufnummer 1-800-688-2002 kontaktieren.
Unsere Berater bieten Ihnen Unterstützung mit
In den USA.
■ Funktionen und Spezikationen zur vollständigen
Produktpalette unserer Geräte.
■ Informationen zur Installation.
■ Spezialisierter Kundendienst (Spanischsprachig,
für Hörbehinderte, für Sehbehinderte etc.).
In den USA und Kanada
■ Benutzung und Wartungsarbeiten.
■ Verkauf von Zubehör und Reparaturteilen.
■ Hinweise zu örtlichen Händlern, den Vertrieben von
Reparaturteilen und Serviceunternehmen. Die von
Maytag autorisierten Kundendiensttechniker sind
speziell geschult für die Erfüllung der Produktgarantie
und Bereitstellung des Kundendienstes nach Ablauf
des Garantiezeitraums, überall in den Vereinigten
Staaten und in Kanada.
Bitte richten Sie schriftliche Anfragen an:
Maytag Brand Appliances
Customer eXperience Center
553 Benson Road
Benton Harbor, MI 49022-2692
1-800-344-1274
Maytag Brand Appliances
Customer eXperience Centre
Unit 200-6750 Century Ave
Mississauga, Ontario L5N 0B7
1-800-688-2002
Bitte teilen Sie uns Ihre Rufnummer in Ihrem Anschreiben mit, unter der Sie tagsüber zu erreichen sind.
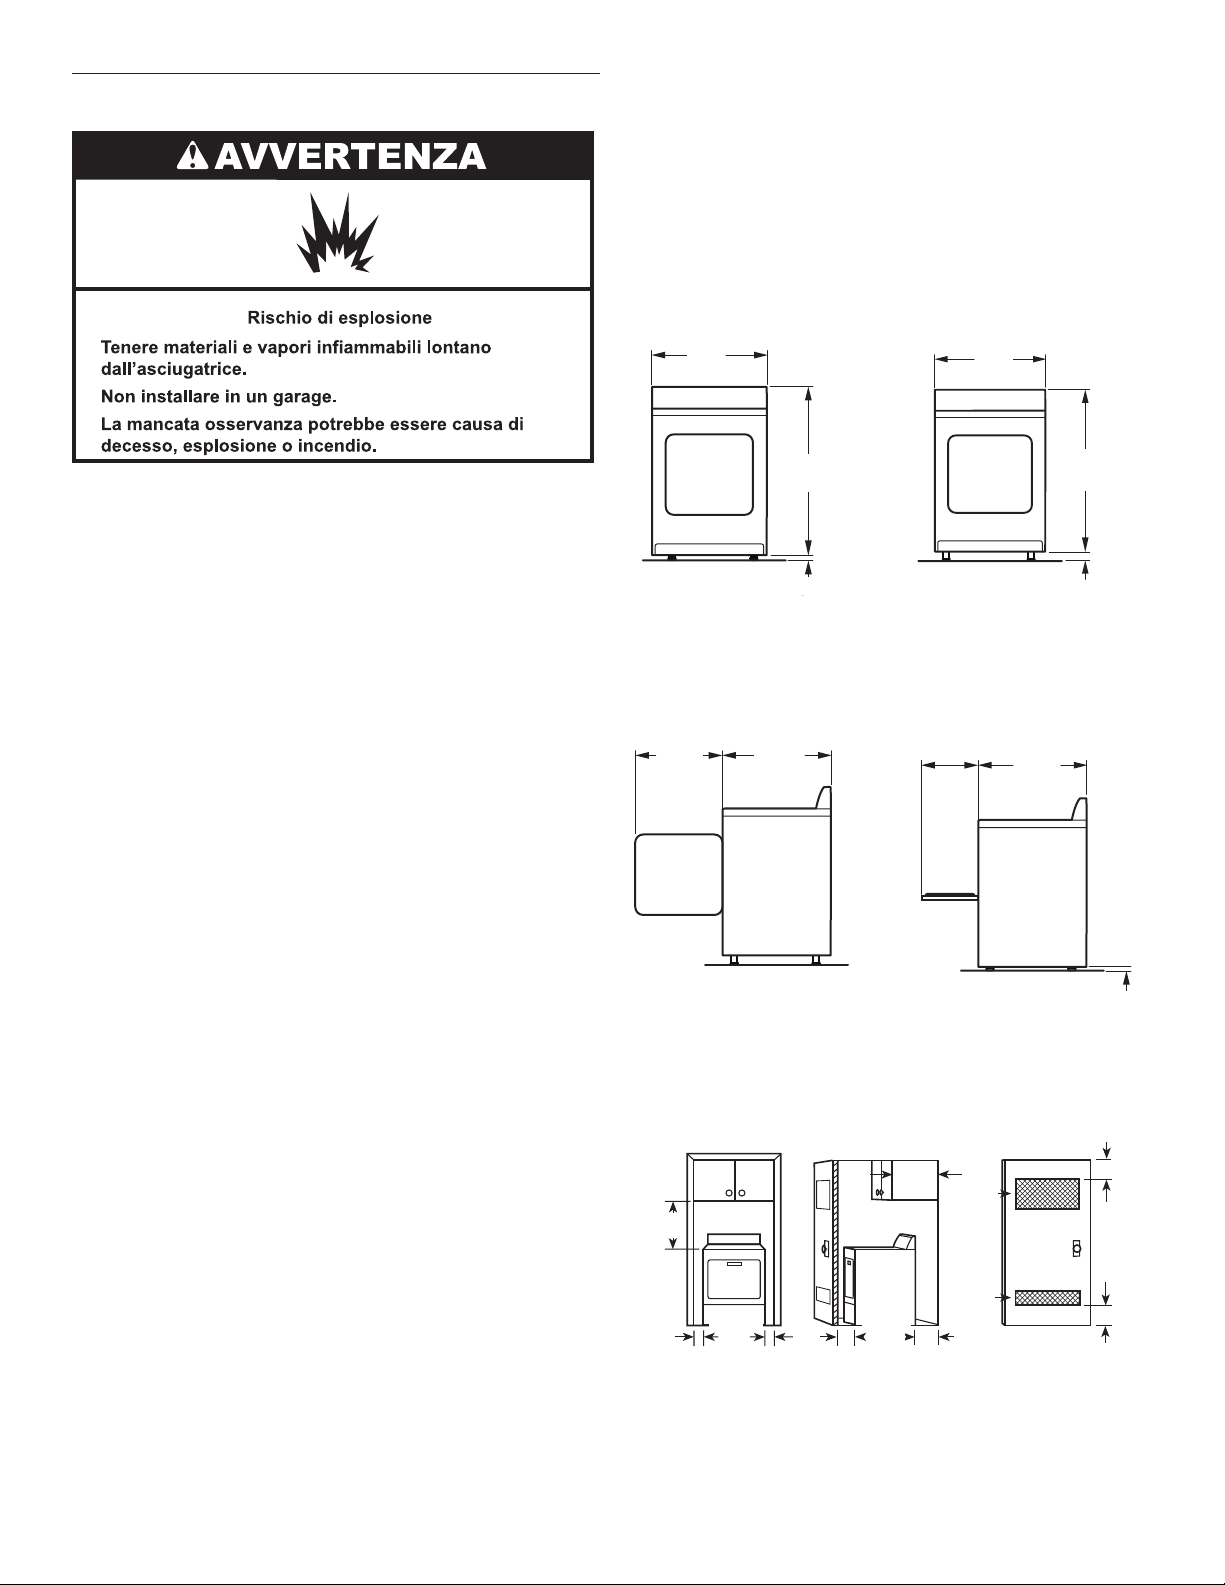
W10849529C
03/18
©2018 Maytag. All rights reserved.
Tous droits réservés.
Todos los derechos reservados.
Tutti i diritti riservati.
Alle Rechte vorbehalten.
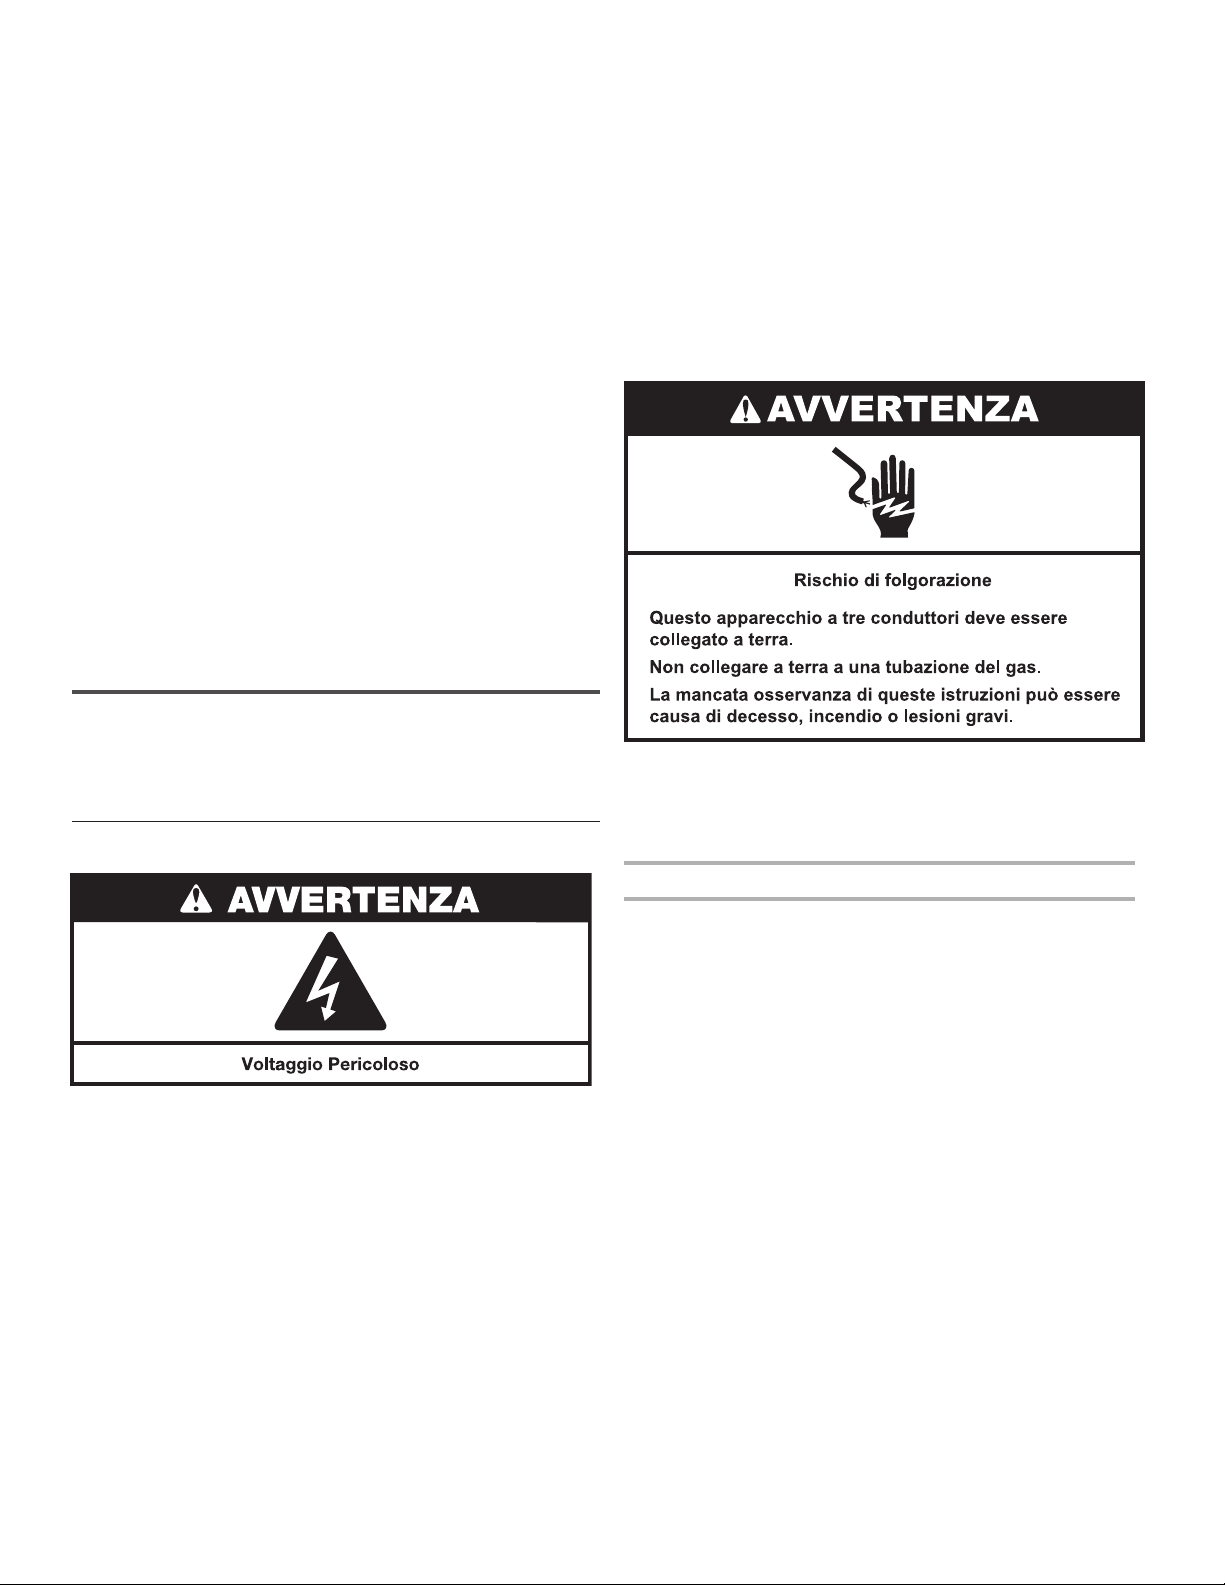
W10849529C
18/03
.ةظوفحم قوقحلا عيمج .Maytag 2018©
ةنايصلا وأ معدلا
.www.maytag.com/owners ةرايز وأ "اهحصإو ءاطخا فاشكتسا" ةعجارم ىجري ،ةنايصلا وأ معدلا ءاعدتسا لبق
.هاندأ تاداشرا عبتا ،ةدعاسم ىلإ ةجاحب لازت تنك اذإ .ةمدخلا ةملاكم ةفلكت كلذ كل رفوي دق
.كزاهجل يلسلستلا عينصتلا مقرو
ً
ماك ليدوملا مقرو ءارشلا خيرات ركذأ كلضف نم ،كلاص
ِ
ّ
تا دنع
.كبلطل ةعيرسلا ةباجتسا ىلع انتردق نيسحت يف اندعاست فوس تامولعملا هذه
تاقحلم بلطل وأ رايغلا عطقل تجتحا اذإ
.ةعنصملا ةكرشلا لبق نم ةددحملا رايغلا عطق طقف مدختست نأب يصون
.MAYTAG نم ديدج زاهج يأ عينصتل ةمدختسملا ةقدلا سفنب ةعونصم اهن ةمءمو ةبسانم هذه رايغلا عطق نوكت فوس
.www.maytagpartsonline.com ر
ُ
ز ضف ،تاقحلملا وأ ةعنصملا ةكرشلا لبق نم ةددحملا رايغلا عطق ديدحتل
.1-800-688-2002 مقرلا ىلع ادنك يف وأ 1-800-344-1274 مقر يناجملا فتاهلا ىلع لصتا ؟ةلئسا
ةدناسملا انوراشتسم كيلإ مدقي فوس
.ةيكيرما ةدحتملا تايولا يف
■ .ةزهجا نم لماكلا طخلاب ةصاخلا تافصاوملاو صئاصخلا
■ .بيكرتلا تامولعم
■ ،رصبلا فاعض ،عمسلا فاعض ،ةينابساب ثدحتلا( ليمعلل ةصصختملا ةدناسملا
.)خلإ
ادنكو ةدحتملا تايولا طقف
■ .ةنايصلاو مادختسا تاءارجإ
■ .رايغلا عطقو تاقحلملا تاعيبم
■ بيردت متي .ةنايصلا تاكرشو رايغلا عطق يعزوم ،نييلحملا ءكولا ىلإ تاح
ةمدخلا ميدقتو تاجتنملا ىلع نامضلا ذيفنتل Maytag نم نيدمتعملا ةمدخلا يينف
.ادنكو ةدحتملا تايولا يف ناكم يأ يف نامضلا دعب
:ىلإ سجاوه وأ ةلئسأ ةيأ لاسرإ نكمي
:ءمعلا ةربخ زكرم
Maytag Brand Appliances
Customer eXperience Center
553 Benson Road
Benton Harbor, MI 49022-2692
1-800-344-1274
:ءمعلا ةربخ زكرم
Maytag Brand Appliances
Customer eXperience Centre
Unit 200-6750 Century Ave
Mississauga, Ontario L5N 0B7
1-800-688-2002
.راهنلا ءانثأ كعم لصاوتلل هب لاصتا نكمي يذلا فتاهلا مقر ركذا ضف
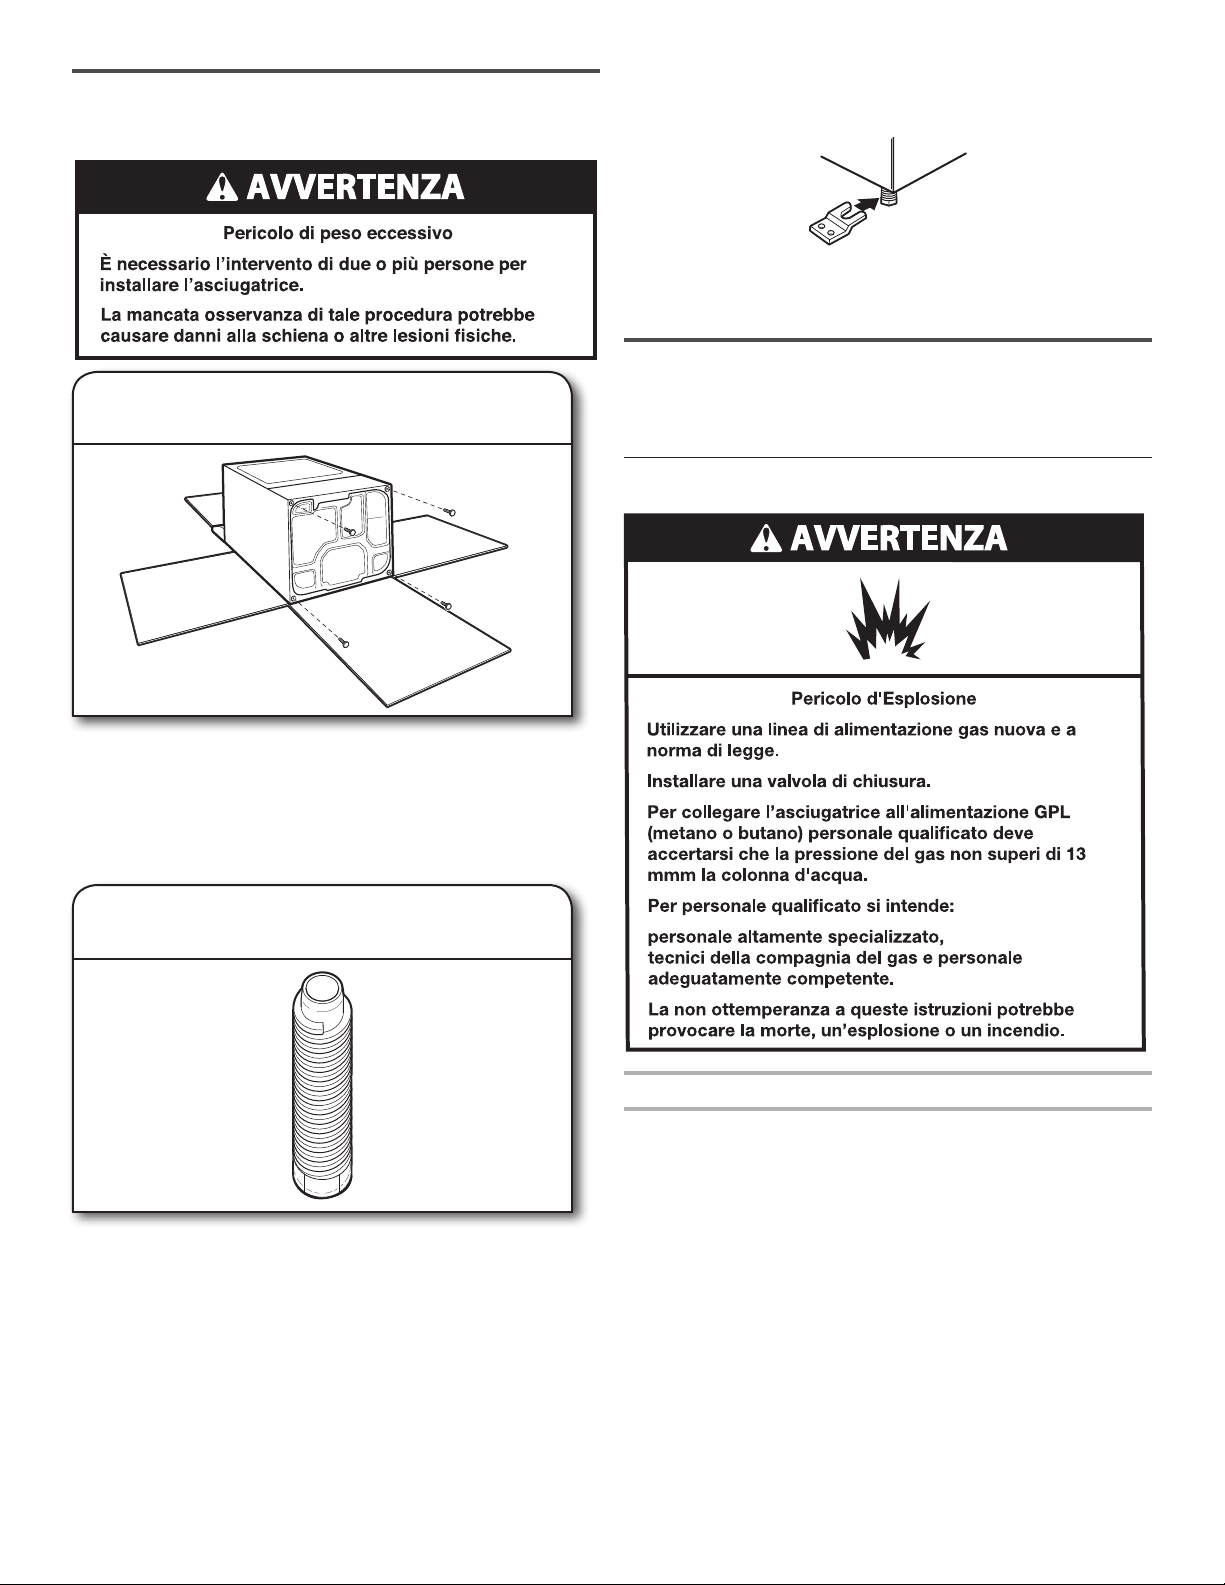
13
:ةﺪﻋﺎﺴﻤﻟا ﻰﻟإ جﺎﺘﺤﺗ ﺖﻨﻛ اذإ
1 . ﺔﻌﺟاﺮﻤﻟ ﺔﻠﯿﻠﻗ ﻖﺋﺎﻗد ﻚﺘﻗو ﻦﻣ ﺬﺧ ﻚﻠﻀﻓ ﻦﻣ .ﺔﻧﺎﯿﺼﻟا ﺔﻣﺪﺧ نوﺪﺑ ﻞﺋﺎﺴﻤﻟا ﺾﻌﺑ ﻞﺣ ﻦﻜﻤﯾ .ﻻ مأ
ً
ﺎﺣﻼﺻإ ﺐﻠﻄﺘﯾ كزﺎﮭﺟ نﺎﻛ اذإ ﺎﻣ ﺪﯾﺪﺤﺗ ﻚﻠﻀﻓ ﻦﻣ ﻲﻐﺒﻨﯾ ،ﺔﻧﺎﯿﺼﻟا ﺔﻣﺪﺧ ﺐﯿﺗﺮﺘﻟ ﺎﻨﺑ لﺎﺼﺗﻻا ﻞﺒﻗ
.https://www.maytag.com/product_help ةرﺎﯾﺰﺑ ﻞﻀﻔﺗ وأ ،ﺔﻧﺎﯿﺼﻟاو ماﺪﺨﺘﺳﻻا ﻞﯿﻟد ﻲﻓ ﻞﻛﺎﺸﻤﻟا ﻞﺣ وأ ﺎﮭﺣﻼﺻإو ءﺎﻄﺧﻷا فﺎﺸﻜﺘﺳا ﻞﺼﻓ
2 . :ﻰﻟإ ﺔﻧﺎﯿﺼﻟا ﺔﻣﺪﺨﺑ ﺔﺻﺎﺨﻟا تﺎﺒﻠﻄﻟا ﺔﻓﺎﻛ ﮫﯿﺟﻮﺘﺑ ﻢﻗ ،اﺪﻨﻛو ﺔﯿﻜﯾﺮﻣﻷا ةﺪﺤﺘﻤﻟا تﺎﯾﻻﻮﻟا ﻲﻓ .ﻦﯾﺪﻤﺘﻌﻤﻟا Maytag ﺔﻧﺎﯿﺻ ﺔﻣﺪﺧ يدرﻮﻣ ﻦﻣ يﺮﺼﺣ
ٍ
ﻞﻜﺸﺑ نﺎﻤﻀﻟا تﺎﻣﺪﺧ ﺔﻓﺎﻛ ﻢﯾﺪﻘﺗ ﻢﺘﯾ
(Maytag ءﻼﻤﻋ ﺔﻣﺪﺧ ﺰﻛﺮﻣ) Maytag Customer eXperience Center
.1-800-807-6777 ﻢﻗﺮﺑ ﻞﺼﺗا اﺪﻨﻛ ﻲﻓ .1-800-688-9900 ﻢﻗﺮﺑ ﻞﺼﺗا ﺔﯿﻜﯾﺮﻣﻷا ةﺪﺤﺘﻤﻟا تﺎﯾﻻﻮﻟا ﻲﻓ
.ﺮﺧآ نﺎﻤﺿ ﻖﯿﺒﻄﺗ ﻢﺘﯾ نﺎﻛ نإ ﺪﯾﺪﺤﺗ ﻞﺟأ ﻦﻣ ﻚﺑ صﺎﺨﻟا ﺪﻤﺘﻌﻤﻟا Maytag ﻞﯿﻛﻮﺑ ﻞﺼﺗا ،اﺪﻨﻛو ﻦﯿﺴﻤﺨﻟا ةﺪﺤﺘﻤﻟا تﺎﯾﻻﻮﻟا جرﺎﺧ ﺖﻨﻛ اذإ
ﻞﯿﺴﻐﻟا ةﺰﮭﺟﻷ دوﺪﺤﻤﻟا نﺎﻤﻀﻟا
MAYTAG
.ءاﺮﺸﻟا ﻞﯿﻟد دﻮﺟو نﺎﻤﻀﻟا ﺔﻣﺪﺧ ﻰﻠﻋ لﻮﺼﺤﻟا ﺐﻠﻄﺘﯾ .ﺎﻨھ ﻚﺑ صﺎﺨﻟا لﺎﺼﯾﻹا ﻖﻓرأ
:ءﻼﻤﻌﻟا ﺔﻣﺪﺧ ﺰﻛﺮﻤﺑ ﻚﻟﺎﺼﺗا ﺪﻨﻋ ﺔﯿﻟﺎﺘﻟا تﺎﻣﻮﻠﻌﻤﻟا ﺮﯿﻓﻮﺗ ﻲﻐﺒﻨﯾ ﻚﻠﻀﻓ ﻦﻣ
ﻒﺗﺎﮭﻟا ﻢﻗرو ،ناﻮﻨﻌﻟا ،ﻢﺳﻻا
ﻞﺴﻠﺴﻤﻟا ﻢﻗﺮﻟاو ﻞﯾدﻮﻤﻟا ﻢﻗر
ﺔﻠﻜﺸﻤﻟا ﻦﻋ ﻲﻠﯿﺼﻔﺗو ﺢﺿاو ﻒﺻو
ناﻮﻨﻌﻟاو ﺔﺋﺰﺠﺘﻟا ﺮﺟﺎﺗ وأ ﻞﯿﻛﻮﻟا ﻢﺳا
ً
ﺎﻨﻤﻀﺘﻣ ءاﺮﺸﻟا ﻞﯿﻟد
تاﻮﻨﺳ ﺮﺸﻋ ة
ﱠ
ﺪﻤﻟ دوﺪﺤﻣ نﺎﻤﺿ
نﺎﻤﻀﻟا ﻲ
ﱢ
ﻄﻐﯾ اذﺎﻣ
نﺎﻤﻀﻟا ﮫﯿﻄﻐﯾ ﻻ ﺎﻣ
(ﻞﻤﻌﻟا ﻢﻗﺎﻃو رﺎﯿﻐﻟا ﻊﻄﻗ) دوﺪﺤﻤﻟا نﺎﻤﻀﻟا ﻦﻣ لوﻷا مﺎﻌﻟا
ﮫﺘﻧﺎﯿﺻو ﮫﻠﯿﻐﺸﺗو ﻲﺴﯿﺋﺮﻟا زﺎﮭﺠﻟا اﺬھ ﺖﯿﺒﺜﺗ
ﱡ
ﻢﺘﯾ ﺎﻣﺪﻨﻋ ،ءاﺮﺸﻟا ﺦﯾرﺎﺗ ﻦﻣ ﺪﺣاو مﺎﻋ ةﺪﻤﻟ
ﺔﻛﺮﺷ ﻦﻣ Maytag ﺔﯾرﺎﺠ
ُ
ﺘﻟا ﺔﻣﻼﻌﻟا
ﱠ
نﺈﻓ ،ﺞﺘﻨﻤﻠﻟ ﺔﺒﺣﺎﺼﻤﻟا وأ ﺔﻘﻓﺮﻤﻟا تادﺎﺷرﻺﻟ ﺎ
ً
ﻘﻓو
ﻲﻠﯾ ﺎﻤﯿﻓ ﺎﮭﯿﻟإ رﺎﺸ
ُ
ﯾ) Whirlpool Canada LP وأ Whirlpool Corporation
بﻮﯿﻋ ﺢﯿﺤﺼﺘﻟ حﻼﺻﻹﺎﺑ ﻢﺋﺎﻘﻟا ﻞﻤﻌﻟا ﻢﻗﺎﻃو ﻊ
َ
ﻨﺼﻤﻟا ﺎھد
ﱢ
ﺪﺤﯾ ءاﺰﺟأ ﻞﺑﺎﻘﻣ ﻊﻓﺪﺘﺳ ("Maytag"
.ﻲﺴﯿﺋﺮﻟا زﺎﮭﺠﻟا اﺬھ ءاﺮﺷ ﺪﻨﻋ ةدﻮﺟﻮﻣ ﺖﻧﺎﻛ ﻲﺘﻟا ﻊﯿﻨﺼﺘﻟا ﺔﻘﯾﺮﻃ وأ ﻊﯿﻨﺼﺘﻟا داﻮﻣ ﻲﻓ
دوﺪﺤﻤﻟا نﺎﻤﻀﻟا ﻦﻣ ةﺮﺷﺎﻌﻟا ﺔﻨﺴﻟا ﺔﯾﺎﮭﻧ ﻰﺘﺣ
ً
ﺎﯿﻧﺎﺛ
(ﻞﻤﻌﻟا ﻢﻗﺎﻃ ﻞﻣﺎﺷ ﺮﯿﻏ – ﻂﻘﻓ أﺪﺼﻠﻟ موﺎﻘﻤﻟا ذﻻﻮﻔﻟا ﻦﻣ ﺔﻋﻮﻨﺼﻤﻟا ﺔﻠﺴﻟاو ﺔﻠﺤﻟا كﺮﺤﻣ)
ﮫﻠﯿﻐﺸﺗو ﻲﺴﯿﺋﺮﻟا زﺎﮭﺠﻟا اﺬھ ﺖﯿﺒﺜﺗ
ﱡ
ﻢﺘﯾ ﺎﻣﺪﻨﻋ ،ﻲﻠﺻﻷا ءاﺮﺸﻟا ﺦﯾرﺎﺘﻟ ﺔﯿﻟﺎﺘﻟا تاﻮﻨﺳ ﺮﺸﻌﻟا ﻲﻓ
ءاﺰﺟأ ﻞﺑﺎﻘﻣ ﻊﻓﺪﺘﺳ Maytag
ﱠ
نﺈﻓ ،ﺞﺘﻨﻤﻠﻟ ﺔﺒﺣﺎﺼﻤﻟا وأ ﺔﻘﻓﺮﻤﻟا تادﺎﺷرﻺﻟ ﺎ
ً
ﻘﻓو ﮫﺘﻧﺎﯿﺻو
وأ ﻊﯿﻨﺼﺘﻟا داﻮﻣ ﻲﻓ ﺔﯿﻟﺎﻤﺠﻟا ﺮﯿﻏ بﻮﯿﻌﻟا ﺢﯿﺤﺼﺗ ﻞﺟأ ﻦﻣ ﺔﯿﻟﺎﺘﻟا تﺎﻧﻮﻜﻤﻠﻟ ﻊ
َ
ﻨﺼﻤﻟا ﺎھد
ﱢ
ﺪﺤﯾ
ﺪﻨﻋ ةدﻮﺟﻮﻣ ﺖﻧﺎﻛ ﻲﺘﻟاو ﻲﺴﯿﺋﺮﻟا زﺎﮭﺠﻟا اﺬھ ﻞﯿﻐﺸﺗ ﻊﻨﻤﺗ ﻲﺘﻟا ءاﺰﺟﻷا هﺬھ ﻲﻓ ﻊﯿﻨﺼﺘﻟا ﺔﻘﯾﺮﻃ
هﺎﻧدأ ةدﺪﺤﻤﻟا ءاﺰﺟﻷا ﻰﻠﻋ تاﻮﻨﺳ 10 ةﺪﻤﻟ دوﺪﺤﻣ نﺎﻤﻀﻟا اﺬھ نإ .ﻲﺴﯿﺋﺮﻟا زﺎﮭﺠﻟا اﺬھ ءاﺮﺷ
.حﻼﺻﻹﺎﺑ ﻢﺋﺎﻘﻟا ﻞﻤﻌﻟا ﻢﻗﺎﻃ ﻞﻤﺸﯾ ﻻو ﻂﻘﻓ
(ﻂﻘﻓ ﺔﯿﺒﻧﺎﺠﻟا نارﺪﺠﻟا) ﺔﻠﺤﻟا
ﻞﯿﻐﺸﺘﻟا كﺮﺤﻣ
صﻮﺼﻨﻣ ﻮھ ﺎﻤﻛ ﺞﺘﻨﻤﻟا حﻼﺻإ ﻮھ دوﺪﺤﻤﻟا نﺎﻤﻀﻟا اﺬھ ﺐﺟﻮﻤﺑ ﻚﻟ ﺔﯾﺮﺼﺤﻟاو ةﺪﯿﺣﻮﻟا ﺔﻠﯿﺳﻮﻟا
.Maytag ﻦﻣ ةﺪﻤﺘﻌﻣ ﺔﻧﺎﯿﺻ ﺔﻛﺮﺷ ﻦﻣ ﺔﻧﺎﯿﺼﻟا ﺔﻣﺪﺧ م
ﱠ
ﺪﻘ
ُ
ﺗ نأ ﺐﺠﯾ .ﺔﻘﯿﺛﻮﻟا هﺬھ ﻲﻓ ﮫﯿﻠﻋ
ﺪﻨﻋ ﻻإ ﻖ
ﱠ
ﺒﻄ
ُ
ﯾ ﻻو اﺪﻨﻛو ﺔﯿﻜﯾﺮﻣﻷا ةﺪﺤﺘﻤﻟا تﺎﯾﻻﻮﻟا ﻲﻓ ﻻإ دوﺪﺤﻤﻟا نﺎﻤﻀﻟا اﺬھ يﺮﺴﯾ ﻻ
ﻦﻣ دوﺪﺤﻤﻟا نﺎﻤﻀﻟا اﺬھ نﺎﯾﺮﺳ أﺪﺒﯾ .ﮫﺑ هؤاﺮﺷ ﻢﺗ يﺬﻟا ﺪﻠﺒﻟا ﻲﻓ ﻲﺴﯿﺋﺮﻟا زﺎﮭﺠﻟا اﺬھ ماﺪﺨﺘﺳا
ﺔﻣﺪﺨﻟا ﻰﻠﻋ لﻮﺼﺤﻠﻟ ﻲﻠﺻﻷا ءاﺮﺸﻟا ﺦﯾرﺎﺘﻟ تﺎﺒﺛإ ﺮﻓاﻮﺗ ﻦﻣ
ﱠ
ﺪﺑ ﻻ .ﻲﻠﺻﻷا ﻞﯿﻤﻌﻟا ءاﺮﺷ ﺦﯾرﺎﺗ
.دوﺪﺤﻤﻟا نﺎﻤﻀﻟا اﺬھ ﺐﺟﻮﻤﺑ
1 . تﺎﻤﯿﻠﻌﺘﻟا ﻊﻣ ضرﺎﻌﺘﻤﻟا ماﺪﺨﺘﺳﻻا وأ ،دﺪﻌﺘﻤﻟا يﺮﺳﻷا ،ﻲﻨﻜﺳ ﺮﯿﻐﻟا ،يرﺎﺠﺘﻟا ماﺪﺨﺘﺳﻻا
.ﺖﯿﺒﺜﺘﻟا وأ ﻞ
ﱢ
ﻐﺸ
ُ
ﻤﻟا وأ مﺪﺨﺘﺴﻤﻟﺎﺑ ﺔﺻﺎﺨﻟا
2 . .ﻚﺑ صﺎﺨﻟا ﺞﺘﻨﻤﻟا ماﺪﺨﺘﺳا ﺔﯿﻔﯿﻛ نﺄﺸﺑ ﺔﯿﻟﺰﻨﻤﻟا تﺎﻤﯿﻠﻌﺘﻟا
3 . ﻖﺑﺎﻄﻣ ﺮﯿﻐﻟا ﺖﯿﺒﺜﺘﻟا وأ ﺞﺘﻨﻤﻠﻟ ﺐﺳﺎﻨﻣ ﺮﯿﻐﻟا ﺖﯿﺒﺜﺘﻟا وأ ﺔﻧﺎﯿﺼﻟا ﺢﯿﺤﺼﺘﺑ ﺔﺻﺎﺨﻟا ﺔﻧﺎﯿﺼﻟا ﺔﻣﺪﺧ
ﻞﺜﻣ) ﺔﯿﻟﺰﻨﻤﻟا هﺎﯿﻤﻟا ﺔﻜﺒﺸﺑ وأ ءﺎﺑﺮﮭﻜﻟا ﺢﯿﺤﺼﺗ وأ ،هﺎﯿﻤﻟا ﺔﻜﺒﺸﺑ وأ ءﺎﺑﺮﮭﻜﻟﺎﺑ ﺔﺻﺎﺨﻟا ﻦﯿﻧاﻮﻘﻠﻟ
.(ءﺎﻤﻟا لﻮﺧد ﺐﯿﺑﺎﻧأ وأ ،تاﺮﮭﺼﻨﻤﻟا ،لﺰﻨﻤﻟا تﻼﺑﺎﻛ
4 . .(ﺦﻟا ،ءﺎﻤﻟا وأ ءاﻮﮭﻟا تﺎﺤﺷﺮﻣ ،تﺎﯾرﺎﻄﺒﻟا ،ةءﺎﺿﻹا ﺢﯿﺑﺎﺼﻣ ﻞﺜﻣ) كﻼﮭﺘﺳﻼﻟ ﺔﻠﺑﺎﻘﻟا ءاﺰﺟﻷا
5 ..زﺎﮭﺠﻟا باﻮﺑأ ﺲﻜﻋ وأ نﺎﺑوﺮﺒﻟا زﺎﻏ وأ ﻲﻌﯿﺒﻄﻟا زﺎﻐﻟا ﻦﻣ ﻚﺑ صﺎﺨﻟا ﺞﺘﻨﻤﻟا ﻞﯾﻮﺤﺗ
6 . وأ ﺔﻤﻌﻃﻷا وأ رﺎﻨﻟا وأ زﺎﮭﺠﻟا ﻊﻣ ﻞﻣﺎﻌﺘﻟا ءﻮﺳ وأ ماﺪﺨﺘﺳا ءﻮﺳ وأ ثدﺎﺣ ﻦﻋ ﺞﺗﺎﻨﻟا ﻒﻠﺘﻟا
.Maytag ﻞﺒ
ِ
ﻗ ﻦﻣ ةﺪﻤﺘﻌﻣ ﺮﯿﻏ تﺎﺠﺘﻨﻣ ماﺪﺨﺘﺳا وأ ﺔﯿﮭﻟﻹا لﺎﻤﻋﻷا
7 . ﺔﻣﺪﺧ ﻦﻋ ﺔﺠﺗﺎﻧ ﺞﺘﻨﻤﻟﺎﺑ بﻮﯿﻋ وأ ﻒﻠﺗ ﺢﯿﺤﺼﺗ ﻞﺟأ ﻦﻣ ﻢﻈﻨﻟا وأ ءاﺰﺟﻷا ﻰﻠﻋ تﺎﺣﻼﺻﻹا
.زﺎﮭﺠﻟا ﻲﻓ ﻞﯾﺪﻌﺗ وأ ﺮﯿﯿﻐﺗ وأ ةﺪﻤﺘﻌﻣ ﺮﯿﻏ ﺔﻧﺎﯿﺻ
8 . تﺎﺒﯿﻄﺸﺘﺑ ىﺮﺧﻷا تﺎﯿﻔﻠﺘﻟاو ،ةﺮﯿﻐﺼﻟا رﻮﺴﻜﻟاو جﺎﻌﺒﻧﻻاو شوﺪﺨﻟا ﻞﻤﺸﯾ يﺬﻟا ﻲﻟﺎﻤﺠﻟا ﻒﻠﺘﻟا
ﻢﺘﯾ نأ ﻰﻠﻋ ﻊﯿﻨﺼﺘﻟا ﺔﻘﯾﺮﻃو ﻊﯿﻨﺼﺘﻟا داﻮﻣ ﻲﻓ بﻮﯿﻋ ﻦﻣ ﺞﺗﺎﻧ ﻒﻠﺘﻟا اﺬھ نﺎﻛ اذإ ﻻإ زﺎﮭﺠﻟا
.
ً
ﺎﻣﻮﯾ 30 لﻼﺧ ﮫﻧﺄﺸﺑ Maytag غﻼﺑإ
9 . ﻞﻤﺸﺗ ﻲﺘﻟا ،ﻞﻛﺂﺘﻠﻟ ﺔﺒﺒﺴﻣ وأ ﺔﯾوﺎﻛ تﺎﺌﯿﺑ ﻦﻋ ﺞﺗﺎﻨﻟاو ﺢﻄﺳﻷﺎﺑ ةﺪﺴﻛﻷا وأ أﺪﺼﻟا وأ نﻮﻠﻟا ﺮﯿﻐﺗ
وأ ﺔﯿﻟﺎﻌﻟا ﺔﺑﻮﻃﺮﻟا وأ ﺔﺑﻮﻃﺮﻟا وأ ﺢﻠﻤﻟا ﻦﻣ ﺔﯿﻟﺎﻌﻟا تاﺰﯿﻛﺮﺘﻟا ،ﺮﺼﺤﻟا ﻻ لﺎﺜﻤﻟا ﻞﯿﺒﺳ ﻰﻠﻋ
.تﺎﯾوﺎﻤﯿﻜﻠﻟ ضﺮﻌﺘﻟا
10 . .لﺰﻨﻤﻟﺎﺑ حﻼﺻﻺﻟ ﺺﺼﺨﻣ ﺞﺘﻨﻤﻟا اﺬھ .ﻞﯿﺻﻮﺘﻟا وأ لﺰﻨﻤﻟا ﻦﻣ ﺬﺧﻷا
11 . ﺔﻧﺎﯿﺼﻟا ﺔﻣﺪﺧ درﻮﻣ ﺮﻓاﻮﺘﯾ ﻻ ﺚﯿﺣ ةﺪﯿﻌﺑ ﻦﻛﺎﻣأ ﻲﻓ ﺔﻧﺎﯿﺼﻟا ﺔﻣﺪﺨﺑ ﺔﺻﺎﺨﻟا ﻞﻘﻨﻟا وأ ﺮﻔﺴﻟا تﺎﻘﻔﻧ
.Maytag ﻦﻣ ﺪﻤﺘﻌﻤﻟا
12 . ﻞﺜﻣ) ﻊﯿﻨﺼﺘﻟا ﺪﻨﻋ زﺎﮭﺠﻟﺎﺑ ﺔﺘﺑﺎﺛ تﺎﻧﻮﻜﻣ وأ ﺎﮭﯿﻟإ لﻮﺻﻮﻟا زﻮﺠﯾ ﻻ ةﺰﮭﺟأ ﺐﯿﻛﺮﺗ ةدﺎﻋإ وأ ﺔﻟازإ
(ﺦﻟا ،ﻒﯿﻔﺠﺘﻟا ﻂﺋﺎﺣو ﻒﻘﺳﻷاو ﺎﯾﻼﺨﻟاو ﻞﻜﯿﮭﻟاو ﺔﯿﺿرﻷاو ﻦﯿﯾﺰﺘﻟا تﺎﺣﻮﻟو ﺔﯿﺟرﺎﺨﻟا ﺔﻓﺮﺧﺰﻟا
.ﺞﺘﻨﻤﻟا لاﺪﺒﺘﺳا وأ ﺔﻟازإ وأ ﺔﻧﺎﯿﺻ ﻊﻣ ﻞﺧاﺪﺘﺗ ﻲﺘﻟاو
13 . ﺔﻠﺴﻠﺴﻤﻟا مﺎﻗرﻷا/ﺎﮭﻟ ﻲﻠﺻﻷا ﻞﯾدﻮﻤﻟا ﺔﻟازإ ﻢﺗ ﻲﺘﻟا ةﺰﮭﺟﻷﺎﺑ ﺔﺻﺎﺨﻟا ءاﺰﺟﻷا وأ ﺔﻧﺎﯿﺼﻟا ﺔﻣﺪﺧ
.ﺎھﺪﯾﺪﺤﺗ ﻞﮭﺴﯾ ﻻ ﻲﺘﻟا وأ ﺎﮭﻔﯾﺮﺤﺗ وأ
.ﺔﯿﺋﺎﻨﺜﺘﺳﻻا فوﺮﻈﻟا هﺬھ ﺖﺤﺗ لاﺪﺒﺘﺳﻻا وأ حﻼﺻﻹا ﻒﯿﻟﺎﻜﺗ ﻞﯿﻤﻌﻟا ﻞﻤﺤﺘﯾ
14/01
ﺔﯿﻨﻤﻀﻟا تﺎﻧﺎﻤﻀﻟاو ﺔﯿﻟوﺆﺴﻤﻟا ءﻼﺧإ
دوﺪﺣ ﻊﺿﻮﺑ تﺎﻌﻃﺎﻘﻤﻟا وأ لوﺪﻟا ﺾﻌﺑ ﺢﻤﺴﺗ ﻻ ﺪﻗ .نﻮﻧﺎﻘﻟا ﺎﮭﺑ ﺢﻤﺴﯾ ةﺮﺘﻓ ﺮﺼﻗأ وأ تاﻮﻨﺳ ﺮﺸﻋ ﻰﻠﻋ ،ﻦ
ﱠ
ﯿﻌﻣ ضﺮﻐﻟ ﺞ
َ
ﺘﻨﻤﻟا ﺔﻤﺋﻼﻣ وأ ﻖﯾﻮﺴﺘﻟا ﺔﯿﻠﺑﺎﻗ تﺎﻧﺎﻤﺿ ﻚﻟذ ﻲﻓ ﺎﻤﺑ ،ﺔﯿﻨﻤﻀﻟا تﺎﻧﺎﻤﻀﻟا ﺮﺼﺘﻘﺗ
ﻰﻟإ ﺔﻟود ﻦﻣ ﻒﻠﺘﺨﺗ ،ىﺮﺧأ قﻮﻘﺣ ﺎﻀﯾأ ﻚﯾﺪﻟ نﻮﻜﯾ ﺪﻗو ةد
ﱠ
ﺪﺤﻣ ﺔﯿﻧﻮﻧﺎﻗ ﺎ
ً
ﻗﻮﻘﺣ نﺎﻤﻀﻟا اﺬھ ﻚﺤﻨﻤﯾ .ﺪﺤﻟا اﺬھ ﻚﯿﻠﻋ ﻖ
ﱠ
ﺒﻄ
ُ
ﯾ
ﱠ
ﻻا ﻦﻜﻤﯾ ﻚﻟﺬﻟ ،ماﺪﺨﺘﺳﻻا ﺔﻤﺋﻼﻣ وأ ﻖﯾﻮﺴﺘﻟا ﺔﯿﻠﺑﺎﻗ ﻰﻠﻋ ﺔﯿﻨﻤﻀﻟا تﺎﻧﺎﻤﻀﻟا ة
ﱠ
ﺪﻤﻟ
.ﺔﻌﻃﺎﻘﻣ ﻰﻟإ ﺔﻌﻃﺎﻘﻣ ﻦﻣ وأ ﺔﻟود
نﺎﻤﻀﻟا جرﺎﺧ تاراﺮﻗﻹا ﻦﻋ ﺔﯿﻟوﺆﺴﻤﻟا ءﻼﺧإ
ةﺮﺘﻓ ﻦﻣ
ً
ﻻﻮﻤﺷ ﺮﺜﻛأ وأ لﻮﻃأ نﺎﻤﺿ ةﺮﺘﻓ ﺪﯾﺮﺗ ﺖﻨﻛ اذإ .نﺎﻤﻀﻟا اﺬھ ﻲﻓ ةدراﻮﻟا تاراﺮﻗﻹا ﺮﯿﻏ ﻲﺴﯿﺋﺮﻟا زﺎﮭﺠﻟا اﺬھ حﻼﺻإ وأ ﺔﻣﺪﺧ ﻰﻟإ ﺔﺟﺎﺤﻟا وأ ،ﺔﻧﺎﺘﻤﻟاو ةدﻮﺠﻟا ﻦﻋ تاراﺮﻗإ ﺔ
ﱠ
ﯾأ Maytag م
ﱢ
ﺪﻘ
ُ
ﺗ ﻻ
.نﺎﻤﻀﻠﻟ ﺔﯿﻓﺎﺿإ ةﺮﺘﻓ ءاﺮﺷ ﺔﯿﻔﯿﻛ ﻦﻋ ﻚﺑ صﺎﺨﻟا ﺔﺋﺰﺠﺘﻟا ﻊﺋﺎﺑ لاﺆﺳ ﻚﯿﻠﻋ ﻲﻐﺒﻨﯾ ﮫ
ﱠ
ﻧﺈﻓ ،ةﺰﮭﺟﻷا ﺔﯿﺒﻟﺎﻏ ﻊﻣ ﻲﺗﺄﯾ يﺬﻟا دوﺪﺤﻤﻟا نﺎﻤﻀﻟا
ﺔﯿﻌﺒﺘﻟاو ﺔﯿﺿﺮﻌﻟا راﺮﺿﻷا دﺎﻌﺒﺘﺳا :دادﺮﺘﺳﻻا قﻮﻘﺣ دوﺪﺣ
لوﺪﻟا ﺾﻌﺑ ﺢﻤﺴﺗ ﻻ .ﺔﯿﻌﺒﺘﻟا وأ ﺔﯿﺿﺮﻌﻟا راﺮﺿﻷا ﻦﻋ ﺔﻟوﺆﺴﻣ ﺮﯿﻏ MAYTAG .ﺔﻘﯿﺛﻮﻟا هﺬھ ﻲﻓ ﮫﯿﻠﻋ صﻮﺼﻨﻣ ﻮھ ﺎﻤﻛ ﺞﺘﻨﻤﻟا حﻼﺻإ ﻮھ دوﺪﺤﻤﻟا نﺎﻤﻀﻟا اﺬھ ﺐﺟﻮﻤﺑ ﻚﻟ ﺔﯾﺮﺼﺤﻟاو ةﺪﯿﺣﻮﻟا ﺔﻠﯿﺳﻮﻟا
،ىﺮﺧأ قﻮﻘﺣ ﺎﻀﯾأ ﻚﯾﺪﻟ نﻮﻜﯾ ﺪﻗو ةد
ﱠ
ﺪﺤﻣ ﺔﯿﻧﻮﻧﺎﻗ ﺎ
ً
ﻗﻮﻘﺣ نﺎﻤﻀﻟا اﺬھ ﻚﺤﻨﻤﯾ .ﻚﯿﻠﻋ ﻖﺒﻄﻨﺗ ﻻ ﺪﻗ تادﺎﻌﺒﺘﺳﻻاو طوﺮﺸﻟاو دوﺪﺤﻟا هﺬھ ﻚﻟﺬﻟ ،ﺔﯿﻌﺒﺘﻟا وأ ﺔﯿﺿﺮﻌﻟا راﺮﺿﻷا ﻦﻣ ﺪﺤﻟا وأ دﺎﻌﺒﺘﺳﺎﺑ تﺎﻌﻃﺎﻘﻤﻟاو
.ﺔﻌﻃﺎﻘﻣ ﻰﻟإ ﺔﻌﻃﺎﻘﻣ ﻦﻣ وأ ﺔﻟود ﻰﻟإ ﺔﻟود ﻦﻣ ﻒﻠﺘﺨﺗ
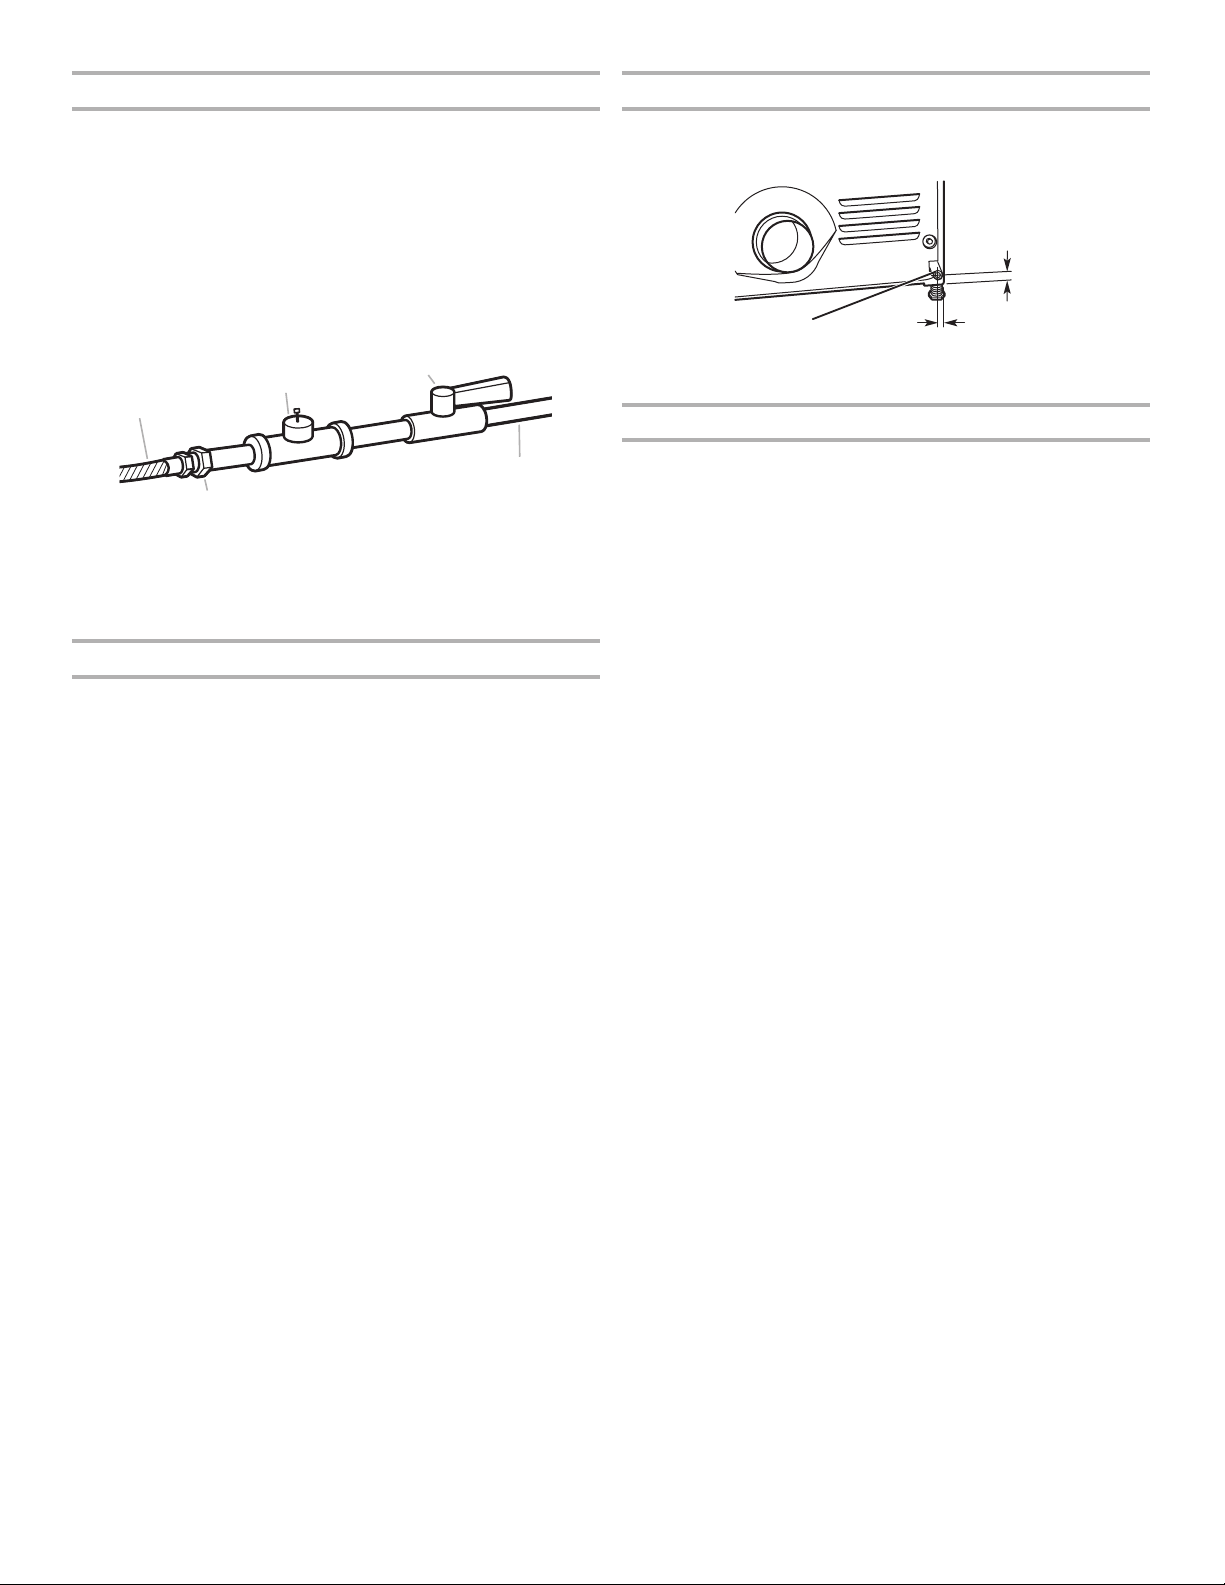
12
اهحصإو لاطعا فاشكتسا
.نكمأ نإ ،ةينفلا ةمدخلاب لاصتا ةفلكت بنجتل ،
ً
وأ يلي اميف ةحرتقملا لولحلا برج
ةلكشملاةلمتحملا بابسالحلا
ادج ريصق ةرودلا تقو.ركبم تقو يف يهتنت يئاقلتلا فيفجتلا ةرود .راعشتسا ةزهجأ حئارشب صتم لمحلا نوكي دق
.ففجملا ةيوستب مق
دادعإ رييغتب مق .ادج ةريغصلا لامحل "Timed Dry" توقوملا فيفجتلا مادختسا
.يئاقلتلا فيفجتلا تارود يف فيفجتلا ىوتسم
.ةرودلا يف فيفجتلا تقو رادقم رييغتب موقي فيفجتلا ىوتسم دادعإ ليلقت وأ ةدايز
ليسغلاب ربو دجوي.دودسم ربولا زجاح.ليمحت لك لبق ربولا زجاح فيظنت بجي
ةلحلاب وأ ليسغلاب عقب كانه.حيحص لكشب مدختس
ُ
ي ففجملاب جيسنلا معنم ةلومح ىلإ جيسنلا معنم قاروأ ةفاضإ .ةرودلا ةيادب يف جيسنلا معنم قاروأ ةفاضإب مق
.كب ةصاخلا سبملاب عقب ببسي نأ نكمي ايئزج ةففجم
لقتنت نل هذه .)قرزا زنيجلا ةداع( سبملا يف غابصا ببسب نوكتت ةلحلا عقب
.سبملا نم اهريغ ىلإ
ديعاجت اهب سبملا.ةرودلا ةياهن يف ففجملا نم سبملا ةلازإ متت مل ةرارح نودب سبملا بيلقتل )ديعاجتلا يف مكحتلا( Wrinkle Control ةزيم ددح
.ديعاجتلا بنجتل
.دئاز لكشب أبعم ففجملا.ديعاجتلا نوكت ةصرف ليلقتل ةيرحب رودت نأ نكمي ةريغص لامحأ فيفجتب مق
ةهيرك حئاور كانه يف شينرولاب ءطلا وأ نيولتلا وأ مسرلاب ارخؤم تمق دقل
.كب صاخلا ففجملا اهب دجوي يتلا ةقطنملا
،ةقطنملا نم ةرخباو حئاورلا يفتخت امدنع .ةقطنملا ةيوهتب مق ،كلذك رما ناك اذإ
.سبملا فيفجتو لسغ دعأ
.ىلوا ةرملل يئابرهكلا ففجملا مادختسا متي .ةحئار هل ديدجلا يئابرهكلا نيخستلا رصنع نوكي دق
.ىلوا ةرودلا دعب ةحئارلا لوزتس
ادج ةنخاس سبملا.ةرودلا ةياهن لبق ففجملا نم سبملا ةلازإ متت متي .ففجملا نم سبملا ةلازإ لبق "Cool Down" ديربتلا ةرود ءاهتناب حمسا
رصانعلا .اهعم لماعتلا ليهستلو ديعاجتلا روهظ نم دحلل ءطبب تارودلا عيمج ديربت
.ادج ةنخاس نوكت دق ديربتلا لبق اهتلازإ متت يتلا
نييعت مت وأ ،ةيلاع ةرارح ةجردب فيفجت ةرود مادختسا مت
دادعإ ىلع ةرارحلا ةجرد يف ةلقتسملا مكحتلا رصانع دحأ
.عفترم
تارودلا هذه رعشتست .يئاقلتلا فيفجتلا ةرود مدختساو ةضفخنم ةرارح ةجرد ددح
لوصو دنع ففجملا فاقيإ متيو سبملا يف ةبوطرلا ىوتسم وأ ةرارحلا ةجرد
.فيفجتلا طرف نم اذه للقي .ةددحملا فافجلا ةجرد ىلإ لمحلا
ةينيتلا اكيرمأ ةمدخ
ةينيتلا اكيرمأ Whirlpool ةكرشل ينورتكلا عقوملا ةرايزو ةينيتلا اكيرمأ نامض ةقاطب ىلع عطا ىجري ،ةينيتلا اكيرمأ يف ىرخا نادلبلل ةبسنلاب
.www.whirlpool-latam.com
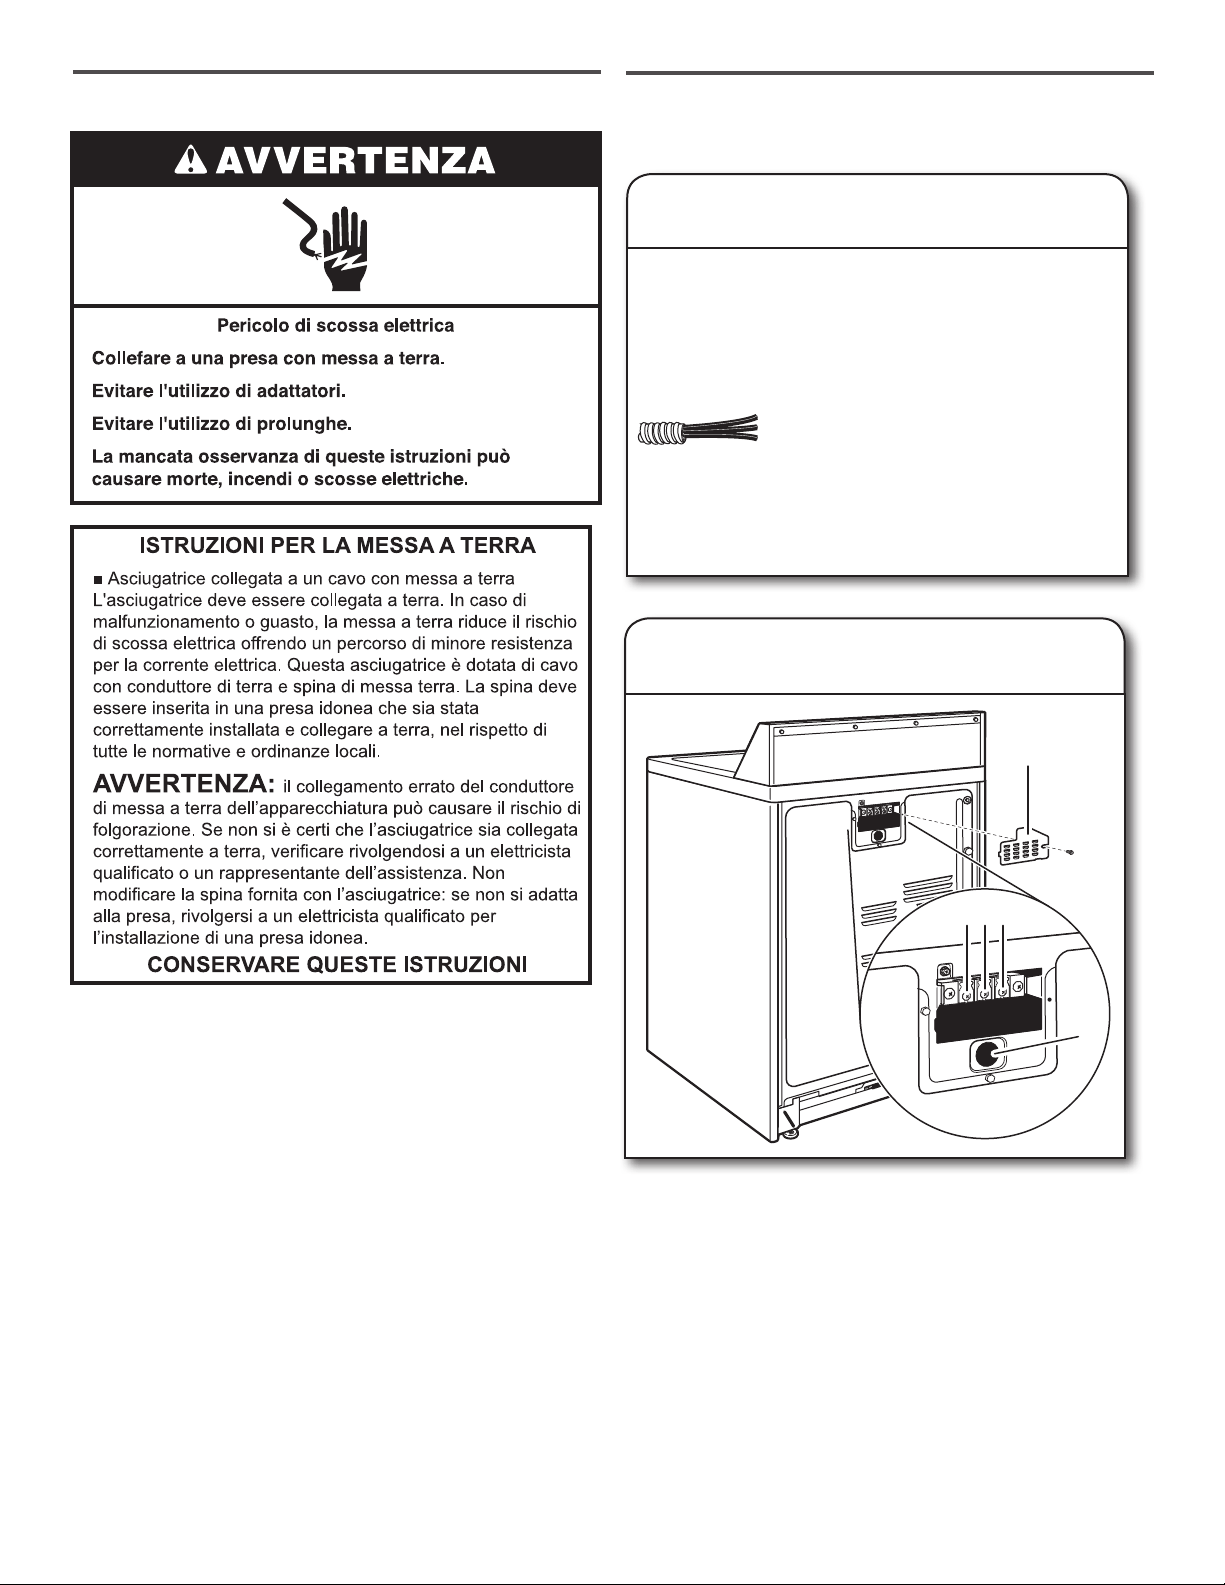
11
.نكمأ نإ ،ةينفلا ةمدخلاب لاصتا ةفلكت بنجتل ،
ً
وأ يلي اميف ةحرتقملا لولحلا برج
ةلكشملاةلمتحملا بابسالحلا
ةقيرطب سبملا فيفجت متي
ادج ةليوط فيفجتلا تاقوأ ؛ةيضرم
.ربولا زجاح تيبم وأ ربولا زجاح دسي ربولا زجاح اهب دجوي يتلا ةحاسملا فيظنتب مق .ليمحت لك لبق ربولا زجاح فيظنتب مق
مكارت دق ربو يأ ةلازإب فطلب مق ،ةيئابرهك ةسنكم مادختساب .ةجاحلا بسح ،ربولا
.ربولا زجاح جراخ
فيفجت/ءاوهلا بغز( Air Fluff/Air Dry ةرود ديدحت مت
."No Heat" ةرارح نودب ةرارح ةجرد دادعإ وأ )يئاوه
."ليسغلا تارود ليلد" عجار .اهفيفجت يراجلا سبملا عونل ةبسانملا ةرودلا ددح
.ةعرسب اهفيفجت متي يك ةليقثو ادج ةريبك ةلومحلا.ةيرحب رودي يك لمحلا لصفا
امم ،ربولاب دودسم يجراخلا مداعلا ءاطغ وأ مداعلا جرخم
.ءاوهلا ةكرح ديقي
ققحتلل يجراخلا مداعلا ءاطغ تحت كدي عض .قئاقد 10-5 ةدمل ففجملا ليغشتب مق
مق وأ ربولا نم مداعلا ماظن فظن ،ءاوهلا ةكرحب رعشت تنك اذإ .ءاوهلا ةكرح نم
ريغ جرخملا نأ نم دكأت .نرم وأ ليقث يندعم مداع جرخمب مداعلا جرخم لادبتساب
.وتلم وأ عدصتم
.تيبثتلا تاميلعت رظنا
.ةكبشلا دست جيسنلا معنم قاروأ.طقف ةدحاو ةرم اهمدختسا ،طقف ةدحاو جيسن معنم ةقرو مادختسا
.حيحص ريغ مداعلا جرخم لوط جراخملا .ادج ةريثك تافطعنم هب وأ ادج يوط سيل مداعلا جرخم نأ نم دكأت
رظنا .وتلم وأ عدصتم ريغ جرخملا نأ نم دكأت .فيفجتلا تقو نم ديزتس ةليوطلا
.تيبثتلا تاميلعت
.حيحص ريغ مداعلا جرخم رطق ساقم.)تاصوب 4( مم 102 رطقب مداع جرخم ةدام مدختسا
ةجرد 7 نم لقأ اهترارح ةجرد ةفرغ يف دوجوم ففجملا
.)تياهنرهف ةجرد 45( ةيوئم
45( ةيوئم ةجرد 7 نم ىلعأ ةرارح تاجرد بلطتت ففجملا تارودل ميلسلا ليغشتلا
.)تياهنرهف ةجرد
.ةيفاك ةيوهت تاحتف اهب سيل ةنازخ يف دوجوم ففجملا .بابلا نم يلفسلاو يولعلا ءزجلا يف ةيوهت تاحتف اهب ةنازخلا باوبأ نوكت نأ بجي
،ءاوهلا زيح نم )ةصوب 1( مم 25 ىندأ ادح بلطتي ففجملا نم يماما ءزجلا
5( مم 127 ففجملا نم يفلخلا ءزجلا بلطتي ،تيبثتلا تايلمع مظعمل ةبسنلابو
.تيبثتلا تاميلعت رظنا .)تاصوب
لمعي ففجملا.لماكلاب بابلا قغإ متي مل.امامت ففجملا باب قغإ نم دكأت
ىلع طوبضم ريغ )Start/Stop( فاقيا/ليغشتلا ضبقم
."ON" ليغشتلا دادعإ
."ON" ليغشتلا دادعإ ىلع فاقيا/ليغشتلا ضبقم ردأ
متي مل وأ ماكحإب فاقيا/ليغشتلا ضبقم ىلع طغضلا متي مل
.ةيفاك ةرتفل هيلع طغضلا
عمست ىتح )Start/Stop( فاقيا/ليغشتلا ضبقم ىلع رارمتسا عم طغضا
.ففجملا ةلح ةكرح
.ةرئادلا عطاق ليغشت مت وأ لزنملا رهصنم قارتحا مت ،رودت ةلحلا نوكت دق .ةرئاد عطاق وأ يلزنم رهصنم 2 مدختست ةيئابرهكلا تاففجملا
.ةرارح دجوت دق نكلو
لصتا ،ةلكشملا ترمتسا اذإ .ةرئادلا عطاق ةئيهت دعأ وأ نيرهصنملا ك لدبتسا
.يئابرهكب
.ةحيحص ريغ ةقاطلا تادادمإ يئابرهك ةدعاسمب ققحت .تلوف 240 ايئابرهك ارايت ةيئابرهكلا تاففجملا بلطتت
.لهؤم
.حيحص ريغ رهصنم عون.ينمزلا ريخأتلا ةفيظوب دوزم رهصنم مدختسا
ةيداع ريغ تاوصأ.نمزلا نم ةرتفل مدختس
ُ
ي مل ففجملا قئاقدلا لخ ذاش توص كانه نوكي دق ،نمزلا نم ةرتفل ففجملا مادختسا متي مل اذإ
.ليغشتلا نم ىلوا ةليلقلا
ةلحلا نيب قرو كبشم وأ رز وأ ةيندعم ةلمع زاجتحا مت
.ففجملل يفلخلا وأ يماما ءزجلاو
بويجلا فيظنتب مق .ةريغص ءايشأ نع اثحب ةلحلل ةيفلخلاو ةيماما فاوحلا نم ققحت
.ليسغلا لبق
.زاغ ففجم اذه.يعيبط ليغشت توص دعي زاغلا مامص طغض
نم ايوتسم سيل ففجملا نأ وأ ،عبرا لجرا تيبثت متي مل
.رخا بناجلا ىلإ بناج نمو فلخلا ىلإ ماما
.حيحص لكشب هتيبثت متي مل اذإ ففجملا زتهي دق
.تيبثتلا تاميلعت رظنا
.ةروكتم وأ ةدقعم سبملا .ففجملا زازتها يف ببستي امم ،ليمحتلا دتري فوس ،ةروكتم سبملا نوكت امدنع
.ففجملا ليغشت ةداعإب مقو ليمحتلا رصانع لصفا
ةرارح دجوت .ةرئادلا عطاق ليغشت مت وأ لزنملا رهصنم قارتحا مت 2 مدختست ةيئابرهكلا تاففجملا .ةرارح دجوت دق نكلو ،رودت ةلحلا نوكت دق
اذإ .ةرئادلا عطاق ةئيهت دعأ وأ نيرهصنملا ك لدبتسا .ةرئاد عطاق وأ يلزنم رهصنم
.يئابرهكب لصتا ،ةلكشملا ترمتسا
.حوتفم ريغ دادما طخ مامص.حوتفم دادما طخ مامص نأ نم دكأت ،زاغلا تاففجمل ةبسنلاب
.ةحيحص ريغ ةقاطلا تادادمإ .تلوف 240 ايئابرهك ارايت ةيئابرهكلا تاففجملا بلطتت
.لهؤم يئابرهك ةدعاسمب ققحت
اهحصإو لاطعا فاشكتسا
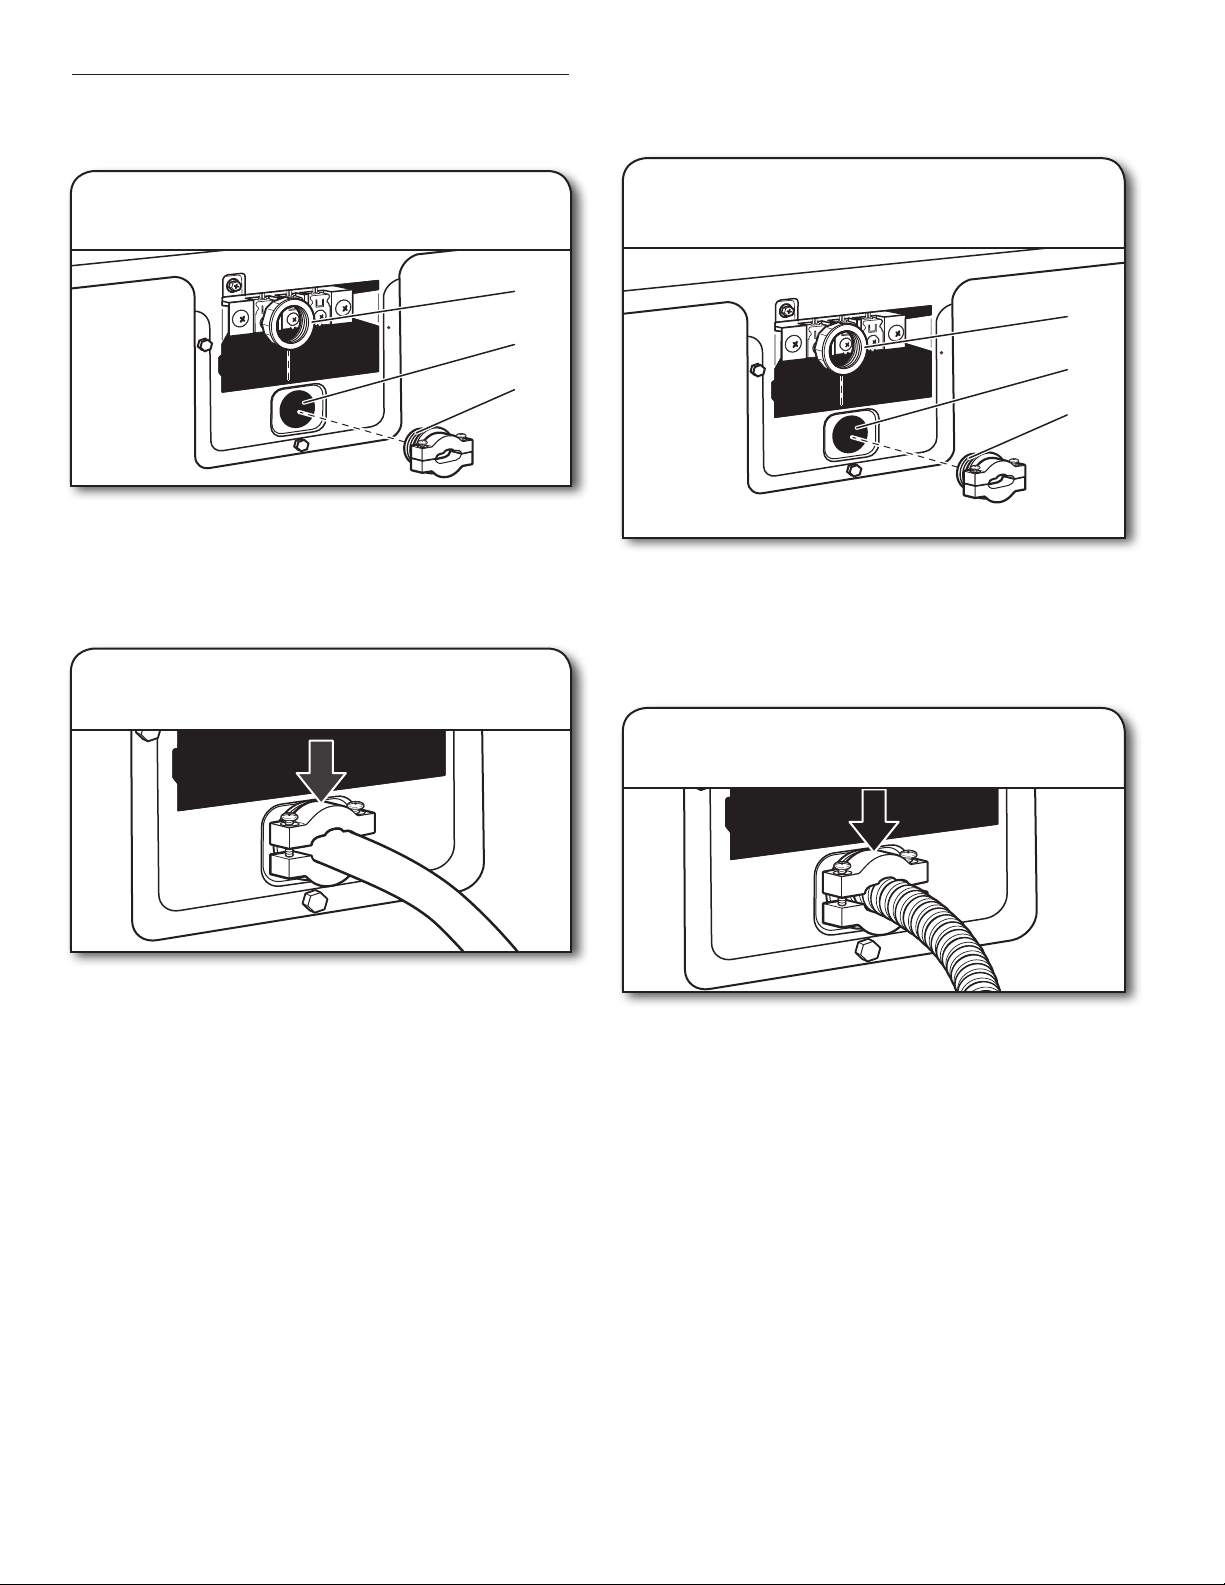
10
كيرحتلاو نيزختلا ءانثأو تازاجا يف ةيانعلا
نيزختلا وأ مادختسا مدع ءانثأ ةيانعلا
مدختست نل وأ ةزاجإب موقتس تنك اذإ .تيبلا يف نوكت امدنع إ ففجملا ليغشتب مقت
:كيلع بجي ،نمزلا نم ةليوط ةرتفل كب صاخلا ففجملا
.ةيئابرهكلا ةقاطلا لصفا وأ ففجملا سباق لصفا .1
.زاغلا دادمإ طخ فاقيإ مامص قغإ :)طقف زاغلا تاففجمل( .2
."ربولا زجاح فيظنت" رظنا .ربولا زجاح فيظنت .3
كيرحتلا ءانثأ ةيانعلا
:ةقاطلا دادمإ لبكب ةلصتملا تاففجملل
.يئابرهكلا رايتلا لبك لصفا .1
.ففجملا ةدعاق يف ةمكحم ةيوستلا لجرأ نأ نم دكأت .2
.ففجملا باب نيمأتل طيرشلا مادختسا .3
:ةرشابم ءابرهكلاب ةلصتملا تاففجملل
.ةرئادلا عطاق قودنص وأ رهصنملا يف ةقاطلا لصفا .1
.كسا لصفا .2
.ففجملا ةدعاق يف ةمكحم ةيوستلا لجرأ نأ نم دكأت .3
.ففجملا باب نيمأتل طيرشلا مادختسا .4
:زاغلا تاففجمل
.ةقاطلا هنع عطقا وأ ففجملا سباق بحسا .1
.زاغلا دادمإ طخ يف فاقيا مامص قغإب مق .2
.ففجملا بوبنأب ةقحلملا تازيهجتلا ةلازإب مقو زاغلا دادمإ بيبانأ طخ لصفا .3
.حوتفملا دوقولا دادمإ طخ ةيطغتب مق .4
.ففجملا ةدعاق يف ةمكحم ةيوستلا لجرأ نأ نم دكأت .5
.ففجملا باب نيمأتل طيرشلا مادختسا .6
ففجملا بيكرت ةداعإ
.هليصوتو هتيوستو ففجملا عضوم طبضل بيكرتلا تاميلعت عبتا
)تيدوملا ضعب يف( ةلحلا حابصم رييغت
.ةيئابرهكلا ةقاطلا لصفا وأ ففجملا سباق لصفا .1
يفلخلا رادجلا ىلع يئابرهكلا حابصملا ءاطغ عقوم ددح .ففجملا باب حتفا .2
يلفسلا نكرلا يف دوجوملا رامسملا ةلازإب مق ،سبيليف كفم مادختساب .ففجملل
.ءاطغلا لزأ .ءاطغلا نم نميا
ةردق ةزهجأ حابصمب حابصملا لدبتسا .ةعاسلا براقع هاجتا سكع حابصملا ردأ .3
.رامسملاب هطبراو ءاطغلا عضو دعأ .طقف تاو 10
.ةقاطلا ليصوت دعأ وأ ضرؤم ذخأمب ففجملا ليصوتب مق .4
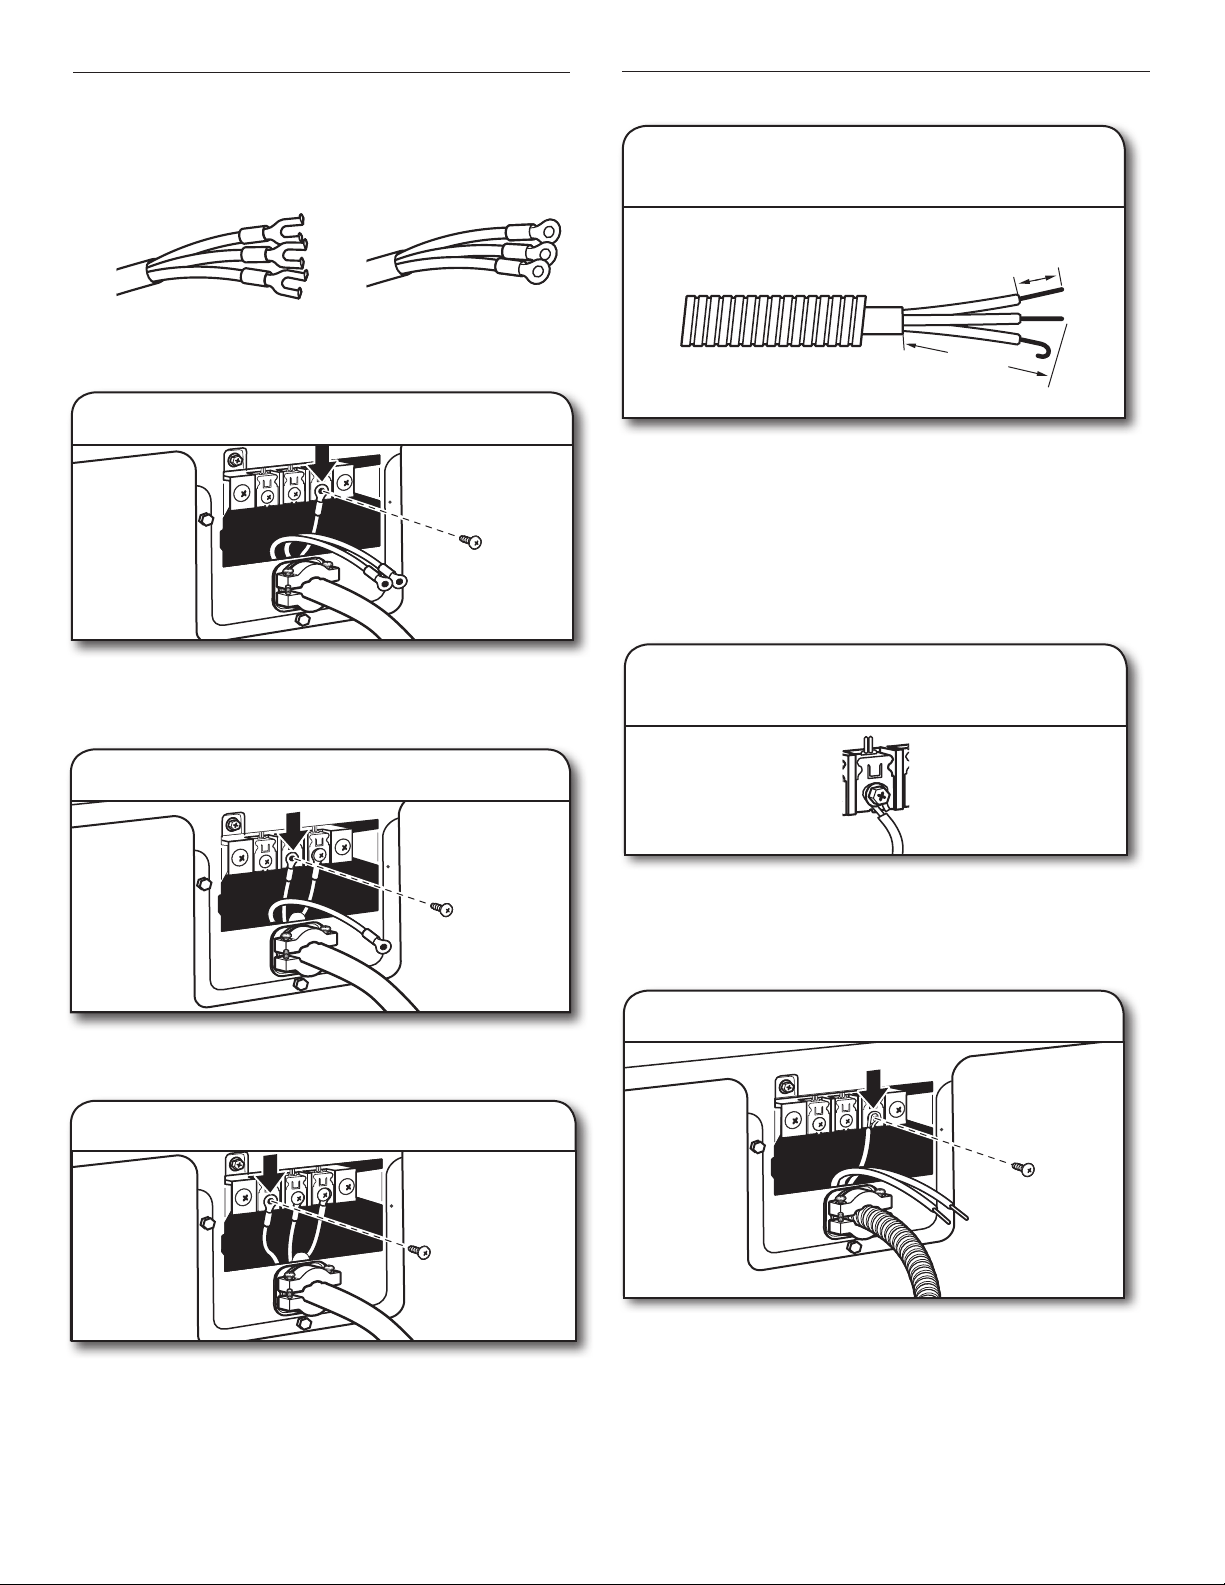
9
ففجملاب ةيانعلا
ءاوهلا قفدت عنم اهنأش نم يتلا رصانعلا نم ايلاخو افيظن ففجملا ناكم ىلع ظفاح
.ففجملا مامأ نم ليسغلا ماوكأ ةلازإ اذه لمشي .ففجملل حيحصلا ليغشتلا لجأ نم
ربولا زجاح فيظنت
لمح لك عضو لبق فيظنتلا
تقو نم ديزي نأ نكمي ربولاب دودسملا زجاحلا .ففجملا لخاد ربولا زجاح عقي
.فيفجتلا
:فيظنتلل
زجاحلا جراخ ربولا فلب مق .هب صاخلا لماحلا نم ربولا زجاح بحسا .1
نم نوكي بطرلا ربولاف .ربولا ةلاز زجاحلا لسغت وأ فطشت .كعباصأب
.هتلازإ بعصلا
.هناكم يف ةوقب ةيناث ةرم ربولا زجاح عفدا .2
:ماه
■ وأ افلات وأ اضافضف ربولاو ةلاسنلا زجاح نوكي امدنع ففجملا ليغشتب مقت
فلتو ةرارحلا ةجرد عافترا ىلإ يدؤي نأ نكمي كلذب مايقلا .ادوقفم وأ ادودسم
.ةشمقاو ففجملا نم لك
■ مداعلا ءاطغ صحفا ،هتلازإ ءانثأ ففجملا لخاد ىلإ زجاحلا نم ربولا طقس اذإ
.تيبثتلا تاميلعت يف "ةيوهتلا تابلطتم" رظنا .ربولا ةلازإب مقو
■ زجاح اهب دجوي يتلا ةحاسملا فيظنتب مق
ةسنكم مادختساب .ةجاحلا بسح ،ربولا
دق ربو يأ ةلازإب فطلب مق ،ةيئابرهك
.ربولا زجاح جراخ مكارت
ةجاحلا بسح فيظنتلا
نكمي جيسنلا تامعنمو ليسغلا تافظنم اياقب
مكارتلا اذه .ربولا زجاح ىلع مكارتت نأ
نأ لبق ففجملا فقوت يف ببستي وأ ،كسبمل لوطأ فيفجت تاقوأ ببسي نأ نكمي
دوجو ءانثأ ربولا طقس اذإ ادودسم زجاحلا نوكي امبر .امامت كب صاخلا لمحلا فجي
.ففجملا يف زجاحلا
اذإ ،اراركت رثكأ لكشب وأ رهشأ 6 لك نوليانلا نم ةاشرفب ربولا زجاح فيظنتب مق
.تافلخملا مكارتل ةجيتن دادسنا ثدح
:ليسغلل
.كعباصأب زجاحلا جراخ ربولا فلب مق .1
.نخاسلا ءاملاب ربولا زجاح يبناج للب .2
ةاشرفلاب ربولا زجاح فيظنتب مق .لئاس فظنمو نخاسلا ءاملاب نوليانلا ةاشرف للب . 3
.ةمكارتملا اياقبلا ةلاز
.ةنخاس هايمب زجاحلا فطشا . 4
.ةفيظن ةفشنمب امامت ربولا زجاح ففج . 5
.ففجملا يف زجاحلا تيبثت دعأ
لخادلا نم ففجملا فيظنت
ففجملا ةلح فيظنتل
ةلحلا نم ةعقبملا ةقطنملا يف لاعتشل لباق ريغ يلزنم فظنم ،لئاس عض .1
.ةعقبلا ةلازإ متت ىتح ةمعان شامق ةعطقب كرفاو
.ةللبم شامق ةعطقب لماكلاب ةلحلا حسما .2
.ةلحلا فيفجتل ةفيظنلا فشانملا وأ سبملا نم ةعومجم بيلقتب مق .3
وأ ميندلا قرزا زنيجلا لثم ،ةبئاس غابصأ ىلع يوتحت يتلا سبملا :ةظحم
تسيل عقبلا هذه .ففجملا لخاد اهنول ريغتي دق ،ةيهاز ناولأب ةنولملا ةينطقلا سبملا
مق .سبملا نم ةيلبقتسملا لامحل اعقب ببست نلو كب صاخلا ففجملاب ةراض
.ةلحلاب عقب ثادحإ بنجتل جراخلا ىلإ ةبولقم سبملا هذه فيفجتب
مكارتملا ربولا ةلازإ
ففجملا ةروصقم لخاد نم
نأ يغبني .ففجملا مادختسا بسح ،اراركت رثكأ لكشب وأ ،نيتنس لك ربولا ةلازإ بجي
.لهؤم ةمدخ ينف ةطساوب فيظنتلا متي
مداعلا جرخم نم
.ففجملا مادختسا بسح ،اراركت رثكأ لكشب وأ ،نيتنس لك ربولا ةلازإ بجي
ففجملا ناكم فيظنت
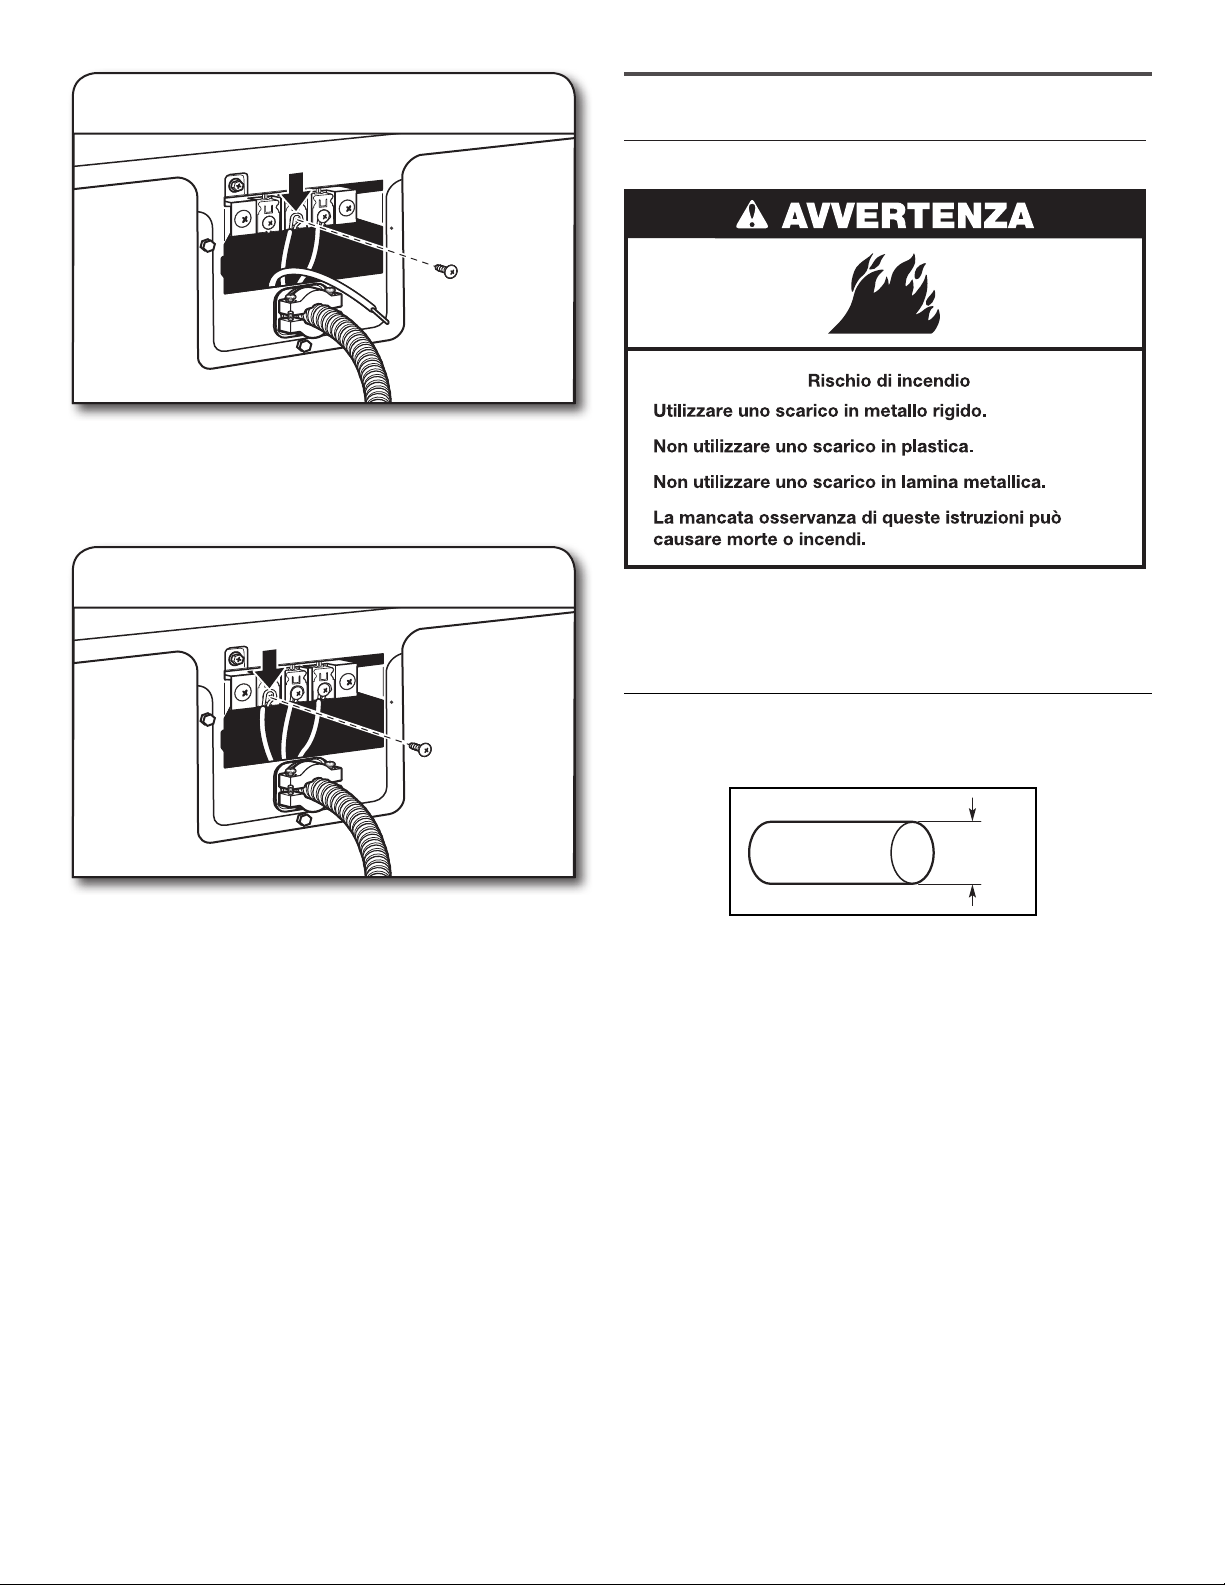
8
ةرودلا ءدبل فاقيا/ليغشتلا ضبقم ىلع طغضا .5
.ةرودلا ءدبل )Start/Stop( فاقيا/ليغشتلا ضبقم ىلع رارمتسا عم طغضا
عضو ىلع )Start/Stop( فاقيا/ليغشتلا ضبقم ردأ ،ركبم تقو يف ةرودلا ءاهن
."OFF" ليغشتلا فاقيإ
ةزيم مادختسا .ديعاجتلا روهظ نم دحلل ةرودلا لامتكا دعب روفلا ىلع سبملا ةلازإب مق
ةلازإ نم نكمتت امدنع ديعاجتلا بنجتل )ديعاجتلا يف مكحتلا( Wrinkle Control
.فقوتي املاح ففجملا نم ةلومح
ةرودلا تارايخو تادادعإ نييعت .4
.بولطملا عضوملا ىلإ ضبقملا ريودت لخ نم ةرودلا تارايخو تادادعإ رتخا
.تارودلا عيمج يف تادادعاو تارايخلا عيمج رفوتت :ةظحم
ةرارحلا ةجرد
ةرارح ةجرد ديدحت" رظنا .فيفجتلا ةرارح ةجرد دادعإ رييغتل ةرارحلا ةجرد ضبقم ردأ
."فيفجتلا
)تيدوملا ضعب يف( )ديعاجتلا يف مكحتلا( Wrinkle Control ةزيم
ردأ .ةرودلا ةياهن يف يرود لكشب ةرارحلا نم يلاخلا بيلقتلا نم ةقيقد 40 ىلع لصحا
يأ يف ففجملا فاقي NO ديدحتل )ديعاجتلا يف مكحتلا( Wrinkle Control ضبقم
.ةرودلا ءاهتنا لبق تقو
ةبولطملا ةرودلا ددح .3
لوح تامولعملا نم ديزمل "تارودلا ليلد" عجار .كب صاخلا لمحلل ةبولطملا ةرودلا ددح
.ةرود لك
"AUTOMATIC DRY" يئاقلتلا فيفجتلا تارود
ليوحت لخ نم ،كب صاخلا لمحلا ىلع ادامتعا ،فلتخم فافج ىوتسم ديدحت كنكمي
.بولطملا فافجلا ىوتسم ىلع ضبقملا
ىوتسم
ً
ايئاقلت لدعي "لقأ فيفجت" وأ "ةلضفملا ةقاطلا" وأ "يداع" وأ "رثكأ فيفجت" ديدحت
هرييغت نكمي هنإف ،فافجلا ىوتسم نييعت درجمب .ففجملا قغإ هدنع متيس يذلا فافجلا
.ةرودلا فقو نود
اقفو فيفجتلا تقو توافتي .تقو رصقأ يف فيفجت لضفأ يطعت يئاقلتلا فيفجتلا تارود
.فافجلا ةجردو لمحلا رادقمو جيسنلا عونل
فيفجت" ةرود ليزت .سبملا ةبوطر نم ديزملا ليزت "رثكأ فيفجت" تارود :ةظحم
لامكتس تاعامشلا ىلع اهعضو يف بغرت دق يتلا لامحل مدختس
ُ
تو لقأ ةبوطر "لقأ
.فيفجتلا
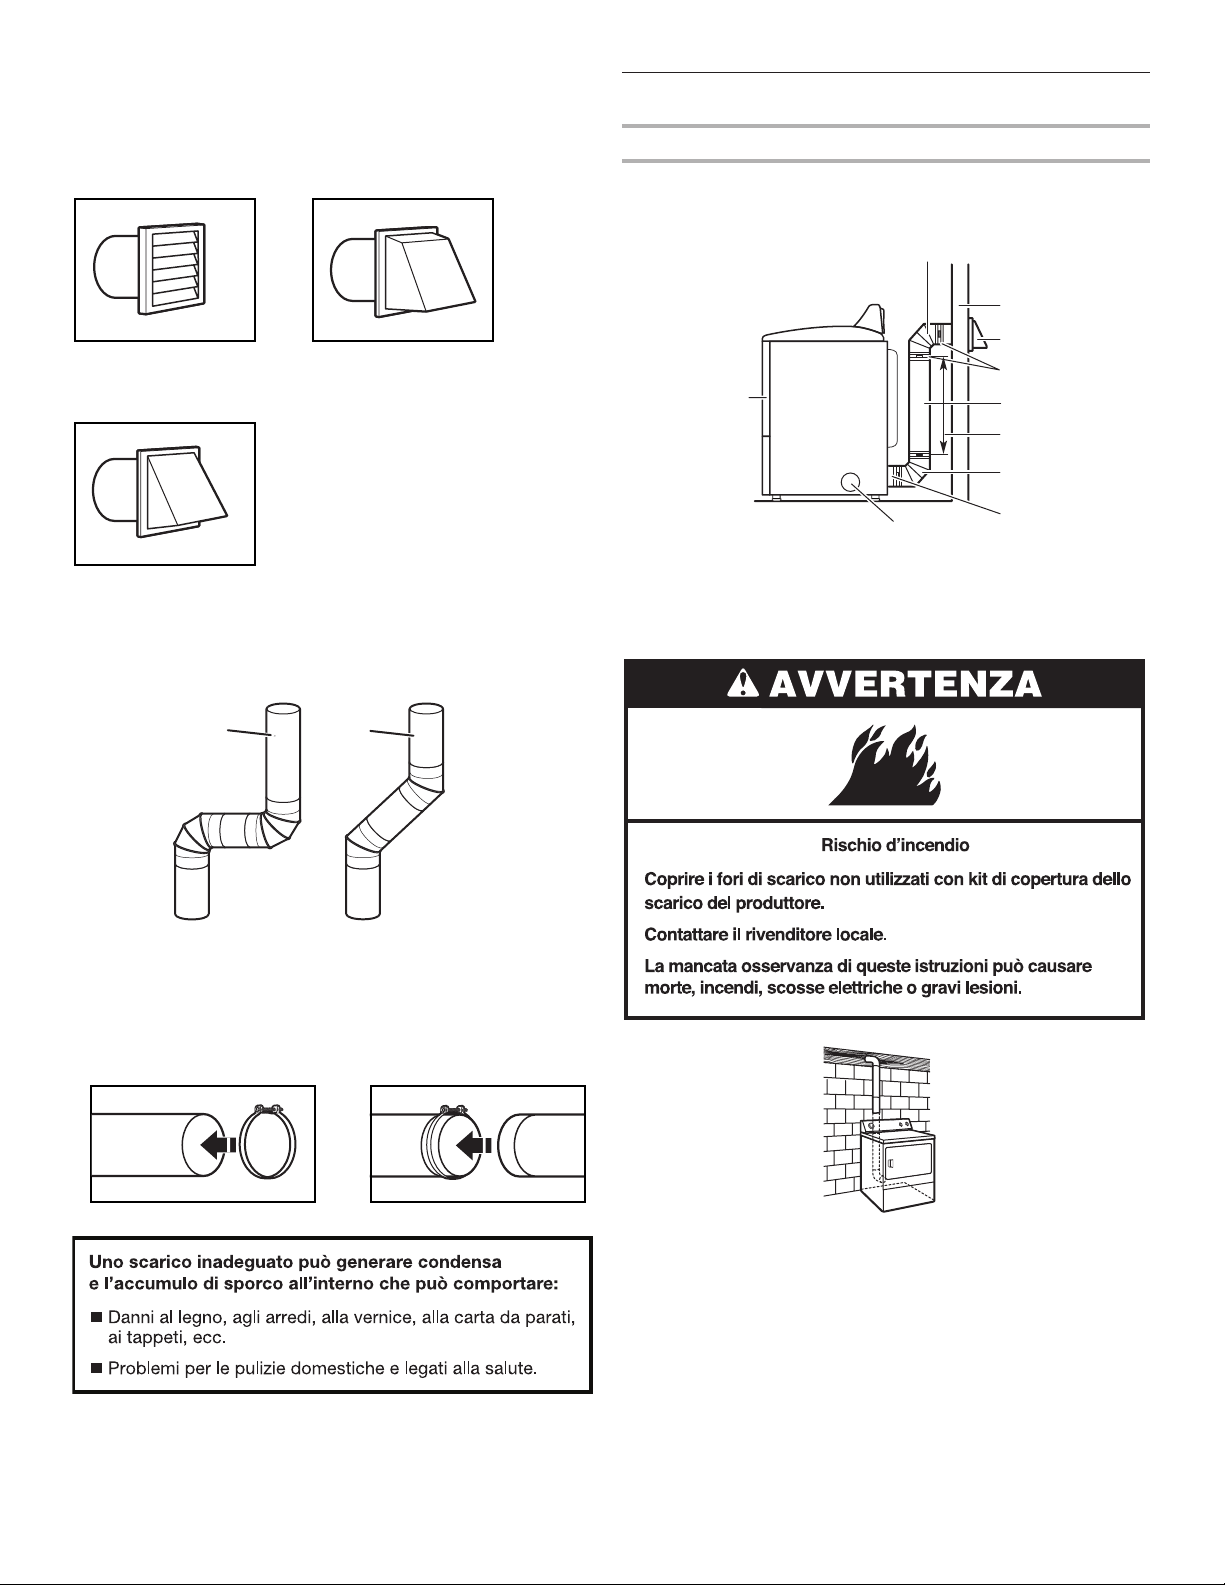
7
ففجملا مادختسا
ربولا زجاح فظن .1
فلب مق .هب صاخلا لماحلا نم ربولا زجاح بحسا .ليمحت لك لبق ربولا زجاح فيظنتب مق
ةرم ربولا زجاح عفدا .ربولا ةلاز زجاحلا لسغت وأ فطشت .كعباصأب زجاحلا جراخ ربولا
.هناكم يف ةوقب ةيناث
."ففجملاب ةيانعلا" مسق رظنا ،فيظنتلا لوح ةيفاضإ تامولعم ىلع لوصحلل
ففجملاب ليسغلا عضو .2
.بابلا قلغأ .ففجملا يف ليسغلا عض
اهل تيدوملا ضعب .رهظي يذلا نع افلتخم كب صاخلا ليدوملا باب نوكي دق :ةظحم
.ةلدسنم باوبأ
.ةيرحب نارودلا نم سبملا نكمتت نأ بجي .ففجملا ةئبعت يف طرفت
ىجري ،دارفا ةباصإ وأ ةيئابرهك تامدص عوقو وأ قيرح بوشن رطخ نم دحلل :ريذحت
.ففجملا اذه ليغشت لبق ةماهلا ناما تاميلعت ةءارق
جتانلا رابغلا ةلاز ةللبم شامق ةعطقب ففجملا ةلح حسما ،كب صاخلا ففجملا مادختسا لبق
.نحشلاو نيزختلا نع

6
.تيدوملا عيمج يف تادادعاو ليسغلا تارود عيمج رفوتت
تادادعا .فيفجتلا ةرارحل طبض ىصقأ عم ةتوقوم فيفجت ةرود ىلإ دنتست تناك زاغلاو ءابرهكلاب ةلماعلا Maytag تيدومل ةحونمملا ةقاطلاب ةصاخلا ةيموكحلا دامتعا تاداهش :ةظحم
ةرارحلا ،)Normal cycle( ةيداعلا ةرودلا ،)Automatic Dry( يئاقلتلا فيفجتلا ،)Sensor Dry( رعشتسملا مادختساب فيفجتلا ةرودب ةصاخلاو هب ةدوزملا وحنلا ىلع ةيضارتفا
.ةمدختسم نكت مل )Wrinkle Shield( دعجتلا صرق ،)Low heat( ةضفخنملا
يئاقلتلا فيفجتلا تارود - تارودلا ليلد
توقوملا فيفجتلا تارود - تارودلا ليلد
.تيدوملا عيمج يف تادادعاو ليسغلا تارود عيمج رفوتت
.مكحتلا ةحولب ةددحملا ةدملل ففجملا ةرودلا هذه ل
ِ
ّ
غش
ُ
تس
- توقوملا فيفجتلا
ةرود ددح ،ديرت امم افافج رثكأ لامحا تناك اذإ .ةهباشم ةلومح اهيف ففجت يتلا ةمداقلا ةرملا يف "More Dry" رثكأ فيفجت ةرود ددح ،هديرت يذلا ردقلاب ةفاج لامحا نكت مل اذإ :ةظحم
.ةهباشم ةلومح اهيف ففجت يتلا ةمداقلا ةرملا يف "Less Dry" لقأ فيفجت
فيفجتلا ةرارح ةجرد ديدحت
:ةددعتم ةرارح تادادعإ هب كب صاخلا ففجملا ناك اذإ
فشانملا لثم نزولا ةليقث سبملا فيفجتل ةعفترم ةرارح ةجرد دادعإ مادختسا نكمي
.لمعلا سبمو
نزولا ةطسوتم سبملا فيفجتل طسوتم ىلإ ضفخنم ةرارح ةجرد دادعإ مادختسا نكمي
ديعاجتلل ةمواقملا ةشمقاو ةيلخادلا سبملاو نيتاسفلاو تازولبلاو تاءملا لثم
.ةكيحملا تاجوسنملا ضعبو
وأ طاطملا وأ ةيوغرلا ةجسنل "No Heat" ةرارح نودب فيفجت دادعإ مدختسا
.ةرارحلل ةساسحلا ةشمقا وأ كيتسبلا
.ليسغلا لبح مادختساب ةفلغملا وأ ةجوسنملا ريغ ةشمقا فيفجتب مق
ىجري ،ةفلتخملا لامحل فيفجتلا ةرارح تاجرد لوح ةلئسأ كيدل ناك اذإ :ةظحم
.ةيانعلا قصلم ىلع ةنودملا تاداشرا ىلإ عوجرلا
:اهفيفجت بجي يتلا سبملا:ةرودلا:ةرارحلا ةجرد:ةحاتملا تارايخلا:ةرودلا ليصافت
،ةليقثلا لمعلا سبم ،زنيجلا
فشانملاو
رثكأ فيفجت
وأ ةيداعلا ةقاطلا
ةلضفملا ةقاطلا
ةيلاعWrinkle Control/
Wrinkle Prevent
)ديعاجتلا عنم/ديعاجتلا يف مكحتلا(
ةرارحلا ةجرد
ةرودلا ةراشإ
.تقو رصقأ يف فيفجت لضفأ يطعت يئاقلتلا فيفجتلا تارود
ةجردو لمحلا رادقمو جيسنلا عونل اقفو فيفجتلا تقو توافتي
.فافجلا
ةدوجوملا ةشمقا ساسأ ىلع فيفجت ةرارح ةجرد ديدحتب مق
بجي يتلا ةرارحلا ةجرد نم دكأتم ريغ تنك اذإ .لمحلا يف
.ىلعأ دادعإ ديدحت نم دب لقأ ادادعإ ددح ،لمحلل اهديدحت
ةطسوتم ةشمقاو ،لمعلا سبم
تاءملاو ،نزولا
وأ ةيداعلا ةقاطلا
ةلضفملا ةقاطلا
ةطسوتمWrinkle Control/
Wrinkle Prevent
)ديعاجتلا عنم/ديعاجتلا يف مكحتلا(
ةرارحلا ةجرد
ةرودلا ةراشإ
ناصمقلاو لاوجاكلا سبملا
نزولا ةفيفخ سبملاو ليوارسلاو
ةساسحلاو ةيعانصلا ةجسناو
ةيضايرلا سبملاو
وأ ةيداعلا ةقاطلا
ةلضفملا ةقاطلا
ةضفخنمWrinkle Control/
Wrinkle Prevent
/ديعاجتلا يف مكحتلا(
)ديعاجتلا عنم
ةرارحلا ةجرد
ةرودلا ةراشإ
:اهفيفجت بجي يتلا سبملا :ةرودلا:ةرارحلا ةجرد:ةحاتملا تارايخلا:ةرودلا ليصافت
لثم ةليقثلا وأ ةريبكلا سبملا
ةيدرا وأ ةكيمسلا فشانملا
ليقث فيفجت
"Heavy Dry"
ةرارح ةجرد يأةرارحلا ةجرد.ةليقثلا وأ ةريبكلا لامحا فيفجتل "High" ةيلاع رتخا
ةلومح يأDamp Dry/
Freshen Up
/بطر فيفجت(
)بيطرت
ةرارح ةجرد يأةرارحلا ةجرد بلطتت يتلا سبملا وأ بطر ىوتسم ىلإ سبملا ففجي
.ةلماك فيفجت ةرود
ةشمقاو كيتسبلاو طاطملا
ةرارحلل ةساسحلا
Air Fluff/
Air Dry
/ءاوهلا بغز(
)يئاوه فيفجت
ةرارح نودبةرارحلا ةجرد.ةرارحلا نم يلاخ فيفجت
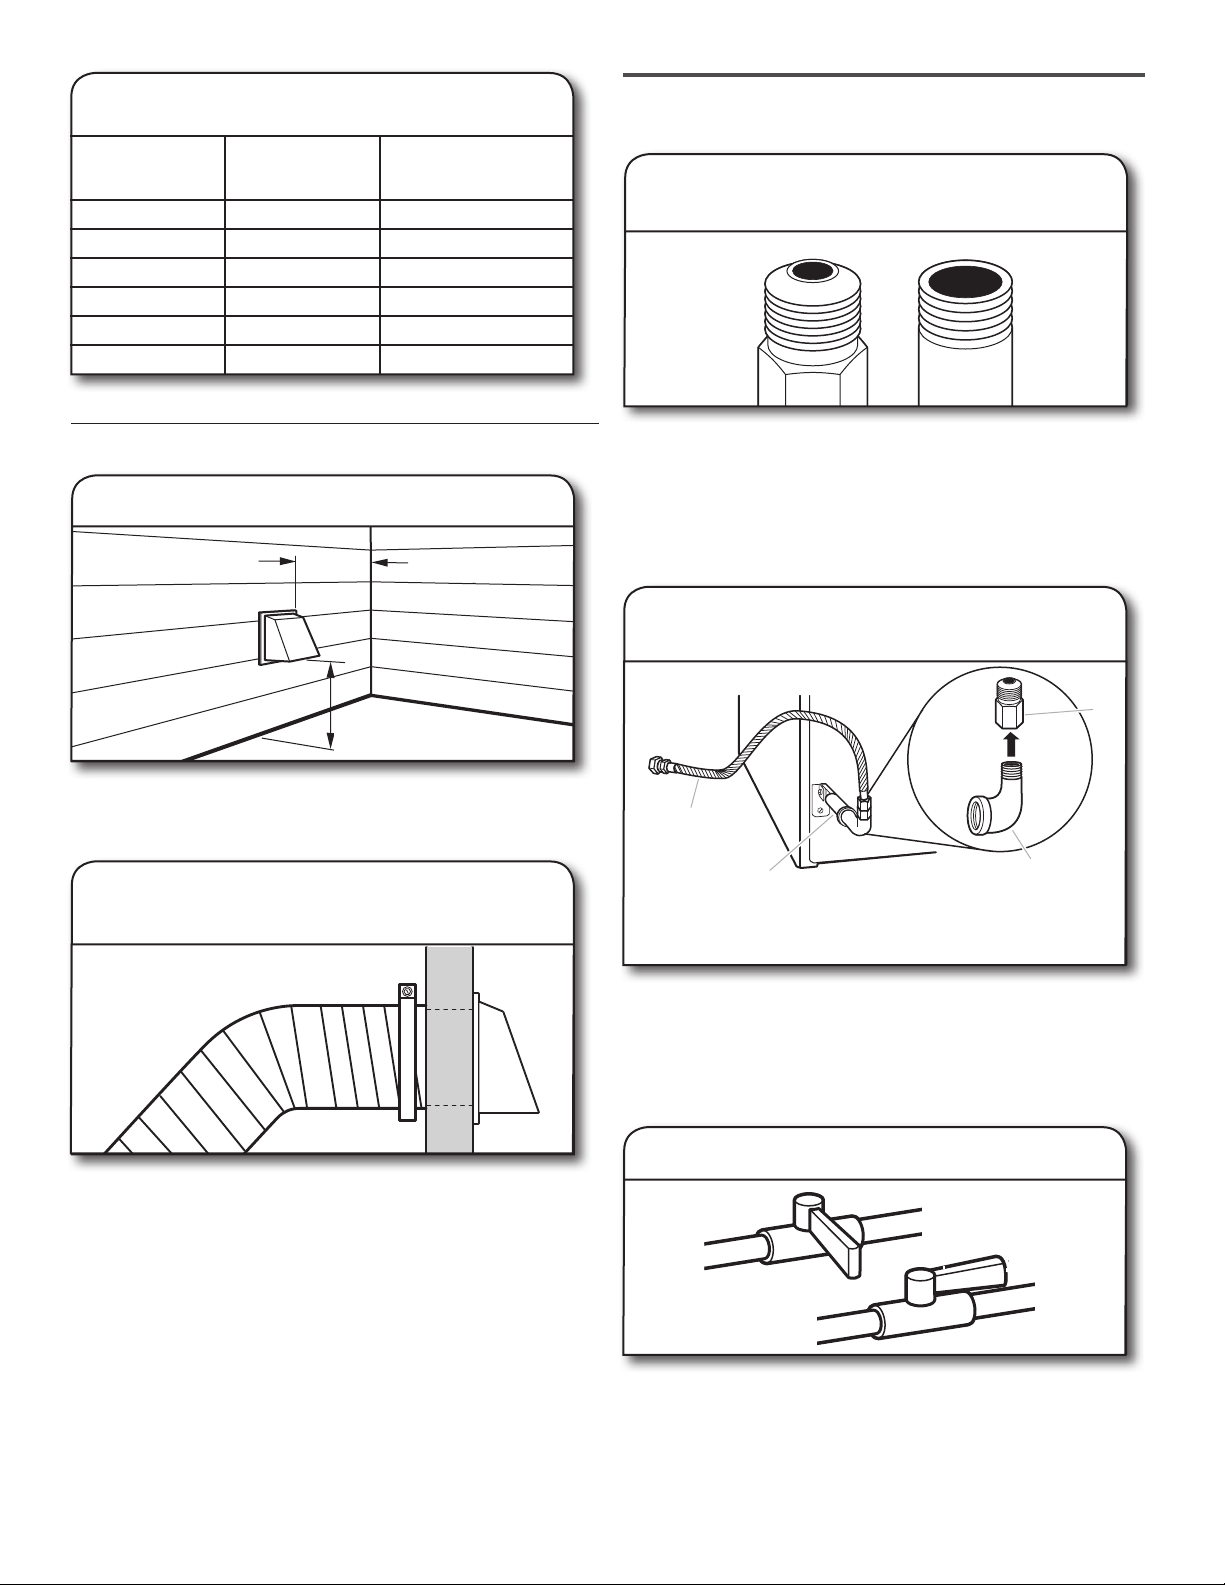
5
تازيملاو مكحتلا ةحول
)ديعاجتلا يف مكحتلا( WRINKLE CONTROL ةزيم
)تيدوملا ضعب يف(
نوكتت نأ نكمي ،فقوتي املاح ففجملا نم سبملا نم ةلومح ةلازإ نم نكمتت امدنع
بيلقتب يرود لكشب )ديعاجتلا يف مكحتلا( Wrinkle Control ةزيم موقت .ديعاجتلا
.ديعاجتلا نوكت مدع ىلع ةدعاسملل سبملا شفنو بيترت ةداعإو
■ ةياهن يف يرود لكشب ةرارحلا نم يلاخلا بيلقتلا نم ةقيقد 40 ىلع لصحا
عضو ىلع )ديعاجتلا يف مكحتلا( Wrinkle Control ضبقم ردأ .ةرودلا
.ةرودلا ءاهتنا لبق تقو يأ يف ليغشتلا وأ فاقيا
ففجملا ةرود ضبقم
ردأ .كب صاخلا ففجملاب ةحاتملا تارودلا ديدحتل ففجملا ةرود ضبقم مدختسا
لوصحلل "ليسغلا تارود ليلد" عجار .ليسغلا ةلومحل ةبسانملا ةرودلا رايتخ ضبقملا
.تارودلل يليصفت فصو ىلع
)TIMED DRY( توقوملا فيفجتلا
.مكحتلا ةادأب ةددحملا ةدملل ففجملا ل
ِ
ّ
غش
ُ
ي
رايتخا كنكمي ،ديدحتلل لباق ةرارحلا ةجردل حاتفم اهب دجوي يتلا تيدوملا يف
ىلع ةرارحلا ةجردو فيفجتلا تقو دمتعيس .ةلومحلا تاجوسنم ىلع
ً
ءانب دادعإ
.كب صاخلا ففجملا ليدوم
)AUTOMATIC DRY( يئاقلتلا فيفجتلا
لوصو دنع فاقياب موقيو ءاوهلا ةرارح ةجرد وأ ةلومحلا يف ةبوطرلا رعشتسي
توافتيس .تقو رصقأ يف فيفجت لضفأ يطعي .ددحملا فافجلا ىوتسم ىلإ ةلومحلا
.فافجلا ةجردو لمحلا رادقمو جيسنلا عونل اقفو فيفجتلا تقو
1
2
3
ةرارحلا ةجرد
ريغ تنك اذإ .لمحلا يف ةدوجوملا ةشمقا ساسأ ىلع فيفجت ةرارح ةجرد ديدحتب مق
ديدحت نم دب لقأ ادادعإ ددح ،لمحلل اهديدحت بجي يتلا ةرارحلا ةجرد نم دكأتم
.ىلعأ دادعإ
)START/STOP( فاقيا/ليغشتلا ءدب
دنع اروف سبملا ةلازإ .فيفجتلا ةرود ءاهتنا دنع اعومسم اتوص ةرودلا ةراشإ جتنت
.ديعاجتلا نم للقي ةرودلا ةياهن
فاقيا وأ "On" ليغشتلا( بولطملا دادعا ديدحتل فاقيا/ليغشتلا ضبقم ردأ
.ففجملا ليغشت ءدبل فاقيا/ليغشتلا ضبقم ىلع طغضا .)"Off"
ردصيس ،)ديعاجتلا يف مكحتلا( Wrinkle Control دادعإ ديدحت دنع :ةظحم
Wrinkle دادعإ يهتني وأ سبملا ةلازإ متت ىتح قئاقد 5 لك ةمغنلا توص
.)ديعاجتلا يف مكحتلا( Control
4
.تيدوملا عيمج يف تارايخلاو ايازملا عيمج رفوتت
.رهظملا فلتخي دق
2 31 4
2 4

4
ءاوهلل ديج قفدت لجأ نم كيدل ةيوهتلا ماظن نم ققحتلا
ءاوهلل ديج قفدت
ةيوهتلا .ةءافكب سبملا فيفجتل ديج ءاوه قفدت تاففجملا بلطتت ،ةرارحلا ىلإ ةفاضإ
تاميلعت رظنا .كيدل ةقاطلا يف ريفوتلا نسحتو فيفجتلا تقو نم للقتس ةميلسلا
.تيبثتلا
.ءاوهلل ديجلا قفدتلا يف اريبك ارود ففجملاب لصتملا ةيوهتلا ماظن بعلي
عفد متيسو نامضلا اهيطغي ةحيحصلا ريغ ةيوهتلا نع ةجتانلا ةمدخلا تاملاكم
.ففجملا تيبثتب ماق نمع رظنلا ضغب ،ءمعلا لبق نم اهتفلكت
:ءاوهلل ديج قفدت ىلع ظافحلل
ديج لضفأ
ةقاطلا ريفوتو جيسنلاب ةيانعلا نيسحتل يئاقلتلا فيفجتلا تارود مادختسا
ةجرد راعشتسا متي ،يئاقلتلا فيفجتلا تارود لخ .جيسنلاب ةيانعلا زيزعتو ةقاطلا يف تاريفوت رثكأ ىلع ففجملا نم لصحتل "Automatic Dry" يئاقلتلا فيفجتلا تارود مدختسا
.ةددحملا فافجلا ةجرد ىلإ سبملا لوصو دنع ففجملا فاقيإ متيو فيفجتلا ةرود لاوط راعشتسا اذه ثدحي .سبملا يف ةبوطرلا ىوتسم وأ فيفجتلا ءاوه ةرارح
فيفجتلا مدختسا .فيفجتلا يف طارفا ببسب ةنكاس ءابرهكو ديعاجتو شامكنا نايحا ضعب يف هنع جتنيو ددحملا تقولا رادقم ففجملا لمعي ،"Timed Dry" توقوملا فيفجتلا عم
.فيفجتلا فر مادختسا دنع وأ يلق رثكأ يفاضإ فيفجت تقو ىلإ جاتحي يذلا انايحأ بطرلا لمحلل توقوملا
■ .ةلومح لك لبق ربولا زجاح فظن
■ ةيندعملا قئاقرلا وأ كيتسبلا نم ةعونصملا ةيوهتلا بوبنأ ةدام لدبتسا
.)تاصوب 4( مم 102 رطقب ةنيتمو ةليقث ةدامب
■ .ةيوهتلا بوبن نكمم لوط رصقأ مدختسا
4"
102 mm
■ لكف ،ةيوهتلا ماظن يف
ً
ةجرد 90 ةيوازب عاوكأ ةعبرأ نم رثكأ مدختست
.ءاوهلا قفدت نم للقي فاطعناو ءانحنا
■ .مداعلا ءاطغ نم تاتفلاو ربولا لزأ
■ ءاهتنا دنع .لقا ىلع نيتنس لك ةيوهتلا ماظن دادتما لماك نم ربولا لزأ
لجأ نم ففجملا عم ةمدقملا تيبثتلا تاداشرإ عابتا نم دكأت ،فيظنتلا نم
.جتنملل يئاهنلا صحفلا
■ .ففجملا ةمدقم نم ءايشا لزأ
تافصاوملا
اميفو .سايقلا ةعاطتسا ثيح نم ةفلتخم تابلطتم تاذ ةددعتم قطانم يف تادحولا هذه عاب
ُ
ت
:جتنملا اذه ىلع ةنيبملا ةحلاصلا سايقلا لاكشأ نم ضعب يلي
هليمحت نكمي يذلا ىصقا ةلومحلا مجح نيبي يذلا نزولا سايقم وهو :ة
فاجلا سبملا ةعس
.ففجملا يف
اهنلعت يتلا تاجوسنملاو فاجلا ناتكلل ىوصقلا ةعسلا لثمت يتلا ةعسلا تاءارجإ :IEC ةعسلا
.ةصاخ ةرودب اهعم لماعتلا نكمي ةعنصملا ةكرشلا
ليدوملا
3LMEDC315FW
3LMEDC415FW
4KMEDC215FW
4KMEDC315FW
4KMEDC415FW
4KMEDC425FW
ةننقم ةيطلف2N~ V 240–2202N~ V 240–220
ردقملا ددرتلازتره 50زتره 60
ردقملا رايتلاريبمأ 20ريبمأ 20
فاجلا ناتكلا ةعاطتسا
)ىصقا دحلا(
)لطر 33( مجك 15)لطر 33( مجك 15
IEC ةعسلا)لطر 15( مجك 7)لطر 15( مجك 7
عافترا)ةصوب 42( مم 1067)ةصوب 42( مم 1067
ضرعلا)ةصوب 29( مم 737)ةصوب 29( مم 737
قمعلا)"16/27
13
( مم 706)"16/27
13
( مم 706
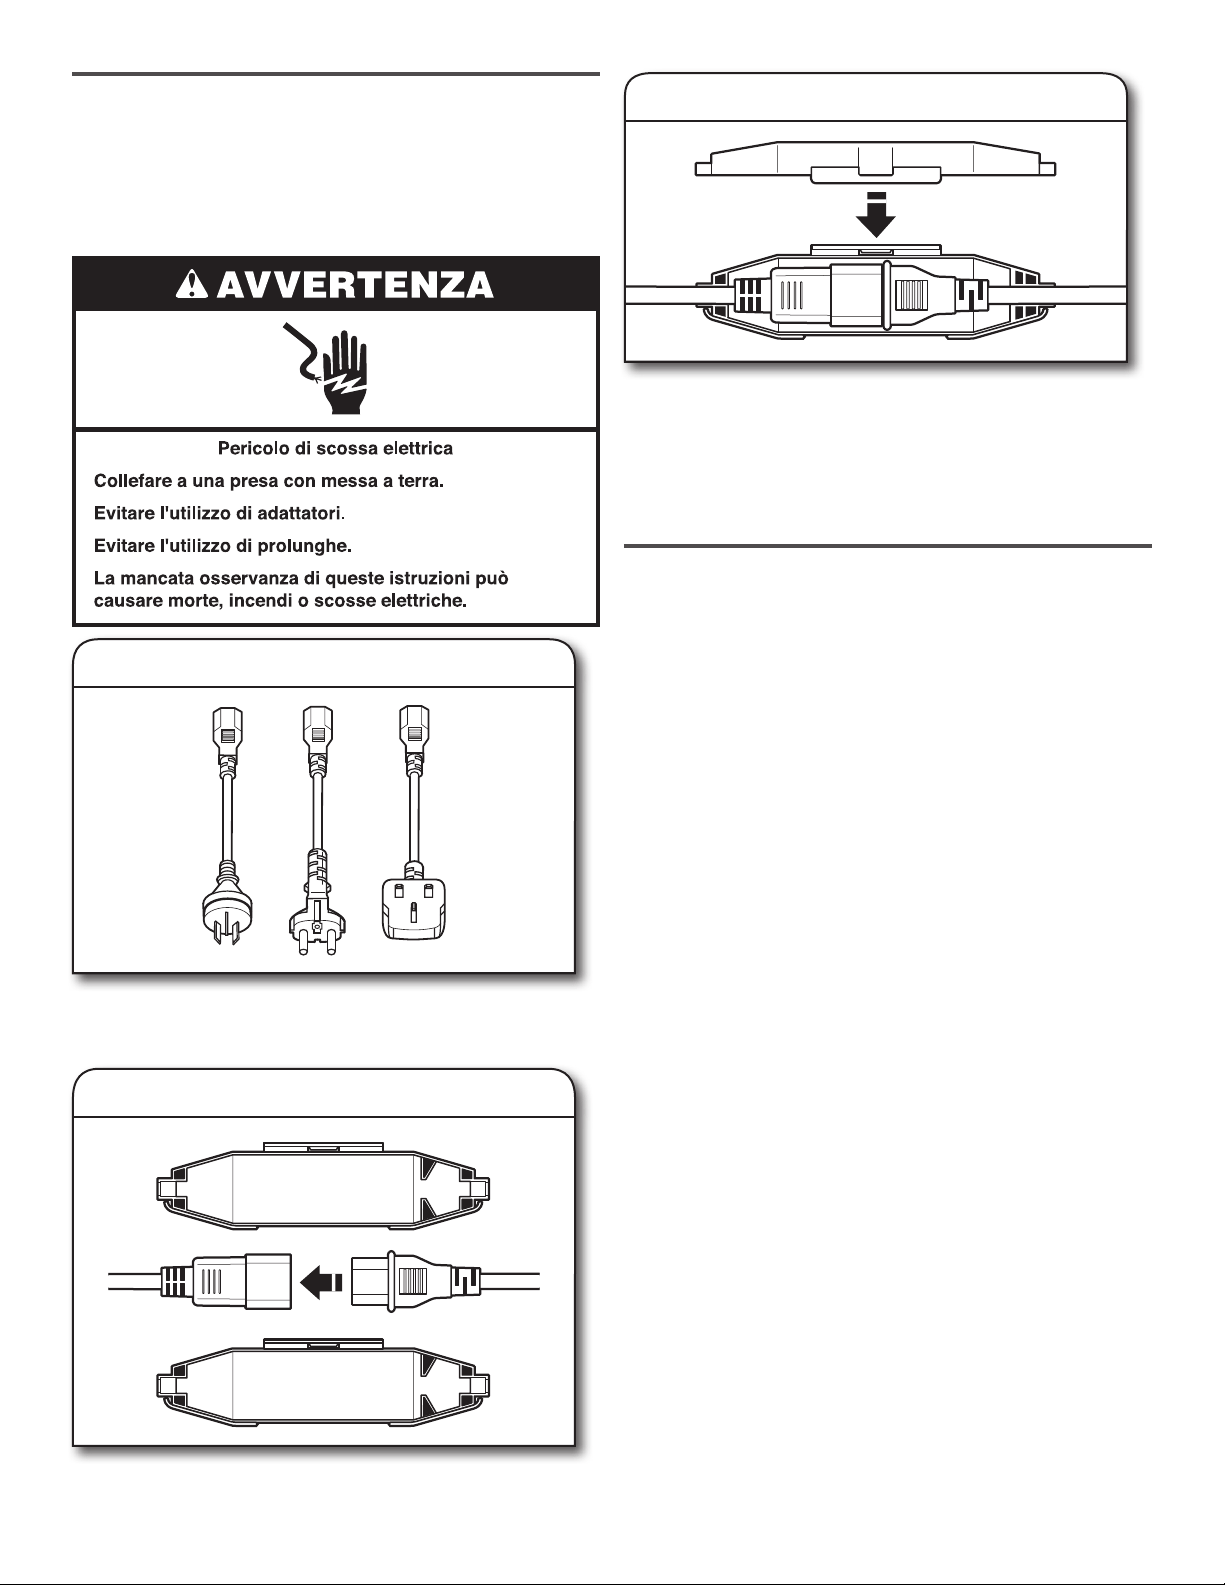
3
كتمس لجأ نم
1 . .هنم برقلاب وأ زاهجلا اذه يف اهنزخت وأ لاعتشا ةعيرس داوملا وأ نيزنبلا مدختست
2 . .هليغشت ءانثأ زاهجلا اذه نم برقلاب )لوسوريا( ذاذرلا شرت
3 ..زاهجلا اذه لدعت
■ .فيظنتلل ةيعانص ةيواميك داوم مادختسا ةلاح يف ففجملا مدختس
ُ
ي أ بجي
■ يف سبملا عضو لبق ،باقثلاو تاعولا لثم ،بويجلا نم ءايشا ةفاك لزأ
.ففجملا
■ .فيفجتلا ةروصقم باوبأ لزأ ،هنم صلختلا وأ ةمدخلا نم ففجملا عفر لبق
■ .كتمس ىلع اظافح بابلل حاتفم زه
ُ
ج .ضوحلا ةكرح ءانثأ ففجملا لخاد كدي دمت
■ .سقطلا لماوعل هيف ضرعتي ناكم يف هنزخت وأ ففجملا تبثت
■ .مكحتلا تاودأب ثبعت
■ .للخلا وأ لطعلا راثآ هيلع تدب اذإ زاهجلا اذه مادختسا لصاوت
■ صني مل ام اهتنايص لواحت وأ زاهجلا ءازجأ نم ءزج يأ لادبتسا وأ حصإب مقت
طقف ةنايصلاو تاحصا ذفني نأ بجي .ديدحتلاب كلذ ىلع ةنايصلاو مادختسا ليلد
.لهؤم ةمدخ ينف
■ ةكرشلا صوت مل ام ةنكاسلا ءابرهكلا ةلازإ تاجتنم وأ ةشمقا تايرطم مدختست
.تاداشرا عبتا .كلذب ةروكذملا تاجتنملا وأ ةشمقا يرطمل ةعنصملا
■ .ةلومح لك عضو لبق ففجملا يف ةلاسنلا حشرم فظن
.هناكم يف ةلاسنلا حشرم عضو نودب ففجملا لغشت
■ ةيلاخ امهب ةطيحملا قطانملاو بحسلاو فيرصتلا تاحتفب ةطيحملا ةقطنملا ىلع ظفاح
.خاسواو رابغلاو ةلاسنلا مكارت نم
■ ةمدخ ينفب ةناعتساب
ً
ايرود مداعلا ىرجمو ففجملا نم يلخادلا ءزجلا فيظنت بجي
.لهؤم
■ .ضيرأتلاب ةصاخلا تاميلعتلا ةفرعمل بيكرتلا تاميلعت رظنا
■ .ففجملا اذه يف ةلوسغملا ريغ رصانعلا ففجت
■ كرت نامضل )ديربت ةرود( ةرارح مادختسا نود ففجملا ةرود نم يئاهنلا ءزجلا لمعي
.فلتلل رصانعلا ضرعت مدع نمضت ةرارح ةجرد يف رصانعلا
■ وأ مامحتسا تاعبق وأ )سكتلا موفلا( يجنفسا طاطملا لثم رصانع فيفجت بجي
ةدوزملا دئاسولا وأ طاطملاب ةموعدملا سبملاو رصانعلا وأ ءاملل ةداضملا ةشمقا
.ليسغلا لبح ىلع طقف يجنفسا طاطملا نم وشحب
■ ليكو وأ ةعنصملا ةكرشلا لبق نم هلادبتسا بجي ،ةقاطلاب ةيذغتلا لباك فلت ةلاح يف
.رطاخملا بنجت لجأ نم ،لهؤم صخش نم هلثامي ام وأ ةنايصلا
رصانعلا ةفاك جارخإ متي مل ام ،فيفجتلا ةرود ةياهن لبق ففجملا فاقيإ بنجت :ريذحت
.ةرارحلا تتشتت ىتح ةعرسب اهدرفو
ةمسلل ةماه تاداشرإ
:يلي ام نمضتت يتلا ةيساسا تاطايتحا هذه عبتا ،ففجملا لامعتسا دنع دارفا ةباصإ وأ ةيئابرهك تامدص عوقو وأ قيرح بوشن رطخ نم دحلل
:ريذحت
تاميلعتلا هذه ظفحا
■
4
IMPORTANT SAFETY INSTRUCTIONS
precautions, including the following:
WARNING:
Read all instructions before using the dryer.
Keep a minimum clearance of 100 mm (4 in.) between the
rear of the dryer and any wall.
The operation of this appliance may affect the operation of
other types of appliances which take their air supply for safe
combustion from the same room. There has to be adequate
ventilation to replace exhausted air and thus avoid the
back-ow of gases into the room from appliances burning
other fuels, including open res, when operating the tumble
dryer. If in doubt, consult the appliance manufacturers.
Do not obstruct the air supply to the dryer (see Installation
Instructions for minimum clearances).
Do not place items exposed to cooking oils in your dryer.
Oil-affected items can ignite spontaneously, especially when
exposed to heat sources such as in a tumble dryer. The
items become warm causing an oxidation reaction in the oil.
Oxidation creates heat. If the heat cannot escape, the items
can become hot enough to catch re. Piling, stacking or
storing oil-affected items can prevent heat from escaping
and so create a re hazard.
If it is unavoidable to dry in the dryer items that have been
soiled with substances such as cooking oil, acetone, alcohol,
petrol, kerosene, spot removers, turpentine, waxes and wax
removers, or that have been contaminated by hair care
products, should be washed in hot water with an extra
amount of detergent before being dried in the dryer. These
items may give off vapours that could ignite or explode. Such
washing will reduce, but not eliminate, the hazard.
This appliance is not intended for use by persons (including
children) with reduced physical, sensory or mental
capabilities, or lack of experience and knowledge, unless
they have been given supervision or instructions concerning
use of the appliance by persons responsible for their safety.
Children should be supervised to ensure that they do not
play with the appliance.
The dryer should not be used if industrial chemicals have
been used for cleaning.
Before the dryer is removed from service or discarded,
remove the doors to the drying compartment.
Do not reach into the dryer if the drum is moving. A door
switch is tted for your safety.
Do not install or store the dryer where it will be exposed
to the weather.
Do not tamper with controls.
Do not continue to use this appliance if it appears to be
faulty.
Do not repair or replace any part of the dryer or attempt
any maintenance unless specically recommended in this
Use and Care Guide. Repairs and servicing should only
be carried out by competent service personnel.
Do not use fabric softeners or products to eliminate static
unless recommended by the manufacturer of the fabric
softener or product. Follow their instructions.
Clean dryer lint screen before or after each load. Do not
operate dryer without lint screen in place.
Keep area around the exhaust and inlet openings and
adjacent surrounding areas free from the accumulation of
lint, dust, and dirt.
The interior of the dryer and exhaust vent should be
cleaned periodically by qualied service personnel.
See Installation Instructions for earthing instructions.
Do not dry unwashed items in this dryer.
Items such as foam rubber (latex foam), shower caps,
waterproof textiles, rubber backed articles and clothes or
pillows tted with foam rubber pads must only be dried
on a clothesline.
SAVE THESE INSTRUCTIONS
WARNING: Never stop a tumble dryer cycle before the
end of the drying cycle unless all items are quickly removed
and spread out so that the heat is dissipated.
To reduce the risk of re, electric shock, or injury to persons when using the dryer, follow basic
The nal part of a tumble dryer cycle occurs without heat
(cool down cycle) to ensure that the items are left at a
temperature that ensures the items will not be damaged.
If the supply cord is damaged, it must be replaced by the
manufacturer or its service agent or a similarly qualied
person in order to avoid a hazard.
.ف
ِ
ّ
فجملا مادختسا لبق تاداشرا عيمج أرقا
■ يأو ففجملا ةرخؤم نيب )تاصوب 4( ملم 100 غلابلا صولخلا نم ىندا دحلا كرتا
.رادج
■ دادمإ ذخأت يتلاو ةزهجا نم ىرخا عاونا ليغشت ىلع زاهجلا اذه ليغشت رثؤي دق
لحم لحتل ةيفاك ةيوهت كانه نوكت نأ بجي .ةفرغلا سفن نم نما ليغشتلل اهئاوه
يتلا ةزهجا نم ةفرغلا ىلإ تازاغلل عجارلا قفدتلا بنجت يلاتلابو ،ذفنتسملا ءاوهلا
ففجملا ليغشت دنع ،فوشكملا بهللا ةنسلأ كلذ يف امب ،ىرخا دوقولا عاونأ قرحت
.زاهجلل ةعنصملا ةكرشلا عم رواشت ،كشلا كرواس اذإ .راودلا
■ نم ىندا دحلاب بيكرتلا تاميلعت رظنا( ففجملا ىلإ ءاوهلا تادادما دست
.)صولخلا
■ ءايشا
نإ • .ف
ِ
ّ
فجملا يف يهطلا تويزل ةض
رعملا تاجوسنملاو سبملا عضت
امك ةرارحلا رداصمل ض
رعتلا دنع
ً
ة
صاخ ،ايئاقلت لعتشت نأ نكمي تيزلاب رثأتت يتلا
لعافت ثودح يف ببستي امم ةئفاد رصانعلا حبصت ثيح .را
ودلا ف
ِ
ّ
فجملا يف لاحلا وه
ةرارحلا هذه فيرصت مدع ةلاح يفو .ةرارح ديلوت كلذ نأش نمو .تيزلل ةدسكأ
نم دحلا لجأ نم .اهلاعتش يفكي امب ةنخاس رصانعلا حبصت امبرف ،اهنم صلختلاو
را
ودلا ففجملا ةرود نم ريخا ءزجلا نإف ،ةثولملا لامحا ةجيتن قيرح بوشن رطخ
فيفجتلا ةرود ةياهن لبق را
ود ف
ِ
ّ
فجم فاقيإ بنجت .)ديربتلا ةرتف( ةرارح نودب ثدحت
يدؤي نأ نكمي امك .اهترارح د
دبتت ىتح ةعرسب اهدرفو رصانعلا ةفاك جارخإ
متي مل ام
مث نمو ةرارحلا ثاعبنا مدع ىلإ تيزلاب ةرثأتملا رصانعلا نيزخت وأ عيمجت وأ مكارت
.قيرح بوشن
■ نوتيساو ،يهطلا تيز لثم داومب ةخستملا ءايشا فيفجت نم رفم ناك اذإ
تيزمو عمشلاو ،نيتنبرتلا تيز ،عقبلا تيزمو نيسوريكلاو نيزنبلاو لوحكلاو
ءاملاب اهلسغ بجيف ،ففجملا يف رعشلاب ةيانعلا تاجتنمب تثولت يتلا وأ ،عمشلا
هذه نم ثعبني دق .ففجملا يف ففج
ُ
ت نأ لبق تافظنملا نم ةيفاضإ ةيمكب نخاسلا
رطاخملا نم دحي فوس ليسغلا اذه لثمو .رجفنت وأ لعتشت نأ نكمي ةرخبأ ءايشا
.امامت اهليزي نل نكلو
■ نم لقا لافطا كلذ يف امب( صاخشا لبق نم مادختسل ممصم ريغ زاهجلا اذه
يدودحم وأ ،ةدودحملا ةيلقعلا وأ ةيسحلا وأ ةيندبلا تاردقلا يوذ نم )تاونس 8 رمع
ىلع زاهجلا مادختساب صاخ هيجوت وأ فارشإ تحت كلذ نكي مل ام ،ةفرعملاو ةربخلا
.مهتمس نع
ً
وؤسم نوكي صخش دي
■ ةبقارملا ىلإ لافطا اهيرجي يتلا مدختسملا ةنايصو فيظنتلا لامعأ عضخت نأ بجي
.فارشاو
■ .زاهجلاب نوثبعي مهنأ دكأتلل لافطا ىلع فارشا بجي
■ ةبقارملل اوعضخي مل ام زاهجلا نع تاونس 3 رمع نم لقا لافطا دعتبي نأ بجي
.رارمتساب
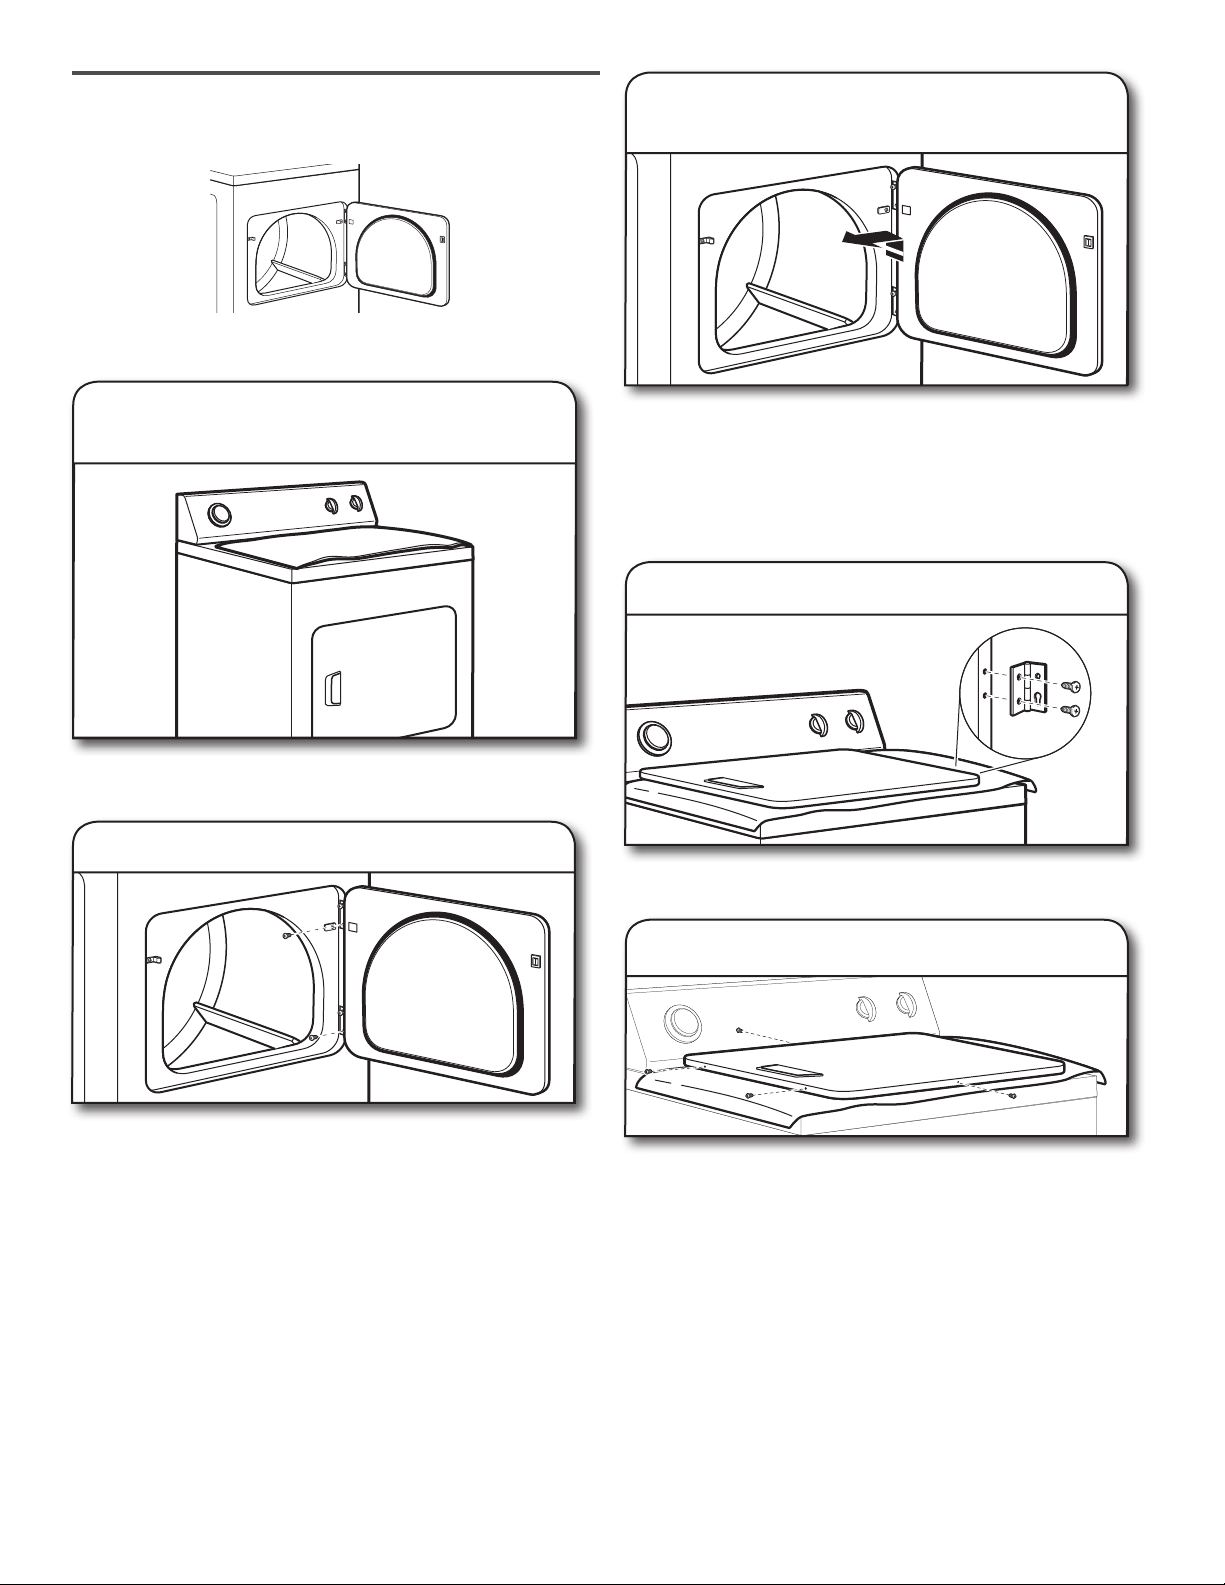
2
ففجملا ةمس
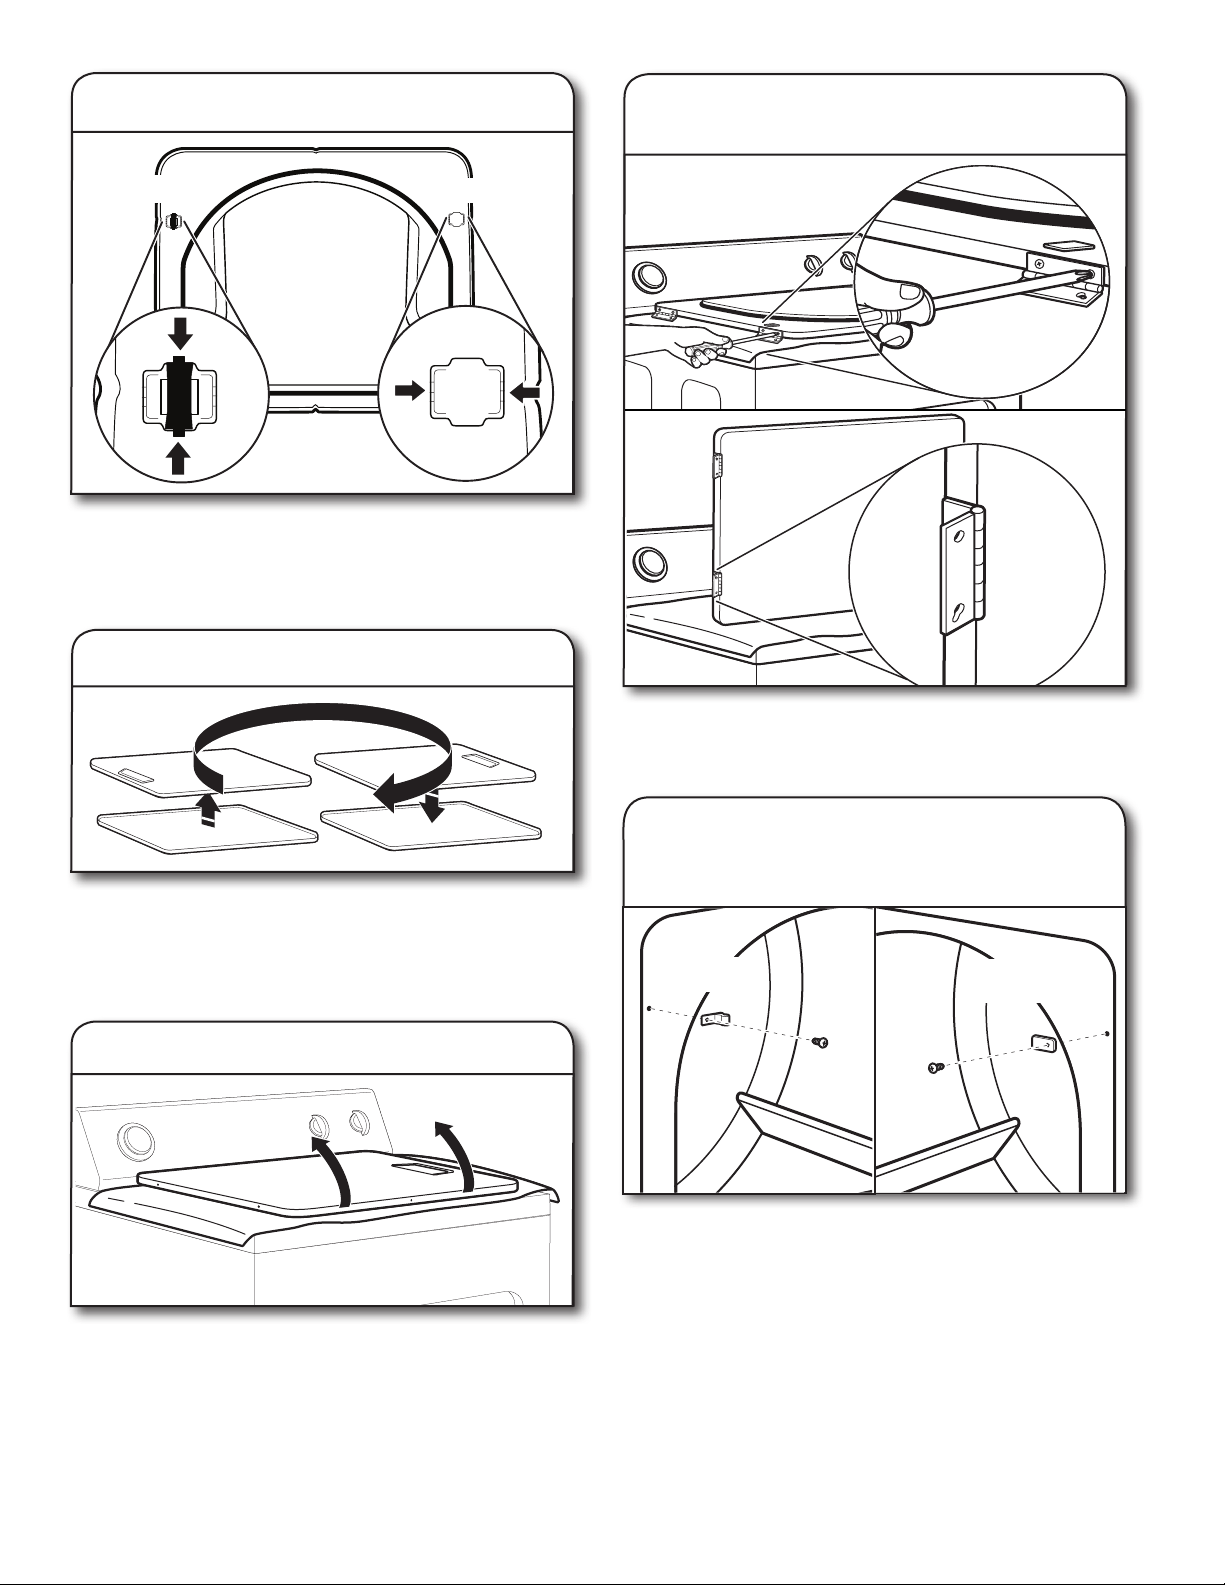
W10849529C
زاغلاب وأ ءابرهكلاب لمعي يذلا ففجملل ةيانعلاو مادختسا ليلد
تايوتحملا لودج
4KMEDC215
4KMEDC315
4KMEDC415
4KMEDC425
3LMEDC315
3LMEDC415
2 ..................................................................................... ففجملا ةمس
4 ......................................................................................... تافصاوملا
4 .......................................ءاوهلل ديج قفدت لجأ نم كيدل ةيوهتلا ماظن نم ققحتلا
4 ....................ةقاطلا ريفوتو جيسنلاب ةيانعلا نيسحتل يئاقلتلا فيفجتلا تارود مادختسا
5 .............................................................................تازيملاو مكحتلا ةحول
6 ....................................................................................... تارودلا ليلد
7 ...................................................................................ففجملا مادختسا
9 ....................................................................................ففجملاب ةيانعلا
11 ...................................................................اهحصإو لاطعا فاشكتسا
13 ........................................................................................... نامضلا
14 ................................................................................ةنايصلا وأ معدلا