É2175847306}ËÍ
2175847306
Order no. P217 0250 13 Part no. 217584 73 06
EditionC2019
S-Class
Mercedes-AMG Supplement
Mercedes-Benz

Welcome to the world of Mercedes-AMG
Before you first drive off, read this Operator's
Manual carefully and familiarize yourself with
your vehicle. For your own safety and a longer
operating lifespan, follow the instructions and
warning notices in this Operator's Manual. Disre‐
garding them may lead to damage to the vehicle
or personal injury.
Vehicle damage resulting from the disregard of
the instructions is not covered by the Mercedes-
Benz Limited Warranty.
The equipment or model designation of your
vehicle may vary according to:
R
Model
R
Order
R
National version
R
Availability
Mercedes-AMG reserves the right to introduce
changes in the following areas:
R
Design
R
Equipment
R
Technical features
The equipment in your vehicle may therefore dif‐
fer from that shown in the descriptions and illus‐
trations.
The following are integral parts of the vehicle:
R
Digital Operator's Manual
R
Printed Operator's Manual
R
Maintenance Booklet
R
Equipment-dependent supplements
Keep these documents in the vehicle at all
times. If you sell the vehicle, always pass all of
the documents on to the new owner.
Mercedes-Benz USA, LLC
Mercedes-Benz Canada, Inc.
A Daimler Company
2175847306
2175847306

Symbols ........................................................ 3
At a glance .................................................... 4
Cockpit ........................................................... 4
General notes ............................................... 7
Operator's Manual .......................................... 7
Operating safety .............................................7
Qualified specialist workshop .........................8
Correct use of the vehicle ...............................8
Limited Warranty ............................................ 9
Seat belts .................................................... 10
Reduced protection ...................................... 10
Function of the seat belt extender ................ 10
Driving and parking .................................... 11
Driving .......................................................... 11
DYNAMIC SELECT switch .............................. 12
Automatic transmission ................................ 13
Driving and driving safety systems ................15
Instrument Display and on-board
computer .................................................... 28
Notes on the Instrument Display and on-
board computer ............................................ 28
Calling up displays on the Performance
menu ............................................................ 28
Displaying and starting RACETIMER in
the Performance menu ................................. 29
Function of the Head-up Display ...................31
Multimedia system .................................... 32
AMG TRACK PACE ........................................ 32
Breakdown assistance ............................... 37
Flat tire ......................................................... 37
Wheels and tires ........................................ 38
Overview of the tire-change tool kit .............. 38
Changing a wheel ......................................... 38
Installing/removing the longitudinal
member panel ..............................................39
Technical data ............................................ 40
Operating fluids ............................................ 40
Vehicle data .................................................. 41
Display messages and warning/indi‐
cator lamps ................................................ 44
Display messages ......................................... 44
Warning and indicator lamps ........................ 44
Index ........................................................... 46
2
Contents

In this Operator's Manual, you will find the fol‐
lowing symbols:
&
DANGER Danger due to not observing
the warning notices
Warning notices draw your attention to haz‐
ards that may endanger your health or life, or
the health or life of others.
#
Observe the warning notices.
+
ENVIRONMENTAL NOTE Environmental
damage due to failure to observe envi‐
ronmental notes
Environmental notes include information on
environmentally responsible behavior or envi‐
ronmentally responsible disposal.
#
Observe environmental notes.
*
NOTE Damage to property due to failure
to observe notes on material damage
Notes on material damage inform you of
risks which may lead to your vehicle being
damaged.
#
Observe notes on material damage.
%
Useful instructions or further information
that could be helpful to you.
X
Instruction
(Q page)
Further information on a topic
Display
Information on the multifunction dis‐
play/media display
+
Highest menu level, which is to be
selected in the multimedia system
*
Corresponding submenus, which are
to be selected in the multimedia sys‐
tem
*Marks a cause
Symbols
3
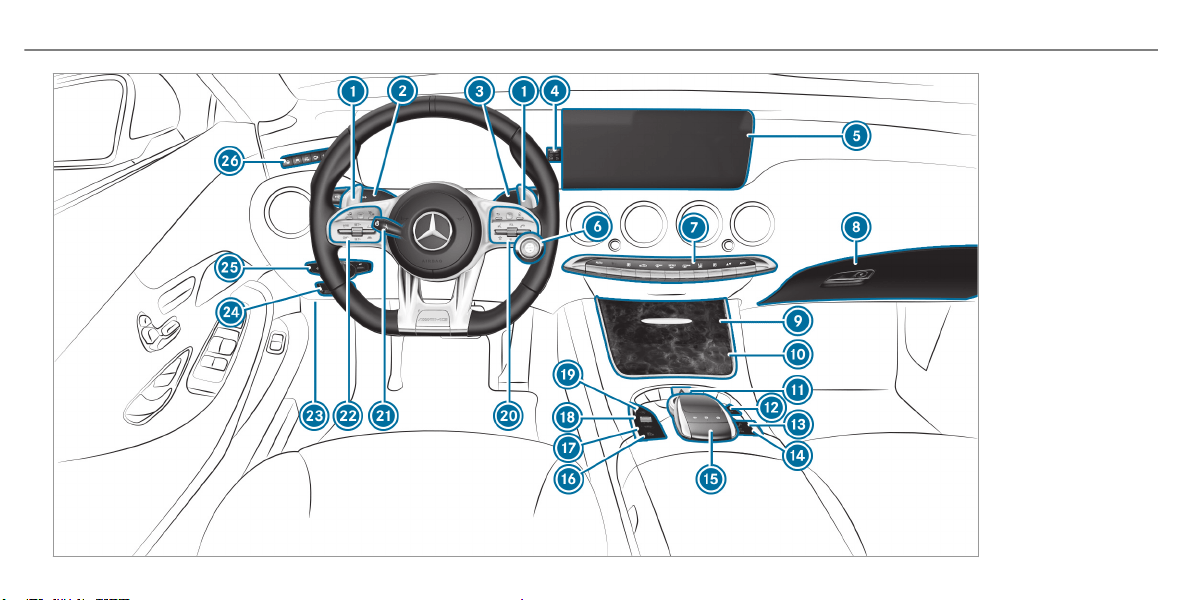
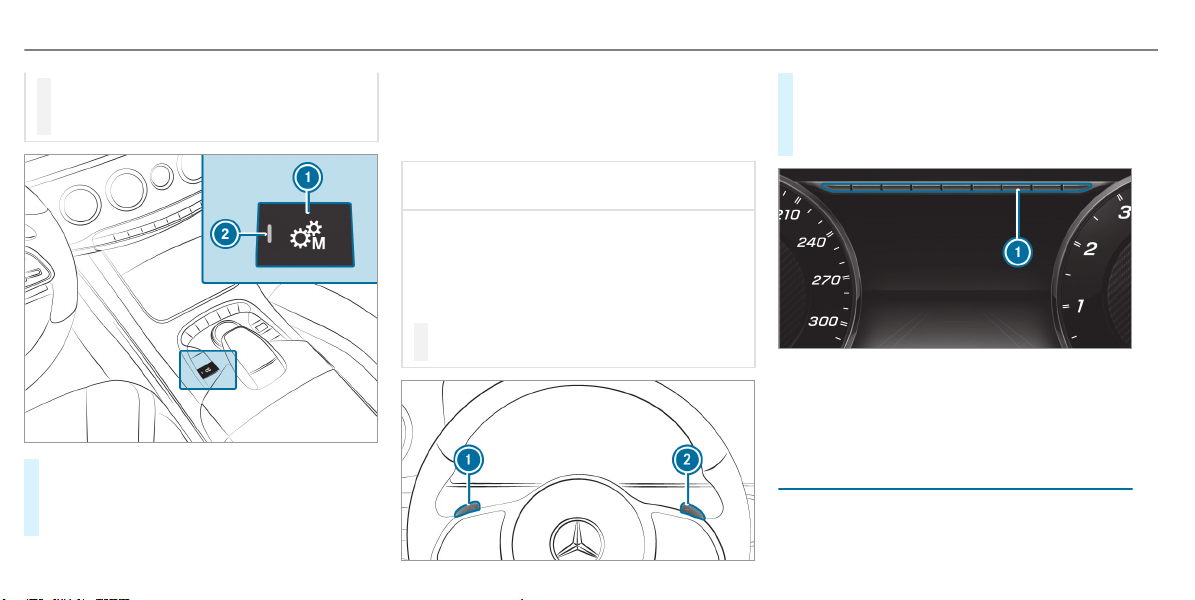
Coupe display
4
At a glance – Cockpit

1
Steering wheel paddle shifter
→
13
2
Combination switch
3
DIRECT SELECT lever
4
PASSENGER AIRBAG indicator lamps
5
Display (multimedia system)
6
Start/stop button
7
Climate control systems
8
Glove box
9
Stowage compartment
A
Cup holder
B
Hazard warning lights
C
Active Parking Assist
D
AMG adaptive sport suspension system with
air suspension (Mercedes‑AMG S 63 4MATIC+
and S 65 Convertible only)
→
19
Hydropneumatic suspension (Mercedes‑AMG
S 65 Coupe only)
→
22
E
AMG Performance exhaust system
(Mercedes‑AMG S 63 4MATIC+ only)
→
12
F
Control elements for the multimedia system
G
Activates/deactivates ESP
®
→
15
H
Manual gearshifting (permanent setting)
→
13
I
DYNAMIC SELECT switch
J
ECO start/stop function
K
Control panel for the multimedia system
L
Adjusts the steering wheel
M
Control panel for:
On-board computer
Operates cruise control
Operates Active Distance Assist DISTRONIC
N
Unlocks the hood
O
Electric parking brake
P
Light switch
Q
Control panel for:
At a glance – Cockpit
5

Active Steering Assist
Active Lane Keeping Assist
Parking Assist PARKTRONIC
Night View Assist
Head-up Display
Sets the vehicle level
6
At a glance – Cockpit
Operator's Manual
This Supplement provides information on all the
important functions of your AMG vehicle that are
either not described or differ from the descrip‐
tions in the vehicle Operator's Manual. This
information supplements or replaces the corre‐
sponding sections in the vehicle Operator's Man‐
ual. Under no circumstances does the Supple‐
ment replace the Operator's Manual.
This Supplement describes all models, and
standard and optional equipment for your vehi‐
cle, as available at the time of going to press.
Country-specific differences are possible. Bear
in mind that your vehicle may not feature all
functions described here. This is also the case
for systems and functions relevant to safety.
Therefore, the equipment on your vehicle may
differ from that in the descriptions and illustra‐
tions.
The original purchase contract documentation
for your vehicle contains a list of all of the sys‐
tems in your vehicle.
Should you have any questions concerning
equipment and operation, please consult an
authorized Mercedes-Benz Center.
The Operator's Manual, the Supplement and the
Maintenance Booklet are important documents
and should be kept in the vehicle.
Operating safety
&
WARNING Risk of accident due to mal‐
functions or system failures
If you do not have the prescribed service/
maintenance work or any required repairs
carried out, this could result in malfunctions
or system failures.
#
Always have the prescribed service/
maintenance work as well any required
repairs carried out at a qualified spe‐
cialist workshop.
&
WARNING Risk of accident or injury due
to incorrect modification of electronic
components and parts
Modification to electronic components, their
software or wiring could impair their function
and/or the function of other networked com‐
ponent parts. In particular, systems relevant
to safety could also be affected.
As a result, these may no longer function
properly and/or jeopardize the operating
safety of the vehicle.
#
Never tamper with the vehicle's wiring,
electronic components or software.
#
You should have all work on electrical
and electronic components carried out
at a qualified specialist workshop.
&
WARNING Risk of fire due to flammable
materials on hot parts of the exhaust
system
Flammable material such as leaves, grass or
twigs may ignite if they come into contact
with hot parts of the exhaust system.
General notes
7
#
When driving on unpaved roads or off-
road, regularly check the vehicle under‐
side.
#
Remove trapped plants or other flam‐
mable material.
#
If there is damage, consult a qualified
specialist workshop immediately.
*
NOTE Damage to the vehicle
In the following situations, in particular, there
is a risk of damage to the vehicle:
R
The vehicle becomes grounded, e.g. on a
high curb or an unpaved road
R
The vehicle is driven too fast over an
obstacle, e.g. a curb, speed bump or pot‐
hole
R
A heavy object strikes the underbody or
chassis components
In situations such as this, the body, the
underbody, chassis components, wheels or
tires could be damaged without the damage
being visible. Components damaged in this
way can unexpectedly fail or, in the case of
an accident, may not absorb the loads that
arise as intended.
If the underbody paneling is damaged, flam‐
mable materials such as leaves, grass or
twigs can collect between the underbody and
the underbody paneling. These materials may
ignite if they come into contact with hot
parts on the exhaust system.
#
Have the vehicle checked and repaired
immediately at a qualified specialist
workshop.
or
#
If driving safety is impaired while con‐
tinuing your journey, pull over and stop
the vehicle immediately in accordance
with the traffic conditions, and contact
a qualified specialist workshop.
Qualified specialist workshop
An authorized Mercedes-Benz Center is a quali‐
fied specialist workshop. It has the necessary
special skills, tools and qualifications to cor‐
rectly carry out the work required on your vehi‐
cle. This particularly applies to safety-relevant
works.
For the following, always have your vehicle
checked at an authorized Mercedes-Benz Cen‐
ter:
R
safety-relevant works
R
service and maintenance work
R
repair work
R
modifications as well as installations and
conversions
R
work on electronic components
Mercedes‑AMG recommends a Mercedes‑Benz
service center.
Correct use of the vehicle
If you remove any warning stickers, you or others
could fail to recognize certain dangers. Leave
warning stickers in position.
Observe the following information in particular
when driving your vehicle:
R
the safety notes in this manual
8
General notes

R
technical data for the vehicle
R
traffic rules and regulations
R
laws and safety standards pertaining to
motor vehicles
Limited Warranty
*
NOTE Damage to the vehicle arising
from violation of these operating instruc‐
tions.
Damage to the vehicle can arise from viola‐
tion of these operating instructions.
This damage is not covered either by the
Mercedes-Benz implied warranty or by the
New‑ or Used-Vehicle Warranty.
#
Follow the instructions in these operat‐
ing instructions on proper operation of
your vehicle as well as on possible vehi‐
cle damage.
General notes
9
Reduced protection
The AMG sport seat is designed for the standard
three-point seat belt. If you install a different
multipoint seat belt, e.g. sport or racing seat
belts, the restraint system cannot provide the
intended level of protection.
Depending on the type of seat, there may be
openings in the seat backrest. These openings
have no function.
&
WARNING Risk of injury or fatal injury
due to modified seat belt systems
If you feed seat belts through the opening in
the seat backrest, the seat backrest may be
damaged or may even break in the event of
an accident.
#
Only use the standard three-point seat
belt.
#
Never modify the seat belt system.
Function of the seat belt extender
The seat belt extender for the front seat helps
you fasten your seat belt. When the door is
closed, the seat belt extender extends.
The seat belt extender retracts again in the fol‐
lowing cases:
R
the seat belt tongue is engaged in the seat
belt buckle
R
The seat belt tongue is not engaged in the
seat belt buckle within 60 seconds
R
The respective door is opened
R
You fold the seat backrest forwards
R
Nobody is sitting in the front passenger seat
The seat belt extender must always be retracted
while the vehicle is in motion.
10
Seat belts

Driving
Breaking-in notes
To preserve the engine during the first
1000 miles (1500 km):
R
drive at varying road speeds and engine
speeds.
R
do not drive faster than 87 mph (140 km/h).
R
only briefly allow the engine to reach a maxi‐
mum engine speed of 4500 rpm (4500 rpm).
R
drive the vehicle in drive program A.
R
change gear before the tachometer needle is
Ô of the way to the red area of the tachome‐
ter.
R
do not shift down a gear manually in order to
brake.
R
avoid overstraining the vehicle, e.g. driving at
full throttle.
R
do not depress the accelerator pedal past
the pressure point (kickdown).
R
only increase the engine speed gradually and
accelerate the vehicle to full speed after
1000 miles (1500 km).
This also applies when the engine or parts of the
drivetrain have been replaced.
Please also observe the following breaking-in
notes:
R
in certain driving and driving safety systems,
the sensors adjust automatically while a cer‐
tain distance is being driven after the vehicle
has been delivered or after repairs. Full sys‐
tem effectiveness is not reached until the
end of this teach-in process.
R
brakepads, brake discs and tires that are
either new or have been replaced only ach‐
ieve optimum braking effect and grip after
several hundred kilometers of driving. Com‐
pensate for the reduced braking effect by
applying greater force to the brake pedal.
Operation of the ECO start/stop function
The engine is automatically switched off if the
following conditions are met:
R
you brake the vehicle to a standstill in trans‐
mission position h or i.
R
if all vehicle conditions for an automatic
engine stop are met.
The è symbol appears in the multifunction
display when the vehicle is stationary.
The engine is restarted automatically if:
R
you release the brake pedal in transmission
position h when the HOLD function is not
active.
R
you shift from transmission position j.
R
you engage transmission position h or k.
R
you depress the accelerator pedal.
R
you permanently activate manual gearshift‐
ing.
R
you pull the left-hand steering wheel paddle
shifter.
R
you change the vehicle level.
R
an automatic engine start is necessary.
If the engine was switched off by the ECO start/
stop function and you leave the vehicle, a warn‐
ing tone sounds. The Vehicle Operational Switch
the Ignition Off Before Exiting display message
also appears in the multifunction display. If you
Driving and parking
11
do not switch off the ignition, the ignition is
automatically switched off after one minute.
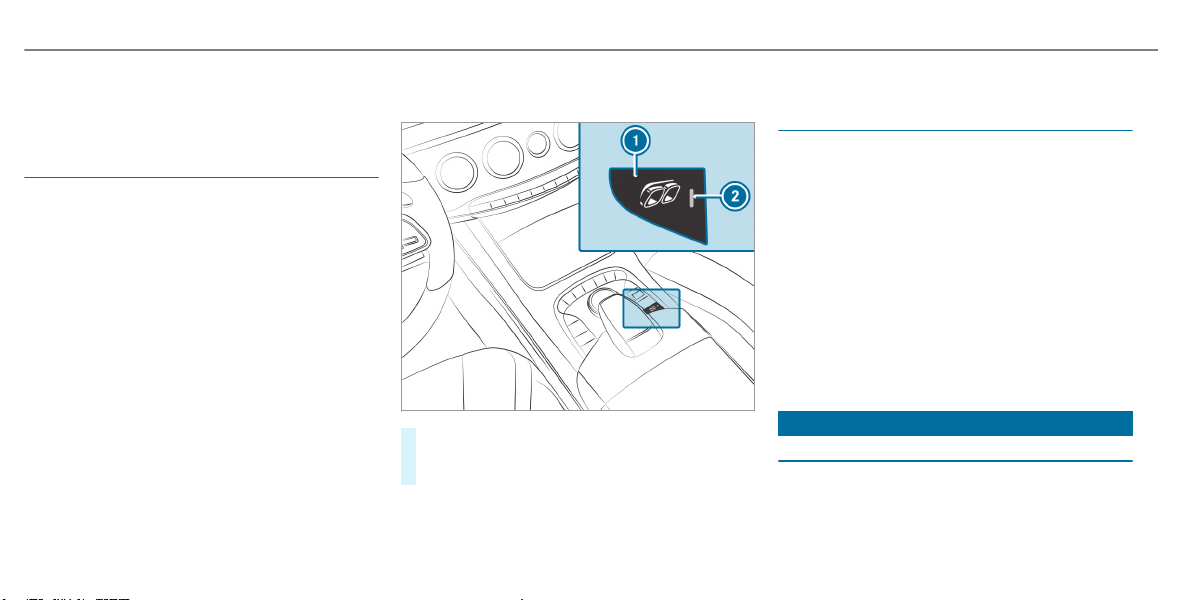
AMG Performance adjustable exhaust sys‐
tem
Function of the AMG Performance exhaust
system
The AMG Performance exhaust system is
only available for the
Mercedes‑AMG S 63 4MATIC+ model.
Changing the position of the exhaust gas flap
allows you to select the volume of the AMG Per‐
formance exhaust system.
Operating the AMG Performance exhaust
system
#
Press button 1.
If indicator lamp 2 lights up, the loudest
setting is selected.
Notes for the AMG high-performance brake
system and the AMG ceramic high-perform‐
ance composite brake system
The brake system is designed for heavy loads.
This may lead to noise when braking. This effect
can also occur after washing the vehicle.
The noise depends on the following factors:
R
Speed
R
Brake force
R
Environmental conditions, e.g. temperature
and air humidity
Have the brake system checked at a qualified
specialist workshop after it has been subjected
to extreme use.
DYNAMIC SELECT switch
Function of the DYNAMIC SELECT switch
Use the DYNAMIC SELECT switch to change
between the following drive programs:
R
= (Individual): individual settings
12
Driving and parking

R
A (Comfort): comfortable and economi‐
cal driving style
R
C (Sport): sporty driving style
R
B (Sport Plus): particularly sporty driving
style
R
Mercedes-AMG S 65 Coupe: N
(CURVE): comfortable driving with curve
inclination function
R
Mercedes-AMG S 63 4MATIC+: I
(RACE): driving like on a race track
%
Drive program I may not be used on nor‐
mal roads. Drive program I may only be
activated and used on dedicated race cir‐
cuits, not on public roads.
%
Mercedes-AMG recommends selecting the
drive program A when in city traffic or
stop-and-go traffic.
Depending on the drive program selected, the
following vehicle characteristics will change:
R
Drive (engine management)
R
Transmission management
R
ESP
®
R
Suspension
R
Mercedes-AMG S 63 4MATIC+: position of
the exhaust gas flaps
R
Steering
R
Availability of the ECO start/stop function
R
Driver assistance systems
R
Mercedes-AMG S 63 4MATIC+: availability
of glide mode
R
Mercedes-AMG S 63 4MATIC+: 4MATIC+
%
You can also change the following vehicle
characteristics using the buttons in the cen‐
ter console:
R
Mercedes-AMG S 63 4MATIC+: position
of the exhaust gas flaps
R
ECO start/stop function
R
ESP
®
R
Suspension
R
Manual gearshifting
Displaying dynamic data
Multimedia system:
,
Vehicle
.
e DYNAMIC SELECT
#
Select Dyn. Data.
Dynamic data is displayed, e.g.:
R
G-force values
R
Torque distribution
R
Boost
R
Current power output
R
Variable all-wheel drive
Automatic transmission
Manual gearshifting
&
WARNING Risk of skidding and of an
accident due to shifting down on slippery
road surfaces
If you shift down on slippery road surfaces to
increase the engine braking effect, the drive
wheels may lose traction.
Driving and parking
13
#
Do not shift down on slippery road sur‐
faces to increase the engine braking
effect.
#
To activate/deactivate: press button 1.
If indicator lamp 2 is lit, manual gearshift‐
ing is activated. The current gear is displayed
in the multifunction display.
%
To permanently shift the gears manually in
drive program = using the steering wheel
paddle shifters, select the M (Manual) set‐
ting for the transmission.
*
NOTE Damage to the engine due to shift‐
ing up too late
The automatic transmission does not shift up
in manual mode even when the engine's lim‐
iting speed is reached.
The fuel supply is interrupted in order to pre‐
vent the engine from overrevving.
#
Shift up before the engine speed rea‐
ches the red area in the tachometer.
#
To shift up: pull steering wheel paddle
shifter 2.
#
To shift down: pull steering wheel paddle
shifter 1.
If the engine speed becomes too high or too low,
you cannot change gear using the steering wheel
paddle shifters. In this case, segments 1 light
up red.
Gearshift recommendation
The gearshift recommendation assists you in
adopting an economical driving style.
14
Driving and parking
#
If gearshift recommendation message 1 is
shown on the multifunction display, shift to
the recommended gear.
%
Gearshift recommendation is active only if
you have activated manual gearshifting with
the button on the center console.
Using kickdown
#
Maximum acceleration: depress the accel‐
erator pedal beyond the pressure point.
%
If you have activated manual gearshifting
with the button in the center console, the
transmission does not react to the kick‐
down.
During kickdown, you cannot change gears using
the steering wheel paddle shifters. The auto‐
matic transmission shifts up to the next gear
when the maximum engine speed is reached to
protect the engine from overrevving.
Driving and driving safety systems
Function of ESP
®
(Electronic Stability Pro‐
gram)
&
WARNING Risk of skidding if ESP
®
is
malfunctioning
If ESP
®
is malfunctioning, ESP
®
cannot carry
out vehicle stabilization. In addition, other
driving safety systems are switched off.
#
Drive on carefully.
#
Have ESP
®
checked at a qualified spe‐
cialist workshop.
You can select between the following modes of
ESP
®
:
R
ESP
®
on
R
SPORT handling mode on
R
ESP
®
off
Characteristics when ESP
®
is activated
ESP
®
monitors and improves driving stability and
traction, particularly in the following situations:
R
When pulling away on wet or slippery road‐
way.
R
When braking.
R
In strong sidewinds when you are driving
faster than 43 mph (70 km/h).
ESP
®
can stabilize the vehicle by intervening in
the following ways:
R
One or more wheels are braked.
R
The engine output is adapted according to
the situation.
ESP
®
is activated every time the engine is star‐
ted, regardless of whether ESP
®
was in SPORT
handling mode or was deactivated before the
engine was switched off.
Driving and parking
15

ESP
®
is intervening if the ESP
®
÷ warning
lamp flashes in the instrument cluster:
R
Do not deactivate ESP
®
.
R
Only depress the accelerator pedal as far as
is necessary.
R
Adapt your driving style to suit the current
road and weather conditions.
Characteristics of activated SPORT handling
mode
&
WARNING Risk of skidding due to incor‐
rect application of SPORT handling mode
When you activate SPORT handling mode,
there is an increased risk of skidding and
having an accident.
#
Only activate SPORT handling mode in
the circumstances described as follows.
Select SPORT handling mode when the vehicle's
own oversteering and understeering characteris‐
tics are desired, for example when driving on
specially designated roads.
Only a highly qualified and experienced driver
should drive in SPORT handling mode or with
ESP
®
deactivated.
If SPORT handling mode is activated and one or
more wheels start to spin, the ÷ ESP
®
warn‐
ing lamp in the instrument cluster flashes. ESP
®
then only stabilizes the vehicle to a limited
degree.
If SPORT handling mode is activated:
R
ESP
®
only improves driving stability to a limi‐
ted degree.
R
ETS/4ETS traction control is still active.
R
The engine's torque is only restricted to a
limited degree and the drive wheels can spin.
The spinning of the wheels results in a cut‐
ting action for better traction on loose surfa‐
ces.
R
ESP
®
continues to provide assistance when
the brakes are firmly applied.
Characteristics when ESP
®
is deactivated
&
WARNING Risk of skidding if ESP
®
is
deactivated
If you deactivate ESP
®
, ESP
®
cannot carry
out vehicle stabilization.
#
ESP
®
should only be deactivated in the
following situations.
ESP
®
is deactivated if the å ESP
®
OFF warn‐
ing lamp lights up continuously in the instrument
cluster:
R
Driving stability will no longer be improved.
R
Crosswind Assist is no longer active.
R
The drive wheels could spin.
R
ETS/4ETS traction control is still active.
%
Even when ESP
®
is deactivated, you are still
assisted by ESP
®
when braking hard.
In the following situations, it may be better to
activate SPORT handling mode or deactivate
ESP
®
:
R
When using snow chains.
16
Driving and parking
R
In deep snow.
R
On sand or gravel.
%
Spinning the wheels results in a cutting
action which provides better grip.
%
Activate ESP
®
as soon as the situations
described above no longer apply. ESP
®
will
otherwise not be able to stabilize the vehicle
if the vehicle starts to skid or a wheel starts
to spin.
If the ÷ ESP
®
warning lamp lights up continu‐
ously, ESP
®
is not available due to a malfunction.
Observe any information which may be displayed
in the instrument cluster:
R
Warning and indicator lamps
R
Display messages
ETS/4ETS (Electronic Traction System)
ETS/4ETS traction control is part of ESP
®
.
ETS/4ETS can improve the vehicle's traction by
intervening in the following ways:
R
The drive wheels are braked individually if
they spin.
R
More drive torque is transferred to the wheel
or wheels with traction.
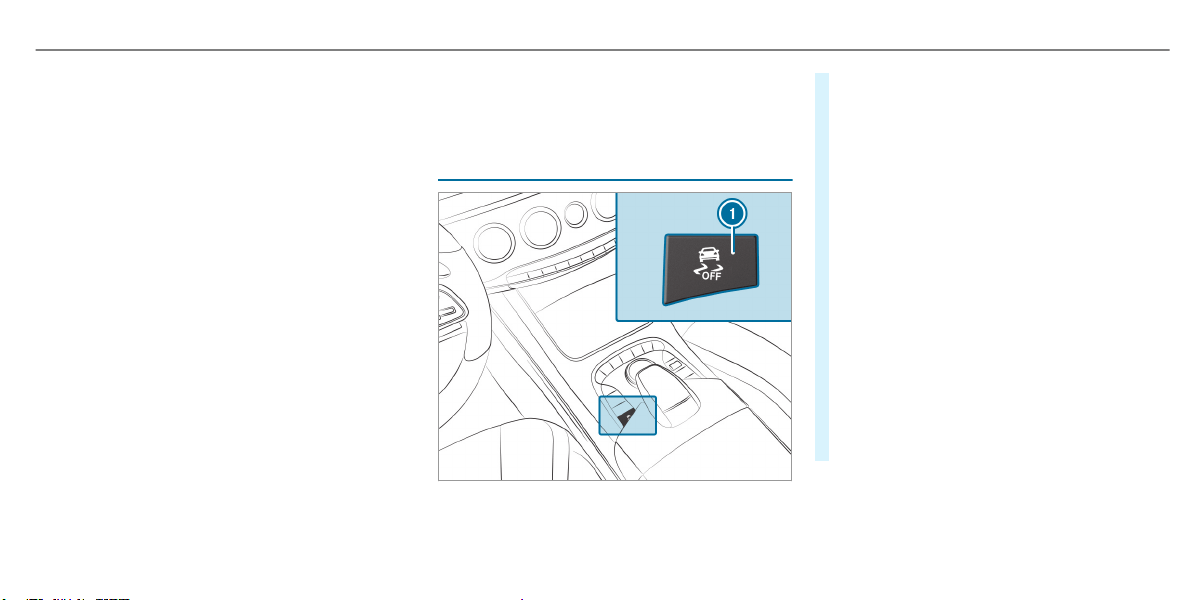
Activating/deactivating ESP
®
(Electronic Sta‐
bility Program)
#
To activate SPORT handling mode: briefly
press button 1.
The M SPORT handling mode warning
lamp in the instrument cluster lights up. The
SPORT handling mode message appears on
the multifunction display.
#
To deactivate SPORT handling mode:
briefly press button 1.
The M SPORT handling mode warning
lamp in the instrument cluster goes out.
#
To deactivate ESP
®
: press button 1 until
the å ESP
®
OFF warning lamp lights up in
the instrument cluster. The ÷ OFF mes‐
sage appears on the multifunction display.
#
To activate ESP
®
: briefly press button 1.
The å ESP
®
OFF warning lamp in the
instrument cluster goes out. The ÷ OFF
message appears on the multifunction dis‐
play.
Observe the information on warning lamps and
display messages which may be shown in the
instrument cluster.
Driving and parking
17

RACE START
Function of RACE START
RACE START is only available for the
Mercedes‑AMG S 63 and S 63 4MATIC+ mod‐
els.
RACE START enables optimal vehicle accelera‐
tion from a standstill. For this, a suitably high-
grip road surface is required, the tires and vehi‐
cle must also be in good condition.
%
RACE START is only available after the vehi‐
cle has been broken in (→ page 11 ).
%
RACE START may not be used on normal
roads. RACE START must only be activated
and used on dedicated race circuits, not on
public roads.
Be sure to read the safety notes and infor‐
mation on ESP
®
(→ page 15).
&
WARNING Risk of skidding and having
an accident from wheels spinning
When you use RACE START, individual wheels
could spin and you could lose control of the
vehicle.
Depending on the ESP
®
mode selected, there
is an increased risk of skidding and having an
accident.
#
Make sure that no persons or obstacles
are in the close vicinity of your vehicle.
Activating RACE START
Requirements:
R
the doors, the hood and the trunk lid are
closed.
R
the engine is running and the transmission
and engine are at normal operating tempera‐
ture.
R
the steering wheel is in the straight-ahead
position.
R
the vehicle is on level ground.
R
the vehicle is stationary, the brake pedal is
depressed (left foot) and the parking brake is
released.
R
the transmission is in position h.
R
one of the drive programs C, B or
I is selected (→ page 12).
#
Rapidly depress the accelerator pedal fully.
The engine speed increases.
%
If the activation conditions are not fulfilled,
RACE START cannot be activated. The RACE
START Not Possible See Operator's Manual
message appears in the multifunction dis‐
play.
#
The RACE START Release brake to start mes‐
sage appears in the multifunction display.
%
In this phase you can adjust RACE START
depending on the road conditions: you can
vary the engine speed by pulling on one of
the steering wheel paddle shifters. The seg‐
ments in the multifunction display flicker
rapidly.
%
If the brake pedal is not released after a
short while, RACE START is canceled. The
RACE START Canceled message appears in
the multifunction display.
18
Driving and parking

#
Take your foot off the brake, but keep the
accelerator pedal depressed.
The vehicle pulls away at maximum accelera‐
tion. The RACE START Active message
appears in the multifunction display.
RACE START is deactivated when the vehicle rea‐
ches a speed of approximately 31 mph
(50 km/h).
RACE START is deactivated immediately if you
release the accelerator pedal during RACE
START or if any of the activation conditions are
no longer fulfilled. The RACE START Canceled
message appears in the multifunction display.
%
After using it several times in short succes‐
sion, RACE START is unavailable until a cer‐
tain distance has been driven.
AMG adaptive sport suspension system (air
suspension)
Function of AMG adaptive sport suspension
system
AMG adaptive sport suspension system is
only available for the
Mercedes‑AMG S 63 4MATIC+ Coupe and
Mercedes‑AMG S 65 Cabriolet models.
AMG adaptive sport suspension system is an air
suspension system with variable damping for
improved driving characteristics. The all-round
level control system ensures the best possible
suspension and constant ground clearance, even
with a laden vehicle. When driving at speed, the
vehicle is lowered automatically to improve driv‐
ing safety and to reduce fuel consumption. You
also have the option of manually adjusting the
vehicle level.
The damping is tuned individually for each wheel
and is affected by the following factors:
R
the driving style, e.g. sporty
R
the road condition, e.g. bumps
R
the individual selection of the drive program:
A (Comfort), C (Sport) or B (Sport
+)
AMG adaptive sport suspension system compri‐
ses:
R
air suspension for ground clearance irrespec‐
tive of load.
R
automatic level control system.
R
speed-dependent lowering to reduce fuel
consumption
R
manually selectable high-level setting for
greater ground clearance
R
ADS PLUS (Adaptive Damping System with
constant damping force adjustment)
R
DYNAMIC SELECT switch and level button
R
suspension tuning button
Driving and parking
19

Available suspension settings
Drive programCharacteristics
A (Comfort)
R
The suspension tuning is comfortable.
R
The vehicle is set to the normal level.
R
When driving at speeds above 77 mph (125 km/h) the vehicle is lowered.
R
When driving at speeds below 50 mph (80 km/h) the vehicle is raised again.
R
4MATIC+ is dynamically synchronised.
C (Sport)
R
The suspension tuning is firmer.
R
The vehicle is set to the normal level.
R
When driving at speeds above 77 mph (125 km/h) the vehicle is lowered.
R
When driving at speeds below 50 mph (80 km/h) the vehicle is raised again.
R
4MATIC+ is dynamically synchronised.
B (Sport Plus)
I (RACE)
R
The suspension tuning is even firmer.
R
The vehicle is set to the normal level.
R
When driving at speeds above 77 mph (125 km/h) the vehicle is lowered.
R
When driving at speeds below 50 mph (80 km/h) the vehicle is raised again.
R
4MATIC+ is more dynamically synchronised.
20
Driving and parking
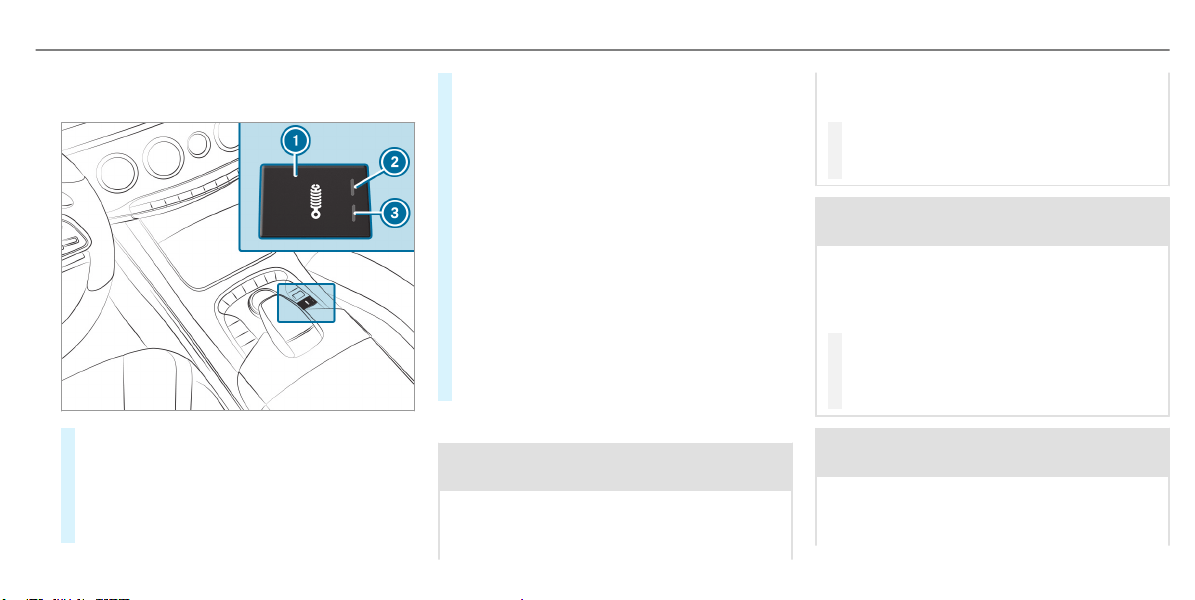
AMG adaptive sport suspension system,
selecting the suspension setting
#
To select the Comfort suspension set‐
ting: press button 1 repeatedly until indica‐
tor lamps 2 and 3 go out.
The AMG Suspension System COMFORT
message appears in the multifunction dis‐
play.
In "Comfort" mode, the driving characteris‐
tics of your vehicle are comfortable.
#
To select the Sport suspension setting:
press button 1 repeatedly until indicator
lamp 3 lights up.
The AMG Suspension System SPORT mes‐
sage appears in the multifunction display.
"Sport" driving mode ensures a firmer sus‐
pension tuning.
#
To select the Sport Plus suspension set‐
ting: press button 1 repeatedly until indica‐
tor lamps 2 and 3 light up.
The AMG Suspension System SPORT + mes‐
sage appears in the multifunction display.
"Sport Plus" driving mode ensures a very
firm suspension tuning.
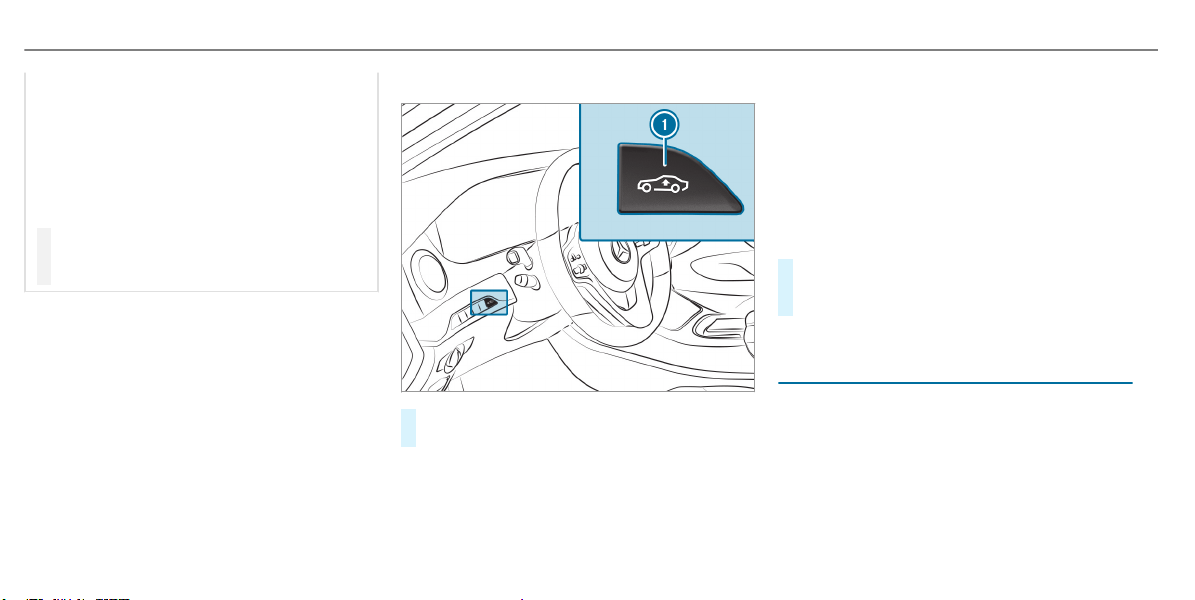
Setting the vehicle level
&
WARNING Risk of accident because
vehicle level is too high
If you drive at a higher vehicle level, the driv‐
ing characteristics may be impaired due to
the higher vehicle center of gravity.
The vehicle can drift outwards, for example,
when steering or cornering.
#
Always choose a vehicle level which is
suited to the driving style and the road
surface conditions.
&
WARNING Risk of entrapment from vehi‐
cle lowering
When lowering the vehicle, people could
become trapped if their limbs are between
the vehicle body and the tires or underneath
the vehicle.
#
Make sure no one is underneath the
vehicle or in the immediate vicinity of
the wheel arches when you lower the
vehicle.
&
WARNING Risk of entrapment from vehi‐
cle lowering
Vehicles with AIR BODY CONTROL or
level control system: When you unload lug‐
gage or leave the vehicle, the vehicle first
Driving and parking
21
rises slightly and then returns to the set level
shortly afterwards.
You or anyone else in the vicinity of the
wheel arches or the underbody could thus
become trapped.
The vehicle can also be lowered after being
locked.
#
When leaving the vehicle, make sure
that nobody is in the vicinity of the
wheel arches or the underbody.
Requirements:
R
The vehicle has been started.
R
The vehicle must not be moving faster than
50 mph (80 km/h).
Raising the vehicle
#
Press button 1.
The vehicle is set to the high level.
Your selection is saved.
The vehicle is lowered again in the following sit‐
uations:
R
When driving faster than 75 mph
(120 km/h).
R
When driving between 50 mph (80 km/h)
and 75 mph (120 km/h) for approximately
three minutes.
R
After selecting a drive program using the
DYNAMIC SELECT switch.
The vehicle is adjusted to the height of the last
active drive program.
Lowering the vehicle
#
Press button 1.
The vehicle is adjusted to the height of the
last active drive program.
The AMG adaptive sport suspension system
(electrohydraulic suspension)
Function of AMG adaptive sport suspension
system
AMG adaptive sport suspension system is
only available for the
Mercedes‑AMG S 65 Coupe.
AMG adaptive sport suspension system is an
electrohydraulic suspension with variable damp‐
ing for improved driving comfort. The all-round
22
Driving and parking

level control system ensures the best possible
suspension and constant ground clearance, even
with a laden vehicle. When driving at speed, the
vehicle is lowered automatically to improve driv‐
ing safety and to reduce fuel consumption. The
suspension tuning is adjusted depending on the
road surface, vehicle load and the drive program
selected. The ROAD SURFACE SCAN function
detects areas of unevenness in the road before
you drive over them by means of a multifunction
camera. This reduces chassis movements. The
option of manually adjusting the vehicle level is
also available.
The damping is tuned individually for each wheel
and is affected by the following factors:
R
The driving style, e.g. sporty
R
The road condition, e.g. bumps
R
The individual selection of the drive program:
A (Comfort), C (Sport), B (Sport+)
or N (CURVE)
AMG adaptive sport suspension system compri‐
ses:
R
Active Body Control ABC
R
ROAD SURFACE SCAN
R
Curve inclination function CURVE
R
Automatic level control system
R
Automatic vehicle stabilization in the event of
sidewinds
R
Speed-dependent lowering to reduce fuel
consumption
R
Manually selectable high-level setting for
greater ground clearance
R
DYNAMIC SELECT switch and level button
R
Suspension tuning button
Driving and parking
23

Available suspension settings
Drive programCharacteristics
A (Comfort)
R
The suspension tuning is comfortable.
R
The vehicle is set to the normal level.
R
When driving at speeds between 75 mph (120 km/h) and 100 mph (160 km/h) the vehicle is lowered steadily.
R
When driving at speeds between 100 mph (160 km/h) and 75 mph (120 km/h) the vehicle is raised again.
R
ROAD SURFACE SCAN is active.
C (Sport)
B (Sport Plus)
R
The suspension tuning is firmer.
R
When driving at speeds between 40 mph (65 km/h) and 62 mph (100 km/h) the vehicle is lowered steadily.
R
When driving at speeds between 62 mph (100 km/h) and 40 mph (65 km/h) the vehicle is raised again.
R
ROAD SURFACE SCAN is deactivated.
N (CURVE)
R
The suspension tuning is comfortable.
R
The vehicle is set to the normal level.
R
When driving at speeds between 75 mph (120 km/h) and 100 mph (160 km/h) the vehicle is lowered steadily.
R
When driving at speeds between 100 mph (160 km/h) and 75 mph (120 km/h) the vehicle is raised again.
R
The curve inclination function is active.
R
ROAD SURFACE SCAN is active.
24
Driving and parking
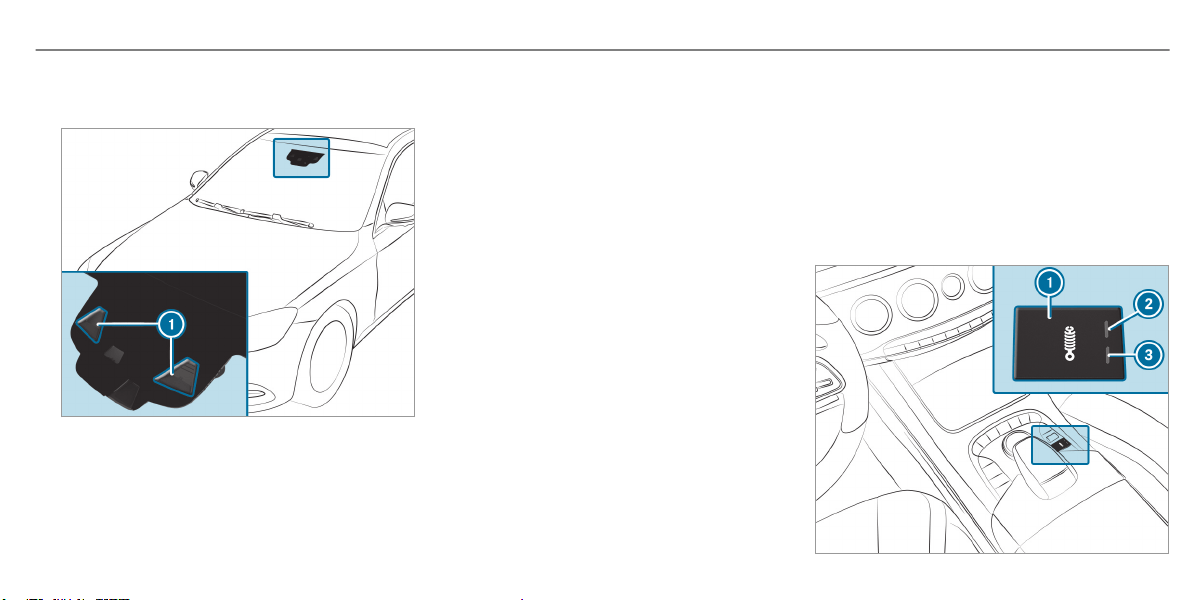
Function of ROAD SURFACE SCAN
%
This function is not available in all countries.
ROAD SURFACE SCAN:
R
Monitors the road in front of the vehicle
using multifunction camera 1.
R
Is active when one of drive programs A
(Comfort) or N (CURVE) is selected.
R
Detects unevenness in the road surface, e.g.
bumps, before the vehicle drives over them.
R
Reduces chassis movements.
System limitations
ROAD SURFACE SCAN can be impaired in the
following situations or can stop functioning:
R
If the roadway is insufficiently lit, e.g. at
night.
R
In snow, rain, fog, heavy spray, if there is
glare, in direct sunlight or in greatly varying
ambient light.
R
If the windshield in the area of multifunction
camera 1 is dirty, fogged up, damaged or
covered.
R
If the road surface has no optic structure or
reflects light.
R
If the distance to the vehicle in front is too
short.
R
If sections of the route have a very small
radius of curvature.
R
During dynamic driving maneuver, e.g. if you
accelerate or brake the vehicle sharply.
R
At speeds below 5 mph (7 km/h) or above
112 mph (180 km/h).
R
If the vehicle is at a raised level or in drive
program C (Sport) or B (Sport Plus).
Observe the notes on cleaning the multifunction
camera .
AMG adaptive sport suspension system,
selecting the suspension setting
Driving and parking
25

#
To select the Comfort suspension set‐
ting: press button 1 repeatedly until indica‐
tor lamps 2 and 3 go out.
The AMG Suspension System COMFORT
message appears in the multifunction dis‐
play.
In "Comfort" mode, the driving characteris‐
tics of your vehicle are comfortable.
#
To select the Sport suspension setting:
press button 1 repeatedly until indicator
lamp 3 lights up.
The AMG Suspension System SPORT mes‐
sage appears in the multifunction display.
"Sport" driving mode ensures a firmer sus‐
pension tuning.
#
To select the Sport Plus suspension set‐
ting: press button 1 repeatedly until indica‐
tor lamps 2 and 3 light up.
The AMG Suspension System SPORT + mes‐
sage appears in the multifunction display.
"Sport Plus" driving mode ensures a very
firm suspension tuning.
Selecting Curve mode
In "Curve" mode, the driving characteristics of
your vehicle are more comfortable and the curve
inclination function is activated. Select this
mode if you prefer a more comfortable driving
style.
#
Press button 1 repeatedly until indicator
lamps 2 and 3 light up.
The AMG Suspension System CURVE mes‐
sage appears on the multifunction display.
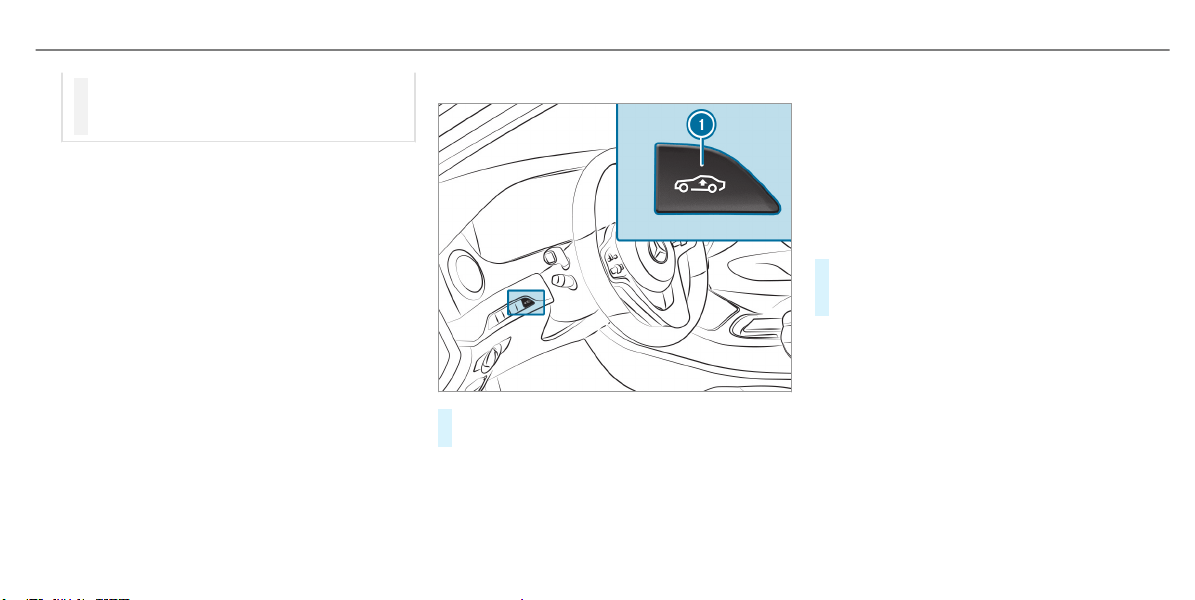
Setting the vehicle level
&
WARNING Risk of accident because
vehicle level is too high
If you drive at a higher vehicle level, the driv‐
ing characteristics may be impaired due to
the higher vehicle center of gravity.
The vehicle can drift outwards, for example,
when steering or cornering.
#
Always choose a vehicle level which is
suited to the driving style and the road
surface conditions.
&
WARNING Risk of entrapment from vehi‐
cle lowering
When lowering the vehicle, people could
become trapped if their limbs are between
the vehicle body and the tires or underneath
the vehicle.
#
Make sure no one is underneath the
vehicle or in the immediate vicinity of
the wheel arches when you lower the
vehicle.
&
WARNING Risk of entrapment from vehi‐
cle lowering
Vehicles with AIR BODY CONTROL or
level control system: When you unload lug‐
gage or leave the vehicle, the vehicle first
rises slightly and then returns to the set level
shortly afterwards.
You or anyone else in the vicinity of the
wheel arches or the underbody could thus
become trapped.
The vehicle can also be lowered after being
locked.
26
Driving and parking
#
When leaving the vehicle, make sure
that nobody is in the vicinity of the
wheel arches or the underbody.
Requirements:
R
The vehicle has been started.
R
The vehicle must not be moving faster than
50 mph (80 km/h).
Raising the vehicle
#
Press button 1.
The vehicle is set to the high level.
Your selection is saved.
The vehicle is lowered again in the following sit‐
uations:
R
When driving faster than 75 mph
(120 km/h).
R
When driving between 50 mph (80 km/h)
and 75 mph (120 km/h) for approximately
three minutes.
R
After selecting a drive program using the
DYNAMIC SELECT switch.
The vehicle is adjusted to the height of the last
active drive program.
Lowering the vehicle
#
Press button 1.
The vehicle is adjusted to the height of the
last active drive program.
Driving and parking
27
Notes on the Instrument Display and on-
board computer
Additional notes regarding your Mercedes-AMG
vehicle:
R
Vehicles with an Instrument Display
(standard) only: If you select the Perform-
ance menu, the upshift bar appears on the
multifunction display.
R
If you switch on the ECO start/stop function
and select drive program A, the engine
electronics switch from 8-cylinder mode to 4-
cylinder mode, if necessary. The multifunc‐
tion display shows the / symbol in the
status area.
R
Additional note regarding the warning and
indicator lamps: the vehicle is also equipped
with the . SPORT handling mode warning
and indicator lamp (→ page 44).
R
You can select the following display content
in Mercedes-AMG vehicles with Widescreen
Cockpit:
-
Tachometer (classic display setting)
-
Tachometer and gear display (classic dis‐
play setting)
-
Date (progressive display setting)
-
Date and gear display
-
Warm-up
-
Engine data
-
G-Meter
-
Trip computer
-
Navigation
Calling up displays on the Performance
menu
On-board computer:
,
Performance
#
To select a display: swipe upwards or down‐
wards on the left-hand Touch Control.
Displays on the Performance menu:
R
Warm-up
R
SETUP
R
G-Meter
R
RACETIMER
R
Engine data
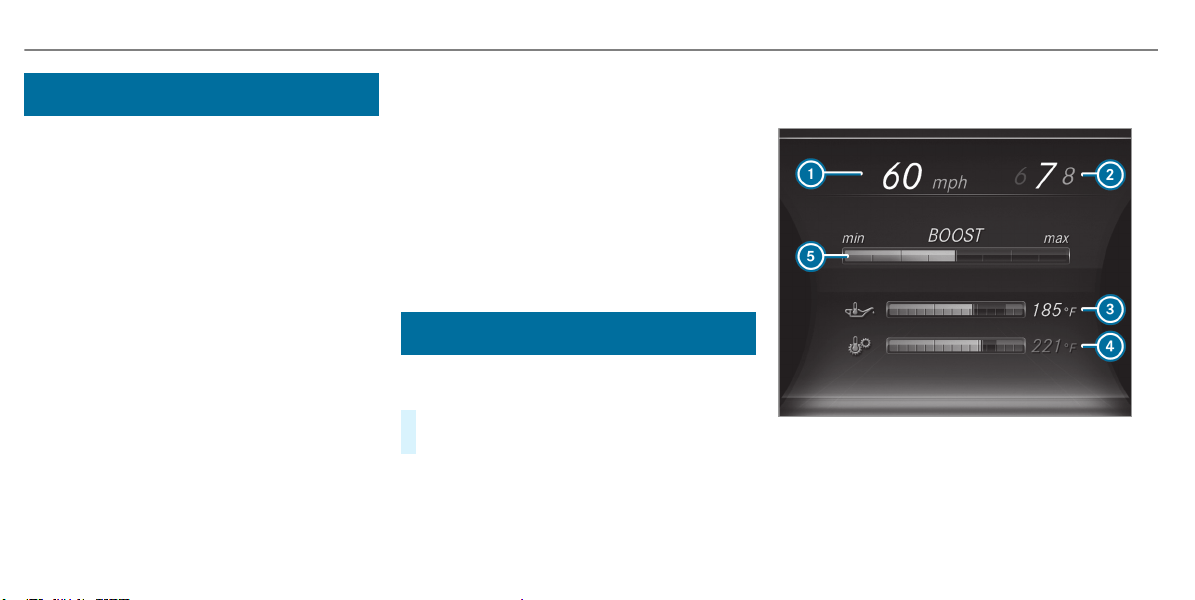
Example: warm-up
1
Digital speedometer
2
Gear display
3
Engine oil temperature
4
Transmission oil temperature
5
Boost pressure
28
Instrument Display and on-board computer

If the engine or transmission are not at operat‐
ing temperature, the multifunction display shows
temperature 3 or 4 in blue. Avoid using the
full engine power output during this time.
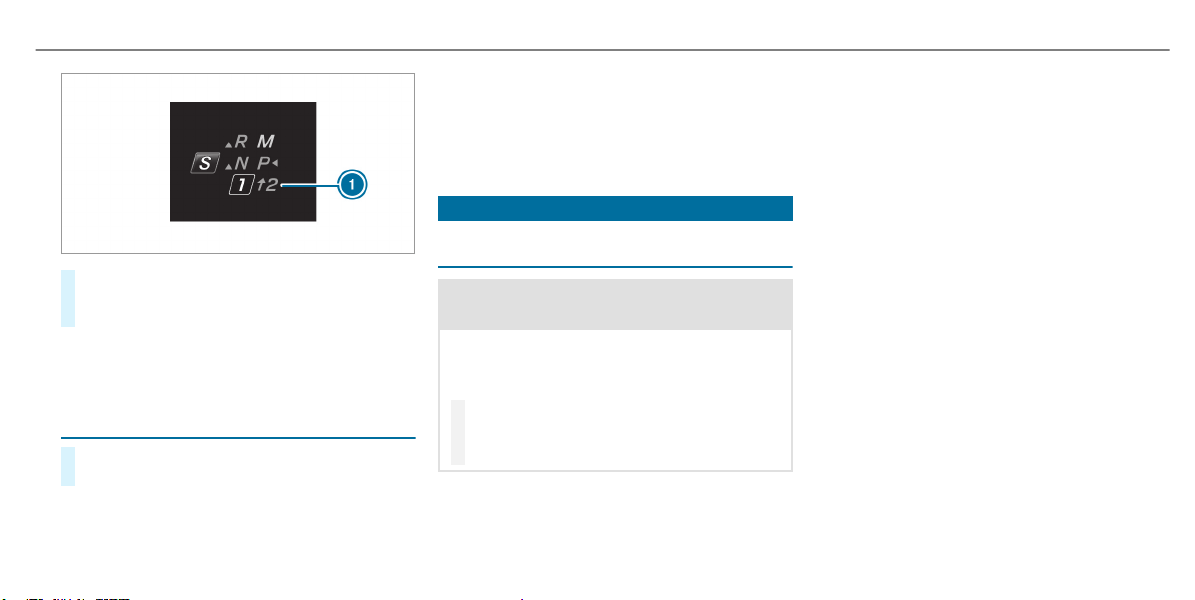
Example: SETUP in Mercedes-AMG vehicles
1
Drive system setting (depending on the
selected drive program A, C or B)
2
Exhaust system (depending on the selected
drive program A, or C)
3
ESP
®
status (On/Off or SPORT handling
mode)
4
Transmission position
5
Suspension tuning (depending on the selec‐
ted drive program A, C or B)
Example: G-meter
While the vehicle is in motion, the G-meter
shows the forces that are exerted on the vehicle
occupants both laterally and in the direction of
travel. The maximum values appear in red in the
coordinate system.
#
To reset the G-meter: press the left-hand
Touch Control.
#
Select Yes.
#
Press the left-hand Touch Control.
If you press and hold the left-hand Touch Con‐
trol, the function will be reset immediately.
Example: engine data
1
Current power output
2
Current torque
Displaying and starting RACETIMER in the
Performance menu
On-board computer:
,
Performance
%
The RACETIMER function is available only in
vehicles without AMG TRACK PACE.
Instrument Display and on-board computer
29
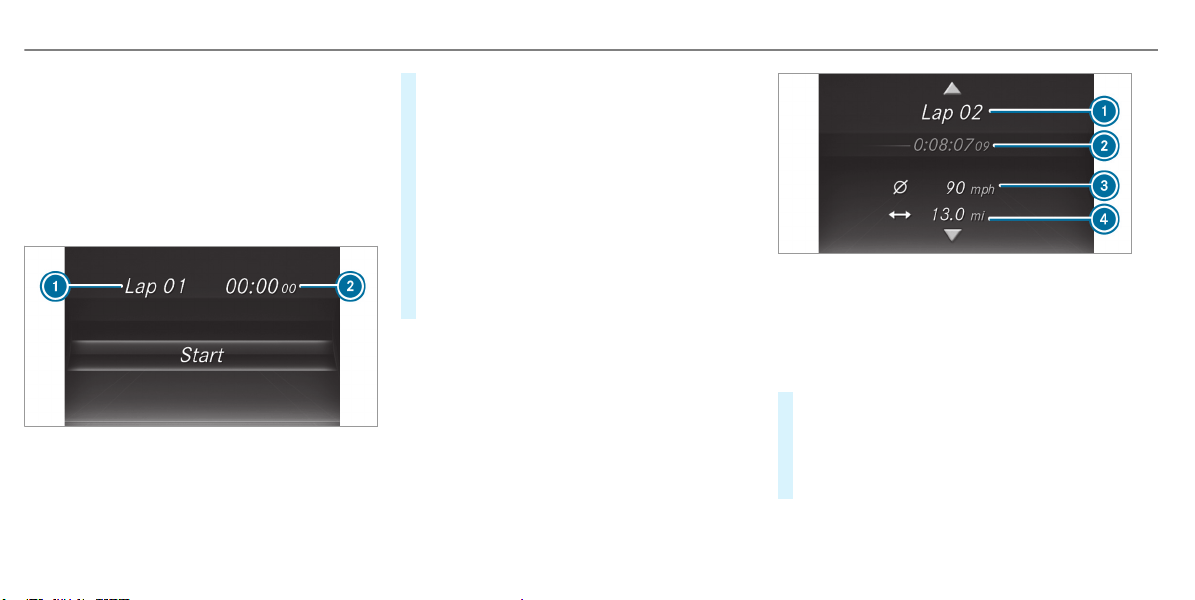
The following functions are possible in RACE‐
TIMER:
R
Displaying and starting
R
Stopping
R
Starting a new lap
R
Displaying lap statistics
R
Resetting
1
Lap
2
Lap time
RACETIMER is intended only for use on a desig‐
nated race tracks. Do not use the function on
public roads.
#
To select a display and start: swipe up or
down on the left-hand Touch Control.
#
Press the left-hand Touch Control.
#
Select Start and press the left-hand Touch
Control.
#
To stop: select Stop and press the left-hand
Touch Control.
#
To start a new lap: after the first stored lap,
press the left-hand Touch Control.
#
Select New Lap.
A maximum of 32 laps may be stored.
Example: RACETIMER
1
Lap
2
Elapsed time
3
Average speed
4
Distance covered
#
To display the lap statistics: after at least
two stored laps, press the left-hand Touch
Control.
#
Select Lap List.
The lap statistics will be displayed.
30
Instrument Display and on-board computer
#
Display the statistics of the next lap by swip‐
ing up or down on the left-hand Touch Con‐
trol.
The fastest lap is indicated by flashing sym‐
bol 1.
#
To reset: stop RACETIMER and press the
left-hand Touch Control.
#
Select Reset and press the left-hand Touch
Control.
All laps will be deleted.
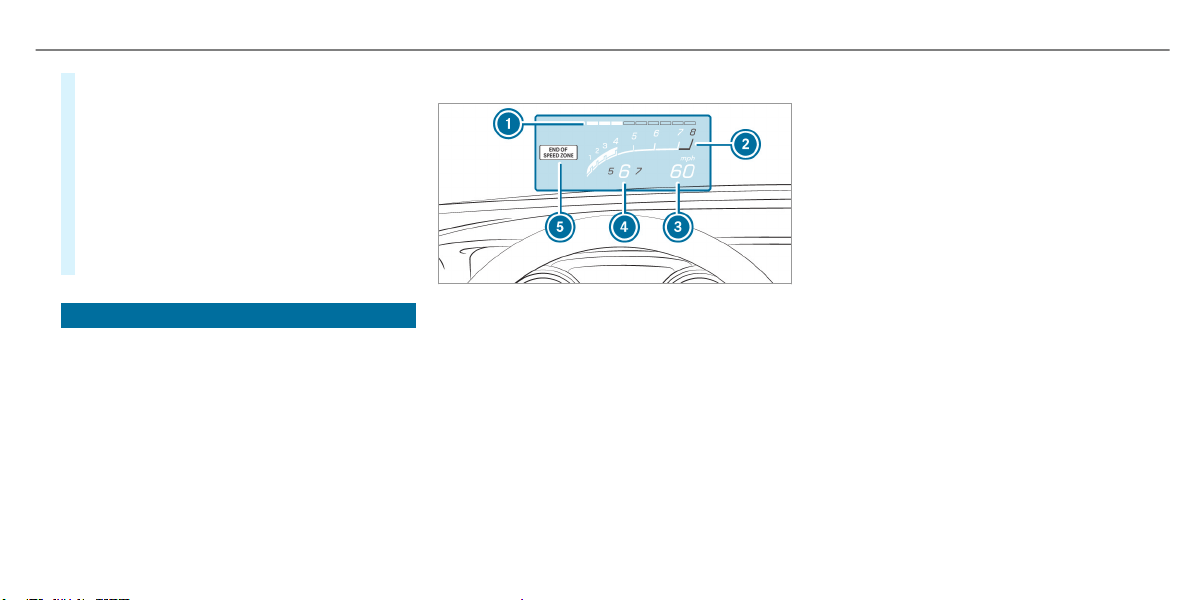
Function of the Head-up Display
The Head-up Display projects information from
the navigation system and the driver assistance
system above the cockpit into the driver's field
of vision.
Mercedes-AMG display content
1
Protection from reaching the overrevving
range
2
Current engine speed
3
Current speed
4
Currently selected gear, gearshift options
with manual shifting
5
Detected instructions and traffic signs
Depending on the vehicle's equipment, you can
select further AMG displays in addition to the
standard displays in the Display Content menu.
If you select RACETIMER, the Head-up Display
shows the lap and lap time.
When you receive a call, the 6 Incoming Call
- message appears on the Head-up Display.
System limitations
The visibility is influenced by the following condi‐
tions:
R
Seat position
R
The positioning of the display image
R
Light conditions
R
Wet roads
R
Objects on the display cover
R
Polarization in sunglasses
Instrument Display and on-board computer
31

AMG TRACK PACE
General information
With AMG TRACK PACE, the driving characteris‐
tics on race tracks can be analyzed and opti‐
mized. You can drive previously stored race
tracks (e.g. Hockenheimring) or new tracks can
be recorded and stored. The driven lap times are
stored for every track. These can be analyzed
and compared to other lap times to achieve the
best possible race results. Additionally, accelera‐
tion and braking procedures can be measured
and stored.
Setting Track Race
Multimedia system:
,
Vehicle
.
TRACK PACE
.
Track Race
Recording a track
#
Select New track.
#
At the desired starting point, select Start.
The track recording starts at this point. Dur‐
ing track recording, sectors can be set to
determine intervals.
#
To finish track recording, select Stop or cross
the starting line again.
#
Enter the weather and the track name.
Searching by track name
#
Select All tracks.
#
Select ª Search.
#
Enter the track name.
Tracks with the searched name are dis‐
played.
Measuring the time on the track
#
Select Timekeeping.
An overview of nearby tracks appears.
The distance and direction to the starting
line of the track is displayed.
#
Select the desired track.
If you have already driven on this track, you
can select a driven time as a reference time.
Timekeeping begins automatically when the
starting line has been crossed.
%
When Zoom is selected, the track display
can be switched from 2D to 3D.
Displaying the analysis
#
Select Lap times.
An overview of all the driven times appears.
#
Select a track.
The following data is displayed:
R
Lap and sector times
R
Average and top speed
R
Driver
R
Vehicle
R
Date
R
Weather
#
Select a desired lap.
The analysis is displayed.
32
Multimedia system
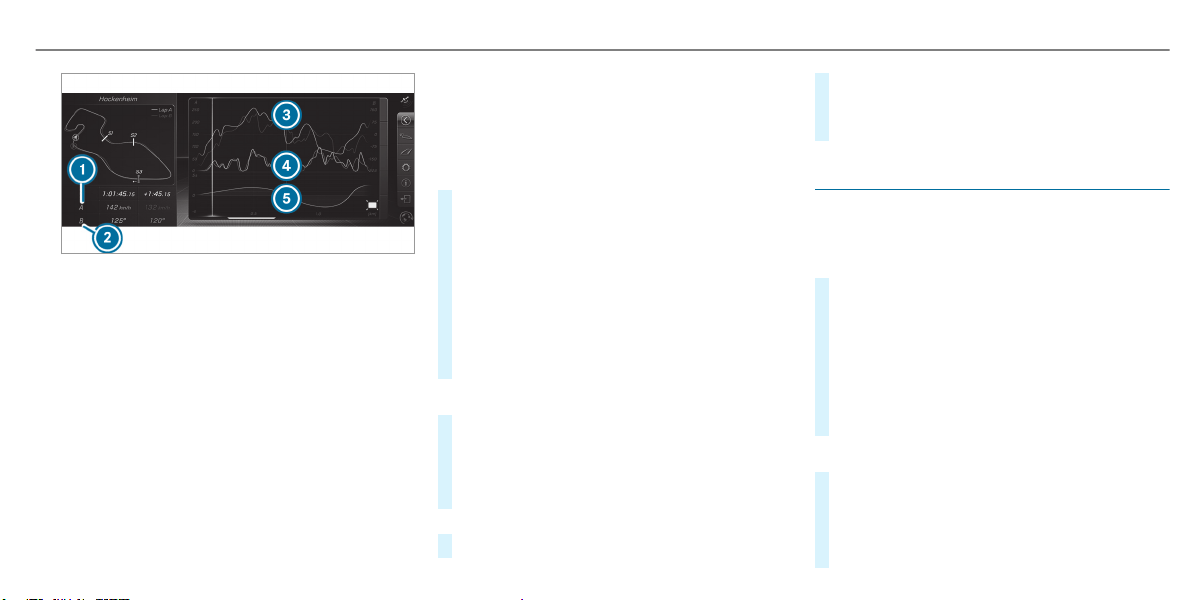
1
Parameter 1 (e.g. speed)
2
Parameter 2 (e.g. steering angle)
3
Speed trend (Parameter 1)
4
Steering angle trend (Parameter 2)
5
Time difference between lap A and B (only
when two laps are selected).
%
The following values can be set for parame‐
ters 1 and 2, for example:
R
Speed
R
Longitudinal/lateral acceleration
R
Steering angle
R
Engine speed
R
Engine oil/tire temperature
Based on the analysis you can check and opti‐
mize driving characteristics for any position on
the track.
Exporting tracks or races (USB)
#
Select All tracks.
An overview of all stored tracks and races
appears.
#
Highlight desired tracks or races.
#
Select Ü Options.
#
Select Export.
The selected tracks or races can be exported
to a USB storage device connected to the
vehicle.
Editing tracks and recordings
#
Select All tracks.
#
Highlight the desired track.
#
Select Ü options.
#
Select Rename or Delete.
or
#
Select a track.
#
Highlight the desired recording.
#
Select Ü options.
#
Select Weather or Delete.
Setting Drag Race
Multimedia system:
,
Vehicle
.
TRACK PACE
.
Drag Race
Measuring acceleration
#
Select Acceleration.
Measurement begins when the vehicle accel‐
erates. Measurement is incremental, in steps
of 30 mph (50 km/h) up to a maximum of
180 mph (300 km/h) or up to the set maxi‐
mum speed.
Measurement can be stopped early by
selecting Stop or by stopping the vehicle.
Quarter-mile race
#
Select Quarter Mile.
The time measurement runs until a mile has
been traveled or a previously set distance
(e.g. 1/4 mile, 1/3 mile or 1/2 mile) has
been reached.
Multimedia system
33

%
The possible values for setting the end dis‐
tance are determined by the system and
cannot be freely chosen.
Measurement can be stopped early by selecting
Stop or by stopping the vehicle.
Manual start for acceleration and quarter-
mile race
#
Select Acceleration or Quarter Mile.
#
Select Manual start.
Three red traffic lights appear one after the
other. The reaction time measurement starts
when they change to green at the same time.
The reaction time is displayed as soon as you
drive off. If you drive off too early, the mes‐
sage Jump start. will appear and acceleration
or quarter mile measurement will be can‐
celed.
Measuring braking
#
Select Braking.
#
Select Start Record.
Measurement is incremental, in steps of
30 mph (50 km/h) to a standstill. If the brak‐
ing procedure is started e.g. at a speed of
99 mph (160 km/h), measurement starts as
soon as 90 mph (150 km/h) has been
reached.
Storing and calling up measurement values
When a measurement has been completed or
canceled, the measured time can be stored.
#
After a measurement, select Save measure-
ment? .
The stored measurements can be displayed via
the History menu item.
Editing measurements
#
Select History.
#
Highlight the desired measurement.
#
Select Ü options.
#
Select Weather or Delete.
%
The measurements can be displayed by cate‐
gory, e.g. acceleration measurements, by
applying a filter.
Calling up the telemetry display
Multimedia system:
,
Vehicle
.
TRACK PACE
.
Telemetry
The telemetry display shows current vehicle data
as a digital value and as a diagram. Up to four
parameters can be selected that are to be
shown in the display.
For example:
R
Engine speed
R
Wheel angle
R
Speed
R
Steering angle
#
Set the desired parameters.
#
Set the time.
The set parameters are evaluated in the dia‐
gram for the time set.
%
The time can range from a minimum of
30 seconds to a maximum of 20 minutes.
34
Multimedia system

Configuring AMG TRACK PACE
Requirements
To use the TRACK PACE app:
R
The TRACK PACE app is installed on the
mobile end device.
R
The mobile end device is connected to the
multimedia system via Wi-Fi.
Multimedia system:
,
Vehicle
.
TRACK PACE
.
Options
Setting driver profiles
#
Select Driver Profile.
#
Create a new driver profile.
or
#
Select an existing driver profile.
The driver profile is activated.
%
Tracks, laps and times driven are assigned to
the active driver profile while driving. For an
exact evaluation of your driving style, you
should always drive with an active driver pro‐
file.
Displaying driver profile statistics
#
Select Driver Profile.
#
Select the desired profile.
The following information is displayed for the
selected driver profile:
R
Driving time
R
Distance driven
R
Number of Track Races, Drag Races and
laps driven
R
Maximum speed
Connecting a mobile device via the TRACK
PACE app
The TRACK PACE app makes it possible to record
videos and to synchronize them with stored
tracks.
#
Select the TRACK PACE app.
Already authorized devices are displayed in
the list.
#
Select Authorize new device.
Available devices are displayed.
#
Start the TRACK PACE app on the device to
be connected and follow the instructions.
#
Confirm the authorization prompt.
#
Enter the code displayed on the device.
The device is authorized.
or
#
Select a device that is already authorized.
The device is de-authorized.
Setting the TRACK PACE display in the head-
up display
#
Select HUD Contents.
#
Activate O or deactivate ª the desired
contents.
The contents in the Head-up Display are
adapted.
%
For further information on the Head-up Dis‐
play, see (→ page 31).
Setting acoustic feedback
#
Select Acoustic feedback.
The following settings are available:
R
Loud
R
Medium
R
Quiet
Multimedia system
35

R
Off
#
Select a setting.
Activating/deactivating additional informa‐
tion
#
Activate O or deactivate ª Display help.
When additional information is activated, popups
provide information on the individual menus.
#
Confirm popups with OK or select Do not dis-
play.
Calling up information
#
Select Info.
The following information is displayed:
R
Software version
R
Memory used
R
Total number of tracks saved
R
Total number of races driven
36
Multimedia system
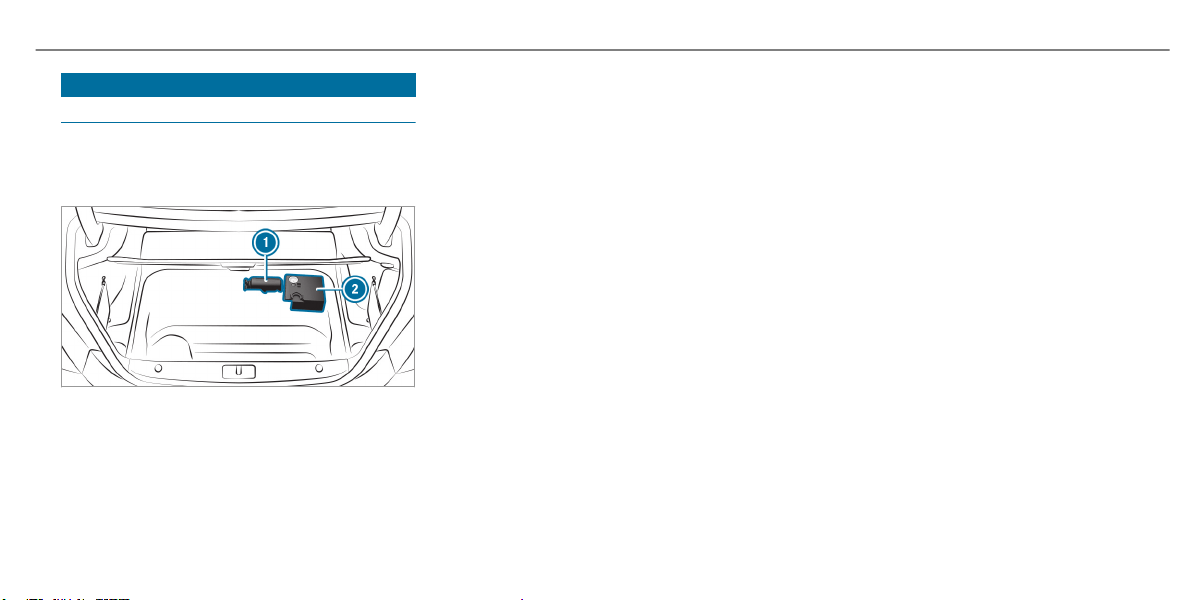
Flat tire
TIREFIT kit storage location
The TIREFIT kit is located under the trunk floor.
Depending on the equipment, the position of the
TIREFIT kit in the trunk floor can vary.
1
Tire sealant bottle
2
Tire inflation compressor
Breakdown assistance
37
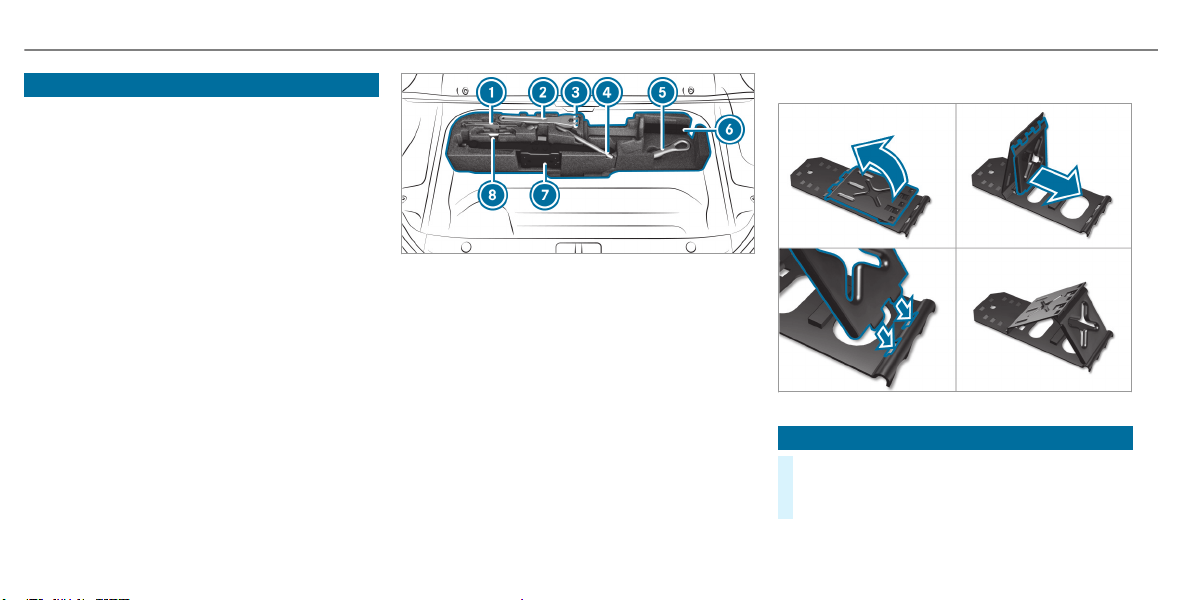
Overview of the tire-change tool kit
Apart from some country-specific variants, vehi‐
cles are not equipped with a tire-change tool kit.
For more information on which tire-change tools
are required and approved for performing a
wheel change on your vehicle, consult a qualified
specialist workshop.
Required tire-change tools may include, for
example:
R
Jack
R
Chock
R
Lug wrench
R
Alignment bolt
The tire-change tool kit is in a tray in the stow‐
age space under the trunk floor.
1
Folding chock
2
Ratchet
3
Socket
4
Lug wrench
5
Towing eye
6
Jacking support
7
Jack
8
Alignment bolt
Setting up the folding chock
Changing a wheel
#
Be sure to also observe the notes on chang‐
ing a wheel in the Operator's Manual of your
vehicle.
Vehicles with AMG ceramic high-perform‐
ance composite braking system:
38
Wheels and tires
*
NOTE Damage to the ceramic brake disk
when changing a wheel
Mercedes-AMG vehicles with ceramic
brake disks: during removal and reposition‐
ing of the wheel, the wheel rim may strike
the ceramic brake disk and damage it.
#
Take particular care.
#
Ask another person for assistance or
use a second centering pin.
#
When changing the wheel, avoid exerting any
force on the brake discs.
This can lead to impaired comfort during
braking.
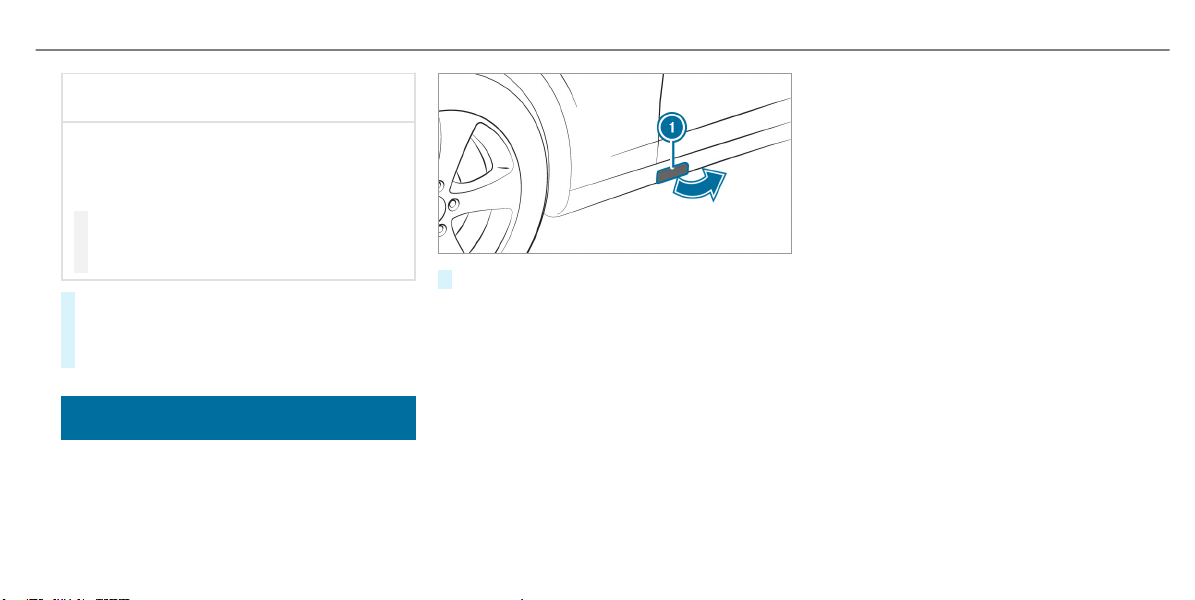
Installing/removing the longitudinal mem‐
ber panel
To protect the vehicle body, the vehicle has cov‐
ers installed next to the jack support points on
the longitudinal member panels.
#
Fold cover 1 upwards.
Wheels and tires
39

Operating fluids
Fuel
Notes on fuel grades for vehicles with a gas‐
oline engine
Observe the notes on operating fluids .
*
NOTE Damage caused by the wrong fuel
Even small amounts of the wrong fuel could
result in damage to the fuel system, the
engine and the emission control system.
#
Only refuel with low-sulfur unleaded
fuel.
This fuel may contain up to 10% ethanol by
volume. Your vehicle is suitable for use with
E10 fuel.
Never refuel with one of the following fuels:
R
Diesel
R
Gasoline with more than 10% ethanol by
volume, e.g. E15, E85, E100
R
Gasoline with more than 3% methanol by
volume, e.g. M15, M30, M85, M100
R
Gasoline with additives containing metal
If you have accidentally refueled with the
wrong fuel:
#
Do not switch on the ignition.
#
Consult a qualified specialist workshop.
Only refuel using unleaded premium grade gaso‐
line with at least 91 AKI/95 RON.
If the available fuel is not sufficiently low in sul‐
fur, this can produce unpleasant odors.
As a temporary measure, if the recommended
fuel is not available, you may also use unleaded
regular gasoline which has at least the octane
number specified in the instruction label in the
fuel filler flap . This may reduce engine perform‐
ance and increase fuel consumption.
Never refuel using gasoline with a lower RON.
*
NOTE Premature wear caused by unlea‐
ded regular gasoline
Unleaded regular gasoline can cause the
engine to wear more quickly and impair lon‐
gevity and performance.
If unleaded premium grade gasoline is
unavailable and you have to refuel using
unleaded regular gasoline:
#
Only fill the fuel tank to half full with
unleaded regular gasoline and refill as
soon as possible with unleaded pre‐
mium grade gasoline.
#
Do not drive at the maximum speed.
#
Avoid sudden acceleration and engine
speeds over 3,000 rpm.
Further information on fuel can be found:
R
at a gas station
R
at a qualified specialist workshop
R
USA only: at http://www.mbusa.com
40
Technical data
Tank content and fuel reserve
The total capacity of the fuel tank may vary,
depending on the vehicle equipment.
Coupe/convertibleTotal capacity
All models 21.1 gal (80.0 liters)
Of which reserve
All models3.2 gal (12.0 liters)
Quality and capacity of engine oil
MB-Freigabe or MB-Approval
Coupe/convertible MB-Freigabe or MB-
Approval
Mercedes-AMG S 65 229.5
Mercedes-AMG S 63
4MATIC+
229.5, 229.51
Only use SAE 0W-40 or SAE 5W-40 engine oils.
The following values refer to an oil change,
including the oil filter.
Capacity
Coupe/convertible Capacity
Mercedes-AMG S 65 11.1 US qt
(10.5 liters)
Mercedes-AMG S 63
4MATIC+
9.5 US qt (9.0 liters)
Coolant capacity
Coupe / convertible Capacity
Mercedes-AMG S 65 16.1 US qt (15.2 l)
Mercedes-AMG S 63
4MATIC+
14.4 US qt (13.6 l)
Refrigerant filling capacity and PAG oil
Coupe/convertibleRefrigerant
All models23.3 ± 0.4 oz
(660 ± 10 g)
Coupe/convertible PAG oil
All models3.9 ± 0.4 oz
(110 ± 10 g)
Vehicle data
Vehicle dimensions
The heights specified may vary as a result of the:
R
Tires
R
Load
R
Condition of the suspension
R
Optional equipment
Technical data
41
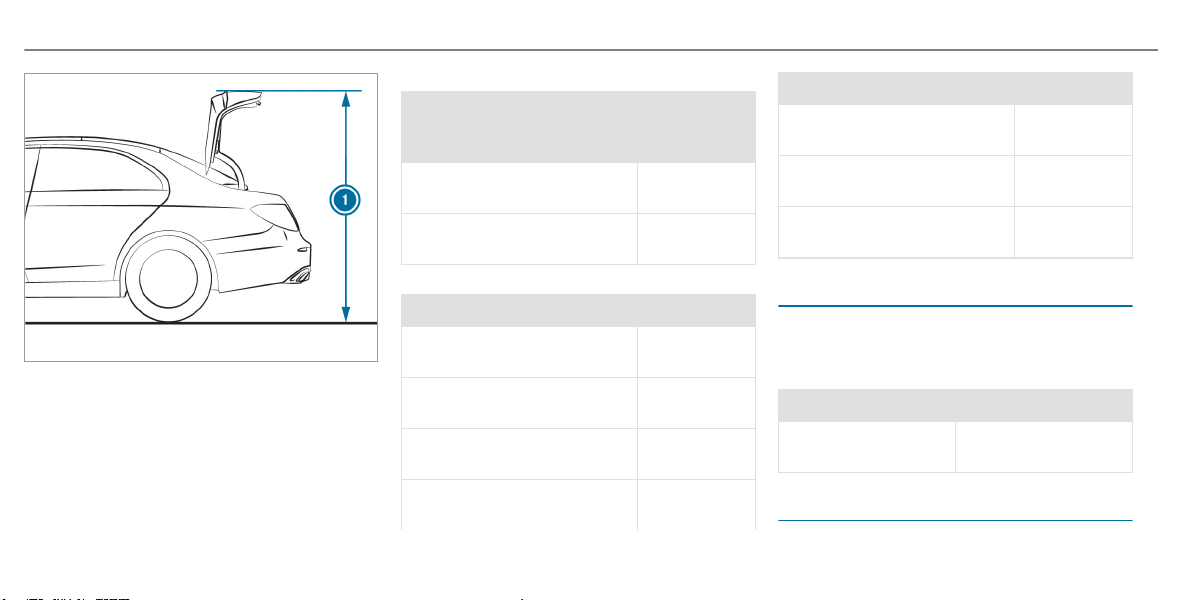
Height when opened
Coupe/convertible
1
1 Height
when
opened
Coupe 69.1 in
(1755 mm)
Convertible 65.5 in
(1663 mm)
Vehicle dimensions
Coupe/convertible
Vehicle length198.9 in
(5051 mm)
Vehicle width including exte‐
rior mirrors
83.0 in
(2108 mm)
Vehicle height 56.2 in
(1428 mm)
Wheelbase 115.9 in
(2945 mm)
Coupe/convertible
Turning radius (Mercedes-
AMG S 65 Coupe)
38.1 ft
(11.60 m)
Turning radius (Mercedes-
AMG S 63 4MATIC+ Coupe)
39.0 ft
(11.90 m)
Turning radius (convertible) 39.0 ft
(11.90 m)
Weights and loads
Please note that for the specified vehicle data:
R
items of optional equipment increase the
curb weight and reduce the payload.
Coupe/convertible
Maximum roof load
(all models)
0 lb (0 kg)
Maximum speeds
The following values only apply to vehicles with
the AMG Driver's Package.
42
Technical data

Maximum speeds
Mercedes-AMG S 65
(Coupe & convertible)
First gear 41 mph (66 km/h)
2nd gear 63 mph (102 km/h)
3rd gear 94 mph (152 km/h)
4th gear 133 mph (214 km/h)
5th gear 182 mph (293 km/h)
6th gear 186 mph (300 km/h)
7th gear 186 mph (300 km/h)
Mercedes-AMG S 63
4MATIC+
(Coupe & convertible)
First gear 41 mph (69 km/h)
2nd gear 66 mph (106 km/h)
3rd gear 98 mph (158 km/h)
Mercedes-AMG S 63
4MATIC+
(Coupe & convertible)
4th gear 137 mph (221 km/h)
5th gear 183 mph (294 km/h)
6th gear 186 mph (300 km/h)
7th gear 186 mph (300 km/h)
8th gear 186 mph (300 km/h)
9th gear 186 mph (300 km/h)
Technical data
43
Display messages
Driving systems
Display messages
Possible causes/consequences and MM Solutions
RACE START Canceled
*Possible causes are:
R
You released the accelerator pedal during RACE START.
R
You depressed the brake pedal during RACE START.
You can try RACE START again at the next start.
RACE START Not Possible
See Operator's Manual
*Possible causes are:
R
The conditions for activation are not met (→ page 18).
Warning and indicator lamps
Safety systems
Warning/indicator lamp
Possible causes/consequences and MM Solutions
.
SPORT handling mode is activated while the engine is running.
When SPORT handling mode is activated, ESP
®
only stabilizes the vehicle to a limited extent.
44
Display messages and warning/indicator lamps
Warning/indicator lamp
Possible causes/consequences and MM Solutions
SPORT handling mode
warning lamp
&
WARNING Risk of skidding due to incorrect application of SPORT handling mode
When you activate SPORT handling mode, there is an increased risk of skidding and having an accident.
#
Only activate SPORT handling mode in the circumstances described as follows.
#
Observe the notes on activating SPORT handling mode (→ page 15).
Display messages and warning/indicator lamps
45

A
Acceleration
see Kickdown
AMG
Menu (on-board computer) .................... 28
AMG adaptive sport suspension sys‐
tem ........................................................21, 25
Selecting Curve mode ........................... 26
Selecting the suspension setting ..... 21, 25
Setting .............................................21, 26
Suspension ............................................ 19
AMG adaptive sport suspension sys‐
tem (Mercedes‑AMG S 65)
Suspension ............................................ 22
AMG ceramic high-performance com‐
posite brake system .................................. 12
AMG high-performance brake system .....12
AMG Performance adjustable exhaust
system ........................................................ 12
Function ................................................ 12
Operating ............................................... 12
AMG TRACK PACE
Configuring ............................................ 35
Drag Race .............................................. 33
General information ............................... 32
Telemetry display .................................. 34
Track Race ............................................. 32
Authorized Mercedes-Benz Center
see Qualified specialist workshop
Authorized workshop
see Qualified specialist workshop
Automatic engine start (ECO start/
stop function) ............................................. 11
Automatic engine stop (ECO start/
stop function) ............................................. 11
Automatic transmission
Drive programs ...................................... 12
DYNAMIC SELECT switch ......................12
Kickdown ............................................... 15
Manual gearshifting ...............................13
Oil temperature (on-board computer,
Performance menu) ...............................28
Steering wheel paddle shifters .............. 13
B
Boost pressure (on-board computer,
Performance menu) .................................. 28
Brakes
AMG ceramic high-performance
composite brake system ........................ 12
AMG high-performance brake system ....12
New/replaced brakepads/brake discs .. 11
Notes on breaking-in a new vehicle .......11
C
Changing a wheel
Installing/removing the longitudinal
member panel ....................................... 39
Changing gears .......................................... 13
Manually ................................................ 13
Chock .........................................................38
Storage location .................................... 38
Chock
see Chock
Climate control
Filling capacity for PAG oil .....................41
Refrigerant filling capacity .....................41
Cockpit .........................................................4
Overview .................................................4
46
Index

Comfort mode
see AMG adaptive sport suspension system
Coolant (engine)
Filling capacity ....................................... 41
D
Dashboard
see Cockpit
Dealership
see Qualified specialist workshop
Display messages
RACE START Canceled ........................... 44
RACE START Not Possible See Oper‐
ator's Manual ........................................44
Drag Race
Setting ...................................................33
Drive programs
see DYNAMIC SELECT
Driving safety system
ESP
®
(Electronic Stability Program) ....... 15
Driving system
AMG adaptive sport suspension sys‐
tem ........................................................19
AMG adaptive sport suspension sys‐
tem (Mercedes‑AMG S 65) .................... 22
Driving tips
AMG ceramic high-performance
composite brake system ........................ 12
AMG high-performance brake system ....12
Notes on breaking-in a new vehicle .......11
Dynamic data
Displaying .............................................. 13
DYNAMIC SELECT ...................................... 12
Drive programs ...................................... 12
Function ................................................ 12
E
E10 .............................................................. 40
ECO start/stop function ........................... 11
Automatic engine start .......................... 11
Automatic engine stop ........................... 11
Method of operation .............................. 11
Engine
ECO start/stop function ........................ 11
Engine oil
Capacity .................................................41
MB-Freigabe or MB-Approval .................41
Quality ...................................................41
Temperature (on-board computer,
Performance menu) ...............................28
ESP
®
(Electronic Stability Program)
Activating/deactivating ......................... 17
Function/notes .....................................15
SPORT handling mode ........................... 15
Status display (on-board computer,
Performance menu) ...............................28
F
Fuel
E10 ........................................................ 40
Fuel reserve ........................................... 41
Gasoline ................................................ 40
Quality (gasoline) ...................................40
sulfur content ........................................40
Tank content .......................................... 41
G
G-meter (on-board computer, Per‐
formance menu) ........................................ 28
Gasoline ..................................................... 40
Index
47

Gear display (on-board computer, Per‐
formance menu) ........................................ 28
Gearshift recommendation ...................... 14
H
Head-up Display
Function (Mercedes-AMG vehicles) .......31
I
Instrument display
AMG displays ......................................... 28
J
Jack
Storage location .................................... 38
K
Kickdown ................................................... 15
Using ..................................................... 15
L
Limited Warranty
Vehicle ..................................................... 9
M
Menu (on-board computer)
AMG displays ......................................... 28
Performance .......................................... 28
Multifunction camera
ROAD SURFACE SCAN .......................... 25
N
Notes on breaking-in a new vehicle ......... 11
O
On-board computer
AMG menu ............................................ 28
Performance menu ................................ 28
Operating fluids
Fuel (gasoline) ....................................... 40
Operating safety
Information ..............................................7
Operator's Manual
Vehicle equipment ................................... 7
P
Performance (on-board computer,
Performance menu) .................................. 28
Power output (on-board computer,
Performance menu) .................................. 28
Q
Qualified specialist workshop .................... 8
R
RACE START
Activating .............................................. 18
Activation conditions ............................. 18
Function ................................................ 18
RACETIMER (on-board computer, Per‐
formance menu) ........................................ 29
Reserve
Fuel ........................................................ 41
ROAD SURFACE SCAN
Multifunction camera ............................ 25
Roof load .................................................... 42
48
Index

S
Seat belt extender .....................................10
Seat belts
Reduced protection ...............................10
Seat belt extender ................................. 10
Selecting a gear
see Changing gears
Service center
see Qualified specialist workshop
SETUP (on-board computer, Perform‐
ance menu) ................................................ 28
Shift paddles
see Steering wheel paddle shifters
Shifting gears
Gearshift recommendation .................... 14
Specialist workshop .................................... 8
SPORT handling mode
Function/notes .....................................15
Sport Plus suspension setting
see AMG adaptive sport suspension system
Sport suspension setting
see AMG adaptive sport suspension system
Sports exhaust
see AMG Performance adjustable
exhaust system
Start/stop function
see ECO start/stop function
Steering wheel paddle shifters ................ 13
Sulfur content ............................................ 40
Suspension
AMG adaptive sport suspension sys‐
tem ........................................................19
AMG adaptive sport suspension sys‐
tem (Mercedes‑AMG S 65) .................... 22
Selecting Curve mode ........................... 26
Selecting the suspension setting ..... 21, 25
Setting the suspension level ............ 21, 26
Suspension level
Setting ............................................. 21, 26
T
Tank content
Fuel ........................................................ 41
Reserve (fuel) .........................................41
Telemetry display
Calling up .............................................. 34
Temperature
Engine oil (on-board computer, Per‐
formance menu) .................................... 28
Transmission oil (on-board computer,
Performance menu) ...............................28
Tire inflation compressor
see TIREFIT kit
Tire-change tool kit
Overview ...............................................38
TIREFIT kit .................................................. 37
Storage location .................................... 37
Tires
Installing ................................................ 38
Removing ..............................................38
Tool
see Vehicle tool kit
Torque (on-board computer, Perform‐
ance menu) ................................................ 28
Track Race
Setting ...................................................32
Index
49

Trunk lid
Opening dimensions .............................. 41
V
Vehicle
Correct use .............................................. 8
Equipment ............................................... 7
Limited Warranty .....................................9
Qualified specialist workshop .................. 8
Vehicle data
Roof load ............................................... 42
Turning radius ........................................ 41
Vehicle height ........................................41
Vehicle length ........................................41
Vehicle width ......................................... 41
Wheelbase ............................................. 41
Vehicle dimensions ................................... 41
Vehicle tool kit ...........................................37
TIREFIT kit ............................................. 37
W
Warm-up (on-board computer, Per‐
formance menu) ........................................ 28
Warning/indicator lamp
.SPORT handling mode warning
lamp ...................................................... 44
Warranty ...................................................... 9
Wheel change
Mounting a new wheel .......................... 38
Removing a wheel ................................. 38
Wheels
Installing ................................................ 38
Removing ..............................................38
Workshop
see Qualified specialist workshop
50
Index