Model: NEWBULIG Ice Makers Countertop with Handle
Overview
This manual provides instructions for the safe and effective use of the NEWBULIG Countertop Ice Maker. This portable appliance produces bullet-shaped ice cubes quickly and is designed for use in homes, kitchens, offices, RVs, and while camping.

Features and Specifications
Key Features
- Portable Design: Compact size (approx. 12.6"D x 8.6"W x 11.6"H) with a carrying handle.
- Rapid Ice Production: Makes 9 bullet ice cubes in approximately 6 minutes.
- High Daily Output: Can produce up to 26.5 lbs (12 kg) of ice in 24 hours.
- Two Ice Cube Sizes: Select between small and large bullet ice cubes.
- Smart Indicators: Infrared sensor with "ICE FULL" and "ADD WATER" indicator lights.
- Self-Cleaning Function: One-touch automatic cleaning cycle.
- Quiet Operation: Operates at less than 40 dB during normal use.
- Included Accessories: Ice scoop and removable ice basket.
Technical Specifications
- Brand: NEWBULIG
- Product Dimensions: 12.6"D x 8.6"W x 11.6"H
- Item Weight: 15.4 Pounds (7 kg)
- Water Tank Capacity: 1.5 Liters
- Power: 160 watts, 110 Volts
- Refrigerant: R600a
- Materials: Alloy Steel, Plastic
Safety Information
WARNING: To reduce the risk of fire, electric shock, or injury when using your appliance, follow these basic precautions.
- Read all instructions before using the ice maker.
- Plug into a grounded 3-prong outlet. Do not remove the grounding prong. Do not use an adapter.
- Do not operate the ice maker if it has a damaged cord or plug, or if it is malfunctioning.
- This appliance is not intended for use by persons (including children) with reduced physical, sensory or mental capabilities, unless they have been given supervision or instruction.
- Keep the ventilation openings in the appliance enclosure clear of obstructions.
- Do not use the ice maker outdoors or in wet conditions.
- Use only clean, potable water in the water tank. Do not add any other substances.
- Always turn off and unplug the unit before cleaning, performing maintenance, or when not in use for an extended period.
Parts Identification
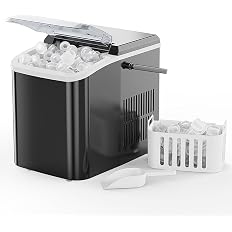
Familiarize yourself with the main components of your ice maker:
- Carrying Handle: For easy portability.
- Control Panel: Houses the ON/OFF button and indicator lights.
- Ice Basket: Removable container that collects the produced ice.
- Ice Scoop: Provided for removing ice from the basket.
- Water Tank: Internal 1.5-liter reservoir (not externally visible).
- Air Vents: Located on the sides or rear for compressor cooling. Keep unobstructed.
- Ice Chute: Opening where ice is dispensed into the basket.
Control Panel and Indicators
The control panel features a single button and status indicator lights.
- ON/OFF Button: Powers the unit on and off. Also used to initiate the cleaning cycle.
- "ICE FULL" Indicator (Red):
- Flashing: The ice basket is full. Remove ice to continue production.
- Solid Red: The ice basket is full and the machine has paused. Press the ON/OFF button to restart the machine after removing ice.
- "ADD WATER" Indicator (likely amber/yellow): Flashes when the internal water tank is low and needs refilling.
Initial Setup and Use
Before First Use
- Remove all packaging materials.
- Place the ice maker on a flat, stable, level countertop. Ensure at least 4 inches of clearance on all sides, especially around the air vents.
- Wipe the exterior with a soft, damp cloth. Do not use abrasive cleaners.
- Perform the initial cleaning cycle as described in the "Cleaning and Maintenance" section.
Making Ice
- Add Water: Ensure the unit is powered OFF. Pour clean, cold drinking water into the top water fill area. Do not exceed the maximum water level. The "ADD WATER" light may be on initially.
- Power On: Press the ON/OFF button. The unit will begin its startup cycle.
- Select Ice Size (if applicable): Some models may have a separate button to toggle between small and large ice cube sizes. Refer to the specific indicator on your model.
- Ice Production: The first batch of ice will be ready in approximately 6-8 minutes. Ice will drop into the removable basket.
- Ice Full Alert: When the basket is full, the "ICE FULL" indicator will flash or stay solid red. Remove ice from the basket using the provided scoop. The machine may pause automatically; press the ON/OFF button to restart production if needed.
- Adding Water During Operation: If the "ADD WATER" light flashes, add water to the tank. The machine may pause until water is added.
- Power Off: To stop ice production, press the ON/OFF button. It is recommended to empty the ice basket and run the cleaning cycle if the unit will not be used for several days.
Cleaning and Maintenance
Regular Cleaning
- Unplug the ice maker.
- Remove and empty the ice basket. Wash the basket and scoop with mild dish soap and warm water. Rinse and dry thoroughly.
- Wipe the exterior and the interior ice chute area with a soft, damp cloth. Do not use harsh chemicals or abrasive pads.
- Allow all parts to dry completely before reassembling and using.
Self-Cleaning Cycle (Descaling)
Perform the cleaning cycle every 2-4 weeks, or more frequently if you have hard water.
- Ensure the ice maker is turned OFF and the ice basket is empty.
- Fill the water tank with clean water mixed with a dedicated ice maker cleaner/descaler (follow cleaner instructions). Alternatively, you can use a mixture of fresh water and vinegar (consult product guidelines for ratios).
- Press and hold the ON/OFF button for 5 seconds to start the automatic cleaning cycle. The cycle will run for approximately 15 minutes.
- After the cycle completes, discard the water from the ice basket. Rinse the water tank by filling it with fresh water and running a second cleaning cycle (with no cleaner) to remove any residue.
- Wipe the interior dry with a clean cloth. The ice maker is now ready for normal use.
NOTE: Never use harsh chemicals, gasoline, thinners, or abrasive cleaners. Do not submerge the main unit in water.
Troubleshooting
| Problem |
Possible Cause |
Solution |
| Ice maker does not turn on. |
Not plugged in. Power outlet issue. Unit not turned on. |
Ensure plug is firmly in a working outlet. Press the ON/OFF button. |
| "ADD WATER" light is flashing. |
Water tank is empty or low. |
Add clean, cold drinking water to the tank. |
| "ICE FULL" light is flashing or solid red. |
Ice basket is full. |
Remove ice from the basket. If light is solid red, press the ON/OFF button to restart. |
| Ice maker is running but not making ice. |
First cycle may take longer. Ambient temperature may be too high. Low water level. |
Wait 10-15 minutes for the first batch. Use in an environment below 90°F (32°C). Check and add water. |
| Ice cubes are small, thin, or hollow. |
Water inlet valve may be blocked by scale. Low water pressure/level. |
Perform the self-cleaning/descaling cycle. Ensure water tank is adequately filled. |
| Ice cubes are sticking together. |
Ice has been sitting in the basket for an extended period. |
Remove ice promptly. This ice maker is designed to produce ice that sticks together less easily than traditional cubes. |
| Unusual noise. |
Unit may not be level. Water pump noise during cycle is normal. |
Place the ice maker on a flat, level surface. A humming sound during operation is typical. |
| Water leakage. |
Overfilled water tank. Loose or misaligned internal connections. |
Do not overfill the water tank. Ensure the unit is level. If problem persists, discontinue use and contact support. |
Storage
- Turn off and unplug the ice maker.
- Empty and clean the ice basket and scoop. Dry thoroughly.
- Run a cleaning cycle with fresh water to drain the internal system. Dry the interior with a clean cloth.
- Store the unit in its original packaging or a dry place, protected from dust.
- Do not store the appliance outdoors.
What's in the Box
- NEWBULIG Countertop Ice Maker (Main Unit)
- Removable Ice Basket
- Ice Scoop
