User Manual: JONYJ Handheld Cordless Car Vacuum Cleaner
1. Safety Information and Warnings
Important Safety Instructions
- Charging Safety: Use only the included Type-C charging cable. The indicator light flashes red during charging and turns solid green when complete. Do not use the device while it is charging.
- Operating Environment: Never use the vacuum in wet conditions or near water. Do not vacuum liquids, burning ashes, or lit cigarette butts.
- Battery Safety: Do not disassemble or puncture the battery. Avoid exposing the device or battery to high temperatures (e.g., open flames, heaters) or direct sunlight.
- Component Safety: Ensure all accessories (e.g., filters, nozzles) are correctly installed before starting the device.
- Intended User: This appliance is not intended for use by persons (including children) with reduced physical, sensory or mental capabilities, or lack of experience and knowledge, unless they have been given supervision or instruction concerning use of the appliance by a person responsible for their safety.
2. Product Overview and Parts List
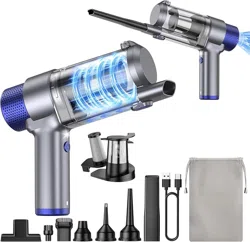
What's in the Box
- JONYJ Handheld Vacuum Main Unit × 1
- Type-C Charging Cable × 1
- Accessory Kit (Includes):
- Long Crevice Tool
- Brush Tool
- Wide Upholstery Nozzle
- Flexible Hose
- Inflator/Blower Nozzle
- Vacuum Bag Sealer Adapter
- Stainless Steel Pre-Filter × 1
- Washable HEPA Filter × 2
- Storage Bag × 1
- User Manual × 1
Core Product Specifications
| Item | Specification |
|---|
| Model | LT-154 |
| Suction Power | 16000Pa Cyclonic Suction |
| Battery | 5200mAh Lithium-ion |
| Runtime | Approx. 30 minutes |
| Full Charge Time | Approx. 3 hours |
| Dust Cup Capacity | 200ml |
| Noise Level | ≤ 75 dB |
| Product Dimensions | Approx. 24.6cm (L) x 7.4cm (W) x 20.6cm (H) |
| Product Weight | Approx. 1.19 lbs (540g) |
3. Quick Start Guide
Step 1: First Charge
- Connect the vacuum to a power source (5V/2A adapter, computer USB port, car charger, or power bank) using the included Type-C cable.
- The charging indicator will flash red during charging.
- When fully charged, the indicator will turn solid green. It is recommended to fully charge before first use.
Step 2: Assembly and Use
- Install Filters: Place the stainless steel pre-filter into the dust cup, then cover it with the washable HEPA filter. Ensure they are seated properly.
- Attach Nozzle: Choose the desired nozzle for your cleaning task. Insert it into the front suction port of the main unit until you hear a "click."
- Power On/Off: Press and hold the power button for about 2 seconds to start. Press and hold again for 2 seconds to turn off. The front LED light will automatically turn on during operation to illuminate the cleaning area.
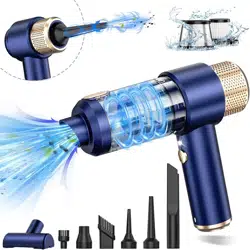
4. Multi-Functional Modes Explained
This is a 4-in-1 multi-function cleaning tool. Switch modes according to your needs:
| Mode | Function | Application & Accessories |
|---|
| Vacuum Mode | Default function with powerful suction. | Car Interior: Use the long crevice tool for seats and floor mats.
Home/Office: Use the brush tool for keyboards, sofas; use the wide nozzle for desks, windowsills. |
| Blower Mode | Reverses airflow to blow out dust. | Attach the Inflator/Blower Nozzle to the air outlet on the back of the unit. Ideal for dusting computer interiors, camera lenses, window tracks. |
| Inflator Mode | Used to inflate items. | Attach the Inflator/Blower Nozzle to the air outlet. Suitable for air mattresses, pool floats, balloons. |
| Vacuum Sealer Mode | Removes air from storage bags to compress items. | Connect the Vacuum Bag Sealer Adapter to the flexible hose, then connect the other end of the hose to the main suction port. Use for compressing down jackets, bedding, travel clothes to save space. |
5. Cleaning and Maintenance
Daily Cleaning (Recommended after each use)
- Empty Dust Cup: Press the dust cup release button on the main unit, remove the cup, and empty debris into the trash.
- Clean Dust Cup: Rinse the inner cup with water if needed and let it dry completely.
Regular Maintenance (Recommended monthly or when suction decreases)
- Wash Filters:
- Remove both the stainless steel filter and the HEPA filter.
- Rinse them thoroughly under clean water. Do not use detergents or scrub brushes forcefully.
- Let the filters air dry completely in a cool, ventilated place (at least 24 hours) before reinstalling. Important: Damp filters will severely reduce suction and may damage the motor.
- Check Suction Path: Clear any hair, threads, or debris that may be blocking the suction inlet, nozzles, or hose.
6. Troubleshooting Guide
| Symptom | Possible Cause | Solution |
|---|
| Won't turn on | 1. Battery is depleted.
2. Power button not held long enough. | 1. Connect the charger.
2. Press and hold the power button for about 2 seconds. |
| Weak suction | 1. Dust cup is full.
2. Filters are clogged or damp.
3. Suction path is blocked. | 1. Empty the dust cup.
2. Clean and thoroughly dry the filters.
3. Check and clear blockages from the inlet, nozzle, or hose. |
| Stops during use | 1. Battery protection triggered (overheating or overuse).
2. Motor blocked by large object. | 1. Turn off the device and let it cool for 15-20 minutes.
2. Check and remove any blockage. |
| Charging light not on | 1. Power outlet has no power.
2. Charging cable is loose or faulty. | 1. Try a different outlet.
2. Ensure the cable is firmly connected at both ends, or try a different cable. |
7. Technical Specifications and Support
Full Technical Specifications
- Input Voltage: 5V ⎓ 2A
- Motor Speed: Up to 84,000 RPM
- Filtration System: Stainless Steel Pre-Filter + Washable HEPA Filter
- Charging Port: Type-C
- Operating Modes: Vacuum / Blower / Inflator / Vacuum Sealer
- Package Dimensions: Approx. 26cm * 9cm * 22cm
Warranty and Support
JONYJ provides a limited warranty for this product. Please keep your proof of purchase. For after-sales service or any questions, please contact the seller's support team through the platform where you purchased the product (e.g., your Amazon order page).
Environmental Notice: This product contains a lithium-ion battery. Please dispose of the product at end of life according to local regulations. Do not dispose of batteries with household waste.